Thursday, July 14, 2011

Breakfast burrito 朝ご飯ブリト

I believe that a hearty breakfast is also a good mid-night snack after excessive imbibing. Although I am over with mid-night snacks these days, this was our breakfast. Some Izakaya could served this, minus the too-healthy-looking fruit. This is inspired by some recipes for breakfast burritos and wraps we saw, but I just made it without following any specific recipe.

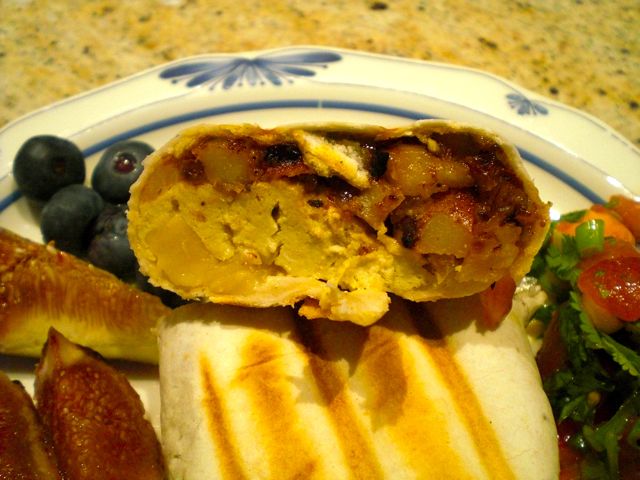
We thought we would just wrap hash browns and scrambled eggs in tortillas. I made the hash browns and my wife made the eggs. This is for two small wraps or burritos

Hash browns: This is my cutting-corner version of hash browns. I first sauteed onion (half medium size, finely chopped) with olive oil (1 tbs) in a frying pan on medium flame until edges are brown. Meanwhile,  I cooked small, new or baby red potatoes (4-5) after removing the "eyes", in a microwave oven, covered, for 2 minutes or until a skewer goes through easily. I diced the potatoes and added them to the frying pan. I seasoned them with salt and pepper and let it cook for several minutes. I mixed and flipped after the bottom turned brown so that all the sides of the potato were browned (5-6 minutes). I then made a bare surface in the frying pan by pushing the hash browns aside and added ketchup (1-2 tbs). I folded ketchup several times using a silicon spatula until the color became dark and brown rather than red (Maillard reaction). I mixed the ketchup with the rest of the ingredients in the pan. I tasted and adjusted the seasoning (a bit more salt). You could add other seasoning and ingredients such as Tabasco or jalapeno pepper and, of course, crispy bacon, if you like.

Scrambled eggs: My wife made scrambled eggs seasoned with Worcestershire sauce, salt and pepper and with an addition of a small amount of cream. This is the reason the scrambled eggs below were not bright yellow but they tasted very good.

Assembly: I placed the hash browns, scrambled eggs and small amount of cubed cheese (I used smoked Gouda but cheddar may have been better), and rolled it up and secured it using  toothpicks. On both ends, I also tacked in the tortillas and secured using toothpicks. If you used a large tortillas, you may not need toothpicks but I hate to bite into tortillas all bunched up (folded into multi-layers) at the ends of rolled wraps.

Salsa: This is a quick salsa without jalopena pepper (I did not have one). I just mixed chopped scallion, diced tomato, and chopped fresh cilantro. I dressed it with lime juice, olive oil, salt and pepper (I did not use garlic .. .I am not into eating garlic as a breakfast).

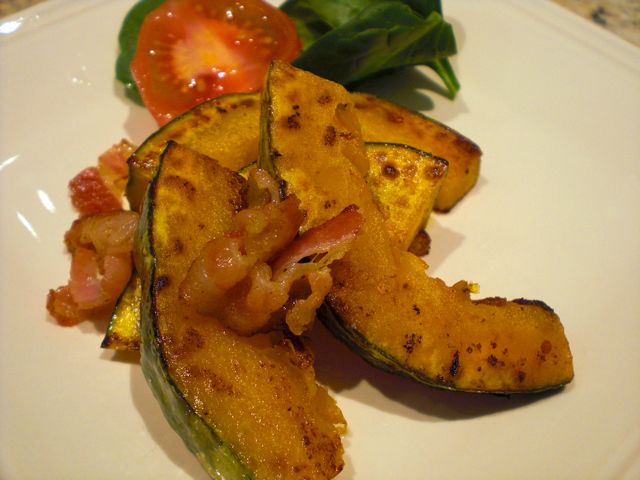
I grilled the tortila rolls using a Foreman's grill until the tortilla surface developed brown marks and the cheese melted (2-3 minutes). Once the rolls were heated up, the tortilla will stay put so that you could safely remove the toothpicks without worrying about unravelling. By my wife's request, I cut the rolls in half and served. On the side, we served fresh mission figs (our favorite), blueberry, and the salsa.

This is a pretty good breakfast or mid-night snack depending on your situation.

Tuesday, July 12, 2011

Sauteed kabocha with pancetta, curry flavor カレー味のパンチェッタかぼちゃ炒め

I have posted Kabocha Hors d'oeuvres previously. This is another variation and is the best so far. This is based on a recipe from e-recipe but I made some changes.


I used the upper half of the kabocha where the meat is thinner than the bottom half. After removing the "guts" from the kabocha, I sliced it into 1/2 inch thick slices. Before sautéing, I microwaved it, covered, for 1-2 minutes or until just barely cooked.

I added a small amount of olive oil (1 tsp) to a frying pan on low heat and fried up chopped pancetta (the amount is arbitrary) until crispy and the fat is rendered. I set aside the crispy pancetta bits on a paper towel lined plate. I added the cooked kabocha slices in the same frying pan and fried them for one to 2 minutes each side on a medium flame until nice brown marks appeared. I added back the pancetta and seasoned it with Japanese curry powder (not too much), black pepper and salt (taste first, pancetta may be salty).

The combination of salty pork fat and curry flavor works very well with Kabocha. the only complaint is that while the skin is quite edible, the sharp contrast in consistency between the skin and meat of kabocha is not pleasant. I will remove most of the skin next time. A very nice drinking snack which will go well with any drink.

Sunday, July 10, 2011

Pork, tofu, mushrooms stir fry 豚肉、豆腐、きのこの炒め物

This is a dish I made from whatever I had on hand in the fridge one evening.  This is nothing noteworthy and there is no real recipe but was not bad.

I had pork (trimming from two pork tenderloins), mushrooms (royal trumpet, shiitake and oyster) and tofu which I had to use very soon (left over from another dish). I decided to make a simple stir fry dish somewhat like chanpuru. The amounts were all arbitrary.

I first thinly sliced the pork (more fatty cuts like belly may have been better). I marinated the meat in soy sauce, mirin, sesame oil, scallion (4 small, finely chopped), garlic (grated*), and ginger root (grated). The amounts are all arbitrary. I mixed into the meat and let it stand for 10-15 minutes at room temperature. I had about 2/3 of a piece of tofu which was cut into 1 inch cubes. I tore the trumpet mushroom from the bottom of the stems into several pieces, oyster mushroom was separated and shiitake mushroom stem removed and cut into 4 or 2 pieces depending on the size.

*if you "grate" garlic, it is potent. The best way you could grate garlic and ginger is to use a Japanese small porcelain grater. Metal graters will not work well.

I put peanut oil (1 tbs) plus sesame oil (1 tsp) in a frying pan on medium high flame. I drained the pork of excess marinade (not much left in the container) and sauteed until the meat was browned and almost cooked. I pushed the meat on one side and browned all sides of the tofu cubes. I made some more space by pushing the tofu aside in the frying pan and added the mushrooms. After a few minutes, turning the mushrooms few times, I mixed everything together crumbling the tofu as well. I added whatever marinade was left to the pan and added black pepper. After a few more minutes of stir frying, I tasted it and added salt (or soy sauce) and splashed in some sesame oil.

I garnished it with chopped chives. This is not an exciting dish but very enjoyable. The three different mushrooms with different textures and the fresh ginger and garlic notes were nice. We switched to sake for this dish.

Friday, July 8, 2011

Parent and offspring "salmon and salmon roe" bowl 鮭いくら親子丼

This is a less common version of parent and offspring bowl 親子丼 but it is popular in Hokkaido. This is a rice bowl dish with a combination of salmon and salmon roe topping. As long as you use salmon and salmon roe, it will qualify as a Hokkaido-style Oyakodon. You could use salmon ashimi or even grilled salmon. For salmon roe, you could use "ikura" イクラ as is or marinated in soy sauce and sake. I had salmon roe いくら I bought last weekend and needed to be used up soon, hence this dish. Instead of salmon sashimi or raw salmon, I used smoked salmon.

Salmon roe: I made marinated salmon roe. I simply made a mixture of sake and soy sauce (1:1 ratio) enough to cover the amount of the roe I had. I marinated it overnight in the refrigerator. Because the skin of the salmon roe is semi-permeable, it will absorb the marinade and swell up. This is called "Ikura no shouyu zuke" いくらの醤油漬. This also makes salmon roe last longer and is a good condiment eaten with hot rice or even as a drinking snack with sake by itself.

Assembly: This is very simple. I made sushi rice. I took a shortcut and used bottled sushi vinegar for this. I placed cold smoked salmon and the marinaded salmon roe on the top of the sushi rice. I also made dashi maki Japanese omelet and used it with a garnish of chiffonade of Perilla and nori. 

This is a very nice "shime" 〆 dish. For a regular person, I suggest serving a much larger portion.


Wednesday, July 6, 2011

Blueberry bread ブルーベリイブレッド

We are again deviating from our theme but when we posted blueberry pancakes, my wife said we had to post this one as well. So here we go; my wife's blueberry bread, which is "berry" excellent. She makes a large amount as you can see and cuts the resulting sheet cake into individual servings then freezes it. We often take this to work as breakfast.

I ask my wife to take over: The recipe will make one 10x15" sheet cake.

Prepare the pan by lining it with parchment paper. Grease the bottom of the pan, put in the parchment paper, then grease the top of the paper. (This allows the cake to release from the pan with no fuss or muss). Next,

Ingredients X1
1/2 cup butter 
1 1/3 cup sugar 
2 eggs and 
2 2/3 cups flour
2 tsp. baking powder, 
1/2 tsp baking soda, 
1/4 tsp salt. In yet another bowl add 
1 1/2 cups of buttermilk and 
2 tsp vanilla.

Ingredients X2
1 cup butter 
2 2/3 cup sugar 
4 eggs and 
5 1/3 cup flour, 
4 tsp. baking powder, 
1 tsp baking soda, 
1/2 tsp salt. 
3 cups of buttermilk and 
4 tsp vanilla.

Cream the butter until light and fluffy. Add the sugar and keep creaming. Add the eggs and cream until yellow light and fluffy. In a separate bowl mix the dry ingredients (flour through salt).  Alternatively add the creamed mixture and buttermilk to the flour. Pour into prepared pans. Next "install" the blueberries. (If the blueberries are added to the batter while it is being mixed they tend to clump. When this happens the batter around the clump doesn't cook because of the moisture in the berries. This makes for partially cooked patches that are unpleasant. Also during cooking the berries tend to sink to the bottom and form a wet mass.) To install the berries scatter them across the top of the batter fairly evenly (below left). Then take your fingers and gently push them slightly below the surface (below center). The batter will rise around them as it cooks.  If they sink its only to the middle of the cake and they are generally distributed so the batter cooks evenly. (if you don't do this step the berries just ride on the surface as the batter rises and they get over cooked.) Cook at 350 degrees for about an hour for this size (10x15") pan (below right).

This is a very luscious form of blueberry "muffin". It's another recipe that says 'summer is here'. The texture of the cake is very light and moist. The blueberries add a burst of juice and fresh flavor to the cake. 

Monday, July 4, 2011

Blueberry pancake ブルーベリイ ホットケーキ

Well, you will not find this in Izakaya. I don't remember how the tradition got started but this is a seasonal food we eat every year when blueberries arrive in the market. We always consider blueberry pancakes as an announcement that summer has arrived. They are also associated with having a good time eating breakfast out on the deck on a nice summer morning. It has been blueberry season for some time.  In the U.S. this type of quick cake made in a pan or on griddle is usually called a pancake but they go by many other names such as hot cakes, flap jacks, or Johnny cakes.  For some reason, however, in Japan they are called hot cakes or ホットケーキ. As a kid, I thought the only way to make hot cakes was to buy a hot cake mix in a box or visit "Snow brand" ice-cream parlor  雪印パーラー with my father in downtown Sapporo (Don't tell Mother). Apparently, they no longer serve hot cakes. Now, there is no reason to buy pancake or hotcake mix or frozen batters. We almost never visit IHOP, either.

We tried several different recipes for the batter and came up with this combination. This produces a very light and fluffy pancake. We have a sort of division of labor in their production; my wife makes the batter and I cook the pancakes and both of us "install" the blue berries.

An average American guy (you know who you are) can easily eat a stack of four of these (below on the left, this is 8 inch diameter pancake) as a breakfast. We, however, can only pack away one each (above). (My wife claims that as a child pancakes for breakfast were extra "special" and she once ate ten--I find that hard to believe). As you can see, I garnished the pancake with extra blueberries but no powdered sugar. We usually do not add extra pats of butter either (since there is plenty of butter in the batter). As you may know, once blueberries are cooked they turn purple (image below right). Another thing I did not know while I was in Japan is how good real maple syrup is compared to the fake kind usually served there. 
Batter: This recipe requires buttermilk which may be impossible to get in Japan.  Plain yogurt can be substituted (add milk if the consistency is too thick), however the resulting pancake may miss some of the taste complexity the buttermilk provides. This make 6 pancakes (8 inch in diameter).

I asked my wife to fill in here:

Dry ingredients: The secret to this pancake is using cake flour (2 cups) instead of regular flour. Add to the flour, sugar (1 Tbs), salt (1 tsp), baking powder (1 1/2 tsp), and baking soda (1 tsp). Mix to combine the dry ingredients. 

Liquid ingredients: 2 eggs, 2 cups buttermilk (or plain yogurt), 2 tsp. butter melted. Use a fork to scramble the eggs. Add 2 tbs of the buttermilk to the eggs and mix to temper them. Add the egg mixture and melted butter to the rest of the buttermilk. Add the buttermilk slowly to the dry ingredients whisking in a few quick strokes to make a smooth batter (don't mix too long or they will get tough) 

To cook: I usually use 4 identical 8 inch non-stick frying pans. I preheat them on low flame for 5-7 minutes so that all the batches come out at the same doness. Instead of butter, I use light olive oil. I add more than enough oil  in one pan, swirl, and dump the oil to next pan and so forth. Whatever excess is in the last pan will be poured back to a small bowl. After pouring the batter (I use a one cup ladle) into the pan, we "install" the blueberries by hand. We found that if we mix the blueberries into the batter they tend to clump together so some pancakes have too many berries and are too wet while others don't have enough. To ensure even distribution of the blueberries we throw the blueberries individually into the pancakes as the batter starts to set up (see above picture). (Requires some precision in aim to get the desired effect). Actually my wife really likes doing this. We have to move quickly to get all the berries in before the pancake is too cooked to accept them. When the edge of the pancake looks dry and small bubbles start appearing on the surface, I flip it using a spatula and a flick of my wrist. I then continue cooking for another 2-3 minutes or until done. The above recipe produced a total of 6 pancakes of a bit less than 8 inch diameter.

For us, it is really worth it to buy really good genuine maple syrup since the taste is so much better than the maple flavored sugar water that is so popular. We use the syrup sparingly. This is a very light pancake. The buttermilk gives it a uniquely pleasing taste. The manual "installation" of the blueberries means a proper distribution of sweet berry juice and cake with every bite. It is best to eat this outside on the deck when it is still nicely cool on a sunny summer morning with a cup of cappuccino (We have a decent but all-manual Italian cappuccino machine. We even roast the coffee beans ourselves).

Saturday, July 2, 2011

Stewed eggplant なすびの含め煮

As you know, eggplant and oil are a good combination.Eggplant parmesan is a good example--the eggplant absorbs a good amount of olive oil while being fried. Of course, modified recipes that try to reduce the amount of oil by baking the eggplant first instead of frying it are also popular.

Even in Japan, a classic recipe for stewed eggplant uses a technique called  "age-bitashi揚げ浸し. The eggplant is first deep fried and then simmered in a seasoning liquid. Although this produces an excellent eggplant dish, eggplants are like a sponge and absorb a large amount of oil.  So I made some modifications to take control of the amount of oil. Japanese eggplants (many different kinds of eggplant are available in Japan), are not readily available here. I do not particularly like the long slender and light purple "Asian" or "Chinese" eggplants. So I tend to use either small Italian eggplant or Zebra eggplant for Japanese-style eggplant dishes. 

Zebra eggplant version: I saw some nice looking small Zebra eggplants at the store the other day and decided to make this dish. 

I used Zebra eggplants (two, medium sized). I removed the stem end and halved them along the long axis. I made criss-cross shallow cuts on the skin and soaked them in water for a few minutes. I removed the moisture using a paper towel by lightly squeezing them. In a skillet large enough to hold 4 halves of the eggplant comfortably, I added light olive oil (2 tbs) and dark sesame oil (1 tsp). On medium flame, I fried the eggplant halves (the cut surfaces only, I did not bother with the skin side) for several minutes until most of the oil was absorbed. In the same pan, I added dashi (300 ml). I made dashi from a Dashi pack, mirin (2 tbs), sake (2 tbs), soy sauce (3 tbs) and sugar (1 tbs). I tasted the seasoning liquid and adjusted the amount of soy sauce and mirin. I also added several thin slices of ginger and a small amount of red pepper flakes for mild heat. I put on an otoshi-buta and simmered it for 30 minutes. I let it cool down in the broth and served it at room temperature with a garnish of scallion threads (shiraga-negi 白髪葱 and very thin juliennes of ginger hari-shouga 針ショウガ (both soaked in water for 10-11 minutes to make them milder). This tasted very good and had just enough oil to make it unctuous. the red pepper gave it a mild but pleasant zing. The meat of the eggplant was very soft and absorbed the nice gentle flavors of the broth and the skin was very tender (because of the scoring before stewing). The next day, I served it cold and it was even better. The only problem was the color, the Zebra pattern was all gone and looked gray and a bit unappetizing.

Italian eggplant version: So a few days later I made the dish using small Italian eggplant in the exactly same way.
This one tasted the same and was excellent. In addition, it retained a nice color. I added baby bok choy, quartered, cooked for the last 5 minutes in the same broth as the eggplants.

You could control the amount of oil being absorbed by the eggplants this way but the tastes and texture were as good as a classic deep fried "age-bitashi" eggplant dish. This dish goes well with any drink but, again, we went for cold sake.