Monday, November 9, 2015

Chestnut flour crepes with honey Ricotta 栗の粉クレープ

This is a continuation of the seasonal chestnut flour recipes. This is a  recipe by Mario Batali.  We served it with very ripe and sweet Mission figs.


This is a rather simple recipe.

Ingredients
1 cup chestnut flour
2 extra large eggs
1 1/4 cups water
2 cups ricotta
1/2 cup honey
2 tablespoons olive oil

Directions
Sift the flour into a mixing bowl and beat in the eggs, 1 at a time. Add the water, whisking until smooth. Allow to stand 15 minutes.

Place the ricotta in a mixing bowl and stir in half the honey.

Heat a 6 to 8-inch nonstick frying pan over medium heat and brush with some of the olive oil. Add 2 tablespoons crepe batter and roll pan to distribute evenly and thinly. Cook until the crepe is firm on the underside and is curling up at the edges, about 1 minute (see below picture).


Flip the crepe and cook on the raw side for about 30 seconds (see picture below).


Continue making crepes until all the batter is finished, stacking each finished crepe on top of the previous one, to keep them warm. To speed up the crepe making process use multiple skillets.

To serve, spoon 2 tablespoons of the ricotta honey mixture in the center of each crepe, roll it up and placed a dollop of honey Ricotta (the original recipe suggested to put honey but that would have been too sweat for us).


We really liked the honey ricotta. The crepes are a bit dry/brittle (or "bosoboso" ボソボソusing Japanese expression) but had a unique flavor of chestnut. We will not get chestnut flour just to make this crepe in the future, though.

Friday, November 6, 2015

Chestnut Flour Cake: Castagnaccio 栗の粉のケーキ:カスタナチオ

Since my wife got chestnut flour, she searched for some recipes and came up with this Tuscan chestnut cake. This is indeed an interesting cake. As the recipe indicated, it requires wine to "wash it down".


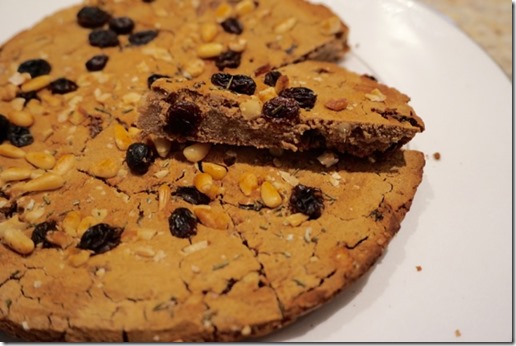
This is a flat cake without any leavening agents. It is savory in taste with rosemary, pine nuts, walnuts and raisins.


My wife put some of these in the batter and some on the top.


We made a few variations from the original recipe.

INGREDIENTS

2 ounces raisins
16 ounces chestnut flour
2 tablespoons sugar
Zest of one lemon,
Pinch salt
2 cups water
3 tablespoons olive oil, plus more for pan
1 fresh rosemary sprig, leaves picked and finely chopped
1 ounce toasted chopped walnuts
1 ounce toasted pine nuts

DIRECTIONS

Preheat the oven to 375 degrees F.

Place the raisins in a ramekin of water to soften for 20 minutes.

In a large mixing bowl, sift the chestnut flour. Add the sugar, lemon zest, and pinch of salt, mix well and then gently start adding the water to the mix.

Using a whisk, beat the mixture well making sure to eliminate any lumps, then add 2 tablespoons olive oil, and half of the raisins, nuts and rosemary and mix again.

Lightly oil an 11-inch pie plate with 2-inch sides with olive oil and pour in the batter it should be no more than 1/3-inch thick. Sprinkle the cake with rosemary leaves, the remaining softened raisins, walnuts, and pine nuts. Sprinkle with 1 tablespoon olive oil and bake for about 40 minutes.

We used a rustic looking ceramic pie pan.


We used finely chopped fresh rosemary from our herb garden.


This is a very interesting cake. It has the texture and taste of a very large chestnut smashed into a flat piece. The predominantly chestnut flavor and texture is accented by intriguing overtones on rosemary and pine nuts (I couldn’t detect any walnut flavor). The original recipe said that this was not “kid friendly” and they were right. This is definitely not for desert and will not go well with coffee or tea. But the flavor grows on you. Also over time the rosemary and pine nut flavor marry into the chestnut flavor and the cake gets better.  We were probably too careful about adding too much rosemary. This time of year the rosemary in our garden is extremely aromatic and tacky with oil—probably at its best for the season.  Next time we can be a lot more aggressive with that herb. This cake reminded me of when I was introduced to the Italian liquor Compari. When I first tasted it, the flavor was very strong/bitter, unique and distinctive and I wasn’t sure I liked it. But then it grew on me. The cake is rather crumbly and we ended up eating it in chunks rather than slices. Since the raisins, pine nuts and rosemary we put on the surface just fell off as we ate and while we stored the cake, my wife suggested that next time we just mix all of it into the batter.

We had this with red wine and that combination worked out well. This cake ranks next to my wife’s anchovy black pepper cookie . They are of a similar  genre. Both go well with sipping wine rather than as a "dessert".

Tuesday, November 3, 2015

Chestnut flour pancake 栗の粉のパンケーキ

When we got this year's shipment of North American Chestnuts I prepared my usual Chestnut rice and other chestnut dishes. In an effort to expand our seasonal chestnut repertoire my wife hit the internet and came up with several recipes using chestnut flour. This is an ingredient we have never used before so my wife had to hit the internet again to find where we could purchase some. She got chestnut flour from Amazon and we made these pancakes one weekend. This also uses almond flour which we just happened to have in our freezer (how it got there and why is another story).  By the way, this pancake is gluten free if that is important to you.


For a pancake without any wheat flour, this one came out very fluffy. I also added my chestnut in syrup as a garnish.


I used a small amount of maple syrup but this pancake is rather sweet and may not need any additional syrup.


This recipe came from this site. We modified the recipe using our CCK (Common Culinary Knowledge)

Ingredients: (4 pancakes)

- 3 Large Eggs
- 1 Cup Chestnut Flour sifted
- 1/3 Cup Blanched Almond Flour sifted
- 3 Tbs Granulated Sugar
- 2 Tsp double acting Baking Powder
- Pinch of Salt
- 1/4 cup Milk*
- 1 tsp Vanilla Extract
- 1 Tbs. melted Butter

Directions: sift the flours. (This step can not be skipped because the chestnut flour has a tendency to clump and without sifting ends up with several hard lumps). Mix the dry ingredients in a bowl and the wet ingredients in another bowl. Stir the two together. Adjust the amount of milk to get a pourable consistency. Ladle the batter into a hot pan with a little olive oil on the bottom. Cook as you would any other pancake.

*Note: It is important to have a appropriate consistency when making pancake batter. We had to add over 1/4 cup of milk (more like 1 cup) to get a "spreadable" consistency so that the batter would spread in the pan (see below). Probably we could have added more liquid to make it spread to fill the pan. We also omitted "vinegar or lemon juice" included in the original recipe since double action baking powder has it's own source of acid to activate and we judged that "acidic" taste will not be good in the pancake.


The pancake tends to brown quickly because of the sugar.


This is a great pancake.  Despite being gluten-free, it has a very fluffy fine texture. It is slightly sweet and because of the chestnut flour, it has a hint of chestnut flavor as well. Amazingly we were surprised that the pancake seemed to have a “chocolate” flavor. If we did not know how it was made we would have sworn that it included coco powder; although it clearly did not. Because of the special flours, this tends to be a rather expensive pancake to make but we really liked this and we will definitely make it again.

Saturday, October 31, 2015

Chestnut buns 栗入り全粒小麦 バン

Since I have exhausted my collection of chestnut recipes over the past several years, my wife came to the rescue. She made chestnut buns. She ended up using her favorite whole wheat buttermilk bun recipe and added chestnuts from North American Chestnuts which I prepared.


We served this with my chestnuts in syrup and pats of butter.

 
The bread recipe came from Laurel's Kitchen: Bread Book.

Ingredients:
2tsp active dry yeast
1/2cup warm water
3/4cup very hot water
1/4 honey
1 1/4 buttermilk
5 1/2 whole wheat flour
2tsp salt
4tbs butter
1 to 2 cups chopped up chestnuts in fairly large chunks

Instructions:

Bloom the yeast in the 1/2 cup warm water. Mix the hot water, salt, honey and buttermilk. It should be just slightly warm. Put 4 cups of wheat flour into the bowl of the mixer. Add the liquid ingredients to the flour and continue mixing. Add additional flour until the dough reaches a soft but not sticky consistency. For rolls the dough should be fairly soft. Once the right consistency is reached, knead for 7 minutes. Then an additional 3 minutes first adding the butter a tablespoon at a time until incorporated then the chestnut pieces. If the mixer can't handle the chestnut pieces knead the last part by hand.

chestnuts roll composit

Form the dough into a ball and put into a bowl that has a little vegetable oil on the bottom to coat the ball so it doesn't dry out as it rises. Rise in a warm place until double. Deflate and let rise again. The second rising will take 1/2 the time. When it has doubled again deflate and form into individual buns. (To get buns of equal size I weigh the dough--3 1/8 ounces makes the size shown here). Put them in a heavily buttered baking dish. (The butter in the dish makes the crust nice and crunchy). Cook at 400 degrees for about 20 minutes (check them after 15 minutes).


Although this is a whole wheat bread, it is very soft and moist and, by far, our favorite whole wheat bun. The addition of chestnuts was very nice but in retrospect, we should have put in larger pieces and more of them. (Initially we were concerned that the chestnuts might end up fairly hard and in a large size would not have a pleasant mouth feel but it turns out they absorbed into the dough and were quite soft). Since preparing chestnuts is a lot of work, next time we may try making this recipe with prepared chestnuts in a jar (from Europe especially France).

Wednesday, October 28, 2015

Tsukune with renkon 蓮根つくね

This is a variation of Japanese chicken patty, tuskune つくね.  Generally tsukune in Japan contains chopped up "soft bone" (cartilage or "nankotsu"  軟骨).  My wife does not like this, since  it reminds of her childhood when ground meat always had some bone fragments mixed in.  Instead, I chop up lotus root ("renkon" 蓮根) to add some crunchy texture to tsukune. This time, instead of including chopped up lotus root in the patty, I used a slice of lotus root as a base and pressed tsukune on the top. The combination of ground meat and lotus root is rather common and I posted deep fried lotus root sandwich 蓮根のはさみ揚げ,  previously.  I got this idea from "Sakaba hourouki 酒場放浪記 on YouTube which we saw one evening. In one of the episodes, this dish was served to the always somewhat inebriated host.


To show how this is constructed, left is the patty side and right is lotus root side on the top, respectively. I took a shortcut and I cooked this in a frying pan. Instead of making "tare" sauce, I just made a quick pan sauce to coat the tsukune.


There are many variations on what can be included in tsukune.  The only consistent ingredient is ground chicken.  One of the reasons I had for making this dish was to use barbequed chicken left over from the previous weekend. So, I mixed finely chopped cooked breast meat with store-bought ground chicken breast. I am not sure about the amount as usual but both the cooked and ground chicken were about 1 lb each. The idea here is that the cooked chicken adds texture and the raw ground chicken binds the tsukune together.  You could add anything you like but this time, I added finely chopped scallion (5 stalks including green parts), grated garlic and ginger (about 1/2 tsp each but whatever amount you like), and 1 tbs of miso. Since the mixture was a bit stiff, I also added one whole egg beaten. I made 1/3 for this dish and 2/3 for usual tsukune. For the usual tsukune, I added coarsely chopped lotus root. I made 8 tsukune on lotus root as you can see below. I pressed the meat mixture so that some went into the holes of the lotus root.


With a small amount of vegetable oil (or dark sesame oil if you so prefer) on medium heat,

I cooked the meat side first for 1-2 minutes until the surface was nicely browned. I flipped them over and cooked for another 1-2 minutes. I then added mirin, sake and soy sauce (1tsp each) into the pan. I shook the pan, until a viscous sauce developed and flipped them over so that the sauce coated all surfaces.

I served hot with a sprinkling of powder “sansho”  山椒. Because I used only breast meat, it was a bit on the dry side especially when it was reheated later. But this is another good way to use up cooked chicken.

Sunday, October 25, 2015

Japanese pumpkin potage with chestnut 栗入りカボチャのポタージュ

This is nothing really new. The other day, I got a Japanese pumpkin or kabocha カボチャ at the Japanese grocery store. As usual, I made simmered pumpkin or カボチャの煮物 (second picture below).  I also made chestnuts simmered in syrup 栗の甘露煮.  So, I just combined all three into one dish.


I prepared the kabocha as usual. I removed the skin and rounded off the sharp edges of each piece to prevent the edges from crumbling during the cooking process (called "nikuzure 煮崩れ). So, I used these scraps and the portion of kabocha which was too thin to be made into individual pieces to make the potage. I made the simmered pumpkin  exactly the same was as before seasoned with sugar, mirin, and soy sauce.


For the potage, I added finely diced onion sautéed in butter, small cubes of potato simmered in chicken broth (my usual Swanson no fat low sodium) with a few bay leaves for 20 minutes or until everything was cooked and soft. After removing the bay leaves, I pureed the pumpkin mixture using an immersion blender until all the solids were gone. (picture below).


I added cream, mixed, seasoned with salt and white pepper and warmed up before serving. Since I  made chestnuts simmered in syrup, I placed the simmered pumpkin and chestnut in the bowl and poured the potage and garnished with finely chopped parsley.


The potage was sweet and velvety. With the addition of the simmered pumpkin and chestnut, this is really the taste of autumn.

Thursday, October 22, 2015

Jalapeno Cheddar roll ハロペニョチェダーロール

When I saw this recipe, I thought ‘This is something my wife would be delighted to make’. Not that she is into Jalapeno pepper or anything hot but the idea of rolling bread dough with cheese and pepper inside would appeal to her. The original recipe calls for pickled Jalapeno peppers but we used fresh ones after deveining and deseeding (i.e. not hot at all).


Even as the bread was baking the kitchen was filled with the wonderful smell of cheddar and Jalapeno. The cheddar cheese all melted and made a nice brown crust on the top  and bottom.


The below is our variation of the original recipe ).
Ingredients:
1/2 cup milk
2 tablespoons sugar,
 2 teaspoons dry yeast, 285 grams bread flour divided into two parts; 95 grams for the yeast sponge and 190 grams for the bread. As is usually the case with bread dough additional flour in reserve in case the dough was too wet.
4 tablespoons butter
1/2 teaspoon salt
2 large eggs
240 grams Cheddar cheese shredded (about 2 cups) (We used smoked Cheddar)
2 fresh jalapeno peppers, deseeded and deveined and finely chopped
Instructions:
1. Stir the sugar and salt into the milk and scald the milk stirring to dissolve the sugar and salt. Cool to about 105 degrees F (40 C), add the yeast to the mixture to proof it. Once the yeast becomes bubbly add the 95 grams flour. Cover and let this mixture rest in a warm place until it's doubled in size. This forms the sponge.
2) Add the remaining 190 grams of flour to the bowl of an electric mixer. Add the sponge and start mixing at a low speed. Add the eggs, one at a time until fully incorporated. Add the butter in pieces until fully incorporated. Add additional flour as needed until the dough is soft but not sticky. Kneed the dough for 7 to 10 minutes. Turn the dough out onto a well floured surface, let it rest for 5 to 10 minutes then roll it out into an 18 x 18 inch square (45 cm x 45 cm).
3) Sprinkle evenly with the cheese, putting a little extra cheese towards the edge closest to you and then scatter the jalapenos evenly over the top. (#1 in the picture below)
4) Roll the dough up and then slice the roll into thirds and then slice each third into 3 wheels. (#2 and 3 in the picture below. We sliced the pieces a bit thinner, after we divided the roll into thirds we sliced each third into 4 equal rolls).
5) We arranged  them in a 8" x 8" greased pan lined with parchment paper. We covered the pan with saran wrap and let it rise in a warm place (we had a bit irregular diameters, #4 in the picture below). We  preheated the oven to 350 degrees F.
6)When the dough had risen to fill the pan, we placed it in the preheated oven and baked until golden brown (25-30 minutes).

Jallopeno pepper role composit

Even though we deviated a bit from the original recipe we love this roll . The cheese we used gave it a very nice smoky cheddar flavor. The fresh jalapeno pepper taste was also very nice without heat. Interestingly the cheese melted into the bread adding moisture and out the top and bottom making a crunchy crust. This is a perfect roll for a snack.