Saturday, July 31, 2010

Sliced roasted pork wrapped potato salad ポテトサラダのローストポーク巻き

This is another nothing dish I quickly made from leftovers. You could make this with commercial ham as well.

Roast pork: When we went to get pasteurized shell eggs at the grocery store which we have not visited before, we picked up a nice pork for roasting. Since it was Saturday, we decided to barbecue it in our Weber grill. The pork was prepared very simply; coated with olive oil and my simple dry rub (a mixture of salt, black pepper, ground cumin, cinnamon, and cloves) and cooked in the same setting as chicken (indirect heat). It was hot smoked with hickory wood chips. I cooked it to the internal temperature of 145F (using a remote monitored temperature probe, not a metal skewer and my lower lip) and let it rest for 10 minutes. Pork is difficult to cook. Overcooking makes it dry but eating under cooking could result in Cysticercosis. I think this my limit to feel comfortable. The picture below is after the roast is totally cooled in a refrigerator overnight. I sliced it very thinly.

Potato salad: This is also leftover from several days ago when we made our potato salad; only very small amount was remaining.

I just put a small amount of the potato salad on the sliced pork and made it into a roll and cut it in half. I served it with a cornichon. This goes well with any drink; wine, beer or sake. We had this with sake. Smokey pork flavor really matched well with the creamy starchy potato salad. Although the presentation can be improved, this is such quick nothing dish yet very good and satisfying.

Thursday, July 29, 2010

Myouga, broccoli and cumber salad with sesame mayonnaise 茗荷、ブロッコリ、キュウリの胡麻醤油マヨネーズ和え

This is still a part of my "myouga" series. This is a variation of Japanese salad called "goma-ae" 胡麻和え. Since I had home grown tomatoes and fresh myouga 茗荷, I made this small salad. For dressing, I add a few twists and  made sesame-soy-sauce-mayonnaise.

For two servings like the one in the picture, I blanched broccoli florets (about 8) and shocked them in ice cold water, so they are green and crunchy. I peeled and cut  one medium tomato into 8 wedges (this was very ripe home grown-by my friend- tomato), and halved and thinly sliced myouga (4-5), and  cut a cucumber in "Jabara" 蛇腹 (1 American mini-cucumber)which was further cut  into a bite size (a bit larger than half inch chunks) and lightly salted.

Dressing: I dry roasted white sesame seeds (2 tbs) in a frying pan for 2-3 minutes until they slightly browned and fragrant. I tipped them into a Japanese mortar or suribachi and ground them coarsely (some oil will come out). I added sesame paste (1 tsp) and soy sauce (2tsp) and mayonnaise (2 tbs, happened to be home made) and mixed. Taste and adjust the amount of soy sauce if needed.

I just arranged the vegetables, poured the dressing and topped it with white sesame seeds.
This is a hybrid Japanese/Western salad but the combination worked well.

Tuesday, July 27, 2010

Myouga, chicken and duck tenderloin tempura 茗荷、鶏と鴨の笹身の天ぷら

We do not particulary like to make tempura of myouga because the myouga seems to lose its flavor when cooked, but this one came out ok. Again, the myouga was used as a part of the tempura assortment rather than the main item.

The chicken tenderloin was stuffed with minced pickled plum or "umeboshi" 梅干し which is called "bainiku" 梅肉, then wrapped in perilla leaves. This is exactly the way I usually make this dish (Left in the back in the above picture). Since I separated the tenderloin from the duck breast when I made a duck breast dish, I wrapped it with a small rectangular sheet of nori 海苔. Whenever nori or aonori is used in this fashion or mixed into the tempura batter, it is called "Isobe age" 磯辺揚げ meaning "Rocky seashore fries" (Right in the back ). The tempura batter is my usual; a mixture of ice cold water and cake flour (I did not add potato starch this time because I was a bit lazy). I also fried this using the shallow frying method rather than deep frying.

I fried the myouga last, briefly and at a higher temperature than other items, which helped retain the flavor. When you cook myouga (such as in a miso or clear soup) the unique flavor of myouga diminishes quickly. I served this with an wedge of lemon and green tea salt.

Sunday, July 25, 2010

Miso pickled Myouga みょうがの味噌漬け

Myouga 茗荷 has a very interesting taste but is usually used for garnish--rarely as a stand-alone dish. This is one of them. Miso 味噌 is a wonderful condiment and pickling or marinating in miso will add a nice salty nutty flavor. You could pickle any vegetables (root and hard vegetables are most suited) this way or tofu or even cheese such as cream or cheddar cheese.

In any case, I just smear enough red miso to coat all freshly harvested, washed and dried myouga. I put them in a Ziploc bag for over 10 days in a refrigerator and it is ready to eat. This is about 2 weeks old. Just wash off the miso and cut in half and serve. This is a perfect accompaniment for sipping sake. The myouga is still tastes fresh and is crunchy yet has an added nutty salty miso flavor.

We have been harvesting myouga every weekend for the past few weeks. This year's crop is not as plump, big, or numerous as other years. The flavor, however, is very strong. Nonetheless even though small, some started flowering (far left). As I said before, once it flowers, the bud became loose and soft and does not taste good.

Saturday, July 24, 2010

Home grown tomatoes 家庭菜園トマト

I mentioned that we used to grow tomatoes in our backyard vegetable patch but over the years the yard got shadier as our trees grew taller. As a result, we stopped growing tomatoes long ago. Now, our Japanese plum tree is in the middle of our old vegetable patch and, underneath, myouga plants grow. So I said in the comment of one of my posts that we did not have easy access to home grown tomatoes. Well, one of our friends took pity on us and gave us of some of his home grown tomatoes. Good, sweet, nice vine ripen tomatoes should be eaten simply like the chilled tomatoes 冷やしトマト served in an Izakaya. For us, though, luscious tomatoes like this need not be chilled. (Certainly, we do not store tomatoes in the refrigerator but we could chill it just before serving). Generally we do not like the skin so I peeled it off. Then I sliced, the tomato and sprinkled it with salt and pepper and served it with home-made mayonnaise. The taste of summer! Thank you, Jimmy.

Friday, July 23, 2010

Cold asparagus soup 冷製アズパラガス スープ

It has been extremely hot especially in recent days. By my wife's request, I made cold asparagus soup. She says it is the essence of everything good about asparagus. It is a perfect starter dish for hot summer days.

For about 4 servings, I used asparagus (10, thick ones, not the pencil kind), white potato (one medium), onion (one, small), bay leaves (3), chicken broth (16 oz) and cream (1/4 cup). First I cut off the tips of the asparagus (about 1 inch from the top) and blanched them for 1 minute. Then I shocked it in cold water. I set them aside as a garnish.  I then cut off the very bottoms which are woody and discard them. I slice the remaining stems on the bias in 1/3 inch thick. I skinned and diced the potato (small dice). I sauteed finely diced onion in olive oil (1 tbs) for 2-3 minutes or until it becomes semitransparent. I then added the sliced asparagus, diced potato and saute for another minute. I added the chicken broth and three bay leaves. Once it come to the boil, I turn down the flame to low and put the lid on. I let it simmer for 15-20 minutes or until all the ingredients are soft and cooked. I remove all three bay leaves (I count them very carefully) and, using an immersion blender, homogenize the soup. Toward the end, I add 1/4 of a cup of cream. I taste it and season with freshly ground white pepper and salt. I season a bit more severely than I would for hot soups since the taste will be somewhat muted when the soup is served cold. I did not strain the soup but you could strain it to make it perfectly smooth. Cool it down to the room temperature and then chill it in a refrigerator for, at least, several hours. I add a bit more cream when I serve it and garnish with the asparagus tips. Perfect cold soup to start hot summer days.

Wednesday, July 21, 2010

Grits and poached egg グリッツとポーチドエッグ

This could be a "shime" 締 ending dish or, more traditionally, a breakfast. It is a variation of "Okayu" お粥 or porridge but in a US Southern style. It is a very comforting and nice starch dish. This one is prepared by my wife and I only help by chopping up the chives and making the poached eggs.

Grits is a very Southern food and my wife is not even from the South but we adapted this dish for some reason. Instead of the more traditional grits which is eaten as a breakfast with additions of cheese, butter or maple syrup (a Northern addition to a Southern dish...don't ask why), we make it savory. We cook the grits in milk instead of water. Just in case you are not familiar with grits, it is coarsely ground alkaline-treated hard kernel corn. Alkaline treated corn prevents the development of a niacin deficiency (Pellagra) especially if your main diet consists of corn. I do not know who first figured this out but certainly American Indians ("hominy" from which grits is made) and Mexicans ("masa harina" for corn tortilla is also made from alkaline treated corn) must be among the first. This treatment also created another flavor different from regular corn meal. Grits and polenta are similar yet distinctive in their taste. The description below is how my wife makes grits.

Grits: She prefers to use "Quick" grits (Quaker brand) rather than "Instant" grits. Quick grits, which has been pre-steamed and then dried, requires about 5 minutes cook time but it is more "authentic" in flavor and consistency than  the "instant" variety. True old fashioned stone-ground grits will take way too long to cook. 

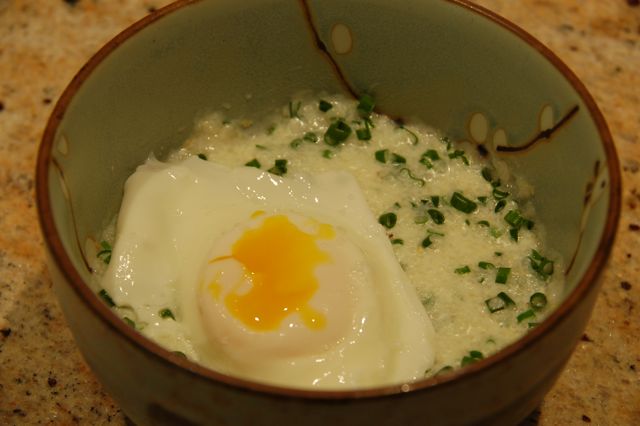
For two small serving, in a small but deep pan, add milk (one cup, we use 1%) and just when it starts boiling, add salt (1/4 tsp) and grits (3 tbs) while stirring with a whisk, turn down the flame and cook covered for 5 minutes until all the milk gets absorbed. Add chopped fresh chives (3-4 tbs). She adds 1 pat of  butter (1/2 tbs) but no cheese.

Poached eggs: I poach eggs very simply without any vinegar and without any special techniques or gadgets but works all the time. I used a 8 inch frying pan with non-stick surface and with a high side wall so that it can have enough depth of water to completely submerge the eggs. After the water comes to a gentle boil, I adjust the heat so no or only few bubbles form in the water (many bubbles result in egg-drop soup). I then add 1 tsp of salt (just for seasoning). I crack the egg into a small ramekin or bowl and gently slide the egg into the water. Repeat the process. After the white is set and the egg yolk becomes opaque on the surface (4-5 minutes), using the perforated spoon or silicon spatula gently pry the bottom of the eggs from the surface of the pan; take care not to break the yolk. The eggs should come loose without a problem because of the non-stick surface. Pick up the egg using a perforated spoon and drain on a paper towel-lined plate.

Place the grits in a bowl and put the poached egg on top. Sprinkle with salt and serve. For breakfast my wife serves this with her home-made buttermilk biscuit (another Southern specialty) but for the "shime" dish serve as is. Break the egg yolk and mix it with the grits. Even if you are not from the South, you will like this dish.