Sunday, July 20, 2014

Chicken and Greek yogurt egg rolls 鶏肉とヨーグルトソースの春巻き

When we barbecue chicken on weekends, we usually cook two chickens at a time in our Weber grill—not because we eat a chicken each but to assure we have leftovers to use in other dishes. The leftovers are always very good to have for the following week. The wings can be just heated up in a toaster oven for a quick snack, the breast meat is used to make salads, sandwiches and other dishes. The dark meat including some of the skin is used in chicken noodle or Minestrone-style  soup. The barbecued flavors make these dishes better than using raw chicken meat.  This time, I had a portion of breast meat left after one week and needed to finish it before it went bad. I saw an unusual recipe for a spring roll using yogurt and chicken breast (the original recipe calls for chicken tenderloin). I decide to try it in one weekday evening.

This was the second small dish we had that evening. I should have rolled them a bit tighter but it tasted very good. I served it with spicy mayonnaise.


The original recipe calls for green pea sprouts "tou-myou" 豆苗 but they are not available here (among the many sprouts we can get here, I have never seen green pea sprouts. The closest we can come may be pea shoots unless you grow green pea sprouts yourself).  I substituted this with water cress (just because I had an open bag).

Water cress: I just used a a big hand full but I could have used more. I cut into short segments and quickly sautéed it in olive oil until wilted ( a few minutes). I seasoned it with salt and pepper. I set it aside to cool in a metal bowl.

Chicken: The original recipe calls for chicken tenderloins but I used  chicken breast meat left over from the previous weekend’s barbecue. I hand shredded it along the grain of the meat (I probably had 1/4 of a whole breast).

Perilla: Perilla is going strong in our herb garden. I cut it into thin strips (4 medium leaves).

I mixed everything with mustard (1tsp), mayonnaise (2 tbs) and greek yogurt (2 tsp). I seasoned with salt and pepper.


Using a paste of flour as a glue, I assembled 6 small egg rolls (I should have rolled them more tightly).


Instead of deep frying, I shallow fried them in 1/4 inch of peanut oil turning once until the skin became brown and crispy.


This is a bit unusual spring roll but it tasted good. As long as it is encased in crispy egg roll skin anything can be made into egg rolls, it seems.

Thursday, July 17, 2014

Sous vide Halibut スービィオヒョウ

This is another sous vide dish. In our regular grocery store, I spotted halibut which looked good and I bought about 1 1/3 lb fillet. I usually do not bother with halibut since it is a rather boring white meat fish but this time I wanted to cook it sous vide.

I served sous vide halibut with salsa I made the day before and shiitake asparagus risotto.


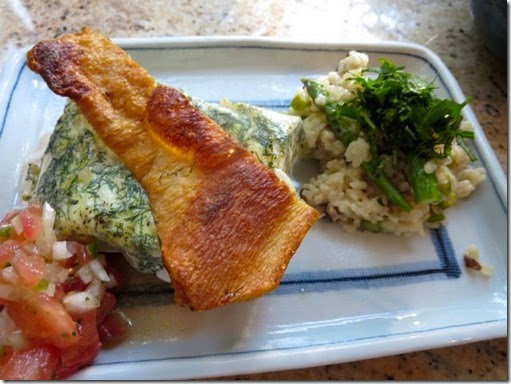
I removed the skin and cooked crisp and brown separately and served it on the top.


Halibut: From the 1 1/3 lb fillet, I removed the skin and made two equal sized portions. I seasoned them with salt and pepper, zest of lemon (micro-graded) and finely chopped fresh dill (we now have a forest of dill plants in our herb garden and have to use it).

I placed two thin pats of cold butter (unsalted) on either side of the fillets and vacuum sealed (left upper in the picture below). An appropriate sous vide temperature is a bit difficult to determine but I wanted to be safe and chose 135F which is above the pasteurization temperature (130F). In retrospect, I could have gone a bit lower (may be 132F). I cooked sous vide for 30 minutes. You could see that the butter has melted and the meat has become opaque just over 10 minutes into cooking (left lower). After 30 minutes were up the fish meat was totally opaque (Please compare the semitransparent appearance in the left upper picture)

halibut sosu vide composit

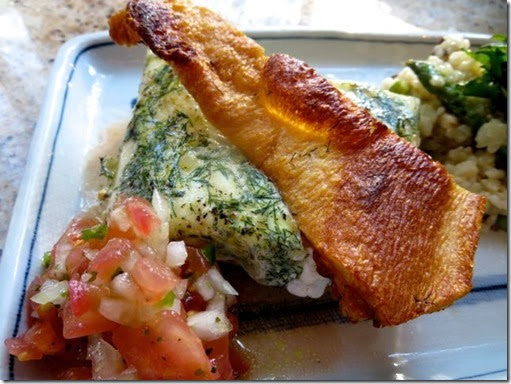
When I took the fish out of the pouch, the surface had a thin smooth shiny layer of congealed protein and the markings of the vacuum sealed plastic bag on it. This looked like it was made out of plastic and didn’t make it look particularly appetizing; one of the problems of sous vide cooked fish. So, I decided to quickly sear both sides so that the congealed protein would melt during the searing (I was not aiming to make it brown or crispy).

Skin: I removed the skin and cooked it separately.  I patted try dry and salted it. I placed it in a non-stick frying pan with a small amount of olive oil on low flame, skin side down. I covered it by nesting an identical frying pan with its bottom covered with an aluminum foil to prevent the skin to curl up and also splattering. After 7-10 minutes, I flipped the skin over and cooked another 5 minutes and placed it on a paper towel lined plate. I cut it into two strips and served them over each of the fillets of cooked halibut.

Salsa: I skinned and cut  two small tomatoes into small cubes. I finely chopped Vidalia onion (1/2 medium), jalapeño pepper (1, seeded and veined) and mixed in. Since I did not have fresh cilantro, I used dried (1/2 tsp). I seasoned it with salt and pepper. I then added lemon juice (from one lemon) and olive oil (1 tbs). I mixed and let it stand (at least for several hours).

Risotto: This was an quick risotto from previously cooked and frozen rice (1/2 cup). I used another half of Vidalia onion from making salsa, (1/2 medium, finely chopped) and fresh shiitake mushrooms (4-5, stem removed and finely chopped) and green asparagus (4 stalks, peeled and blanched) with stalk finely chopped and the spear heads set aside. I did mise en place and my wife cooked the risotto.

She first sautéed the onion, mushroom and asparagus (except for the spear heads), seasoned with salt and pepper. After few minutes, she added the defrosted rice and kept stirring until the rice kernels were well coated. She added Japanese sake (or white wine, 5 tbs) and let it evaporate as you stir to almost all incorporated. She then added chicken broth (low-salt, non-fat Swanson chicken broth) in increments as she stirred until it attained creamy consistency (3-4 increments, probably close to 1 cup total). When no more free fluid was present, she added a few pats of butter. After the butter incorporated, she added grated Parmesan cheese and the spear heads of asparagus.

The halibut was nicely flakey and completely cooked. Although the fish itself is rather boring, the dill and lemon scented butter flavors came through and the texture was very nice. The addition of the salsa (this one came out rather spicy due to the jalapeño I used) spiked up the flavor. Of course, you cannot go wrong with crispy skin which we picked up with our fingers and enjoyed. The risotto was, of course,  not al-dente (actually we do not like undercooked risotto) but very creamy with nice flavors (I garnished with thin strips of fresh basil).

Compared to salmon, halibut does not have a strong flavor or oily texture. It does have a nice subtle flavor which can be enhanced by other seasonings and flakey texture. This was probably the best halibut we ever tasted. Compared to oily fish like salmon, I could go with a slightly lower temperature to make it a bit less dry. I’ll try that next time.

Monday, July 14, 2014

White (brown?) almond gazpacho 白い (茶色?)アーモンドガスパッチョ

Some days, in cooking, things just don’t go right, even with items you’ve made many times before. That happened to me one recent weekend when I set out to make baguette. Everything went wrong. First the dough refused to rise sufficiently (even though I had proofed the yeast). I decided to cook it anyway. Somehow I got the wrong temperature and the bread came out “high done” i.e. burnt. So there we were with two skinny burnt baguettes (one shown below).

Surprisingly it still tasted pretty good. I was ready to throw it out and make like the whole thing never happened. But my wife stayed my hand. She came up with this dish based on a recipe from "Cooks illustrated".  This is a gazpacho using bread as the base. It is also supposed to be white (crusts removed) but my wife used my botched bread, dark brown crust, included so the the color is rather tan than white.  The brown (burned) crust added a nice nutty taste to the soup.


Ingredients:
Baguette sliced, enough water to cover the baguette slices
1 1/2 cup toasted sliced almonds
2 garlic cloves
5 tbs. rice vinegar
1 1/4 tsp. salt
1/4 tsp cayenne pepper
1/2 cup extra-virgin olive oil
Seedless grapes cut thin and more toasted almonds for garnish

Soak the sliced bread in the water for several minutes. Process the toasted almonds in a blender until finely ground. Remove the bread from the water and gently squeeze out most of the water. (save the water). Add the bread to the blender with the almonds. Add enough of the soaking water that the bread can be pureed. After the bread mixture has reached the consistency of cake batter, add the garlic, vinegar, salt, and cayenne and continue processing (add more soaking liquid if necessary). Then add the olive oil in a thin steady stream. If the mixture is processed long enough it should be very smooth and creamy. Serve with the sliced grapes and toasted almonds as garnish.

Although the gazpacho was not white, the tan color was very pleasing. It was very creamy with a nice nutty flavor (from the burnt crust). The cayenne gave it a pleasant zing. It was a very filling and refreshing soup for a hot summer day. I took the remaining botched baguette, cut it up and put it in the freezer ready for the next batch of white/brown gazpacho. BTW the next morning, I redeemed myself, by successfully baking 2 baguettes. Next my wife will be asking me to botch a loaf because she wants to make gazpacho.

Friday, July 11, 2014

Cold simmered vegetables 冷製野菜の煮付け

The last time when I was at the Japanese grocery store, I bought a whole daikon 大根. When I came home I found 1/3 of the daikon I previously purchased in the refrigerator. So, I decided to make something from this left over daikon. Although I was not sure what I was going to make, I decided to just prep it. I peeled and cut the daikon into half circles (about 1 inch thick) and boiled them with a small amount of raw rice. After 30-40 minutes, I removed the daikon pieces and put them in a sealable container and placed it in the refrigerator. The next day, I made dashi broth from dried kelp and bonito flakes. I seasoned the broth with mirin and light colored "usukuchi" soy sauce 薄口醤油 and simmered the precooked daikon and carrot (this was not precooked). Although the dish was ready-to-go the weather was extremely hot and humid so the idea of eating a hot dish was not appealing so I placed it in the refrigerator. The next day, I served these vegetable cold. I added a bit more light colored soy sauce since the seasoning gets muted when served cold. Since we had a small amount of left over sou vide salmon, I also served that cold with a dab of Japanese hot mustard.


We were pleasantly surprised at how good and refreshing these cold simmered vegetables were. The dashi broth was very good since I made it without taking shortcuts.


We will make this dish as a regular "teiban" 定番 dish during the summer. We have more left, so we will be enjoying this a few more times.

Tuesday, July 8, 2014

Kelp cured Hamachi はまちの昆布締め

Generally the sashimi-grade fish from Catalina is good but sometimes it can be a bit of a disappointment. The current batch had excellent toro tuna but mediocre hamachi (wild caught) and the premium uni was not particularly great for sashimi (from which I made "Uni and water cress cooked in butter and soy sauce"). After tasting the hamachi as sashimi on the first day, I made this "kelp-cured" hamachi for the next day.


The hamachi shown in the left back arranged to look like a flower and the hamachi between the cucumber and perilla leaves are kelp-cured. The toro shown on the left front was absolutely excellent and "toro aburi"トロの炙り next to it was also great.


The kelp-curing helped the hamachi lose its slight gaminess (gamey because it was not quite fresh enough), firmed up the texture and added a nice additional "umami" from the kelp. This is exactly the same as kelp-cured "amber jack" ヒラマサの昆布締め I posted before.


I sliced the hamachi on the bias relatively thin ("Sogi-Giri" そぎ切り) and placed it in one layer between two sheets of dried kelp. I had previously wiped the surface of the kelp with a moist paper towel. I then wrapped the kelp with hamachi sandwiched between the two layers in plastic wrap and placed it in the refrigerator for several hours.

Although the main reason for kelp-curing is to add more flavor to white meat fish like flounder, it worked to make a somewhat marginal sashimi palatable—good save, team..

Saturday, July 5, 2014

Soft tofu with miso-butter shimeji 掬い豆腐のシメジ味噌バター乗せ

I had a combination of white and brown shimeji mushrooms in the fridge. When we fired up the Weber grill the other day for barbecued  chicken, I also made Miso butter flavored shimeji mushrooms (in an aluminum foil packet on the grill). Because the barbeque that day included other dishes including fish, we only ate a little of the shimeji. Several days later, I made this "otoshi" drinking snack from the left over barbecued chicken (I used the tenderloins) and the shimeji dish. The left below is cold "spooned" tofu (or "Sukui-dofu" 掬い豆腐) topped with miso butter flavored shimeji mushrooms and the right is shredded chicken tenderloin dressed in sesame dressing 鶏肉の胡麻和え.


Chicken: I used two tenderloins from the barbecued chicken which was very moist. I hand shredded the chicken along the grain of the meat.

Sesame dressing: I mixed white sesame past or shiro-neri goma 白練り胡麻 (1 tbs), sugar (1 tsp), mirin (1 tsp), soy sauce (2 -3 tsp), rice vinegar (1 tsp). Tasted and adjusted the consistency by adding more liquid (if seasoned enough, add "dashi"broth or one of the liquid ingredients). As the chicken meat tends to absorb the moisture from the dressing, it is better to have the dressing somewhat liquid and loose. I got lazy and used roasted white sesame as a garnish (you could have added dry roasted and ground sesame in the dressing for a better result).


The sukui-dofu was from a package which I got at the Japanese grocery store. I spooned several spoonfuls on the plate and then placed the leftover shimeji mushroom on top followed by some, thinly chopped scallion, Japanese one flavored red pepper flakes and drizzled "mentsuyu" 麺つゆ noodle dipping sauce from the bottle.

Since I had cucumber asazuke 胡瓜の浅漬け with salted kelp 塩昆布, I added that as well on the side of the chicken. For leftover control, this is decent drinking snack to start.

Wednesday, July 2, 2014

Nattou and tuna chiai spring roll 鮪の血合いと納豆の春巻き

Whenever we get toro tuna from Catalina, it is a challenge to finish the dark red portion of meat called "chiai" 血合い. It is the most undesirable and gamey part of the tuna. In the past, I made chiai, nattou and egg yolk and chiai burger. This time, I made several long cigar-shaped spring rolls from marinated chiai and nattou. I was afraid of how strong this would taste but the end result turned out to be very pleasant and we enjoyed it as the first snack of the evening.


I got this idea after seeing a recipe for red meat of tuna with nattou wrapped in eggroll skin (which is in the first book of the  Japanese Izakaya cookbooks section of this blog).

Tuna chiai: When I prepared the toro, I removed the chiai and cut it into small cubes (1/2-1/3 inch cubes) and marinated in in straight "mentsuyu" 麺つゆ noodle sauce and kept it in the refrigerator for a few days.

Nattou: This was one small package of  frozen nattou which I thawed. I added chopped scallion, mustard (1/2 tsp) and mayonnaise (1 tsp) and the sauce that came with the package. I then combined the marinated chiai tuna and nattou (almost all the marinade was absorbed in the chiai).

Spring roll skin: I cut the square egg roll skin in half to make a long rectangle. I placed the the above mixture along the near end of the spring roll skin and rolled into a cigar shape using a mixture of flour and water as a glue at the three edges. With the amount of the stuffing I had, I could make 5 rolls.

Instead of deep frying, I shallow fried the rolls. I used less than 1/4 inch  of peanut oil in the frying pan. After the oil heated up on medium flame, I placed the rolls seam side down into the oil. I  fried them for several minutes and then turned them over (see below). I fried the other side for another two minutes or so until the spring skins were nicely browned and crispy. I drained the excess oil on a paper towel line plate and served the rolls  in a small wine grass as seen in the first picture.


I did not make any dipping sauce since everything was well seasoned especially the chiai. Despite the combination of two very strong tasting items (chiai and nattou), the frying seems to have brought the flavors under control—this actually tasted rather tame. The nattou was not too smelly or sticky. The marination and cooking also made the chiai rather palatable and, of course, the crispy fried egg roll skin was just great. So this is another good way to consume the chiai of tuna.