Saturday, March 4, 2017

Marinated "Kyu-chan" cucumber きゅうりのキューちゃん

When it comes to cucumbers we much prefer Japanese cucumbers. While not large, they have a rich cucumber flavor and nice crunchy texture. They are quite different from American cucumbers which are large with a thick skin, generally tasteless, and watery. While we really like Japanese cucumbers, they are hard to come by. Sometimes, they are available at the Japanese grocery store but we never see them in the regular grocery stores. In desperation, we even tried growing our own only to discover the existence a nasty insect that snacks on the growing plant and infects it with a bacteria that eventually ends up killing the entire plant. It was heartbreaking to watch perfectly healthy growing plants wither and die just before the ripening cucumbers could be harvested.


For a while, we used English cucumbers, which were much better than the American variety. Several years ago, however, we switched to "mini-cucumbers" when they started appearing in our grocery stores. Although, not as good as Japanese cucumbers, they are the closest thing we can have to the taste and texture of a Japanese cucumber. They come 5 to 6 in a package and it is not easy to use them up before they go bad. So making cucumber salad or pickles is a good means of inventory control. As a result, I am always looking for new pickle recipes. I saw this recipe and decided to try it.

This is called "Kyuri-no Kyu-chan" きゅうりのキューちゃん and appears to reproduce a 
popular commercial product of the same name. I have not tasted or seen the commercial product. It is described on the company's website as first being salt pickled, then washed and soaked to remove excess salt, finally, marinated in a secret marinade (of a special soy sauce mix) with ginger. According to the website, all the processes are temperature controlled (i.e. chilled). Interestingly, all homemade recipes I found use hot (temperature) marinade. In any case, this is the result.


This is after 2 days of marination. The cucumber pieces have gotten darker in color.


The below is the first day after it was made.


Ingredients:
Cucumbers, 6 American mini-cucumbers (see picture below), washed, cut into half inch thick rounds.
Kosher salt

For marinade
Soy sauce 80 ml
Concentrated noodle sauce 20ml
Sugar 1 tbs
Rice vinegar 2-3 tbs
Mirin 2tbs
Ginger, thin julienne, 1tsp
Japanese togarashi red pepper 唐辛子, whole, cut into thin rings, seed removed

Directions:
1. Salt the rounds of cucumber and let them sit for 30 minutes. Wash and pat dry.
2. Place the marinade ingredients in a pan and bring to a boil. Cut the flame and add the cucumber (see below).
3. Let it sit until cooled to room temperature.
4. Remove the cucumber and set aside. Turn on the fire and let the marinade come to a boil.
5. Repeat 2, and 3 three times.
6. Add the ginger and red pepper in the last marinading step.
7. Let it cool to room temperature then place it in a sealable container.


Initially, the marinade appeared too small for the amount of cucumber but the liquid coming out of the cucumber made the marinade more than enough. According to the recipe, the tastes gets better amalgamated after 2 days in the refrigerator.


Although we have never tasted the commercial variety, we really liked this pickled cucumber. It still had a nice crunchiness. The taste was sweet, sour and salty with hints of heat and ginger making this a pickle with a complexity of flavor. We had this as is for a drinking snack but I am sure this will go well with rice.

Wednesday, March 1, 2017

Home made pasta with squid in beer sauce 自家製フェタチーニのイカビールソース

My wife surprised me with a Valentine's day gift of an automatic pasta maker. I had made fresh pasta using a hand cranked pasta machine many years ago but we decide it is not worth the time and effort since the resulting pasta was rather soft and did not have much of the texture. The pasta machine with which I was gifted, was like a bread machine for pasta. Just put in the flour, add liquid  (i.e. egg and water), flip the switch, watch it knead the dough for a while and be prepared to collect the pasta it extrudes in 15 minutes or less. I have to admit I was a bit skeptical about the "extruded" part but since my wife got me a pasta machine, I had to try it. After one failed attempt (too much water results in glop), I successfully made homemade "extruded" fettuccine which had a surprisingly nice firm texture. Since I had a leftover tapa "squid in beer sauce", I used it as a pasta sauce.  I had also just made meatballs, I added one (top in the picture below).


I garnished the pasta with  our favorite spicy Spanish olive oil


I also added blanched broccoli for color and adjusted the seasoning with Kosher salt and freshly clacked black pepper. The long cooking made both the squid bodies and tentacles very tender and flavorful. The fettuccine was nicely chewy and satisfying.


The pasta machine is a small 2 person model made by Phillips.  As per the instructions I used 200 grams of flour (Hodgson mill Semolina Pasta flour, since I could not find straight semolina flour at my grocery store. This flour is a mixture of Semolina and Durham wheat flour). The amount of liquid is 75 grams including one egg. This means the amount of the water you need to add is very small. It mixes and kneads for 3-4 minutes and then it reverses the turning direction of the paddle loading the mixture into the extruder (#1 in the picture. Very clever!). The dough looks very dry and the kneading does not form into a single mass but when it started extruding, it came together (#2 and #3). Since I made the pasta in the morning, I placed it on parchment paper and covered it with a towel (#2 and 3) until noon. This further dried the pasta.


I cooked the pasta in boiling water with added olive oil and salt (#4). I checked several times until still al dente but cooked (probably took 5-7 minutes). I drained and coated with olive oil (#5). I added the pasta to the warmed up squid in beer sauce (#6) and stirred so the sauce would cling to the pasta (#6).

This was much better than expected. The pasta had a nice chewy texture and went well with the squid. I learned that the amount of liquid should be between 75 to 80 grams including the egg for 200 grams of flour.  The amount of pasta it made is supposedly for 2 servings but for us small eaters, half was enough for the two of us. This dough was much dryer than the one I made by hand. I made the first batch too wet like regular hand made pasta dough, but only half of the dough got extruded and the rest remained in the machine. The resulting pasta came out as a blob and could not be separated. The dough has to be fairly dry so that the it will go into the opening of the extruder. I assume that the pasta's firm chewy texture derives from the fact that the pasta is rather dry when extruded and dries further when left out. I have to play with the machine some more (adding olive oil and salt comes to mind immediately). There are also several other dies that I have to experiment with not to mention vegetable juice to substitute for the water. I have to admit that my wife hit on just the right kind of gift to keep me "happily playing the sandbox" for some time to come. We were pretty pleased with the results.

Sunday, February 26, 2017

Squid in beer sauce tapa イカのビールソース煮タパ

We like squid. The only type of squid available in our regular grocery store is relatively small, cleaned and previously frozen. We can occasionally get a frozen, larger whole squid (probably "Surume-ika" スルメイカ) at the Japanese grocery store. In any case, here again, I got a pound of squid from our grocery store. I asked my wife how I should cook it and she reminded me of a tapa dish I used to make frequently but have not made in a long time. So, I consulted my tapas cookbook  and made this squid in beer sauce.


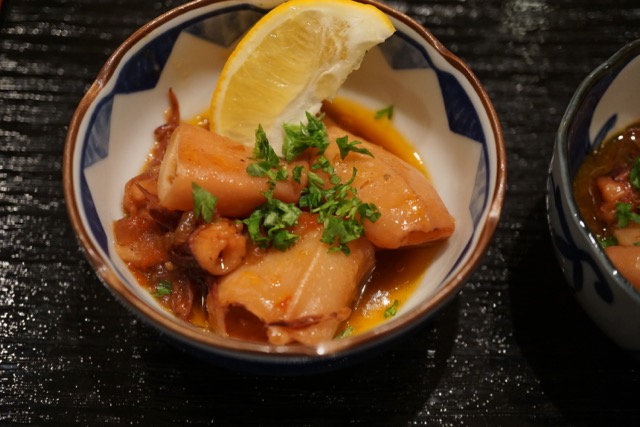
The recipe calls for small squid (less than 4 inches long). Many of the squid I had just bought were that size but some were larger so I cut them into two or three pieces. I served the dish at (room temperature) garnished with a wedge of Meyer lemon and chopped parsley as a small starter dish.


This went well with the Tempranillo we were enjoying (Ribera del Duero 2010 Matanegra Vendimia Seleccionada, WA 92 points).

Ingredients:
1 lb small squid tubes and tentacles, cleaned. If much larger than 4 inches long cut into several pieces.
1  medium sweet onion, finely chopped
3 cloves of garlic, crushed and peeled
1 bay leaf
1 medium tomato, skinned, seeded and chopped (I used 5 skinned Campari tomatoes)
4 tbs olive oil
Salt, pepper and sugar (1/4 tbs)
1/2 cup beer (I used rather hoppy Samuel Adams Brown ale)

Directions:
1. I put 2  tbs of olive oil in a sauce pan on a low flame and added the garlic stirring until fragrant and starting to turn color and added the onion and let it gently cook for 10 minutes with a lid on (#1 below).
2. After the onion was cooked, I added the tomato, bay leaf, sugar, salt and ground black pepper (#2) and kept cooking for another 5 minutes uncovered.
3. In a shallow casserole (I used my antique Pyrex ware), I added 2 tbs of olive oil and heated on a medium flame and sautéd the squid (#3) for 2-3 minutes and added the beer (#4), covered, lowered heat, and simmered for 10 minutes.
4. I added the onion-tomato sauce (#5), covered and cooked another 25 minutes (#6).
5. I removed the squid to a plate and set aside. On a medium flame, I reduced the sauce in half or until thickened (#7).
6. I returned the squid to the pan and cooked 10 more minutes (#8).


The squid was very tender and the sauce was great. My wife reminded me that we used to use this as a pasta sauce.

Thursday, February 23, 2017

Artichokes hearts アーティチョークハーツ

While we lived in California, fresh artichokes were so readily available. We enjoyed them often. But after moving East, we do not frequently see good artichokes in our grocery stores. The other day, I spotted some good small (not "baby") artichokes. I have posted several artichoke recipes;  large ones, baby ones but this one falls in-between.  I served this simply with mayo, a wedge of lemon, skinned Campari tomato, and some pork meatballs that I made. I served this as a starter dish with red wine.


I did not take pictures of the preparation of the artichokes but it was prepared in a manner similar to the large artichokes I posted before.  Using a long sharp knife, I went around the outside of the artichoke to remove the hard petals. I then removed the top and removed the skin of the stalk and the base. I immediately placed it into acidulated water (lemon juice added to water) to prevent discoloration. I added wedges of lemon (after squeezing the juice), a medium onion, peeled and quartered, whole pepper corns, a splash of olive oil, and a few bay leaves. I boiled the artichokes on a medium low flame of 40 minutes or so or until the base could be easily pierced. I let them cool down in the simmering liquid. After they cooled to the room temperature, I  cut them in half. Using a spoon, I then removed the chokes (see below).


These were not baby artichokes so the chokes had to be removed. The young inner petals, however, were edible and I did not remove them (see below).


Since we have not had artichokes for a long time, we decide  to have it simply with lemon and mayo. The artichokes hearts have such a unique flavor. During our time of eating artichokes in California, we discovered chasing a bite of artichoke with a swig of water enhances the unique artichoke flavor for a second time and really adds to the enjoyment of the dish. As we may have said before, whomever first ate this huge thistle bud known as artichokes must have been really hungry but it turned out to be a delicacy. This was perfect starter for us.

Monday, February 20, 2017

Three cheese Jalapeno cheddar roll ハロペニョとチェダーチーズロール

At the near-by Whole Food grocery store, Jalapeno cheddar rolls are only available on weekends when the local football team is playing. My wife really likes this cheese bread. The last time we happened to be in the the store, the bread was available. My wife went "wild" and bought four loaves thinking she would cache them in the freezer, so they would be available on non-game weekends. Unfortunately, unlike previous batches, the person who made this batch was extremely heavy handed with the jalapeno. The heat was so intense, it could have caused spontaneous combustion of the mouth. We couldn't eat it. With great regret my wife gave away the loaves to friends with asbestos tongues who thought the heat was wonderful.

My wife was very discouraged because she didn't think she could have faith that the bread she purchased would be an edible batch. I encouraged her to make Jalapeno cheese bread herself. I told her that I could remove all the veins and seeds from the Jalapeno before mincing so that we would have only fresh pepper flavors but no heat. I also pointed out that she could then have the cheddar rolls whenever she wanted them, not just on football weekends. (I didn't mention that I too secretly looked forward to the availability of homemade cheddar rolls). So, one weekend, she made her own version of  Japaleno Cheddar rolls or,  I should say,  Japapeno double cheddar, triple cheese rolls. They were double cheddar because the bread itself had cheddar cheese in it as well as the filling. Triple cheese because she used two different kinds of cheddar as well as a gouda. She decided to include cheese in the bread itself because she had noticed one of the reasons the Jalapeno rolls from Whole foods was so hot was because the bread itself had jalapeno in it. So she decided if the goal was cheesy flavor go all out and include cheese in the bread too.


My wife also added finely chopped and caramelized onion.


Ingredients:
(for bread dough)
4 cups of bread flour
1 3/4 cup milk, scalded
1/2 cup water
3 tablespoons butter, unsalted
2 tablespoons sugar
1 tbs salt
2 packages dry yeast
2 cups shredded Irish cheddar

(for stuffing)
4 fresh jalapeno pepper, seeded and deveined, finely chopped
1 onion, finely chopped and caramelized in olive oil
2 cup total, grated smoked gouda and double Gloucester cheese

Directions:
Put bread flour in mixing bowl. Combine the milk, butter, sugar, and salt in a sauce pan.
Scald milk and dissolve the butter, sugar, and salt. Let cool to about 110 degrees.
Meanwhile proof the yeast in the 1/2 cup water with a 1/2 tsp sugar added.
Turn on the mixer and add the liquid ingredients.
After they have been incorporated slowly added the grated cheese until it is incorporated. Add additional flour a little at time until a dough clings to hook and cleans the sides of the bowl.
Continue kneading on speed 2 for 7 to 10 minutes.
Place in greased bowl. Cover and let rise until doubled.
While dough is rising caramelize the onions, prepare the jalapeno and grate the cheeses.
Punch down dough and roll out into a rectangle about 1/4 inch thick.
Spread the onions, jalapeno and cheese evenly over it making sure to get to the edges (#1 and #2).
Roll the dough into a log (#3). Cut crosswise (#4). Put in a heavily greased pyrex pan. Let rolls rise until doubled in size (#5).
Bake in a 375 degree oven for 20 to 25 minutes (#6).


This was a resounding success and decadent beyond belief! While baking, we could smell cheddar and fresh jalapeno.  This was a very good roll. It had a soft texture with a nice cheesy cheddar-y bread and fresh jalapeno pepper taste but no significant heat (thanks to my careful removal of veins and seeds). You also can't go wrong adding the flavor of caramelized onions. Although we are not a football fans, this could have been a perfect snack for watching the Super bowl.

Friday, February 17, 2017

Salmon salad sushi 鮭のサラダ寿司

After my wife had sushi made with tuna salad ツナサラダ (canned tuna dressed in mayo) in Japan, she was convinced that mayo and sushi rice are a good combination. We tried hand rolls of sashimi tuna dressed in mayonnaise which was quite good. I also made "imitation" negi-toro 擬制ネギトロ from low quality frozen yellow tail tuna using mayonnaise. I then made a "donburi" with it  ネギトロ丼 which was also very good. One evening, my wife, all of the sudden, asked me to make sushi out of my salmon salad as an ending dish. I often make salmon salad from leftover salmon after we have a salmon dinner. The version of salmon salad we had was made from  flaked cooked salmon, chopped sweet onion, celery, and fresh dill dressed with mayo, Dijon mustard and the Greek yogurt my wife makes. We usually eat this as a sandwich or a canapé.  I complied with her request and made salmon salad sushi.


I garnished it with thin slices of cucumber.


I made it in "Gunkan" 軍艦 or battle ship style. I just used our frozen rice which I microwaved and then dressed with sushi vinegar. This is not the best sushi I have ever had but it was certainly quick and more than just edible.


Having this dish, further confirmed my wife's belief that sushi rice and mayo are an excellent match, and I have to agree. This was an impromptu "shime" 〆 ending dish and it was quite good. Now, she is lobbying me to make "egg salad" sushi, we will have to see.

Tuesday, February 14, 2017

Butter bit rolls バターロール

This is another of my wife's baking "specials". She is always on the look out for a new and interesting baking recipe. This is based on the recipe she saw on-line. It was a bit complicated but the end result was really good.


As you can see, there are some layers and butter bits were incorporated in each layers.


Ingredients (Makes: 24 rolls)
2½ cups all-purpose flour, plus more for work surface
1 (¼-ounce) packet instant yeast
¼ cup sugar
1 tablespoon kosher salt
6 ounces warm milk
1 egg
½ stick unsalted butter, softened, plus ½ stick, cold, plus ¼stick, melted, for brushing

Direction:
1. Combine flour, sugar, salt and yeast in a large bowl. Use an electric mixer fitted with dough hook to mix on low speed as you slowly pour in milk. Once the dough pulls away from sides of bowl, add the egg and softened butter. Mix on medium until dough is smooth and elastic, about 10 minutes.

2. Place dough in a lightly oiled large bowl. Cover bowl with plastic wrap and then with a kitchen towel. Set aside in a warm place until dough doubles in size, 2-4 hours.

3. Pull dough up, then press down to release air bubbles. Turn dough onto a floured surface. Roll out into a 9-by-12-inch rectangle. Slice cold butter into 8 pieces and arrange over dough, leaving a wide border all around (#1 picture below).

4. Fold one-third of dough over center, then fold opposite third over first. Lightly flour dough, then roll out into a 9-by-12-inch rectangle. Lightly brush dough with warm water, then fold dough in half. Cover and place in refrigerator for 30 minutes. (#2 and #3 in the picture below).

5.Preheat oven to 350 degrees. Roll dough out into an 8-by-12-inch rectangle. Flour dough, then cut into 24 square pieces (#4, #5 and #6). Arrange on a parchment-lined baking sheet, at least 1 inch apart. Let dough rise, uncovered, until doubled in size, about 20 minutes. Bake rolls until golden, 13-15 minutes (#7 and 8). Brush rolls with warm melted butter before serving.


The butter ended up unevenly distributed. We think it might be better to cut the butter thinly and distribute more evenly.

Nonetheless these rolls are pretty good. With nice soft consistency with butter flavor. Certainly good for the holiday dinners.