Most recent post

Tuesday, April 26, 2022

Potato mozzarella croquet モッツァレラチーズいりコロッケ

My wife was inspired to make these cheese croquets after viewing a similar dish on Webspoon (Youtube). Of course, ingredients and directions are hard to remember since there appears to be no written recipes for Webspoon. This recipe (as shown on the web site) was mashed potatoes with some starch, salt and grated parmesan cheese added. Mix and make discs, place mozzarella  cheese on one disc and cover it with another to make cheese enclosed by potato and fry it. My wife decided to make this dish and as usual took the web recipe as advisory. For the potatoes, she used her gnocchi recipe. The picture below shows the result; crusty outside, soft creamy potato with melted mozzarella cheese oozing out. This is a good version. As usual, I will ask my wife to take over. 


Ingredients:
16 oz. of mashed potatoes* (3 cups) 
4 oz. of AP flour (3/4 cup)
1 egg
1 tsp. salt

Low-moisture while cow’s milk Mozzarella cheese

*The mashed potatoes are made from russet potatoes wrapped in aluminum foil cooked in the Weber when we cook either pork or chicken. My wife then removes the potato skins, mashes them in a bowl and adds about 1/2 stick of butter, 1/4 cup cream cheese and chives, salt and drippings from barbecued meat. (These are pretty luscious mashed potatoes as is, especially wrapped in crispy chicken skin.)

Directions:
Put the potatoes through a potato ricer to remove any remaining clumps not previously mashed. Add the remaining ingredients and mix until it forms a dough. (Shown in the bowl in #1. You may need to add more flour until the dough forms.) Form a patty and put it on a parchment paper covered cookie sheet. Put the cheese (also shown in the lower right in #1) on the patty. Take another clump of potato mixture put it on top of the cheese covered patty and seal the edges. After the patties are formed dredge them in flour (#2). Fry the patties in peanut oil (#3) until they are golden brown (#4). 


These are a great way to eat potatoes. The potatoes themselves have great flavor from the cream cheese, butter and barbecue meat drippings. They have a nice crispy outside texture and a soft creamy interior. Also, there is no way to go wrong with the added feature of cheese oozing out. They also crisp up nicely in the toaster oven. 

Wednesday, April 20, 2022

Carrot soup with shrimp エビ入り人参スープ

 This is an impromptu dish I made one weekend for lunch. We bought a bottle of carrot juice sometime ago with the intension of making the carrot curry shrimp dish. But I did not have a chance to make it and the carrot juice passed “used best by” date by a few weeks. Not to be deterred by a “hypothetical (?)  best by” date wife cautiously tasted it and declared it perfectly good. She suggested using it to make a carrot soup. So, I came up with one based on what we had in the refrigerator.  I added boiled shrimp to the soup and served it with a potato muffin my wife made some time ago.


I made the soup the day before I served it. When I served it I added some cream and warmed it up. My wife suggested adding shrimp which was in line with the carrot shrimp curry we were originally planning to make. This was a perfect suggestion since we had frozen shrimp which was also past its “best by” date. The shrimp was shell-on. I gently poached them shell on in salted water with some sake then removed the shell. I garnished the soup with chives.


This is not following any recipe and I just winged it.


Ingredients:
450ml (15.2oz) bottle of carrot juice
4 medium carrots, peeled and cut into small cubes/coins
1 medium onion, finely chopped
2 parsnips, peeled and cut into small cubes/coins (I added this because I had it and it was passing it’s peak)
2 small red potatoes, peeled and cut into small cubes
1/2 tsp fresh ginger, peeled and chopped finely
1 cup (or just enough to cover the vegetables) chicken broth
1tbs olive oil
Salt and pepper to taste

6 shrimp, poached and shelled (optional)

Directions:
Add the olive oil in a pan on medium flame, add the onion and cook for several minutes or until soft but not browned. Add the carrot, parsnips, potatoes and ginger. Add the chicken broth to just cover the vegetables. Simmer for 30 minutes or more until all the vegetables are soft. Add the carrot juice and cook for a few more minutes. Using either a food processor or immersion blender, process until the soup is smooth. Season with salt and pepper.


Just before serving, add the cream to your liking and warm it up. Add whatever topping and garnish.
This was a good soup especially since I made it not using any recipe. We did not taste the ginger but the taste of parsnips came through. There was enough carrot flavor to tell this was a carrot soup. It went well with the potato muffins and was perfect lunch.

Sunday, April 17, 2022

Chicken curry with navy beans ネイビー豆入りチキンカレー

This is another one of my wife’s curry projects. This is a chicken curry based on a recipe in Madhur Jaffrey’s “Quick and Easy Indian Cooking.” The original recipe calls for lentils but we did not have any. So my wife used canned navy beans. The addition of navy beans really worked adding a creamy texture to the sauce. My wife put just enough “heat” in addition to all the other spices. One of the best curries she made.


Ingredients: (shown below with little easter bunny to commemorate the season)
6 tbs. Oil
3 bay leaves
5 whole cloves
6 cardamon pods
1 cinnamon stick about 2 inches long

2 or 3 onions diced
2 cloves garlic finely chopped

1/2 tsp. Turmeric
2 tsp. Salt
1 1/2 tsp garam masala
1 1/2 tsp. Lemon juice

1 1/2 tsp cumin seeds
1 tsp ground cumin
1 tsp ground coriander
1/4 tsp cayenne pepper
12 cherry tomatoes
1 can of white navy beans
6 oz. Green beans cut into 1 inch lengths
4 chicken thighs

Directions:
Put the ingredients from the oil to the cinnamon stick in a frying pan and heat until the bay leaves turn dark and the other spices bloom and become fragrant. Remove all the whole spices except for the bay leaves and cinnamon stick. (These can stay because they are easy to spot and there’s no chance someone might eat them by accident.) Add the onions to the spiced oil and cook until they start to brown slightly. Add the garlic and cook (careful not to burn). Next add the turmeric through lemon juice and cook until they bloom and become fragrant. Then  add and bloom the next spices—cumin seeds though cayenne pepper. Add the green beans, navy beans and tomatoes. Stir them into the sauce. Add the chicken and turn it over until coated in the sauce. Nestle into the sauce leaving it skin side down. Cover and cook gently on simmer for about 30 minutes. Then turn the chicken over and coat with the sauce. Continue cooking until the chicken is done about another 30 minutes for a total of 1 hour cooking. 


This was truly one of the best curries my wife has made. The beans absorbed the spice flavor and partially dissolved into the creamy sauce with some left whole to add a texture element. The spices provided layers and depth of flavor. The cayenne added just the right amount of zing to provide an interest that slowly built on the tongue. The chicken was flavorful and tender. This will become a regular in our repertoire. 

Tuesday, April 12, 2022

Hot cross buns 2022 ホットクロスバン 2022

It has been customary every year when Easter approaches, for my wife to make hot cross buns  (mostly without the sugar frosting cross, because the buns are sweet enough without it). This year was no exception. This year the recipe came from the heavy hard covered cookbook called “Bouchon Bakery Cookbook”. To me, this one looked like the most complicated recipe for hot cross buns I’ve seen my wife make over the years. Nonetheless it tasted very good and had a very nice texture.


This recipe calls for a lot of butter and multiple foldings. You can sort of see the multi-layering on the curt surface.


Ingredients: (#1)
Flour 372 g (2 1/2 cups)
Yeast 8 g (2 3/8 tsp)
Sugar 44 g (3 tbs. + 2 tsp)
Salt 9 g (1 1/2 tsp.)
Eggs 186 g (2 eggs)
Whole milk 63 g (1/4 cup)
Butter 167 g (5.8 oz) cut into small cubes
Raisins 122 g (3/4 cup)
Dried cranberries 61 g (1/2 cup)
1 tsp. Vanilla

Ingredients doubled:
Flour 744 g
Yeast 16 g (4 3/4 tsp)
Sugar 88 g (7 tbs. + 1 tsp)
Salt 18 g (3 tsp.)
Eggs 372 g (4 eggs)
Whole milk 126 g (1/2 cup)
Butter 334 g (11 oz) cut into small cubes Raisins 244 g (1 1/2 cups)
Dried cranberries 122 g (1 cup)
2 tsp. Vanilla

Directions:
Combine the fruit in a bowl and pour 2 cups of boiling water over it. Let sit for 5 minutes then drain and pat dry with paper towel. Set aside. Add all the other ingredients but the butter to the bowl of a stand mixer with a dough hook. Mix until a paste-like dough forms. Add the butter a piece at a time and incorporate into the dough. (At this point it will look like that will never happen since there seems to be more butter than flour mixture to incorporate it into.) When all the butter is incorporated mix on speed 2 for 7 to 10 minutes. Pat the dough into a rectangle and spread the fruit evenly over it (#2). Fold the dough into thirds as an envelope fold. Press the dough out into a rectangle again. Turn the dough 180 degrees and do another envelope fold. Press into a rectangle, turn and fold again (#3). Pat into a loaf and place in a lightly oiled bowl turning to coat with the oil and placing it seam side down (#4). Cover and put in proofing box at 75 degrees and let rise for 45 minutes. Remove from bowl and repeat 2 more folds. Return to bowl to rise another 45 minutes. Remove from bowl and divide into 12 equal portions, (24 equal portions for doubled recipe). Roll the divided portions into bun shape and place evenly spaced on a cookie sheet lined with parchment paper. (Next time I will just cut into squares. This will require less working of the dough and make the number of folds more evident in the final product). Cover the pan and let rise until rolls are touching each other. Coat with egg wash and bake in 350 degree oven for 18 to 22 minutes until golden and toothpick comes out clean. Let cool on a rack.


These were indeed fairly complicated muffins. The hardest part was incorporating all the butter. At one point it looked like it wouldn’t happen. But it did. The muffins themselves are luxurious. The texture is dense but very soft. The numerous foldings made very fine layers. They were sweet but not too sweet. (They would have been sweeter if we had added the icing). The fruit adds another texture and a slight vanilla flavor. These are really quite something and worth the effort. 

Friday, April 8, 2022

Salmon cake with rapini サーモンケーキ

 After we switched to grocery home delivery, we realized some of the items were different from the ones available at a physical store. One of them is a whole half filet of salmon with skin on (around 2.5 lbs.) which appears to be only available for home delivery. The price per pound is more reasonable compared to smaller filets available in the store. We like every part of the salmon even the skin particularly when cooked to crispiness.  Interestingly the salmon is not scaled when it arrives. So one of the first things I have to do is to scale it using a handy-dandy Japanese fish scaler. (I guess the grocery store reasons that most customers don’t like the skin. They just remove it and throw it away so why take the time to scale it.)  Another part of this type of fillet that we particularly like is the belly portion which we eat as a small hors d’oeuvre . We also like the main portion of the fillet dried in the fridge for a few days before panfrying it .  (Drying the salmon in the fridge was a technique my mother introduced to us. On one of our visits to Japan my mother offered to cook some salmon she dried with the enticing phrase “Totemo oishi WA” delivered with an emphatic nod of her head. Even my wife knew this meant, “it’s really good” and it was.) Drying the fish obviously removes some of the moisture and in so doing improves the flavor. 

I usually end up with several portions of salmon in irregular shape from both the belly and tail end of the fillet. I remove the skin and and make salmon cakes with these portions. I usually make 4 cakes which are perfect for lunch or snack. This time, I served this as a small dish to go with red wine. I heated up the cakes in a frying pan, added blanched and chopped rapini and made sauce with brown butter and lemon juice. To make it more interesting, I added yuzu-kosho 柚子胡椒 which went remarkably well with this dish.


I followed this with fried shrimp heads  reheated in the toaster oven (this was a part of take out sashimi/sushi combination from Tako Grill the night before)  and the usual simmered root vegetables I make (lotus root, burdock root, carrot, bamboo shoot, and shiitake mushroom (dried). The greens are blanched sugar snap in salt broth.


Salmon cakes

Ingredients: (make 4 small salmon cakes)
150 gram salmon meat, half finely chopped (to hold the cakes together) and another half coarsely chopped (to add texture), amount is variable, whatever I have when preparing the whole half filet of the salmon.
1 small shallot (or onion) finely chopped (#1)
1 jalapeño pepper, seeded and deveined, chopped finely (#1, optional)
2 fresh shiitake mushrooms, stems removed and caps finely chopped (optional, this time I did not have fresh shiitake)
2-3 tbs of panko Japanese bread crumbs (#4, adjust the amount based on the consistency of the mixture)
1 tbs mayonnaise (#2)
1 1/2 tsp Dijon mustard (#2)
Lemon juice from half a lemon
1 tbs chopped fresh dill (#2), I use the dill I cleaned and froze)
Olive oil for frying the vegetables and the salmon cakes


Directions:
Sauté the onion, pepper and shiitake mushroom in olive oil, season with salt and pepper, let it cool down before mixing with other ingredients.
Mix the remaining ingredients except for the panko (#3), add panko to adjust the consistency of the cakes (#4).
Make round disks (#5) and cook with olive oil in a frying pan, several minutes on each sides until brown and cooked through (#6).

This is a good dish to have. The leftover cakes can be warmed up in a frying pan or in a toaster oven. You could make some kind of sauce as I did here or just a squeeze of lemon juice. They go great with red wine.

Tuesday, April 5, 2022

Cabbage stir fried Japanese style 日本風キャベツと油揚の炒め物

This is a simple Japanese family-style cabbage dish which my mother used to make. I thought I must have posted this before but obviously I did not. When we celebrated St. Patrick’s day this year we had a sort of Irish dinner with Shepherd pie, Irish soda bread, and I contributed this cabbage dish to complete the meal. This is a vegetarian dish since instead of meat, deep fried tofu or “abura-autge” 油揚げ is used. I also added onion but it was most likely not included in the original recipe. The seasoning is a typical Japanese one; soy sauce and mirin. This can be a drinking snack or accompaniment for rice (in that case, more soy sauce is called for). 


 I made. this with the center portion of cabbage I had left in the refrigerator. Since I was trying to use up the last of the cabbage, I made a bit more than I intended.


Ingredients: (The amount of the ingredients are arbitrary)
Cabbage, thinly sliced, soaked in water for 10 minutes and then moisture removed in a salad spinner (#1).
Deep fried tofu (abura-age), rinsed in hot water to remove excess oil, cut in half and sliced into thin strips (#2).
Onion, cut in half and thinly sliced (#3).
Vegetable oil with a dash or dark sesame oil for stir flying (#4)
Soy sauce and mirin as seasoning.

Directions:
Add the oil to a wok on medium-high flame
Stir fry the onion for a few minuets and then add the cabbage and continue cooking or few more minutes or until the cabbage softens.
Add the mirin and then soy sauce. Add the seasoning to taste.


This is a nice side dish and a nostalgic reminder from my childhood. 

Saturday, April 2, 2022

Firefly squid grilled in miso-scallion sauce ホタルイカのネギみそ焼き

 One of the delicacies of Spring in Japan is firefly squid or “hotaru-ika” ホタルイカ.  Like last year, we got boiled firefly squid from Regalis Food. Since I started seeing “Hotaru-ika” in the Japanese food blogs I follow, I checked the Regalis site but they were not available yet so I asked to be notified when they came in. A few days later, I got an email saying firefly squid was available. I looked for something else to purchase from their site but nothing drew my attention so I decided to fill out the order with two packages of the squid. A major part of the preparation of this squid is removing the stone hard eyes and beak before serving/cooking. (It is more difficult to remove the beak than the eyes. Unfortunately I was not completely successful in beak-removal on some of the squid as my wife so kindly pointed out to me after crunching down on several of the ones I accidentally left behind). I served the firefly squid with “sumiso” 酢味噌 with “wakame” 若芽 seaweed twice which is the most common and basic way to enjoy this. For some reason, this year’s firefly squid tasted better than the ones we got last year. Since this is such a simple way of serving the squid the quality really makes a difference. I then proceeded with other preparations to serve.

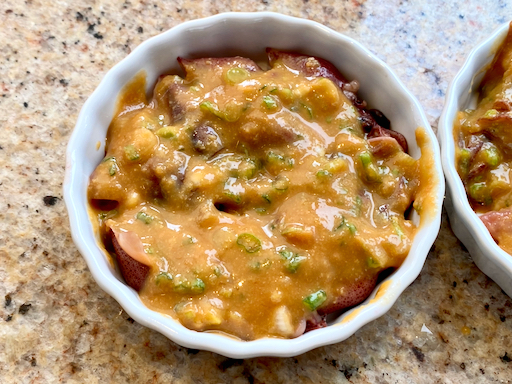
One of those new preparations is shown below;  “firefly squid grilled in miso scallion sauce”. This is a perfect drinking snack and went so well with the cold sake we were having. 

The recipe came from e-recipe (in Japanese).

Ingredient: (for two small servings)
Firefly squid, about 20, both eyes and beak removed.

For sauce:
Scallion, finely chopped, about 2 tbs
Miso 1tbs
Japanese “dashi” broth 1tbs
Sugar 1-2 tsp
Soy sauce and white sesame (small amount, optional)

Directions:
Mix the all ingredients for the sauce (taste and adjust the amount of sugar and broth).
Place the firefly squid in a single layer in a oven-proof ramekin (picture below).


Cover the squid with the miso sauce (picture below).


Cook in the toaster oven until the surface becomes brown (6-7 minutes in toast mode). If needed, broil the surface for additional browning. Serve immediately.


Since grilled miso by itself is great with sake, this combination with firefly squid makes this dish perfect.