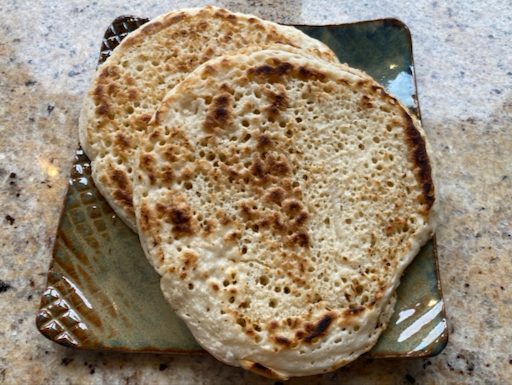
This is the 4th version of crumpet we (my wife) made. She essentially combined V2 ingredients with V3 cooking method. She got much better at regulating the flame and made really good crumpets. Compared to thin and small crumpets (V2), V4 has nice crunchy crust but much softer inside. We liked V2 flavors and liked cooking method of V3 (using an 8 inch frying pan). So, this is culmination of all the good aspects of crumpets we made.
Ingredients:
(makes 7, 8 inch crumpets)
2 cups AP flour
1 cup plus 2 Tbs. cake flour
600 ml. warm water
1 1/2 tsp. Salt
2 tsp. Sugar
3 tsp. Baking powder (The recipe said baking soda doesn’t work as well)
3 tsp yeast
3 tbs. warm water
Directions
Bloom the yeast in the warm water. Put the flour, water and salt in the bowl of an electric mixer and beat on speed 5 for 1 minute until smooth paste forms. Add the yeast mixture, sugar and baking powder and mix on speed 5 for another 30 seconds. Cover with cling wrap and put in a warm place for 15 to 30 minutes. The surface should get foamy but it will only increase in volume by 10 to 15 % (#1 picture below).
The whole secret of getting the little holes in the crumpets is in the cooking. (They need a burst of heat at the beginning of the cooking process for the water in the batter to form steam bubbles which create little holes when they burst on the surface of the cooking batter.) Put 1 tsp. butter in an 8 inch skillet and heat on low for at least 5 minutes. Increase heat to medium and heat skillet for an additional 1 minute. Increase the heat to high and immediately pour enough batter into the skillet to cover the bottom. (This will give the batter a burst of heat to start the bubbles forming.) After the batter is in the pan quickly reduce the heat to medium low and contiue cooking until the edges are risen, set and beginning to dry out (about 4 minutes). Keep checking the bottom to make sure it isn’t burning. Take skillet off the heat. Place a dry flat spatula on top of the crumpet and pull up sharply to remove the excess batter and reveal the underlying holes (#2). Turn the crumpet over (#3). Return to the heat on medium until the edges on the second side are lightly browned. Remove to cooling rack (#4). Wipe any crumbs out of the pan. Add a little more butter. Turn heat to high pour in more batter and repeat cooking process.
As can be seen in the picture 3 the bottom of these crumpets came out nicely lightly browned. These crumpets were really good. They had better flavor than V3 because the batter was cooked in butter, which gave it a browned butter taste. In addition we avoided the last step in V3 of adding additional water. We used the batter straight from the proofing stage. As a result it still made the required bubbles but the lovely yeast flavor came through. The texture of V4 was better than the texture in V2 because of the addition of the cake flour. When toasted the surface was crunchy with a browned butter taste. The interior was soft with a nice yeasty flavor. Slathered with butter that dripped into the many holes that formed in the cooking process this made a really nice breakfast bread.
As can be seen in the picture 3 the bottom of these crumpets came out nicely lightly browned. These crumpets were really good. They had better flavor than V3 because the batter was cooked in butter, which gave it a browned butter taste. In addition we avoided the last step in V3 of adding additional water. We used the batter straight from the proofing stage. As a result it still made the required bubbles but the lovely yeast flavor came through. The texture of V4 was better than the texture in V2 because of the addition of the cake flour. When toasted the surface was crunchy with a browned butter taste. The interior was soft with a nice yeasty flavor. Slathered with butter that dripped into the many holes that formed in the cooking process this made a really nice breakfast bread.


No comments:
Post a Comment
When you post a comment on the post, it does not appear immediately pending moderation.