Most recent post

Monday, September 28, 2020

Salted and grilled mackerel 鯖の塩焼き

 Come to think of it, I never cooked mackerel this basic way. When I got two whole Spanish mackerels from HMart via Instacart, there was too much to make it all into the miso-simmered dish 鯖の味噌煮 I usually make. So, I took two filets I prepared from the smaller of the two fish and made this salted and grilled mackerel. I filleted the fish and removed the small pin bones. Then I cut one filet into two and salted both sides. I let it stand for 10 minutes and blotted the surfaces using a paper towel. I made shallow cuts on the skin and re-salted it. Since I do not have a Japanese style fish grill and I did not want to cook fish in the toaster oven, I sautéed the fillets in a frying pan with a small amount of olive oil.


This is a basic simple way of cooking mackerel but it was good. On the side, I added sliced mini-cucumber (salted and moisture squeezed out) dressed in sushi vinegar. Since we had just harvested and pickled myoga, I added it too. This could have gone very well with rice. We had it as a drinking snack with cold sake.

Friday, September 25, 2020

Mackerel ball soup with myoga flowers 鯖のつみれ汁と茗荷の花

We used to get whole Spanish mackerel 鯖 or サワラ at Whole Foods but recently it has not been available.  We discovered we could get mackerel as well as many other asian food items from a local Korean market called “HMart”.  Although their main focus is Korean food, they also carry Japanese food items that are not available elsewhere. In this time of Covid, we are using a delivery service (Instacart) to "shop" HMart and it has opened new horizons for us. 

One weekend, we got 2 lbs. of Spanish mackerel which consisted of one large and one small mackerel. As usual, I prepared the fish "san mai-in-orosu” 三枚におろす meaning into three layers i.e. two filets and the remaining bone. I removed the small pin bones from the filets.  I made most of the larger mackerel filets into miso-simmered mackerel 鯖の味噌煮. With the filets of the smaller mackerel, I made a salted and grilled mackerel dish 鯖の塩焼き(subject of a future post). 

The third and final part of the preparation involved the remaining bone. I removed the meat clinging to the bones by scraping it off using a small spoon. (This is a classic Japanese technique used mostly for tuna to make sure no meat of the fish is left behind). I made the scrapings into fish balls for our usual fish ball soup or 鯖のツミレ汁 which I served as lunch one day. I rounded out the soup by adding Japanese udon noodles (we happened to have noodles already cooked), silken tofu I got from Tako Grill (beside take-out, tako grill now sells some Japanese groceries), shiitake mushrooms and topped it with myoga flowers we just harvested and freeze dried “mitsu-ba” ミツバwhich was also from Tako grill.


Unfortunately, you cannot see the fish balls because they sank to the bottom.


Although the freeze dried mitsuba did not have much flavor, the myoga flowers did. They had the subtle bitter flavor characteristic of myoga. The only way it is possible to eat myoga flowers is getting them from myoga grown in your own backyard. The flowers are extremely perishable so once the myoga blooms, it immediately loses its commercial value. It has been some time since we have been able to experience the luxury and subtle taste of myoga flowers. 

Tuesday, September 22, 2020

Myoga harvest 2020 冥加の収穫 2020

Last year, we could harvest only a few myoga (or myouga 冥加) from the new myoga rhizomes we planted in the spring of 2019 to replace the ones that had mysteriously disappeared. But this year we finally got a good harvest. This harvest was much later than usual; mid September instead of early August as in previous years. Nonetheless the myoga buds were much larger and well formed. To harvest myoga, these edible buds are under ground just below the surface. The only way to harvest them is to scrabble in the dirt with your bare hands to find them with your fingers and then dig them up. My wife is skilled and persistent at finding myoga. She can go over a patch I just harvested and dig up many more. She did comment, however, that harvesting myoga wrecks havoc on her manicure. (News Flash! She admitted she has never had a manicure). So, the below is this year’s harvest.


A few had already flowered but we harvested many just in time. I decided to leave the small ones to enjoy fresh. I made the remaining myoga into pickles (pickled in sweet vinegar). Since this year's myoga were large, I decided to halve them before making them to pickles. By halving them, I could clean them better as well.


Ingredients:
Myoga (we probably had about 4 cups), cleaned and halved (or whole if they are small)

For sweet vinegar (combine the below in a pan and heat and melt the sugar and salt)
1 cup rice vinegar
1/2 cup sugar
1/2 tsp salt

Directions:
In a sealable  container, add the myoga and the sweet vinegar. It may not completely cover the myoga but myoga will exude water and in few days, all myoga will be covered. Seal the lid and refrigerate. It can be eaten after 3-4 days. In the previous post 10 years ago, I said this will keep for at least several weeks but we have eaten the previous batch for at least 3 years. After one year, all the red color was bleached out but it was still good.

We are so delighted to have a decent myoga harvest! We had cold silken tofu (hiya-yakko 冷奴) with thinly sliced myoga and bonito flakes. Myoga has such a distinct flavor which we really missed.

Saturday, September 19, 2020

Scallops "Isobe-yaki" 帆立の磯辺焼き

We recently succumbed to one of the advertising emails we frequently get from Great-Alaska seafood. This time, the deal was 2 lbs each of wild sockeye salmon filet, colossal sea scallops and jumbo shrimp. Since the deal included three different seafoods, we thought we could handle it and ordered it. When the shipment arrived, I decided to try the scallops first. The scallops were a good size (so-called diver scallops) and nicely coated with a thin layer of ice so the outside would be protected while they thawed. I defrosted 4 scallops uncovered on a plate in the refrigerator. Interestingly, the ice coating remained intact even as the scallop itself got soft and thawed. Since I only thawed 4 to try, I made a classic Japanese snack that goes well with sake and is often served at sushi-bars 寿司や called "Hotate-no-Isobe-yaki" 帆立の磯辺焼. Whenever "Iso-be", meaning  ”near the rocky beach", is used in Japanese culinary parlance, it is a dish containing "nori" seaweed, either grilled "isobe-yaki" or fried "isobe-age" 磯辺揚げ. In this case,  it was a scallop sautéed and wrapped in nori.  At a sushi-bar, sometimes this would be handed directly to you by the sushi chef. It is literally a finger food conveyed to your mouth with your fingers as shown in the picture below--then "chomp".


The scallops are usually marinaded with soy sauce based marinade. There appears to be quite a few variations on this theme. I used a mixture of mirin and soy sauce and marinated the scallops for 10-15 minutes before cooking. Since two of the scallops were rather thick, I halved them producing 3 portions per serving. I served them with sheets of nori.


Ingredients: (for two servings of small appetizer like above)
4 scallops
Nori sheet cut into small rectangles or use packaged seasoned nori.

Marinade:
1 tbs each of soy sauce and mirin.
1 tbs unsalted butter for frying

Directions:
Place the scallops and the marinade in a small Ziploc bag (I used a sandwich bag), remove the air as much as you can and place in the refrigerator for 15 or so minutes (I am sure longer marination will not hurt). Removed from marinade and blot the excess (below).


Melt the butter and cook the scallops for 1-2 minutes each until browned (below). Add 1 -2 tsp of the marinade to the pan and put on the lid for 30 seconds. When the marinade slightly reduces, coat the scallops with sauce. Try not to over cook. (If using sashimi quality fresh scallops, the center could be raw).

Sandwich between the folded nori sheet and enjoy.

This was really good. The quality of scallops are really good. they were sweet, soft and moist. Perfect drinking snack for cold sake.

Wednesday, September 16, 2020

Marinated tuna sashimi with grated Daikon 鮪のおろし和え

This is a continuation of the “using up yellowfin tuna sashimi block”. We started with “Tuna caprese” and proceeded with the cold chawan-mushi. This was the third appetizer and second tuna sashimi dish. Without knowing specifically what I would make, I marinated 1/3 block of tuna sashimi “saku” block sliced in concentrated Japanese noodle sauce or “mentsuyu” 麺つゆ to make “Zuke tuna” 漬けマグロ. I could have served as it is or as “yama-kake” 山かけ but I did not have any nagaimo 長芋. I did have daikon 大根, however, so I made this dish.


Beside mixing in chopped scallion, I garnished it with the green part of the scallion thinly sliced. 


This is not really a recipe. I grated the daikon and let it sit in a fine meshed strainer to remove any excess moisture. I cut the marinated tuna into small cubes. I chopped one small scallion finely then mixed the tuna, grated daikon, scallion and added “Ponzu” ポン酢 (from the bottle).

This could have been a good refreshing dish but this daikon, as sometimes happens, was extremely hot (spicy) which made it difficult to enjoy. It was like eating straight wasabi or more like horse radish. We ended up scraping as much of the grated daikon as we could off the tuna. Oh well, I should have tasted the daikon before adding to the tuna. 

The last tuna appetizer was  tuna “cutlet”  マグロカツ (I did not take pictures this time but here is the previous tuna cutlet).


 We switched to red wine. Previously, I made the red wine miso sauce and had it with the tuna cutlet. We felt the sauce needed more miso flavor. I reheated the remaining sauce and added more miso. This time, the sauce was better but we think we could have even more miso in this sauce. But we finished the entire saku of yellowfin tuna.

Sunday, September 13, 2020

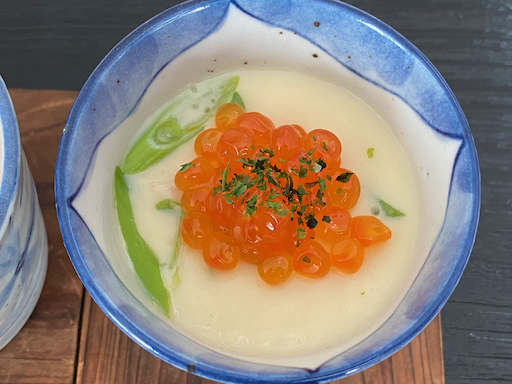
Chawan-mushi with “ikura” salmon roe 冷製茶碗蒸しイクラのせ

 This is not a new dish but it was the second appetizer for the evening when we had the tuna caprese as the first dish. This is a cold chawan-mushi which I made in the morning.  I topped it with “ikura” salmon roe and garnished with “ao-nori” 青海苔 a type of dried green seaweed called laver.


For this version of  chawan-mushi , I used shrimp, chicken and scallion since I did not have the other items I usually use.


Ingredients: (for 6 small cups such as the sized container shown above)
3 large eggs (150-170 ml)
Broth, three times volume of the eggs (450- 520ml). Any broth including chicken broth will do. I used a mixture of bonito and kelp broth from a dashi-pack and broth I made from shrimp shells. I seasoned the broth with mirin, light colored soy sauce and salt.

6 large frozen shrimp, shell on, thawed, salted, let it stand for 5-10 minutes, shelled and cut into bite sized pieces.
1 cooked chicken tenderloin, shredded.
1/2 scallion, sliced on bias.

Directions
In 6 small bowls, add the shrimp, chicken, and scallion. Mix the eggs and seasoned cold broth, pour the egg mixture through a fine sieve. Steam (I used an electric wok) on high stream for 10 minutes and then lowered the steam and keep steaming until the egg mixture was set (another 10-15 minutes or more).

Instead of eating this hot, I let it cool to room temperature and refrigerated it. I served it cold with Ikura and dried “ao-nori” on top.

Since I did not have other items such as shiitake mushrooms, I used whatever was available. This simpler approach worked very well for this cold chawan-mushi. The addition of the ikura salmon worked very well. It provided a nice texture with a delicate pop in the mouth followed by a  burst of fresh sea saltiness. After this we had another tuna dish.

Thursday, September 10, 2020

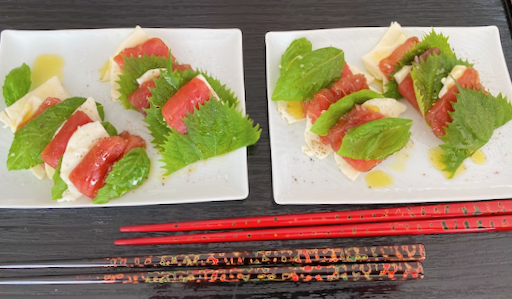
Tuna sashimi caprese with basil and perilla 漬けマグロのカプレーゼ

This was the first of three appetizers I made one evening using a saku block of yellowfin "ahi" tuna キハダマグロ we got from Great-Alaska seafood. I am always looking for different ways to serve yellowfin tuna sashimi. The recipe I saw at e-recipe was a usual caprese with the addition on tuna sashimi.  I altered the recipe by leaving out the tomato. In addition, I used basil for one batch and perilla for the other.


The one with basil is shown on the left in the picture below . The basil came from our window-sill garden. The one with perilla is shown on the right. The perilla is from our herb garden.


Ingredients: (for an appetizer for two)
1/3 tuna “saku” block, sliced into 6 slices (3 slices per serving)
6 slices of fresh mozzarella cheese
6 basil leaves
6 perilla leaves (if large cut into two)
Good olive oil (I used our favorite Spanish olive oil)
Salt and pepper

Marinade:
2 tbs soy sauce
1 small clove of garlic, crushed  using a garlic press (or grated from tube).
1/2 tsp. sugar

Directions
Add the marinade and the tuna into a Ziploc bag, remove the air, seal and marinate for 10-15 minutes. Blot out excess marinade (I decided to cut one slice into two so that I could make the basil and perilla versions). Layer the mozzarella cheese, tuna, and either basil or perilla. Sprinkle with the olive oil, salt, and freshly cracked black pepper.

This was a really good way to have tuna sashimi. The addition of garlic in the marinade made it really good. Both the basil and perilla versions while different were good. We thought both are good but the perilla ones had stronger and more distinct flavor.

Monday, September 7, 2020

Cabbage and perilla in brine キャベツの青じそ漬け

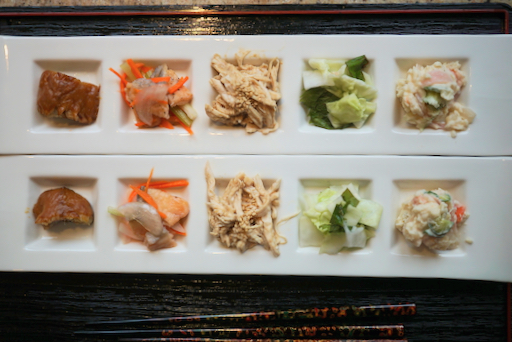
These were five small appetizers we had one evening. Among these five appetizers, one is new and another is sort of new (a variation).


From the left, three kinds of protein. In the picture below which is the close up of the individual dishes, the left is smoked mackerel with miso sauce (since it is difficult now to get fresh mackerel, we got a package of smoked mackerel). My wife suggested serving it with the miso sauce I use to simmer the fresh mackerel サバの燻製味噌ソース. Unfortunately, this batch of the smoked mackerel was a bit too salty and the addition of the miso sauce did not improved the situation by adding more saltiness. The center is vegetables and fried salmon in sweet vinegar 酒の南蛮漬け and the right is chicken dressed in sesame dressing 酒蒸し鶏胸肉の胡麻和え.


Below, from  left to right is the previously mentioned chicken with sesame dressing, the center is a new small dish which is cabbage and perilla in brine キャベツの青じそ漬け.  There are many variations on this theme but I used a recipe from the on-line version of the Japanese newspaper "Asahi shinbun" 朝日新聞. (The recipe follows below the picture). The right is my usual potato saladポテトサラダ. 


Ingredients for cabbage dish
150 grams cabbage, cut into 1 x 3-4 cm strips
4-5 Green perilla leaves, cut into 1cm square

For Brine (mix the below and let it cool to room temperature)
1/2 cup hot water
1 tsp salt
1/2 tsp sugar
1/2 tsp rice vinegar


Directions
In a Ziploc bag, add the cabbage and green perilla, pour in the brine, remove the air as much as you can and seal. Sandwich the bag between two plates and put the weight and let it stand for 30 minutes until more water comes out and the cabbage becomes soft. It will keep several days in the refrigerator.

The brine was rather gentle and the cabbage tasted fresh and had a nice crunch. eating it with the perilla pieces really made it. This is a nice refreshing dish.

Friday, September 4, 2020

Homemade Ricotta cheese 自家製リッコタチーズ

For a while during covid we were not able to get plain yogurt. In the past, my wife made yogurt using Dannon yogurt as the seed but when it was not available, she bought some heirloom yogurt starter from Cultures for Health. Recently she has been into making yogurt from the heirloom starter as well as the Dannon yogurt which is now available. The home-made yogurt from the heirloom starter lactobacillus is now in its 16th generation.  With some effort (heating and maintaining the temperature of the milk for a specific time before seeding), the consistency of the heirloom yogurt has greatly improved and it tastes much better than commercial yogurt. It is very creamy, sweet with a slight tang. Meanwhile, we noticed that the  Dannon based home-made yogurt has a slight viscous (slimy) consistency which is different from the original store-bought Dannon and is not entirely pleasant. (When my wife made yogurt many years ago using Dannon the resulting yogurt did not have this consistency). When it is made into Greek (strained) yogurt, however, it is much creamer and nicer than Greek yogurt made from store bought Dannon.  The dip made from Home-made Dannon derived Greek yogurt is really nice. When making Greek yogurt, however, it produces a large amount of whey. My wife always thought it was a bit of a waste to throw it away and wanted to find a way to use it. Finally she found a recipe for homemade ricotta using the whey from yogurt and decided to make a small experimental batch. We were a bit amazed at how good this homemade ricotta is.


Although we learned that authentic ricotta (re-cooked) is made using only whey, the ones commercially available in the U.S. apparently are mostly made from milk. The recipe my wife found uses a combination of whey and whole milk.

Ingriedients: This is the original recipe. The recipe my wife used for the small experimental batch follows.
2 gallons fresh whey (use within a few hours of straining)
1 gallon milk (optional)
1/2 cup distilled white vinegar
salt to taste

What my wife used for her small experimental amount
1 cup whey
1 cup milk (optional)
1/8 cup vinegar (she used rice vinegar)
salt to taste.

Directions
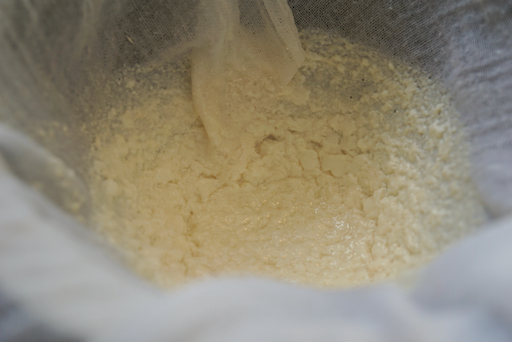
Mix the whey and milk and put in a slow cooker. Heat on low until the combination reaches 195 F. (About 2 to 3 hours). Remove from heat add vinegar and stir. The curd will form and float to the top. (When the milk reached 195 F and we took off the lid and it looked like this (picture below). Apparently, the curd had already started to form)


Drain the curd through a butter cheese cloth (picture below). One hour draining for soft ricotta. Six or more hours for firmer ricotta. Remove from the cloth, put it into a small bowl and salt to taste.


Although my wife made only a small amount, it was really good. It was creamy with a soft texture. The vinegar gave it a slight tang while it also maintained a slightly yogurt flavor and the salt really brought everything together. My wife is inspired...Watch out. 

Tuesday, September 1, 2020

Super-soft Milk Bread 日本風食パン

Many years ago, when we visited Tokyo 東京, we stayed at hotels in the Asakusa area 浅草. (More recently, we've been staying at hotels in the Ginza/Tokyo station area). One of the fond memories we have of our stay at the Asakusa hotels was going to a coffee house or "Kissa-ten" 喫茶店 for breakfast and coffee. At that time, they usually offered, at a very reasonable price, choices of "morning sets" モーニングセットdesignated as  "A", "B" or "C". They consisted of some kind of egg (hard boiled or egg salad) and slightly different sides such as a mini green salad or cucumber. The foundation of the meal, and, as far as we are concerned, the best part, was a very thick slice of soft bread lightly toasted and served with butter or sometimes jam or jelly. The second cup of coffee was usually available at a steep discount which was another reason we liked breakfast at the Kissa-ten. Recently my wife came across a recipe for "Super-soft Milk Bread". In addition to being reminiscent of our favorite Kissa-ten bread, the accompanying write-up referred to it as a variation of "Hokkaido milk bread". Since I am originally from Hokkaido 北海道, that "sealed the deal". I had to make this. This is a very different recipe from our usual white bread loaf. It came out super soft, light and fluffy. It really reminded us of "Kissa-ten" toast. I sliced a very thick piece (but not as thick as some we had at kissa-ten) toasted it and slathered on the butter. Voila!


Some Japanese recipes for this type of bread include "Yu-dane" 湯種 or "Yu-kone or Yu-gone" 湯捏ね in which  a portion of flour is mixed and kneaded with hot water. Instead, this recipe pre-cooked the flour and milk into a soft paste called "tangzhong" which is the Chinese pronunciation of "Yu-dane"  湯種.  I read that this was popularized by a Chinese cookbook author Yvonne Chen as "tangzhong" which is the term that commonly appears in English-written recipes for this type of bread. This recipe came from the King Arthur website.

Ingredients
Tangzhong
3 tablespoons (43g) water
3 tablespoons (43g) whole milk
2 tablespoons (14g) King Arthur Unbleached Bread Flour


Dough
2 1/2 cups (298g) King Arthur Unbleached Bread Flour
2 tablespoons (14g) Baker's Special Dry Milk or nonfat dry milk
1/4 cup (50g) sugar
1 teaspoon salt
1 tablespoon instant yeast (This looked like too much for one loaf of bread, next time I may reduced it in half)
1/2 cup (113g) whole milk
1 large egg
4 tablespoons (57g) unsalted butter, melted

I weighed all ingredients except for the yeast and egg.

Directions
To make the tangzhong: Combine all of the ingredients in a small saucepan, and whisk until no lumps remain.

Place the saucepan over low heat and cook the mixture, whisking constantly, until it becomes thick and the whisk leaves lines on the bottom of the pan, about 3 to 5 minutes (#1 below).

Transfer the tangzhong to a small mixing bowl or measuring cup and let it cool to lukewarm.
To make the dough
Combine the tangzhong with the remaining dough ingredients, then mix and knead — by mixer or bread machine — until a smooth, elastic dough forms; this could take almost 15 minutes in a stand mixer (I used a standing mixer with a dough hook and kneaded it for 7-10 minutes).

Shape the dough into a ball, and let it rest in a lightly greased bowl, covered, for 60 to 90 minutes, until puffy but not necessarily doubled in bulk.

Gently deflate the dough and divide it into four equal pieces; if you have a scale each piece will weigh between 170g and 175g (I divided the dough in half-- I should have weighed the halves; the loaf came out uneven).

Flatten each piece of dough into a 5" x 8" rectangle, then fold the short ends in towards one another like a letter. Flatten the folded pieces into rectangles again (this time about 3" x 6") and, starting with a short end, roll them each into a 4" log. (After flattening, folding, I rolled it into two logs).

Place the logs in a row of four (in my case, two) — seam side down and side by side — in a lightly greased 9" x 5" loaf pan.

Cover the loaf and allow it to rest/rise for 40 to 50 minutes, until puffy (#2 below).

Toward the end of the rising time, preheat the oven to 350°F.

To bake the bread: Brush the loaf with milk and bake it for 30 to 35 minutes, until it's golden brown on top and a digital thermometer inserted into the center reads at least 190°F (#3 below).
Remove the loaf from the oven and cool it in the pan until you can transfer it safely to a rack to cool completely (#4).


The dough rose rather quickly (this is the reason I think I will reduce the yeast next time). After the bread completely cooled, I sliced it (#4).We have been making white bread loafs for some time using an old recipe which came with our stand mixer. Our white bread loaf is good but this one is different and may be better. It is extremely light and very close to the Japanese loaf bread we had at the Kissa-ten. We were "transported" back to Tokyo with the first bite. It had a mildly sweet flavor and the crust was nice and crunchy. We will definitely make this again for sure.

Addendum:

I doubled the amount and made two loaves. I also, decreased the yeast by half (proportionally). I also weighed the 4 portions (2 for one loaf) and they came out in equal sizes (see pictures below). This is just a note to myself so that I do not have to calculate  the ingredients' weight again.

Ingredients:

Tangzhong
86 g water
86 g whole milk
28 g King Arthur Unbleached Bread Flour

Dough
596 g King Arthur Unbleached Bread Flour
28 g  nonfat dry milk 
100 g sugar
2 teaspoon salt
1 tablespoon instant yeast
226 g whole milk
2 large egg
114 g (one stick) unsalted butter, melted

Despite halving the yeast, the dough rose and the bread came out soft and fluffy. It may have taken a little bit more time to rise but the flavor of the bread, we thought, was better.