Showing posts sorted by relevance for query 磯辺. Sort by date Show all posts

Saturday, September 19, 2020

Scallops "Isobe-yaki" 帆立の磯辺焼き

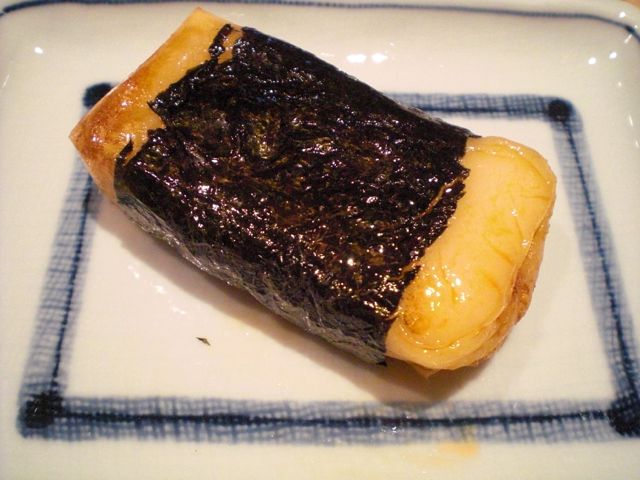
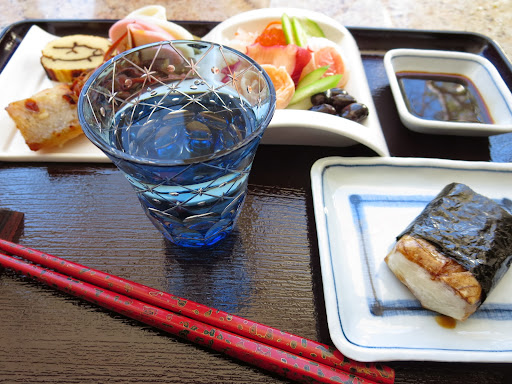
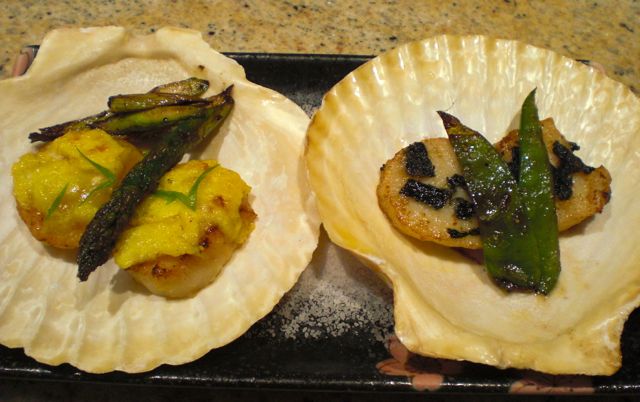
We recently succumbed to one of the advertising emails we frequently get from Great-Alaska seafood. This time, the deal was 2 lbs each of wild sockeye salmon filet, colossal sea scallops and jumbo shrimp. Since the deal included three different seafoods, we thought we could handle it and ordered it. When the shipment arrived, I decided to try the scallops first. The scallops were a good size (so-called diver scallops) and nicely coated with a thin layer of ice so the outside would be protected while they thawed. I defrosted 4 scallops uncovered on a plate in the refrigerator. Interestingly, the ice coating remained intact even as the scallop itself got soft and thawed. Since I only thawed 4 to try, I made a classic Japanese snack that goes well with sake and is often served at sushi-bars 寿司や called "Hotate-no-Isobe-yaki" 帆立の磯辺焼. Whenever "Iso-be", meaning  ”near the rocky beach", is used in Japanese culinary parlance, it is a dish containing "nori" seaweed, either grilled "isobe-yaki" or fried "isobe-age" 磯辺揚げ. In this case,  it was a scallop sautéed and wrapped in nori.  At a sushi-bar, sometimes this would be handed directly to you by the sushi chef. It is literally a finger food conveyed to your mouth with your fingers as shown in the picture below--then "chomp".


The scallops are usually marinaded with soy sauce based marinade. There appears to be quite a few variations on this theme. I used a mixture of mirin and soy sauce and marinated the scallops for 10-15 minutes before cooking. Since two of the scallops were rather thick, I halved them producing 3 portions per serving. I served them with sheets of nori.


Ingredients: (for two servings of small appetizer like above)
4 scallops
Nori sheet cut into small rectangles or use packaged seasoned nori.

Marinade:
1 tbs each of soy sauce and mirin.
1 tbs unsalted butter for frying

Directions:
Place the scallops and the marinade in a small Ziploc bag (I used a sandwich bag), remove the air as much as you can and place in the refrigerator for 15 or so minutes (I am sure longer marination will not hurt). Removed from marinade and blot the excess (below).


Melt the butter and cook the scallops for 1-2 minutes each until browned (below). Add 1 -2 tsp of the marinade to the pan and put on the lid for 30 seconds. When the marinade slightly reduces, coat the scallops with sauce. Try not to over cook. (If using sashimi quality fresh scallops, the center could be raw).

Sandwich between the folded nori sheet and enjoy.

This was really good. The quality of scallops are really good. they were sweet, soft and moist. Perfect drinking snack for cold sake.

Tuesday, March 28, 2017

Nagaimo and salmon sausage Isobe fry 長芋とサーモンソーセージの磯辺揚げ

This was inspired by the vegan cooking by a Buddhist monk in Kyoto. He briefly cooked the nagaimo 長芋 rounds in broth, soy sauce and mirin to season it before making a type of tempura called "Isobe-age" 磯辺揚げ with the batter containing dried "aonori" 青海苔. I also made salmon sausages we got from my mother for new year into a similar tempura. I served it as a drinking snack with green tea salt, wedges of lemon and skinned Campari tomato.


I cooked the nagaimo a bit too much but I just used the leftover nagaimo dish and converted to the current dish.


Ingredients (for two small servings):
Nagaimo, peeled and cut into half inch thick rounds (four)
Dashi broth, soy sauce, mirin and sake
Salmon sausages, sliced diagonally in half inch thick (four)

For the tempura batter
Cake flour and potato starch
Cold water
Dried "Aonori"

Directions:
1. Cook the nagaimo in seasoned broth (Japanese broth seasoned with soy sauce, mirin and sake) for few minutes and let it cool in the broth (see below, this one is cooked longer than called for in this dish).


2. Make the tempura batter by mixing the flours and "aonori" with cold water until desired consistency (I made this rather runny). Coat the nagaimo and sausages.
3. Heat vegetable oil (I used peanut oil) to 350F and deep fry for few minutes.
4. Drain and serve immediately.

Since this was converted from "simmered Nagaimo" dish, the nagaimo was cooked more than needed before it was deep fried. Still, it had nice crunchy texture. It has nice crust with aonori flavor. The salmon sausages also tasted much better than when we tasted as is. This was  unusual but quite good tempura items.

Thursday, November 12, 2009

Mountain yam on nori sheet 長いもの磯辺焼き

We like Asakusa 浅草 in Tokyo. For some years, when we visited Japan, we stayed in Asakusa. About 20 some years ago, we visited a small Izakaya located on the 3rd or 4th floor of a small, unassuming building in Asakusa. There were many drinking places in this building but each floor was small--just large enough to house one establishment. We saw the sign for this place while we were walking along the street and knew nothing about it but we decided to go in. The Izakaya had a small U-shaped counter for about 10 customers and two tables in a tatami floor area ("koagari" 小上がり) which seated another 10. This was run by a husband and wife team; the husband cooked behind the counter and the wife was in charge of serving the tables and counter. Two of the dishes we had there stuck in our memory; deep fried grated mountain yam wrapped in nori sheet 山芋の磯辺揚げ and fresh boiled fava beans or "sora-mame" そら豆.

The chef husband made the deep fried dish by using two chopsticks to make a small cylinder of the grated mountain yam. He then wrapped the cylinder with nori and deftly deep fried it. It puffed up and had a nice crunchy shell and soft inside. It was wonderful and had the flavor and crunch of crispy nori.

Unfortunately, real mountain yam "yama-imo" is difficult to get here in the U.S. Instead, we get cultivated ones called "naga-imo" (left image, from Hokkaiodo Shinbun Web site 10/28/2009). Although both have similar taste and texture (slimy!), they are quite different when grated. Yama-imo is much more viscous or firm than naga-imo and holds its shape. Nago-imo, in contrast is much more watery and doesn't hold its shape. For these reasons it is not possible to deep fry grated nago-imo the way the chef husband did at the Izakaya--it won't hold the shape of a cylinder and just runs out of the nori casing.  So I just spread the runny grated naga-imo on a small rectangle of nori sheet, and slip it, nori side down, into a frying pan filled with just a bit more oil than I would use for sauteing. When the edge becomes brown, it is cooked enough to hold its shape and I turn it over once. I fry it until it is nicely golden brown. I serve the pieces hot with soy sauce or salt. This version is not as good as the original but it is close and a perfect sake accompaniment.

Sunday, July 21, 2013

Fish cake and green beans "Isobe" fry ちくわとインゲンの磯辺揚げ

I made this dish to try out the new plates we recently acquired in New York. This white square plate with rim is very versatile. My only complaint is that it does not seem to have been made to stack—when stacked on atop the other the top plates slide off making it difficult to store. I realized that I had defrosted "chikuwa" 竹輪 fish cake the previous day but did not use it. I decided to make tried-and true "Isobe" 磯辺 fry. I also made green beans in the same  fashion.


Chikuwa: I cut it in half crosswise and then cut the halves into 4 pieces lengthwise to make 8 small batons.

Green beans: I trimmed both ends and cut in half to make the length equal to the chikuwa pieces.

Tempura batter: Just a mixture of cake flour and cold Seltzer water plus dried "aonori" 青海苔 sea weed. I made this a thin, runny batter.

I deep fried in 170F oil until done (the chikuwa 1-2 minutes, the green beans 3 minutes).

These two items were quite good. The green beans got so "etherial" like the dried green beans. The chikuwa developed good slightly chewy texture. Both had nice crisp  light crust with "seashore" flavors from the "aonori". I served this with my usual green tea salt.

Friday, September 2, 2011

Rice cake "isobe" roll お餅の磯辺巻き

"Mochi" 餅 is steamed glutenous rice pounded into paste which is shaped into discs with one convexed side ("maru-mochi" 丸餅) or rolled out ("noshi-mochi" 伸し餅) and cut into small rectangles ("kiri-mochi" 切り餅). Instead of using a traditional wooden mallet or "kine" 杵 and mortar or "usu" 臼, nowadays, mochi can be made at home using a smal mochi making machine and, apparently, mochi can be made using a Kitchen-Aid mixer with a dough hook. The easiest way, however, is to buy packaged commercially produced mochi at a Japanese grocery store which is the route we usually take.

Especially If mochi is made at home, you could enjoy it while it is still warm and soft, however, more commonly, it is allowed to harden. Hardened mochi cakes can last at least a few weeks or longer and easily can be transformed back into a soft and edible state by boiling or grilling. After all, it does have its origins as a preserved food or emergency ration. Although it is eaten year around and many types of Japanese crackers are also made from mochi, it is a traditional New Year food (so that house wives do not have to cook rice for at least the first 3 days of New Year). I have posted mochi in New Year soup called "Zouni" 雑煮 and in a deep fried tofu pouch for "oden" おでん called "mochi kinchaku" 餅巾着 or "mochi-kin" for short.

One of the simplest and quickest ways to prepare mochi, however, is this dish called "Isobemaki". "Isobe" means "seashore" and "maki" means "wrap" or "roll", since it is wrapped in dried nori sea weed. We had this "isobemaki" 磯辺巻き one evening (one each) as an ending dish or "shime" dish. The taste brought me back to my childhood. Most of the Japanese families used to eat mochi more in quantity, in frequency, and for a longer period in New Year. When I was a kid, we used to eat mochi for breakfast and lunch at least in the first 3 days of New Year. We used to eat "isobemaki" mochi as lunch.

We bought a package of "kiri-mochi" for the past New Year. This is individually sealed in a plastic wrap and lasts for long time in the refrigerator. So one night, I decided to make this dish. It is not even a recipe but here it is.

Toasting mochi: Traditionally, mochi is grilled on a charcoal braiser but, in modern days, a toaster oven is the best choice. It tends to become very sticky so I used a small removable metal grate which prevents the mochi from sticking to the grate of the toaster oven. The small grate can be easily cleaned by soaking in water first.  I toasted the mochi like a piece of bread but I kept an eye on it closely. When it started puffing up I stopped cooking and took it out.

Sauce: This is sometimes called "sato(u)jouyu" 砂糖醤油 and can be very easily made. It is a mixture of sugar and soy sauce. The ratio is up to your taste but I use 1:1 rato. I microwave it briefly (a few seconds) so that sugar melts completely.

After I coated all sides of the cooked mochi, I wrapped it with a rectagular portion of dried nori sheet. If you hold the nori sheet on the mochi for a few seonds with chopsticks, it will stick to mochi like you see above. As you eat, you could dip it in the sauce if you like.

My wife told me that this is the very first Japanese food she ever ate. While at college she shared a dormitory house with a girl who grew up in Japan. Her family sent her a "CARE" package for New Year which included "mochi" and nori to wrap it in. My wife tasted it and immediately liked it. In her enthusiasm to share her new discovery she raced to take a piece to another friend who scowled at it critically and said, "wait, take the paper off first," referring to the nori. Every time I serve this dish my wife nostalgically laughs about that comment. In any case, this is not a bad ending for the evening of an Izakaya feast, although I do not know any Izakaya which would serve a mochi dish like this.

Tuesday, April 4, 2023

Scallops With Shallot Citrus Sauce 帆立のシトラスシャロットソース

This is a continuation of our story about frozen food inventory control. This time it was scallops from Great-Alaska-Seafood. These are really good scallops and we wanted to enjoy them while they were still good. Our most common and favorite way to prepare scallops is “Hotate-no Isobe-yaki” 帆立の磯辺焼き in which the scallops are seared, seasoned with soy sauce, then wrapped in a sheet of nori. This time we tried something different. We saw an article in the Washington Post featuring 6 scallop recipes. One of them was “scallops with shallot citrus sauce”. This was perfect since we happened to have some grape fruit and oranges we’d gotten from Harry and David. So one evening we decide to make this.


To prepare the fruit is a bit of work but the this dish was really great. Nice fresh citrus flavors went well with the seared scallops.

Ingredients (2 small servings)
4 large sea scallops (we used 4 scallops for 2 servings but the standard size may be 4 diver scallops for each serving).
1 medium red grapefruit.
1 large orange
3 tablespoons olive oil, divided
1 large shallot, finely diced (about 3/4 cup)
1/2 cup dry white wine, (we used sauvignon blanc)
1 tablespoon unsalted butter
1/2 teaspoon kosher salt, divided
1/4 teaspoon freshly ground black pepper
2 teaspoons chopped fresh tarragon or basil, for serving (I used chopped fresh parsley)

Directions:
Using a sharp paring knife, trim the top and bottom off the grapefruit and the orange. Working over a bowl so the citrus segments fall into the bowl and you catch the juice, use a paring knife to remove each segment of the fruit from its membrane. Squeeze the remaining membrane over the bowl to extract more juice. Using a slotted spoon, transfer the citrus segments to a separate bowl; reserve the juice.

In a medium saucepan over medium heat, heat 1 tablespoon of the oil until shimmering. Add the shallots and cook, stirring, until they soften slightly, about 2 minutes. Add the wine, increase the heat to medium-high and bring to a boil. Cook until the wine is reduced by about half, about 2 minutes. Add the reserved citrus juice and cook until the liquid in the pan has reduced slightly, 1 to 2 minutes more. Stir in the butter and 1/4 teaspoon of the salt, then remove from the heat and cover to keep warm.

Pat the scallops all over with paper towels to ensure they are as dry as possible, then sprinkle with the remaining 1/4 teaspoon of salt and pepper. Heat the remaining oil in a large skillet over high heat, until shimmering. Add the scallops and cook, without moving them, until caramelized and brown on the bottom, 2 to 3 minutes. Gently flip, and cook on the other side until the scallops are only slightly translucent in the center, 2 to 3 minutes more.

While the scallops are cooking, add the citrus segments to the sauce, stirring gently so they don’t break up much; return the sauce to low heat until warmed through.
 Evenly divide up the scallops per serving and place on the plates. Pour about 1/3 cup of sauce on top, and sprinkle with the herbs. Serve warm.

We had this with freshly cooked rice mainly because we were running short of frozen rice (which is very convenient to have on hand).  The citrus sauce went remarkably well with the rice. We ended up pouring all the available sauce on the rice and even supplementing the dish with more fresh rice. We do not always have grapefruit and oranges on hand but when we do this is a great way to serve scallops.

Tuesday, July 27, 2010

Myouga, chicken and duck tenderloin tempura 茗荷、鶏と鴨の笹身の天ぷら

We do not particulary like to make tempura of myouga because the myouga seems to lose its flavor when cooked, but this one came out ok. Again, the myouga was used as a part of the tempura assortment rather than the main item.

The chicken tenderloin was stuffed with minced pickled plum or "umeboshi" 梅干し which is called "bainiku" 梅肉, then wrapped in perilla leaves. This is exactly the way I usually make this dish (Left in the back in the above picture). Since I separated the tenderloin from the duck breast when I made a duck breast dish, I wrapped it with a small rectangular sheet of nori 海苔. Whenever nori or aonori is used in this fashion or mixed into the tempura batter, it is called "Isobe age" 磯辺揚げ meaning "Rocky seashore fries" (Right in the back ). The tempura batter is my usual; a mixture of ice cold water and cake flour (I did not add potato starch this time because I was a bit lazy). I also fried this using the shallow frying method rather than deep frying.

I fried the myouga last, briefly and at a higher temperature than other items, which helped retain the flavor. When you cook myouga (such as in a miso or clear soup) the unique flavor of myouga diminishes quickly. I served this with an wedge of lemon and green tea salt.

Sunday, March 10, 2013

Crispy nagaimo "isobe" fry 長芋のカリカリ磯辺焼き

I had half a small nagaimo 長芋 left. I previously posted quite a few ways to prepare nagaimo . So I decided to do something a bit different. I remembered seeing recipes similar to this on the internet but the details are probably different since I just made this dish from memory without looking for the original recipe. Essentially, this is a pan-fried nagaimo. Instead of using the usual butter and soy sauce or salt, I made a breading with panko, dried powdered seaweed or "aonori" 青海苔 and also added grated Parmigiano Reggiano cheese. Just for kicks, I served it with mayonnaise-Sriracha (the yellow stuff shown in the picture below) and my home-made pesto.


I first peeled and cut the nagaimo into 1/4 inch thick medallions (#1). I mixed panko (3tsp), aonori (1 tsp), Parmigiano Reggiano cheese (grated, 3 tbs), salt (1/2 tsp), and black pepper (to taste). I put this mixture in a Ziploc bag added the nagaimo and shook the bag to coat the nagaimo medallions (#2). To a non-stick frying pan, I added light olive oil (1/2 tbs) on low flame. I fried one side for 5 minutes (or longer) without moving or touching the pieces (I leave them alone to prevent the forming crust from breaking). Once a nice brown crust formed I flipped them over and fried the other side for another 5 minutes (#4).


I decided to make some dipping sauces; one is a mixture of mayonnaise with Sriracha (or any hot sauce) and the other is a pesto sauce I made some days ago.
The cooked nagaimo is quite different from raw or grated nagaimo. The slimy surface almost disappears. The crust has lots of flavor and a crispy texture. The nagaimo itself has nice firm crunch. For sauce, we liked the mayonnaise/Sriracha the best.

Friday, March 2, 2012

Chicken "tsukune" with lotus root; two ways 蓮根入り鶏のつくね、2種類

I posted two versions of chicken patties or "tsukune" before. There are many variations to the recipe. Some put egg, grated nagaimo or yamaimo, chopped up chicken cartilage, shiitake mushroom etc. We do not particulary like having bits of cartilage in the meat. Instead, to add an interesting texture contrast, I added finely chopped lotus root or renkon 蓮根. The renkon bits do give some crunch but not like cartilage or bone bits.

Tsukune mixture: I hand chopped to make ground chicken from thighs (2 large) but of course you could just buy ground chicken or use a food processor. I like to use thigh meat with a bit of fat. I mixed in finely chopped onion (1/2 small), ground ginger (1/4 tsp), sliced and chopped lotus root (1/4 of vacuum packed pre-boiled), yuzu-kosho (1/2 tbs or more). As I mentioned, one could add more ingredients such as ground nagaimo or yamaimo, tofu, beaten egg etc. Using the same mixture I cooked it in two ways.

In the first version, I spread the meat mixture on the square (1/4 of full nori sheet) of nori and fried it--meat side first and then nori-side. Dishes with nori involved often include a word "seashore" or "Isobe" 磯辺. So this is "Isobe" grilled chicken patty. I made an equal mixture of mirin and soy sauce and added it to the pan towards the end of cooking and coated the chicken patties. After removing the patties from the pan, I further reduced the sauce until it was rather thick and put back the patties to coat. I sprinkled Japanese "sansho" 山椒 powder. I served this with "kinpira" or braised lotus root (This was made from the remaining lotus root, a subject for another post). I should have taken pictures with this dish turned over to show the piece of nori.
 The next day using the same mixture, I made the tuskune in the regular way (pan fried and then braised in mirin and soy sauce) and served it with celery salad with powdered kelp or "kobucha" 昆布茶 and olive oil.
The Addition of lotus root and yuzu-kosho made this tsukune pretty good. I like grilled yakitori style tsukue best but when you cannot grill, pan frying like this is also excellent.

Sunday, January 5, 2014

New Year "Osechi" from sushi Taro 寿司太郎のおせち料理

 We have been feasting on Sushi Taro Osechi Boxes おせち料理 for three days and there is still some left. As usual we picked it up the boxes on the afternoon of December 31. We received two boxes or "Ju-bako" 重箱 neatly wrapped in "Furoshiki" 風呂敷 Japanese wrapping cloth as you can see below. Although this is the 3rd year we've gotten the Sushi Taro Osechi, it was still exciting to peek into the boxes to see what treats are inside.


This is a view of the upper box. Black beans (kuro-mame 黒豆) are in the jar (left upper corner) and steamed sea urchin is in the right upper corner. In the center is a small grilled red fish or "Tai" 小鯛の姿焼き and the right to that is beef tongue, Some items are hidden underneath.


This is the lower box. We love "ankimo" monkfish liver terrine (left upper) and this year, we got more of our favorite "karasumi" からすみ or Japanese bottarga (in the upper center). With these two items alone we can consume a lot of sake. The center row includes sake steamed prawns and chestnuts. The 3rd row contains simmered vegetables, duck breast and simmered octopus.


On New Year's Day, I made a plate with the combination of my dishes and the ones from Sushi Taro Osechi. Although, "Datemaki" 伊達巻き (yellow roll) was also in the box, I served the one I made from "Hanpen" はんぺん fish cake and eggs. Besides "matsukaze yaki" 松風焼き (left lower), salmon kelp roll 鮭の昆布巻き (behind Datemaki) and Kazunoko herring roe 数の子 (below Datemaki, the rest of the items are from the box. I added decorative cuts on the red and white fish cake 紅白蒲鉾. A big prawn was sake steamed and delicious.


Daikon Namatsu 大根なます was also included in the box but I served mine with Ikura salmon eggs and sweet vinear marinated octopus.


This is marinated "Russian" salmon with lemon and onion I made as usual from my mother's recipe.


The below are drinking snacks on January 2. These are all from the box. We had this with red wine. From the left, beef tongue, marinated egg yolk with Brasilian nuts (wonderful!), Sweet potato, Datemaki, Chestnut (shibukawa-ni 渋皮煮), Ankimo terrine (right upper), Daifuki mame beans 大福豆 and cherry petal nagaimo. All went well with the wine.


This could have been a lunch on the second. The left is small molded sushi with cured snapper, the front is my salmon kelp roll.


This could have been the 3rd day appetizers. Duck breast, marinated egg yolk, mustard stuffed burdock root, burdock root with sesame sauce, cumquat simmered in syrup, three rolled items on the right (from the top) are cod roe wrapped in kelp, shrimp cake "shinjo" 海老しんじょう wrapped in "yuba" 湯葉 tofu skin, cured snapper with center of vinegared young ginger "gari" wrapped in kelp. All are excellent but the mustard (mixed with egg yolk??) stuffed burdock root is exceptional and only a "pro" could make the items wrapped in the nori sheets (I think).


I have not mentioned all the nice simmered vegetables and several kinds of marinated grilled fish and other goodies. For the past three days of the New Year, we have been indulging in so many small nice dishes. This is better than Christmas feast (at least for me).

This is January 4th. I again combined items from the box with the ones I made. The marinated grilled fish was best served heated up in the toaster oven.


Although this was a lunch, this type of food begs for sake and we succumbed. For starch, we had grilled mochi Izobemaki 磯辺巻き.


I think we have to stop this sometime soon. We are definitely over indulging. The items below were the ultimate snacks for drinking sake including karasumi, ankimo terrine, cod roe wrapped in kelp, sweet fish with its roe and sake steamed prawn.

With these, we finished a bottle of rather dry but very agreeable Suigei 酔鯨 from Kochi 高知.

Again the boxes from Sushi Taro were fabulous. They make a good New Year an even better New Year. We could get used to this life style!

Tuesday, November 15, 2011

Sautéed scallops two ways; with nori and egg yolk 帆立貝の黄金焼き、海苔焼き

Hokkaido is famous for scallops among other sea food and I am partial to it but, come to think of it, I have not cooked scallops that often. So, I decided to make this dish one weekend.

I thought I would make a standard scallop dish called a "Golden grilled" scallop. This dish uses only an egg yolk which leaves the egg white behind. So I also made "nori coated scallop" or "Seashore grill" 磯辺焼き using the egg white.

I got medium sized "dry" sea scallops. In an ideal situation, you would like to get fresh ones with roes (liver) and membrane ("himo" 紐 in Japanese) attached but the ones I got were just the muscle. I removed the hard small bundle of muscle from the main muscle. I washed and patted dry. I salted the scallops but did not use any marinade this time.

I separated a pasteurized egg into the yolk and white. I mixed a small amount of mirin (less than 1 tsp) and salt into the egg yolk.

I tore the nori into small pieces. I dipped half of the scallops into the egg white and then rolled them in the nori to coat. The remaining scallops and the nori coated scallops were then sautéed in melted butter on medium high heat until both side were nicely brown turing once for 1 minutes or so depending on the thickness of the scallops. (Do not over cook). I took out the ones I was using for golden scallops before they were completely cooked. I left the nori coated ones for another 30 seconds to complete cooking.

For the golden scallops, I placed the sautéed scallops on a metal tray in a toaster oven on grill mode. I brushed the egg yolk mixture over the grilling scallops several times until a golden crust formed (2-3 additional minutes).

In the same sauté pan I used to cook the scallops, I added green asparagus (skin peeled and the bottom portion cut into several pieces on a slant) and snow peas. I cooked them for a few minutes in the remaining melted and browned butter seasoned with salt and pepper.

I placed scallop shells on the plate covered with a layer of Kosher salt to make the shells stable. I garnished the golden scallops with the green part of a scallion cut in a decorative shape and served with a side of asparagus. For the nori-coated scallops, I added a garnish of snow peas.

This is a perfect drinking snack. Both recipes have some variations. For golden scallops, you could add miso and sugar to the egg yolk. For Isobe scallops, you could marinade the scallops in a mixture of mirin and soy sauce before grilling or sautéing and instead of small pieces of nori, you could use a larger rectangle of nori to wrap the cooked scallops.

Sunday, September 4, 2011

"Chikuwa" fish cake "isobe" fry 竹輪の磯辺揚げ

I was pleasantly surprised to discover I have not already blogged this item. This is another classic Izakaya fare. You will never see this in fancy or (not even fancy) restaurants. You have to make it at home or have it at an Izakaya. To make this you need a type of fish cake called "Chikuwa" 竹輪. Chikuwa literally means "bamboo ring" since traditionally it was made by putting fish meat paste or surimi すりみ around a small stick of bamboo and steaming it first then grilling it (if grilled it is called "yaki-chikuwa"). The bamboo stick left a hole in the center of the cylinder of fish cake. I am sure it is now mass produced using an extruder. Chikuwa is an essential item in oden. I can buy frozen chikuwa at the Japanese grocery store.

To make this dish, I cut chikuwa (2 for 2 small serving) into 4 pieces lengthwise and cut its length in half producing 8 small sticks from one chikuwa.

Batter; I used cake flour (3 tbs) and rice four (1 tbs, optional) and dried aonori  青海苔 (1 tsp, optional) and cold water to make a rather loose batter.

After coating each piece of the chikuwa sticks, I fried them in 170C or (340F) vegetable oil for 1-2 minutes or until a crispy crust formed (it doesn't have to cook long because chikuwa is already cooked). Serve hot with a lemon wedge and salt (optional).

This is a quick but perfect small dish for your sake. Nice crunchy crust has oceanic taste of aonori with soft but slightly chewy fish cake inside.