Monday, January 31, 2011

Baked oyster 牡蛎焼き

We usually make this dish on the grill but grilling was not an option in the bitterly cold weather we are having at the moment. I decided to do a small scale grilled (baked) oysters using the oven. Due to the simplicity of preparation this dish totally depends on the availability of good fresh live oysters. This is a very nice dish and perfect for an Izakaya feast.

At the near-by gourmet grocery store, they had live oysters but many were rather small (I assume they were Chesapeake bay oysters). I only got 4 (they were rather expensive).  I first pre-heated my convection oven to 450F. I washed the oysters in running water using a small brush to remove any dirt or seaweed attached to the shell. In a small frying pan, I added Kosher salt about a half inch thick (if you do not want to use salt, you could use crumpled aluminum foil instead). I placed the oysters on the salt with the pointed or deep side of the shell down (left in the image below). The salt help hold the oyster shells upright and also conducts the heat evenly. I made sure that the oyster shells were horizontal so that the juice wouldn't run out once the shells open. I placed the pan on the upper rack of the oven for 7-8 minutes*. I try not to over cook the oysters. You may have to remove the smaller ones earlier. All live oysters will open up like the one seen in the middle of the image below. If the shell does not open the oyster was dead and you should not attempt to eat it. Unfortunately that was the case with one of these. So four became three and we felt cheated. Taking care not to burn myself and not spill the juice, I grabbed the open edge of the upper shell and removed it. The shells can be removed very easily, usually without any tools. The larger oysters may still be attached to the shell but it is easy to detach them with a small knife. During this process it is important not to spill any of the liquid gathered in the lower shell. As you can see the oyster was done and sitting in a nice pool of briny oyster liquor (right in the image below).

*Although I have not tried, I remember seeing or reading that you could put the oysters in an oven for a short period (1-2 minutes??) to make the shells open without cooking them. Then, it is much easier to remove the oysters from their shells.

You could eat these with ponzu or lemon juice but the oyster liquor has its own flavor of the ocean itself and you may not need anything. Just slurp the liquor and eat the luscious plump oyster.

Hope we can do this in a bit larger scale when the weather gets warmer and we can fire up the charcoal grill.

Saturday, January 29, 2011

Herring roe with cucumber in wasabi mayonnaise 数の子とキュウリのわさびマヨネーズあえ

This is another dish I made from the "kazunoko" 数の子 herring roe which did not arrive in time for New Year. This is a dish, again, I just whipped up. This turned out to be pretty good.

These herring roe were the last three we had left (of the batch I prepared) and had been marinated fairly long. Nonetheless, the seasoning was very light and subtle. I simply cut it up in small bite sized pieces. The cucumber is the usual American mini-cucumber, sliced thin, salted with the excess liquid squeezed out. The dressing is a mixture of real wasabi (almost 1 tsp), mayonnaise (1 tbs) and soy sauce (1/2 tsp). When mixing wasabi in mayonnaise, you can add quite a lot because the Mayonnaise dampens the wasabi's sharpness. I just dressed the cucumber and kazunoko with the wasabi-mayonnaise. I garnished it with tomato (this was a regular hydroponically grown tomato which was rather tasteless).

This was quite a success. The kazunoko and wasabi mayo go very well together--perfect with cold sake.

Friday, January 28, 2011

Salmon chanpuru 鮭のチャンプルー

I had leftover grilled salmon. I often cut it into good size cubes and just reheat it in a frying pan and season with mirin and soy sauce. With a sprinkling of sancho powder 山椒, it is quite good. I also made another dish with grated daikon and ponzu from leftover salmon. You could also make salmon salad. This time I wanted to make something different. Chanpuru is an Okinawan stir-fry. The most popular variety of this dish includes bitter melon which I posted previously.

Use of tofu and egg may qualify this dish as chanpuru. I cut the leftover grilled salmon into large cubes. I am not sure about the amount but 6-7 half inch salmon cubes. I  drained 1/3 block of tofu and wrapped it in paper towels. I weighted it down for 10-15 minutes with a plate on top to remove excess moisture. I then cut the tofu in cubes similar in size to the salmon.

I added sesame oil (2 tsp) to a frying pan on a medium flame. I first fried the tofu cubes to make all four sides slightly brown (1 minute each side). I added the salmon and stir-fried for several minutes. The tofu cubes may crumble but that is OK. I then added finely chopped scallion and beaten egg (one large). As the egg was cooking I seasoned the dish with salt, pepper and a small splash of soy sauce to taste.

I am not sure this was a great success. Somehow this combination does not work as well as a classic goya chanpuru. Still, this is something different using leftover grilled salmon.


Thursday, January 27, 2011

Roasted duck breast with grated daikon in ponzu sauce 鴨の胸肉のポン酢紅葉おろし

              
This is another roasted duck breast leftover dish. This one is perfect with sake. Again, there is no recipe, I just made it in a true Izakaya style.

I grated daikon (daikon-oroshi 大根おろし) and squeezed out the excess moisture. That left me with about 4-5 tbs of grated daikon but again, the amount of each ingredient is totally arbitrary. I mixed about 1/2 tsp of 7 flavor Japanese red pepper 七味唐辛子 powder into the grated diakon. You could use one flavor pepper 一味唐辛子 or regular red pepper flakes. You could also add more pepper to make it spicier. Then I added ponzu shouyu (from the bottle, about 2 tbs). If you squeeze out the excess water from the grated daikon properly, it should absorb all the ponzu liquid and not get too runny. I made a mound of the flavored diakon on the center of the plate (or shallow bowl as seen above). I surrounded it with thinly sliced roasted duck breast and garnished with julienne of cucumber, Campari tomato and finely chopped chives. 

This is a rather classic combination. The daikon I used was a very nice one and was not too pungent or hot on its own. The addition of ponzu and red pepper powder made it nicely spicy with citrus flavor. The diakon served as a refreshing counter-point to the richness of the duck breast--it served as an excellent dressing for the duck. Grated daikon is not one of my wife's favorites but she finished everything including the grated daikon. We had this with our newly discovered Gekkeikan "Black and Gold".

Tuesday, January 25, 2011

"Kazunoko" Herring roe 数の子

This year, my mother's "care" package for New Year was delayed because she could not send it by air due to the package bomb scare (which is now lifted according to my mother). In any case, her package finally came rolling in after almost one and half months at sea. We fully expected the package to be a complete "write-off" but surprisingly, everything she sent including the salt-preserved kazunoko 数の子 or herring roe was still in good shape and edible. This was probably because the majority of the "goodies" consisted of some form of dried or otherwise preserved fish. Although the kazunoko did not make it to the new year's day feast, I decided to prepare it for a post-New Year's feast to celebrate its belated arrival.

Nishin 鰊 or herring was abundant in Hokkaido in the past and some master fishermen or "amimoto" 網元 made fortunes from them. They built large buildings on the beach called "Nishin goten" 鰊御殿 or "Herring castle". After the world war II, over-fishing and changes in the cold currents almost totally decimated the once abundant herring fisheries on the coast of Hokkaido. In those hay days, herring and their roe were cheap and abundant. Once the schools of herring disappeared from waters of Hokkaido, both herrings and, especially, herring roe became luxury items. Since it is golden in color and made of numerous eggs, it is a symbol of prosperity and wealth and considered good luck food for new year.
I served kazunoko as a part of a starter dish this evening. In the image below, the left is kazunoko, the center ankimo with grated daikon and ponzu soy sauce and the right is boiled octopus leg sliced with vinegared daikon and renkon garnished with salmon roe.
Since I did not post how I prepared kazunoko last year, I decided to post it this year.

First, I have to remove the salt from the kazunoko (called "shionuki" 塩抜き) by soaking it in weak salted water (I taste the salted water; just a nice salty taste you can drink if you wanted to). Although you could start with water and then finish "shionuki" with salted water. I prefer to use salted water from the beginning and change it several times in 3-4 hour periods. The reason is that if you remove the salt completely, kazunoko will taste "bitter". So, you need to leave some saltiness behind. Using salted water prevents the complete removal of the salt even if you forget and soak it too long. While soaking, I removed the thin white membrane which covers the roe by rubbing the surface with my finger tips under water. After "shionuki" and removing the membrane, herring roe is ready as shown in the lower left image. I tasted a small piece from the edge to make sure it is not too salty. I sometimes thinly slice this and serve it like sashimi with wasabi and soy sauce but I usually marinate it.

For the marinade, I make dashi broth from a kelp and bonito dash pack. I season with light colored soy sauce (to preserve the golden color) and sake. The amount of sake (or mirin if you like it sweet) and soy sauce are up to your taste but I tend to make a strong dashi packed with "umami" and go light on soy sauce. I gently boiled the mixture for few minutes to make sure the alcohol has all evaporated and tastes amalgamated. I let it cool to the room temperature and then refrigerate. I marinated the prepared herring roe for, at least several hours or over night in the refrigerator (The right lower image shows the roe after marinading). You should eat this in few days.
I sliced it into small bite sized pieces and then mixed them with dried bonito flakes or kezuribushi 削り節 and served. It has a very interesting crunch and is an excellent drinking companion for cold sake. After eating it, my wife asked, "Why does it suddenly feel like New Year?"

Sunday, January 23, 2011

Sauteed "Ankimo" Monkfish liver with simmered Nagaimo 鮟肝と長芋

Last time we had a shipment of sashimi from Catalina, as usual, we also got frozen ankimo 鮟肝 or monkfish liver. I thawed it one weekend thinking we would eat it that evening. But we had impromptu dinner guests who, most likely, would not have appreciated ankimo and we did not serve it. So, the next day and the day after, we had to finish it before it went bad (eating that much ankimo was tough job but someone had to do it). Besides my usual ankimo with grated daikon and ponzu sauce or with orange marmalade sauce, I needed to come up with a new way to eat ankimo. I got an idea from the sauteed ankimo and simmered daikon dish that I saw on the web (It came from a beautifully done blog, I highly recommend the blog but it is in Japanese). I also remembered that I had said I would post a simmered nagaimo dish next after posting several ways to enjoy Japanese slimy potato "Nagaimo" 長芋 or "Yamaimo" 山芋.  All this led me to come up with this dish.

Nagaimo: I peeled and cut the nagaimo into about 1 inch thick disks. I simmered it in dashi broth (about 1 cup, which I made using a kelp and bonio dashi pack). I added sake and "usukuchi" 薄口醤油 or light-colored soy sauce (about 1 tbs each). I simmered it for 20 minutes or so and let it cool in the broth. I did this several hours before serving.

Sauce: This is a variation of the orange marmalade sauce. I borrowed the broth from the nagaimo simmering liquid (2 tbs) and dissolved orange marmalade (2 tbs) in a small sauce pan on a very low flame. After the marmalade completely dissolved, I added soy sauce (2 tsp). The sauce is slightly thick because of the marmalade. I kept it warm.

Ankimo: I sliced the ankimo into disks about the same thickness as the nagaimo (1 inch thick which is thicker than I would have cut it for the other presentation). I dredged it in flour and sauteed it in a frying pan with butter (1/2 tbs) on a medium flame. I browned the surface (the butter browned as well but did not burn) for 1-2 minutes and flipped over and browned the other side as well.

Assembly: I reheated the nagaimo before sauteing the ankimo. After placing the sauteed ankimo on the top of the simmered nagaimo, I put the sauce on and garnished with thinly sliced scallion.

This was a really wonderful dish. Both the ankimo and nagaimo were soft enough to be cut with chopsticks. The nagaimo was nicely soft but still maintained some crunch. Although I did not sweeten the broth, the nagaimo had a nice natural sweetness which was enhanced by cooking--it did not have any hint of sliminess. The ankimo was very unctuous; similar in texture and taste to foie gras but better. The browned butter added a "nutty" note. The sauce was also perfect for this dish with a nice orange flavor and sweetness. We will definitely add this to our "teiban" 定番 or regular list of home Izakaya dishes.

We had this with Gekkeikan "Black and Gold". I decanted the sake into a sake pitcher. We have collected several over the years but we use them only rarely. Since the shape of the bottle (a fat "tokkuri" shape") of "Black and Gold" makes pouring from the bottle with one hand a bit difficult for us (we can't one-hand a basket ball either), this pitcher/decanter was perfect. This is also from Kitaichi glass 北一グラス, Otaru 小樽, Hokkaido. We have matching "guinomo" ぐいのみ glasses but did not use them this time.

This is an extremely satisfying dish and perfect for cold sake but I think it will go very well with good sturdy reds such as Cabernet or Syrah or even crisp whites with some acidity such as Sauvignon blanc. Another good pairing will be dry or semi-dry sparkling wine. (In other words it will go with almost anything.)

Friday, January 21, 2011

Stuffing cake スタッフィングのケーキ

This is a mere leftover control dish but it tasted pretty good. We had leftover stuffing which my wife made for Christmas. I needed a shine dish to end a meal and this was a perfect solution.

I added one beaten egg to whatever amount of the leftover stuffing we had. I melted butter and placed two ring molds in a frying pan on a medium-low flame. I made two thin disks (1/2 inch) of the stuffing by pressing it firmly into the ring molds using a silicon spatula.  I fried one side  for one to two minutes. I then removed the molds (the disks should hold shape) and flipped them over and cooked the other side for 1 more minute. I garnished it with good old fashioned American ketchup. This retained the stuffing taste but had a nice crunchy crust while still being moist on the inside. It is a quite nice "shime"  締め or ending dish.

Wednesday, January 19, 2011

Fried oyster redux カキのフライ再登場

This is a repeat of my post from about one year ago. The reason I am posting this again is that this was one of  the best fried oysters I have ever made and probably I have ever tasted (kindly allow me to boast). Although the oysters came in a glass jar pre-shucked, they were quite large and equal in size without any broken pieces. I proposed several options including an oyster nabe to my wife. After my report of the quality of the oysters, she said fried oysters, and I gladly obliged.

The recipe is the same as before. This time, though, because of the good quality of the oysters and the fact that I fried them perfectly (just luck). They were light and crunchy outside and juicy, soft and flavorful inside. We just enjoyed them with a squeeze of lemon and cold sake.  We both thought the quantity of oysters was a bit too much for us to finish, but both of us ate everything. The side was the usual, my variation of coleslaw with honey mustard dressing.

Monday, January 17, 2011

Salmon kelp roll 鮭の昆布巻き

This is typically served as a New Year's day dish. The reason, I think, is that "kelp" in Japanese is "kobu" こぶ or "Konbu" 昆布 which sounds like a part of the phrase "yorokobu" よろこぶ meaning rejoice. In any case, I did not make kelp rolls until last year. Once I made them, we realized how much better they could be than the commercial ones (even compared to an expensive variety from Hokkaido that my friends sent me one year). Since I did not post how to make this last year, I decided to post it this year.

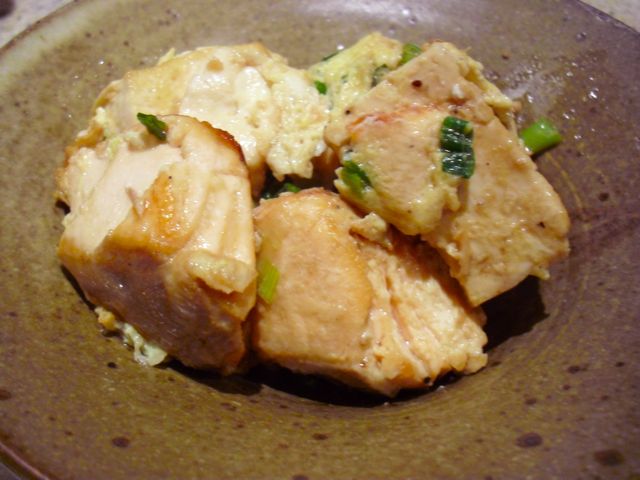
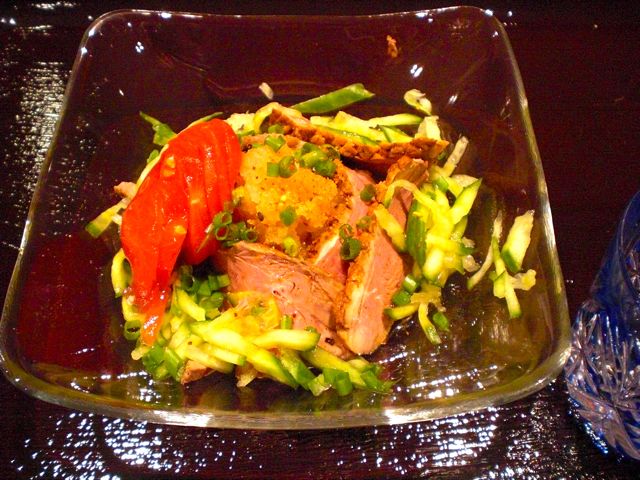
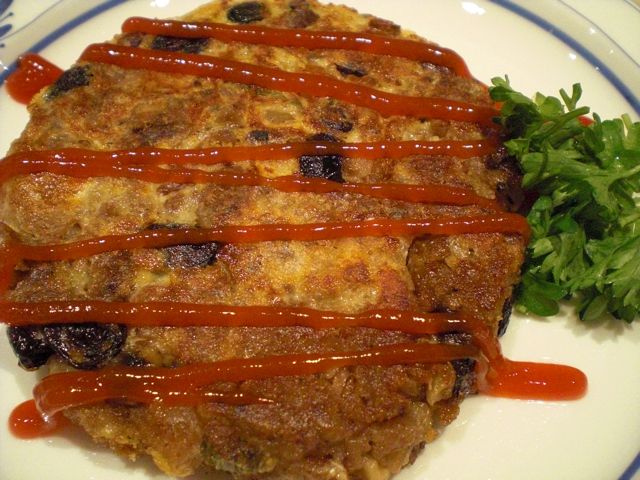
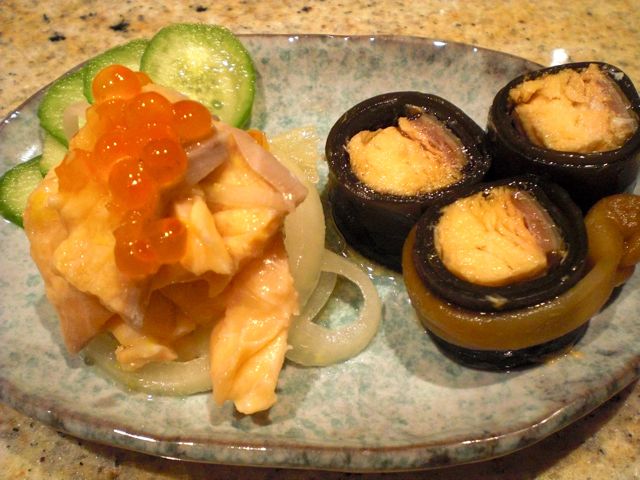
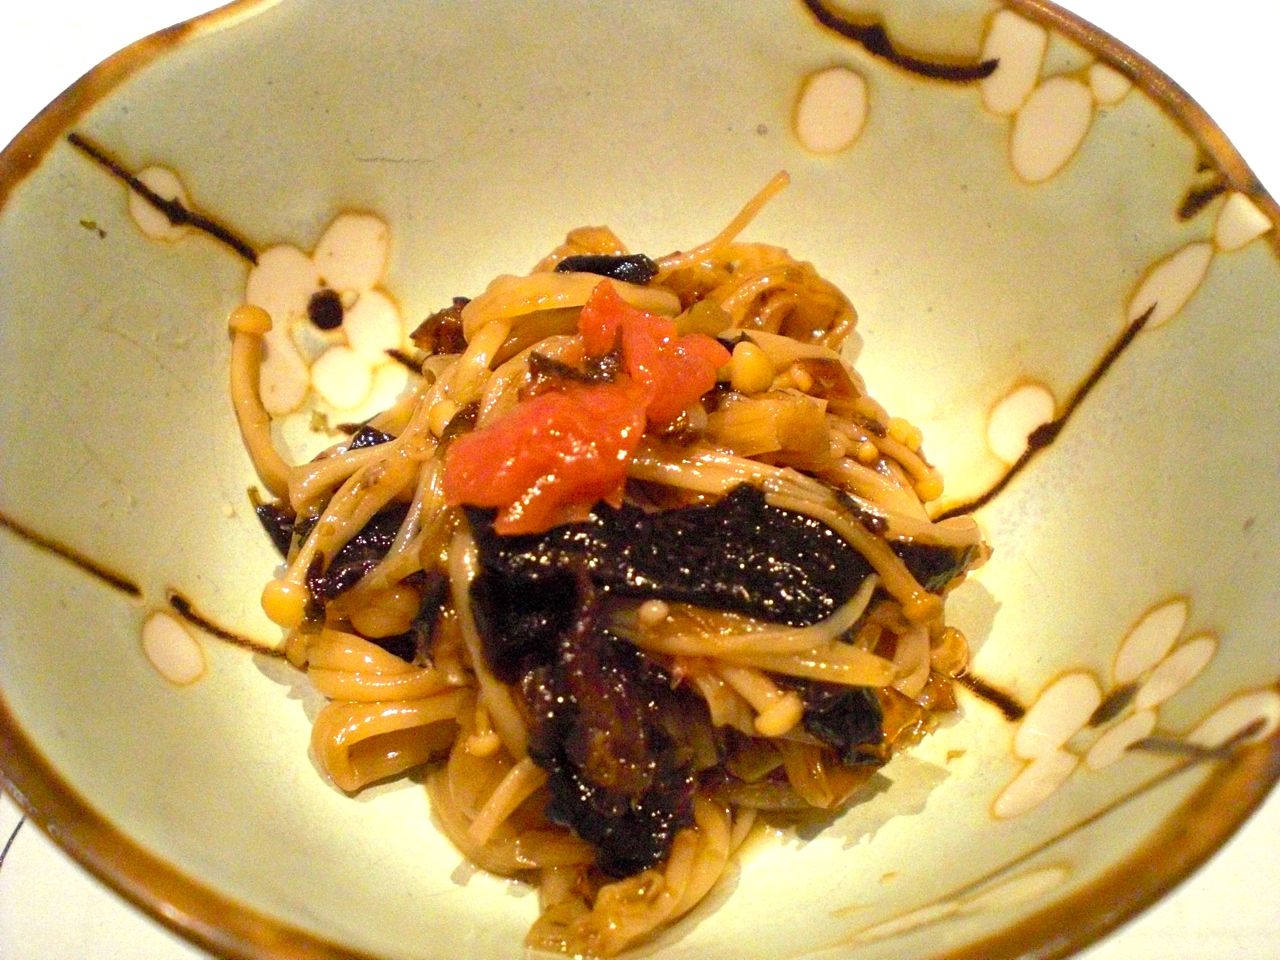
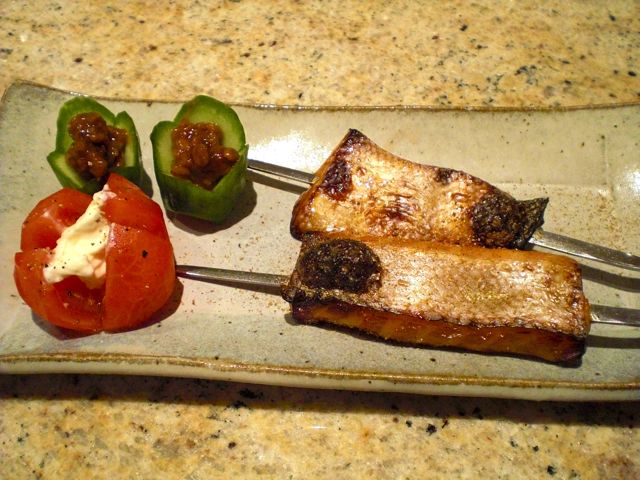
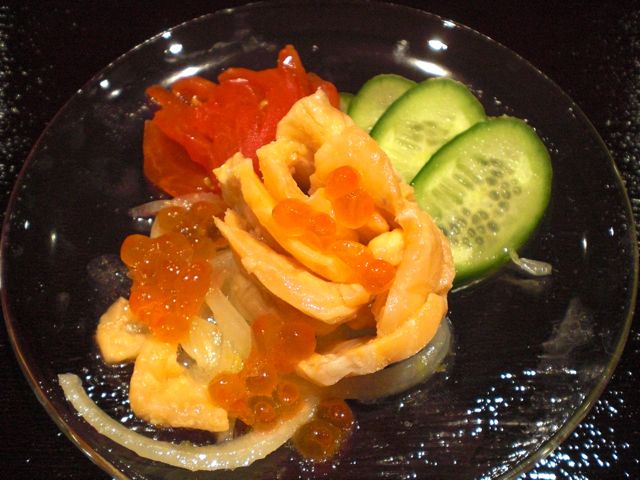
The picture above shows the salmon kelp roll served with my marinated salmon as a drinking snack; both were leftover from New Year's dishes. The kelp rolls are not too difficult to make and the effort is definitely worth it. I made this based on a recipe from e-recipe but I made the seasoning much lighter than they suggested.

Kelp: A good dried kelp--one that gets soft when cooked and is therefore good for eating. "Hidaka" 日高 kelp is especially desirable, since it gets softer more quickly than other types of kelp such as Rausu 羅臼 or Rishiri 利尻 kelp. I soaked a 5-6 inch long piece of dried "Hidaka" kelp in water until it returned to its "natural state" and became pliable (30 minutes to 1 hour). I used 4 strips to make 8 good sized rolls. I trimmed the ragged ends to make a nice rectangular piece. I reserved the soaking liquid.

Kanpyo: This is mostly to tie up the rolls so they don't unravel but it does have some texture and taste. I washed and then massaged several pieces of kanpyo with salt and washed again. I soaked it in water for 30 minutes to one hour but did not cook.

Salmon: I used fresh salmon. I cut the fillet into 1/2 inch wide strips with the skin left on. I trimmed the end to make it fit the width of the kelp.

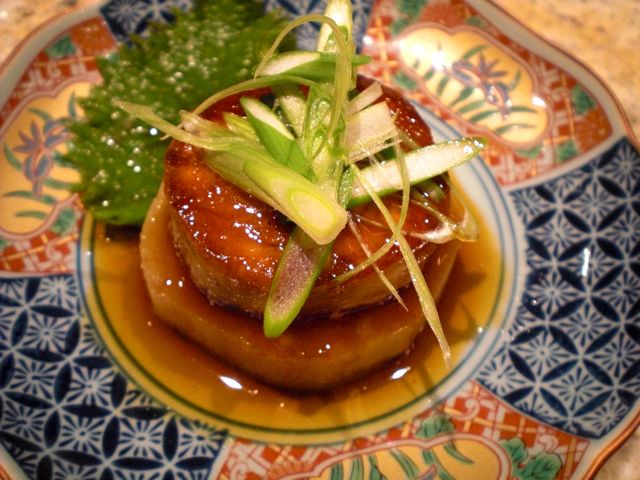
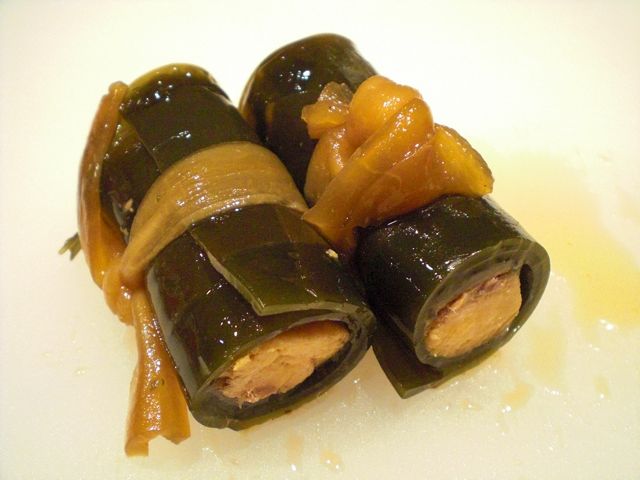
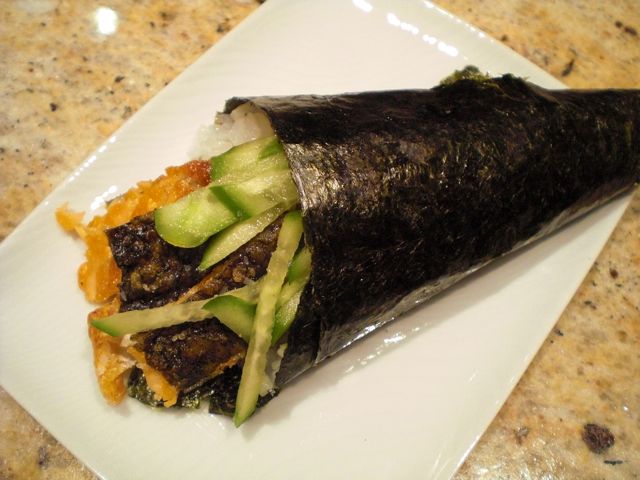
I rolled the kelp around the salmon strip in the center and tied it off in two places using the kanpyou as shown below (this pictures is after cooking). I placed all 4 rolls in a shallow pan in which they fit snuggly (I used a square Pyrex baking pan with a glass lid). I then poured in the kelp soaking liquid. Since I also had a soaking liquid left over from rehydrating dried shiitake mushrooms (used in another dish), and the mushrooms had imparted some good flavor to the liquid I also added that. I added sake (2-3 tbs) as well. The kelp rolls should be just covered with water. I simmered it with the lid on for 1 hour or until the kelp is soft.


Seasoning: The seasoning is essentially sweet and salty (soy sauce) which is a typical Japanese seasoning. As a rule, the "sweet" of the seasoning is added first. So I added sugar (1 tsp) over the rolls and let it simmer for 5 minutes with an 
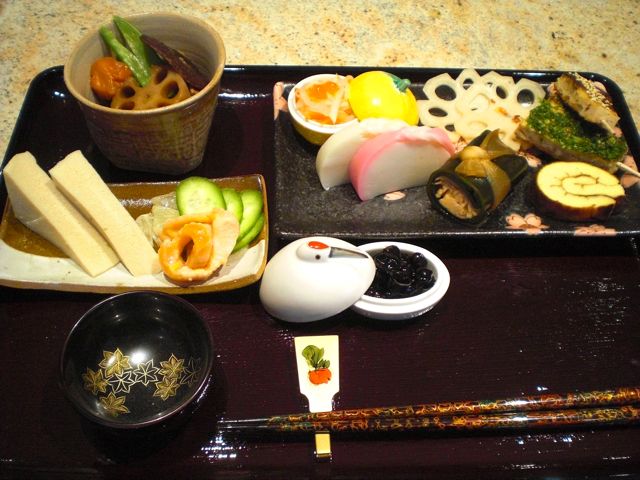
otoshibuta 落 とし蓋. I then added more sugar (1 tsp) and soy sauce (1 tbs) and simmered it for 10-15 minutes. At the end of  cooking, the liquid was reduced in half. At the very end, I added mirin (2 tsp) and soy sauce (2 tsp) for a fresh taste. Again, the seasoning is up to your liking; you could add more sugar, mirin and soy sauce. I did not want to season it too strongly. I let it cool in the cooking liquid. The picture above shows it after it cooled and was ready to be cut.

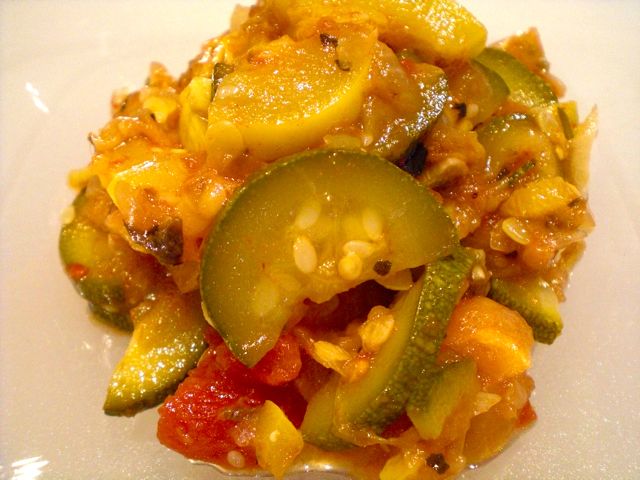
The standard way is to cut the roll in half to make two rolls as seen above but that would have resulted in pieces that were too big to eat in one bite. For a drinking snack, I cut the individual rolls into three smaller pieces as seen in the first picture. 

The kelp is soft but not mushy. It has a lovely unctuous mouth feel. The salmon is lusciously tender with a slight sweetness and mild soy sauce flavor. It is hard to imagine how a dish this good could be transformed into the product sold commercially. While my wife did not dislike the commercial product it was not the first thing she chose from the New Year's box. She liked this one so much it could "star" as a drinking snack. Maybe this dish "isn't just for New Year anymore."

Saturday, January 15, 2011

Ratatouille ラタトゥユ

Izakaya and bar food tend to be more often meat than vegetables (especially Western bar food) and deep fried. We try to eat more vegetables if we can and one of the easiest vegetable dishes I can make to eat during the week, either warm or cold, is my version of ratatouille. I am sure my version is not the authentic true Provençal dish but we like it and it is very versatile. It goes well with red wines (particularly lighter reds such as Rhone, Croze-Hermitage etc) but also goes with cold sake as well.


I sometimes cut all the vegetables rather small and sometime a bit larger, but never very chunky. The vegetables I usually use are zucchini, yellow squash, egg plant, tomato (canned plum tomatoes) with onion and garlic. My wife does not like green or red peppers in Ratatouille so I do not use them. I do not add any liquid but the amount of liquid that exudes from the vegetables is amazing. I have to make a conscious effort to reduce the liquid. I also use finely minced anchovy (canned, salted and preserved in olive oil). I also like the vegetables well cooked and soft--not too crunchy. The amount of vegetables is arbitrary but I make a relatively large batch as seen below because they also reduce in size as they cook.

I finely chop red onion (one medium) and garlic (3 fat cloves). I skin and cut egg plant (1 Italian, large) into small cubes. I cut half moon slices of zucchini (3 medium) and yellow squash (2 medium). I first saute onion in olive oil (2-3 tbs) on a medium flame until the onion become soft and semi-transparent, add the garlic and saute for another 3-4 minutes. I, then, add the eggplant and saute for 3 more minutes. Finally, I add zucchini and yellow squash and mix well. I add a small amount of salt to encourage the moisture to come out of the vegetables and turn down the heat. I add canned whole plum tomato (8oz can), either crushed by hand or cut up leaving the excess liquid in the can but I do not drain the tomatoes.

I add dried oregano (1/2 tsp), basil (1/2 tsp), (or sometimes thyme) and whole bay leaves (3) and put on the lid. I simmer for 20-30 minutes. After the liquid comes out, I put the lid askew and turn up the heat a bit to let the liquid evaporate. Instead of salt,  I use a small can of anchovy fillets finely cut up. The anchovies are very salty, so I start adding the anchovy in stages, tasting until desired saltiness is attained. I am not sure where I got this idea but I must have gotten it  from one of the recipes I read. It certainly adds a more complex "je ne sais quoi" quality to the dish.

I try to remove all 3 bay leaves since they could be a hazard if swallowed by the unsuspecting. This dish is good, warm or cold. Just simply prepared like this, the vegetables end up surprisingly sweet. The is a perfect side for pork, lamb or chicken dishes.

Thursday, January 13, 2011

"Nametake" cooked and seasoned enoki mushroom ナメタケ

Enoki and Nametake mushroom are the same mushroom but enoki is cultivated and grown in the dark causing it to grow long and white. Nametake, is grown wild in the light and therefore larger than the enoki in size and brownish in color. Confusingly, commercial products made from enoki mushroom is widely sold as "Nametake" in a jar as a condiment.In any case, I had a package of enoki mushrooms that I had to cook before they went bad. I posted enoki cooked in butter and miso, so this time, I made enoki mushroom cooked in soy sauce and mirin (or nametake in the second meaning described above). I added dried nori seaweed 海苔 and meat of umeboshi 梅肉 or pickled plum for make it slightly more interesting.

Making this is simple. I first made a mixture of mirin and soy sauce (about 1 to 1,  or reduce soy sauce for milder, sweeter variety. For one package of enoki, I used 2 tsp each. If you do not like it sweet, use sake or a sake and mirin mixture). I cut off the bottom 1/3 of the enoki mushroom and combined the mushrooms with the above seasoning in a small pan and let it simmer. I also added about 1/2 of the umeboshi cut up in small pieces. I also added a half sheet of dried nori torn up in small pieces (by hand). The dish can become salty very quickly depending on the how salty your umeboshi is and how much soy sauce you use. I cooked it for 5 minutes or so on simmer or until most of the liquid is gone. I served this as a small dish that goes with sake but you can use it as a rice condiment as well. This came out a bit on the salty side but it is perfect for sipping cold sake--encouraging you to drink more sake than you intended

Tuesday, January 11, 2011

Stuffed Omelet オムレツ

This may not look like something you see in an Izakaya, but any good hearty breakfast item, in our opinion, can be had as a "shime" 締め or a mid-night snack after drinking--for those who are young and reckless. Stuffed omelets are very popular in Japan including ones stuffed with rice seasoned with ketchup called "Omuraisu" オムライス.

We are not big omelet eaters anymore but, in our reckless days, we often looked for nice brunch/omelet places over the weekend. While we were living in Los(t) Angles, our friend introduced us to one such place near the famous La Brea tar pit. We cannot remember the name of the place and I am sure it does not exist any longer. After that, I emulated how they made omelets at home. Omelets were cooked to order in front of the customers. There were many kinds of fillings to choose from, which were kept in a warming drawer.

Filling: I use whatever is available at the moment. This time, for one two-egg omelet, I use red onion (thinly sliced, 1/3 medium), fresh shiitake mushroom (stem removed and sliced, 4-5 medium), leftover oven roasted pork fillet (4-5 thin slices cut into strips), baby spinach (a very small handful) and fresh goat cheese (3 tbs). I first saute the onion in the mixture of olive oil and butter, add the pork and shiitake mushroom. After they are cooked, I add spinach and saute until wilted. Season with salt and pepper. Since nice "fond" is formed, I deglaze it with a Marsala wine (1 tbs, optional) and cook it until liquid is all gone. I add crumbled goat cheese (I do not mix at this point) and leave the mixture on the stove on a very low flame (our stove has a very low simmer setting or use as a "warm" setting if you are using an electric stove top) (#1, image below).

Eggs: I used two brown eggs (for one omelet) beaten with the addition of cream (2 tbs) and seasoned with salt and pepper. If you use 3 eggs, it will be easier to form an omelet but you can do it with two eggs.

In a non-stick frying pan with low side or an omelet pan  (8 inch) on a medium low flame, I melt butter (1 tbs) and pour in the egg mixture. When the bottom is set, I use a small spatula to lift one side of the omelet and let the excess uncooked egg flow under the cooked portion. I repeat this on all four quadrants until the desired amount of  liquid egg remains (I like it almost all cooked). If you want to make pristine yellow, not-browned omelets, you have to cook the eggs on a very low heat with a lid on to cook the omelet through (for a stuffed kind not for a plain French style) but I like some brown markings on my omelets. I add the filling, which was kept warm allowing the cheese to melt, onto half of the omelet--the half opposite the handle of the pan (#2 in the image below).  Take a plate in the left hand and hold the frying pan in the right hand grabbing the handle from underneath (I am right-handed), angle the pan and slide it out and then fold over the omelet using the edge of the frying pan to cover the stuffing (I should have recruited my wife to take pictures). The omelet is done (#3 in the image below). I am not sure what this shot (#4) is called in food bloggers parlance (I have to defer to Jon), here is the cut section.

This is very satisfying dish. Since I am not making a living doing this, it is kind of fun to make omelets every-now-and-then. I had to admit that we had this as a breakfast not as a mid-night snack and we share one omelet.

Sunday, January 9, 2011

Grilled fatty salmon belly 鮭のハラスの祐庵焼き

This was a starter dish one evening. Although the belly portion of salmon, "harasu" ハラス* is very fatty and probably the best part of the salmon, if you cook it with the rest of fillet, because it is very thin, it gets over cooked by the time the rest of the fillet is done. So, I often remove the belly portion of salmon fillets and make other small dishes. Sometimes, you could get only salmon belly in a package very inexpensively in the U.S. (sold as a scrap I am sure) but I have not seen it for sometime. (*I think, in Hokkaido, this portion is called "harashi" ハラシ, probably derived from "harashita" 腹下 meaning "the bottom of the belly". At least, that is what I remember.)

If I was cooking outside with a charcoal fire, I would simply grill it with some salt, which is the most simple and wonderful way to eat this. This time, I marinated the salmon belly in Yuuan-ji 祐庵地 (sake:mirin:soy sauce=1:1:2) for about one hour. I skewered and broiled it in a toaster oven for 3-4 minutes each side. I could have made the skin a bit crisper but this is such a nice dish to start with a drink of cold sake.  For sure, it is better for you than eating "pork" belly, which is another wonderful belly you can savor. I served this with my usual cucumber with moromi miso もろみ味噌 and Campari tomato with mayonnaise.

Friday, January 7, 2011

Pork scallopini with Pennsylvania dutch egg noodle 豚肉スカルピーニとペンシルバニアダッチエッグヌードル

This is a "padding" post. (I wrote this just in case I may have a lean moment realizing I do not have much to post, so if you are seeing this post, this is such a moment). We think this is a good simple dish which is very satisfying. The noodles you see here are called "Pennsylvania Dutch Egg noodles". It is a type of pasta but Pennsylvania "Dutch" ("Deutsch" or German) people brought it with them when they migrated to North America. I am sure there must be some traditional German or Swiss noodles which resemble this noodle. Since my wife grew up in "Pennsylvania Dutch country", this is her comfort food. As a result, we often eat this as a starch dish. After boiling the noodles as per the instruction on the bag, my wife simply sautés it in brown butter and a small amount of crème fraiche (optional), (traditional recipe uses sour cream) with the addition of chopped chives, salt and pepper.

I made a sort of scaloppini or, more authentically, scaloppine using flattened pork masquerading as veal. I used pork tenderloin. After removing the silver skin and fat, I cut the tenderloin into one inch thick rounds. Using a meat pounder, I made the rounds into thin flat pieces (as thin as you can make it). If you really want to emulate the taste of veal, you could soak the meat in milk for 10-20 minutes but, this time, I skipped this step especially since we like the porky flavor. I seasoned the meat with salt, pepper, dried oregano and basil on both sides (I overdid it). I then dredged the seasoned meat in flour. In a large skillet (or a frying pan) on a medium flame, I added a bit more than your usual amount of olive oil for sauteing, since the flour will absorb the oil. I cooked the meat on both sides (1 minute each). Since the meat is very thin, it will cook very quickly. You could make a sauce but I did not, since the meat was highly seasoned. Somehow this is a very comforting (especially for my wife), basic meat and starch supper.

Wednesday, January 5, 2011

Chicken rice 鶏飯

This was a "shime" 締め we had one weekday evening. This is loosely based on the recipe from "Otsumami yokocho" volume 1, page 132. This dish "keihan" 鶏飯 is supposedly famous in Kagoshima prefecture 鹿児島 but a similar combination of boiled chicken and rice appears to be  somewhat universal across the Asian ethnic food cultures with the Hainanese variation best known (we never had this but only saw it in the Anthony Bourdain's No reservations, Singapore episode). 

Digression alert: The two kanji letters (ideogram) "鶏飯" in "kun-yomi" 訓読み, or the pronunciation of the letter based on the meaning of the each letter in Japanese, will be "Tori-meshi" but if you pronounced it as such, it indicates a totally different type of a flavored rice dish with chicken meat mixed in. When you pronounce it using the sound related to the original ancient Chinese pronunciation of the letter or "on-yomi" 音読み, then it will be "Kei-han" indicating this dish. Nobody will care but, I am sure, Jon does. 

The most important part of this dish is the broth/soup. This is not a recipe to follow but this was what happened. I was vaguely thinking about this dish when I ended up with excess kelp and bonito broth but it took almost 10 days before I finished the broth for this dish. I started this with the leftover Japanese dashi broth (using a dashi pack when I made "snap peas in broth"). I kept the dashi I did not use in the refrigerator for several days. When I deboned chicken thighs for another dish, I warmed up the dashi and added the chicken thigh bones (4) with more sake, slices of ginger and several stalks of scallion and simmered it for 30-40 minutes. I let it cool and again placed it in the refrigerator.  The next day, I removed all the bones and congealed fat and strained it to a sealable container and kept it the fridge until today. I first warmed up the broth and gently poached a half skinless, boneless breast for 10 minutes. I took out the chicken breast and set aside. I added more sake, and light-colored "usukuchi" soy sauce 薄口醤油 to taste with a touch of mirin to finish the broth for this dish. This turned out to be a very nice delicate broth with a hint of ginger.

I shredded the poached chicken into thin strands by hand after it was cool enough to handle. I also made "Golden thread omelet" or "kinshiran" 金糸卵 seasoned only with salt, julienne of cucumber and thinly sliced scallion. I just arranged these toppings on warm cooked rice in a bowl (I used frozen and microwaved rice) and poured the warm broth over top. I did not have miso-cured cucumber キュウリの味噌漬け or "Kaiware" daikon sprouts 貝割れ大根, which were called for in the recipe, and I forgot to add sesame seeds.

My wife usually does not like a dish with lots of liquid like "Ochazuke" お茶漬け as a "shime" dish but she really liked this dish especially the broth. She totally emptied the bowl including the broth. Next time, I will try to make the broth in much less than 10 days.

Monday, January 3, 2011

New year's day sashimi, marinaded salmon and salmon skin roll 元旦の刺身, ロシア漬けと手巻きサーモンスキンロール

This is a repeat of last year but we were again lucky enough to receive the shipment of sashimi from Catalina offshore products on December 31. This time we got fresh farm raised "Toro", which had "akami" 赤身, chutoro 中トロ and Ootoro 大トロ on it. In addition, we got anikimo, uni, and salmon roe. Ootoro was quite good. In the picture, the left back is "namasu" なます大根 topped with salmon roe. This year, I added yuzu juice in addition to rice vinegar which added a nice flavor. The golden uni was also excellent as usual (right back).

I also served marinated salmon which is my mother's recipe (right front). This salmon dish is called "Russian marinated salmon" ロシア漬け and my mother does not know how the dish got the name or where she got the recipe*. Of course, I made my contribution (read modification) to the recipe since I think the pith of the lemon imparts a bitter taste to the dish.  Essentially, I slice fresh salmon (the original recipe uses salt preserved salmon "aramaki shake" 新巻鮭) fillet paper thin, layered with sliced onion, lemon zest (grated by a micrograter), lemon slices (without the rind and pith). As I lay on the new salmon layer I salt it. The marinade is a mixture of sake, vegetable oil and rice vinegar (1:1:3) but I reduced the amount of oil. I tightly pack the salmon in a sealable container and let it marinade for a few days. The picture below is this dish served stand alone on the next day.

When I made the salmon dish described above, I removed the skin with a bit of the meat attached. Using the skin, I made salmon skin rolls as a "shime" dish.  This is a very popular hand roll item in the U.S. but I do not know if any sushi bars in Japan serve this. We like it very much. It is very simple to make, I cooked the salmon skin seasoned with salt, in a frying pan instead of a toaster oven (which is how most sushi bars in the U.S. cook the salmon skin). The skin should be nicely crunchy. I cut the cooked crispy skin into long strips. I used a half sheet of nori crisped up by passing over the gas flame. I smeared real wasabi, added sushi rice, perilla leaf, julienned cucumber and several strips of the salmon skin and made it into a cone shaped hand roll as seen below.

This is a very nice end to your new year's day Izakaya feast.

* I googled (google.co.jp) "鮭のロシア漬け" the marinated salmon recipe and found this blog (in Japanese). The recipe is a very similar to my mother's.  According to this blogger, her mother got the recipe from a Japanese magazine "Kurashi no techo" 暮らしの手帖. The recipe is reportedly published in the section called "Apron memo" quite a number of years ago, although the exact year is unclear. Even though the blogger mentioned the recipe was published some time ago, I was eating this as a kid and it is possible my mother's recipe predates even that publication.

Saturday, January 1, 2011

Happy New Year 2011 明けましてお目出度う御座いました 2011

Saying the New Year's greeting in the past tense must be Hokkadio dialect. My father used to say it this way and my wife somehow picked this up as the correct way to say Happy New Year. Most people, however, will say the greeting in the present tense "明けましてお目出度う御座います".

It seems I have made excuses concerning the New Year feast for 2 years running. Last year, I said I had to work until December 31 and could not make the New Year Boxes or "Juubako" 重箱. This time, I have two major excuses both of which led to a paucity of food products; First one of our favorite Japanese grocery stores closed unexpectedly this year and second because of the recent package bomb scare, my mother's annual New Year's "care package" exceeded the new restrictions to be sent by air--it had to be sent by sea and even though it was sent over a month ago it did not arrive in time. In addtion, we are remodeling our house and the Japanese tea room we usually use to celebrate is not available. In any case, I essentially made everthing in one day on December 31. Although I had to "punt" and use frozen premade vegetables for "Umani" New Year stew (left upper) and used a boiled packaged lotus root "renkon" 蓮根 for sweet vinegared renkon 酢蓮根, the rest is homemade (except the fish cakes and black beans).

Here is our new year soup or "ozouni" お雑煮. We used a hybrid broth of vegetable chicken broth my wife made and kelp and bonito stock.

In any case, we started the new year with a good new year breakfast. Happy New Year!