Monday, February 28, 2011

Cabbage rolls ロールキャベツ

I do not know why and when thinly sliced raw cabbage became the most common accompaniment for Japanese Western style cuisines called "yoshoku" 洋食. It appears that a famous yoshoku restaurant in Ginza called "Rengatei" 煉瓦亭  invented raw shredded cabbage as an accompaniment for their yoshoku dishes. I suppose in contrast to "nappa cabbage" or "Hakusai" 白菜, regular cabbage is considered a "Western" vegetable, thus, an appropriate accompaniment of "Western" dishes. Although many "yoshoku" items are now considered uniquely "Japanese" dishes such as "tonkatsu" トンカツ, you can not serve tonkatsu without shredded cabbage. Another cabbage related dish, cabbage rolls, also became a classic Japanese home cooked food, although it is a Japanese modification of Western cabbage rolls. I suppose many Western cultures have similar dishes with a Polish version or American Polish version (especially in Chicago), "Gołąbki [ɡɔˈwɔmpki]", being the most famous. I mentioned previously that my old favorite "Oden-ya" おでん屋, "Katsu-ya" in Sapporo, served a Japanese version of cabbage roll or "ロールキャベツ", or "roll cabbage" as Japanese call it. My wife usually does not like cabbage and I have not made this dish for a long time but I convinced my wife that I was running out of dishes to bog and made this Japanese style cabbage roll.

The amount below is four small Japanese size cabbage rolls.

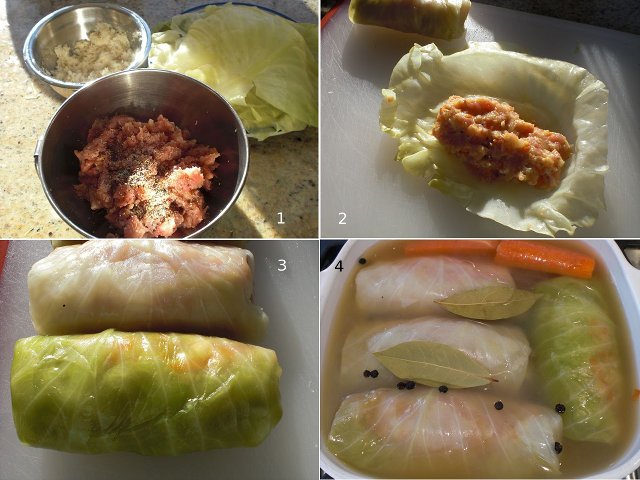
Cabbage leaves: In large scale productions, you boil an entire large head of cabbage and then separate the individual leaves. For my small scale production and small-sized cabbage rolls, I separated each cabbage leaf by first cutting into the bottom veins and then using running water (introducing it between the leaves), to separate each leaf without tearing it. (I prepared 4 leaves). I used a rather small head of cabbage. I boiled the leaves in a large pan with salted boiling water for 10 minutes covered with a plate which fit snugly inside of the pan to keep all the leaves submerged during cooking.  After the leaves were cool enough to handle I shaved off the large veins toward the bottom of the leaves without cutting through them (the #1 image below in the right back).

Stuffing: I finely minced onion (1/3 medium), carrot (1/2 medium), garlic (1 clove), and ginger (one thin slivers) which I sauteed in vegetable oil for few minutes and seasoned with salt and pepper and set aside to cool. You could also add shiitake mushroom, finely chopped, but I did not have one.

For the meat, I used trimmings from a pork tenderloin. I hand chopped it into ground pork (about 200 gram, I guess. The image #1). I mixed in the vegetables above,with bread crumbs (1/4 cup, I use panko, moistened with milk, the image #1 below in the left back). I added an egg (1 large) and seasoned it with freshly ground nutmeg, salt and black pepper. I mixed it well until the stuffing become elastic and hung together.

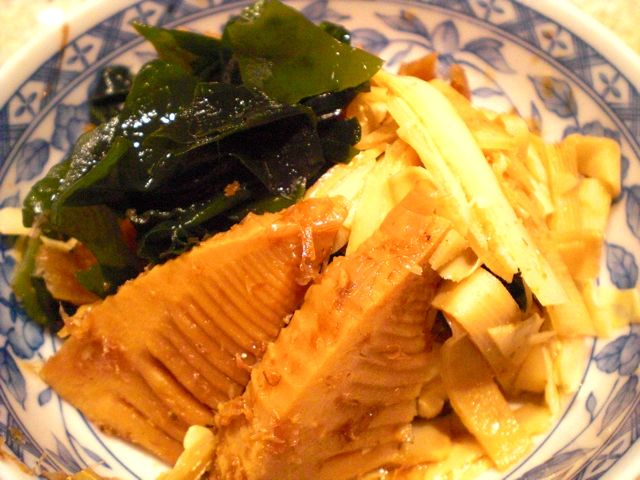
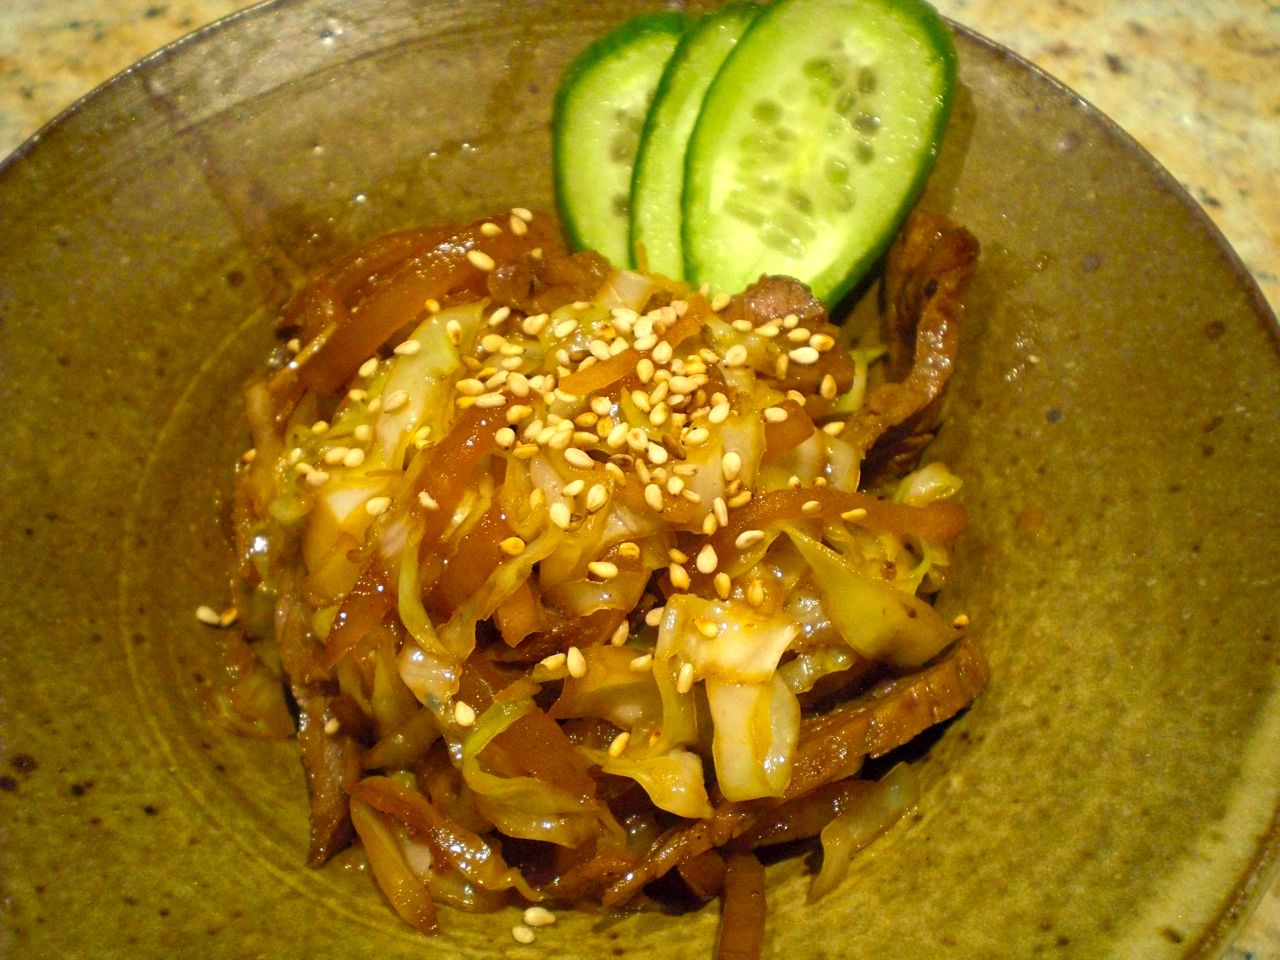
Assembly: As seen in the image #2, I made a small cylinder and placed it closed to the root end of the precooked cabbage leaf and rolled with the both side tucked in and made four rolls. Try not to over stuff the cabbage (the image below #3). (I had some stuffing left over. I made small patties and cooked it like a hamburger and braised it with mirin and soy sauce in teriyaki style. I served it with the side of a Japanese coleslaw. I forgot to take a picture)

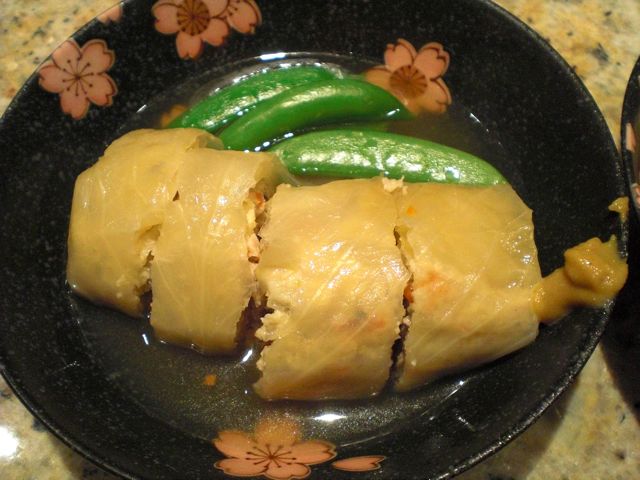
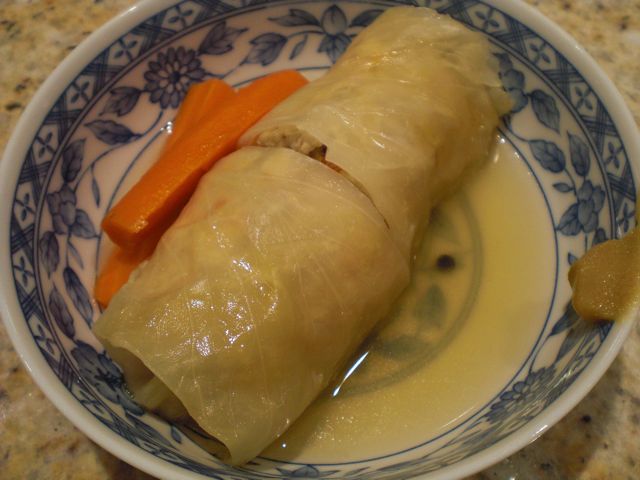
Cooking: I used a Japanese-Western hybrid broth. I used Swanson non-fat reduced salt chicken broth and added bay leaves, sake, whole black pepper corns and a half a carrot (left over from the above). The cabbage rolls should fit snugly submerged in the cooking liquid (the image below #4). Of course, you could cook the cabbage rolls in "Oden" broth or tomato sauce if you like. On a very low flame, I gently simmered it with the lid mostly on and when it started boiling, I set the lid slightly askew and cooked for 40-50 minutes (I added more sake in the middle to compensate for the evaporation).

Here is the cut surface after cooking.

I served it in a small bowl with some broth and a small dab of Japanese hot mustard as would be used for oden. The stuffing was very tender and fluffy with very subtle rich flavor. The pork did not have a porky taste and seemed more like chicken. It was permeated with an interesting amalgamation of western and eastern flavors. The cabbage was also nicely cooked and not too strong. It was very soft, so much so you could cut the rolls with chopsticks. The hot Japanese mustard gave it a contrasting sharp jolt. Even my wife liked this one (it passed our "Mikey likes it" test). She particularly liked the light texture which was so different from the dense heavy classic stuffed cabbage with tomato sauce she learned to dislike as a kid. This dish will go with almost any drink but chilled G-sake was our choice.

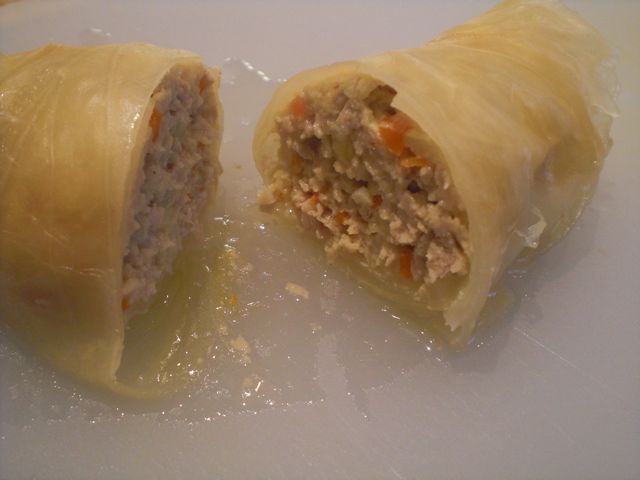
Two days later, we reheated the cabbage rolls with snap peas. It tasted even better.

Saturday, February 26, 2011

Buffalo wings バッファローウイング

This is a classic American bar food. The dish is named after the city in New York state not the animal--buffaloes don't have wings.  These wings come from chicken. This was said to be first served at Anchor Bar in Buffalo, hence the name Buffalo wings. This is my tamed down version.

Although the classic recipe calls for the wings (and drumetts) to be deep fried, I baked these to make them somewhat less deadly. I also used only a small amount of melted butter and Tabasco.

For two servings, I first washed and pat dried the wings and drumetts (6 each).  I then made slits between the two bones of the wings. I lightly salted them and baked in a 400F pre-heated convection oven for about 20 minutes. In retrospect, I should have broiled or baked it in higher temperature to make the skin more crispy.

I melted 2 tbs of sweet butter in a metal bowl over a very low flame and added Tabasco. I added Tabasco in stages so that the butter had a Tabasco taste but was not too hot. The amount of Tabasco and butter is up to you; some people make the wings "red" but we are not that kind of people. Just toss and coat the cooked wings and serve.

Traditionally, this is served with celery sticks with blue cheese dressing (I suppose to cool down the palate). I added carrot sticks as well. The blue cheese dressing is from the bottle (I just chose it based on the shape and appearance of the bottle and avoided big names like "Kraft") This happened to be a really good one with chunks of real blue cheese. It was creamy, sweet, and tangy in flavor. If you so prefer, you could make it from scratch with quality blue cheese, butter milk and sour cream but, I am sure, for the original Buffalo wings at Anchor bar, they must have used commercial blue cheese dressing from a gallon bottle. The sauce has just enough Tabasco to taste some heat, vinegary and buttery flavors but it is not too hot or overwhelming. If you want more heat, it is easy to add more Tabasco on your wings.

This will go well with cold beer but we stuck to red wine (for our cardiovascular health).

Thursday, February 24, 2011

Duck breast and avocado salad 鴨の胸肉とアボカドのサラダ

This is another one of making-something-from-leftover dishes. We had leftover roasted duck breast. I thought I was making a starter dish for sake but I was told that we were having red wine instead. So I had to change my menu on a dime and came up with this starter.

This is just a small salad consisting of greens (baby arugula and spinach), avocado, tomato, cucumber and sliced duck breast. The avocado was nicely ripe and made this dish. The avocado was cut into 1/2 inch cubes. I cut the cucumber in my usual snake belly fashion and then cut into half inch segments. Campari tomato was skinned, peeled and quartered. The duck breast was thinly sliced and halved. The dressing is my usual mustard, honey dressing (Dijon mustard, honey, finely chopped shallot, rice vinegar, olive oil with salt and pepper).

Again nothing special but the combination worked well. We had this with a glass of red, Maroon Winery Spring Mountain District, Napa Valley Cabernet Sauvignon 2007. Despite vinegar in the dressing (the dressing is sightly sweet from honey and rice vinegar is mild), this salad went well with this wine. After this, I made three tuna sashimi dish from frozen yellow-fin tuna including tuna and avocado cubes, tuna "zuke" sashimi, and Yamakake. We switched to a U.S. brewed Gekkeikan sake, "Black and Gold", surprisingly pleasant sake and we enjoyed both the sake and the food. Only problem was that this was Sunday evening instead of Saturday or Friday.

Tuesday, February 22, 2011

Japanese omelet and smoked salmon avocado sushi だし巻きとスモークサーモン、アボカドちらし寿司

One weekend evening, we had a series of small dishes with sake as usual. Among others, I prepared marinated tuna or maguro-zuke. The next day I saw the container I had used for the tuna in the refrigerator and thought 'we must not have eaten it last night because we were too full." So, in great anticipation, I planned to have tuna-zuke donburi ま ぐろ漬け丼 for dinner. But when I opened the container, there was no tuna inside--just the marinade. I asked my wife where the tuna was. She said she didn't know about the tuna in the container but we had eaten tuna the night before and, by the way, it was really good. I asked why she put the container back in the fridge when there was no tuna in it? She told me that she didn't know tuna was involved with the container but she did know, from experience, not to throw out any liquid in a container she may run across while cleaning up, whether or not she knew what it is used for. So, I had to change gears and make something else, especially since (at my request) my wife had prepared freshly cooked rice for the marinated tuna dish.

Since we had half an avocado (left over from the tuna and avocado cubes I made the night before) and smoked salmon, I decided to make this smoke salmon avocado scattered sushi. To make this dish more interesting, I decided to add "dashimaki" だし巻き or Japanese omelet. I have previously posted variations of dashimaki.

Dashimaki: This is a regular item in Izakaya and sushi bar*. "Otsumami yokocho" also have the recipe (volume 1, p64) but this is a rather standard affair and I made it in the way I usually make it. Although you could make this in a regular round frying pan, to make the omelet in a proper rectangular shape, you need to use a rectangular frying pan. I have a small home-cook version with a nonstick surface as seen below. 

*Especially in Kyoto, dashimaki appears to be extremely popular. We found stores in Nishiki market 錦市場 specialized in all kinds of dashimaki variations. In the morning, in one such store, we saw 5-6 cooks lined up shaking large square pans up and down making dashimaki to be sold for the day. Many Kyotoites appear to just come and buy these large rectangular omelets.

I used brown eggs (3 large), dashi broth (3 tbs or 1 tbs per egg), sugar (3 tsp or more if you like it sweet) and salt (a small pinch). I mixed all ingredients using cooking chopsticks. In a square frying pan on medium-low flame, I add vegetable oil (1/2 tsp) and add the egg mixture (just enough to cover the bottom in a thin layer. As the bottom sets but the surface is still wet or uncooked, I start rolling from one end using chopsticks and/or silicon spatula (If you are a dashimaki Jedi, you use only chopsticks). You repeat this several times and keep rolling. It is important to lift the already cooked omelet so that the new egg mixture will flow under it. For my pan, three eggs makes a perfect rectangle omelet which is even with the height of the pan's edge (left lower). I press against the vertical rim to make the two long ends straight. Here is a visual aid by a pro.

Since my omelet was near-perfectly formed, I did not have to use a sushi bamboo mat to shape the omelet. On the right above, you can see the cut surface with multiple layers.

Sushi Rice: As usual, I used sushi vinegar from the bottle. I added as much as the rice would absorb. I let it sit for few minutes after the rice was lightly mixed while the rice was fanned (by my wife). 

I sliced the omelet into one inch thick slices and then cut each slices in diagonal. I placed them on the vinegared rice as seen in the first image. After placing slices of smoked salmon, and sliced avocado, I added a small mound of real wasabi and sprinkled soy sauce on the avocado. I garnished it with nori strips. Marinated tuna would have been better but this is a mighty good "shime" 締め.

...and also as a starter dish for the next evening.

Traditionally this is served with grated daikon. Add a little soy sauce when eating. The side is my drunken tomatoes and cucumber dressed in sushi vinegar.

Sunday, February 20, 2011

Octopus "butsu-giri" in miso-vinegar sauce 鮹のぶつ切りのからし酢みそ和え

This is an assortment of "Chinmi" 珍味 items. Dried shishamo シシャモ and smoked scallop were sent to us from my mother, same as last year. I slightly grilled the shishamo. I also served a smoked scallop from lake Saroma サロマ湖 in Hokkaido.

The "drunken" grape tomatoes (smaller than cherry tomato) were leftovers. I made them based on a recipe called "Bloody Mary" on a stick by Frugal gourmet. The original recipe calls for soaking the tomatoes in Vodka but I did not have any. So instead, I soaked the tomatoes in gin with dry vermouth making them "martini" on a stick. Here is the recipe; I skinned the grape tomatoes (by blanching). Then put them in a container of "martini" and left them to enjoy themselves in the fridge for several days. I served them with a small mound of kosher salt on the side and toothpicks to dip them into the salt. The end product has a nice gin flavor and the tomato is sweet. It is a very nice dish. We particularly like the burst of flavor when we bite down on them. Of course, one of us has to drink up the marinade when we finish all the tomatoes (hardship!).

Finally, octopus with miso-vinegar dressing. I just used an end piece of boiled octopus leg. "Butsu-giri" ぶつ切り means simply "cut into chunks". By cutting this way, it has a different texture than when it is thinly sliced. I just used my usual "Karashi sumiso" からし酢みそ made of saikyo miso 西京味噌(2 tbs), Japanese hot mustard (1/2 tsp from a tube), rice vinegar (1 tbs). I added mirin to adjust the thickness and sweetness of the sauce.

All items are intended to go with sake and they were indeed good pairing for sake. Martini and sake in the same offering--what's not to like?

Friday, February 18, 2011

Broiled bamboo shoot with sumiso sauce 焼きタケノコの酢みそがけ

This is from "Otsumami Yokocho" Volume 1, Page 63. When I made the simmered bamboo shoot with wakame seaweed dish, I set aside the bottom 1/3 of the bamboo shoot and made this dish the next day. I never had a bamboo shoot this way before. I was curious to see how it would turn out. It turned out to be a very simple but good dish.

Bamboo shoot: I used the bottom 1/3 of a vacuum packed boiled bamboo shoot (top 2/3 was used for another dish). I cut the bottom in half lengthwise and then made thin (1/4 inch) half moon slices. I washed off the chalky white stuff (congealed tyrosine) so that the dish would be more presentable. I blotted the shoot dry with a paper towel. I used my toaster oven to broil the bamboo shoot. I broiled it for about 5 minutes. When the edges became brown, I turned them over and broiled them another 4-5 minutes.

Sumiso sauce: I added Saikyo miso 西京味噌 (1 tbs), mirin (1 tbs) and rice vinegar (1/2 tbs) in a suribachi or Japanese mortar and mixed them until it became a smooth sauce.

I arranged the broiled bamboo shoot on a small plate, poured the sauce over and garnished with finely chopped chive as seen above.

This is a nice way to enjoy bamboo shoot. You can really experience the subtle flavor and nice crunchy texture of the shoot. The sauce was very complimentary to the bamboo shoot. It went perfectly with the cold sake we were having.  

Wednesday, February 16, 2011

Flavored rice ball with beef slices in miso sauce おにぎりと牛肉の薄切りの味噌和え

 This is, again, not really post-worthy but I am posting this to make the point that you need to improvise on short notice when eating and drinking at home. This was a small "shime" dish we had on a weeknight, from leftovers. We started with some snacky-snacks (cheese with crackers, roasted cashew nuts and such) and "snap pea in broth", progressed to grilled chicken thigh 鶏の塩焼き with celery salad with kelp tea powder  セロリの昆布茶サラダ, and finished with this "shime" 締め. For most people (especially some fellow bloggers or blog-eagues), the amount of food is not enough or not even close, I am sure.

Rice ball おにぎり: This was from yesterday's cold (but not frozen) rice. I first microwaved and mixed with perilla seedpod tsukudani 紫蘇の実の佃煮, made it to a cylindrical shape and wrapped with a strip of nori.

Beef with miso sauce: I had leftover flat iron steak which was cooked medium rare. I sliced it very thinly across the grain. In a small frying pan, I added sesame oil (1/2 tsp) and chopped scallion (1 tbs) and sauteed for a few minutes and added miso (2 tbs). After a minute or so, I added mirin (2 tbs) and stirred. While the sauce was still loose I placed the slices of steak on top to warm them but I did not mix them with the sauce. After a few minutes, when the meat was warmed through, I removed the meat and placed it on a small serving plate. I turned the flame to medium and reduced the miso mixture to make the consistency firmer (not to the level of the original miso consistency though). I poured the miso sauce on top of the meat. 

I could have served the thinly sliced steak on top of greens with Japanese style dressing (sesame oil, rice vinegar, soy sauce) or I could have served them with sliced cucumber and/or daikon with ponzu sauce and so on.  

I also added asazuke 浅漬け of daikon, nappa cabbage and cucumber. Probably I should have made two rice balls per person even for us.

Monday, February 14, 2011

Simmered Bamboo shoot with Wakame 若竹煮もどき

Newly harvested bamboo shoots are a sign of spring in Japan (not in Hokkaido, though, it is too cold for big bamboo to grow). When bamboo is cooked with fresh wakame sea weed, it is called "Wakatake-ni" 若竹煮 and is considered the ultimate combination of two seasonal food items in spring. My dish is not quite authentic; first of all, I made this from a vacuum packed boiled bamboo shoot and second, the wakame I used is not fresh or even salt preserved but dried. "Otsumami yokocho" volume 1 on page 44 has a similar but more simplified version of this dish. In the U.S., both bamboo shoot and fresh wakame are "out of season" so this is the best I can do for this dish.


The boiled bamboo shoot I bought at a near-by Japanese grocery store had "Himekawa" 姫皮 attached (left image). Himekawa is the very soft top inner part of bamboo shoot. I removed this first and cut it into strips. I was initially thinking of using this for a different dish such as a Japanese "ae-mono" salad but I got lazy and decided to use it in this dish as well. I added "himekawa" to the pot just before serving to warm it up and season. You need not really cook this part further.

I cut off the lower 1/3 (I intended to use the lower part for other dish) and cut the top portion in quarters lengthwise. Then I further cut it into small wedges. You may find chalky white stuff between the segments of bamboo shoot. This is an amino acid (tyrosine) congealed. Tyrosine is not water soluble and is contained abundantly in the bamboo shoot itself.  As such, it is not harmful and OK to eat but, for a better presentation, you may want to wash off most of the visible ones.

I put dashi (1 cup), mirin (1 tbs), sake (1 tbs) and soy sauce (2 tbs) in a small pan on medium flame. If you want to keep the light color of the bamboo shoot, use a light colored soy sauce or "usukuchi shuyu". When it comes to a boil, turn the heat down to simmer. I cook it for about 20-30 minutes or until the cooking liquid is reduced in half. Just 1 minute before serving, I add "himekawa" and hydrated wakame to warm them up but not really "cook" them. To serve, I first place the wakame (left, back in the above picture) and "himekawa" (right, back) in a sallow bowl. I took out the cooked bamboo shoot in another bowl and added bonito flakes and mixed to coat (optional) and served them next to the wakame and himekawa as seen above.

For dried wakame and vacuum packed bamboo shoot, this was not bad. We had this with cold sake as a second dish after we had the avocado and tunas sashimi cubes, a very nice contrast.

Saturday, February 12, 2011

Cornish game hen with ratatouille and baked cauliflower and green beans コーニシュ ゲーム ヘン と ラタトゥイユ

I posted barbecued Cornish hens before . This is the second best way to have Cornish game hen especially on a weeknight. Since we are not barbecuing, it may not have enough taste, thus, requiring prior marination.
On one weekend, we made a couple of vegetable dishes including ratatouille, baked green beans, and baked cauliflower with back olive and garbanzo beans. I cooked a Cornish game hen on Monday evening with these vegetables as side dishes. Because the bird is small, it cooks rather quickly. I pan-fried and then finished it in the oven.

I remove the back bone using kitchen shears by cutting lengthwise across either side of the bone. I flatten the bird on the cutting board skin-side down and then cut the breast bone lengthwise in half using a heavy chef's knife making two halves of the hen.  I marinated the hen over night in the refrigerator using a mixture of olive oil, lemon juice, crushed garlic, roughly cut stalks of green onion, salt and pepper.  Essentially, you are marinating the birds in French vinaigrette. You could add herbs like rosemary or tarragon. The next day, after draining, the marinade, I pat dry the surface with a paper towel and lightly sprinkle salt and pepper. In a frying pan, I add olive oil (1 tbs) and cook the skin side down for 5-7 minutes until the skin become brown. You may have to blot the excess oil using paper towels during this process. I flip the bird over and finish cooking in a 400F convection oven for about 15 minutes or maybe a bit longer. After 15 minutes, take the temperature at the thickest thigh part if or when it registers 160F or higher, remove the bird to a plate and loosely cover with aluminum foil and let it rest for 10 minutes. Meanwhile, I make a simple pan juice sauce. If there is too much oil in the pan, remove most of it (leaving 1-2 tsp) by blotting with a paper towel. Put the pan on a medium flame and add finely chopped shallot and saute for 1-2 minutes, de-glaze with dry red wine (1/4 cup) (white wine, Marsala, or white vermouth will also work), reduce the liquid by half. Add any juice accumulated on the plate on which the bird is resting.  I finish the sauce by adding and emulsifying with pats of butter. Usually it does not need additional salt and pepper since these come off the surface of the bird to the pan while cooking.

The only way to enjoy a Cornish game hen is to use your fingers and go at it. The meat is more succulent than its larger cousin and the skin, especially of the wing, is crispy.

Thursday, February 10, 2011

Braised beef, cabbage and fennel in butter and soy sauce 牛肉とキャベツの炒め物

I took this picture when I served this dish but a few days later when I tried to write up the recipe, I couldn't remember how I made it for a moment--sometimes I surprise myself. This was one of those made-from-leftover type quick and small dishes.  Looking at the picture carefully, I remembered that I used leftover skirt steak, cabbage and fennel. Not really post-worthy but here we go.

I thinly slice left-over skirt steak across the grain, cut cabbage (after removing the thick veins) into thin strips and thinly sliced fennel. I put a small amount of vegetable oil and a dash of dark roasted sesame oil in a pan and sauteed the vegetables for several minutes on a high flame. I then added the steak, mirin and soy sauce and braised for few more minutes. I garnished with roasted white sesame seeds.

This is a nothing small dish but still pretty good especially with sake.

Tuesday, February 8, 2011

Pork saute with red miso sauce 豚肉のソーテー赤味噌ソース

This is part of a whole pork loin we bought on sale a few days ago. From this one piece of meat, I made six 1 inch thick chops, an oven roast and a Sino-Japanese style pot roast. This dish is made with 2 of the chops and served with red miso honey sauce.

Red miso sauce (for 2 serving as shown above): I used red miso (1 tbs) which is mostly made of soybeans and is rather salty and has a somewhat bitter taste. I added warm dashi broth (2 tbs) and dissolved it over a very low flame. When the miso dissolved, I added sugar (1 tsp) and honey (1 tsp). I then added, a good ol' American ketchup (1 tbs). I kept stirring until it came to a simmer and reduced to a thick saucy consistency. I tasted and adjusted the seasonings (slightly more sugar). If it gets too thick, add a bit more dashi, sake, or water. I finished the sauce by incorporating a small amount of butter (1 tsp).

Pork chops: The chops were marinated in sake for a few days. This keeps the meat from spoiling too quickly as well as making the porky flavor mild. After blotting the moisture from the surface of the chops, I seasoned with salt and pepper and dredged in flour. I fried them in a small amount of vegetable oil on a medium flame to make both sides brown (2-3 minutes on each side) and then turned the flame down to complete cooking (another 4-5 minutes).

Since we are eating this with chopsticks, I pre-cut the pork chops and put on the sauce. For the accompaniment, we had nice French green beans (much tastier and skinnier than regular green beans), briefly boiled in salt water (still crispy) and then sauteed in butter with finely chopped shallot and garlic seasoned with salt and pepper. I also served leftover mashed popatoes reheated.  My wife made these a few days ago from boiled red potatoes seasoned with creme fraiche and soy sauce. (Don't ask me how she came up with this combination but it tastes pretty good.) I made this into a sort of a potato pancake. I simply pressed the mashed potatoes into a thin disk in a small non-stick frying pan with melted butter. I fried one side until browned and flipped it over to brown the other side.

Everything went very well. The red miso sauce has a salty nutty flavor and gentle sweetness. The slight bitterness of the miso goes well with the richness of the pork. Ketchup also adds to the dimension of the sauce and final addtion of butter made it richer.


We had this with Casali di Bibbiano Argante Toscana Rosso Red Blend 2006. This is a Super-Tuscan made of no Sangiovese but Cabernet Sauvignon (70%) and Merlot (30%). It tastes more like a good California cab. This is very nice red which went well with the pork and the red miso sauce.

Wine Spectator gave 91 score with a comment; "Blackberry jam and sandalwood aromas, with fresh herbs. Full-bodied, with velvety tannins and jammy fruit. Tannic and rich. Cabernet Sauvignon and Merlot. Best after 2011."(ws)

Sunday, February 6, 2011

Chestnut and parsnip soup 栗のポタージュ

This is a very interesting soup/potage and this can be a very good starter dish. Here we served it in a demitasse cup.

This was made by my wife. The soup is made with peeled and boiled chestnuts sold in a jar from France. (With the failure I experienced trying to use chestnuts-in-the-shell, we are sticking to pre-processed products like this one when the recipe calls for chestnuts). 

She sauteed onions (one medium, roughly chopped), carrots (2 medium, peeled roughly chopped), and parsnip (4 small, peeled and chopped) for few minutes in butter (3 tbs). She then added the chestnuts (16oz) and low-sodium, fat free Swanson chicken stock (about 4 cups) and simmered for 30 minutes. Using an immersion blender she pureed the cooked mixture. She added more chicken broth to adjust the thickness of the soup and obtain a smoother texture. Then she seasoned with salt and white pepper. She served this garnished with a small dollop of creme fraiche and chopped chive.

The chestnuts give a very interesting sweet nutty taste which is complemented by the parsnips. The chestnuts and parsnips also add to a rich velvety texture of the soup. In all, this is a quite unique and good soup/potage.

Saturday, February 5, 2011

Curry flavored chicken salad with grapes and cantaloupe カレー味のメロンとぶどう入り鶏肉のサラダ


I am not sure what is the origin of the recipe for this salad but it may have been based on a recipe in one of the cookbooks or magazines we have. In any case, it is very interesting since it is curry flavored and uses a combination of yogurt, manogo chutney and mayonnaise as a dressing with the addition of fruit; cantaloupe and grapes.

I made this with left-over barbecued chicken but any cooked chicken will do. I coarsely shredded the chicken by hand. Other ingredients are chopped celery, scallion, and walnuts (pre-toasted). I added grapes and cubes of cantaloupe but the fruit can be added later.  The amount of the ingredients are all arbitrary. Of course, I use seedless grapes.

Dressing: I used 2/3 cup plain yogurt and 1/3 cup mayonnaise (happened to be home-made from pasteurized eggs), Japanese-style curry powder (1 tsp, as much as you like, yogurt reduces the heat of the curry so you can use quite a bit of curry powder). and mango chutney (2 tbs, I  like Major Grey's). Season with salt if needed (I did not).

I served this as one of a small dish with a garnish of baby arugula, Campari tomato and a small dab of home-made mayonnaise. This small salad goes well with any drink. The curry flavor, sweetness of the mango chutney and of the fruit with crunch of walnuts all works well.

Thursday, February 3, 2011

Spoon tofu with green tea salt and salted plum topping 掬い豆腐の抹茶塩と梅肉かけ

I have posted similar dishes before but this one is rather good. Tofu comes in various degrees of firmness such as momenkoshi 木綿ごし (firm) and kinugoshi 絹ごし (soft or silken), the softest kind of tofu is called "zarutofu" ざる豆腐 (tofu scoped up by a basket or "zaru" in Japanese but not pressed) and "sukuitofu" すくい豆腐 or spoon tofu. I happened to get a package of sukuitofu at the Japanese grocery store.
Since this tofu is so soft, you just spoon it into a small bowl. I topped this with green tea salt (a mixture of powdered green tea and kosher salt which I make in batches and keep in the freezer in a sealed container). To make this dish more interesting, I added umeboshi 梅干し or Japanese salted plum. This was from the last batch of home made that my mother sent me. I removed the meat of the umeboshi from the stone. I also included the red perilla leaves from the umeboshi container (salted red perilla adds the color and flavor to umeboshi) . I chopped finely both umeboshi and red perilla together and mixed in a small amount of sake (or mirin if you prefer some sweetness). For good measure, I also added a chiffonade of perilla.

Since the tofu is very soft, you just mix the toppings with the tofu using a spoon and enjoy. It had a perfect amount of saltiness and flavor. You have to have this with sake. We had this with chilled G-sake

P.S. I noticed that the taste of leftover G-sake deteriorates after a few days--losing its fresh clean taste and becoming very cloying, even if the the bottle is tightly sealed and kept in a refrigerator. This means that if we open the bottle, we have to finish it in one sitting. What a hardship!

Tuesday, February 1, 2011

Baked cauliflower with garbanzo beans, olive and garlic カリフラワーとひよこ豆、オリーブ、ニンニクのオーブン焼き

This is or another attempt at keeping ready-to-eat vegetables, like my ratatouille, handy. My wife is in charge of making this dish and the recipe below is from her. This dish goes well with any main proteins but especially goes well with lamb or roasted pork. Served by itself, this is also a good drinking snack.

Separate cauliflower into florets (one large head), place it in a bowl. Add garbanzo beans (chick peas), drained and rinsed (one 16 oz can), olives (pitted, oil cured black olive is best, add several kinds if you have them, the amount is arbitrary), garlic (several cloves, separated but with inner skin still on). Season with salt (olives are salty, so careful with salt) and pepper. Add olive oil (3-4 tbs) and toss to coat each florets. Add a pinch of red pepper flakes (more if you like it hot) and mix again. Place it in a baking dish such as a flat pyrex baking dish and bake it in a 350F oven for 30-35 minutes, uncovered, mixing midway through. The cauliflower should be cooked but still crunchy. Be aware that it will keep cooking after the pan is out of the oven. The reason we keep the skin on the garlic is to prevent it from browning and becoming bitter. The cloves still add flavor. The resulting roasted garlic is an added byproduct of the dish and can be used two ways. If you are eating this at home, squeeze out the inside of the roasted garlic and mix it with the other items.  Or use it separately by smearing it on bread and enjoy. If you are taking this as a part of your lunch, I would leave out the garlic as a "public service".

This is a good dish either warm or cold. The crunch of the cauliflower with the hot zing of the pepper flakes really makes this dish. Do not overcook.