Tuesday, August 31, 2010

Roasted pork tenderloin with rosemary ポークテンダーロインのオーブン焼き

We cook this very often and we use the leftovers for sandwiches and other dishes. We cook this in several different ways depending on the situation, although the initial preparation is the same. I use packaged pork tenderloin (usually two in the package) and season it with rosemary, salt and black pepper. We cook this one of three ways: 1) In a low-temperature oven (350F) for 1 hour with other vegetables (sweet potato, onion, garlic-clove separated but with skin still on, carrot etc. coated with olive oil, 2) Seared first in a frying pan and finished in a 400F oven, 3) Using a Weber grill. The end products are slightly different but all are good in their own way.
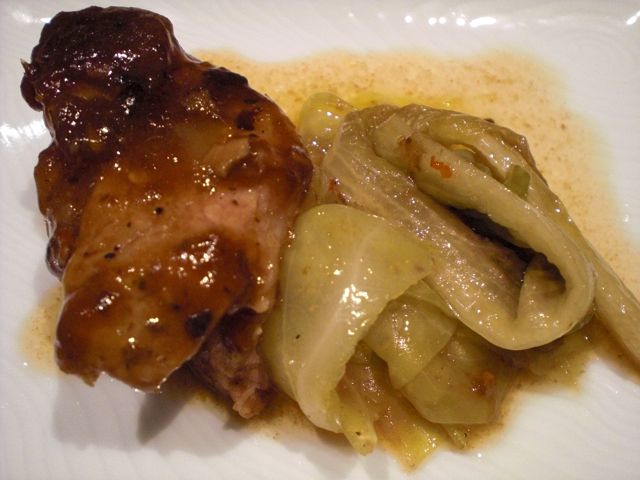
Preparation: After removing the silver skin and the ends (tail and head) of the tenderloins (I use these cut off portions for other pork dishes), you will have two nice cylinders with an even diameter throughout the length of the loins. I finely chop fresh rosemary (2 tbs) and mix it with olive oil (4 tbs) and coat the surface of the meat generously and season it with salt and freshly cracked black pepper. This time I used the method #2 above. I added olive oil (1 tbs) to a frying pan on a medium high flame and seared the surface all round by turning 90 degree once one side is nicely browned. Then I put it in a 400F preheated oven for about 10 minutes or until internal temperature reads 145F at the center of the loin. I remove the meat and keep it warm on a plate under a tent of aluminum foil.
Sauce: I made a red wine reduction with a sprig of rosemary in it ahead of time and used it on the pork. I made this reduction since I had leftover red wine (called "Cheap Red Wine"). I reduced it to 1/4 of the original volume with a sprig of fresh rosemary in it.

I removed the excess oil from the frying pan in which the pork was cooked using a paper towel On a medium flame, I deglazed the brown bits from the bottom of the pan ("fond") with a 1-2 tsp of red wine vinegar and let cook down until it was almost dry. Then I added the rosemary flavored red wine reduction (4 tbs). I also added any juices that may have accumulated on the plate on which the pork was resting.  I seasoned the sauce with a bit of sugar, salt and pepper. I finished the sauce with several pats of butter. Another sauce that we use, especially if the meat is cooked in one of the other two ways and there is no "fond" to deglaze, is a simply reduced balsamic vinegar.

Since I had leftover fennel (1/3 bulb), red onion (1/2 medium), and sweet potato (1/3, medium), I just cut them up in equal sized strips and sauteed them in olive oil with salt and pepper and placed the frying pan in the same oven to finish as an accompaniment. The "presentation" of this dish, as shown in the picture, could stand some improvement but it did taste good.

Monday, August 30, 2010

Chicken patty with perilla つくねの大葉焼き

This is a variation of "Tsukune" つくね or Japanese style chicken patty. You could make this with any variation of seasonings. For this one, besides ground chicken, I added chopped shallot, a small amount of miso, grated ginger, grated garlic, soy sauce and mirin. As a binder, I also added potato starch and small amount of beaten egg. Unfortunately, I did not measure anything but you could always cook a small portion of the meat mixture and taste to adjust the seasonings. I make a flat oval about the size of perilla leaves and attach perilla leaves on both side. On medium-low heat, I fried it in a small amount of olive oil, for several minutes on both sides or until done. You could make a sauce with mirin and soy sauce towards the end of cooking to make the sauce thicken and cling to the patties but I just served it with tonkatsu sauce and Japanese hot mustard.

The perilla becomes crispy and adds its distinctive flavor. Miso make nice nutty and salty taste and it did not need any sauce. Again a simple quick dish but excellent with sake, nonetheless.

Saturday, August 28, 2010

Making tekkamaki and uni sushi at home 鉄火巻きと雲丹の軍艦巻き

Since we received the shipment of tuna and uni from Catalina, we are "pushing" these items on our menu--lunch and dinner. We gave some serious thought to breakfast but decided to draw the line somewhere. I made this as lunch over the weekend.

At home, I usually make sushi rolls 巻き寿司 or scattered sushi "chirashi" ちらし寿司 but not "nigiri" 握り寿司 which requires the skill that I do not have. Among the sushi rolls, one is called futomaki 太巻き. I actually make a deluxe (?) version which our sushi chef, Hajime, at the long-defunct Japanese restaurant, Mikado, showed me how to make many years ago. This deluxe version uses two nori sheets with both uramaki 裏巻き (the rice layer facing outside) and omotemaki 表巻き (the rice layer inside and the nori outside) combined into one roll.  I am sure I will post it sometime in the future. Another roll I make often is California roll since it is uramaki, it is easier to make (it will not come apart easily like a regular hosomaki 細巻き and the ingredients are readily available at any time in the U.S.- avocado and crab meat. 

This time I made a classic Tekka roll 鉄火巻き using an akami 赤身 portion of the tuna and "Uni no gunkan-maki" 雲丹の軍艦巻き.

First, I make sushi rice. Since my wife (and myself) like a good vinegar flavor, I add as much sushi vinegar (from the bottle, but one which contains real rice vinegar such as Mizkan ミツカン brand ) as the rice can absorb.

Next, I make the base for the Uni sushi called "Gunkan-maki" 軍艦巻き, "gunkan" means a miitary ship since it resembles the hull of a naval vessel (see the flotilla in the lower left image). I just make a small oval shaped rice ball and then wrap a nori sheet (cut 1/2 along the long axis to make a half-width nori sheet and then cut long strips with 1/3 of the width of the half sheet). I use a rice kernel to secure the end of the nori strip to make the nori-rice container as in the lower left image (another technique I learned from Hajime the sushi chef). The lower right is a tray of uni from Catalina.

I put enough uni on the gunkan-maki base to cover the rice (generously).

To make the tuna tekka maki, I cut a long rectangle of akami of tuna for tekka maki. I put a small amount of real wasabi on a small plate.

I cut a full sheet of nori 海苔 in half and place in on the bamboo sushi mat or makisu 巻き簾 (lower left) and spread the sushi rice in a thin layer and smear wasabi along the mid-line. I make sure to leave a 1/2 inch of nori at the far end uncovered, otherwise, the roll will not close or stay closed. To prevent the rice from sticking to my hands, I use cold water with a dash of vinegar in it to moisten my hand. I shake off or wipe off excess moisture from my hands using a tea towel just before touching the rice every time. This keeps my hands cold and prevents the rice from sticking.

I place the rectangles of akami on top of the stripe of smeared wasabi. Since I took these pictures myself, I cannot show how I made the roll more precisely using pictures. Here goes a verbal description: with the edge of nori covered in rice close to me, while holding the tuna with my index fingers in the middle of the roll, I aim the rice covered edge to meet the far edge of the rice layer. I then pull back slightly so the two rice edges make good contact. Then I roll forward again so the nori tab covers the rice seam.  (This step is what assures that the pieces of the roll hold together after they are cut). Once the seal has been made, I squeeze the bamboo mat to form the roll.
Anyway here is the end result. The rice should not come out at the bottom seam and the nori should wrap all around. After making two rolls I used a thin bladed sharp knife, put the rolls next to each other and cut both rolls simultaneously. (I do not have a Japanese yanagi-ba 柳刃 so I use a long "Swedish" fillet knife from Global - for slicing smoke salmon, I suppose - but works very well). I dip the blade into the water vinegar mixture and shake off the excess water before slicing the rolls (all this is to prevent the rice from sticking to the blade of the knife). Imitating a sushi chef, I cut the rolls in half first and then cut the each half into thirds.
This was lunch but we had a one small glass of cold sake. (The taste of vinegared rice demands the accompanying taste of sake). It may not look as pretty as the ones prepared by a pro but this tasted very good. Certainly 100% better than any box of sushi bought at the grocer store.

Thursday, August 26, 2010

Sweet shrimp ceviche Japanese style with yuzu and wasabi 甘エビの和風サビーチェ

We got a shipment of fresh tuna, amaebi and other "goodies" from Catalina. The 6 amaebi we received were the most perishable product in the shipment. After eating two as sashimi and shrimp head miso soup on the day the fish arrived, we polished off the remaining 4 the next day (they were large and there were only 6 per pound). I cooked the heads and shells to make a broth and will use it as a soup later. I just came up with this dish especially since the amaebi were a bit larger than usual. I removed the head, shelled, deveined and cut the amaebi into small chunks. I then marinated them in yuzu 柚子 juice (from the bottle) with a pinch of salt, finely chopped scallion (white part), small dices of mini-cucumber. I served this on a bed of baby spinach (dressed lightly with my honey mustard vinaigrette) and thinly sliced cucumber. I garnished it with slices of skinned Campari tomato and a good size dab of real wasabi on the top. Just before serving, I poured the yuzu shouyu sauce over the mixture (I used yuzu shouyu from the bottle--the one I used has a nice kelp flavor as well). The good amount of real wasabi I used really makes this dish. (The real wasabi is not really hot like the other kind which contains mostly western horse radish).  The yuzu and wasabi combination goes very well with sweet amaebi.

Tuesday, August 24, 2010

Sashimi from Catalina Offshore products カタリーナオフショア プロダクツからの刺身

We were deprived of good sushi and sashimi this summer for various reasons. Finally we stopped by our Izakaya substitute, Tako Grill, and enjoyed sake and food, especially seki-saba 関サバ but this "tease" of Japanese food left us wanting more. Then I received an e-mail announcing that Catalina was having a special on several of their products. The targeting of the e-mail couldn't have been better aimed. We responded by ordering a feast of sashimi items from Catalina Offshore products. This time, we ordered fresh blue fin tuna 本マグロ, live amaebi 甘エビ ("live" at least when it was shipped--twitching when it arrived), uni 雲丹, and ankimo 鮟肝. Everything arrived in good condition. The bottom segment of the package had frozen ankimo packed with dry ice and a Styrofoam board separated the fresh fish compartment with plenty of ice packs still mostly solid. The amaebi was a bit too large to my taste (6 to a pound, see picture below) but for something still moving (albeit barely) about as fresh as it can be. The tuna is a 2 lb block with "chiai" 血合い, "akami" 赤身 and "chutoro" 中トロ but no "ootro" 大トロ (this block is toward the tail without a belly portion). As I mentioned, previously, you have to remove the chiai and skin and block out appropriate portions before preparing sashimi. (In my anticipatory zeal to get from tuna block to sashimi as quickly as possible without actually gnawing on the block itself I forgot to take pictures of this preparation process). For some reason, Catalina does not carry toro of fresh blue fine tuna any longer but only frozen Ootoro. 

Here are two sashimi servings to start.

It is an amateurish presentation, or you can say, a true Izakaya style rustic presentation; chutoro (left), akami (right) and amaebi (front). Since amaebi (more like botan ebi or spotted prawn) was large, after removing the head, shelled, and deveined, I cut it into small pieces. It was a cross between Iseebi 伊勢エビ and amaebi and was very sweet with firm texture and was excellent.  The akami and chutoro were very fresh and likewise excellent, although it may not be the very best we ever had.
You can see how big these amaebis are. We used to get amaebi from the company in Alaska but Catalina has much fresher (mostly alive as I mentioned) and better. 
The only problem is that the shrimp heads are too big for deep frying so I made shrimp head miso soup. Some disassembly required for the shrimp head, and nothing delicate about it, you have to use your fingers; to begin, suck out the goodies from the bottom of the head, then dismantle and enjoy all the small bits you can find (whatever than may be). One thing we can say is that the Uni from Catalina is the best, even compared to those we had in Hokkaido or elsewhere in Japan. This is absolutely the best in our opinion; from California, creamy, flavorful and fresh. We had an uni donburi ウニ丼 (sushi rice - with a good amount of vinegar of course - chiffonade of perilla 大葉 and nori 海苔 with a small dab of real wasabi on the top. We did not even need soy sauce since it had such good flavor. 
I think we may OD on sashimi in the next few days. (Two pounds of tuna sashimi and 4 trays of uni are quite a lot for two. Although we did justice to the amaebi, in a surprisingly short period of time). But this is exactly the "fix" we needed.

Monday, August 23, 2010

Norio's slider スライダー

Small hamburgers are called "sliders" in the U.S. and they are a very popular bar food. There appears to be several theories about the origin of the name.  The small burgers sold at White castle burgers are trade-marked as "Slyders". In any case, I made this one day because I had extra ground chicken breast and we had just bought a nice crusty baguette. I made this as an open sandwich on an ellipse of toasted baguette. I served this as the first or second dish (do not remember which) accompanied with a bottle of Von Strasser Cab.  This Cab happens to be the vintage 2000 (we previously tasted 04 and 06) and it was quite good; still lots of nice fruits remaining with mellow but well-structured tannin.

The meat patty is a mixture of ground chicken breast seasoned with minced shallot, chopped basil, garlic paste (I used garlic from a tube), beaten egg, salt, and black pepper. For good measure, I also added a bit of Yuzu kosho 柚 子胡椒 from a tube, which added a certain zing to the meat. I made an oval flat patty matching the size of the baguette. I fried it in a frying pan with a bit of olive oil for 3-4 minutes each side or until done. To assemble, I smeared Dijon mustard on the baguette, layered the chicken patty, added a squirt of ketchup, and topped it with basil leaf and sliced Campari tomato. It sure slid down well!

Saturday, August 21, 2010

Simmered squid stuffed with ground chicken イカの鶏肉詰め

I am not sure where I got this recipe. It may be that this is how my mother made it. I used to make this often but somehow stopped making it for some time. Since we had some nice small squid, my wife requested it.
I just followed my memory and did not look for any recipe. I made the stuffing from ground chicken breast (I could have used thigh), grated ginger, chopped scallion, chopped up squid legs and squid bodies (I used the ones with nicks or holes which were not suitable for stuffing), salt and pepper (the amount is all arbitrary). Make sure the squid body is clean and the cartilage is out. Stuff it to 2/3 full with the chicken mixture and close the end by inserting toothpicks as if it were a needle worked into cloth. I used a classic Japanese simmering liquid consisting of broth, mirin, sake, and soy sauce and added a few slices of ginger for added ginger flavor. I added small baby Yukon gold potatoes in addition to the stuffed squid and simmered it for 30 minutes with the lid on. In the last 4 minutes, I added florets of broccoli. You could add any kind of greens such as snow peas, green beans or asparagus, instead. You can serve this immediately after removing the tooth pick and slicing it into a ring. You could leave the leftovers in the broth in the refrigerator and  reheat it the next day.  It actually tastes better as all the flavors marry.

This is a very nice dish with a good ginger flavor and nice soft chicken stuffing with small bits of cut-up squid. Squid body has nice texture and also adds flavor to the broth. Potatoes absorbed all the flavors. My wife likes to mash up the potatoes in the broth. Cold sake is what we had with this and it was perfect.

Thursday, August 19, 2010

Steamed pork spareribs with black bean garlic sauce 豚骨付きバラ肉の豆鼓蒸し

This is derived from a Cantonese dish called 豉汁蒸排骨 "si zap zing paai gwat".  I should have used "rib tips" to be authentic (which apparently can be had in a Chinese butcher/grocery store) but I used the entire spare rib which has significant belly portions attached and much more meat than the traditional "rib tips".

I used two bone-in pork spare ribs (about 400-500 grams or about 1 lb.). The marinade is made of black bean garlic sauce 蒜蓉豆鼓醤 (2 tbs), chili garlic sauce 蒜蓉辣椒醬 (1 tsp), soy sauce (1 tbs), sake (2 tbs), roasted sesame oil (2 tsp), sugar (1 tsp), potato or corn starch (2-3 tsp) and grated ginger (1/2 tsp). I did not add more garlic or red pepper since both sauces contain garlic and the chili garlic sauce is quite spicy (but you could add these). I first season the meat with a sprinkle of salt and black pepper (go light, the sauce has enough salt) and massage in the marinade and let it sit for 30 minutes at room temperature. I then set up a steamer (I use an electric wok). I place several leaves of cabbage and lettuce on the bottom of a large deep plate (I used a pasta plate) and set it in the steamer with strong continuous steam. Since the size of meat is much larger than "rib tips", I steamed for about 1 hour. Because of the potato starch, a nice sauce will form on the bottom of the plate.

I cut a small portion and serve it with steamed cabbage and lettuce. Although the meat has nice flavors, it is a bit tough. I put the left-overs in the refrigerator. A few days later, after removing the congealed fat, I re-steamed it for another 20-30 minutes with a base of fresh lettuce leaves. The meat became much more tender and the flavor better amalgamated. I served this dish as a small drinking dish but you could serve a larger portion over cooked rice with more sauce, that will be a dinner.

Tuesday, August 17, 2010

German Potato Hash ジャーマンポテトハッシュ

Japanese Izakaya version of so-called "German potato" appears to be rather fatty and they often (not always) use commercial frozen french fries. Onion is cooked with bacon and then combined (Mark's book p24). Instead of the Japanese variation or a classic German potatoes, I make a hybrid between Potato hash and German potatoes. This is perfect for breakfast as well as a snack with a drink. My version is less fatty but not bad (albeit not photogenic either).

This will make a generous (for us at least) serving for two. Instead of bacon, I use roasted pork tender loin seasoned with rosemary, which we cook often. We use the leftovers for sandwiches and other dishes such as this one. I cut small strips of roasted pork tenderloin (about 2 inches long) and fry it with a small amount of olive oil (1 tbs) until the edges get crispy and start to smell a bit like bacon (it's the same animal after all). I add onion, halved and sliced into thin strips (one small) and saute until soft and slightly browned. I season it with salt and pepper. I set these cooked items aside on a plate. 

Meanwhile, I thinly slice and julienne white potatoes (2 medium) and add olive oil (1 tbs) in the same frying pan and saute until all the potato pieces are coated with oil and add the mixture of the pork and onion back into the potatoes. I season again with salt and pepper. After sauteing for 1-2 minutes, I flatten the mixture into a thin disk using a silicon spatula (just in case you have not noticed, I love silicon spatulas) (left images below). I turned down the flame to low and put on a tight fitting lid so that the bottom browns and the rest of the potatoes steam. I cook it like this for 10 minutes. Shake the pan to make sure the entire disk of hash moves as a single unit (meaning the bottom is not sticking and all the potato pieces are sort of melded together because of the starch.) If any portion is sticking, use the spatula to encourage the potato to unstick from the bottom of the pan and flip (right image below). (The flipping part requires some skill to make it all return to the pan as desired. That is one reason you make sure that the pieces are melded together)
Now, keep frying for another 5 minutes, so that the other side becomes brown and crispy. I cut this into 4 quarters and serve. You could serve this with a side of ketchup. For breakfast, serve this with fried egg(s). You could, of course, use real bacon and bacon grease to fry the onion and potato which will make this dish definitely better. But for a lower-fat alternative, this is not bad at all.

Sunday, August 15, 2010

Small squid stuffed with crab meat イカのカニ肉詰め

Squid body is a perfect structure to be stuffed. I saw this recipe in "Takashi's noodles" and wanted to try it for sometime. Instead of serving this on the top of squid ink pasta, I simply served it as an appetizer on a bed of baby arugula with a wedge of lemon. The flavor profile is not particularly Japanese but this can be served with any drink including sake.

I used the body of rather small squid. The stuffing is lump crab meat (not canned), minced shallot, minced fresh tarragon (from our garden) and basil. I seasoned it with salt and pepper. The proportions are sort of arbitrary as I made it. Stuff  2/3 of the squid body with the crab meat stuffing and close it with a tooth pick. I sauteed it in a frying pan with a bit of olive oil for 3 minutes on each side and added a small pat of butter and then put the frying pan in a 450F oven for 3 minutes to complete the cooking. Since there was stuffing left, I added a bit of mayonnaise and Dijon mustard and made small crab cakes as well.

When it slightly cooled, I removed the toothpick and sliced. This is a nice dish and especially the tarragon favor comes through nicely. The freshness of the crab meat appears to be most important. Our crab was not the best. On balance, this is an easy dish to make as long as you have the ingredients. This will pair nicely with a cold white wine such as good crisp Sauvignon Blanc with some acidity but we had it with cold sake, which also went well.

Friday, August 13, 2010

Store bought sushi from a near-by market アメリカ市販のお寿司

This post is to remind those people privileged enough to have easy access to quality sushi and bento boxes, particularly in Japan, how good they have it. In the past 10 years or so, increasing numbers of gourmet markets in the U.S. as well as even regular supermarkets started carrying sushi. In many food courts like the one in Union station, you can find small sushi bars mainly for take-out. Some gourmet markets even have a small sushi bar in the store. Some cafeterias may even offer a box of sushi (mostly rolls). The quality of the sushi served in these places, however, often leaves much to be desired. If we like to have take-out sushi for a party, our best bet is to place a take-out order in our favorite sushi bar for pick up just before the party.
This one was bought from the near-by gourmet market. It is made on the premises, but not to order, the plastic sushi boxes are placed in the cold case. So, sometimes these sushi boxes may be sitting in the cold case for quite some time. I served the sushi on a plate with my asazuke and real wasabi to make it more presentable. I also made a tofu and nameko (small slimy Japanese mushroom) miso soup with a garnish of chopped scallion and myouga.
While the fish, luckily was fairly fresh if somewhat spongy, in general the quality of the sushi was dismal. As you can see in the picture the California roll barely held together. The rice balls were huge (in the U.S. big is better) and unless we practically choked ourselves stuffing them into our mouth in one bite they quickly fell apart while trying for a more manageable two bites. The rice was especially disappointing. It turned out to be dry and hard without much vinegar flavor.  Although sushi means vinegared rice for some reason much of the sushi sold this way seems to leave it out--(saving costs? Americans won't notice?) So why did we even bother buying this stuff? It's better than nothing when you need a sushi fix for lunch. Desperate times call for desperate measures (Due to recent demands at work and other factors we did not have a chance to visit our sushi bar much this summer). At least, the miso soup was excellent (because I made it). We have to hit the sushi bar soon!!

Wednesday, August 11, 2010

Gambas al Ajillo 海老のニンニクオリーブオイル焼き

This is a quintessential tapas dish. As far as I am concerned, any good tapas dish can be a good Izakaya food. Many years ago, our Spanish friend served this to us at a small party held in his backyard. Since then, this "gambas" became our favorite and quick snack accompanying a drink. I think the way I make this dish is based on the recipe in my old tapas cook book with my slight modification (of course).


Shrimp: For this dish, relatively small shrimp (20-25 count/lb) works best. Since the vast majority of shrimp we buy here are previously frozen and thawed at the store (they say "for your convenience" but sometimes they are sitting in a case for several days after thawing), I rather buy frozen raw shrimp and thaw it myself. For quick thawing, I use running tap water. Some say the flavour will be lost in the running water but it is quick and convenient for me. Sprinkling salt on the shrimp after thawing appears to bring back some briny flavours of the ocean. This one is peeled and deveined except for the tail segment. I dry them on a paper towel.

I use a small flat Pyrex pan as seen above but any small flat pan will also work. I add 3-4 tbs of good quality olive oil (olive oil is an important part of the dish and we dip the bread to soak it all up). I thinly slice garlic (2-3 fat cloves) rather than finely mincing it. I slowly fry the garlic pieces on a low flame with red pepper flakes (whatever amount you like) until they are fragrant and the garlic slices are slightly browned. "Slowly" is important since the garlic flavour is transferred to the oil better and the garlic slices become crispy (become garlic chips) without imparting a burnt bitter taste. Take the garlic chips out of the pan and put them on a small paper towel lined plate and set aside. I then fry the shrimp in the garlic scented olive oil for 30 seconds on each side or until just done and take it off the heat. I sprinkle chopped parsley, lemon juice on the cooked shrimp and garnish with the garlic chips. You could sprinkle Spanish paprika if you wish (mostly for decoration). I do not add any salt since it was already added after the shrimp thawed.

For this, we need a rustic and crusty bread like good baguette or ciabatta. We happened to have a very nice crusty ciabatta from a local bakery. We opened the last bottle of Vilafonte. It went with the meal very well.

Monday, August 9, 2010

Grilled salmon with Ponzu soy sauce and Grated Daikon radish 焼塩鮭のポン酢みぞれ和え

"Mizore" みぞれ means "sleet" in Japanese. Whenever you use grated daikon in your dressing it is called  "Mizore-ae" みぞれ和え for an obvious reason. We were getting low on our groceries and I did not see much in the fridge that I could use to make a dish to go with sake. But I found several little pieces of leftover salted and grilled salmon. They were too small to make a dish by themselves. I also found a small end piece of leftover daikon. OK, I have enough to make something.

I grated the daikon and squeeze out the excess liquid (about 1/4 cup) and added ponzu soy sauce (about 1 tbs from the bottle). I then crumbled the grilled salmon leftovers and mixed them into the daikon. I splashed Yuzu juice (from the bottle) on the top and garnished with finely julienned radish and finely sliced scallion (I used the green part for color). A simple quick dish but it was quite nice with cold sake. A good start.

Saturday, August 7, 2010

Grilled egg plant 焼き茄子

In Japan, you can get such nice and fresh vegetables, including cucumbers and eggplants, much more easily than in the U.S.. There are several kinds of Japanese eggplants; some can be even eaten raw ("water eggplant" or "Mizunasu" 水茄子). I like "Kamonasu" 賀茂茄子, famous for being used in Kyoto cuisines. You can not get these easily in the U.S.. The kind of eggplants we can get here are limited to mostly Western varieties. Occasionally, what they call a "Japanese" eggplant is available (a light purple and small elongated kind) but I do not recall seeing similar eggplants in Japan. I tend to use small Italian eggplant and Zebra eggplant for my Japanese style cooking but, sometimes, it does not work out. Simply grilled Japanese eggplant, "yakinasu" 焼き茄子 is wonderful if the eggplant is good. I found a small (baby) Italian eggplant which looked very good but bought only one, because the last time I tried to make this from Italian eggplants, it was pretty bad. I am sure, because  I only got one this time, it turned out pretty good and I wish I had bought more.

Before grilling, I just prick the skin of the eggplant all over with the tines of a fork or a tip of a bamboo skewer to prevent from the eggplant from exploding (This happened once in our Weber grill. We heard a big "bong" noise. A small puff of ash came out the bottom vents of the grill. Upon investigation we found the meat of the eggplant spread all over the inside of the lid. Nothing was left on the grill except for few fragments of the charred skin.) After 15 minutes or so, the eggplant is thoroughly cooked (turn several times during the cooking) and soft as seen below. Make sure the eggplant is completely cooked. Using chopsticks or tongs, peel off the skin holding the cap while it is hot. Using a small knife or a bamboo skewer, cut the eggplant along the long axis (you can plant the skewer in the meat near the cap and then grab the cap and pull the skewer through). repeat this a few times to make long strands of eggplant. Cut at the cap but I keep the cap for presentation. I garnish with dried bonito flakes and chiffonade of perilla. As a seasoning, I can use just soy sauce but I happened to make my dipping sauce for other dishes we had (dashi 2 parts, mirin 1 part and soy sauce 2 parts) so I used my dipping sauce.

Eggplant is almost done along side potatoes which are being grilled for "Jagabata" or potato with butter.

Thursday, August 5, 2010

Grilled Trout 鱒の塩焼き

The types of fish, especially whole fish, we can get in a regular market, is very limited. Among the whole fish we can get almost all the time is a trout. I thought I bought trout that was just cleaned but it turned out this one was deboned and butterflied as well. Since we were planning to grill outside, I decided to grill this fish as planned. I sprinkled it with salt and pepper all around and put sprigs of fresh thyme and slices of lemon inside the fish.

Since I do not like the skin to stick to the grill, I used two large metal skewers so that I can suspend the fish over the charcoals. The fish were fairly large but they just fit side-by-side.
Grilled whole fish, in general, is difficult to present in a pleasing way. While trout, as a white fresh water fish can be rather bland, and if not fresh,  inedible, this fish had a nice thyme flavor and the barbecue imparts a lovely smokiness. When we were in California, we used to cook trout all the time, because it was almost the only whole fish we could get, but we have not have had trout for a long time.

I fondly remember the large juicy grilled herring I ate at the Robatayaki/Izakaya specializing in grilled fish, which was next door to the my old favorite "Oden" place, Kastuya, before it moved from the quaint dead-end alley way near Oodouri park 大通公園 in Sapporo 札幌.

Monday, August 2, 2010

Myouga pickled in sweet vinegar 冥加の甘酢漬 Myouga asazuke 冥加の浅漬

This is probably the last installment of my "myouga" series. This year's crop was not as good as other years but we had enough myouga to enjoy.

The picture below is myouga in sweet vinegar. This is a rather common preparation of myouga and I was told you could get this as a commercial product (in Japan). The recipe is rather simple. I first make sweet vinegar by dissolving sugar in Japanese rice vinegar (I used about 100m of vinegar with 4 tbs of sugar but the proportion is to your taste. I thought this was a bit too sweet but my wife thought it was just fine). I just microwaved it for 30-40 seconds or until the vinegar is warm enough to dissolve the sugar completely. Do not boil, it will make the vinegar less potent. (On the other hand, you may want to gently boil it in a pan to make the sweet vinegar more mellow). I then blanched the cleaned myouga, drained and added it to the sweet vinegar while the myouga are still hot. I keep this in a refrigerator for at least 3 days before eating. The one shown here is about a week old and still nicely crunchy with a sweet vinegar flavor mixed with the distinctive myouga taste. I do not know how long this will keep but I am sure, at least, several weeks. This is perfect for sipping sake or with rice.

This is an assortment of asazuke 浅漬け (cucumber, carrot, daikon, in the back from left to right) and beer marinated daikon (front left) but the main item is, of course, myouga. I made the other vegetables exactly the same way as I posted before but I did not add ginger or hot pepper flakes. In addition to the nice myouga buds, I also added the chopped up stalk of myouga as well. This one has a purely myouga flavor with nice crisp texture.

I think I am running out of myouga recipes. You could of course use finely chopped myouga as a condiment for anything including cold tofu 冷や奴, miso or clear soup, chawanmushi 茶碗蒸し, noodle dishes, sunomono 酢の物 dishes etc.