Sunday, March 29, 2020

Hanami at home 2020

This is the small "Somei Yoshino" 染井吉野 cherry tree we planted to replace the 30+ year old cherry tree destroyed in a nor'easter in 2018. It is still fairly small but it is in full bloom. Another older, larger tree is just 80% in bloom and the third small one blossomed early and now the flowers are gone. Because of the Covid19 pandemic, all restaurants in our area are closed or only open for takeout. So, one weekday, I placed a takeout order for sashimi and sushi from Tako Grill and picked it up on the way home.


Tako Grill was running with minimal staff, Terry at the sushi bar, his wife managing the floor and one cook in the kitchen. Shown below is our sashimi takeout. They had toro, hamachi, uni with squid and Japanese "tai" snapper cured on kelp ("Kobu jime).


Since the little cherry tree was in full bloom and we had a lovely sashimi/sushi takeout, I put together the plate shown below and declared an impromptu  hanami, .


We also got out ususal line up of sushi (toro and hamachi), and California roll (with real lump crab).


The small cherry tree only reaches just above the railing of our deck but it is still beautiful. The sashimi was great. Even the uni was from Maine, it was especially good.


We really enjoyed this and when the sashimi plate was empty we moved on to the sushi without missing a beat. In these trying times, little moments like this are especially cherished and appreciated. We sincerely hope all restaurants and other business can weather this and will soon be open for regular business again. In the meantime, thanks goodness for takeout. Stay safe!

Thursday, March 26, 2020

Salmon cake サーモンケーキ

When it comes to what we eat and how we prepare it, we sometimes find ourselves in a rut. For example, almost every week I get a filet of salmon weighing 1 and 1/2 lbs; "the portion of the filet close to the head, please". I scale and remove the belly portion, and make 4 filets with the rest. I salt and dry them in the refrigerator with the skin side up for few days before cooking. This preparation results in really wonderful crunchy skin when the salmon is cooked. We snarf up the cooked skin from all the filets like potato chips and eat them along with 2 of the filets. We use the remaining filets for salmon salad which we then eat over the next week. To break this rut, I attempted to make salmon cakes from the dried cooked salmon. Since the salmon was cooked, I needed some kind of binder to make the salmon into cakes. I decide to use raw shrimp paste. The cakes held together and came out nicely. Interestingly, however, they tasted primarily of salmon without a hint of shrimp.


Ingredients:
3 small salmon filets, cooked and skin (removed) (eaten previously while still crispy after salmon was first cooked). Crush them in a Ziploc bag to make small flakes.
6 frozen raw shrimp (I used Argentinean red shrimp), thawed, shelled, and made into a paste by chopping them finely with a chef's knife.
1/2 onion, finely chopped and sautéed in olive oil until transparent, let it cool.
1 tbs chopped fresh dill
Salt and pepper for seasoning

For dredging
flour, egg water and Panko bread crumbs

Oil for deep frying

Directions:
Mix the ingredients. I was not sure if I would have to add more binders such as flour and egg but the shrimp paste worked well and I could make small cakes (#1) without much difficulty. I dredged them in flour, egg water and Panko (#2). Deep fried for a few minutes turning occasionally until golden brown and cooked through (the only ingredient that needed to be cooked was the shrimp paste) (#4).


This was a sort of proof of concept but the shrimp paste really worked well as a binder without adding strong flavor of its own. Making salmon cakes this way may be a bit of work as compared to using uncooked salmon or making salmon salad but it is another good way to use leftover cooked salmon. Drying the filets intensifies the flavor in a very good way. The cakes reheated nicely in the toaster oven making a very nice appetizer. Great snack to start the evening.

Thursday, March 19, 2020

Six "otoshi" appetizers お通し6種類

Although I secretly aspire to come up with 6 appetizers to start a meal like we enjoyed at two special izakayas, "Suiko" 酔香 or "Shuhai" 酒杯  in Japan, my appetizer count usually falls short. But one evening I found I could fairly easily come up with a set of 5 appetizers.  After giving it some thought I realized I could make one more for a total of six. Yay! The extra dish, however, did not make the group pic. Its portrait is, nonetheless, shown below.

The upper row from left to right are Chinese-style squid salad (store-bought) with my sugar snap in salt broth, grilled fish cake (store bought) with blanched broccolini dressed in mustard soy sauce, Russian marinated salmon (leftover from the previous evening). (It had been marinading for 2 days by then). The lower row from left to right are octopus leg, cucumber slices and Campari tomato dressed in sumiso sauce and "mizuna" oshitashi 水菜のお浸しtopped with bonito flakes.


Although it missed the group picture, the sixth appetizer was; salmon sashimi and avocado cubes dressed in soy sauce, sesame oil, chiffonade of perilla and finely chopped garlic. The salmon was leftover from the prior evening. I made a slight modification by salting one side and searing it with a kitchen torch before cutting it into cubes. This added an additional grilled flavor and slight crusty texture.


The dish shown below is Chinese-style squid salad 中華風イカサラダ  bought at our Japanese grocery store. The variation of this appears to be available at Catalina offshore products as well.


Below is a small deep fried fish cake which is almost always available at our Japanese grocery store. This appears to be locally made and is pretty good. We heat it up in the toaster oven. I dressed blanched broccolini florets with mustard soy sauce (I now make several Japanese sauces in small squeeze bottles and store them in the refrigerator for instant use).


This was leftover Russian marinaded salmon I made the night before. This marinaded a total of 2 days and was almost completely "chemically" cooked but the onion was better now (marinating just overnight,  the sweet onion was a bit too raw). I topped this with salmon roe and garnished it with perilla.


The dish below came about due to a mistake I made. I thought I got a bunch of edible chrysanthemum 春菊 but instead it was Japanese mizuna 水菜. I blanched it very quickly for 20 seconds, drained and cooled it down by fanning and squeezed out the moisture (I did this in the morning and kept it in a Ziploc bag in the fridge.) I made this to "ohitashi" お浸し("hitasu" in Japanese is to "soak", I made the sauce with equal parts Japanese dashi and concentrated noodle sauce and  "soaked" the mizuna) and topped it with bonito flakes. My wife preferred edible chrysanthemum but this was different and nice in its own right.


We still had the tip portion of the octopus leg left over. I just cut it up into small chunks and mixed the pieces with vinegared cucumber slices and quartered Campari tomato and dressed in sumiso (from the squeeze bottle I prepared earlier).


So with the help of store-bought and leftover items from the previous evening, I finally made a set of 6 appetizer to start the evening--mission accomplished!

Sunday, March 15, 2020

Squid fritters イカのすり身揚げ

This recipe is from "The real Japanese Izakaya Cookbook". This dish is featured on the cover. I ended up, by necessity, having to modify the recipe. Despite the modification, this dish turned out to be very good. I served it, as per my wife's suggestion, with a wedge of lemon rather than "Japanese sauce" as the original recipe suggested. I served it with my usual sugar snaps and Campari tomato.


Since the squid legs were only coarsely chopped, you can see them in the cut surface which gave texture to this dish.


Actually, I made a soup using the squid mixture as per the original recipe. As I dropped the mixture into the broth, I realized the squid balls were not sticking together as well as I expected. For the soup, this was not much of a problem but I did not want the squid balls to fall apart in the hot oil. So, I had to modify the recipe by adding more "binders"(egg, more flour and panko bread crumbs).


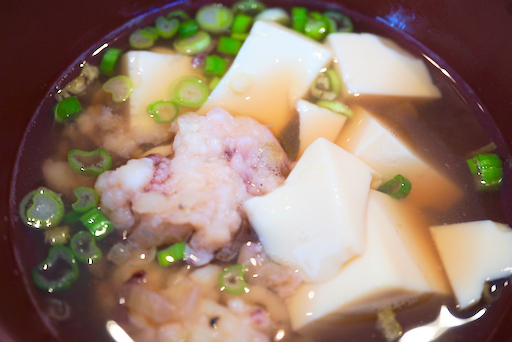
This clear soup was made of dashi from my usual dashi pack, sake, mirin and light colored soy sauce. I made "quenelles" using two teaspoons and dropped them into the simmering soup. They did not maintain a quenelle shape but mostly stayed together. I added silken tofu and chopped scallion to the soup. Just before serving, I added frozen "yuzu" skin to the soup bowls. Despite the fact the squid mixture became a rather amorphous blob this was a pretty good soup.


The squid balls in the soup were based on the original recipe. When I saw how they cooked in the soup I realized I had to alter the recipe to make sure they did not dissolve when I put them in the hot oil. The instructions below are for the squid fritters and include my modifications.

Ingredients (This is my modification):
1lb cleaned squid, tentacles and body, half and half (the body hand chopped into small pieces , #1 and the tentacles cut into small chunks, #2).
2-3 tbs Panko Japanese bread crumbs
1 egg
2 tbs flour
1/2 tsp salt
1/4 tsp black pepper

For frying
Flour, egg+water, panko
Peanut oil for deep frying

Directions:
Mix all ingredients well and make small oval patties. Usual frying process; dredge in flour, dip in egg water, and coat with panko crumbs (#3)
Deep fry for 4-5 minutes turning occasionally (maybe because of the egg, the fritters puffed up into a ball (#4)


I think the reason I had to add more binders (flour, bread crumb and egg) is because the body of the squid was not chopped finely enough (to paste). Next time I will use a small food processor and make it more the consistency of mousse.  It is not easy to hand chop squid.

In any case, the end result was pretty good. We think just lemon is better than Japanese Worcestershire sauce for these rather delicate tasting squid fritters. During the week we heated up the remaining fritters in the toaster oven for a week night appetizer and that worked out very well.

My wife found the daffodils in the front yard with large buds on them. She brought two inside and put them in a Japanese style flower vase. A few days later it bloomed beautifully. Spring is coming!


Friday, March 13, 2020

Cheesy spinach squares

My wife is into making small cheesy appetizers--particularly green cheesy appetizers. This recipe fulfilled both conditions and she had to make it.


The cheese squares were fairly easy to make but despite all the cheese and other ingredients that went into it, we felt, in general, it was pretty bland. The spinach gave it a green color but didn't add much flavor. To jazz it up a bit we tried it with my tomato sauce which was made from skinned Campari tomatoes. The addition of the tomato sauce added more flavor and really helped.


My wife was on the look-out for other ways she could improve the cheese squares and one evening when she was frying up some scrapple for an appetizer she decide she would fry up the cheese squares the same way since she had peanut oil in the pan and it was hot  .


She dredged the squares in flour and fried them on all sides until they had a nice brown crust as shown in the picture below. This was an improvement. The crust had a nice crunchy toasted flavor and the inside was soft with a slight cheesy flavor.  It was okay but not outstanding.


Ingredients (#1 in the composite picture):
1 cup flour
1 tsp salt
1 tsp baking powder
1 cup milk
1 and 1/2 cups grated cheddar cheese
2 eggs, lightly beaten
4 tbs butter, melted
1 cup chopped fresh spinach (original recipe calls or 1package or 9oz frozen chopped spinach).


Directions:
Mix all the ingredients (#1 in composite picture) together (#2 in composite picture) . Place the mixture in a greased 9 inch square pan lined with parchment paper and greased again. (This makes it easier to get out after it is done.) (#3 in composite picture)  Bake in a 350 degree oven for 30 to 35 minutes. Loosen the edges from the sides of the pan as soon as it comes out of the oven (#4 in composite picture) . Let it cool slightly before cutting.

This wasn't bad and certainly went together quickly. It was quite edible but not exciting. If we make it again we will have to make some significant alterations.

Tuesday, March 10, 2020

Salmon sashimi three ways 鮭の刺身3種

Whenever we get frozen sashimi salmon from Catalina offshore products, I have to come up with several ways to serve it since having it as only straight salmon sashimi gets to be a bit too much of a good thing.  The first evening after the salmon was thawed, I served only the belly portion as sashimi for a small starting dish. The next evening, I prepared the plate shown below with three different salmon preparations, octopus leg and several vegetables.


The picture below shows straight salmon sashimi with my usual sugar snap in salted broth スナップ豌豆の塩びたし shown on the right.


The below is a new and very simple dish which I read about somewhere online. I just marinated the salmon sashimi in "shio ko-ji" 塩麹 for a few hours in the refrigerator. I served it topped with "ikura" salmon roe and garnished with chopped chives.  The shio ko-ji made the salmon sashimi softer but added a bit slippery surface texture. This is certainly different and not bad but not our favorite way of serving salmon sashimi.


The picture below shows salmon cured overnight in Russian marinade 鮭のロシア漬け. Since the salmon is marinated only overnight, just the surface of the salmon pieces are chemically cooked but the center is still raw. This partial curing is possible because this is sashimi grade salmon. If I made this dish from regular salmon filet, I would make sure the center was opaque indicating that it was completely chemically cooked. I garnished this with a chiffonade of perilla leaves. We liked this preparation very much. To the left of the salmon is a salad of thinly sliced cucumber in sushi vinegar 胡瓜の酢の物 and sliced Campari tomato. On the right side is blanched broccolini dressed with mustard soy sauce.


Since we had boiled octopus leg from the Japanese grocery store, I served it with sumiso dressing as usual.


We really enjoyed this medley of salmon dishes but luckily there was still a small piece of salmon left to look forward to the next evening.

Saturday, March 7, 2020

Straw grilled bonito at Tako Grill 藁焼きカツオ

On  a recent visit to Tako Grill, the owner Mr. Terry Segawa 瀬川哲紀さん told us that he was going to get some fresh bonito 鰹 from Japan and cook it in the traditional Japanese way of searing and smoking it over a straw fueled fire 藁焼き. Since Mr. Segawa is originally from Kochi 高知 in Shikoku 四国 which is famous for this dish, this was clearly something we couldn't miss and we are glad we didn't.  Firstly, the cooking of the bonito as shown in the pictures below was quite a breath-taking display.


Mr. Segawa placed a small shiny brand-new metal garbage can and filled straw under the restaurant's industrial strength exhaust hood. He told me that he got the straw from a near-by farm. When he lit the straw, the flame flared up bright and strong. As you can see, it made a pretty impressive fire. (From deep inside the restaurant I heard a child's voice pipe up "Daddy, is that a real fire?") I suspect other customers were also taken by the impressive display.


Mr. Segawa skillfully seared the outside of the bonito leaving the inside still raw, i.e. Katsuo tataki カツオのたたき. Not only was the outside seared but it was also washed in the fragrant straw smoke. The result was the dish shown below. It was served with grated ginger, thinly sliced garlic and red onion. Needless to say, the bonito was melt-in-your-mouth tender with a contrasting seared bark texture on the surface and a wonderful straw-grilled flavor. Compared to our usual pre-packaged frozen bonito tataki, this is in a totally different class. This was a wonderful experience without having to go to Kochi ourselves. Thanks, Segawa-san.


I also took some video.


Wednesday, March 4, 2020

Hijiki stir fry and other otoshi ひじきの炒め物と他2品

This is a starter line-up for one evening. Nothing is particularly new. From left to right are "aji-tsuke-tamago" 味付け卵 marinated soft boiled egg, hijiki seaweed and fried tofu stir fly ひじきと油揚の炒め物, and salt-broth soaked sugar snap スナップ豌豆の塩びたし.


Over the years I changed the way I make aji-tsuke tamago a bit (made it simpler and easier). As usual, I use pasteurized eggs. For some time, I have been using "boil-steam" cooking method for boiled eggs which works much better than just submerging eggs in water and boiling. I use just enough water to come half way up the sides of the eggs. (The eggs are cooked by steam). I pierce the eggs first and place them in the water that is boiling rapidly on medium high flame. I put on the lid and cook for 6 minutes 30 seconds for soft boiled eggs with runny yolk (I usually ask Siri to time the 6 1/2 minutes). I cool the eggs using cold running water and then further cool them down using ice water. This appears to make peeling the egg easier (I think). I then put the peeled eggs in a small Ziloc bag and just pour in a small amount of concentrated "men-tsuyu" めんつゆ noodle sauce from the bottle. I remove the air as much as possible and seal. I let it marinade for a few days in the fridge changing the position whenever I open the fridge door. After a few days, the runny yolk jells into an almost custard consistency. To serve I cut one in half and sprinkle with salt. This is usually a topping for ramen noodles but it is also great as an appetizer.


The dish shown below is very similar to what I posted before. I made this because I hydrated too much hijiki when I made the takoyaki variation. This is made of just hijiki, julienned carrot and thinly cut "abra-age" deep fried tofu pouch, stir fried with sesame oil, mirin and soy sauce. This can be a good condiment for rice or as we did here, a great snack.


The dish below has become our favorite way to have sugar snaps. Just blanched sugar snaps are nice but this extra step of trimming both ends of the pods and soaking in salt seasoned Japanese "dashi" broth makes it much better. The only caution is when you bite into them the salt broth that migrated into the sugar snap while it was soaking may squirt out.


So these three items with cold sake nicely started the evening. This home Izakaya is not bad if I say so myself.

Sunday, March 1, 2020

Takoyaki variation with tofu and nagaimo 長芋豆腐たこ焼き

This is a takoyaki たこ焼き ("tako grill") variation made without "tako" (octopus). This recipe is from "The real Japanese Izakaya Cookbook". We made takoyaki (octopus inclusive) using an electric ebelskiver maker before. An ebelskiver maker is the closest we could come to a traditional takoyaki grill.  This recipe deviates significantly from the traditional approach because it uses grated nagaimo 長芋 and tofu 豆腐 instead of flour. Instead of tako is uses hijiki ひじき sea weed and edamame 枝豆 . Continuing on the innovative theme, instead of the usual "Takoyaki sauce", this recipe used "Gin-an" 銀餡 which is a milder and "more sophisticated" sauce.


The surface was nicely brown and crunchy.


The inside was soft and hot showing hijiki (black stringy below) and edamame (green).


Ingredients: (I tried to halve the amount of the original recipe. I ended up making some changes inadvertently, since I just did not want to use "half egg" and I did not want to leave a small portion of nagaimo).

The original recipe is as follows;

1 firm silken tofu 12oz (350g)
Handful dried Hijiki seaweed
8 oz (225g) unshelled edamame pods (then, cooked and shelled)
1 egg
4oz (125g) yamaimo
1/2 tbs sugar
1/2 tsp salt

The amount below are what I think I used. It made 6 balls using the Ebelskiver cooker (the balls were larger than regular takoyaki) as below.

1 small package of silken tofu, about 125gram, wrapped in paper towel with a weight (I used wooden cutting board) to drain for 1 hour.
Nagaimo, skin removed and grated, about 120g (I used up what I had left)
1 egg
Hijiki seaweed, hydrated, arbitrary amount
Edamame, frozen, cooked and shelled, arbitrary amount
Pinch of salt and sugar
"Katakuri-ko" potato Starch (because, proportionally I used more nagaimo and egg than the original recipe which made the batter runnier, I added potato starch to adjust the consistency of the batter).

For the dipping sauce; (this is the original, again, I halved the recipe when I made it)
2 tbs potato starch
2 cup (500ml) dashi
1 tbs soy sauce
1/2 sugar
1/2 tbs mirin
1/4 tsp salt

Directions:
Using a small food processor, I mixed the tofu, grated nagaimo, egg, salt and sugar until the batter was smooth. I then added the potato starch in small increments to adjust the consistency (it was the consistency of a bit runny pancake batter).
I added the hijiki, edamame and mixed (#1)
I preheated my electric ebelskiver to medium high (#2)
I poured the batter filling 6 wells (#3)
After the bottom got set and browned (it took a few minutes, I was too inpatient and started flipping too early)
After several flipping, the surface started getting evenly brown (#4)
I kept flipping until the surface is all cooked and browned about 5-6 minutes (#5 and 6).


This version of takoyaki was good and the dipping sauce went well with it but this is not really takoyaki (I am sure people from Osaka would agree). It is a dish in-and-of its own just resembling the shape of takoyaki. Making  this requires some steps and effort and I would rather make  regular takoyaki which is much easier to make.