Showing posts with label Chestnuts. Show all posts

Sunday, December 8, 2024

Chestnut olive oil bread 栗とオリーブオイルケーキ

This is a variation on the theme of  “olive oil cakes” that my wife has been making recently. Previous versions were: “almond olive oil cake” and “Hazelnut olive oil cake”. The hazelnut olive oil cake was gluten-free but since our purpose in making these cakes was to use various unusual nut flours rather than make gluten-free cakes, she added a small amount of AP flour in the almond olive oil cake which appears to make the cake more stable by preventing the center of the cake from collapsing after it cooled. This time, she added more wheat flour and the cake consistency is closer to “regular” cake. The chestnut flour gave a really nicely distinctive flavor. Next time, she said she might add chunks of prepared chestnuts.


Ingredients
2 cups firmly packed chestnut flour
1/2 cup AP flour
1 1/2 tsp baking powder
Pinch of salt
1/3 extra-virgin olive oil (medium quality is OK)
1 cup sugar
4 large eggs at room temperature
2 tsp vanilla extract

Directions
Preheat oven to 350°F. Grease a 20 cm 8" springform pan with olive oil then line with baking paper (parchment paper), then grease the paper. In a medium bowl, mix the chestnut flour, AP flour, baking powder, and salt. In a large bowl, beat the olive oil, eggs and sugar for 2 to 3 minutes on speed 7 or 8 until it becomes pale and thick (like pouring cream or runny mayonnaise). Add vanilla extract and beat on speed one for 10 seconds. Add the Dry ingredients and mix in gently using a rubber spatula. Pour the batter into the prepared pan and bake for 45 minutes. It will puff up dramatically in the oven but it collapses as it cools. (This version did not collapse as much as previous nut olive oil cakes). Remove from the oven and allow the cake to fully cool in the pan before releasing from the springform pan. This is a rustic cake that has higher edges and a flatter centre.


This is a very distinctive cake. It has a moist dense texture and a deep rich nutty chestnut flavor. (The flavor is unique, in a good way, and very distinctive.) Because of the intense rich flavor a small piece goes a long way. We found it is particularly good served with a slather of blueberry flavored cream cheese. 

Thursday, November 21, 2024

Chestnut Apple Soup クリとリンゴのスープ

Some years ago, we gave up on preparing fresh chestnuts especially the North American variety. These have a characteristic tough inner membrane that goes deeply into the flesh of the nut and is extremely hard to remove. So we switched to already prepared roasted chestnuts that come in a pouch. These come from France and are infinitely easier to use. The only problem is we bought them last year in bulk (12 packages) and we have quite a few packages left. But this is chestnut season—time to bust into those packages of chestnuts. My wife suggested using them to make chestnut soup which we made before. In addition, we found several Fuji apples in the refrigerator. We bought them sometime ago but totally forgot about them. The surface of the apple was wrinkled and looked dry. When we tasted them after peeling the wrinkled skin and surface dried parts their texture was a bit mushy but sweet, juicy and certainly edible. My wife pointed out that we didn’t have parsnips which we often use in this type of soup and she suggested using the newly recovered apples instead. So, we made chestnut soup from the packaged chestnuts and apples and garnished with some left over sautéed shallot and shiitake mushrooms. Adding the apple made this soup sweet (in a very natural way) and great. We really like this. We had this as a lunch with slices of the baguette I baked sometime ago (frozen).


I essentially winged it although I did see some recipes using chestnuts and apples on the internet

Ingredients: (made a bit over 4 cups of the soup)
100 grams of the prepared chestnuts (we used the brand called Gefen)
2 medium onions, finely chopped
1 large stalk of celery, string removed and chopped fine
2 carrots, peeled and cut into small dice
2 apples, peeled, cored and chopped in small pieces
3 cups or more chicken broth
2 tbs olive oil and 1 tbs butter
Salt and pepper to taste

Garnish: (optional)
1 medium shallot, sliced
3 large cups of fresh shiitake mushrooms, cut into half and sliced
1tbs butter and olive oil
salt and pepper to taste

Directions:
In a pan on medium low flame, add the oil and butter. When it is hot and the butter is melted, add the onion and celery and sauté for a few minutes,  Add the carrots and apples and sauté for few more minutes. Add the chestnuts (crumble as you add). Add the chicken broth and simmer for 30 minutes.
Using the immersion blender or mixer, blend the vegetables, add cream (optional).

Garnish
Sauté the shallot until soft and edge is brown, add the mushrooms and cook for a few more minutes and season.

This soup is extremely good. The apple and chestnut are a perfect blend. The apple brings a fresh sweet slightly acidic sharpness while the chestnut is a deep nuttiness. The mushroom garnish is the final touch—bringing a mellow umami to the whole collection. The apple and the mushroom really made this soup special.

Saturday, February 3, 2024

Chestnut, Brown Butter, Sage Muffin 栗の粉とセイジマフィン

This fall we bought a new batch of chestnut flour. It was to replace the previous batch we had been storing in the freezer that had a Best-Use-By (BUB) date of 2015. The new batch came in bulk; 3 bags of flour. Given this “plenitude”, my wife was trying to come up with new dishes to use the chestnut flour. She came across a recipe for “chestnut and sage muffin” at the “Serious eats” site.  This was a perfect recipe to use for 2 reasons: 1) as previously stated we had an abundance of chestnut flour and 2) The sage bush in our herb garden still had nice lush green leaves despite several cold days and snow. The muffin was really good. Nice sage and brown butter flavor and chestnut flour made this muffin very light and moist.


I ask my wife to continue as usual.

Ingredients: (makes 12 small muffins)
Several bunches of sage (with about 5 leaves on each, one of which used in the browned butter the other steeped in the milk).
6 tablespoons unsalted butter
2/3 cup milk
3/4 cup all purpose flour
3/4 cup chestnut flour
1/4 cup sugar
2 teaspoons baking powder
1 teaspoon baking soda
1/2 teaspoon salt
2/3 cup yogurt
1/4 teaspoon vanilla extract


Ingredients X2: (suggested to make larger muffins)
Several bunches of sage (one of which used in the browned butter the other steeped in the milk. The more leaves use the more intense the sage flavor).
12 tablespoons unsalted butter
1 1/3 cup milk
1 1/2 cup all purpose flour
1 1/2 cup chestnut flour
1/2 cup sugar
4 teaspoons baking powder
2 teaspoon baking soda
1  teaspoon salt
1 1/3 cup yogurt
1/2 teaspoon vanilla extract

Directions
1. Preheat oven to 400°F. Combine milk and sage in small saucepan and heat to a bare simmer, then remove from heat and cover. Allow to steep at least 10 minutes, then remove sage, squeezing as much milk as possible from sage before discarding.
2. Place butter and remaining sage in small saucepan and heat over medium until melted and foamy. Allow to cook until liquid butter is golden brown and solids at bottom are deep brown and smell nutty. Transfer to a heatproof container, remove the sage and make sure to scrape out as much of the browned butter solids as possible.
3. Combine all purpose flour, chestnut flour, sugar, baking powder, baking soda and salt in medium mixing bowl. Sift if necessary, or simply whisk together. In separate mixing bowl, combine sage milk, sage butter, yogurt and vanilla and whisk until smooth. Gently fold the wet ingredients into the dry until all streaks of flour are incorporated and batter is fluffy and slightly lumpy. Divide evenly between cups in a 12 cup muffin pan lined with paper cups. Bake 7 minutes, then rotate pan and bake another 3-5 minutes, until a skewer inserted into muffin comes out clean. Be careful not to overbake. Allow to cool in pan slightly before transferring to rack to finish cooling.

These are truly remarkable muffins. They are a combination of unexpected tastes that work extremely well together. The combination of browned butter and sage came through with a pleasing robustness. The chestnut flour added a slightly nutty dimension. The chestnut flour also contributes to the very light and tender texture of the muffin. While these muffins were a bit of surprise flavor-wise they were also a great new discovery. Next time we’ll double the recipe so the muffins are a bit larger.

P.S. In early February, the plum tree in our yard started blooming. It is always amazing and nice to see this when it is still winter and the weather is still cold. It is such a nice early harbinger of hope for the upcoming spring.


Thursday, November 30, 2023

Sweet Potato and Chestnut Rice サツマイモ、栗ご飯

My wife got three relatively small Japanese sweet potatoes or “Satsuma-imo” さつまいも from Whole Foods.  She was vaguely thinking of making sweet potato muffins but the amount was not really enough. I suggested making sweet potato rice instead (I ended up using all three potatoes for three different dishes). Since we also had prepared chestnuts, I made sweet potato chestnut rice. To extend the autumnal theme, I also made miso soup with mushrooms and lily bulb. Since I also made new batches of pickled daikon and “asazuke” 浅漬け cucumber, I served those on the side.


This is a close-up of sweet potato chestnut rice. I sprinkled “goma-shio” ごま塩, a mixture of black sesame and salt.


For the miso soup, I added shimeji しめじand shiitake mushroom along with lily bulb 百合根 which sank to the bottom. We picked the lily bulb up with the chopsticks so they got their place in the photo op.


Ingredients:
2 cups (using the cup came with out rice cooker) of short grain rice (we used “Yumepirica” ゆめぴりかHokkaido rice we got form NY rice factory).
1 inch square kelp
1 Japanese sweet potato, peeled, diced and soaked in cold water
10 prepared chestnuts
1 tbs x4 concentrated “Mentsuyu” Japanese noodle sauce

Directions:
Wash the rice, place it in the rice cooker, add the specified amount of water, add the seasoning, sweet potato and chestnuts and turn on the switch.
When it is done (see below), remove the kelp and gently mix.


This is a very autumnal and nice rice. Nice sweetness from both the sweet potato and the chestnuts with contrasting texture of soft and somewhat crunchy. I just sprinkled the “goma-shio” and my wife, as usual, added butter and soy sauce. The soup also went very well. The nice sweetness and crunchy texture of the lily bulb and mushrooms worked well together. We were also pleased with the daikon tsukemono.

Monday, November 6, 2023

Chestnut Soup 栗ときのこのスープ

We used to get fresh chestnuts from California every fall. The preparation, especially removing the inner brown membrane is time consuming and difficult. So we decided to try commercially prepared chestnuts sold either in a jar or a plastic pouch. As a test to see if the prepared chestnut tasted any different from the fresh, I made chestnut rice 栗ごはん with it. The final dish came out similar to using fresh chestnuts with the added advantage of much less effort of preparation required. (Since we posted  making chestnut rice with fresh chestnuts and this preparation tasted exactly the same we did not post it again.) But this exercise proved to us that fresh and commercially prepared chestnuts are interchangeable.  After making the rice we were left with one and half bags of prepared/roasted chestnuts (about 7-8 oz or about 200 grams.) My wife came up with this chestnut soup recipe which she found on-line. Again I had to modify the recipe because of the ingredients we had. The original calls for dried porcini and fresh button mushrooms but I only had fresh shiitake mushrooms.


Ingredients
5-6 fresh shiitake mushrooms, stems removed and caps sliced.
2 tbs. unsalted butter and 2 tbs. olive oil
1 large leek, white and tender green parts only, finely chopped
1 carrot, thinly sliced
2 celery stalks finely chopped
1 teaspoon minced rosemary (from our herb garden)
7 oz. (200 grams) peeled roasted vacuum-packed chestnuts (see picture below)
3 cups chicken stock
Salt
Freshly ground pepper

For garnish
1 tbs each of olive oil and unsalted butter
5-6 fresh shiitake mushrooms, stem removed and caps thinly sliced
Salt and pepper to taste
Fresh rosemary, finely chopped up


Directions
In a saucepan on medium heat, add the olive oil and butter. Add the sliced shiitake mushrooms, leeks, carrot, celery and rosemary and cook, stirring occasionally, until the vegetables are cooked; about 15 minutes. Add the chestnuts and stock, season with salt and pepper. Bring the soup to a boil and simmer over low heat for 30 minutes. Using an immersion blender, puree the soup until smooth.

For garnish
In a frying pan, heat the oil and butter. Add the sliced shiitake mushrooms, cook over moderately high heat until lightly browned (6 minutes). Season with salt and pepper. I served the soup warm and garnished with the sautéed shiitake and the chopped rosemary.

This is an excellent soup/potage. The chestnuts and leeks imparted a nice sweetness and distinctive chestnut flavor. Although the original recipe calls for heavy cream, I served this warm without any cream. It really didn’t need it. We had this as a lunch with slices of my home baked baguette. I am sure certain chestnut dishes cannot be made using these kinds of prepared chestnuts but I will try to use them in more of our favorite chestnut dishes

Thursday, October 19, 2023

Chestnut Flour Cake with Persimmons and Buttermilk チェストナッツフラワーと柿のケーキ

This is an another cake my wife made from the new chestnut flour.   She came across the recipe using chestnut flour, persimmons, and buttermilk. Since we happened to have all these ingredients, she went for it. The cake was very moist and had nice chestnut flavor but the persimmon flavor is very subtle (i.e. not discernible at all). It was not too sweet and perfect for breakfast.


Ingredients:
172 grams chestnut flour
148 grams or 5.2 ounces of persimmon puree. *
1/2 cup buttermilk (we used my wife favorite buttermilk from Harrisburg dairies.)
3 eggs, at room temperature
1/4 cup melted unsalted  butter
1 tsp vanilla extract
generous pinch of salt
1 tsp baking powder

* The persimmon came from Weee (#1 below). They are “Fuyu” 富有柿 (which is pronounced “fuyuu” meaning “wealthy”) variety and are called chocolate fuyuu because of the dark brown color of the fruit. They were not expensive but they were small with seeds. (Most commercially grown Fuyu persimmons are seed-less). They were irregular in shape with dark blemishes which made them look like they came from somebody’s backyard tree. But when ripened they are very good with pudding-like consistency and sweet. Only problem was that it was very difficult to remove all the seeds/stones.

Directions:
Preheat oven to 350°F (177°C). Butter 9" cake pan. (Having learned from our previous experience with the chestnut flour cake we added a buttered piece of parchment paper to the bottom of the pan and the cake came out of the pan with no problem) 
Puree the persimmon and set aside (#2). Sift chestnut flour to remove any larger bits/chunks.
Mix dry ingredients in bowl and set aside. Using either an electric mixer or a bowl whisk and beat the eggs. Add other wet ingredients. Fold dry ingredients into wet ingredients until fully incorporated (#3).
Pour batter into buttered pan and put into pre-heated oven for about 30 minutes, until the cake is firm in the middle and a toothpick pulls out clean. Remove from oven and cool on baking rack for at least 30 minutes before serving (#4). We reheated in the microwave for 15 seconds (First picture).


This cake was very moist, slightly sweet with a dense texture. The nutty chestnut flavor came through but we couldn’t identify any persimmon taste. This was a very good addition to breakfast.

Monday, October 16, 2023

Castanaccio Pugliese (Chestnut Flour Cake) カスタナチオ

We like pancakes for breakfast sometimes. One of the unusual ones we like to make is chestnut flour pancake”. Since we are now in the chestnut season, we decided to have the chestnut flour pancake for breakfast one weekend. We keep all exotic and whole grain flours including the chestnut flour in a small freezer in the basement. When my wife got it out, she realized its BUB (best used by) was in 2015. It smelled ok. We went ahead and made the pancakes which were very good but even by our standards this flour was a bit too far past its BUB. We decided it is the time to buy a new batch. We got a couple of bags of chestnut flour and my wife looked for some new recipes to use it. She came across this recipe for chestnut flour cake on-line. Actually, she made a chestnut flour cake with the same Italian name “Castagnaccio” previously. But that cake was quite different from this one. It was very savory and did not use any leavening agent, or sugar but did use fresh rosemary which provided good flavor. Overall, however, we were not crazy about it because it was rather dry and crumbly. The new recipe she found must be a variation of an Italian generic cake called castagnaccio. In any case, the major differences are this cake uses a leavening agent, sugar and coco powder. Instead of herbs such as rosemary this used a combination of nuts and candied fruit. It is much thicker as well. This version is more suitable for breakfast or dessert than the previous version which was more savory and as the original recipe suggested “should be washed down with red wine”. The common thing is that both cakes are quite crumbly. (We ended up eating both of them as crumbs with a spoon.)


Ingredients
1 1/2 cups chestnut flour
1/3 cups sugar
1 tablespoon baking powder
2 tablespoons cocoa powder, plus more for dusting
Pinch of salt
1/2 cup extra virgin olive oil, plus more for brushing
2 tablespoons honey, plus more for serving
2 large eggs
1 cup milk
1 cup of Harry and David’s medley of candied fruit. (The original recipe calls for 1/2 cup raisins and 1/2 cup dried cranberries, plumped in 1/4 cup warm water or wine - preferably Vin Santo).
1/3 cup toasted pine nuts
1/3 cup roughly chopped toasted walnuts (As added measure we added chopped chestnuts)
Confectioner's sugar for dusting

Directions:
Preheat oven to 350F degrees. Prepare a 9-inch cake pan (The original recipe suggested lightly greasing it with olive oil but we had trouble getting the cooked cake out of the pan. We suggest next time greasing the bottom of the pan and adding a layer of greased parchment paper.)
Toast the pine nuts and walnuts. In a large bowl, swift together the flour, sugar, baking powder, cocoa powder and salt. In a separate bowl, whisk together the olive oil, honey, eggs and milk. Slowly pour the liquids into the dry ingredients, whisking very well to avoid lumps. The batter should be smooth and a bit liquid. Add the nuts and dried fruit. Pour the batter into the prepared pan, and bake for 35 minutes, or until the cake begins to puff slightly and the middle is set. Remove from the oven and cool completely before removing from pan.
Dust lightly with confectioner's sugar and cocoa powder and serve with some warm honey.


We found it was difficult to remove the cake from the pan. A portion of it stuck to the pan and crumbled. (See the picture below). (Next time, we will use buttered parchment paper on the bottom of the pan). Even the portion that came out in one piece was difficult to cut into wedges since it kept crumbling. The only good thing was that even the crumbs tasted good.


Although eaten in crumbs this cake was very good. The chestnut flour added a nuttiness to the overall chocolate flavor. The pine nuts, walnuts and dried fruit added little bursts of flavor and texture. The dried fruit was particularly nice because it added a burst of sweetness. Interestingly, over time the chestnuts we added became rock hard and we had to be careful to remove them from every mouthful. We liked this cake better than the previous version my wife made. It would just be nice if it did not disintegrate into crumbs.

Wednesday, January 4, 2023

New Year’s day Evening 元旦の夕べ

So finally, we busted into the osechi box for the New Year’s day evening feast. Like we did before, I decided to use “Tsugaru-muri” 津軽塗り lacquerware two-tier lunch box (one tier for each of us) to serve the goodies. As a side, I also served the diakon-namasu 大根なます I made topped with slices of boiled Spanish octopus leg we got from D’Artagnan  and Ikura salmon roe.


I picked up most of the key items here including our favorites like “kazunoko” herring roe marinated in miso かずのこの味噌漬け, “karasumi” 唐墨 botargo and “ankimo tofu” あん肝豆腐 monkfish liver terrine. I lightly toasted karasumi, duck breast and “sawara saikyo-yaki” 鰆の西京焼き before serving.


These small items were such a treat. We enjoyed every bite along with a sip of our house sake “Tengumai daiginjo” 天狗舞大吟醸.

Friday, October 29, 2021

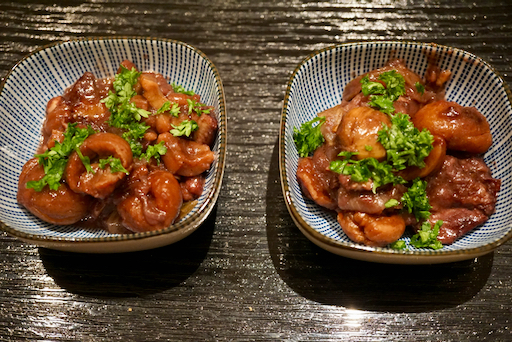
Chicken stew with red wine and chestnuts 鳥もも肉と栗の赤ワイン蒸し煮

This is another dish made with chicken and chestnuts. Compared to the previous one which had a traditional Japanese flavor, this one uses red wine. 


This dish tasted quite different from the Japanese flavored one and because it was made with red wine (needless to say) it went very well with red wine. Since the chicken was dredged in flour and then cooked, the sauce was thick; nicely coating the chicken and chestnuts.


Ingredients:
2 chicken thighs, bone removed and cut into bite size
200 ml dry red wine (I used Tempranillo from Rivera del duero which I happened to have)
2 bay leaves
1 medium onion, cut into rings
1/3 celery stalk, sliced on bias
1 clove garlic
2 tbs vegetable oil (I used olive oil)
1 tbs butter (I used unsalted)
2 tbs AP flour
10-15 prepared chest nuts (I used commercial chestnuts from a jar)

2 tsp Worcester sauce
Fresh parsley, chopped, for garnish


Directions:
Marinate the chicken in the red wine and the bay leaves for one hour (room temperature) or overnight (in the refrigerator).
Remove the chicken, reserve the marinade and the bay leaves
Season the chicken with salt and pepper, dredge in the flour and set aside
Add the oil to the pan and sauté the garlic, celery, and onion. Remove when cooked and softened and set aside.
In the same pan, melt the butter and brown the chicken pieces.
Add back the vegetables and the marinade with the bay leaves, the Worcester sauce and cook for 15 minutes mixing occasionally.
Garnish with chopped parsley.

We really like this dish. Although the original recipe calls for sugar and granulated chicken bouillon, I did not use them. The chicken kept its shape. The chestnuts added an additional “meatiness” to the dish.  The combination of red wine sauce and mildly sweet chestnuts went well together. 

Saturday, October 23, 2021

Chicken and chestnuts stew 鶏肉と栗の煮込み

For some years we have gotten fresh North American chestnuts from California. It is a lot of work to peel/clean chestnuts. It is particularly hard to remove the internal brown membrane or “shibukawa” 渋皮 that extends into the meat of the chestnut and is a particular characteristic of North American chestnuts.  The chestnuts we got from California last year were a bit disappointing. They were kind of dry and chalky. So this year we got prepared chestnuts in a jar. According to the label they appear to have been packaged/processed in France but the chestnuts themselves originated in unspecified EU countries. It said “roasted chestnuts” but in fact they were steamed. When we opened the jar, many of the chestnuts were fragmented with a few whole intact chestnuts tucked in at the top. They were not sweetened and tasted fairly good with nice texture**. So I decided use the chestnuts for this stew dish I saw on line. Since I had leftover daikon and burdock root I need to use up this recipe was a perfect choice. Although the recipe calls for “renkon” 蓮根 lotus root, I did not have it. I made this one weekend morning and served this as a lunch with kinpira-gobou 金平牛蒡 and rice.

**Interestingly, my wife discovered while eating the dish I made that several of the chestnuts indeed had the internal  brown membrane. These membranes were left in the nut and the nut was just processed as if they weren’t there. It was a rather unpleasant surprise to bite down unexpectedly on the hard shell-like substance. After that she recommended checking the chestnuts as they come out of the jar and if necessary dismantling them to remove any membrane left. We saw this as a sloppy element of the processing. 


Not all the items I put in the dish are seen in the picture. I also put in konjack or konnyaku こんにゃく.The seasoning is typical Japanese but the kobou flavor comes through strongly. While simmering, the chestnuts broke into large chunks but tasted good.


According to the recipe the chicken was to be cooked in water with sake and scallion before adding to the rest of the ingredients. I would have just put the cut up chicken into the stew. I suppose this extra process would reduce “chicken-ness”.


Ingredients (at least 4 fairly good size servings).
For pre-cooking of the chicken
Two chicken thigh, bone removed (I left the skin on) .
2 tbs sake
2 scallions
several slices of ginger
12000 ml water

For stew
2-3 inch daikon, peeled, cut into 1/2 inch thick rounds and then quarters
2-3 carrots, peeled and cut into bite sized pieces (“rangiri” 乱切り cut at 45 degree angle as you rotate the carrot)
1/2 “gobou” burdock root, skin scraped off using the back of the knife and also cut into bite sized pieces using “rangiri”
2 inch long renkon, skin peeled and cut into 1/4 inch thick half moon (I did not have renkon).
1/2 Konnyaku, torn into small bite sized pieces by hand (irregular shapes increase the surface areas), parboiled and drained
10-15 parboiled green beans
12-15 chestnuts (original recipe calls for roasted and sweetened chestnuts called “Tenshin amaguri” 天津甘栗.

For cooking liquid
250ml of the water in which the chicken was cooked
250ml dashi broth
100ml sake
3 tbs mirin
3 tbs soy sauce
1-2 slices of ginger cut into julienne


Directions:
For pre-cooking the chicken
Add the sake, ginger and scallion to the water and let it come to a boil then place the chicken into the water.
Turn down the flame to simmer and let it cook for 5 minutes and then turn off the flame. Let it stand for 15 minutes (the original instructions said cook for15 minutes but I thought that would be overcooking especially since the chicken will be simmered again with the vegetables).
Take out the chicken and cut into bite sizes pieces.
Keep the water which was used for cooking the chicken to  cook the vegetables.

For stew
Add the chicken cooking liquid to a pan
Add the chicken, vegetables and konnyaku
Cook them on medium high flame
Once it starts boiling, turn down to simmer, add the chestnuts and cook for 20 minutes.
Add the green beans in the last 5 minutes.

This has a typical Japanese flavor profile. I am not sure pre-cooking the chicken is necessary. The prepared chestnuts had a natural sweetness and the entire dish was really nice if not outstanding. The quality of the jarred chestnuts was not the best we have ever had but it was still a lot easier then trying to process the raw chestnuts and tasted better too. 

Friday, January 31, 2020

Kuri-kinton Daifuku 栗きんとん大福

In the Sushi Taro Osechi, we always get two traditional New Year items "kuromame" or simmered black beans 黒豆 and "kurikinton" or mashed sweet potato with chestnuts 栗きんとん. Although these are traditional "auspicious" foods for New Year, they are a bit sweet and we usually eat them last as a dessert. This year I wanted to do something different. From the leftover "kuromame", we made "green tea cake with kuromame" 黒豆入り抹茶ケーキ as before. As something new, I made "daikufu" 大福餅 with "kurikinton" in the center for the first time.  Diafuku literally means "Big luck" or "good luck" and usually has sweet red beans or "anko" あんこ in the center. I thought because the "kurikinton" was yellow in color (representing gold or riches) and sweet (in the old days in Japan sugar was rare so anything sweet was revered), it was appropriate to substitute for the beans with good-luck "kurikinton". I also added cooked chestnuts (store bought). It turned out the kurikinton had a generous amount of chestnut pieces as well so the addition of the chestnuts was not really needed but made the end result more sumptuous. Although it was the very first time I tried to make daifuku it turned out OK. I followed the instructions from a recipe on line (in English with a video).


This is the cut surface. My wife thought the mochi skin could have been a bit thicker.


Ingredients: (I halved the amounts specified in the original recipe. It made 5 daifuku)
Kurikinton (came in the osechi box) (#2)
Additional cooked chestnuts (store bought in a jar*) (#1)
100gram Mochi-ko もちこ Japanese rice flour (or Shiratama-ko 白玉粉)
90 grams water
25 grams sugar
50 grams or as needed potato starch 片栗粉 for dusting

* I did make chestnuts cooked in syrup 栗の甘露煮 this past fall. They came from California but they were dry and chalky. I tasted them and decided to use the store bought instead).

Directions (near Verbatim quote from the "Just One Cook book" recipe for my own convenience, please look up the original recipe):
1. Combine mochiko and sugar in a medium bowl and whisk all together.

2. Add water and mix well until combined.
3. Cover the bowl loosely with plastic wrap. Cook in a microwave on high heat (1100w) for 1 minute. Take it out and stir with wet rubber spatula. Cover again and cook for 1 minute. Stir again, cover, and cook for 30 seconds to finish cooking. The color of mochi should change from white to almost translucent.
4. Cover the work surface with parchment paper and dust it generously with potato starch. Then transfer the cooked mochi on top.
5. To prevent from sticking, sprinkle more potato starch on top of the mochi. Once it’s cools down a bit,  using a rolling pin roll the mochi into a thin layer. Apply potato starch on your hands and the rolling pin.
6. Transfer the mochi with parchment paper onto a large baking sheet. Refrigerate for 15 minutes until the mochi is set.
6.Take the mochi out of the refrigerator and cut out 2-3 inch circles with a cookie cutter (#3).
7. Dust off the excess potato starch with a pastry brush. Place plastic wrap on a plate and then the mochi wrapper on top. Then lay another layer of plastic wrap down. Repeat for all wrappers (#4). 


6. Place the chestnut and kurikinton in the middle (#5)
7. Pull up the edges  in the center and pinch it together (#6).

For my first try, the mochi skin came out quite soft and nice. The Daifuku had just the right amount of sweetness and combined texture of soft and crunchy. This is a good Daifuku variation.

Wednesday, October 30, 2019

Chestnuts in syrup and sweet potato with green tea お茶請け

The North American chestnuts we got this year were not as good as usual. They were kind of dry and chalky. We made our usual chestnut rice  栗ご飯 using the fragmented ones and made "kanro-ni" 栗の甘露煮 or chestnuts simmered in syrup. Since I also made "sweet" Japanese sweet potato, we had both as a snack with green tea which is called "Ocha-uke" 御茶請け.


The tea was sold by Hibikian 響庵 and came from Uji 宇治 . With green tea, something sweet goes well. Although both the chestnut and sweet potato are not "sweet tea cake", they are sweet enough to be "ocha-uke".


As before I boiled the chestnuts after soaking them for a few hours in water. I removed the outer and inner skins while they were hot. I simmered the peeled chestnuts in a simple syrup (equal amounts of water and sugar) for 30 minutes and cooled in the syrup.


Once in a syrup, the chestnuts will last for a while in the refrigerator. As I said, this year's batch was not the best but still, the chestnuts brought an autumn taste.

Saturday, June 2, 2018

Fried taro root cake in broth 里芋まんじゅうの揚げ出し

This recipe is again from "a Buddhist  Monk" which regularly appears in Asahi-shinbun Japanese newspaper. Since I got taro root or "sato-imo" 里芋 from our regular grocery store and saw this recipe video, making this dish was a "no-brainer". I did not follow the original recipe precisely since I only had oyster mushroom (it calls for shimeji mushroom).


For  greens, I used blanched rapini instead of spinach just because I had it.  Of course, I did not used vegetarian broth and instead used bonito and kelp broth. I also did not have edible lily roots called "Yuri-ne" 百合根 or wood ear mushroom "ki-kurage" 木耳 which were called for in the original recipe.


Ingredients (for 5 dumplings):
Sato-imo "taro", 4 medium, peeled, parboiled and washed in cold running water (to reduce the slimy surface).
Fresh mushrooms (Original recipe calls for Shimeji mushroom, I used oyster mushroom), arbitrary amount.
Green vegetables (Original recipe calls for spinach, I used blanched rapini), arbitrary amount.
Dashi broth 200ml (I used a "kelp and bonito flakes" dash pack but to make it a vegetarian dish one can use kelp broth)
Soy sauce 1 tbs
Mirin 1/2 tbs
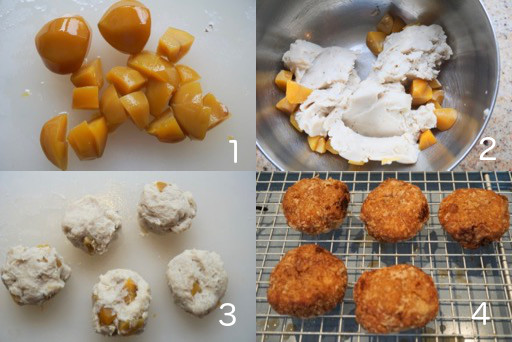
Prepared chestnuts, 5, (I used bottled preserved chestnuts in syrup called "kuri-no-kanroni" 栗の甘露煮 (#1 below), cut into small chunks.
Potato starch or "Katakuri-ko" かたくり粉 for dredging.
Oil for deep frying


Directions:
I added the parboiled sato-imo into the seasoned broth and cooked for 15-20 minutes or until a tooth pick goes through easily.  I let it cool down in the broth and mashed it in a Japanese suri-bachi mortar すり鉢 then mixed in the chestnuts (#2).
I made small flat rounds (#3), dredged in potato starch and deep fried in 350 F oil for 3-4 minutes until the surface was nicely browned (#4).
I addeds the green and mushroom in the broth the sato-imo was cooked in and heat it up for a few minutes. I tasted and adjusted the seasoning (I added a small amount of additional soy sauce).
I placed the sato-imo cake in a serving bowl and arranged the mushrooms and the greens then
poured the warm broth over everything and served.

This is a very nice and interesting dish. The sato-imo cake has a thin crust, very soft creamy texture with the chestnuts being nicely firm and sweet. I think the blanched rapini with its slight bitter distinctive taste went better than spinach would have. This is also a rather filling dish.

Monday, December 5, 2016

Chestnuts 北米産の栗

In mid September, we finally got a shipment of North American Chestnuts from Girolami farm. I have already exhausted my repertoire of chestnut recipes but one post per year is warranted to commemorate the chestnut season.  This year, I made only a few dishes. The first one was chestnut rice 栗ご飯.  I used regular Japanese rice instead of sweet rice this time. As before, I made it in the "Kamado san" かまどさん donabe rice cooker.


North American chestnuts have many creases and when mixed tend to crumble into smaller pieces. I seasoned the rice with a mixture of black sesame seeds and kosher salt "Goma shio" ごま塩.


Since it was Sunday, we had some small dishes (which I do not remember) and the chestnut rice was the ending or "shime" dish. I usually barbecue some kind of meat mostly for sandwiches the next week. This time we cooked pork roast.


Since we were already rather full, we had a few slices of pork with cucumber onion salad with Greek yogurt dressing.


Here are all three items lined up. I was a pretty good combination. 


This is just a composite picture of this year's chestnuts. They are nice large, fresh chestnuts (much better than imported uncooked chestnuts from Europe).


I've finally gotten the hang of peeling these type of chestnuts. I first soak them in cold water for several hours and then boil them for 30 minutes. I take several at a time and start peeling them while they are still hot. The outer skin is easy to peel but the inner skin requires some effort. In any case, I peeled quite few of them in no time.


Monday, November 9, 2015

Chestnut flour crepes with honey Ricotta 栗の粉クレープ

This is a continuation of the seasonal chestnut flour recipes. This is a  recipe by Mario Batali.  We served it with very ripe and sweet Mission figs.


This is a rather simple recipe.

Ingredients
1 cup chestnut flour
2 extra large eggs
1 1/4 cups water
2 cups ricotta
1/2 cup honey
2 tablespoons olive oil

Directions
Sift the flour into a mixing bowl and beat in the eggs, 1 at a time. Add the water, whisking until smooth. Allow to stand 15 minutes.

Place the ricotta in a mixing bowl and stir in half the honey.

Heat a 6 to 8-inch nonstick frying pan over medium heat and brush with some of the olive oil. Add 2 tablespoons crepe batter and roll pan to distribute evenly and thinly. Cook until the crepe is firm on the underside and is curling up at the edges, about 1 minute (see below picture).


Flip the crepe and cook on the raw side for about 30 seconds (see picture below).


Continue making crepes until all the batter is finished, stacking each finished crepe on top of the previous one, to keep them warm. To speed up the crepe making process use multiple skillets.

To serve, spoon 2 tablespoons of the ricotta honey mixture in the center of each crepe, roll it up and placed a dollop of honey Ricotta (the original recipe suggested to put honey but that would have been too sweat for us).


We really liked the honey ricotta. The crepes are a bit dry/brittle (or "bosoboso" ボソボソusing Japanese expression) but had a unique flavor of chestnut. We will not get chestnut flour just to make this crepe in the future, though.

Friday, November 6, 2015

Chestnut Flour Cake: Castagnaccio 栗の粉のケーキ:カスタナチオ

Since my wife got chestnut flour, she searched for some recipes and came up with this Tuscan chestnut cake. This is indeed an interesting cake. As the recipe indicated, it requires wine to "wash it down".


This is a flat cake without any leavening agents. It is savory in taste with rosemary, pine nuts, walnuts and raisins.


My wife put some of these in the batter and some on the top.


We made a few variations from the original recipe.

INGREDIENTS

2 ounces raisins
16 ounces chestnut flour
2 tablespoons sugar
Zest of one lemon,
Pinch salt
2 cups water
3 tablespoons olive oil, plus more for pan
1 fresh rosemary sprig, leaves picked and finely chopped
1 ounce toasted chopped walnuts
1 ounce toasted pine nuts

DIRECTIONS

Preheat the oven to 375 degrees F.

Place the raisins in a ramekin of water to soften for 20 minutes.

In a large mixing bowl, sift the chestnut flour. Add the sugar, lemon zest, and pinch of salt, mix well and then gently start adding the water to the mix.

Using a whisk, beat the mixture well making sure to eliminate any lumps, then add 2 tablespoons olive oil, and half of the raisins, nuts and rosemary and mix again.

Lightly oil an 11-inch pie plate with 2-inch sides with olive oil and pour in the batter it should be no more than 1/3-inch thick. Sprinkle the cake with rosemary leaves, the remaining softened raisins, walnuts, and pine nuts. Sprinkle with 1 tablespoon olive oil and bake for about 40 minutes.

We used a rustic looking ceramic pie pan.


We used finely chopped fresh rosemary from our herb garden.


This is a very interesting cake. It has the texture and taste of a very large chestnut smashed into a flat piece. The predominantly chestnut flavor and texture is accented by intriguing overtones on rosemary and pine nuts (I couldn’t detect any walnut flavor). The original recipe said that this was not “kid friendly” and they were right. This is definitely not for desert and will not go well with coffee or tea. But the flavor grows on you. Also over time the rosemary and pine nut flavor marry into the chestnut flavor and the cake gets better.  We were probably too careful about adding too much rosemary. This time of year the rosemary in our garden is extremely aromatic and tacky with oil—probably at its best for the season.  Next time we can be a lot more aggressive with that herb. This cake reminded me of when I was introduced to the Italian liquor Compari. When I first tasted it, the flavor was very strong/bitter, unique and distinctive and I wasn’t sure I liked it. But then it grew on me. The cake is rather crumbly and we ended up eating it in chunks rather than slices. Since the raisins, pine nuts and rosemary we put on the surface just fell off as we ate and while we stored the cake, my wife suggested that next time we just mix all of it into the batter.

We had this with red wine and that combination worked out well. This cake ranks next to my wife’s anchovy black pepper cookie . They are of a similar  genre. Both go well with sipping wine rather than as a "dessert".

Tuesday, November 3, 2015

Chestnut flour pancake 栗の粉のパンケーキ

When we got this year's shipment of North American Chestnuts I prepared my usual Chestnut rice and other chestnut dishes. In an effort to expand our seasonal chestnut repertoire my wife hit the internet and came up with several recipes using chestnut flour. This is an ingredient we have never used before so my wife had to hit the internet again to find where we could purchase some. She got chestnut flour from Amazon and we made these pancakes one weekend. This also uses almond flour which we just happened to have in our freezer (how it got there and why is another story).  By the way, this pancake is gluten free if that is important to you.


For a pancake without any wheat flour, this one came out very fluffy. I also added my chestnut in syrup as a garnish.


I used a small amount of maple syrup but this pancake is rather sweet and may not need any additional syrup.


This recipe came from this site. We modified the recipe using our CCK (Common Culinary Knowledge)

Ingredients: (4 pancakes)

- 3 Large Eggs
- 1 Cup Chestnut Flour sifted
- 1/3 Cup Blanched Almond Flour sifted
- 3 Tbs Granulated Sugar
- 2 Tsp double acting Baking Powder
- Pinch of Salt
- 1/4 cup Milk*
- 1 tsp Vanilla Extract
- 1 Tbs. melted Butter

Directions: sift the flours. (This step can not be skipped because the chestnut flour has a tendency to clump and without sifting ends up with several hard lumps). Mix the dry ingredients in a bowl and the wet ingredients in another bowl. Stir the two together. Adjust the amount of milk to get a pourable consistency. Ladle the batter into a hot pan with a little olive oil on the bottom. Cook as you would any other pancake.

*Note: It is important to have a appropriate consistency when making pancake batter. We had to add over 1/4 cup of milk (more like 1 cup) to get a "spreadable" consistency so that the batter would spread in the pan (see below). Probably we could have added more liquid to make it spread to fill the pan. We also omitted "vinegar or lemon juice" included in the original recipe since double action baking powder has it's own source of acid to activate and we judged that "acidic" taste will not be good in the pancake.


The pancake tends to brown quickly because of the sugar.


This is a great pancake.  Despite being gluten-free, it has a very fluffy fine texture. It is slightly sweet and because of the chestnut flour, it has a hint of chestnut flavor as well. Amazingly we were surprised that the pancake seemed to have a “chocolate” flavor. If we did not know how it was made we would have sworn that it included coco powder; although it clearly did not. Because of the special flours, this tends to be a rather expensive pancake to make but we really liked this and we will definitely make it again.