Showing posts sorted by relevance for query sweet potato muffin. Sort by date Show all posts

Sunday, May 17, 2020

Japanese sweet potato muffin Version3 サツマイモ マフィン バージョン3

This is the third iteration of Japanese "Satsuma-imo" sweet potato roll/muffin. In dealing with various food shortages during the covid-19 crisis we took an inventory of the foods we had in the freezer. My wife discovered a package of prepared satsuma-imo which she had prepared in the fall but forgotten about. She immediately decided to make sweet potato muffins. She basically used the recipe for the first version of sweet potato muffin and did not rise the dough over night in the refrigerator as she did in version 2 . The good news is that we finally have regular yeast again (from Amazon, Fleischmann's instant yeast* 1 lb) so she did not use biga to make this. She used the usual amount of active yeast.

* Digression alert:
This is the largest amount of yeast we ever bought but this was the only package available. We usually buy a 4 oz jar of Fleischmann's active yeast. We are bit confused about  the differences between "active", "instant" and "rapid-rise" or "rapid-acting" yeast. This is a somewhat confusing subject but this web site appears to provide the most clear explanation. The following is what we understand from reading this article.  The only difference between "active" and "instant" yeasts is the size of the granules. The granules in "active" yeast are larger than in "instant" yeast and require "proofing" or "activating" before being mixed into the rest of the ingredients.  Because the granules in "instant" yeast are finer it can be mixed into dry ingredients without proofing. In addition, instant yeast unlike active yeast can be frozen--which we will have to do since this is such a large quantity. "Rapid-acting" and "Rapid-rising" yeasts are brand-specific names. These yeasts include additional ingredients that make rising faster and these yeasts are not suited for long fermentation such as overnight rising in the refrigerator or making over night pre-ferments.

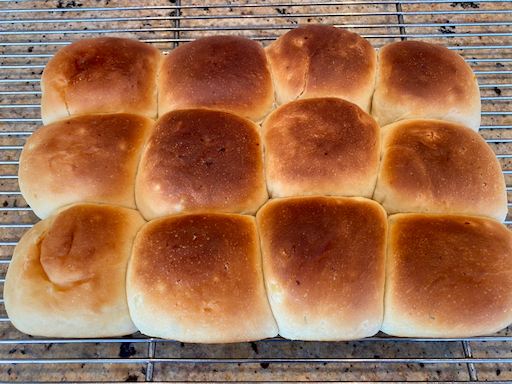
This 3rd iteration of sweet potato muffin, is basically the same as the first version. The major difference is the mixture used for the stuffing. My wife didn't have enough sweet potato to just use that in the stuffing as she did in the original version so she used a mixture of ricotta cheese and sweet potato instead. As you can see, as it cooked steam made a space over the stuffing but the muffin tasted really good. We like this stuffing better.


She brushed the top with melted butter before placing into the oven.


Ingredients:
for the bread
1 cup of processed sweet potato (1/2 cup for the bread and about 1/2 cup to use as filling in the bread)
4 1/2 teaspoons (two 1/4-ounce packets) active dry yeast
1/4 cup sugar
1/2 cup warm water (110 to 115 degrees)
3 large eggs
3 tablespoons melted unsalted butter
1 teaspoon salt
3 to 3 1/2 cups flour, plus more for the work surface
Oil, for greasing the proofing bowl.
an additional 1 tsp butter to brush on the muffins before baking

for the stuffing
1/2 cup processed sweet potato
1/2 cup ricotta cheese

Directions:
Process the sweet potato by cooking several Japanese sweet potatoes either in the Weber grill or microwave. Let cool, peel and thoroughly mash in a food mill so it is smooth. (Since we made this batch of sweet potatoes in the Weber one weekend to have with barbecued chicken it had butter and soy sauce previously added).

Combine the yeast with 1 tablespoon of the sugar and the warm water in the bowl of a stand mixer; proof for 5 minutes.  Add the eggs and beat on low speed, then add the remaining sugar, the butter and salt. Beat on low speed for about 2 minutes (no need to scrape down the bowl), then add the sweet potato and beat for about 1 minute. Add 1 cup of the flour at a time, beating to form a slightly stiff dough that has pulled away from the sides of the bowl; add flour as needed to form dough. Knead on speed 2 for 7 to 10 minutes. 

Transfer the dough to a lightly floured work surface; knead for 2 to 3 minutes. When it is smooth and springy, shape it into a ball. Use oil to lightly grease the inside of a large bowl, then place the dough in it, turning it to coat evenly. Cover the bowl with plastic wrap; let the dough rest for about 1 hour or until it has doubled in size. The dough will be ready when you can push 2 fingers into it and the indentations remain.

Meanwhile mix the remaining processed sweet potato and ricotta cheese in another bowl and set aside. (shown in picture below).

Punch down the dough. Cut into pieces weighing about 2 oz. each (about 56 g). Flatten the dough and put a small scoop of the sweet potato ricotta mixture in the middle. Pinch the dough around the sweet potato ball and form into a muffin. Place in a greased baking dish. Cover with plastic wrap; let the muffins rise for 45 minutes to 1 hour or until doubled in size. Just before baking brush with 1 tbs of melted butter. Cook in a preheated oven of 375 degrees for 18 to 20 minutes until golden.


These sweet potato muffins are definitely one of our favorites. They are very nice when stuffed with just excess processed sweet potato but these stuffed with sweet potato and ricotta cheese are even better. The ricotta cheese picks up the flavor of the potato and seems to accentuate it. It has a mild sweetness. In addition the filling is very smooth and creamy. This goes very well with the tenderness of the bread's texture.

Tuesday, November 19, 2019

Japanese "Satsuma-imo" Sweet potato muffin version2

My wife likes to bake bread and she also likes Japanese "Satsuma-imo" 薩摩芋 sweet potato so she is always looking for ways to combine the two. She made "sweet potato" rolls using Japanese sweet potato roasted in the Weber grill and then mashed and seasoned with butter and soy sauce. She used the mashed Japanese sweet potato in the bread dough and also as a filling. In this variation she used the recipe for "refrigerator potato bread" but substituted mashed sweet potatoes for the white potato called for in the recipe. The result was this wonderful rolls/muffin. It has a very tender delicate texture and you can definitely taste the mild sweetness of the Japanese sweet potato. This muffin does not have a sweet potato filling because all mashed the sweet potato went into the dough.


Ingredients:
1 pkg. yeast
1/2 cup sugar (plus 1/2 tsp additional to proof the yeast)
1/2 cup warm water
1 cup warm milk
1 1/2 sticks ( 3/4 cup butter softened)
2 tsp. salt
2 eggs
1 cup mashed Japanese "Satsuma-imo" sweet potatoes (make link to my potato recipe) run through a food mill to eliminate any chunks that may remain after the potatoes have been mashed #1.
4 cups bread flour (with more as needed)

Directions:
Day1:
1. Proof the yeast in the warm water and 1/2 tsp. sugar.  Warm the milk with the butter in it. Dissolve the sugar in the milk mixture.
2. Using a mixing paddle on the stand mixer add the warm milk butter mixture, eggs and mashed potatoes blend thoroughly. Add the proofed yeast and salt. Mix completely.
3. Switch to a dough hook and add the flour one cup at a time until the dough clings to the hook and is smooth and springy to the touch. Knead on speed 2 for 7 to 10 minutes.
4. Form into a ball and put into a bowl with a small amount of vegetable oil turning the dough to cover with a coat of the oil. Cover tightly and place in the refrigerator overnight (or as the recipe says up to 16 to 18 hours).

Day2:
1. Next morning punch down the dough. (It will extremely cold and dense so "punch down" may not be the process that is actually possible. Just flatten the best you can) #2. Let rest for about 5 minutes (picture below) #3. Cut off pieces weighing 2 1/4 oz. #4. Form into rolls and place in a heavily greased baking dish several inches apart so they can rise #5. Cover and let rise until doubled. Cook in a 400 degree oven for 18 to 20 minutes until they sound hollow when tapped #6.


These muffins were amazing. The slow rise overnight in the refrigerator resulted in a very fine texture. The flavor was very delicate but clearly tasted of the sweetness of the sweet potato. The combination of the delicate texture and flavor almost felt like we were actually eating fluffy cooked sweet potato rather than bread. So the substitution of sweet potato for regular potato in this recipe worked very well and the end result was equally as good but distinctly different...well worth the variation.

Wednesday, May 20, 2020

Buttermilk muffin with biga ビガで作ったバターミルクマフィン

My wife's baking. This is a variation of buttermilk muffin she made previously. During the Covid-19 induced yeast shortage, she made this with biga/starter to mostly to conserve the amount of yeast we had. Although the taste and texture are very similar to the original, this one appears to have a much more pronounced slightly tangy buttermilk flavor.


Ingredients:
Biga
1 3/4 cup flour
2 cups buttermilk
1/8 tsp yeast

Dough
Biga
1 tbs. sugar
2 tsp. salt
3 tbs. butter
2 1/4 cups flour or more as needed to make smooth dough
additional 1/8 tsp yeast (optional)

Directions:
In the evening mix together the ingredients for the biga, wrap the bowl in towels and leave overnight.

Next day mix the biga and other ingredients to make the dough. Rise in a bowl until doubled in size. Punch down. Measure 2 1/4 pieces of dough and form into a bun. Place buns in heavily buttered pyrex baking dish. Let rise again until buns are touching and about doubled in size. Bake in a 400 degree oven for 18 to 20 minutes or until golden and sound hollow when tapped. Remove immediately from pan to cool.

These buns were fantastic. Again the lovely biga dough resulted in a richly flavored muffin. We'll definitely be making this again.

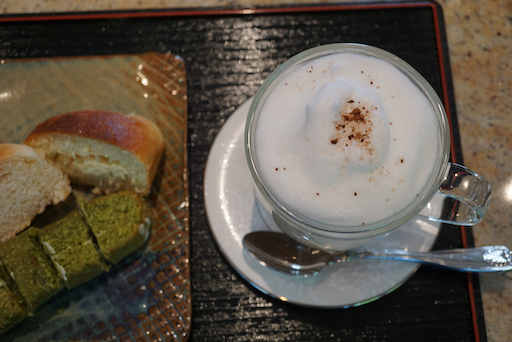
The picture below shows a combination of baked goods we had for breakfast one day. We freeze the bread and muffins we bake. Then in the morning we just briefly microwave a selection of what we have available in the freezer in a silicon container. Left upper is buttermilk muffin made with biga, right upper is sweet potato bread with ricotta sweet potato filling and the lower is mint cake. This mint cake was made with only mint and no spinach as was used in the original recipe since spinach adds nice color but not much taste.


Of course, no monrning is complete without our cappcino (or more like latte).


This type of assorted bread/muffin is getting to be our regular breakfast on weekends.

Sunday, August 4, 2019

Sous Vide chicken salad with mango for lunch マンゴー入り低温調理鶏胸肉サラダ

I regularly make sous vide chicken breast. Using skin-on and bone-in split breast, sous vide at 140F for 4 hours produces really good moist chicken. Most of the time, I ice it down in the cooking pouch and use it for chicken salad or just for sandwiches. If you do not open the pouch and keep it in the meat drawer, it will last for at least 2 weeks. I did not describe the chicken salad recipe accurately in the previous post. I add some fruit to this curry flavored chicken salad. The original recipe calls for grapes and cantaloupe which makes a wonderful salad. I did not have grapes or cantaloupe this time but had champagne mango, I added to this to the salad and it went extremely well. This was a weekend lunch.


We served my potato salad (Instead of Yukon gold, I am using Russet potato recently) and cheesy muffin with prosciutto and chives.


I added thinly sliced cucumber, salted with the moisture squeezed out and lightly dressed with sushi vinegar before mixing it into the potato salad.


I removed the skin and deboned the sous vide chicken breast (I also removed the tenderloin for another dish) then cut it into bite sized cubes. The dressing is the same as before; mixture of mayo, Greek yogurt, mango chutney, curry powder, and lemon juice. Since the dressing included mango chutney, I thought adding mango to the salad may work. So, I added champagne (yellow) mango cut into small cubes.


This worked well. The dressing is sweet and sour with curry flavor (although not hot despite a large amount of curry powder used due to the Greek yogurt and mayo) which is echoed in the taste of mango (more sweet than sour). This was a really good satisfying lunch.

Thursday, November 5, 2020

Cream cheese and chive with white bread muffin

This is one of my wife's baking projects. She likes cream cheese with onions and chives. It come in a small plastic tub. She usually uses it for mashed potatoes. She noticed that there were several containers in the fridge that were not getting any younger. She also like muffins stuffed with a “surprise” such as sweet potato or flavored ricotta cheese. So she decided to use the cream cheese in muffins. She used her favorite white bread recipe (which surprisingly we have not blogged before) and filled it with cream cheese as shown below.


I will turn the next part over to her

Ingredients
1/2 cup milk
3 Tbs. sugar
2 tsp. salt
3 Tbs. butter
2 packages yeast
1 1/2 cup warm water
4 -6 cups bread flour

for the filling:
1 tub of Philadelphia cream cheese with chive

Directions:
Combine the milk, sugar, salt and butter in a sauce pan and heat up until the milk is scalded and the other ingredients have melted or dissolved. Add the water and let the mixture cool. Add 4 cups of bread flour and yeast to a stand mixer. When the milk mixture has cooled add it to the flour while stirring on speed 2 with the bread hook. Add more flour as needed to make a smooth workable dough. Put dough in a bowl and coat the surface with vegetable oil to keep it from drying out. Let rise until doubled.

Form the muffins by punching down the dough. I weighed the dough and decided to make muffins weighing 2 1/4 or 63.78 grams. With this dough I got 20 muffins. I then used a small ice cream scoop for the cream cheese and made 20 balls weighing about 11 grams. I folded the dough over the individual cheese balls and placed the muffins in a heavily greased pyrex baking dish. I baked them at 400 degrees for 18- 20 minutes or until they sounded hollow when tapped.

These muffins were pretty good. As usual an air space developed above the cheese. I fully expected the cheese would melt into the bread but was surprised to find it sitting there about the same consistency as when I put it in the dough. (Made me wonder what the cream cheese was actually made of). The bread was good as always and the cream cheese flavor was very pronounced. But I have to say in all honesty the easiest thing to do in the future if we want this flavor combination is just to make the muffins and smear the cheese on with a butter knife.

Thursday, February 7, 2019

Refrigerator Potato Bread/muffin 冷蔵庫ポテトパン/マフィン

This is the second potato bread we made. This time my wife did everything herself from the beginning to the end. So, her arm is definitely improving as well as she is determined to accomplish what she wants to do. This is called "refrigerator" bread since it rises over night in the refrigerator. The recipe also came from "Beard on Bread" cookbook. Again, it is a nice rustic bread with integrity and perfect for toasting with butter for breakfast.


Ingredients:
1 pkg. yeast
1/2 cup sugar (plus 1/2 tsp additional to proof the yeast)
1/2 cup warm water
1 cup warm milk
1 1/2 sticks ( 3/4 cup butter softened)
2 tsp. salt
2 eggs
1 cup mashed potatoes (make link to my potato recipe) run through a food mill to eliminate any        chunks that may remain after the potatoes have been mashed.
4 cups bread flour (with more as needed)

Directions:
Day1:
1. Proof the yeast in the warm water and 1/2 tsp. sugar.  Warm the milk with the butter in it. Dissolve the sugar in the milk mixture.
2. Using a mixing paddle on the stand mixer add the warm milk butter mixture, eggs and mashed potatoes blend thoroughly. Add the proofed yeast and salt. Mix completely.
3. Switch to a dough hook and add the flour one cup at a time until the dough clings to the hook and is smooth and springy to the touch. Knead on speed 2 for 7 to 10 minutes.
4. Form into a ball and put into a bowl with a small amount of vegetable oil turning the dough to cover with a coat of the oil. Cover tightly and place in the refrigerator overnight (or as the recipe says up to 16 to 18 hours).

Day2:
1. Next morning punch down the dough. (It will extremely cold and dense). Let rest for about 5 minutes (picture below).


2. Knead vigorously until it becomes soft and pliable (about 6 minutes).
3. Shape into 2 loaves of equal size and place into 2 heavily greased loaf pans. Cover and let rise until doubled in bulk  (the recipe says this could take up to 4 hours. This bread rose in 2 hours).  Make shallow slashes using a bread lame (see picture below).


4. Bake in a 375 degree oven for 40 to 45 minutes until browned and sounds hollow when tapped.
5. Remove from the pans immediately when they come out of the oven. (When I removed the loaves they seemed a bit soft on the underside so I put the loafs back in the oven outside the pans directly on the oven rack for about 5 minutes. This made the crust nice and crunchy).


This bread has a very pleasing dense but fine texture. It has a slightly sweet taste and the taste of the cream cheese and chives used in the mashed potatoes came through adding a pleasant dimension.


We are glad that my wife is up to baking again. I am certainly benefitting from having good breads to enjoy.

Addendum (1-22-22): This bread can also be made into muffins as shown in the next picture. These muffins were weighed at 76 grams and produced a total of 23 muffins. They were cooked in a 400 degree over for 20 to 25 minutes or until golden. When turned out of the pan the underside was very soft and white so I turned them upside down on a cookie sheet and cooked them for another 5 to ten minutes until they formed a light brown crust. 


Thursday, August 16, 2018

Couscous with fresh mint ミント入りクスクスサラダ

This combination of greens and salads was our lunch on one weekend. Among the three salads, salmon salad and potato salad are our usual but couscous salad with fresh mint is new. The greens are home-grown arugula, blanched broccoli, and sugar snaps. For color, I added skinned Campari tomato. After taking the pictures, I added my honey mustard dressing on the greens.


The couscous recipe came from WP food section as a way to use mint from your yard which may be profusely growing at this time of the year. The original included frozen sweet peas but we omitted it. Since we planted mint late spring this year, this was a recipe we had to try. The lunch included cheese muffins my wife made some time ago.  (She just realized we did not post the muffin recipe).


Ingredients (2 servings, for us more like 4-6 servings)
3/4 cup dried plain couscous.
1 cup chicken broth (our usual Swanson no salt and no fat kind).
1/4 tsp salt
2 tbs butter
1/4 cup finely minced fresh mint leaves.
1/4 tbs chopped parsley.

For dressing
1/4 cup live oil
1/4 rice vinegar
black pepper

Directions:
let the chicken broth with the salt, butter come to boil and add the couscous, remove from the heat and let it steep with the lid on for 15 minutes. Use a folk to fluff the grains and let it cool.
Add the minced mint and parsley (see below).


Mix the oil and vinegar together.


Mixed it into the couscous.


This is very refreshing couscous salad. Because of the dressing, it is not too dry and there is no danger of inhaling it (which can happen when eating dry couscous). Especially with the combination of other salads and greens, this is a really nice summer lunch. Once the salads are made up, it is a cinch to put together a lunch without having to do any cooking.