Sunday, October 30, 2011

Matsutake "chawanmushi" savory egg custard 松茸の茶碗蒸し

I have posted "chawanmushi"  茶碗蒸し or Japanese savory egg custard before. "Chawan" means "bowl" (more literally "tea bowl" but this word is usually used to just mean a generic bowl) and "mushi" means to steam. Although this is a very popular dish in Japan, only rarely do you see it served in Japanese restaurants in the U.S. Since I got fresh matsutake from Oregon mushroom and I posted most of the ways I can think of to serve matsutake before, I decided to make chawanmush with matsutake.

Although I have traditional lidded containers specifically designed for chawanmush, I have been using a set of 6 small bowls for chawanmush for sometime (picture below). I am not sure where I got this one but probably by mail order. This must have been for export, since the traditional Japanese set is either 5 or 10. In any case, three eggs make the perfect amount for these 6 small bowls. The two important tips to make good chawanmushi is the ratio between the eggs and the broth and how to steam it.
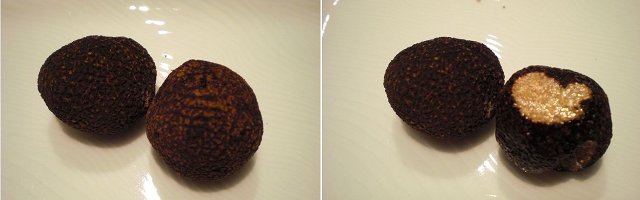
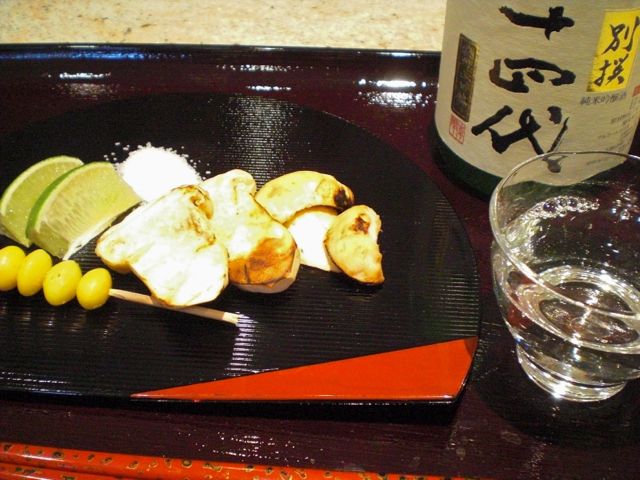
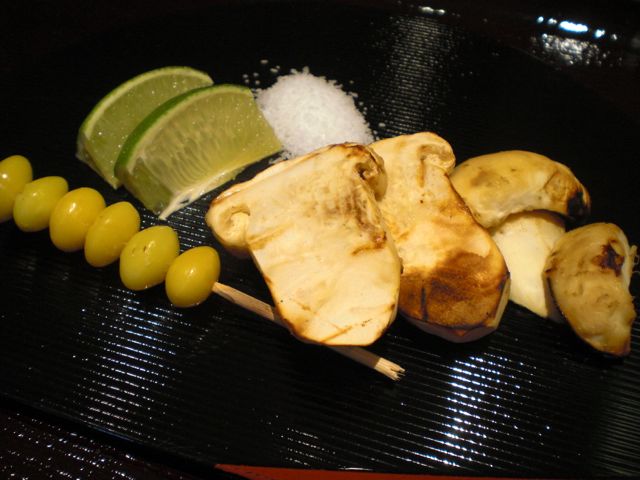
Matsutake: I had two relatively large matsutake left. After I cleaned it, I sliced it. 

Eggs: I used 3 large eggs. Since the size of eggs is not uniform,  I measured the amount after lightly beating the eggs (this time, it was 150ml).

Broth: I made dashi broth using a dashi pack (kelp and bonito kind). The amount of liquid should be 3 times of the eggs. (In my case, the final broth should be 150ml x 3 =450 ml). I first measured about 400ml of the broth and I added light colored soy sauce or "usukuchi shouuyu" 薄口醤油 (1 tbs) and mirin (1tbs).  (Taste and if the saltiness is not enough, add salt instead of soy sauce to prevent further darkening the color of the custard. I did not need it this time). I added more broth to make it exactly 3 times of the eggs (in this case, 450 ml).

Egg mixture: I mixed the broth and the eggs trying not to make too many bubbles on the surface. It is important to strain the egg mixture through a fine sieve. If not strained, Chalaza and other chunks of egg white will congeal in chawanmushi producing a very unpleasant white hard spot.

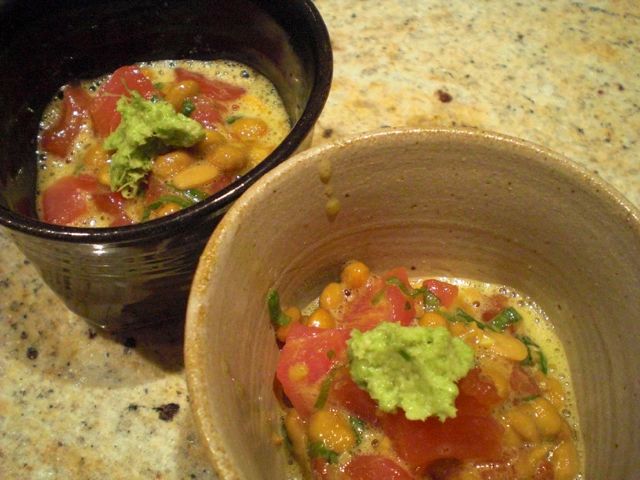
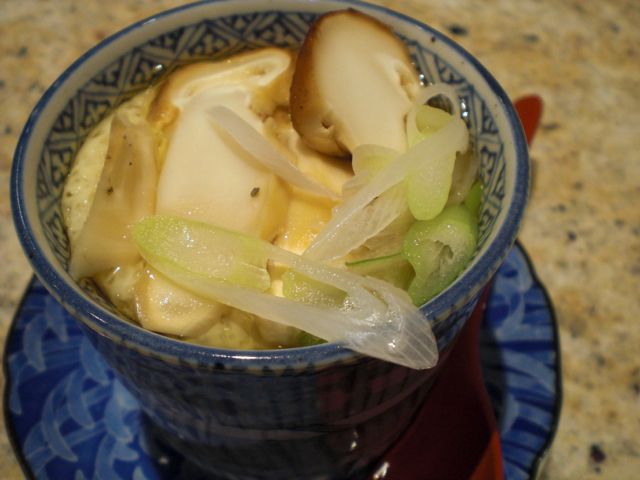
Other ingredients: Since the main feature of this chawanmushi was matsutake, I only used a few other items in this dish; ginko nuts (prepared, in a can, 5-6 in each bowl) and thinly sliced chicken tenderloin (2). After I placed the ginko nuts and the chicken meat in each bowl, I poured in the strained egg mixture. If I had it, I would have used mitsuba 三つ葉 for granish but instead, I had to settle for thinly sliced (on a slant) scallion.

Steaming: I used an electric wok. I started on medium high heat with continuos steam for 2 minutes or so and turned it down to low intermittent steam. After 5 minutes when the surface became lighter yellow and congealed, I placed sliced matsutake and scallion on the top and continued steaming for another 15-20 minutes until a clear liquid started coming or from the custard.

I have to admit the difference between using fresh shiitake mushroom (my usual) and mastutake is subtle but there is a sublime subtle aroma and flavor of matsutake. This dish is so delicate only cold sake could be our choice of libation. Over the next few days I served the remaining chawanmush cold (I could have made cold broth which can be poured over it but I did not). Even cold, it is very good.

Friday, October 28, 2011

Tuna and Salmon roe 'yamakake" 鮪といくらのやまかけ

This post indicates than it is getting harder and harder for me to come up with new dishes to post. These are some of the dishes I served when we were tasting the new batch of G-sake "joy". The yamakake was the 4th dish after octopus sumiso-ae, braised potatoes and green beans and  "ankimo" with orange marmalade soy sauce.

The only variation of this "yamakake" was to add salmon roe or "ikura" to this dish. Again, the tuna sashimi is from frozen "yellow-fin" tuna block from my freezer which was marinated in sake and soy sauce (1:1) overnight.   I used home-grown perilla as the garnish. As usual, I dissolved wasabi in soy sauce and mixed it into the grated nagaimo before serving.

We  progressed into simmered eggplant (with Italian eggplant) served cold. We also reheated simmered chicken wings. This chicken wing dish is getting to be our favorite. It is so easy to make and tastes even better after a few days, reheated. At my wife's suggestion, I also cooked bone-in chicken thighs the same way. Instead of nice collagen from the skin and tendons of the wings, the thighs were much meatier and also tasted excellent.

The stewed eggplants are also nice to have since it also tastes better next day or later served cold. For this batch, I used a whole dried red pepper cut up instead of red pepper flakes, which made the dish a bit more spicy than usual.

There is nothing really new here but showing our Izakaya dishes in sequence.

Wednesday, October 26, 2011

Pasta with black truffle and cream sauce 黒トリュフとクリームソースパスタ

This is an extravaganza I prepared using the remaining black truffles. If we could not taste or smell black truffles with this pasta dish, we have to give up tasting truffles. I made this as simple as I can make it without garlic and without red pepper flakes; just olive oil, salt, cream, and garnish of chopped chives.
I just cooked the Angel hair pasta according to the instructions on the package. Meanwhile, I sliced off both ends of a black truffle and minced it. In a frying pan, I heated good olive oil and sautéed the pasta and mixed in the minced truffle, seasoned it with salt and cream (3-4 tbs) and reduced it for a few minutes. Off heat, I added thinly sliced truffles as you can see in the picture above. (I used a small sharp utility knife since I did not have a truffle slicer).

The taste? Well, this amount of truffles, we should be able to taste them. They definitely had a good earthy aroma wafting from this dish. The taste? I am not sure. It has a interesting texture and more aroma than the taste. Although my wife said it was something familiar, something she has tasted before. 

We decided  to go with a very inexpensive (but got 90 from Robert Parker) Riondo Prosecco for this dish. This effervescent light wine with floral note was perfect without overwhelming the truffle.

Monday, October 24, 2011

Black truffle with creamy scrambled egg 黒トリュフとクリーミーいり卵

When I ordered fresh matsutake from Oregon mushroom, I also ordered two small black truffles (from France). My wife says that even when the dish is advertised as having truffles she can't taste anything special. When we went to Paris, she ordered a dish that was smothered in tuffles and she said maybe there was something there but she wasn't sure. So, I decided to splurge and got two Burgundy truffles (left in the image below). This way we could experience truffle by itself so we could identify what flavor the truffle had and find out what the hoopla was all about. The first dish I made was designed to highlight the flavor of truffles.  These truffles have a nice earthy aroma which became more pronounced when they were sliced (right in the image below).

I decided to make an egg dish with truffles as the first dish since eggs and truffles are known to go together well. Instead of regular scrambled eggs, however, I used bain marie to make some very creamy scrambled eggs.

I first cut off the both ends of the truffle (right in the image above) and minced it into fine cubes. I then added that to two beaten eggs with cream (2 tbs) and a pinch of salt. On bain marie, I scrambled the egg mixture using a silicon spatula until the eggs reached a very creamy texture. I divided the creamy scrambled eggs into two small egg shaped containers, garnished with thin slices of truffle, chopped chives and freshly cracked white pepper (below).

I have to say that the aroma of truffles is very subtle and, by itself, they do not seem to have much taste. The textural contrast between the creamy scrambled eggs and truffle is nice and added a "je ne se qua" to this very nice scrambled egg. The eggs seemed to absorb the flavor and made it seem like the whole dish was truffles. We couldn't help but compare this flavor the the subtlety of Matsutake. Both mushrooms have a very distinctive flavor but truffles are definitely much more subtle. My wife said she found the flavor surprisingly familiar... so THIS is the taste of truffles. Does this mean she actually tasted truffles before and just didn't realize it?

Saturday, October 22, 2011

Marinated tuna bento 鮪の漬け弁当

This is another way to present a one bowl "donburi" dish. Instead of a bowl, (which is "donburi" 丼 in Japanese),  however, I used a rectangular Japanese lacquer box. This is a very common presentation for grilled eels called "una-juu" うな重. (Lacquered square vessels are called "juubako" 重箱、since they can be stacked, "juubako"  means stacked boxes). Mine was not a "juubako" but a two-tiered bento box, so I will call this dish "marinated tuna bento" but I could have called this dish "tuna-juu" ツナ重. This beautiful Japanese lacquer bento box in "Tsugaru-nuri" 津軽塗 (see the picture below) is from Northern Japan (Tsugaru is an area near Aomori 青森). It was a gift I received a long time ago from one of my friends but I have not used it for many years. For this occasion, it was perfect since this has two stackable rectangular compartments.


This post is actually the continuation of a "fresh wasabi rhizome" post. That means the center of attention is the small mound of wasabi in the picture below. The rest of the dish was just to highlight the wasabi (this could be a case of the tail wagging the dog). I made marinated tuna or 鮪の漬け for this. This time I marinated the tuna overnight which made the texture of the tuna somewhat slimy which may not sound appetizing but many Japanese like this particular texture in marinated tuna.

I made the marinade as I posted before (a mixture of soy sauce, sake, juice of grated ginger, and ground roasted white sesame seeds). I did my "yubiki" 湯引き preparation as before, sliced the tuna and marinated it in the refrigerator.

I made sushi rice and spread it on the bottom of the bento box. I then covered the surface with marinated tuna. As garnish, I used Jabara-cut cucumber, avocado, scallion (briefly microwaved with splash of sesame oil), strips of nori and perilla. Of course, the most important garnish is the freshly grated wasabi.

I served it with miso soup (see above, with tofu, scallion and wakame seaweed).

The slightly slimy texture of the tuna, of course, does not brother me and even my wife sort of liked it. We spread a little of the wasabi on the each slice of tuna before eating. The is a sublime combination of flavors and textures. We almost used up this small wasabi daikon after all these dishes.

Thursday, October 20, 2011

Real wasabi from Oregon 本物のオレゴン州産山葵大根

Real wasabi root is wonderful stuff especially if you compare it to the fake kinds you get in a tube or in powder form. That stuff is mostly made from Western horse radish and artificial coloring. (Freshly grated horse radish is wonderful stuff in its own right but it is not wasabi). Real wasabi daikon (root of wasabi plant or wasabi Rhizomes) have been produced in the U.S. especially in Oregon for some time. We got wasabi daikon from "Real wasabi" once  (before we started this blog) but it stopped selling fresh wasabi daikon and, instead, only sold prepared and frozen real wasabi-in-a-tube, real wasabi powder and real wasabi containing dressings. The prepared frozen wasabi-in-a-tube is not bad but it has some additives and became dry making it difficult to squeeze out of the tube which I posted before. To my delight, this company re-started selling fresh Rhizomes. The problem is that the smallest unit they sell is 1/2 lb. that is too much to use it up before it spoils unless you are running a sushi bar. (I was told it can be frozen but I have not tried it) and the shipping becomes almost as expensive as the wasabi when ordering the smallest unit.

When I ordered "matsutake" 松茸 from Oregon Mushroom, I found that they also sell wasabi rhizomes in 2 oz increment (2 oz is about one rhizome). I took advantage of this offer and ordered some wasabi with the fresh matsutake and other fresh mushrooms.

The above is a 2 oz wasabi daikon. It arrived with some discoloration on the surface which needed to be shaved off and cleaned but otherwise it was in OK shape. Traditionally, you are supposed to use a shark skin grater for grating a wasabi daikon but I used a porcelain grater which works just fine. After removing the skin from the portion to be grated, I used a nice circular motion to grate it. The enzymatic action develops the flavors and spiciness. The initial aroma is especially wonderful which can be only experienced when you grate it yourself. I planned an evening centered around fresh wasabi.

I tried to get good fresh tuna sashimi from Catalina Offshore products coinciding with the arrival of the wasabi rhizome but fresh sashimi blue fin tuna has been out of stock at Catalina for some time, so I resorted to my backup frozen saku (block) of yellowfin tuna.

I started with tuna nametrou なめろう but added fresh grated wasabi.

This is a mixture of nattou, tuna cubes and egg yolk 卵黄マグロ納豆 (from a pasteurized shell egg) with fresh wasabi.

Cubes of tuna and avocado 鮪とアボカドの角切り with fresh wasabi.

If you have not tasted freshly ground real wasabi, you are missing a lot. The fresh wasabi does have some heat but it is much fresher and flavorful than the stuff served at sushi bars that cleans out your sinuses. All these "usual" suspects I prepared as driking snacks got upgraded one notch by simply adding fresh wasabi!

In between these dishes above, we also had baked marinated tofu and one more dish to follow (to be continued).

Tuesday, October 18, 2011

Grilled Matsutake and Ginko nuts 焼き松茸と銀杏

This is the ultimate taste of autumn; grilled matsutake 松茸 and ginkgo nuts or "gin-nan" 銀杏. Of course real Japanese Mastutake cannot be had here in the U.S. and, even if available, it would be prohibitively expensive. Last year, I posted several dishes made with North American matsutake. We had the first matsutake of the year at Tako Grill and after that, I promptly ordered matsutake from Oregon Mushroom as I did last year. The price appears to be a bit higher this year but "cheap" compared to either Mexican or Japanese matsutake. The Mexican mushroom is closer in appearance to the Japanese kind and they fetch higher prices. The appearance and smell of the North American matsutake are not as good as the Japanese but the will do for us.

The simplest and the best way to enjoy matsutake is simply grilled and eaten with a squeeze of "kabosu" カボス citrus and salt. I also added grilled gingko nuts or "gin-nan" 銀杏 (I could have collected gingko fruit from gingko trees in our areas but the effort for preparation and not so pleasant smell of the fresh flesh of the fruit forced me to use a canned prepared gingko nuts instead). I served grilled matsutake and gingko nuts with small wedges of lime (since I did not have "kabosu" or "yuzu" 柚子 fruit, this is closest I can come) and salt. I opened a bottle of Juyondai sake 十四代 I had for this occasion (above). (I have one more left).

You can enjoy the subtle but distinctive smell and flavors of matsutake in its pure form. The combination of matsutake and gingko nuts is ultimate autumn flavors but I went further and also served boiled North American chest nuts (below) to complete the autumnal theme. Juyondai brewed from Yamada-nishiki 山田錦 was nicely fruity with subtle "umami" dimensions.

Matustake preparation: In the image #1 below, you see how dirty it was when I received it (#1 left). I first used a dump paper towel to remove the dirt but you need to use a sharp paring knife to scrape off embedded dirt (#1 right). You really have to make sure all the dirt and sands were removed (#2). I prepared special bamboo skewers by shaving regular bomb skewer into very thin skewers so that it will not break the gingko nuts when pierced (#2 shown with two cleaned matsutake).

To prevent the matustake from getting too dry while being grilled, I sprinkled sake over the sliced matsutake (sliced in 1/4 to 1/3 inch thick) and let it soak in for 3-4 minutes before grilling. Since I could not use a charcoal fire this time, I used a Japanese diffuser and a metal wire grill to grill directly over the gas fire (#4). I used a rather hot fire to make grill marks and also cook the matsutake quickly without drying it out (for 3-4 minutes or less). The gingko nuts only grilled for only 1-2 minutes but you have to be careful not to burn the skewers.

We throughly enjoyed the good sake and this autumnal collection of goodies and opening Juyondai was definitely worth it.

Sunday, October 16, 2011

White Asparagus with Béarnaise(-like) sauce ホワイトアスパラガスのバーネイもどきソース添え

Usually, spring is the season for asparagus but, nowadays, they are available all year long. Europeans especially Germans appear to love white asparagus more than green asparagus. Although we generally prefer green asparagus, we go for the white when they appear in the grocery store. I am not sure where this one came from but probably Chile. I posted white asparagus before. I made a different sauce this time.

Digression alert: One of the reasons we can get asparagus all year round is because (believe it or not) they are part of the U.S. "war on drugs". In an effort to encourage farmers in South American countries south of the equator to produce something other than drugs, the U.S. opened trade to other agricultural products, one of which was asparagus. How successful the effort was in reducing the supply of drugs I'm not sure...I suspect farmers are now producing both products. The asparagus production occurs south of the equator in their spring when it is fall in the northern hemisphere. So we get the asparagus produced in the U.S. in our spring and summer and those produced in South America in our fall and winter. Maybe not such a successful weapon to win the "war on drugs" but definitely a win for great cuisine. 

 If you happen to cook white asparagus often, it may be worthwhile to get a special peeler which must be a very common kitchen item in Germany, I suppose. For us, I just use a good, sharp vegetable peeler. It is necessary to peel the skin of white asparagus except for the tips otherwise, they are too fibrous no matter how long they are cooked. The center may become soft but the skin remains hard and unpleasant. There are some tricks to peeling white asparagus. Since they are so brittle, the stems breaks very easily particularly if you try to hold the stalk in your hand while peeling with a regular vegetable peeler. So this is how I do it: I first break off the root ends by bending the bottom portion by hand until it snaps.  I discarded the bottom part. I then lay the stalk flat on the cutting board and roll it 90 degree as I peeled, so that the asparagus is always supported by the board. (This does not work well if the asparagus is not straight or your peeler is not sharp). No matter what you do, you may break a few. In that case, you revert to the classic cooking technique known as "camouflage" by arranging the stalk as though it has not broken and cover it with sauce like I did. I do not discard the peel at this point.

I arranged the asparagus in one layer in a sauté pan or large frying pan, spread the peels on top and pour enough water to just cover. I put on the lid and cooked on low flame for 30-40 minutes. I then removed the lid and turned up the flame to medium and let it continue cooking for 10-15 minutes or until only a small amount of the cooking liquid remained. The purpose of this exercise is to make a liquid that has a highly concentrated white asparagus flavor.  I removed the peels and discarded them. I then set aside the asparagus on a plate keeping them warm. 

Sauce: This time I made a Béarnaise-like sauce but did not add melted butter to qualify for Béarnaise. I added champagne vinegar (1 tbs) and white vermouth (2 tbs) to the reducing simmering liquid and reduce a little further. I added tarragon (dried, 1/2 tsp). When only a very small amount of liquid remained (3-4 tbs), off heat, I added a beaten egg yolk (I first tempered the egg by making a "liaison"--adding a small portion of the reduced liquid into the yolk and mixing well). I added the liaison back to the pan and vigorously wisked it while moving the pan on and off the flame until I achieved a saucy (or mayonnaise like) consistency. I could have made a real Béarnaise sauce by further drizzling in melted butter but the consistency of the sauce was just fine and I decided not to add the butter. This happened because the liquid was a very small amount as compared to the egg yolk. I just wanted to make a quick sauce and did this (brave) quick method. Fortunately, the sauce did not break or become scrambled egg (by the way, I used an egg yolk from a pasteurized shell egg). I tasted the sauce and added salt and freshly ground white pepper. It tasted good with a nice acid and tarragon flavors. 

There is something about the taste of white asparagus. It is distinctive and different from the green kind. The sauce had a concentrated flavor of white asparagus with a nice but gentle acidity from the champagne vinegar. It almost tasted like Béarnaise sauce without butter. I saw my wife lick her plate clean after finishing the asparagus, when she thought I wasn't looking. I take that as her seal of approval for my sauce.

Friday, October 14, 2011

Boiled Chestnuts 茹で栗

This is continuation of the North American chestnut theme derived from the chestnuts I mail ordered from a farm in California. The chestnut rice was a success. I decided to just simply boil the chestnuts since this was the most common way I enjoyed them as a kid in Japan and we collected chestnuts from the neighborhood chestnut trees.

Obviously my mother cooked the chestnuts when I was a kid and I do not remember how long she cooked them. The pamphlet that came with the chestnuts had some information but I decided to do a web search and settled on this method.

I first soaked the chestnuts in cold water just enough to cover for several hours (close to 6 hours).  I poured the water to just covered the chestnuts, then added a pinch of salt. I placed the pot on a medium flame. As soon as the water started boiling, I tuned it down to simmer with the lid on. I boiled it for 40 minutes mixing the chestnuts once during the cooking. I let it sit in the pot until the water cooled to room temperature and then drained (Picture above).

When I was a kid, everybody peeled their own chestnuts. My mother would serve them in a big bowl and we all sat around the table peeling and eating. Since I was dealing with a chestnut amateur (my wife) I did the peeling before I served them. I peeled the outer skin as well as the inner skin (Picture above). It was not too difficult to remove these two layers of skins.

This was very good. The natural sweetness of the chestnuts was very nice with an almost starchy consistency. I told my wife that I did not remember when I last tasted boiled chestnuts.  She replied that she had nothing to remember since she never had boiled chestnuts and certainly nothing related to chestnuts that tasted this good. Surprisingly, the chestnuts went very well with the red we were drinking  (100% tempranillo from Spain), Bodegas Resalte de Penafiel Ribera del Duero Crianza 2005.  This is interesting pairing and we rather enjoyed it.

Wednesday, October 12, 2011

Chestnuts rice with North American Chestnuts 北米栗の栗ご飯

Last year I posted chestnuts rice or 栗ご飯. The chestnuts I bought at the gourmet market were probably of European origin and not particularly fresh. They were basically tasteless and had a really chalky consistency. In that post, I also mentioned that almost all North American chestnut trees were wiped out by the Chestnuts blight around 1940. But, at that time, by searching on the web, I found out that small numbers of chestnut groves survived and some farms are indeed producing North American chestnuts. By the time I got onto this last year, the season was over and I could not get the North American Chestnuts. This year, I was prepared and as soon as the chestnuts season came around, I placed my order. Although there are a few farms that sell chestnuts, mine came from Girolami farms in Califronia.

Here is a 3 lb bag of North American chestnuts I received (#1 below). They look excellent and are fairly big.

Chestnuts preparation: I soaked the chestnuts in boiling water (off heat) and let them soak until the water cooled down to room temperature. This softened the outer skin ("onikawa" 鬼皮 or demon skin) and made them easier to peel. Using a sharp paring knife, I first cut the bottom of the chestnut and peeled off the outer skin and then removed the inner skin ("shibukawa" 渋皮 or bitter skin). The inner skin was more difficult to remove, although for some I got lucky and it came off in one piece. For many of them I had to shave off some of the meat of the nuts to get the skin off (#2 below). I prepared 11 chestnuts (for 2 Japanese cups or 360ml of uncooked rice). As I peeled the inner skin I soaked the nuts in water to prevent discoloration and some starch leached out as well.

Rice: I used two cups (the measuring cup that came with the rice cooker--180ml. I understand that a regular Japanese cup is 200ml and an American cup is 240ml) of rice (360ml); a combination of regular Japanese short grain rice (Koshihikari コシヒカリ variety from California called "Kagayaki" かがやき) and "mochigome" 餅米 (glutenous or sweet rice), one rice cooker cup (180ml) each. After washing the rice in running cold water until the water ran clear. I drained the rice in a fine meshed strainer and let it sit in the strainer until I was ready to cook it.

Broth: I decided to use a seasoned "dashi" broth for this dish. I made dashi broth from a dash pack (combination of bonito flakes and kelp). In the cooled down dash broth, I added light colored soy sauce or "usukuchi shouyu 薄口醤油 (1 tbs) and mirin (1 tbs) and made it 400ml total.

Cooking: I used "Kamadosan" かまどさん, an earthenware rice cooker. I added the rice, broth and, for a good measure, a 3 inch square of dried kelp (surface wiped with damp paper towel) and arranged the prepared chestnuts on the surface. As per the instructions that came with the rice cooker, I set the steam holes of the inner and outer lids perpendicular to each other and placed it on a medium high flame for 14 minutes. I then shut off the heat and let it steep for 20 more minutes (#4 above).

While the rice was steeping, I made a small cucumber and myouga sunomono 胡瓜と茗荷の酢の物 (left in the back in the first picture).

I removed the kelp and mixed the rice while trying not to break the chestnuts. The bottom had a very slight crust of "okoge" おこげ. I served it with a garnish of black sesame seeds (The first picture above). 

The result? Much better than last year--a world of difference. The chestnuts were much sweeter and while they had the somewhat dry texture characteristic of chestnuts, it was pleasing and definately not chalky.  The  addition of the glutenous rice gave the dish a sticky consistency or "mochimochi" もちもち consistency. The seasoned broth that I used also added a subtle but nice flavor. So, I have to say this was a success. We are glad that North American chestnuts have survived and we can enjoy them. 

Monday, October 10, 2011

Cubes of chicken breast, cucumber and black vinegar soy sauce Gelée 鶏の黒酢煮、キュウリと黒酢醤油ジェレー

This is another one of those quick and simple dishes I make from leftovers. When I stew chicken wings or chicken breast, I have been re-using the simmering liquid (adding a mixture of mirin, soy sauce, and black vinegar in 1:1:1 ratio as I cook a new batch). After stewing a few batches of chicken wings, the amount of protein or collagen in the simmering liquid is high enough to make a nice gelée or "nikogori" 煮こごり in the refrigerator, so I decide to use it.

I just cubed cooked chicken breast, cucumber, and the gelée of the simmering liquid and topped it with mayonnaise with Japanese 7 flavored red pepper. I also garnished with fan-cut cucumber and perilla . The gelée really made this dish since it has nice slightly sweet, mild vinegary and salty flavors which come in bursts as you taste the small cubes of the jelled simmering liquid. If you have to make the gelée from scratch, I suppose you can dissolve either gelatin or agar-agar in the simmering liquid but that is probably not worth the effort.

In any case, the addition of mayonnaise further takes the vinegary edge off and this dish will go with any drink.

Saturday, October 8, 2011

Miso marinated tofu and Mozzarella cheese 豆腐とマッレラチーズの味噌漬け

This is a variation on the previous post. This time I used "silken" tofu as well as fresh Mozzarella cheese. We also experimented with overnight to 3 and 5 day marination to see if the duration of the marination will make any difference.

The above is 5 day old Silken tofu marinated in miso (back) and fresh Mozzarella cheese marinated in miso overnight.

The above is 3 day old silken tofu marinated in miso.

Tofu: I used one silken tofu which was wrapped in a paper towel placed on a perforated metal tray with a matching bottom. I placed a similar sized metal tray on top and weighed it down with a full container of American-size yogurt (1 lb). For firm tofu I used two containers (2 lb) as weights but for silken tofu I used only one (1 lb) so as not to crush it. After a few hours in the refrigerator, I replaced the paper towel and let it drain for 2-3 more hours.

Fresh Mozzarella cheese: I used fresh high moisture content whole cow's milk Mozzarella cheese. I cut the edges off to make it a sort of rectangular shape.

Miso marinade: I used rice miso or "kome" miso 米味噌 with saltiness between red and yellow miso. I added mirin and mixed until the miso became a nice spreadable paste. This time I did not add anything else.

In an air tight plastic container, I made a thin layer of the miso marinade on the bottom and place the tofu and the cheese on top. I smeared the remaining miso marinate all over the other sides of tofu and the cheese.

The texture of the silken tofu is a bit too soft to our taste. We liked the firm tofu texture, which is more similar to that of soft cheeses, better. In terms of overnight vs. 3 day vs. 5 day versions, there were only slight changes in texture, flavor and saltiness. The miso marinated tofu was particularly good if you eat it with perilla.  The Mozzarella cheese became more interesting than the original cheese, since plain mozzarella does not have any strong flavor by itself. This is a very interesting combination of a real cheese with a nutty miso flavor with slight saltiness. We may keep experimenting with the longer marination.

Thursday, October 6, 2011

Baked marinated tofu with cheese 豆腐とチーズのピリ辛オーブン焼き

This is a variation (euphemism!) or, more precisely, a leftover control, of the baked  marinated tofu which I made yesterday. I could have just warm it up but I added cheeses and spruced it up a notch.


I just put the leftover cubes of marinated and baked tofu into a small ramekin as seen above. I added slices of fresh Mazarella cheese and freshly grated Parmesan cheese on the top.  I drizzled a small amount of good fruity olive oil on the top and baked it for 10 minutes in 450F preheated toaster oven. Since I happened to have myouga harvested on the weekend, I added thinly sliced myouga (strictly optional) on the top and cooked it for another 5 minutes. I garnished it with a chiffonade of perilla.

This addition of cheese make it a much richer (less healthy) dish. Although the addition of myouga is subtle (cooking reduces myouga's flavor), it added one more dimension to this dish. 

We  had this with a red wine from Priorat, Genium Cellar Red Blend 2005. This is a blend of old-vine garnacha (60%) and the remaining balance consisting of cariñena, merlot and syrah. It is a good, rather big red especially if you are thinking of wines made from granache from elsewhere (Rhone). This wine would be good one to have with roasted red meat but this tofu dish has a "meaty" quality so the wine went very well.

Tuesday, October 4, 2011

Baked marinated tofu 豆腐のピリ辛オーブン焼き

One weekend, my wife found this tofu recipe in the Washington Post and suggested I make it. I made slight modifications and served it as a drinking snack.
The below is the ingredients list from the original recipe.

Ingredients:
14 ounces (1 block) extra-firm tofu
1 tablespoon toasted sesame oil
1 tablespoon low-sodium soy sauce
1 tablespoon rice wine, sake or dry sherry
1 tablespoon rice vinegar or apple cider vinegar
1 medium clove garlic, pressed or finely chopped
1-inch piece peeled ginger root, grated
4 tablespoons water
1/2 teaspoon hot chili paste

Since I did not have a chili paste, I used a Chinese garlic chili paste but otherwise followed the recipe. They suggest freezing and thawing the tofu before using it in this recipe. This is an interesting suggestion since one of the Japanese tofu products is called "Shimidoufu" 凍み豆腐 ("shim" means "frozen") or "Kouyadoufu" 高野豆腐. In the "old days", this was produced by hanging a thin block of tofu outside in the cold winter. This essentially freeze dries the tofu. I am sure, now, this type of tofu is produced in a factory freeze-drying machine. The end product is hard and dried squares which will last a long time. You simply hydrate and simmer it in a seasoning broth. The texture is completely different from the original tofu and firmer and spongier. I often make this for New Year (If you follow the link, on the left and front,  the triangular white item is simmered "kouyadofu"). I will certainly try this freezing and thawing tofu method for this dish, which is different from freeze-dried tofu, in the near future.

This time, I just drained the excess moisture from tofu. I cut the drained tofu into 1 inch cubes and mixed with the marinade (left in the image below). I placed it without a lid in a 350F convection oven. I baked it for 45 minutes mixing and turning several time until the marinade was almost all gone and just started scorching around the edge (right in the image below). I made a slight modification and added finely chopped scallion (2 stalks) just 5 minutes before I took the tofu out of the oven.
I served it with chiffonade of perilla as a garnish. The taste profile is similar to "Mapo tofu" but much drier and the tofu has a much firmer texture. It is nicely hot (both spice and temperature) with garlicky (this one is more garlicky than it should have been since the chili paste I used also included garlic and I used grated garlic instead of chopped garlic) and ginger tastes. Perilla and scallion also added to the flavor. We really like this dish.

Sunday, October 2, 2011

Squid stir fry with celery, tomato, and cucumber イカ、胡瓜、セロリの炒め物

When I made fried squid tentacles one evening, and I had the bodies of squid left (or may be the other-way-around) from a pound of squid I bought. From this, I made this dish. This is a sort of variation of sautéed squid and celery. But the taste and texture are different.

Squid: I started out with one pound of squid including the bodies and tentacles. After cleaning and using the tentacles for kara-age dish, I cut the remaining squid bodies into rings (about 1/2 inch wide).

Vegetables: I cut celery obliquely into half inch wide and 2-3 inch long pieces (2 stalks) and American mini-cucumber in similar manner after removing the seeds and soft part around the seeds (1 mini-cucu). I made a wide julienne of tomato after I skinned and removed the seeds (1 medium).

I added olive oil (1/2 tbs) and butter (1 tsp) to a frying pan on medium low heat and sautéed slices of garlic (1 fat clove) and red pepper flakes (1/5 tsp or to your taste). When the garlic was fragrant, I added the celery first and sautéed for 1-2 minutes and then added the cucumber followed by the tomato. After 1 minute or so, I increased the heat to medium and added the squid rings (patted dry with a paper towel to remove any moisture) and quickly sautéed for 30 seconds or until the squid became just opaque and done. I seasoned it with salt and black pepper.

This is a very nice dish albeit it was a bit too spicy for my wife. I may have overdone the red pepper flakes and black pepper but it created a nice gentle buzzing in my mouth. The freshness and quality of the squid were quite good. Butter and garlic flavors combined with the still crunchy refreshing celery and cucumber all go well together. Squid has not been overcooked has a nice texture and taste and the tomato almost melted adding richness to the sauce and some acidity. We kept enjoying cold sake with which we started this evening.