Tuesday, December 30, 2014

Three Otoushi appetizers お通し3種類

These are three appetizers or "Otoshi" お通し I served one evening. It is always nice to start a meal with multiple small appetizer dishes but sometimes coming up with them can be a lot of work. Of course I could make things up ahead of time but somehow things don’t seem to work out that way.


The left most is shira-ae 白和え of green asparagus tips and "Fuyu" persimmon 富有柿.


The middle is "mozuki onsen tamago" もずく温泉卵 that is "mozuku" sea weed in sweet vinegar (store bought frozen) and "Onsen" egg on the top garnished with chopped scallion.


I also served deep fried tofu pouch, grilled. I tried to make it cheese filled or "Kitsune" Raclette but I did not have Raclette cheese and used a combination of cheddar and gruyere cheese which melted and ran out during the cooking process. So this became faintly cheese flavored grilled abura-age.

None of these dishes are new but it is really enjoyable to sip sake and taste these different flavors.

Saturday, December 27, 2014

Samosa Croquette サモサコロッケ

We had leftover stuffing when we made samosa using egg roll skin. We decided to make a croquette samosa or "サモサコロッケ”. This one also had non-traditional chopped (roasted) pork meat as well.


Instead of the traditional Japanese oval and flat shape ("kobann-gata" 小判型 which is made that way to represent the shape of old Japanese gold currency in the Edo 江戸 period), I made it in the "Tawara" 俵* shape with cheddar cheese in the middle (see below).

*Tawara is cylindrical container woven from dried straw which was often used to store and transport rice in old Japan.


Since "curry" flavor is common in Japanese potato croquette or "potato korokke", we thought samosa seasoning would go well. Indeed this was very good.


We added "tonkatsu" sauce and enjoyed it with a sip of Cabernet.

Wednesday, December 24, 2014

Asparagus green and white グリーンとホワイト アスパラガス

This is a “nothing” dish but we enjoyed it as a drinking snack. The seasonality of asparagus has been somewhat lost since Peruvian asparagus is readily available in the United States in winter*. Coming from Hokkaido where fresh asparagus indicates the beginning of late spring moving into summer, I miss the anticipation and excitement inherent in the seasonality of the dish. But the fact we can enjoy fresh asparagus all year long provides some compensation. Although green asparagus are very popular, white asparagus is not as widely appreciated. When I was a kid white asparagus only came canned which is rather awful compared to fresh. I have posted about white asparagus before but I made a slightly different dressing for it this time.

*factoid: Believe it or not asparagus have been an “integral” part of the U.S. war on drugs. Under various free trade agreements with Andean countries particularly Peru, asparagus were imported to the United States duty free or with reduced tariff. It was thought this would provide incentives to produce asparagus rather than drugs. (I privately suspect they produce both now). Prior to these Agreements, as was the case in Hokkaido, asparagus were  only available in the United States in late spring early summer. Peruvian asparagus are also produced in Peru in the spring. Since the production occurs south of the equator, however, Peruvian spring/summer is our fall/winter. As a result asparagus are available in the U.S. all year round: from the United States in spring and summer and Peru south of the equator in fall and winter.


I quickly blanched the green asparagus tips (for a few minutes) and then cooled them (by spreading them on a paper towel in a cool place) and served with sesame dressing (Thicker bottom stalks were made into asparagus soup).  The sesame dressing is a mixture of white sesame paste, 1 tbs, sugar 1/2 tsp, soy sauce 1-2 tbs and rice vinegar 1/2 tsp).

The while asparagus can be a bit tricky to cook. First, I removed the bottom of the stalk by snapping it off by bending (where ever it snaps, that is the right spot). I then used a vegetable peeler (Europeans have a special white asparagus peeler) and removed the outer fibrous layer, preserving all the peels. The white asparagus tends to be very brittle and often breaks when it is peeled. The best way to prevent this is to use a sharp peeler and also place the asparagus on a flat surface such as a cutting board and rolling it as you peel. I placed all the peels and root ends as well as peeled white asparagus in a large frying pan with enough water to cover everything (I used filtered water from our home reverse osmosis device). I did not add salt (since I would be reducing the liquid). I cooked it on low flame for 1 hour (could be less depending on how well you peel and how fibrous the outer skin of the asparagus). After taking out the asparagus, I kept simmering the scraps and peels until the liquid was 1/3 of the original amount (the resulting liquid is full of white asparagus flavor). After staining through a fine meshed sieve, I kept this reduced broth in a sealable container for later use.

The first night, I served the asparagus warm.  I heated the cooked spears in a small amount of the asparagus broth. After they were heated through I removed them from the pan and set them aside. I then finished the sauce by adding butter, cream, and seasoning it with salt and white pepper. I then poured the sauce over the asparagus. This is very good for warm white asparagus.

The second time I served the asparagus (picture above), I used the broth to loosen mayonnaise to make a sauce for cold white asparagus. Adding, the concentrated white asparagus both really makes a difference. Although this was not early summer, we still enjoyed the asparagus.

Sunday, December 21, 2014

Persimmon in tofu dressing 柿とほうれん草の白和え

I did a post on persimmon previously. In the US, we can usually get either "Fuyu 富有 or Jiro 次郎" and "Hachiya 蜂屋".  This time we found Fuyu persimmons at the store and I let them ripen to the point where the meat of the fruit was soft and gelatinous but very sweet (I didn’t let them ripen to that point on purpose, I just forgot about them). Before they passed the point of no return, I quickly made this persimmon salad with traditional tofu dressing called "Shira-ae 白和え. "Shun-giku" 春菊 or edible chrysanthemum would be the traditional pairing but since I did not have it, I substituted blanched baby spinach.


I served this on two occasions.  Since I had a small persimmon shaped bowl, I served in this container but it was a bit too small (below).


Ingredients (for two servings as seen in the first picture)
Persimmon, Fuyu Jiro variety, one, skinned and cut into 1/4 inch slices.
Spinach, hand-full, quickly blanched in salted boiling water, quickly washed/cooled in cold running water and moisture squeezed out then cut into half inch long pieces.

Tofu dressing: I used a half container of sukui tofu. The seasonings can be variable but I added Japanese white sesame paste "Neri-goma" 練りゴマ (2 tsp), sugar (1 tsp) and salt (1/2 tsp). You could add light colored soy sauce or miso instead of salt. I mixed them up in a small Japanese pestle and mortar (suribachi with surikogi) as seen below. Using silken or sukui tofu makes the dressing very smooth and creamy.


I simply dressed the persimmon and spinach with the tofu dressing. It is nice small salad. Although there is no oil added, the tofu makes the dressing very smooth, rich and creamy. The persimmons we used was a bit over ripe but still this was a nice small starter dish.

Thursday, December 18, 2014

Lobster bisque ロブスタービスク

Every time we have lobster, I make lobster bisque from the carcasses and shells. According to my wife, lobster bisque is actually better than the lobster itself (which is mighty fine in its own right) because of the concentrated lobster taste. It is also much easier to eat.


I do not follow a particular recipe but I am sure all lobster bisque recipes must be similar. I use only a small amount of flour to thicken the soup as I do not want a very thick starchy bisque. Some may like to use all heavy cream to make the bisque thicken but, for me, that is a bit too much.

Ingredients
Lobster Carcasses: from 2 lobsters, cut into manageable size.
Vegetables: onion (2, finely diced), celery (3 stalks finely sliced),  carrots (3, cut into small chunks).
Tomato paste: about 2 tbs
White wine: 1 cup
Water to just cover the vegetables and lobster carcasses.
Thyme: 1/4 tsp, dried
Bay leaves: 2-3
Olive oil and butter.
Cream
Flour: 2-3 tabs (to thicken the bisque)

In a deep stock pot, I added butter and olive oil (1 tbs each). When hot, I added the onion and celery and sautéed until soft (3-4 minutes) and seasoned it with salt and pepper. I moved the vegetables aside and added the tomato paste to the bottom of the pan and moved it around to caramelize it as indicated when the color turned dark. This took about 1-2 minutes. Then I added the white wine (left over from dinner the previous night) and simmered for few minutes. I then added the carrots and the lobster carcasses. Using a wooden spatula, I pushed down on the carcasses and then poured in the water (we always use filtered water from our reverse osmosis system) to just cover. I added the thyme and bay leaves. I put the lid on and let it simmer for one hour or more. I occasionally mixed/pressed down on the carcasses using a wooden spatula during the cooking to make sure everything was submerged.

Using a large fine meshed sieve, I strained and removed all solids. This yielded about 4 cups of broth. I let it cool down to the room temperature, covered, and placed in the refrigerator (of course, you can do the reduction part without a pause).

Next day, I melted butter (about 3 tbs) in a stock pot. When melted, I added the flour (3 tbs) and mixed until no raw flour was visible but not colored (about 5 minutes). I added about a cup of cold broth and whisked quickly. When the flour/butter mixture was completely incorporated, I added the rest of the broth to the pot. At this point, the broth was very slightly thickened. I let it simmer without the lid on for about one hour to reduce it to half (about 2 cups). At the end of the reduction, I tasted it. Because of the saltiness from the lobster carcasses and the reduction, no salt was needed. The broth was nicely seasoned and all the essence of lobster was there. Again, I let it cool down to room temperature and place the reduced broth into a sealable container and placed it in the refrigerator.

To serve, I poured the amount for two servings into a sauce pan and gently heated it up. When warm, I added cream (about 4 tbs, the amount is up to you) and gently stirred. I do not like very thick starchy bisque but I also do not like too much heavy cream in my bisque.  I poured it into soup bowls with the cooked lobster meat in the center. I did not add any other garnish. I even omitted the slug of sherry usually included in this kid of bisque by my wife's request. She said she did not want to risk having the sherry overpower the lobster flavor.

As my wife said, this is a very essence of the lobster. It is velvety smooth with all the flavor of lobster. The lobster meat got warmed up which was very sweet.

Monday, December 15, 2014

Crab meat stuffed baked lobster 蟹肉入りロブスターのオーブン焼き

In preparation for an upcoming celebration I asked my wife if she would like to go out to a fancy restaurant. She said she preferred either a lobster or dry aged good beef cooked at home.  So I ordered two live lobsters that were each slightly over 2 lbs. They arrived the next day loose in a Styrofoam box. They were quite lively, moving around and according to my wife, focused on getting out of the box. Since I was not at home at the time, my wife was at a bit of loss as to what to do with them. She taped the box shut to prevent a “great escape” and put the box in the refrigerator. After some thought I decided to "bake" the lobsters stuffed with crab meat and topped with bread crumbs.


In the past we have tried boiling lobsters but that tends to get messy. First you need a pot that is big enough, secondly the process is somewhat gruesome, and thirdly the lobsters end up cooked but waterlogged.  We have also asked to have them steamed at the store where we bought them. Steaming is better than boiling at home, but we get the impression some of the lobsters have been residing in the tanks for quite some time because they have algae growing on their shells which is not very appealing. (The mail-order lobsters were not cloaked in any algae).  I decided to dispatch these fellows in the quickest most humane way possible. I had read somewhere that putting them in the freezer for a short period would anesthetize them but we did not have enough space in the freezer so I covered them in ice cubes. Maybe it would have been more effective to put them in the freezer because even with the ice cube bath this guy was feisty enough to challenge the heavy and sharp chef's knife in front of him.  I used the tip of the knife to pierce the junction between the head and abdominal segments cutting through the entire head section in one fell-swoop. This is the least pleasant aspect of a lobster dinner but I like to think this was much quicker than death by hot boiling water.  


I then cut the tail into half by extending the cut I made in the head section. I cleaned the head section leaving only the edible portions; the "coral" (it looks green when raw  but will turn orange or coral color when cooked) and liver or "tamalley". I then removed the intestine along the upper portion of the tail meat. I put the lobsters on a cookie sheet lined with aluminum foil (see below).


I removed the rubber bands around the claws and baked them at 410F for 10 minutes. I then stuff the head cavity with crab meat (Jumbo lump) in Bechamel sauce* and also spread the crab over the tail meat (below).

* This is my usual bechamel sauce. I sautéed finely chopped onion (one medium) in butter (2 tbs) until semi-transparent and soft. I added flour (3 tbs) and kept sautéing until no "raw" flour remained and the onion pieces were all coated with the butter/flour mixture. I added 1 cup of cold milk at once and kept stirring until thickened. I seasoned with salt and white pepper. I did not use any other seasoning to preserve the delicate flavor of the crab and lobster meat. I then mixed in jombo lump crab meat (about 8oz).


I then, spread bread crumbs (Panko) mixed with chopped parsley, olive oil and grated parmesan cheese (below) and place it back to the oven.


After 15 more minutes, the lobsters were done and bread crumbs got nicely brown and crispy (below).


For libation, we started with Cuvee Mumm Napa DVX 2001 which we had kept for over 10 years in our refrigerator for a special occasion like this. It was very nice with fine small bubbles and very slight toasted bread aroma with green apple and citrus. Although we usually do not drink white wine, we made an exception and opened Robert Young Chardonnay Red Winery Road 2007. This is one of the rare "old" California style oaked chardonnay with nice buttery oaky flavors.


The lobsters were sweet and great. Getting to the claw meat was as always a bit of work but at the end it was well worth it.

Friday, December 12, 2014

Pork Curry buns カレー肉まん

One of my food memories growing up in Japan is "Nikuman" 肉まん. It was sold in many small neighborhood stores displayed in a tall white square steam case with glass walls on three sides. (This was long before "Konbini" コンビニ or convenience stores made their appearance and became wide spread in Japan. Now-a-days, "nikuman" and many "unique" variations specific to the particular Konbini-chains are popular in convenience stores). Nikuman is a Japanese variation of Chinese baozi (包子). It is modified to better appeal to the Japanese palate. I remember as a kid, the steaming hot round white bun filled with seasoned pork meat was definitely a comfort food especially on cold winter days in Sapporo. Over the years we tried various frozen nikuman here in US. They were edible but a pale shadow in comparison to the ones from my childhood. We even tried some recently at a small Chinese bakery/eatery in San Francisco Chinatown but it was not what I remembered. Recently one of my friends (Chinese) gave me home-made baozi made by her mother. (I greatly appreciate her sacrifice in parting with some so I could taste them). They were by far the best I’ve had.  The flavor, however, was the original Chinese flavor not the Japanese flavor matching my childhood memory. So, I decided to make my own "Nikuman" using my wife's Indian-style pork curry for the filling as a test. (Curry flavored nikuman is definitely a common variation in Japan).


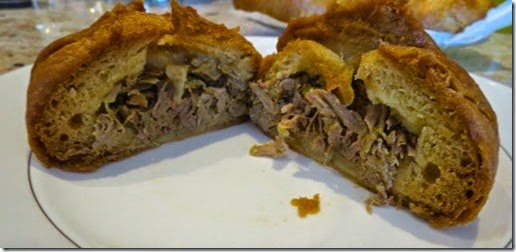
This is mystery to me but my steamed buns came out brown like baked bread (above). Besides, I did not do a great job to sealing the top of the buns as you can see.


I have to assume that the spices in the curry especially the turmeric and mustard must have caused the brown color but as you can see below only surface is brown and the inside is more yellow which is the color of turmeric and mustard.


In any case, my version of "curry nikuman" was pretty good. Although obviously biased, my wife thought this was the best nikuman she has had.

I adapted my version from this recipe. I reduced this recipe in half but the proportion of ingredients especially water in the original recipe was off and ended up using much more water than the previous recipe specified.

Ingredients for buns (made four good sized ones):
Flour: all purpose, 250grams
Dry yeast: 1 tsp
Sugar: 25 grams (I reduced sugar in half)
Baking powder: 1 tsp (I just realized the original asks for baking powder but I used baking soda—they still puffed up).
Water: nearly 2 cups

I combined the dry ingredients in a Kitchen-aid mixer using a dough hook. I mixed at speed 2 and gradually added water until a ball of dough formed on the hook as well as the center of the bottom of the bowl. I removed the dough onto the floured surface and hand kneaded it until it was nicely elastic. I placed the dough in a Ziploc bag (1 gallon) sprayed with Pam, removed the air, sealed, wrapped with towels and let it rise in a warm place for 1 hour or more (until the bulk doubled). I divided the dough into equal sized pieces (I weighed them), formed the pieces into balls and flattened it to a disk. I covered it with a towel and let it rest for 10 minutes (to relax the gluten).

Filling: I used the pork curry my wife made. I just removed the cubes of pork, shredded it by hand and using a fork, I added enough sauce to make it stick together but not too wet.

I flattened the dough and placed the stuffing in the middle on my left hand (#1), Then I stretched the dough and brought the edge to the center and repeated the process until the stuffing was covered and the surface of the buns were sealed (#2 and 3). I placed the buns on a square of parchment paper and put them in a steamer (preheated, #4). I placed on the lid and steamed for 15 minutes (#5 and 6).


To my surprise, The surface of the buns turned brown looking like baked bread. Again, I have to assume this is due to the color of the stuffing leaching out to the surface of the buns but it is not "yellow" like colors of turmeric and mustard.

In any case, the buns were soft and hot. The curry flavored pork stuffing went very well. This is not quite my childhood "nikuman" but good enough for me and my wife really liked it. The left over buns microwaved very well the next day.

Tuesday, December 9, 2014

Egg in a pouch 卵の袋煮

In general Japanese are fond of hen's eggs (or for that matter any kind of eggs either bird or fish). This ranges from "raw" eggs on rice 卵かけ御飯, omelet (either Western style or Japanese "Dashimaki" 出し巻き卵),  onsen egg 温泉卵, "tamago-toji" 卵とじ (binding topping items with beaten eggs which was lightly cooked like in Donburi どんぶり) and so on.  We like eggs but try not to eat too many. When it comes to eggs the one thing we do not like is hard boiled eggs which have been boiled to the point where a green layer of sulfur appears around a very hard egg yolk. One way to avoid this is to make a soft- or medium boiled egg, peel it and then simmer it in a broth such as in oden おでん. The yolk gets totally cooked and becomes creamy with no sulfa-rings. The same thing happens with this dish "egg-in-a-pouch" or "Tanago no fukuro-ni" 卵の袋煮.

"Fukuro" means "pouch" which in this case is made of deep fried tofu or abra-age. It is made by cracking a raw egg into the deep fried tofu pouch, sealing it with a tooth pick and simmering it in broth. The result is a creamy egg yolk without the sulfur ring but with the added texture and flavor of the deep dried tofu. Besides, busting into it is like opening a surprise package particularly if you do not know what is inside the pouch.


This dish is usually cooked in "nitsuke" 煮付け but I made  it as part of oden this time. The above are daikon, carrots, "chikuwa" 竹輪 fish cake and the "egg in a pouch" served with Japanese hot mustard.


When you cut into it, you can see the totally cooked and creamy yolk without the green sulfa ring. My wife said, that, although this is very good, she prefers a simple boiled egg in oden.

Saturday, December 6, 2014

Samosa with pork 豚肉入りサモサ

On a recent weekend we had dinner guests and my wife decide to serve two different Indian-style curries with rice. As an appetizer, in keeping with the “curry” theme, I proposed making samosa. Including pork is not traditional, but I had left over baked pork tenderloin so I minced it up and added it to the filling. Instead of making the skin from scratch we took a “short cut” and used store bought "egg roll" wraps which worked well.


Here are the samosa hot out of the oil but when we served them to our guests we re-heated them in the toaster oven, which actually made the skin crispier and better.


Ingredients: (this made about 30 samosas with a fair amount of stuffing leftover.)
Potato: white potato, 4 large mashed, boiled whole until done, skin removed while hot.
Onion: 1 medium, finely chopped.
Spices:
Ginger, 1 Tbs. finely chopped fresh
Jalapeno pepper, one,  finely chopped
3 tbs finely chopped cilantro
1 1/2 tsp salt
1 tsp ground coriander
1 tsp garam masara,
1 tsp ground roasted cumin seeds
1/4 tsp cayenne pepper
2 tbs lemon juice
Pork:
I had previously cooked the pork tenderloin. I used a dry rub of smoked Spanish paprika, cumin, cinnamon, nutmeg, black pepper and salt, and baked it at 350F for 30 minutes). I just chopped one tenderloin (#1 below). This is totally optional.
Egg roll skin (one package) (see #5 below).

My wife first sautéed the onion in vegetable oil (1 tbs) until the edges got slightly brown and the added the spice mixture to bloom (#2), The minced pork was added and further sautéed (#3), If using uncooked ground meat, it may have to be cook in a separate frying pan and then combined with the spices. #3 The meat/spice mixture was mixed into the mashed potatoes. I tasted the mixture and it was highly spiced and seasoned (#4).


samosa composit

as a wrapper, I used egg roll wraps (skin) as seen in #5 above. This is almost square but one end is slightly longer (#6). I cut this in half (I layered several of them) using a sharp long knife. I then removed the narrower strips from each halves so that resulting sheets have a proportion of 1:4 (#7).

The diagram on the left is from http://masalanmagic.blogspot.com/2012/02/patti-samosa-folding-techniques.html. There are many YouTube videos you can watch as well.

We made about 30 of these with the loose ends of the egg roll wraps secured by painting them with a "glue" made of water and potato starch or flour (#8).

I deep fried them in 320-340F vegetable oil for several minutes per side until golden (#9). I drained them first on a metal cooling rack #9 with a cookie sheet underneath) and then on sheets of paper towel (#10).

These reheated very well in the toaster oven (turning once during the reheating), we used the highest "toast" mode. They were actually more crisp after the reheating.

As you know "fried" starch tastes good. The egg roll wraps worked very well and after reheating they tasted even better than when they just came out of the oil. The stuffing was very hot (temperature) and flavorful but not too "hot" (spicy). This was great hit among our guests.

Wednesday, December 3, 2014

Indian-style Lamb curry インド風ラムカレー

We bought butter flied lamb leg last weekend to be barbecued but the weather was not co-operative and we could not cook it outside in our Weber grill. We were planning a dinner party so we had to cook it somehow. My wife suggested we make an Indian-style lamb curry. This is more like ragout than a saucy curry but it was very good.


I was a sous chef and did all the prepping and my wife made the dish.

Ingredients:
Lamb, butterflied leg of lamb (about 3lb), sliver skin, visible fat removed and cubed (#1).
Garlic (3 fat cloves, finely chopped),
Jalapeno pepper (two, seeded and deveined and finely chopped),
Ginger root, half inch, skin removed and finely chopped (#2)
Spices; (#4)
Curry leaves, dried,15 (#3).
2 tsp garam masala,
1 tsp ground cumin.
1/4 tsp ground turmeric.
1/4 tsp cayenne pepper.
1/2 tsp salt (#4).
2 tsp sushi vinegar (original recipe calls for lemon juice but I used the vinegar

lamb curry compoist

My wife first sautéed or bloomed all the spices (#2, #3 and $4) in vegetable oil (3 tbs). Once the spices became fragrant, she added the lamb (Our philosophy is that "searing" the meat before adding is not important or necessary) (#5). She put the lid on and simmered it for an hour. Although, my wife did not add any liquid, enough liquid came out of the meat that the dish looked like a soup. She removed the lid and reduced the liquid until it just formed a thick coating of  'sauce" on the meat (#6). We reheated this before serving to our guests by adding a small amount of liquid (we used chicken broth but water would have done it).

This was a great hit. We served it “family style” with rice so the quests could take what they wanted. The meat was tender, very flavorful and a bit "spicy". When served with rice, it was just right. We provided yogurt as a condiment. In addition of tasting good with the meat the yogurt also calmed the spiciness for anyone who felt it was still a bit too much for them. (One of our guests did that but the rest of us were OK with the spiciness). This dish did not stay around long enough to get cold.