Showing posts with label tomato. Show all posts

Wednesday, July 22, 2026

Tomato-Spinach Roulade Bread トマトとほうれん草のルラード

This is another one of my wife’s baking projects. This is based on a recipe in the “Silver Palate Good Times Cookbook”. When I made “no-cook tomato sauce” and “marinara sauce” using “Cento San Marzano Tomatoes” for Neapolitan-ish pizza, we ended up with extra tomato sauce. Since the bread recipe called for canned Italian tomatoes and we had left over tomato sauce made with canned Italian tomatoes, my wife saw an opportunity and asked if she could use the left-over sauces. I, of course, said “By all means”.  This is a very complicated bread recipe and I would not even consider trying it but my wife is not deterred by complex baking recipes. In any case, the pic shows the bread she produced. This is a very soft tender bread with lots of flavors. The spinach and ricotta cheese spread does provide a nice color and texture contrast to the surrounding bread but it didn’t bring much additional flavor to the show. In my humble opinion, the bread could be made with the marinara as a simple loaf omitting the spinach spread, especially since this would make this bread much easier to make. (Wifey’s comment: In my humble opinion I agree.)


Here comes my wife to continue.

Ingredients
For Bread
14 ounces (half 28-ounce can) Italian plum tomatoes (We used the marinara sauce we made for pizza)
2 packages active dry yeast
1 tablespoon sugar
1 small yellow onion, finely chopped
2 cloves garlic, finely chopped
1 tablespoon dried basil (We didn’t include this)
1 tablespoon dried oregano  (We didn’t include this)
1/2 teaspoon celery seeds (We didn’t include this)
2 teaspoons salt
1 cup grated Swiss, mozzarella, or Fontina cheese (We used mozzarella)
5 to 6 cups unbleached all-purpose flour

For spread
1 tablespoon unsalted butter
1 small yellow onion, chopped
2 cups finely chopped fresh spinach (We precooked the spinach)
½ cup Mascarpone or ricotta cheese (We used ricotta)
1 tablespoon Marsala
2 teaspoons fresh lemon juice
Salt and freshly ground black pepper, to taste

Directions:
For bread 
In a saucepan sautee the onions and garlic. Purée the tomatoes with their liquid in a blender. Add to the onions and garlic, Stir in the sugar and salt. Then add the grated cheese and stir to mix and melt the cheese. If you are using them stir in the basil, oregano, and celery seed. (We just used the left-over marinara sauce we made for pizza. We used the same amount as the tomatoes called for in the original recipe.) Cool to room temperature. In the bowl of a stand mixer combine the yeast and 3 cups of flour to start. With the machine running add the tomato mixture. Stir in enough additional flour, 1 cup at a time, to make a firm dough. Knead in the mixer for 7 to 10 minutes. Turn out onto a floured surface and continue kneading until the dough is smooth and elastic, adding more flour if necessary (#1). 

Place the dough in a buttered large bowl and turn to coat with butter. Cover with a damp towel and let rise in a warm place until doubled in bulk, 1 to 1½ hours.

For the spread
While the dough is rising, melt the butter in a medium-size saucepan over medium-low heat. Add the chopped onion and sauté until translucent. Stir in the spinach and cook 5 more minutes. (We precooked the spinach). Stir in the cheese, Marsala, lemon juice, and salt and pepper to taste. Refrigerate covered until firm enough to spread.

Assembly:
Punch the dough down and divide it in half. Roll each half into a rectangle about ¾ inch thick and spread with the spinach filling (#2). Roll up each rectangle like a jelly roll (#3) and place on greased baking sheets. Cover loosely with plastic wrap and let rise 1 hour.
Preheat oven to 375°F. 
Bake until the loaves are lightly browned (#4) and sound hollow when lightly thumped, 40 to 50 minutes. Allow to cool on the baking sheets for 10 minutes.  
Turn out onto wire racks to cool completely.


The bread had a very soft tender texture. The flavor was very complex melding together all the flavors of the tomato/marinara sauce and cheeses. The filling made a nice texture contrast but despite the many varied flavors that went into it, particularly the marsala, their flavor didn’t really come through. It is a very unique (in a good way) bread.

Sunday, July 19, 2026

Neapolitan-ish pizza ナポリ風ピザ

I have been making  home-style pizza for some time first using the regular oven and a pizza stone, then, more recently, using the “Pizzaiolo” pizza oven. Although, in general, we like the pizza I make, I am always looking for ways to improve it. Recently, we got a new pizza cookbook from King Arthur called  “The Book of Pizza”. This is quite an encyclopedia on pizza. It covers pizza from classic Neapolitan and other Italian styles to American regional versions. This inspired me to do some experiments/improvements.

With is experiment version I had three goals in mind. #1. try to make the dough/crust as close as I could make it to “authentic” Neapolitan style. #2. determine wether Italian canned plum tomatoes (I got “Cento San Marzano” canned tomatoes) are better than the domestic canned ones? If so, are they worth the cost? #3. Compare “no-cook” tomato sauce (to make a classic “Pizza Margherita”) to the Marinara sauce I make using the same tomatoes for both sauces. (Rest assured that I am not going to make a classic Neapolitan cheese-less “Pizza Marinara”. We like cheese on our pizza.)

I made a pizza half with the  no-cook tomato sauce (left side) and the other half with the Marinara sauce (right side) (picture #1).  I did this so that both sides are identical except for the sauce. For both, I used low-moisture Mozzarella cheese and fresh basil from our window-sill garden.


It appeared I succeeded in making classic “cornicione” on the edge of the crust (pictures #1 and #2).


Just for my own record of what I cooked, I will post the recipe.

Pizza dough:

Ingredients: (makes 4 small pizza with dough weighing about 215 grams each with hydration of about 65%)
520 grams “00” flour (from King Arthur)
340 grams water
8 grams of salt
1/4 tsp active yeast

Directions:
In a food processor fitted with a kneading blade, add the flour, salt and yeast and mix. While the blade is turning on low speed, add the water in a steady thin stream until a dough ball forms above the blade. Let it stand for 5-10 minutes (for even distribution of moisture). Turn the food processor to low speed again to knead for another minute or two. Turn the dough out onto a flour dusted kneading board and knead for a few minutes. Then make the dough into a tight ball. 

In a large enough mixing bowl, add a small amount of olive oil to thinly coat the inside. Add the dough ball, turn to coat all the surface with the olive oil. Cover the bowl with a plastic wrap and let it ferment (bulk fermentation) for about 1 hour (I use a Brod and Tylor bread proofer at 86F). 

Fold and deflate the dough and make 4 dough balls (about 215 gram each). As with the bulk fermentation add a small amount of oil to a bowl and coat each of the 4 dough balls with the olive oil. (I generally use the bowl in which I did the initial bulk fermentation to save on the number of bowls that have to be washed.) Then put each ball individually into a small Ziploc bag. Remove as much air as possible and seal the bag. I place the Ziploc bags in the refrigerator. I will keep the dough at least over night or a couple of days. After that if I do not use the dough, I move it to the freezer.

The next day, I take the Ziploc bags with dough balls in them out of the refridgerator about 1 hour before cooking to warm them up to room temperature.

Sauces:

1. No-cook pizza sauce (“No-cook”  is not quite accurate since the tomatoes were cooked during the canning process but we do not cook it):

Ingredients and directions:
Canned tomatoes, hand torn or cut, drained. (Retain the juice that was in the can.) Place the tomatoes in a cylinder-shaped container and blend using an immersion blender. Add salt to taste. (The Cento brand we used contained sea salt and basil leaves so we did not add salt).

2. Marinara sauce:

Ingredients
28oz can of  Cento San Marzano tomatoes, hand crushed and liquid separated but retained 
1 medium shallot (or small onion), finely diced
3 cloves garlic, finely chopped
3 tbs olive oil
1/4 tsp dried oregano
1 bay leaf
Salt to taste

Directions:
Add the olive oil in a sauce pan on medium-low flame. When heated, add the shallots sauté for a few minutes. Then add the garlic and sauté until fragrant. Add the tomatoes and the juice reserved from the can, oregano and bay leaf. Simmer for 20-30 minutes. Taste and season with salt if needed. (When I use the domestic canned tomatoes, I usually add some sugar and baking soda to compensate for the tomatoes excess acidity. This was not needed at all for the Italian canned tomatoes.)

Assembly and cooking:
I assembled the pizza as usual but payed particular attention not to deflate the edge.
I cooked it in “Neapolitan pizza” mode (it is called “Wood Fired” or about 700F) on the Pizzaiolo oven for 2 minutes.

We reach three conclusions concerning the goals I mentioned earlier:
#1. Compared to domestic canned tomatoes, the Italian Cento brand canned tomatoes we tried were much better. It is worth the higher cost.

#2.  Both of us liked the marinara sauce side of the pizza better than the no cook tomato sauce side. The marinara sauce has much more flavor. Although classic “Pizza Marinara” has no cheese, as you can see in the picture we broke with tradition because we like cheese on the pizza.

#3. The crust was soft, pillowy, and chewy. Did we like it?? We’re not sure. This sort of confirms what we said previously that “00” flour without oil in the dough was too chewy for us.  Actually, we preferred the left-over pizza we made for this experiment reheated in a toaster oven because the crust became much crisper. Lesson learned? We like a bit more crispy crust.  I may try to make New York style next.

Wednesday, April 8, 2026

Baked Spaghetti (angle hair) Cup with meatballs オーブン焼きスパゲッティカップ

My wife saw the original recipe for this dish on the Washington Post website but she made substantial changes. She really was sold on the idea of making pasta cups and stuffing them with something. We usually do not keep spaghetti on hand but we do keep angel hair pasta in the pantry. I had just made pork meatballs with ricotta cheese as well as some marinara sauce to use on pizza. So my wife came up with the idea of taking the angel hair pasta we had, tossing it with the marinara sauce I just made and using it to make “spaghetti” cups. Then since we already had the meat balls, using them to stuff the spaghetti cups and topping them with cheese. (In the original recipe, the pasta cups are made with spaghetti are stuffed with ground turkey and broccoli). In any case, her idea worked well.  We were expecting the pasta cups to be crispy outside but it did not happen and they tasted like regular pasta with marinara sauce. This was basically pasta with meatballs in marinara sauce in compact basket form.  I served this with chicken wing simmered in black vinegar (I happened to make this dish for other reasons) and small green salad with cucumber and Campari tomato. I ask my wife to continue.


Ingredients:
6 ounces cooked angle hair pasta 
1 1/2 cups marinara sauce, (or to taste)
12 meat balls cut in half (if cooking in mini muffin tins that make 24 small muffins or 24 if using whole meatballs). 
1 large egg, beaten
1/4 cup (3/4 ounce) grated parmesan cheese (or more to taste)
various cheeses to top the pasta cups (we used smoked gouda and sharp cheddar 
Salt to taste

Directions:
Cook the angle hair pasta according to package instructions. After it is drained toss it with the homemade marinara sauce. Add the egg and toss until the egg is incorporated. Add the grated parmesan cheese and toss until fully mixed with the pasta. 

When ready to make the spaghetti cups, position a rack in the middle of the oven and preheat to 375 degrees. Put the paper liners in the small bite muffin tin. Distribute the pasta into the wells of the muffin tin, creating a divot in the center of each to hold the meatball (#1). Distribute the meatballs among the spaghetti cups (it’s okay if it comes above the top of the wells) (#2). Cover the meatballs with the gouda/cheddar cheeses (#3). Bake until nicely browned, 20 to 30 minutes (#4). Let cool for 5 minutes then serve. 


These make very nice bite-sized appetizers. They taste very savory and satisfying. This was a great variation on the theme of spaghetti and meatballs.

Thursday, March 12, 2026

Roasted Red Pepper Sauce V2 赤パプリカのソース

Whenever we have red peppers, we roast them in the toaster oven. We do this on broil mode until the skin blackens and blisters about 15 minutes turning occasionally.  Then I place the peppers in a metal bowl and tightly cover it with aluminum foil to let the peppers steam for about 10-15 minutes. After removing the seeds and skin, the red peppers can be used for salad or other dishes but our main way of using them is to make roasted red pepper sauce. This time I made a different version of red pepper sauce. Since I used tomato paste in this recipe my wife was concerned that this version of the sauce would taste like more tomato sauce but the pepper flavor predominated. While the sauce had a distinctive roasted red pepper flavor unlike the previous version it was creamy (#2). We liked the new version better than the old one. One day I used it to make a pasta dish with poached  shrimp for lunch. (I gently poached the shrimp with the shell on for a short time then removed the shell and halved the shrimp length wise. I use this method because it cooks the shrimp but the shrimp comes out very tender with its sweetness preserved.) The pasta was Pennsylvania Dutch egg noodles (my wife’s favorite). I also added steamed green beans (#1). This was a good lunch.


The recipe is based on one I saw on-line. I changed the proportions of the ingredients using my CCK (Common Culinary Knowledge).

Ingredients:
3 roasted red peppers, skin removed and seeded, cut into small squares
1 shallot, finely diced
1 tsp garlic, finely chopped
1 tbs tomato paste
1/2 tsp dried basil
1/4 cup cream
3 tbs parmigiano reggiano, grated
2 tbs olive oil
Pepper and salt to taste

Directions:
Sauté the shallots in the olive oil for 1 minute and add the garlic for another minute. Add the tomato paste and keep cooking until the color of the tomato paste slightly darkens. Add the roasted red pepper, basil, and cream. Cook for a few minutes. Transfer to the cylinder container that came with the immersion blender and blend until smooth. If needed add more cream. Taste and season with salt and pepper. Add the Parmesan cheese and mix (#2).


This is very versatile sauce. It was very creamy and had the rich savory flavor of the roasted peppers. We can use it for many purposes such as chicken or white fish.

Monday, January 26, 2026

“Bento” Lunch Box 弁当

Since the occasion called for it, I made a bento box which is something I rarely do. As usual, I used an adult sized two tier bento box. I filled the layers with whatever we had on hand. I would have included cooked rice but since we had arancini, I used that instead.


#1: Simmered kabocha Japanese squash かぼちゃの煮物  and blanched green beans サヤインゲン. #2: Cucumber and nappa cabbage “asazuke” 胡瓜と白菜の浅漬け(nappa cabbage is hiding underneath). #3: boiled and marinated quail egg うずらの味玉 and skinned Campari tomato. #4: Carrot salad 人参サラダ. #5: Ricotta cheese meatballs in marinara sauce  トマトソースとミートボール. #6: Arancini made with shiitake mushroom risotto アランチーニ. #7: Japanese omelet seasoned with “Shiro-dashi” 白出汁味のオムレツ.


I made the omelet just for the lunch box (two eggs beaten and seasoned with shiro-dashi*). I made the meatballs shown here in the marinara sauce a few days ago. I combined the meatballs and marinara sauce by cutting the meatballs in half, adding them to the sauce in a frying pan and heating every thing until it was warmed up and the marinara sauce thickened. I finished this by adding grated parmesan cheese. I let these two dishes cool before adding them to the lunch box.

*Shiro-dashi 白出汁: A concentrated dashi soup base. Japanese dashi broth (made from kelp, bonito flakes etc) with added light colored soy sauce. This is most commonly used to make “Chawan mushi 茶碗蒸し. I used a commercial bottled one. It adds both nice flavors and saltiness without adding color like regular soy sauce or concentrated noodle sauce would do.

This was a quite filling and nice bento.

P.S. As a side light shown in the following picture, the Christmas amaryllis are in full bloom. What a treat on a gloomy winter’s day. 


Monday, February 24, 2025

Quesadilla with Mini-corn Tortilla and Browned Cheese

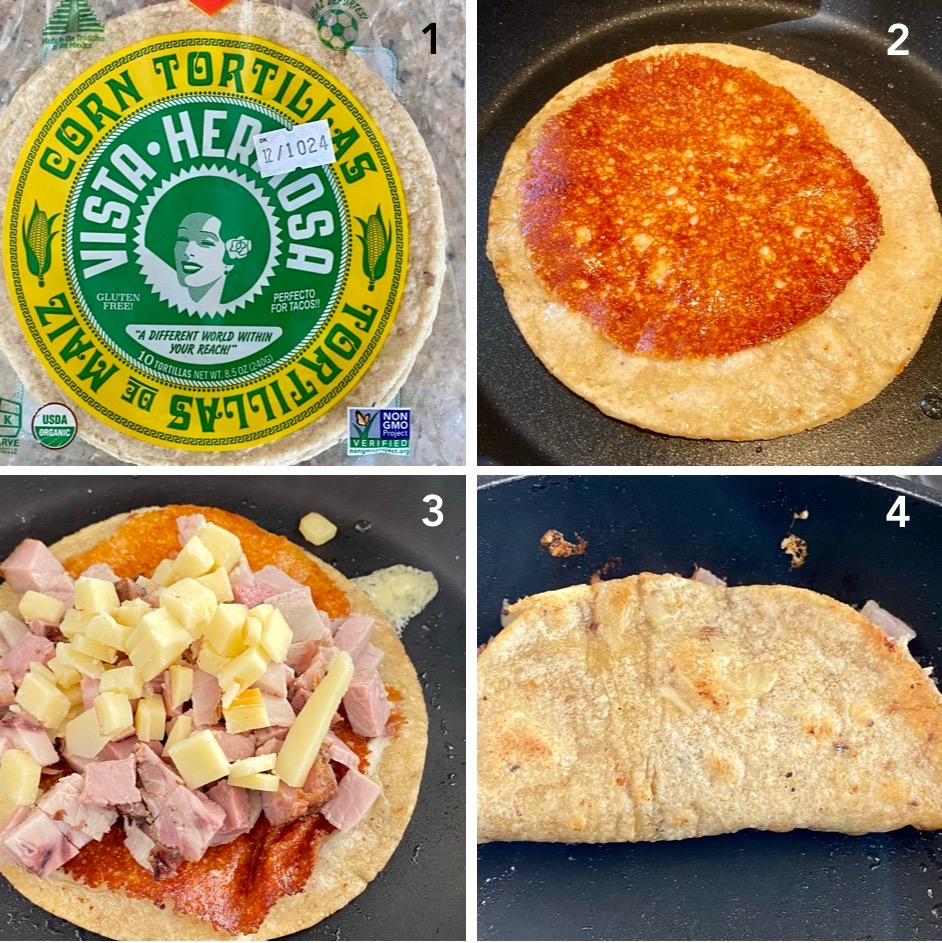
My wife really liked the mini corn tortilla we got from Whole Foods (#1 in the composite picture). Using this tortilla, last time we made something resembling “taco carnitas”.  This time, we made something resembling quesadilla with a bit of a twist.  This was inspired  by a Youtube episode in which melted and browned cheese was transferred to tortillas which were made into quesadilla. Since we made a mochi and mushroom dishes using the melted and brown cheese, it was not too difficult to transfer the browed cheese to the tortillas (#2 in the composite picture) to make our quesadilla. I added more cheese and small dices of roasted/Bbqed pork we had. I served this with guacamole I made a quick salsa (the first picture). This was a bit messy to eat. We ended up using folk and knife. This was very good the tortilla has nice corn flavor. The browned cheese layers made it better.


This is not a recipe but just a note for ourselves to remember.

Ingredients (for two mini-quesadillas)
Two mini corn tortillas (#1 in composite)
Two slices of low-moisture mozzarella cheese
Three slices each of sharp cheddar and smoke gouda cheese, cut int small dice
3-4 slices of roasted pork, cut into small dice
Guacamole
Salsa, sour cream (optional)

Directions:
In a dry no-stick frying pan in low flame, add the slice of the mozzarella cheese.
The cheese will melt and bubble and edges start browning after a few minutes
Place the tortilla on the top of the melting cheese and let it cook for one more minute (the cheese needed to be uniformly browned but it is not easy to judge)
Flip it over and the brown crispy layer of the cheese is attached (#2 in the composite picture)
Place on half of pork and cheeses (#3 in the composite picture)
When the cheeses start melting, fold the tortilla with a small spatula and press  and hold (#4)
After one more minute, carefully flip over and cook other side for one more minute.


Top it with the guac (and sour cream if using)  and the side of  salsa. This was perfect lunch for us.


Saturday, November 9, 2024

Prosciutto-wrapped Haddock 生ハム巻きハドック (コダラ)

Haddock is not fish we usually cook but we had some in our freezer which we received as part of a “white fish sampler” from Vital Choice. Although we finished all the “Chilean sea bass” and almost finished all the “sable fish or black cod”, sole and haddock were left behind. So we decide it is time to try the haddock. I was not familiar with this fish in Japan but the Japanese name is reportedly either “Kodara コダラor montuski-dara 紋付ダラ”.  From our previous experience, haddock is not our all time favorite. If you are going for “cod family”, true cod is much better. Then, my wife found this recipe for “prosciutto-wrapped haddock”. We thought wrapping in prosciutto may give the haddock an additional dimension and make it a bit more interesting. The original recipe was a “baking pan” affair in which the main and side dish are cooked in a baking pan in the oven. I decided to cook the haddock as well as the vegetables in a frying pan. The haddock was much better this way but still faces stiff competition from Chilean sea bass and sable fish. As a side I cooked green beans, shallot and skinned Campari (or cocktail) tomato in the same frying pan I cooked the fish.


Ingredients:
One filet of haddock, thawed and cut into two small servings, skin removed (I removed the skin but skin is very delicate and probably not need be removed).
Prosciutto, enough to wrap the two filets (2-3 slices)
Black pepper
Olive oil and butter

For the side
10 green beans, blanched
1 shallot, sliced 
2 Campari tomatoes, skinned
Olive oil
Salt and pepper to taste

Directions:
Season the haddock with pepper (but not salt since prosciutto has enough salty flavor), wrap the filets with the slices of prosciutto 
In a 10 inch non-stick frying pan, add the olive oil on medium flame. When the oil is hot add the shallot and sauté until lightly caramelized, add the green beans and tomato and cook for another minute, season with salt and pepper
Push the vegetables to the side to make space in the center of the pan. Add the olive oil and butter and place the prosciutto wrapped filets
Cook one side for 1-2 minutes, turn it over and cook another minutes or until done.
Serve it with the side of the vegetables and wedges of lemon.

This is not bad. It really “kicked-it-up-a-notch”. But if we have a choice we would choose other fish. We may try this with true cod or halibut.

Wednesday, September 11, 2024

Vegetables in Cold Broth 冷製のトマトの煮浸し

Cold vegetables soaked in broth is the perfect dish for summer. I have posted cold simmered tomato and sugar snap soaked in salt broth before. I made a tomato dish similar to the one I made before but it differed because I did not simmer the tomato (Picture #1). I skinned the Campari tomato (by briefly blanching) and then soaking (but not cooking) it in the hot broth. I let it cool to room temperature and then refrigerated it. I blanched the Sugar snap then soaked it in the broth. I topped it with very briefly blanched “mitsuba ミツバ”. This preparation allows you to taste a fresher tomato flavor. The broth is also slightly sweet containing mirin and soy sauce in addition to kelp-bonito broth.


A few days later, I added simmered daikon and shiitake mushroom (picture #2, right). I also served salmon kelp roll 鮭の昆布巻き and seasoned egg or “ajitama 味玉” (left). The green is arugula sprouts which were growing in the window pot but needed to be thinned. I dressed with truffle oil.


Directions:
Vegetables I used are simmered daikon and fresh shiitake mushrooms, skinned Campari tomatoes and blanched sugar snaps. The daikon was first simmered in water with added one pinch of raw rice for 30 minutes. The seasoning broth is my usual kelp and bonito broth (I made it stronger with two dashi packs with 500ml of water) which was seasoned with mirin and soy sauce (not too strong to bring out the natural flavor of the vegetable). I did not cook the vegetable further, just placed in hot seasoned both and let it cool down and then refrigerated.

This is a very light refreshing dish to serve on a hot summer evening. The veggies have a very fresh flavor but a slightly cooked texture that make them a bit easier to eat. This is the essence of summer.

Monday, July 8, 2024

Pizza Made in Indoor Electric “Pizzaiolo” Pizza Oven

After my wife gave me this indoor electric pizza oven for my birthday (at the end of March), I have made quite a few pizzas (4-5 times, total of 10-12 pizzas) in the past 2 and half months. The  pizzas I made were quite good (better than the ones I made using our regular oven) but they can be improved and I kept changing the settings and dough recipes. I also got a pizza steel made for the Pizzaiolo and tried that too. 

Compared to the pizza stone, the steel retains and conducts heat better. When making multiple pizzas, the pizza stone requires a few minutes to recover and reach the correct heat settings after making each pizza. The pizza steel appears to stay hot.  The bottom of the crust gets carbonized a bit too much, though. I only used the pizza steel once.  I have to try a few more time before I can evaluate properly.  I am sticking to the pizza stone for now. 


In any case, picture #1A is my most recent pizza (using “00” flour, half Margherita and half pepperoni). To me, the crust charr marks are just right (“Darkness” setting at 11 o’clock) as compared to #3 which was too charred with the “Darkness” setting at one o’clock.


The next pizza (picture #1B) is our first attempt using pesto (from the basil on home-grown on the window sill) and red pepper sauce. The cheeses are low moisture Mozzarella and fresh goat cheese.


The picture #2 is another Margherita I made earlier. It looks “charred” but the taste was not bad, it did not taste like you are eating pure carbon but it was too much charr. This was the “darkness” setting at one o’clock.


Picture #3 is one of our most popular pizza; artichoke hearts (from a jar) with olives. Cheeses are mozzarella, Irish cheddar, smoked gouda and fresh goat cheese. This was baked immediately after the #3 pizza (I prepared this pizza in a wooden pizza paddle while the first one was being cooked). This made this pizza crust bottom not as crispy and charred since the pizza stone was not completely recovered heat.


Although this is still on-going process, the below are my current set-ups for the oven and dough.

Dough: I tried both “00” and bread flours with and without addition of olive oil. “00” dough without olive oil is a bit too chewy for us but addition of a small amount of olive oil appears to make it better (may not be authentic for Neapolitan or New York pizza). For us, the bread flour or “00” flour does not make a big difference but  we may even prefer “bread-y” consistency of crust using the bread flour.

Ingredients:
3 and 1/2 of flour (either bread or “00”)
2 tbs olive oil
1 (or a bit more) cup of water
2 tsp Kosher salt
2 tsp instant yeast

Addendum: (65% hydration with weighing)
520 gram 00flour
340 gram water

Directions: (I use the food processor fitted with a kneading blade in low-speed up to 4 cups  of flour).
After running the blade to mix all the dry ingredients, I drizzle the water in a thin steady stream as it is running until the dough forms above the blade (the surface is a bit sticky). Let it sit for 5 minutes for better hydration and run another 1-2 minutes. Take it out on a floured board and hand knead until elastic. Placed the dough in a lightly oiled bowl, turn it over to coat all the surface, cover it with a plastic wrap and place it in a proofing box at 85F for 1 hour or until doubles.

Deflate gently, fold several times and divide it up into 4 equal dough balls (I weigh making 4 balls of a bit over  200grams each). After the first rise, I divide the dough and form 4 balls with a smooth surface. Place it in a small Ziploc bag coated with olive oil inside and let it sit in the refrigerator at least overnight or up to  several days. I take out the dough balls one hour before baking and let it come to the room temperature. If I do not use it within several days, I freeze them. (to use the frozen dough, I transfer it to the refrigerator one day before to completely thaw).

I hand stretch the dough to make 10 inch pizza, coat it with olive oil with crushed garlic. I place the slices of  low moisture Mozzarella first and then tomato sauce.

Oven settings: “Wood fired” and the darkness setting to “11 o’clock”. Preheat for 30 minutes. I use the modified the wooden paddles which fit the oven perfectly. I use corn meal on the paddle so that the dough slides better. I cook for 2 minutes (as it is the automatically setting). Steam and some smoke come out during cooking so I use the oven under the hood with the exhaust fan running. For the next pizza, I wait until the stone temperature completely recovers (a few minutes until the “at temp” indicator light stops blinking).

Is it worth it?? Although pizza I made using the regular oven and pizza stone was quite good, pizza cooked in the Pizzaiola is definitely much better. They cook so quickly (instead of 6-7 minutes in the conventional oven they’re done in just 2 minutes). So if you have a pizza party, you could turn out a few pizzas in a jiffy. I am trying to keep this oven clean but it is a bit of a chore. Other use of this oven may be to bake focaccia (which we tried with a good result) or naan (which we have not tried yet).

Friday, May 24, 2024

Anchovy Salad アンチョビサラダ

Anchovies are not a regular item in our pantry. The canned ones are usually very salty and when I use it as a part of a seasoning I only use one or two fillets and often end up wasting the remaining canned anchovies. More recently, I use anchovy paste in a tube for this purpose. While we were at Whole Foods, my wife found a package of anchovy fillets packed in oil (not canned but in the refrigerator section picture 3#). She was curious of how this would be different from canned varieties so we got a package. Getting an idea from the picture on the package, I made a sort of salad (right in the picture #1 and #2). To keep the seafood theme, I served this anchovy salad with salmon kelp rolls (left) and marinated herring (center, the herrings came from a jar and are marinated in wine sauce. I made sour cream sauce with dill to go with the herring).


For the anchovy salad I sliced skinned Campari tomatoes and topped them with the anchovy filets and fresh basil. I dressed the salad with our favorite Spanish olive oil. I did not add salt thinking the anchovies would be salty.


The anchovies are much better than we expected. They were not too salty or fishy. All nicely filleted and no discernible small bones. We really like these anchovies.

Friday, January 5, 2024

Tomato and Egg Stir-fry with Wood Ear and Natto 納豆、トマト、木耳の卵炒め

This is on the theme of “stir-fried tomato and egg”. We also added fresh wood ear mushroom which made the crunchiness of wood ear quite a nice contrast to the soft scrambled egg and tomato. The current dish came about because I found several small packages of natto 納豆 (dreaded Japanese fermented soybean) in the freezer. I have posted quite a few dishes using natto. Mixing well (400 stirs) using a special natto mixing contraption is the key to making it less pungent and (as far as my wife is concerned ) edible. For a number of years or until my mother discovered and introduced us to the “400 stirs” method my wife would not even consider eating natto.  But now she certainly can eat it, although this is not her most favorite. Upon the news of finding natto in the freezer, I proposed several dishes I made previously including “natto omelet”. She then suggested adding the natto to the stir-fried egg dish with wood ear and tomato. So, I complied willingly. Since the natto was seasoned with the sauce and hot mustard that came with the package, I omitted the ginger I usually use for this dish. This was an unqualified success. The natto gave a nice nutty flavor but no pungent smell or sliminess. We had this as a drinking snack for cold sake and it was perfect.


On close-up, you could see the natto among the tomato and wood ear mushroom.


There is no recipe per-se but this is how I made it (just a note for myself)

Ingredients:
2 large eggs, beaten
3 skinned Campari tomato, quartered
1 package of natto, prepared with the season packets  (tare sauce and hot mustard came with the natto), mix well (I used the special the “400 stir” natto mixing contraption)
Wood ear mushroom, cut into smaller size (amount arbitrary)
2 scallions, finely chopped
1 tbs peanut oil plus 1 more tsp for frying the tomato
1/4 tsp dark sesame oil

Directions:
Mix the prepared natto, eggs and wood ear mushroom
Heat up the peanut and sesame oil in a frying pan on medium heat
Make loose scrambled eggs and set aside
Add the sesame oil in the same pan and fry the tomato for 1 minutes and add back the cooked egg mixture and cook another 1 minute.

In addition to the “400 stir” method, cooking the natto, further reduces its pungency and stickiness. The combination worked well. We had this as a snack but it would also be good over rice.

Sunday, December 10, 2023

Eggplant, Avocado and Nagaimo Gratin ナスとアボカドの長芋グラタン

I made this dish for lunch one day from what we had on hand and what we need to finish before it went bad. I just winged it without any particular recipe. As a result I was not sure how it would come out but it was certainly edible and quite interesting (in a good way).


The main items are Asian eggplant, avocado and grated nagaimo mixed with an egg (in leu of Béchamel sauce). I also added tomato and shiitake mushroom sautéed with shallot, just because I had them.


Ingredients:
One Asian eggplant (pale purple and long), cut into a bite size by cutting at 45 degree angle as I turned the egg plant (“Rangiri” 乱切り)
One avocado, cut into a bite size pieces similar to the eggplant (I only had half of a leftover avocado).
Nagaimo, about 200grams, peeled and grated
One large egg
3 skinned Campari tomatoes, seeds removed and cut into small cubes
1 tbs of chopped shiitake mushroom and shallot sautéed in olive oil (I made this few says ago mostly from the stems of the shiitake mushrooms)
Cheeses (I used sharp cheddar and parmesan but any melting cheese will do), the amount is arbitrary
2-3 tbs olive oil

Directions:
Sauté the eggplant in 2 tbs of olive oil the skin side down first then brown all other sides (4-5 minutes)
Place the eggplant and the avocado in the bottom of a small Pyrex baking dish.  Add the remaining 1tbs olive oil.
Mix the grated nagaimo and the egg and pour over (see below)


Top with the mushroom mixture, the tomatoes, and the  cheeses and bake for 30 minutes at 350F (I used the toaster oven in convection mode) (see below).


Let it stand for 5 minutes and serve (the first picture).

I was not sure the grated nagaimo and egg ratio but it came out ok. This is a sort of healthy Béchamel sauce substitute. The eggplant and avocado went well together. The next day, we placed the remaining dish in smaller individual ramekins and added a bit more cheese and toasted it in the highest setting. It heated up very nicely.

Tuesday, October 10, 2023

Eggplant Gratin with Cold Eggplant Soup 茄子のグラタンと冷製スープ

These are other eggplant dishes I made from Asian eggplant from Wee. Each dish used one eggplant so in total I used two of the 4 eggplants I bought. The first dish which is “eggplant au-gratin with meat sauce”  was perfect since it would use up a number of ingredients I had on hand. I had the marinara sauce I made some time ago but kept from going bad by reheating it. I also had 1/4 lb of ground chicken to use. I also had some skinned Campari tomatoes which were getting old. All these would be used in this dish (shown in the picture below on the left). Under the melting cheese and the meat sauce are the chunks of eggplant. This was a really good combination.  The second dish was cold eggplant soup which again was perfect since we like cold soup for lunch (shown in the picture on the right). So this was a lunch we had one day.


The hot eggplant au-gratin went well with the cold eggplant soup. There is not really a recipe since it was mostly left-over control.

Directions for the eggplant au-gratin:
I cut up the skinned Campari tomatoes (3 or 4) cooked with minced garlic in olive oil and seasoned it with salt, pepper, dried oregano and basil. I then added the ground chicken and cooked it completely. Finally, I added the left-over marinara sauce to heat through.

I used one Asian eggplant. I peeled off stripes of the skin, (so the eggplant wouldn’t explode while being cooked in the microwave), placed it in a silicon container and microwaved it for 2-3 minutes or until it became soft and cooked through. I cut it into bit-size chunks (#1), layered it with the meat sauce (#2), put the grated cheeses on top (we used sharp cheddar and smoked gouda) and baked at 350F toaster oven for 30 minutes (#4).


Directions for cold eggplant soup is also not really a recipe (made two small servings)
One Asian eggplant, stem end removed and peeled. Cut in half lengthwise and then cut into thin half moon. I placed the eggplant and chicken broth (I used Swanson brand low salt low fat) in a pan just enough to completely cover the eggplant then cooked it for 10-15 minutes. I added salt and pureed it using the immersion blender.

I served it chilled and diluted slightly with cold milk (or cream to your liking).

Both are pretty simple and good dishes. The eggplant added a meat-like texture and umami taste to the au-gratin that blended with the ground chicken in the tomato meat sauce. And what wouldn’t taste good topped with a mixture of toasted cheese? The soup was very subtle but went well with its cousin eggplant in the au-gratin. This was a perfect combo for our lunch.

Saturday, September 23, 2023

Creamy Tomato Aspic Salad クリーミートマトアスピックサラダ

My wife is a great fan of ribbon or aspic salad which now appears to be out of fashion. I also developed a liking for these aspic salads. Somewhere on-line, she came across a recipe for “creamy aspic salad”. She also had some V-8 juice left over from when she made ribbon salad so she decided to use it making this creamy aspic. As usual, although she got the idea to make the aspic from the recipe she modified it to her liking to accommodate the ingredients that were available. The most difficult part of making aspic is determining the correct amount of gelatin to use. Too much gelatin makes it like rubber and too little and it won’t hold together and keep its shape. This one was a bit on the softer side but had nice flavors and texture from using ricotta cheese and some crunch from celery.


Beside the celery, it has sliced and chopped green and black olive which gives a burst of salty flavor.


Ingredients:
3 cup V8 juice
2 packets of powdered gelatin (the end result was a bit soft so maybe another 1/2 packet of gelatin would make it firmer)
1 tbs sushi vinegar
2 tbs Worcestershire sauce
1/4 tsp salt
1 cup Ricotta cheese (I used 3/4 cup ricotta and 1/4 cup sour cream)
1 small onion (sweet or Vidalia onion), grated
2 stalks of celery, finely chopped
5 each Kalamata and oil cured olives, stone removed and chopped
5 pimento stuffed green olives, thinly sliced

Directions:
Soak the powdered gelatin in a cup of the V8 juice. Mix the remaining V8, vinegar, Worcestershire sauce and salt. Combine the ricotta and sour cream. Mix the cheese into the V8 vinegar mixture. Cut up and prepare the vegetables. Heat the soaked gelatin in the top of a double boiler until completely dissolved. (This is the only way I found to make sure all the gelatin is dissolved.) Add to the cheese mixture and stir to combine completely. Pour into the 9 X 13 pyrex pan and refrigerate. When the mixture becomes semi-solid stir in the vegetables. (This will encourage them to spread through out the mixture instead of sinking to the bottom.) Chill until fully set.

This is a very refreshing dish served cold on a hot summer day. The cheese and sour cream tone down the acidity of the V8 juice while ironically the sushi vinegar adds a nice acidic sharpness. The grated onion completely blends nicely into the mixture rather than standing out. The chopped veggies add a nice texture and the celery in particular really makes the dish. This is a good summer salad.

Monday, August 7, 2023

Nine appetizers served in nine divided plate version 2

This is the second version of nine small appetizers served on the nine space divided plate. Although it was not intentional it turned out that I did not have even one repeat of the items I presented in the previously posted nine appetizers. But this time I did include two store-bought items that I got from our Japanese grocery store; Chinese-style octopus salad and fish cakes. But I made the remaining 7.


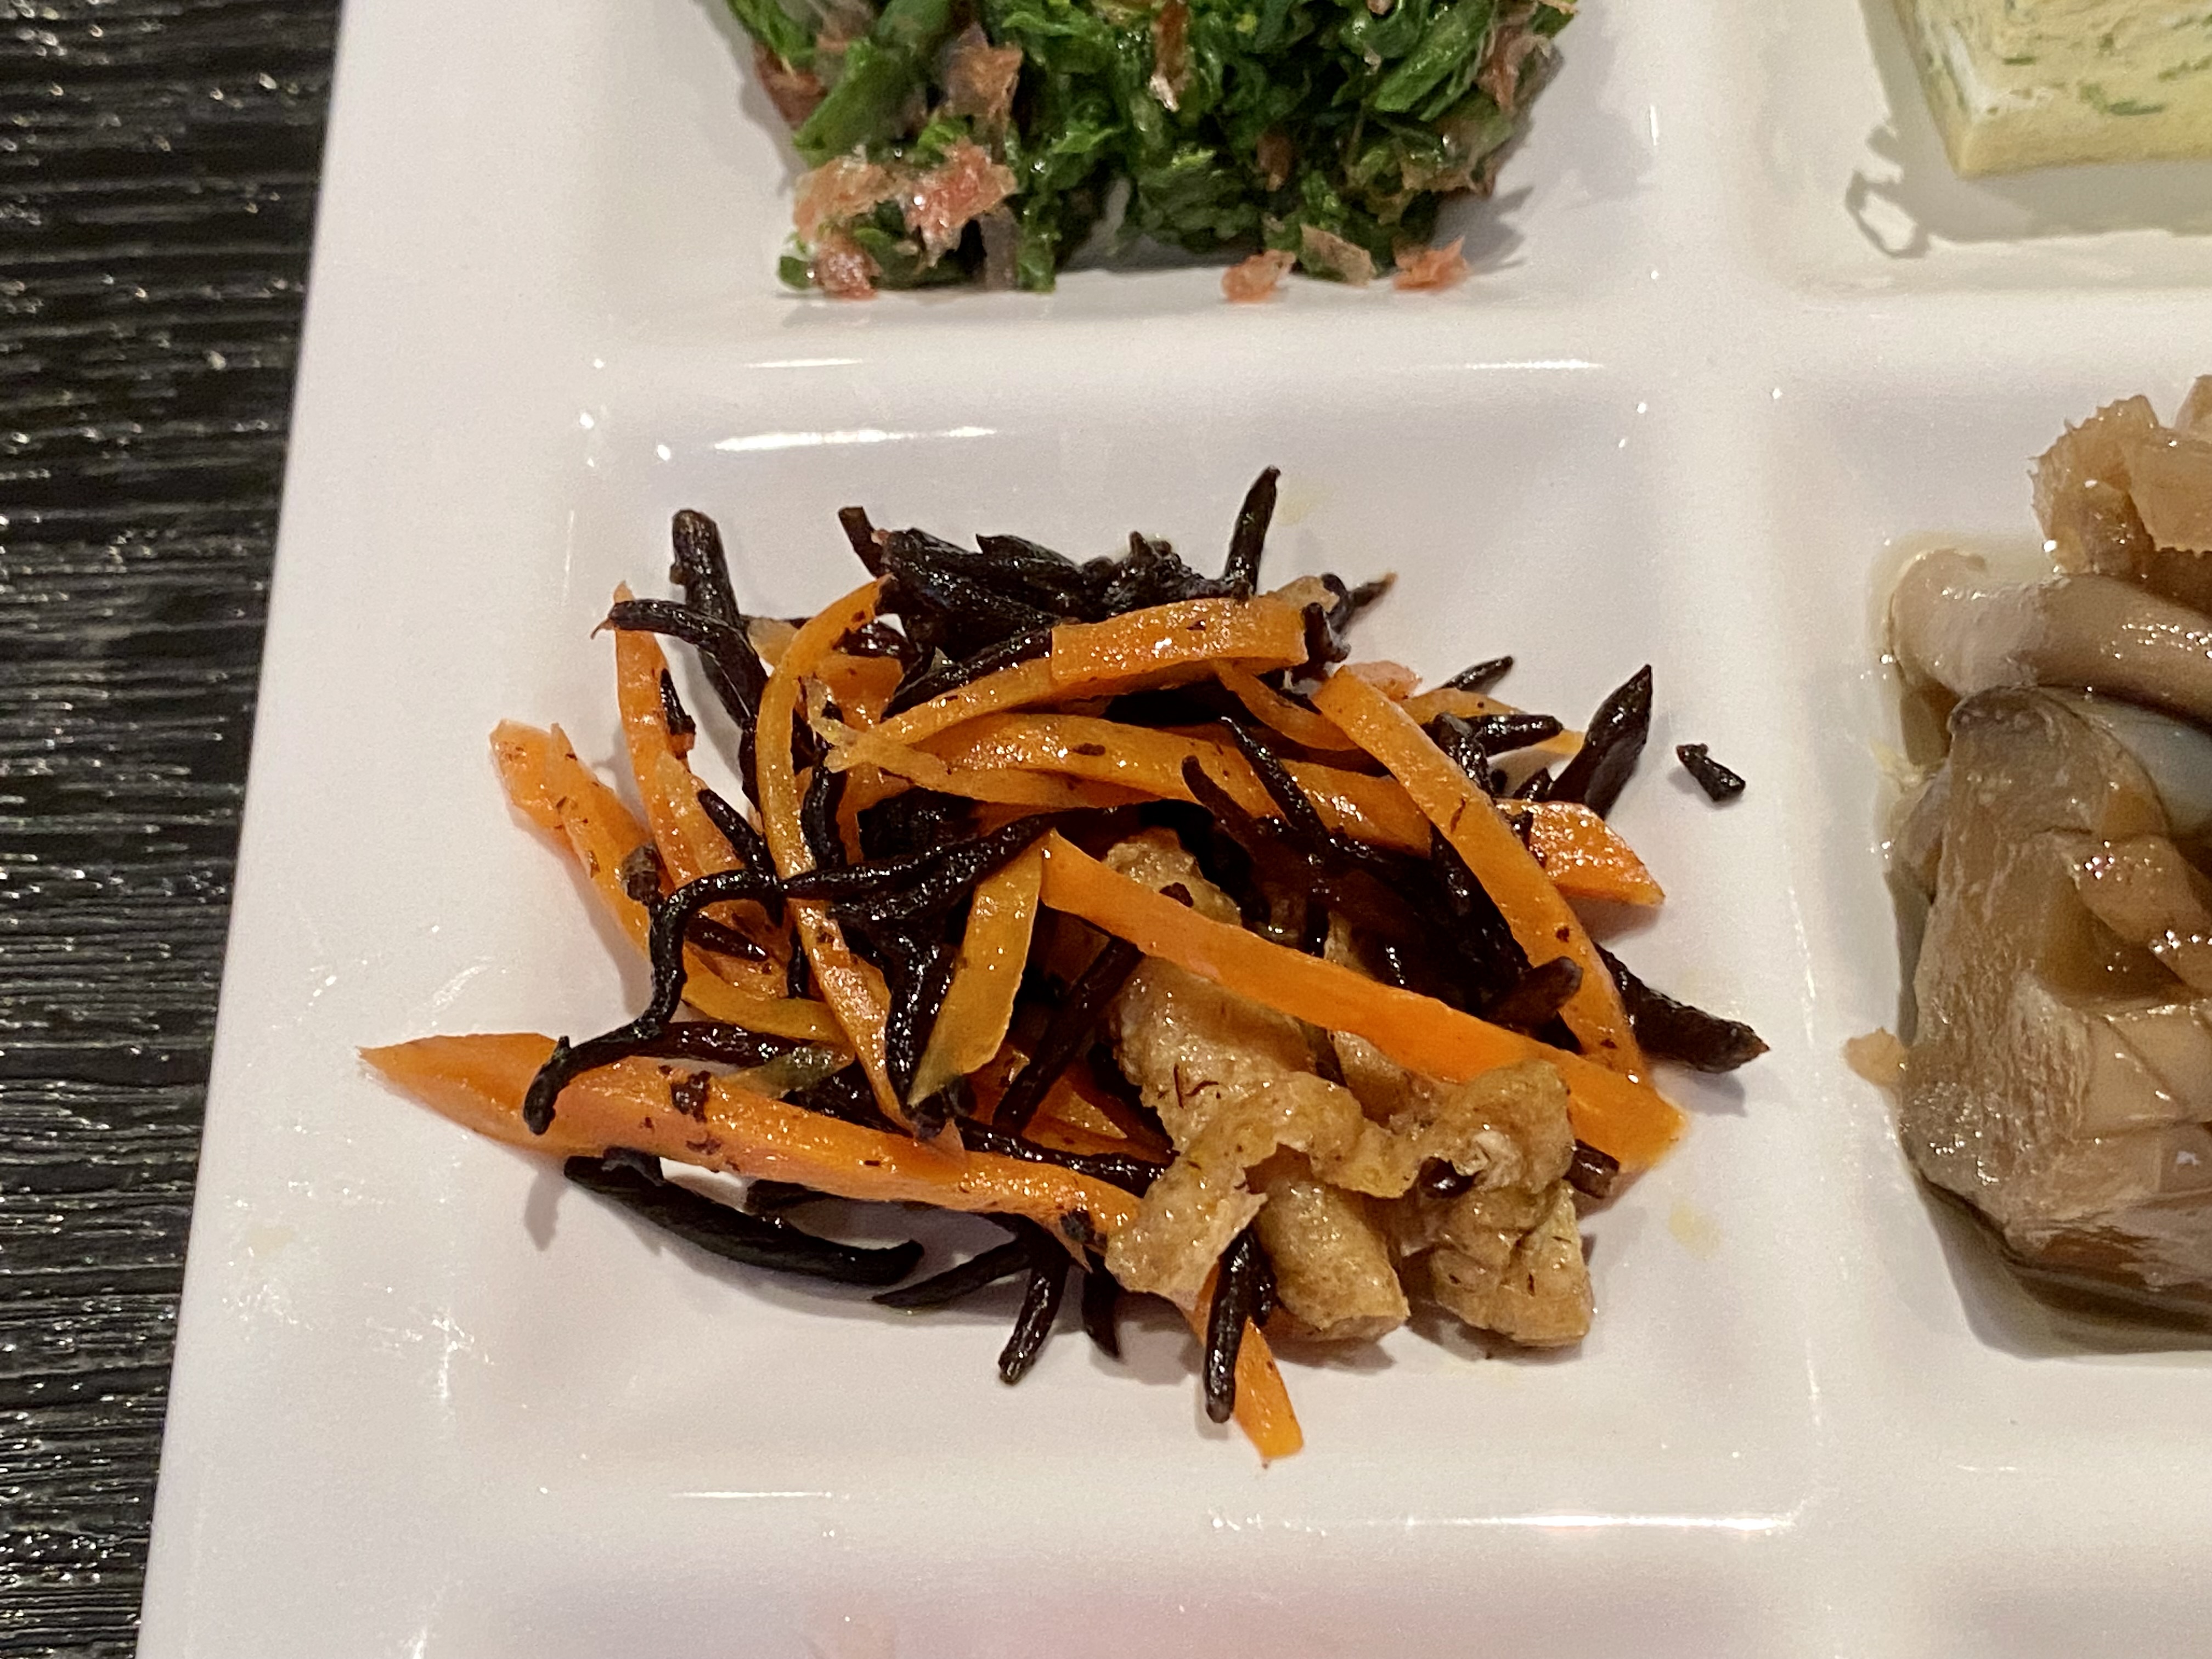
The top row left is blanched edible chrysanthemum or “shun-giku” 春菊 shown in detail below, dressed with x4 Japanese noodle sauce and mixed with generous amount of dried bonito flakes or “kezuri-bushi”  削り節. It has very distinct flavors which we really like.


The 1st row, middle is my ususal “dashi-maki” だし巻き Japanese omelet. This time I added dried green nori or “aonori” 青のり. I garnished it with julienne of green perila or “aoziso” 青紫蘇.


The next dish is a Chinese-style octopus salad or 中華風タコサラダ. It is pretty good and we like it.


The center row, left is hijiki seaweed, deep fried tofu and carrot stir fry or ひじきと油揚の炒め物.


The 2nd row center is one I just made this morning. Fried egg plant and mushroom simmered in broth or ナスと椎茸の揚げ浸し. The mushrooms include fresh shiitake and brown shimeji. This is served cold with garnish of blanched green beans.


The 2nd row left is my usual burdock root stir fry ゴボウのきんぴら.


The 3rd row left is a cold skinned Campari tomato. I cross cut the top halfway-through and poured on some Irizake  煎り酒 and special sushi vinegar (both from the Rice Factory). Irizake is boiled down sake seasoned with “umeboshi” picked plum 梅干し, kelp and bonito flakes. The sushi vinegar is a special kind from “Echizen 越前” or present day Fukui 福井.  It tastes milder and better than our usual (Mizkan brand). I topped this with fine julienne of  “Gari” がりsweet vinegar marinated thinly sliced ginger root (usually use to accompany sushi) and perilla. I got this idea from one of the food blogs I follow but I did not follow the recipe exactly.


The 3rd row center is store-bought fish cake which I heated up in the toaster oven and dressed in x4 Japanese noodle sauce and yuzukosho.


The 3rd row right is my usual “asazuke” 浅漬け picked (salted) vegetable which includes cucumber, carrot, nappa cabbage and daikon radish. I also added “shio konbu” 塩昆布, and ginger. The asazuke is about two weeks old but still tasted fresh (I attribute this to the fact I added a bit more salt - more than the usual 3% - and added a small amount of Vodka when I made it. While it didn’t alter the overall taste, I think this makes the asazuke last longer without becoming sour).


After enjoying these 9 small dishes both of us were quite full and did not eat anything else. All the wonderful different flavors and textures made a really enjoyable dinner.

Tuesday, April 25, 2023

Israeli (Pearl) Couscous Salad イスラエルクスクスサラダ

The other day, we were taking inventory of our pantry and found boxes of couscous (classic and Israeli or pearled) as well as tabouleh all of which were way pass their BUB (best-used-by) date. We sniffed and did not detect any rancid oil odor so we cooked the classic couscous and the tabouleh. But once they were cooked, it was clear that in these cases the BUB date had some meaning—they tasted terrible. So we discarded those boxes and bought new ones. We decided to go ahead and try cooking the Israeli couscous* and it turned out to be OK. So we decided to use it to make a salad. We looked up recipes on the web and essentailly combined two recipes omitting some of the ingredients called for in the recipe while adding others not mentioned.

*Digression alert: While we were looking up recipes, we found that Israeli or pearl couscous was invented by an Israeli company as a substitute for rice in 1959 since there was a rice shortage at that time.In any case, the end result was a quite nice filling salad. The vinaigrette had a nice lemony flavor with dill which made this salad very refreshing.


Ingredietns:

For Couscous
1 1/2 cup (250gram or 8oz) Israel couscous
1 garlic clove, minced (I used three)
1/2 small onion, finely mince (I used one small onion)
2 tbs olive oil
1 1/2 chicken broth (I used our ususal low sodium Swanson)
1 cup water (we did not add the water. The couscous was fully cooked and the liquid was completely absorbed but although it was not scorched, the couscous stuck to the bottom of the pan. So next time we will try it with the additional water.)

For the salad
5 Campari tomatoes, skinned and cut into quarters
2 tbs dill, finely chopped
6 marinated artichoke hearts, cut into half length wise
1 can (15.5 oz) garbanzo beans, drained and skin removed (optional, but my wife insist on removing the skin)

Other items could be olives, cucumber and other greens.

For dressing
Zest and juice from one lemon
1 tsp dijon mustard
1 tsp honey
Salt and pepper to taste

Directions: {For couscous)
Add the oil in a pan, sauté the onion and garlic for 3-4 minutes, add the couscous and sauté another minute
Add the chicken broth and simmer for 10 minutes
Fluff it up with a fork and let it cool to the room temperature

Mix all the ingredients and the dressing.

Although we forgot to add one cup of water, the couscous was nicely cooked without. The lemony dressing really worked.

Thursday, March 9, 2023

Creamy Tomato Soup クリーミィトマトスープ

I get Campari tomatoes almost every week and prepare them by removing the skin. Then I keep them in the refrigerator which is very convenient to make a quick cucumber tomato salad or just add as a side. Often, we can’t use up all the tomatoes and my default is to make them into marinara sauce. This time since we already had a batch of marinara sauce which had been re-heated several times, I decided to make the excess tomatoes into a creamy tomato soup. I served the soup with macaroni salad (for the salad dressing I used mayo, Greek yogurt, Dijon mustard) and couscous salad, Campari tomato and a slice of baguette I made few days ago. I made this bread using biga made of rye flour and buttermilk (My wife prepared this for me). As a result, this baguette had a slightly different flavor which we really liked.


Ingredients:
5 Campari tomatoes, skinned, cut into small chunks
1 small onion, finely diced
1 small stalk of celery, finely diced
2 garlic cloves, finely chopped
1 tsp tomato paste
1 cup water/chicken broth (I used whey from the cheese curd my wife made recently)
1 tsp butter
1 tsp olive oil
1 tsp sodium bicarbonate (baking soda) (to reduce the acidity of the soup, optional*)
1/2 c heavy cream

*Digression alert: If tomato sauce or soup is too acidic, the most common suggestion is to add a small amount of sugar. This may mask the acidic taste but does not reduce the acidity (or does not raise pH). Adding sodium bicarbonate does reduce the acidity. My understanding is that tomato’s acidity mainly come from oxalic acid. So, the addition of bi-carbonate will produce carbon dioxide (CO2 gas), water (H20) and sodium carbonate (Na2CO3). Reportedly, the resulting sodium carbonate may give rise to a “bitter” and “soapy” taste but I have not experienced this. I have found that adding a small amount of sodium bicarbonate definitely makes these tomato containing dishes less acidic without negative effects in taste. The sodium ion from sodium carbonate in water may add some “saltiness” so the salt seasoning may have to be adjusted. It should be noted that when you add bicarbonate, the soup bubbles up for several minutes.

Directions:
Add the olive oil in a pan on medium heat. Add the butter and sauté the onion, celery, and garlic for a few minutes. Set the vegetables aside and add the tomato paste and sauté for 30 seconds (I use the type of tomato paste that comes in a tube, Cento tomato paste. It is much easier to use tomato paste from a tube when a small amount is needed compared to opening a whole can). Add the tomato and the liquid (I used whey). Cook 10-15 minutes until all the vegetables are cooked and soft. Using an immersion blender, make smooth soup. Season with salt and pepper.

(Optional) This process is to reduce the acidity. While it is simmering, add the sodium bicarbonate and mix (lots of bubbles come out, keep stirring for serval minutes until the bubbles subside.) I tasted the soup at this stage and it was very good without cream.

Since I was not planning to serve this immediately, I quickly chilled the soup by putting the pan in a large bowl with running water while stirring. Then I put it in sealable container in the refrigerator.


The next day, I served this for lunch. I warmed up the soup and added the cream. With an the addition of the cream, this became quite a luxurious soup.

Monday, February 13, 2023

Tomato and Egg Stir-fry with Wood Ear Mushroom トマトと卵炒め丼 キクラゲ入り

This is another version of “tomato and egg stir-fry”.  I made a few changes to improve this dish. Least of those is the inclusion of fresh wood ear mushrooms we got from “Weee”.  Another change I made was to add potato starch to better coat the tomato with ketchup. I served this on rice for lunch.


Ingredients (for 2 servings): 2-3  Campari tomato, skinned and quartered
1 tbs ketchup
Dash of Sriracha or other hot sauce, optional and to taste
1 tsp “katakuriko” potato starch
1/4 cup fresh or dry rehydrated wood ear mushroom, washed and patted dry using a paper towel, cut into strips and if needed hard attachment part removed
2 eggs, beaten
1/4 tsp ginger root, finely chopped
salt and pepper for seasoning
Olive or vegetable oil

Directions:
Coat the tomato quarters with the ketchup, sriracha, and potato starch.
Heat the oil in frying pan and sauté the ginger and then tomato for 1-2 minutes
Add the wood ear and sauté another minute (despite being patted dry, it does splatter)
Add the egg and let it sit for a few seconds until the bottom is set. Mix and repeat until all eggs are just cooked
Season it with salt and pepper
Serve by itself or over the rice.

We think this version is better. Because of the potato starch, the tomato does not exude too much liquid. The wood ear adds nice crunch and went well with the cooked egg.

Wednesday, January 11, 2023

Tomato and Egg Stir-fry on Rice トマトと卵炒め丼

 This is a variation of tomato and egg stirfly I posted previously. I learned that this is based on a Chinese dish called “番茄炒蛋” and there appears to be many variations. The main difference between this version and the recipe I posted previously, is the addition of caramelized catsup which adds a slightly sweet dimension. I made this one day for a lunch from my memory since we had skinned Campari tomatoes which needed to be used fairly soon. I made it as a type of “donburi”. Since I just made “simmered” pork or “nibuta” 煮豚 using InstantPot, I included a slice and also broccoli rabe (rapini) which I blanched earlier.


I may have overcooked the tomato a bit, but it was juicy and flavorful and very nice over the rice.


Ingredients:
4 skinned Campari tomatoes, cut into quarter pieces
2 eggs
Vegetable oil and dark sesame oil for stir frying
Salt and peper to tast
1tbs Ketchup
A dash or more of Sriracha sauce (to taste, optional)

Directions:
Add the tomatoes, ketchup and Suriracha into a small bowl and coat the tomato pieces.
Add the vegetable oil and a splash of sesame oil into a frying pan on midum high flame. Quickly stir fry and season with salt and pepper.
Add beaten eggs and let it sit until the bottom is set.
Gradually mix until the eggs are cooked (for 1-2 minutes).

Heat up the slices of simmered pork and chopped up blanched rapini in a separate frying pan with a small amount of oil. Season the rapini with salt and pepper (optional).

Pour over the bowl of rice and place the pork and rapini on top.

In general, we like “donburi” dishes. This one is no exception. The caramelized Catsup adds a nice complex slightly sweet dimension. Also the slow heat from the Sriracha is nice and enough juice came out of the tomatoes to make a nice sauce for the rice.

Thursday, November 10, 2022

Chilean Sea bass チリアン・シーバス

 We eat lots of fish. When we lived in California many years ago, we really liked  “Chilean sea bass” which is buttery moist yet flakey and very difficult to overcook and make dry. Then we learned the real name of this fish is ‘Patagonian toothfish” and, at that time, that the fish was frequently illegally poached. So we stopped buying it and forgot about it for a long time. Then, my wife found Chilean sea bass available at Vital Choice which came from MSC (Marine Stewardship Council) -certified sustainable fishery. We remembered how wonderful it was and ordered it, although  it was a bit on the expensive side.

Digression alert: “Chilean sea bass” is said to be the most popular in US, and EU as well as in Japan. (Although when I was in Japan I did not know about this fish.) In Japan, this imported fish is reportedly called “mero” メロ or “ginmutsu” ギンムツ.

The fish was as wonderful as we remembered. Actually the first time I cooked this fish, I did not take a picture. So, I made the same dish a second time in an identical fashion. This was simply sautéed in butter with a caper lemon butter sauce. The sides were  cauliflower purée and haricot vert (pre-blanched) and Campari tomato (skinned) sautéed in butter. Everything went well together but the combination of cauliflower puree and Chilean sea bass was sublime.


Ingredients (2 servings):
2 4oz frozen Chilean sea bass, thawed, seasoned with salt and pepper

For Caper lemon butter sauce
2 tsp pickled capers (from a jar)
1 tbs unsalted butter
1 tsp lemon juice (half lemon)

Directions:
Cook the filets in melted butter on medium flame, turn once after 5 minutes and cook another 5 minutes (I put on the lid since one of the filets was rather thick)
Once cooked, set aside on a plate
In the same pan add the butter. capers and lemon juice and quickly warm them up then pour over the filets

We also served small slices of mini-baguette I baked to soak up the sauce. The fish is buttery, flakey but moist. Somehow it went so well with the cauliflower puree. The green beans can be “a hit” (nicely crunchy after few minutes of steaming) or “a miss” (fibrous skin no matter how you cook) but this one was definitely “a hit”.