Showing posts with label baked bread. Show all posts

Wednesday, June 22, 2022

Home-made English Muffin 自家製イングリッシュマフィン

We posted English muffin previously but have not made them for some time especially since my wife started making English muffin bread. But for some reason, my wife started making English muffins again. One of the problems in making English muffins is that the dough is very sticky and it is very difficult to handle especially if you use English muffin rings. My wife used to cut the dough using a kitchen scissors to place it in the ring. My version of "no-knead English muffin" was a bit easier. This version my wife used came from YouTube and used a lot of cornmeal as a way to handle the sticky dough. (Although this was the amount of cornmeal shown in the video, a lot less probably would have worked just fine.) The result was rather rewarding. It is definitely an authentic English muffin.


I ask my wife to continue. This recipe came of aYouTube video called "Sheldo’s kitchen". My wife painstakingly wrote down the recipe, frequently stopping the video.

Ingredients:  (12 muffins)
4 cups (560 g) AP flour
1 1/2 tsp (10 g) salt
2 Tbs. (28 g) sugar
1 tsp yeast
3/4 cup (167g) greek yogurt
325 Ml water
oil 3 Tbs. (40 g) vegetable oil.

Double recipe:
8 cups (1,120 g) AP flour
3 tsp (20 g) salt
1/4 cup (56 g) sugar
2 tsp yeast
1 1/2 cup (334g) greek yogurt
650 Ml water (milk?)
oil 6 Tbs. (80 g) vegetable oil.


Directions:
Stir to wet all the flour. Stir to further combine and knead slightly.  In the first  90 minutes, 3 sets of stretches each 30 minutes apart. Take dough and pull out one side and fold it to the middle. Do that with each of the remaining 3 sides. Let the dough rest 30 minutes and repeat stretch 2 more times for a total of 3 stretches. Leave undisturbed for 1 hour. Put covered in fridge for 10 to 48 hours. The longer it is in the fridge the better the taste. 

Cover cookie sheet with corn meal. (A little less cornmeal than what I used here would probably work just fine). While the dough is still cold make it into a round. Put a large hole in the middle and pull the edges out straight and stretch into a log. Divide the log into 12 portions (24 if using double recipe). Make each portion into a flat round and move the edges to the middle then roll into a ball. Put on corn meal covered tray about 2 inches apart. Dust the top with corn meal. Cover and let rise until doubled.


Using 2 spatulas lift the dough into a skillet (no butter). Flatten the top. Cover with a lid and cook 6 minutes. (After 2-3 minutes rotate so it browns evenly.) Turn over and tap the top with a spatula to flatten. Cook another 6 minutes with lid off. After they have cooked 12 minutes check temperature. It should be 200 F to be done.  


Let it cool off a bit before separating the muffin using the "fork method".


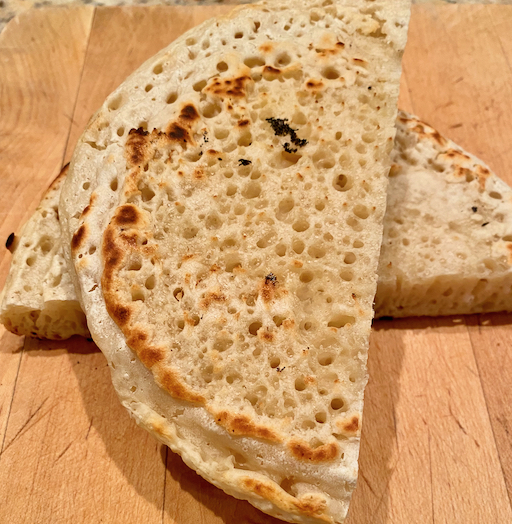
These were our idea of genuine English muffins. They toasted up nicely with lots of “little nooks and crannies” to catch the melted butter. The crusts were crunchy and had a mild taste of cornmeal which was very nice. (One of the problems was during cooking the excess cornmeal tended to burn). While very good they were a bit of work to make. Making English muffin bread is much easier. 

Friday, June 10, 2022

Hamburger with home-made buns 自家製バンのハンバーガー

We cannot remember when was the last time we ate a hamburger; probably sometime when we lived in California i.e. many years ago. Since the package we got recently from Omaha steaks included hamburger patties (total of 8), we decided to make hamburgers. Also as we were “taste testing” the burgers, my wife declared there would be no pickles, catchup, mustard or onions (or “special sauce”; this was not Burger King/McDonalds after all) to obscure the taste. But cheese was OK. (Truth-be-told she is a hamburger purist.) So as shown below we had a cheese burger on a homemade hamburger bun (made by my wife just for the occasion, see below) with a side of scalloped potatoes (also from Omaha steak) and caprese salad.


We thought about grilling the burgers on a charcoal fire but decided to cook them in a frying pan with olive oil since it was the easiest. Initially we thought the hamburger patties looked thin but once they were out of the package and cooked they were nicely thick enough. My wife decided to use two cheeses; cheddar and Monterey Jack. After the meat was cooked, we toasted/fried the hamburger buns using the remaining oil and meat juices in the pan which came out rather nicely. As my wife wished, no ketchup, mustard, onion, lettuce, or pickles.  The meat was just cooked right and very juicy and had a nice beefy taste. This is a good way to just taste the meat and of course, the cheeses enhanced the flavors. 


Since we have a basil forest growing in numerous pots on the kitchen window sill, I made caprase salad with skinned Campari tomato, fresh mozzarella cheese and basil. Salt, black pepper, our favorite Spanish olive oil and balsamic vinegar dressed the salad.


My wife made hamburger buns for this occasion. She used a rather basic recipe from King Arthur.  I will ask her to continue.


Ingredients: for the dough
3 1/2 cups (420g) Ap flour
3/4 to 1 cup (170g to 227g) water, lukewarm (she used milk)
2 tablespoons (28g) butter, at room temperature
1 large egg
1/4 cup (50g) granulated sugar
1 1/4 teaspoons salt
1 tablespoon (9g) instant yeast

For topping the buns.
1-2 Tbs. Butter melted to brush on top of the muffins before baking them.

Directions:
Mix and knead all of the dough ingredients in a stand-up mixer with a dough hook to make a soft, smooth dough. Cover the dough and let it rise until it's nearly doubled in bulk, about 1 to 2 hours. Gently deflate the dough and divide it into eight pieces (about 100g each). Flatten each dough ball with the palm of your hand until it's about 3" across.

Place the buns on a parchment-lined baking sheet. Cover and let rise until noticeably puffy, about an hour. Toward the end of the rising time, preheat the oven to 375°F. Brush the buns with about half of the melted butter. Bake the buns for 15 to 18 minutes, until golden (see below).
Remove them from the oven and brush with the remaining melted butter; this will give the buns a satiny, buttery crust (which she did not do). Cool the buns on a rack before slicing in half, horizontally.


These hamburger buns really added to the overall hamburger experience. The buns in-and-of themselves had a very nice flavor and a soft texture. (We had some later just lightly toasted and buttered and they were quite good served that way.) The hamburger itself was nicely seasoned with a very distinctive beefy taste. Even without all the condiments, the burger and bun were every thing you could possibly want in a hamburger.

Tuesday, April 12, 2022

Hot cross buns 2022 ホットクロスバン 2022

It has been customary every year when Easter approaches, for my wife to make hot cross buns  (mostly without the sugar frosting cross, because the buns are sweet enough without it). This year was no exception. This year the recipe came from the heavy hard covered cookbook called “Bouchon Bakery Cookbook”. To me, this one looked like the most complicated recipe for hot cross buns I’ve seen my wife make over the years. Nonetheless it tasted very good and had a very nice texture.


This recipe calls for a lot of butter and multiple foldings. You can sort of see the multi-layering on the curt surface.


Ingredients: (#1)
Flour 372 g (2 1/2 cups)
Yeast 8 g (2 3/8 tsp)
Sugar 44 g (3 tbs. + 2 tsp)
Salt 9 g (1 1/2 tsp.)
Eggs 186 g (2 eggs)
Whole milk 63 g (1/4 cup)
Butter 167 g (5.8 oz) cut into small cubes
Raisins 122 g (3/4 cup)
Dried cranberries 61 g (1/2 cup)
1 tsp. Vanilla

Ingredients doubled:
Flour 744 g
Yeast 16 g (4 3/4 tsp)
Sugar 88 g (7 tbs. + 1 tsp)
Salt 18 g (3 tsp.)
Eggs 372 g (4 eggs)
Whole milk 126 g (1/2 cup)
Butter 334 g (11 oz) cut into small cubes Raisins 244 g (1 1/2 cups)
Dried cranberries 122 g (1 cup)
2 tsp. Vanilla

Directions:
Combine the fruit in a bowl and pour 2 cups of boiling water over it. Let sit for 5 minutes then drain and pat dry with paper towel. Set aside. Add all the other ingredients but the butter to the bowl of a stand mixer with a dough hook. Mix until a paste-like dough forms. Add the butter a piece at a time and incorporate into the dough. (At this point it will look like that will never happen since there seems to be more butter than flour mixture to incorporate it into.) When all the butter is incorporated mix on speed 2 for 7 to 10 minutes. Pat the dough into a rectangle and spread the fruit evenly over it (#2). Fold the dough into thirds as an envelope fold. Press the dough out into a rectangle again. Turn the dough 180 degrees and do another envelope fold. Press into a rectangle, turn and fold again (#3). Pat into a loaf and place in a lightly oiled bowl turning to coat with the oil and placing it seam side down (#4). Cover and put in proofing box at 75 degrees and let rise for 45 minutes. Remove from bowl and repeat 2 more folds. Return to bowl to rise another 45 minutes. Remove from bowl and divide into 12 equal portions, (24 equal portions for doubled recipe). Roll the divided portions into bun shape and place evenly spaced on a cookie sheet lined with parchment paper. (Next time I will just cut into squares. This will require less working of the dough and make the number of folds more evident in the final product). Cover the pan and let rise until rolls are touching each other. Coat with egg wash and bake in 350 degree oven for 18 to 22 minutes until golden and toothpick comes out clean. Let cool on a rack.


These were indeed fairly complicated muffins. The hardest part was incorporating all the butter. At one point it looked like it wouldn’t happen. But it did. The muffins themselves are luxurious. The texture is dense but very soft. The numerous foldings made very fine layers. They were sweet but not too sweet. (They would have been sweeter if we had added the icing). The fruit adds another texture and a slight vanilla flavor. These are really quite something and worth the effort. 

Friday, February 18, 2022

Crumpet version 3 クランペット 第三弾

We have made crumpets a few times. The first attempt was basically a failure. They were certainly edible but did not develop the small multiple holes which makes a crumpet a crumpet. The second attempt was a great success.  Using a “platar” resulted in small crumpets which were the right size but the cooking process was kind of tedious. My wife found a recipe in "Cooks Illustrated 2020" using an 8 inch frying pan to make a large crumpet. It is served cut into wedges. So, she tried it. The serving is shown in the picture below liberally slathered in butter; Yum. 


Ingredients
1 cup (5 oz) AP flour
1 cup (4 oz) cake flour
2 tsp. yeast
3/4 tsp baking powder
1/2 tsp salt
1 1/2 cup warm water (1 1/4 into dough before rising, 1/4 into dough after rising)

Directions:
Combine AP flour through salt in an 8 cup measuring cup (the measuring cup makes it easier to pour the batter into the pan). Add 1 1/4 warm water and mix until smooth. Cover and let rise until double (about 40 minutes). The whole secret of getting the little holes in the crumpets is in the cooking. Put oil in an 8 inch skillet and heat on low for at least 5 minutes. Meanwhile add the remaining 1/4 water to the batter and mix until smooth. Increase heat to medium and heat skillet for an additional 1 minute. Using a paper towel wipe the excess oil out of the skillet. Pour 1/3 of the batter into the skillet. Increase the heat to high and cook on high for 45 seconds. Reduce heat to medium low and contiue cooking until the edges are risen, set and beginning to dry out (about 4 minutes). Take skillet off the heat. Place a dry flat spatula on top of the crumpet and pull up sharply to remove the excess batter and reveal the underlying holes. Turn the crumpet over. Return to the heat on high until the edges on the second side are lightly browned. Remove to cooling rack. Immediately add half of the remaining batter to the pan, turn up the heat and repeat the cooking process.

The picture below shows the crumpet soon after it comes out of the skillet. As you can see there are many nice holes to collect the melted butter or honey. 


The method works well to elicit the necessary nooks and crannies to collect the toppings. The picture below however shows what happened to the underside that was exposed to the high heat to create those lovely holes. No matter how we did it this happened with the batter actually smoking. The good news is that although the surface turned black it apparently was not burned and tasted just fine.

This process of cooking the crumpet is certainly less tedious than our previous method. The crumpet was very nice; crunchy on the outside and soft on the inside. It also held what ever topping we used very well. It tasted pretty good although I think the previous recipe we had tasted better. Also, I'm not sure about adding the additional 1/4 cup of warm water after the batter has risen to double. The recipe says the water in the batter converts rapidly to steam when the high heat is applied creating the bubbles that form the holes before the batter firms up. But this would also have the effect of deflating the rise created by the yeast. The next step would be to use the previous recipe with this cooking method to see what we get. 

Monday, January 24, 2022

Mayonaisse biscuit マヨネーズビスケット

This is another one of my wife's baking projects. When she made the mayonaisse/miso/peanut butter cookies, using the recipe in the freebee cookie cookbook we got from the grocery store, she saw an advertisement for Hellmann’s mayo beside the recipe. It stated “great cakes take Hellman’s”. She knew this to be true because many years ago a friend gave her a recipe for chocolate mayonnaise cake and it was a great hit. Further down the page she saw the following: “for this recipe and many more, visit Hellman’s.com. Intrigued she logged on and found a goldmine of recipes. This one for mayonnaise biscuits caught her eye particularly after making two versions of butter milk biscuits. So this was a “must bake”.


As usual she took the original recipe as advisory and made her own alterations


Ingredients:
2 cups all-purpose flour
1 Tbs. baking powder
1 Tbs. Sugar
1/2 tsp. salt
1/2 cup mayonnaise
3/4 cup milk (I used butter milk)
1 cup cheddar cheese grated

Other optional additions:
1/2 tsp. Dried basil
1/2 tsp. Dried dill weed
2 Tbs. Finely chopped onion
1/3 cup pepper jack cheese

Directions:
Preheat oven to 450°.
Combine flour, baking powder and salt in medium bowl. In another bowl combine the mayonnaise and buttermilk (#1). Shred the cheese (#2). Stir the mayo/buttermilk mixture and shredded cheese into the dry ingredients. On a baking sheet, lined with parchment paper, drop the batter by 1/4 cupfuls (#3). (I used a medium size ice cream scoop) .
Bake 10 minutes or until slightly golden (#4).


These are amazing biscuits. They have an outside “crust” that almost has the consistency of a very well made very thin pie crust. It gives the biscuit a very pleasing crunch. The inside is very soft and moist. It took a little while for the cheddar cheese flavor to come through but when it did it added another pleasing dimension of flavor. These are so easy to make they could be done at the drop-of-a hat or at the drop-of-an-ice-cream-scoop full. 

Thursday, December 23, 2021

Buttermilk biscuit redux バターミルクビスケット 第二弾

This is one of my wife's baking projects. Since we really liked our old friend the “tried-and-true buttermilk biscuit she used to make many years ago and reintroduced to our diet recently, when she found a recipe labeled “better” buttermilk biscuits, she had to try it.  This is basically a "redux" of the previous recipe with some improvements. The major difference is that it includes an egg. It also has a slightly different way of doing the envelop folds that cause the flakey layers such as those shown in the picture below. The end product is very flakey but a bit more moist which makes it a bit better than the previous recipe. As usual I will ask my wife to  with "how-to"es.


Ingredients:
3 cups (360 gr.) flour (or 2 cups AP flour and 1 cup plus 2 Tbs. Cake flour)
3 Tbs. Sugar
2 1/2 tsp baking powder
3/4 tsp. Salt
1/2 tsp. Baking soda
1 1/2 stick (170 gr.) cold butter cut into small cubes (I froze the butter cubes)
1 large egg
3/4 cup (180 Milliliters) cold buttermilk

Directions:
Mix the dry ingredients (flour through soda) in a bowl. Using your hands quickly work the butter into the dry ingredients until the pieces of butter are the size of small beans. (It’s ok to have the butter in visible chunks because that is what contributes to the flakiness). In another bowl combine the egg and the buttermilk. Whisk with a fork to combine. Add the wet ingredients to the dry ingredients. Lightly mix until a crumbly dough forms. Turn out onto a floured surface and using a rolling pin roll the dough into a 1 inch thick 2 1/2 inch wide strip with the narrow end facing you. Fold the dough into thirds as you would a letter. (This creates a thin but long strip of dough which is a slightly different from the usual configuration of a square which is then folded). Turn the dough one quarter turn, roll out into 1 inch thick 2 1/2 inch wide and fold again. Turn, roll it out and fold again. Roll it out one final time and cut into 12 pieces. Put on a cookie sheet covered in parchment paper. Cook in a 400 degree oven for 18 to 20 minutes until the biscuits are golden brown. (If you used frozen butter you may cook a little longer to make sure the centers are cooked.) Cool on a rack.

These biscuits were excellent. They were flakey, had a slight sweetness, the tang of the butter milk and and taste of butter. While they were nicely flakey they were also very moist on the inside. (The biscuits made with the previous recipe while still very good were a bit drier.) This will probably be the buttermilk biscuit recipe we will use in the future. 

Tuesday, December 14, 2021

PA Dutch Schnecken ペンシルバニアダッチ シュネッケン

My wife grew up in the PA Dutch area of Pennsylvania and PA Dutch food is something special for her from her childhood.  For Christmas, we usually get German-style cookies from a bakery called “Bredenbecks” which is located in Philadelphia, (historically Germantown but currently Chestnut Hill) and has been in business since 1886. According to my wife, these cookies were her grandfather’s favorite and he used to bring a large tin of them from Bredenbecks every year when her grandparents came for Xmas. So, for my wife, Bredenbecks’ cookies are associated with a good time during the holidays as a kid. Last Xmas, my wife decided to try something different in addition to the traditional German cookies. So she ordered a tin of “Schnecken” (which means “snail” in German).* As I mentioned before, I am not a “desert” person and I have to admit I am also not a charter member of the traditional German cookie fan club. For these reasons I have no problem by-passing a plate full of them without taking one. But the schnecken were great! (My wife actually caught me red-handed snarfing some directly out the tin between meals). 

*digression alert: One year my wife decided to order a stollen in addition to the traditional German cookies from Bredenbecks. While the cookies are shipped in a tin, the stollen was shipped in a light cardboard box. The goodies were delivered to the front door and quickly discovered by the resident squirrels who recognize a good thing when they smell it. They busted into the box and helped themselves to the stollen. By the time we got home the only things left were a cardboard shipping box with a large hole in it, a few large crumbs and chunks of stollen scattered all over the front porch. It was a merry holiday for some lucky squirrels. 

Recently my wife was going through one of the old PA dutch cookbooks she has when the recipe for PA Dutch schnecken jumped out at her. Knowing how much I liked the ones from Bredenbecks she couldn’t ignore the recipe and decided to surprise me with some. As shown in the picture below the schneken from Bredenbecks are little cookies and shaped more like a mini-croissant than a snail. 


As shown in the next picture, the PA Dutch schnecken my wife made is more like cinnamon a bun but as you can see, it is indeed shaped like a “Schnecken”.


The picture below shows the cut surface. Alternating layers of bread and cinnamon sugar/ butter. This version is not too sweet but very flavorful and we are enjoying them mostly as a breakfast.


I ask my wife, as usual, to share the “how-to” part.

Word of advice from wifey: in the tradition of old recipes used to make dishes for large farming families (such as the PA Dutch), doing hard labor chores the yield from this recipe is quite generous.…it makes 2 dozen schnecken! 

Ingredients:
For the dough
1 package of yeast
1/2 tsp. Salt
1/3 cup sugar
4 to 5 cups AP flour
1 1/2 cup milk (buttermilk would work too)
2 eggs beaten
1/4 cup melted butter

For the filling
1/3 cup butter softened
1/3 cup packed brown sugar
1 1/2 tsp. Ground cinnamon

Optional topping
1 egg white mixed with 1 tbs water
1/2 tsp. Sugar per muffin (more or less to taste)

Directions:
Add the dry ingredients (yeast through flour) to the bowl of a mixer with a dough hook. Mix together the wet ingredients (milk through melted butter) together and mix well. With the mixer running add the wet ingredients to the dry ingredients. Add more flour as needed to make a soft dough. Knead for 7 to 10 minutes. Cover and let rise in a warm place.

Meanwhile combine the ingredients for the filling (butter through cinnamon) into a paste and set aside.

When the dough has doubled in size punch it down and divide it into two portions weighing them to make them about even in size. Roll out each portion into a rectangle of about 15 X 18 inches. Spread 1/2 the filling over each rectangle right to the edges. Roll up each “as for a jelly roll” as specified by the instructions. Cut each roll crosswise into 12 pieces. (A word of advice: to get pieces of somewhat equal size, cut the roll into thirds. Then cut each third into fourths (3 x 4 = 12). Place the slices cut side down into a well greased muffin tin. (First picture below) Cover and let rise until double. Just before baking brush each muffin with the egg wash mixture and sprinkle on the desired amount of sugar per bun. This sugar will caramelize slightly when cooked. Bake in a 375 degree oven form 18 to 20 minutes or until golden brown. (Second picture below). Another word of advice: remove the buns from the tins immediately after they come out of the oven before the caramelized sugar hardens . Once it hardens it will become extremely difficult to extract them. Also, scoop any caramelized sugar left on the bottom of the tins before it hardens and spread onto the buns.


Here are a bunch of snails. 


Imagine how nice it was to come home to the rich baking smell of butter, cinnamon and caramelized sugar. As usual my wife made a small one for me to eat immediately upon my arrival. Needless to say that one disappeared very quickly. While this is basically a cinnamon bun it is more demure than its better known cousin the sticky bun. The sweetness is just right with a gentle taste of cinnamon and a lovely soft slightly chewy dough. Only 2 dozen yield?

Sunday, November 28, 2021

Swedish cardamom buns カルダモンロール

This is one of my wife's baking projects. She saw this recipe in the "Milk Street” magazine. It is a sweet roll seasoned with ground cardamom. We were not sure whether we would like the cardamom flavor in a  sweet roll but my wife decided to try it. This was a great success. It is sweet and the sugar/cardamom mixture melted and made a nice crust especially on the bottom.


Ingredients:
For the dough:
390 grams (3 cups) AP flour
103 grams (3/4 cup) bread flour
80 grams (6 Tbs.) White sugar
1 Tbs. Yeast
1 tsp. Ground cardamom (more if you want stronger cardamom taste)
3/4 tsp. Salt
1 1/4 cup whole milk warmed to 100 degrees F.
113 grams (8 Tbs. Butter) melted and cooled
1 large egg separated (yolk for dough. White to brush on buns before baking)

For filling
170 grams (12 Tbs.) Salted butter at room temperature (maybe try less butter to keep it from running out and puddling during cooking.)
163 grams (3/4 cup) packed light brown sugar
2 tsp. Ground cardamom
27 grams (2 Tbs.) white sugar

Directions:
To make the dough: in a stand mixer with dough hook mix AP flour through salt to combine. Add together the wet ingredients (milk through egg yolk). Then with mixer running slowly add the wet mixture into the dry ingredients and mix until the ingredients form a sticky dough. Increase mixer’s speed and knead until the dough becomes smooth and elastic (about 10 minutes). Line a 9 X 13 baking dish with parchment paper (#1). Put in the dough and press it with your hand to flatten it into an even layer. Cover with plastic wrap and let rise until almost doubled in size (about 1 hour). Transfer to a refridgerator and chill for at least 2 hours or up to 24 hours. (I chilled the dough overnight.)

When ready to fill and shape the rolls first make the filling by mashing the butter through cardamom together to form a well combined paste. Set aside. Turn the chilled dough onto a large cutting board. Roll out into a 12 X 16 rectangle. Spread the filling in a even layer on the dough spreading out to edges (#2). Do a three envelope fold with the dough (fold bottom third to middle then top third over that fold (#3). 

Rotate the dough 180 degrees so the short side is facing you. Roll the dough out into a 12 X 16 rectangle and repeat the envelope fold.

To form buns: Rotate the rectangle so the long side is parallel with the counter’s edge. Cut the dough crosswise into 16 even strips (#4). Pick up one strip by the ends and gently stretch it to about 16 inches by gently bouncing it against the counter while very gently pulling on the ends. At the same time twist the ends of the strip in opposite directions while gently stretching to create a looose spiral about 16 inches long. While holding one end of the strip in place between your thumb on one side of the dough strip and index, middle and ring fingers on the other side of the strip wrap the strip around your 3 fingers (index, middle and ring) without untwisting the spiral. Then tuck the end under and up into the center while sliding the resulting turban shaped knot off your fingers (Rt. Side of #4). Using 2 cookie sheets lined with parchment paper put 8 of the buns on one sheet and 8 on the other sheet using the pattern shown in #5 below. (Using this pattern is helpful because the muffins expand and they can cook without touching.) Cover and let rise until doubled. When doubled in size add 1 Tbs of water to the egg white beat the mixture together and then brush on the buns. Top with 1/2 of the white sugar listed in the filling ingredients list. Bake each sheet one at a time in a 400 degree oven for 15 to 18 minutes until the buns are a deep brown (#6). (When the trays are cooked separately it allows the muffins to be exposed to equal heat all around and helps caramelize the sugar to make a crunchy candy like crust.) 


As shown below it is a good thing to cover the sheets with parchment paper because it is normal for some of the filling to seep out and caramelize on the baking sheet.


Once the overflow cooled it became a nice candy/caramel with crispy texture (as shown in the next picture). We enjoyed some of it as a snack.


This is a perfect roll for breakfast. It is best soon out of the oven because it is covered in a crispy light caramelized candy crust both top and bottom. While not too sweet, the crust provides a wonderful crunchy texture over the softly chewy bread inside. Although the bun tends to lose its crispy candy crust over time as it melts into the bread and  it is still extremely good. Although we were initially unsure of whether we would like the cardamon flavor, it was gentle and went extremely well with the buttery caramelized flavor coming from the sugar. This bun has everything going for it as a breakfast. 


P.S. As I was browsing a Japanese newspaper web site (Asahi Shinbun 朝日新聞), I came across a series of articles describing a number of amazing bakeries in Japan. One of the articles was about a family-run bakery in Urawa ward of Saitama city さいたま市浦和 called "Bake house Yellow knife".  Among the amazing breads they bake was Swedish cardamon rolls. It appears that this kind of artisanal bakery with dedicated bakers paying attention to every detail is becoming more common in Japan now-a-days.

Tuesday, March 9, 2021

Almost no-knead whole wheat bread

I am experimenting with "almost" no-knead bread  variations. This time, I made a whole wheat version and increased the hydration level to exactly 70%. As shown below it came out nicely. 

Some of the holes were a bit too large but it had a nice overall texture, crust and flavor. I am posting this just as notes for my record.


Ingredients:(everything except salt and yeast were weighed)
425gram of AP and whole wheat flour (1 cup wheat flour and I added about 3 cups of AP flour to reach the total weight of 425grams).
300 grams of liquids (Total liquid amount is most important),
80grams (6tbs) of beer (again I used Samuel Adams Boston brown ale)
13grams (1tbs) of rice vinegar
207grams of water (I just added water to the total liquid amount of 300grams)
1 1/2 tsp salt
1/4 tsp instant yeast

Hydration ratio = 70%

Direction:
Mix the ingredients in a bowl with a spatula until all the flour is incorporated (towards the end, I used my hands to incorporate all the flour. Again it looked too dry). Cover the bowl with a plastic wrap.
Place the bowl in the proofing box at 85F (with a water tray), this time, I let it rise overnight for about 12 hours.
Next morning, the dough was more than doubled and well-hydrated. Using a floured plastic dough scraper, I placed the dough on a well floured board and quickly kneaded it 15-20 times then made a boule shaped dough ball.
I placed the dough ball on a piece of parchment paper (sized to hold the whole thing) with the seam side of the dough boule down. I then placed it in a bowl or skillet in which the dough ball snugly fit.
The bowl uncovered went into the proofing box for 1 and half hours.
Preheat the oven with a cast iron Dutch oven in at least 30 minutes before the secondrise is finished.
Slash the top of the dough ball using a lame.
Lift the dough by the parchment paper and place it in the hot Dutch oven. Put the lid on and bake for 30minutes.
Remove the lid and bake another 10 minutes.
Again,hydration ratio of 70% makes a wet but very manageable dough and using the parchment paper is easier and safer than the original floured towel method.