Sunday, October 31, 2010

Flounder simmered in Japanese broth カレイの煮付け

I do not think I ever made this dish before. Probably because I somehow associate this dish with being ill as a kid. This was the first solid food my mother served me when I was recovering from some GI ailment. My mother thought this dish was the most mild flavored, easily digestible and highly nutritious food she could serve to speed recovery. All this is probably true but I can't imagine feeding this to an American kid just getting over a tummy ache.

I bought too much fluke (flounder) which I used in my matsutake dish. I thought about making  menier or grilled or fried flounder but I decided to make this dish. One of the reasons I chose this dish is because I had extra kelp broth left over from when I made matsutake rice.

The different Japanese and English names for flatfish are numerous and confusing. I usually associated the Japanese name "Karei" カレイ 鰈 (The left symbol which makes up this kanji letter is "fish魚" and the right symbol is "leaf葉") with sand dabs and "Hirame" 平目 (meaning "flat eye") with flounder or fluke but I am not sure this is a correct association. A classic Japanese recipe calls for small sand dabs or karei for this dish so that the whole fish with skin on is simmered in broth (see image below). The skin adds a slightly slimy texture which, I suppose, the Japanese like but I only had previously skinned and boned fillets of flounder.

Broth: Again, this is typical Japanese seasoning combination. I used kelp dashi, sake, mirin, and soy sauce (2:1:1:1). If you like you could add sugar (up to 1 tbs) to this. You must add enough slices of fresh ginger (3-4 thin slices) to add a good ginger flavor to this dish. I placed the seasoning liquid in a flat wide pan like a sauté pan so that the fillets are in a single layer and covered with the seasoning liquid. I gently simmered it for 10 minutes. Since this was a fillet, I did not bother with "otoshi buta" 落とし蓋 but instead, I covered it with a piece of kelp while the fish was cooking.

I served the fish with the kelp on the bottom (as decoration, just becase I had it) and boiled asparagus. I had to admit, this is not one of my favorites but it has a nice gentle texture and the taste of fresh ginger. Oddly, I am already feeling better.

Here is a more classic image of "Karei no nituske" カレイの煮付け(http://www.jf-net.ne.jp/kagyoren/image/santi/12-6.jpg

Friday, October 29, 2010

Braised potatoes and green beans 小芋とインゲンの煮物

This is a very homey and simple dish. My mother used to make it often. I made this one evening since my wife washed and dried green beans but did not have a time to make the dish she had in mind and was in the process of putting them away in the refrigerator. I just grabbed a handful of green beans and made this dish.

One of the problems I have is that I do not measure anything especially for this kind of dish The amount of ingredients and seasoning is just a guesstimate. The above picture is the entire amount I made; about 20 green beans and 6-7 baby red potatoes.

I removed the "eyes" of the potatoes and cut them in half or quarters depending on their size. In a large frying pan on a medium flame, I added 1/2 tbs of vegetable oil and a splash of dark roasted sesame oil. When the oil was shimmering, I added the green beans (please make sure they are dry, otherwise it splatters) and the potatoes and sautéed briefly so that all the vegetables are coated with oil. I added 2-3 tbs of mirin and tossed it around. After 1 minute or so I added chicken broth (3-4 tbs, non-fat and reduced sodium Swanson as usual but you can use dashi, sake, or water). I put on a tight fitting lid and turned down the flame to a low simmer.  I let it cook for 10 minutes or so and added 1 tbs of soy sauce. I put back the lid and simmered it for another 5-7 minutes. I opened the lid and checked the potatoes to see it they were done (insert a skewer or knife tip). If the potatoes are not done and not much liquid is left, add more water or chicken broth. (In my case, the potatoes were done). The liquid should be reduced quite a bit at this point (Picture below). I added a half tbs more soy sauce (to give a fresh soy sauce flavor) and tossed it around and let the liquid evaporate almost completely (another 1 to 2 minutes).

This is a somehow very comforting dish for me since it was one of my mother's repertoire. Classic Japanese seasoning but the fresh taste of green beans comes through. Perfect side for any Japanese meal or you could have it by itself with sake like we did.

Wednesday, October 27, 2010

Tuna "namerou" tartar 鮪のなめろう

I have done posts about frozen yellow-fin tuna sashimi block or "saku" 冊 previously several times. Although it is by no means quality tuna sashimi, it is very convenient to have in your freezer and affordable. My quest to make this frozen tuna palatable continues. This evening, I made three different dishes--one of them I attempted for the first time.

This is called "namerou" なめろう. It is a type of "tataki" たたき or Japanese style tartar type preparation. I am not sure of the origin of the name but "nameru" なめる means "to lick". This dish was said to be made by a fisherman on the boat, simialr to the origin of "okizuke" 沖漬け. The fish used in this dish is usually a blue-white shiny skinned fish, "hikarimono" ひかりもの, such as mackerel. Tuna is not commonly used but I made this with the frozen tuna.

I used about 1/3 saku since I made three different dishes shown here. I first roughly chopped the tuna into small cubes, sliced scallion, minced perilla and fresh ginger (amounts all arbitrary). I added half a tsp of red miso paste to start. I minced (or "tataku", meaning to bang or hit with a knife blade) all these together until it became sticky and well mixed but still retained some shape. I tasted it and added a little more miso to finish. If this becomes too stiff, you could add a small amount of sake to make it the right consistency, which I did not need to do. This was a great success! Because of the many flavors especially the miso and the nice consistency, it was perfect to nibble while sipping cold sake. If you were not told, you would not be able to tell that this was made of frozen yellow-fin tuna.

This is variation of "zuke" 漬け. Last time I made it, it was very good but, for me, it was a bit too salty, so I made some modifications to make it more like slightly flavored sashimi than a classic "zuke" preparation. I used the same type of marinade but increased the amount of sake and mirin (sake, mirin, regular dark soy sauce and usukuchi syouyu in 2:2:1:1 ratio). I also added ginger juice (from freshly grated ginger root), and coarsely ground roasted white sesame as before. I also did a "shimofuri" 霜降り process and then marinated it for 2 hours in the refrigerator. This is not quite "zuke" and the consistency of the tuna did not change too much to the point of "sliminess" like in a classic "zuke" preparation. The marinade did impart nice flavors and the consistency of the tuna was quite good. I sort of like this preparation. So far, two solid hits for me tonight--one more to follow, bases loaded. Actually, at this point, probably more than just "bases" are loaded. These two dishes are so perfect with sake we may be "enjoying" ourselves too much at this point.

The third tuna dish is our usual stand-by and is nothing new; just classic "yamakake" やまかけ.

We think, even for frozen saku of yellow-fin tuna, these three dishes I made tonight were quite good (I know my standards may have fallen substantially compared to those of Japanese food connoisseurs out there, especially a few in Tokyo).

Monday, October 25, 2010

Brie and Fuji Apple quesadilla ブリィチーズとリンゴのケサディア

This is a very interesting quesadilla. I bet you will not get this in Mexico but it is perfect with wine. We saw this in "Cooking Light" (paper copy) and both my wife and I independently thought it was interesting. Although the recipe came form "Cooking Light", by no means, is this dish "light". 
This is essentially just like any quesadilla but instead of Jack cheese and some kind of meat,  brie and Fuji apple are used, which make it very unique. Disclaimer: I did not follow the recipe to the letter, so the end product may have been slightly different. I used two small flour tortillas (instead of using a one large tortilla and folding it in half). The recipe calls for regular brie but it turns out I picked up goat milk brie instead, Fuji apple, and baby arugula.

I spread a thin layer of Dijon mustard (Grey Poupon) on one side of both tortillas. In a small (8 inch) frying pan on low flame, I add 1 tsp of olive oil and placed the first tortilla with the mustard side up and placed slices of brie on the tortilla.  After the cheese started melting, I placed thinly sliced Fuji apple on the cheese to cover the surface (I peeled and cored the apple before slicing) and a handful of arugula on the top. I sprinkled freshly cracked black pepper over it. I then placed the other tortilla with the mustard side down. I pressed gently with a spatula. After few minutes, I flipped it to brown the other side and cook it for 2-3 more minutes.

As you can see in the above image, melted brie started oozing out as I tried to cut it. The unique combination of goat milk brie, mustard, black pepper, apple (still crispy, sweet and sour) and slightly peppery arugula, all works together. The goat milk brie had a very pleasant somewhat "gamey" flavor. This was a very nice Franco-Mex (?) hors d'oeuvre indeed, which goes particularly well with wine. We had this with red wine but any white, particularly something like Riesling will also do.

Sunday, October 24, 2010

Pork cutlet bowl カツ丼


This looks like the classic lidded Japanese bowl you may see in "Taishu shokudo" 大衆食堂、which is the Japanese equivalent of American diners.  I do not remember when I got this bowl but it must have been in California. I have not used this bowl for a long time for some reason. This dish, Katsu-don カツ丼, is a classic dish being served in Japanese eateries and this bowl is perfect for it. Since we had already made pork fillet cutlets, I made this classic dish from the leftovers and frozen rice. Of course, you could make this from just fried tonkatsu and freshly cooked rice, which would be much better.

There are two distinctive styles in "Katsudon". One type is with soy sauce based broth and beaten egg anchoring everthing together called "Tamago-toji katsudon" 卵とじカツどん, which is, by far, the most popular style and is usually referred as simply "Katsudon". Another (more  regional and less popular) kind is tonkatsu dipped in semi-Western style tonkatsu "sauce" with shredded raw cabbage placed on the top of rice, which is called  "sauce Katsudon" ソースカツどん. I am from the area of Japan where the former style is the only type of Katsudon available. I personally never had a "sauce" Katsudon but I do not think I am missing much (I can easily image how that would taste). 

Here is the view with the lid off, served with beer marinated daikon. Perfect dish to make quickly on a weekday evening. I could have worked on the presentation, though.
To make this dish, you could use the special pan shown below (also perfect for Oyako-don 親 子丼) but I do not have one. Any small (8 inch) frying pan with a fitting lid will also work. You have to use one pan for making one serving. So, in our case, I use two 8 inch frying pans.

Broth/sauce: This is a typical dashi, soy sauce, mirin combination. How much and how strong the broth should be depends on personal preferences. Japanese diners tend to go with a strong broth and a small amount. My wife likes enough broth to moisten the rice adequately. I favor less broth but a bit stronger taste. For this evening, my broth is a compromise. For two servings, it iconsists of dashi (1/3 cup, instant granulated dashi dissolved in hot water), mirin (1 tbs), and soy sauce (1 tbs) but you have to taste and decide how sweet and how strong you would like the broth to be. You could also add sugar, if you like it sweet. I tasted and adjusted further (a bit more soy sauce). I seasoned it more severely than soup you will drink but not as strong as a dipping sauce.You could use any type of tonkatsu. I used "hirekatsu" ヒレカツ or fried fillet of pork.

I arranged the ingredients except for the snow peas in a small frying pan, which makes one serving. I used one medallion of pork per serving for us but I suggest two for most people; sliced in 1/3 inch (or about 1 cm) thick. For vegetables, I used fresh shiitake mushroom (one medium, stem removed but not sliced, with a decorative cut but you can not see it well in the picture), onion (1/4 medium, halved and thinly sliced) and snow peas (2 or more). I add the broth above (1/6 cup or half of what I made). Put a tight lid on the pan and cook for 4-5 minutes on a low flame. I add beaten egg (1 large) and the snow peas and cook another two minutes or so with a lid on.  I take the pan off the heat when the egg is just barely congealed in the center.

I place the cooked rice (in our case, microwaved froze leftover rice) in the bottom of the bowl and slide the topping onto the rice with all the remaining broth (The broth reduces a bit. The special pan in the picture comes in handy if you have one). Put the lid on the bowl and let it stand for a one minute or two. If you like the eggs to be a bit runny skip this last step. If you do, please use pasteurized shell eggs). If you have already made rice and tonkatsu, this is a very quick weekday evening meal. Everything tasted pretty good except my wife wanted more broth.

Saturday, October 23, 2010

Japanese Breakfast 日本風朝ご飯

Hangover or "futsuka-yoi" 二日酔い is sometimes an inevitable by-product of the izakaya scene. In my bar hopping days in Japan, hangovers were unavoidable. There are many folk remedies for hangover but their effectiveness is dubious. One such remedy recommended by fellow imbibers while I was living in Japan, was the administration of tomato juice or miso soup--but this never worked for me. Of course, "hair of the dog" or "mukaezake" 迎え酒 (meaning welcoming sake) may be the ultimate cure but it may set you up for the next day's hangover and a vicious cycle may ensue. "Moderation" (what's that) and "hydration" probably are the best way to prevent hangovers.

In any case, you may want to try a traditional breakfast to combat hangovers after having too much fun in Izakayas the night before. Here is my Japanese breakfast but I did not have a hangover and I ate it as supper (Please do not ask why because I don't know why. I had all the ingredients and it just struck my fancy). If you have a hangover, you will feel better after eating this.

 Of course, you need rice and miso soup with any Japanese breakfast.

This example consists of grilled aburaage 焼き油揚げ (top left in the picture below, a bit over done), stewed potatoes and green beans (top right), grilled shishamo 焼きシシャモ (middle left), asazuke 浅漬け (middle right), Perila seedpod tsukudani (bottom left) and miso soup with tofu, wakame sea weed, and aburaage (bottom right).

Other common items include seasoned dried nori (味付け海苔), raw eggs (生卵), natto (納豆), Japanese omelet (卵焼き), and any kind of condiments such as tsukudani (佃煮) of small fish, kelp, and nori.

I am not sure how you feel about eating raw egg over hot rice called "Tamago kake gohan" 卵掛けご飯 (This subject actually appears in Wikipedia--truly amazing!) with a bit of soy sauce (all mixed well), but this is a very popular way to enjoy rice and egg especially in the morning. There is strong following for this dish in Japan with restaurants specializing in it and even a special soy sauce to use on it. (the link is in Japanese).  

Several years ago, we stayed at Kinkazan Shrine/Island 金華山 overnight. Why I decided to visit and stay there is a long story. I think I was expecting to have an experience similar to the lovely time we had at a Buddhist temple in Koyasan 高 野山 a few years earlier. Suffice it to say that was not the case. Just a quick hint; the men's showers had only cold water. Breakfast was served after the morning prayer ceremony (participation in the ceremony was mandatory for all guests--something we didn't know before we arrived). The ceremony occurred at 5:30 AM with 50 or so other fellow worshipers. When we say participate I mean literally. The guests are expected to run part of the ceremony. Luckily I was provided with a crib-sheet of instructions to be learned hastily before going to the main alter in front of all those people to "perform". The priestess conducting the ceremony announced our family name and stated that, as devoted worshipers, we came all the way from Washington, DC. Since I am Japanese (at least from outward appearance), I was expected to sit on the hard floor with legs folded (pure agony) but my wife was provided with a folding stool. In my agony, I didn't think that was quite fair. After the ceremony, all 50 guests were herded into another big room where long bench tables were set with a traditional Japanese breakfast. 

Next to all the usual Japanese breakfast items sat an egg in a small bowl just like the one shown in the picture. While I knew immediately what it was and what it was for, my wife automatically assumed it was a hard boiled egg, something often served in an American breakfast or at Japanese coffee houses. As she was getting ready to smack the egg hard on the table to crack the shell and eat it, something caused her to stay her hand. And a good thing too. Imagine how embarrassing it would have been to deliberately smash a raw egg onto the table while all the other guests, who were Japanese, were managing to get their raw egg onto the rice. How surprised the other guests would have been! It didn't occur to her for even a second that the egg could possibly be raw! Nobody serves a raw egg in the shell for breakfast in the United States (not even our household) !! But she now knows that, in Japan, they do. 

Friday, October 22, 2010

Sauteed nagaimo 焼き長いも

I have posted quite a few dishes of nagaimo 長芋. You can make so many variations, either cooked or raw, but this grilled nagaimo with black pepper and salt has been featured not once but twice by the expert expats Izakaya connoisseurs and I decided to make my version. Since this was a weeknight, I did not charcoal grill the nagaimo but pan fried it.

This dish is simple to make. Since I do not like the skin I removed it but you could keep the skin on. I sliced it into rather thin (1/4 inch) disks but this could be a bit thicker. I blotted any moisture from the surface using a paper towel. I added light olive oil (1 tbs) to a hot frying pan on medium-high flame and browned one side rather well (bottom side) for 2 minutes. I flipped it over and fried for 1 more minute. I flipped it over again and sprinkled salt and freshly cracked black pepper. You could use different seasoning such as Japanese 7 flavored red pepper  七味唐辛子, sansho 山椒, or even cumin or curry powder if you like.

We had this as an opening dish with leftover yakitori drumettes reheated in a toaster oven as seen above. The nagaimo has a nice mild crunchy crust and becomes very sweet (some starch must convert to sugar). It is really satisfying and the salt and pepper make this dish. Nagaimo can be simmered in broth as well but I never posted it. Maybe that will be my next post on nagaimo.

Wednesday, October 20, 2010

Grilled Baby Octopus and grilled smashed potatoes 子鮹のグリルと焼き潰しジャガイモ

I don't think I've ever seen uncooked baby octopuses in a regular grocery store.  Last time we went to the market to get pasteurized eggs, to our surprise, they had fresh baby octopuses. It was also very cheap (less than $5 per pound and I could not resist getting some). I decided to marinade them in both Western and Japanese styles and just grill them on a charcoal fire.

In the picture below, the left four are Western style and the right 5 are Japanese style in the back row (This is the first batch that we grilled, we had much more). Aren't they cute? The front row is smashed and grilled potatoes. I think this definitely qualifies for Izakaya food.

Western style Marinade: Lemon juice (from one medium lemon), lemon zest (from one lemon before squeezing its juice using a micrograter), olive oil (3-4 tbs), salt and pepper. I also added fresh thyme (finely chopped) from our herb garden.

Japanese style marinade: Sake, Mirin, and soy sauce (1:1:2) with several slices of fresh ginger.

I marinated the octopuses for several hours in the refrigerator. I drained the marinade and simply grilled them for 2-3 minutes turning frequently (below, left). As per my wife's idea (she got the idea from one of the issues of Cook Illustrated), she microwaved baby red potatoes, then coated them with oil and smash them flat. We then grilled both sides (below, right).

Both styles had lots of flavor, especially the Western version had nice lemony and thyme flavors. Only problem was that both were a bit chewy. For most Japanese, this degree of chewiness is Ok but not for most Westerners including my wife. I ended up cutting them into small pieces.

Since we made perilla seedpod Tsukudani 紫蘇の実の佃煮, we tried it on the potatoes. it is much better than just salt. It has very interesting taste, sweet and saltiness and popping texture. We also made our usual grilled rice balls. These food all went very well with cold sake and we stayed until dark on our back deck. 

Our neighbor's dog showed up and hung around despite her owner's calling. She was not about to leave our barbecue. She may get in trouble if this continues.

Monday, October 18, 2010

Artichoke, acorn squash and rack of lamb アティチョーク、エイコーンスクワシュ, 子羊肉

This is certainly not Izakaya food. But I thought, just in case there are some Japanese readers out  there, acorn squash and artichokes may be a bit unusual for them. Artichoke is a very strange vegetable (if it is a vegetable). It is the immature flower bud of a giant thistle. Whoever (must have been Europeans) decided this could be eaten, must have been very hungry. In terms of its strangeness and the fact that it is a flower bud, it is on par with myouga 茗荷. I didn't cook artichokes myself until I moved to California from the east coast many, many moons ago. We fondly remember driving through Half-moon Bay on the California coast, one of the major artichoke producing regions of the United States. We often stopped at one of the many road side stands to buy fresh artichokes just harvested from the fields that extended either side of the road. After moving back to the east, the artichokes we see at the market are usually pitiful and we only rarely buy them. Last weekend, I found some reasonably good looking artichokes and I could not resist buying them, but I did not have a chance to prepare them right away.

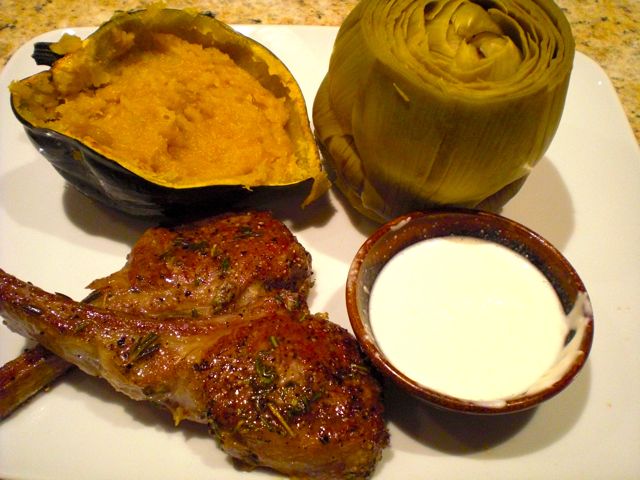
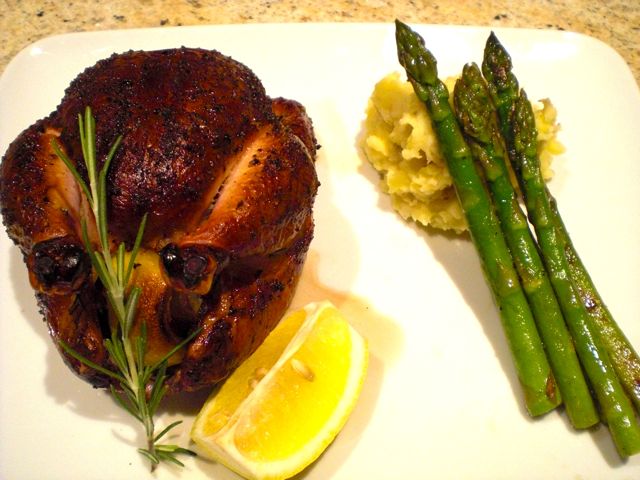
My wife came to the rescue and she prepared the artichokes along with acorn squash the following Friday. I only had to cook the rack of lamb that went along with them for dinner.

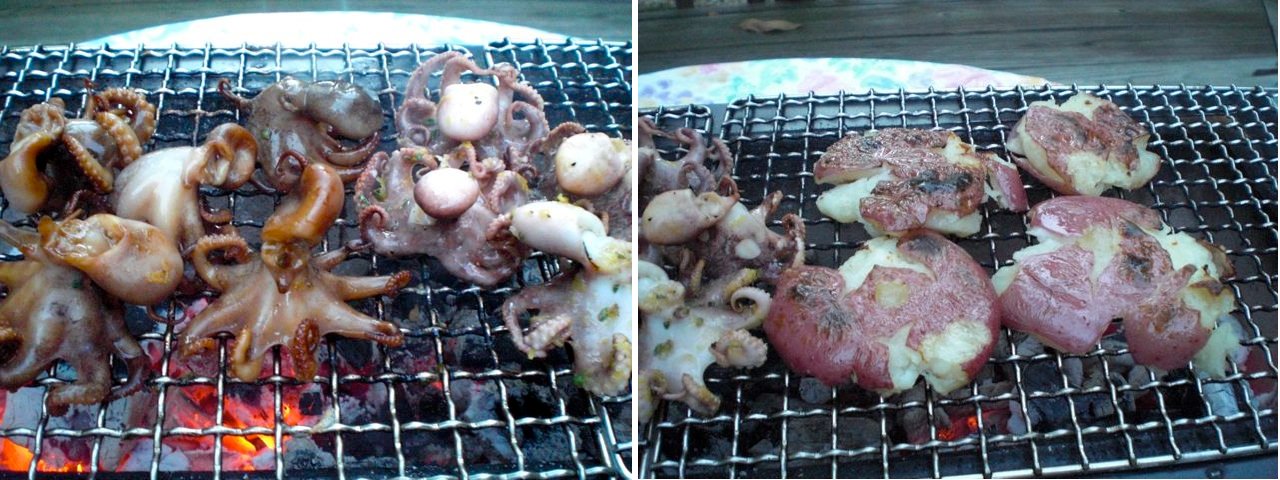
Artichokes: There are many ways to cook artichokes (which also depend on the size of the artichokes). The most classic old fashioned way for regular size artichokes is what we did this evening.  
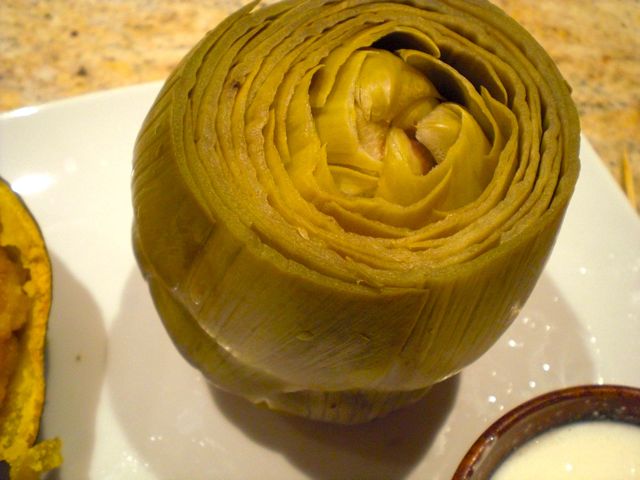
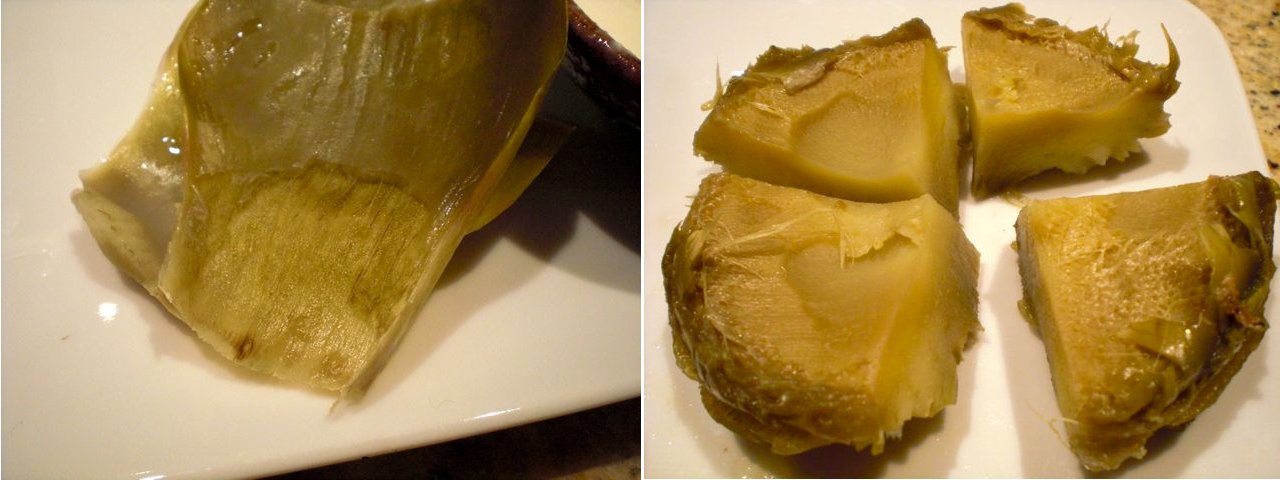
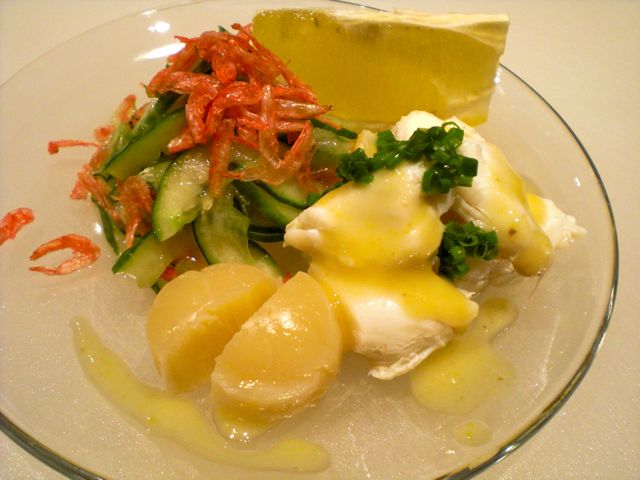
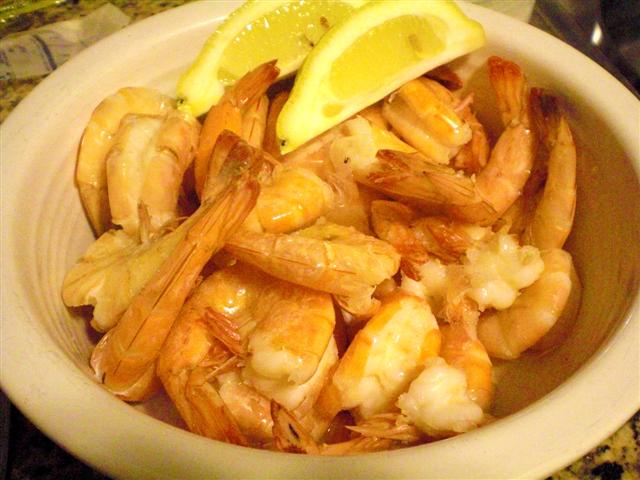
How to clean and prepare artichokes is readily available elsewhere. My wife steamed them for 45 minutes in water to which lemon juice, onion, black pepper corns, bay leaf and olive oil had been added. The picture above shows the cooked artichoke served on the plate. What it doesn't show are the many outer petals that were already eaten in transit between pot and plate (It went swimmingly well with a sip of the red wine we were having).

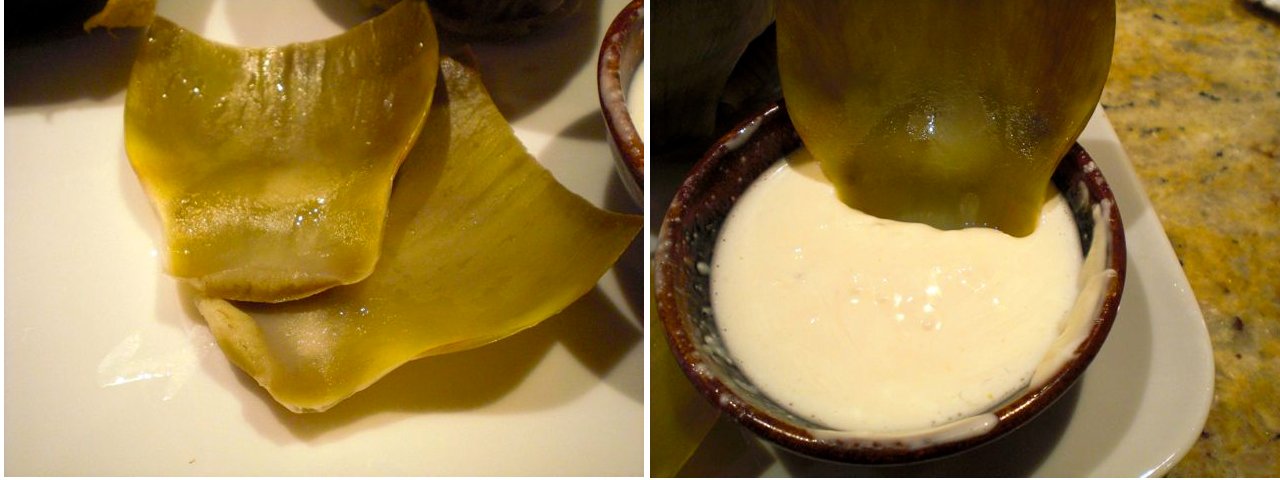
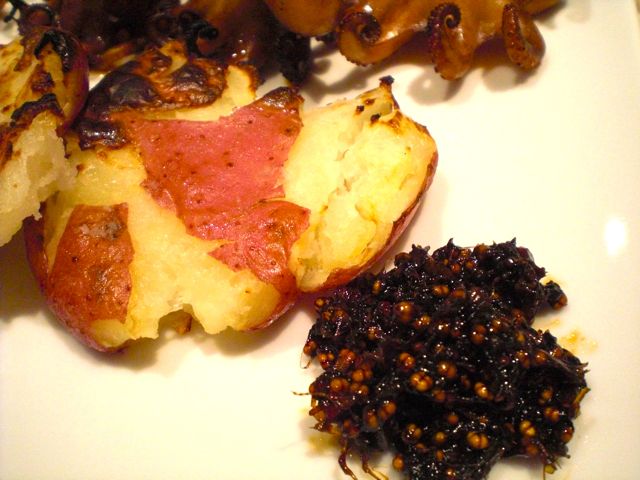
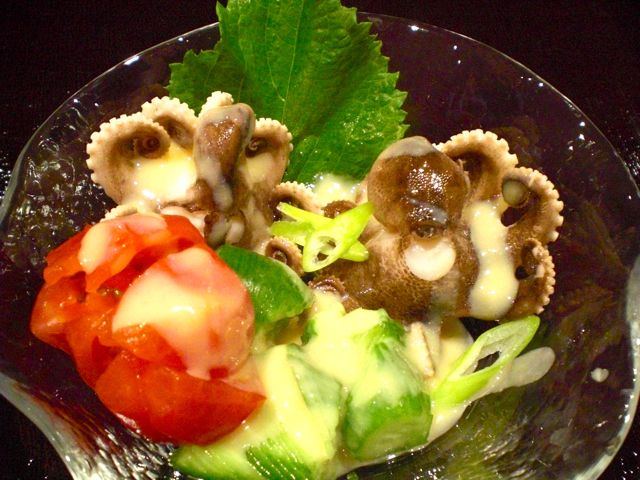
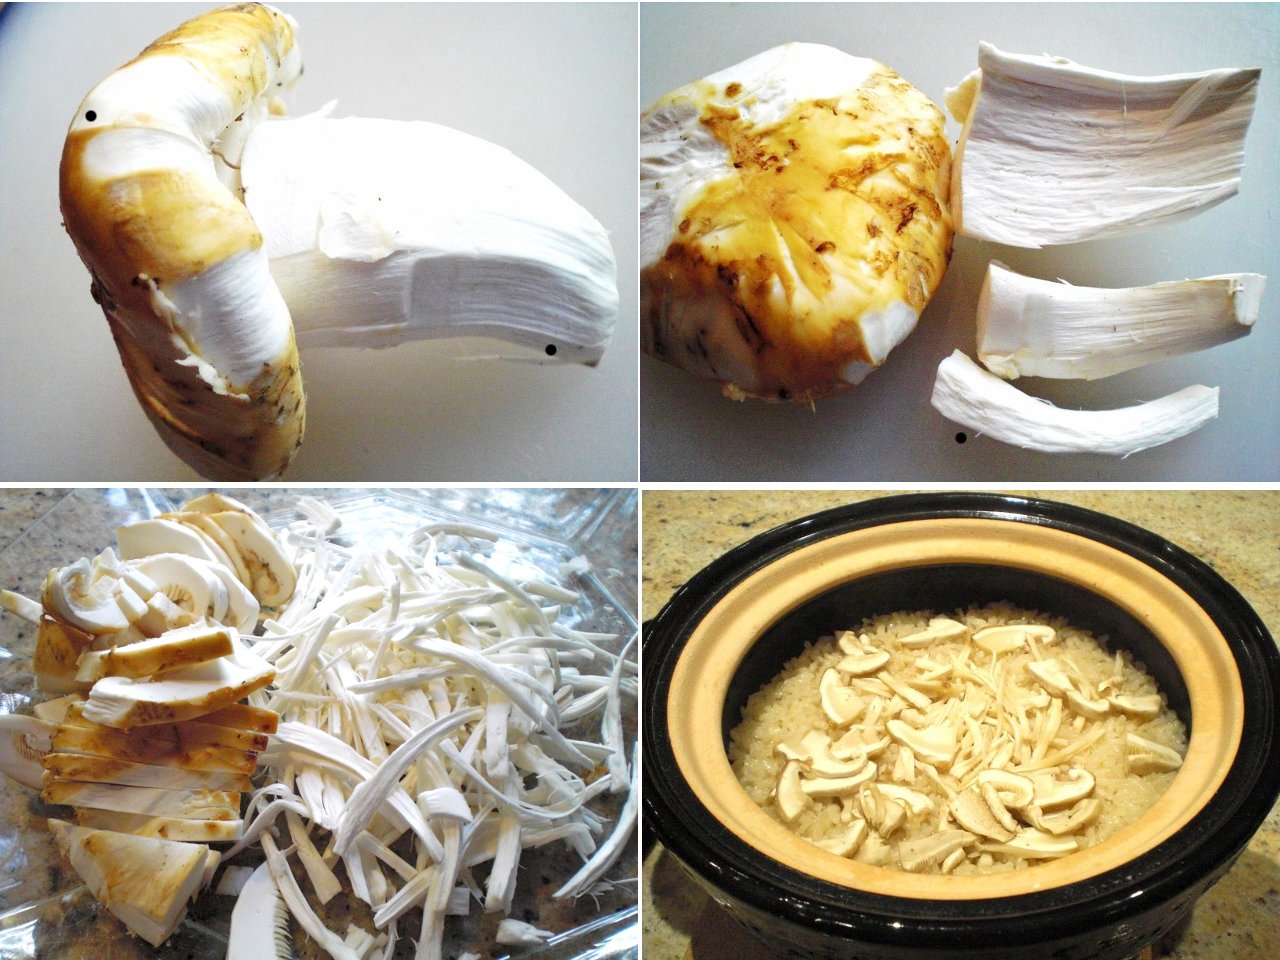
To eat, remove a petal, the edible portion is attached only to the bottom inside of the petal (above image, upper left), dip it in a whatever dip you like (the above image, upper right, is mayonnaise with lemon juice, but you could use melted butter as well) and using your front teeth, scrape off the edible portion (above image, lower left). When you get into the more immature inner petals, not much edible portion is attached. You then remove all the petals exposing the "chokes" (which, I suppose, eventually become the fluffy cottony stuff attached to the seeds to be carried by the wind). As the name implies, you do not want to put these chokes into your mouth. They are not named "chokes" for no reason. The name describes how you will feel if you attempt to eat it--choked. You must carefully remove all the chokes using a knife or spoon or both. You end up with the heart of the artichoke (the above image lower right, this one is already quartered). Actually, this is the meatiest and the best part of the plant. This is what the previous work was all about. The taste of artichokes is difficult to describe. We like it very much but you would have to taste it and decide for yourself.

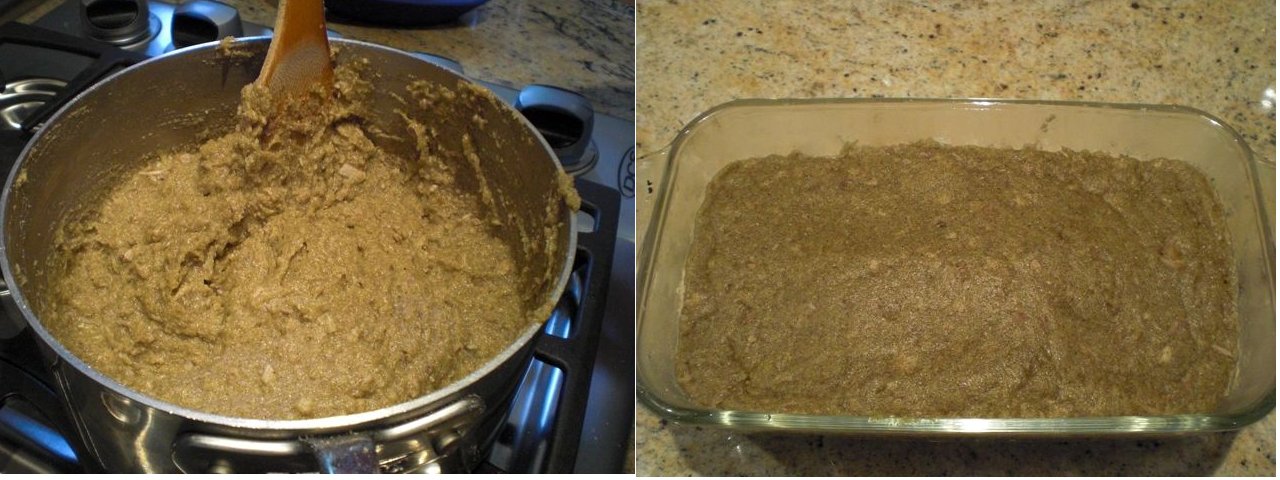
Acorn squash: It is a very popular fall vegetable and my wife cooked it in the traditional American way but seasoned it with a Japanese touch. She cut the squash in half and removed the guts (seeds and inner membranes). She washed it under running water (leaving some water inside). The water puddles under the squash and steams it as it bakes. She then placed them on a flat cooking sheet with the cut-side down. The squash baked in a 350F oven for 45 minutes. She scraped all the meat out of the shells and put it in a bowl. She added butter, honey, and soy sauce (in lieu of salt), mixed well and then stuffed it back into the half shells. This tastes somewhat like mashed sweet potatoes but different. It has a mildly sweet taste yet is savory at the same time. This was a perfect side for the lamb (or more like, the lamb is perfect side for the squash).

Rack of lamb: This was seasoned with salt, pepper, and fresh rosemary. identically seasoned as ones in my previous post but I did not marinate and, instead of an electric grill, I browned it in a frying pan and finished it in an oven (350F 5-8 minutes).

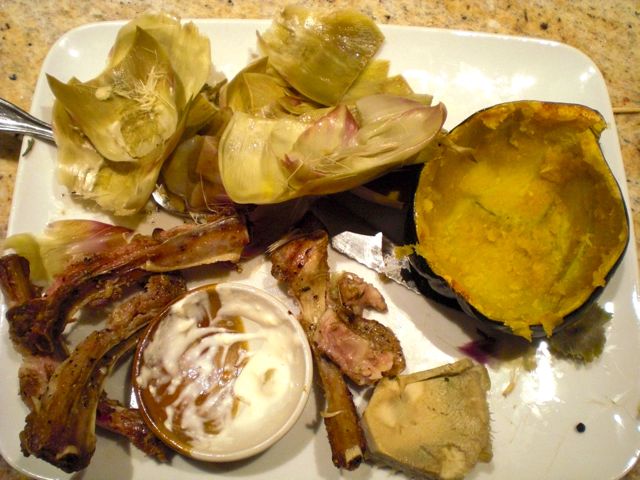
Between the artichoke, squash, and lamb we noticed that this meal resulted in an unusually large amount of debris on the plate by the time we were finished. Doesn't this look the epitome of a good feast thoroughly enjoyed? In case you were wondering, it was.

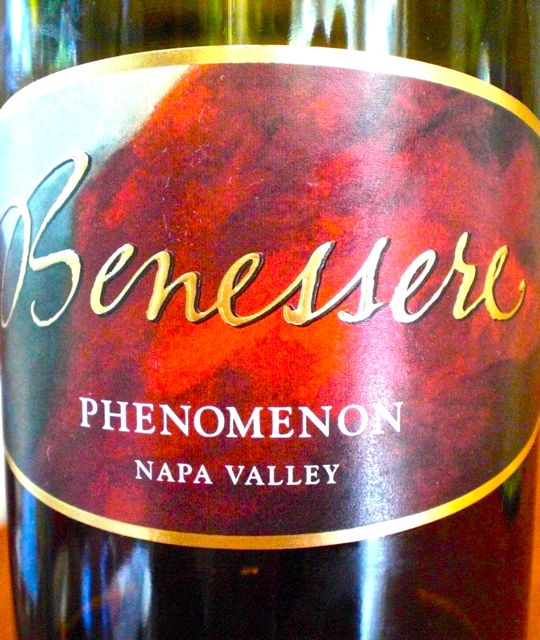
The wine we had this evening was Benessere Vineyards Napa Valley Phenomenon 2005. This is a California red blend Super Tuscan style and made of Cab Sauv (47%), Sangiovese (27%), Merlot (14%) and syrah (12%), all from St. Helena estate-grown fruits. It is not like classic Napa cab with strong vanilla and chocolate but has a more subtle but complex taste. The tannin is now nicely matured giving a nice backbone to this California Super Tuscan. We like this wine very much. It went so well withthe lamb and artichokes. Perfect for tonight dinner.
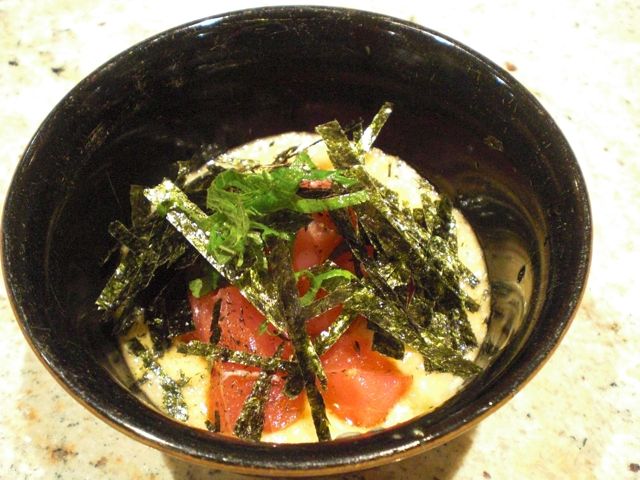
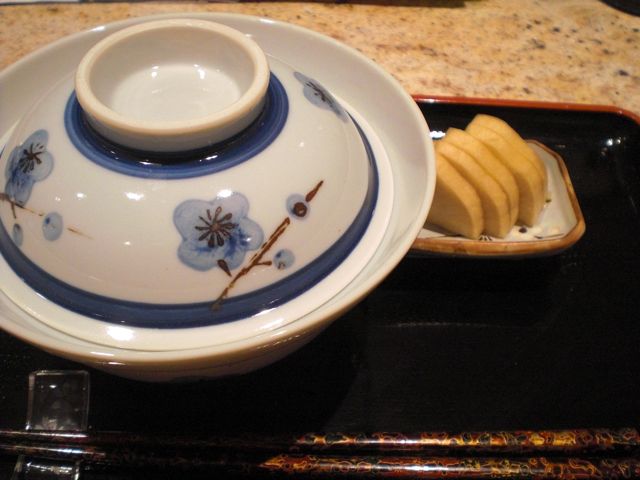
Saturday, October 16, 2010

Perilla seedpod Tsukudani 紫蘇の実の佃煮


Aojiso 青じそ or green perilla is nice to have in your garden, especially if you are making any Japanese dishes as an ingredient as well as a garnish.The only problem is that this plant is like mint and is very prolific. It will reseed and take over the entire garden if you are not careful. When they start blossoming and making seeds, it is one of the signs of autumn for us. As you can see below, our small raised herb garden is dominated by perilla now with its flowers and seedpods.

I have used the flowers and seedpods as a garnish/decoration and seen commercial Tsukudani of shiso seedpods 紫蘇の実の佃煮 but never thought of making it myself until I came across the post from one of the blog I follow (in Japanese). I think the major effort required to make this dish is to remove the seedpods from the stalks.

The image above on the left and center are seedpods attached to the stalk and the right is after separating pods from the stalk. This is a rather time consuming tedious step (My wife helped me). I washed the pods with stalks and let it dry before removing the seedpods. I would have only used mirin, sake and soy sauce for the seasoning like I did with kelp tsukudani, but I followed the recipe from the aforementioned blog and also added rice vinegar (at the very end of the cooking) and umeboshi.

I just poured the seasoning liquid of sake, mirin, and soy sauce (1:1:1) just to barely cover the seed pods and add the meat of two umeboshi 梅干し (pickled plum) cut up and also added their stones. I also added rice vinegar (2 tsp) at the very end. I am not sure how much of the seedpods I had to begin with but probably 3 cups or so. After 20-30 minutes with the lid slightly askew to encourage reduction, the liquid almost all evaporated and the pods become brown with the seeds visible (image below).

It tastes somewhat like any tsukudani (salty soy sauce and molasses-like sweetness) but has a nice popping crunchy texture when you bite down on it (Japanese expression is "puchi puchi" プチプチ). It doesn't have much perilla taste per se but it does have interesting flavors. Certainly, this will be very good to just nibble while drinking cold sake or on hot rice. We actually tried it on potatoes and it was very good. At least, we feel like we reduced the amount of reseeding for the next year.

Wednesday, October 13, 2010

Stewed Pacific saury with Umeboshi さんまの梅煮

I posted sanma previously but I had two more frozen sanma left. I pondered what to make. Since it was a bit dry when grilled, I decided to make stewed sanma.

Here are two remaining sanma thawed (below). The innards are traditionally kept for this dish. Since this was previously frozen, I removed the innards. I cut the fish in three equal size potions.

I washed and soaked the fish in salted cold water for 5 minutes to firm up the meat of the fish and then removed the excess moisture using paper towels (below left). For simmerig liquid, I first soaked two 2-inch long dried kelp pieces in 1 cup of cold water for a few hours. I placed the hydrated kelp pieces in the bottom of the sauce pan (to prevent the fish from sticking to the bottom of the pan). To the remaining broth (the kelp absorbed water, about 2/3 cup remained), I added mirin (2 tbs), sake (2 tbs), soy sauce (2 tbs), and rice vinegar (2 tsp). I also added the shredded meat of umeboshi (two) as well as their stones. Since I had ripe (red) Jalapeno peppers from our herb garden, I halved and seeded them but left the veins on and added them to the simmering liquid for some heat (or use dried red pepper). When it came to a simmer, I placed the fish into the pan. I put on a lid and simmered for 20 minutes and then let it cool in the liquid. Actually, we did not eat this the same day I made it. I put the pan in the refrigerator after it cooled to room temperature. I warmed it up the next day and served at room temperature.

I served it with a very thin julienne of fresh ginger (soaked in water for 10-15 minutes to remove the harshness) called "hari shouga" 針ショウガ and thin strips of scallion cut lengthwise and soaked in water. This preparation of scallion or "negi" is called "shiraga negi"白髪ねぎ or "white hair scallion". Since I did not have a thick Japanese scallion called "Tokyo scallion" in the U.S., it was difficult to make this from a small American green onion.

This was surprisingly good. The mild heat from Jalapeno was very nice. The meat was well seasoned and not dry and also much easier to remove from the bones compared to grilled sanma. For frozen sanma, this method of preparation appears better than grilling.

Tuesday, October 12, 2010

Three dishes with Miso mustard vinegar dressing からし酢みそ和え、三種類

I am not sure this is even worth posting. Here are three variations on the theme of "sumiso ae" 酢みそ和え.

1. Squid legs and crab salad イカのゲソとかにのからし酢みそ和え

I made this when I made crab stuffed squid since I had extra squid legs and crab. Squid legs (called "geso" ゲソ) are briefly boiled in salted water with a splash of sake (for 30 seconds). After cooling, I cut them into bite sized pieces. The crab meat was used as is from the container. American mini-cucumber was washed and rolled on the cutting board with salt (called "itazuri" 板ずり) and washed again and dried with a paper towel. Sliced thinly, salted lightly and let stand for 3-4 minutes and extra moisture squeezed out. Sumiso sauce was made in my usual way but this time I used "Saikyou miso" 西京味噌 with Japanese hot mustard, mirin and rice vinegar. Because of the vinegary taste, sake is the best accompaniment for this dish. Unfortunately, the crab was not the best.

2. Crab meat, semi-dried scallop, and sakuraebi カニ、貝柱、桜えびの酢味噌和え

I made this one when I made the California roll since extra lump crab meat was available. I also used steamed and semi-soft scallop from Hokkaido, cucumber which was dressed with sushi vinegar and dried small red shrimp, sakuraebi 桜えび.

3. Baby octopus, snake-belly-cut cucumber and tomato 子鮹と蛇腹切りのキュウリの酢みそ和え

We happened to find fresh baby octopuses (octopi ?). I marinated and grilled the rest of them but I served this as a starter. I just very breifly boiled the baby octopuses in salted water (30 seconds) and stopped the cooking by plunging them in ice water. I was hoping that the brief cooking would make them less chewy. But this strategy apparently did not work. The dish was sent back to the kitchen by my customer (my wife) with the request that it be cut into bite size pieces because it was hard chew. The over all review, however, once the pieces were made manageable was that the octopuses were very good and fresh. The cucumber was cut in a snake belly or jabara 蛇腹 fashion first and then cut into one inch long segments.

Monday, October 11, 2010

Barbecued Cornish Game Hen 若鶏のバベキュー


This is certainly not Izakaya food but this small young chicken must be rather unique to the U.S. and I decided to post this dish. Exactly what is Cornish game hen is not really clear; whether this is a just young regular chicken or descendants of the original cross breed of Cornish game cocks and Rock hens (from which the name derived) in 1950 or similar cross breed developed later (1965) by Tyson food. But since the vast majority of "Cornish game hens" are supplied by Tyson, whatever cross breed that Tyson may have developed must be what we are eating here. Because of its small size, it is perfect to serve one whole bird per person. In the past I've served these birds instead of a big turkey for such occasions as Thanksgiving. For us, half of the bird is usually enough. We like this small bird since the meat is more tender and juicier than regular chicken, albeit it may not have a strong taste. I have never seen this bird in Japan but, apparently, Tyson brand can be had by mail order in Japan.

This could have been what we served if Jon had visited us along with no-crapple scrapple. The way I barbecue Cornish game hens is near identical to the recipe for regular chicken. I first squeeze the juice from two wedges of lemon inside and out the chicken and generously salt and pepper inside the cavity. I put the lemon wedges (the ones I used for the juice), coarsely chopped onion, crushed and skinned garlic cloves (as many as you like), and finely chopped fresh rosemary in the cavity. (Things have to be cut relatively small to stuff the small cavity of the bird). I truss it. I smear olive oil on the outside of the chicken and again generously coat the skin with salt and black pepper. I hot smoke/barbecue in a Weber kettle using indirect heat. This time I used hickory chips for smoking. I cook until the deepest part of the thigh registers 165-170F. I let it rest for at least 10 minutes.

My wife made mashed potatoes which were quite excellent. We used small (or baby) Yukon gold potatoes. After removing the "eyes" (leaving the skin on), she just wrapped several potatoes together in aluminum foil and put them along side the chickens in the Weber. The chicken took almost 45-50 minutes to cook and during that time, the potatoes were perfectly done. She mashed the potatoes and added salt, pepper, and very, very finely chopped red onion (this adds a nice burst of onion flavor to the bite), and creme fraiche instead of butter. 

I also briefly grilled blanched and oil coated asparagus.

We think this is the best way to cook (hot smoke barbecue) and enjoy a chicken. Cornish game hens are particularly elegant (we think) when the whole bird is served per person. Although I have tried stuffing the cavity with porcini mushroom and grapes, or stuffing the space under the breast skin with herbs/goat cheese mixtures etc, we settled on the current simple method. Of course, you need to use your fingers to eat the bird, at that point, "elegance" is out-the-window.

Our neighbor's small dog has started showing up as an impromptu dinner guest when we have barbecue. Tonight was no exception.

Saturday, October 9, 2010

Grilled "Sanma" Pacific Saury さんまの塩焼き

"Sanma" 秋刀魚 (The kanji letters mean "autumn秋-blade刀-fish魚" indicating the season and the shape of the fish but you can not possibly pronounce these kanji as "sanma"). It is a fish seasonal for autumn in Japan. Historically this fish was considered lowly fare and an inexpensive source of protein for households that couldn't afford anything else. Regardless of its original lowly status, it has a dedicated following because of its rich oiliness and flavor (despite its ubiquitous bones). I was told it is getting expensive especially this year. You will never see it served in expensive restaurants but it is being served in cheap Japanese eateries, Izakaya, and at home.
The historic lowly status of this fish and the hard life of the people who could afford to eat only fish like sanma, is further exemplified in a famous Japanese poem by Haruo Satoh 佐藤春夫 publish around 1922 called "Song of Sanma" or 秋刀魚の歌 (link is in Japanese). One passage of the poem "Sanma nigai ka shoppai ka" 秋刀魚苦いか塩っぱいか "Does sanma taste bitter or salty?" has become a Japanese metaphor for the hardships of "life". As lowly as this fish may have been (not much meat, oily with lots of small bones), it is best eaten simply grilled with soy sauce and grated daikon. This point was well made in one of the classic stories entitled "Meguro-no sanma" 目黒のさんま (sorry, again, this link is in Japanese) from "Rakugo" 落語 the traditional Japanese art of story telling. For those who may not read Japanese here is the story in a nutshell. A lord out on a hunting trip stops at a farmer's house and asks for something to eat. The poor farmer only had the lowly Sanma and although it was something they knew a lord would never eat otherwise they simply grilled it and served it. The lord thought it was great. When he returned home, he wanted to taste it again. His servants went to the best fish market in Nihonbashi 日本橋 (No Tsukiji 築地 market at the time of this story) to get the sanma, carefully steamed it, removed all the little bones and served it in a lacquer ware bowel. After all that preparation the oil and flavor were gone. The lord told his servants this was not the fish he had before. When he found out it came from the best fish market, he declared as a self appointed sanma connoisseur, the best sanma had to come from "Meguro" the inland area where he had eaten it before. (even though Meguro could not possibly have had the best fish). 

In any case, we (regular consumers) can only get frozen sanma here. We had frozen sanma before and I was not impressed since it was dry and not oily enough (fresh seasonal sanma should be very oily; in Japanese parlance "abura ga notte iru" 油がのっている.) I read of Jon eating sanma at one of his Izakaya, which prompted me to try it at home again. For grilling, I do not particularly like to retain the innards (keeping the innards is the more traditional method, in that case, sanma really tastes bitter. I only consider keeping the innards if I stew the fish Japanese style and the fish is fresh). I thawed the sanma and cleaned it (removing head, gills and innards) and lightly salted it. I just grilled it over the charcoal fire.
My wife who refers to this as "torpedo fish" has likened the experience of eating sanma, with all its tiny bones, to the time her tooth brush disintegrated while she was brushing her teeth and all the bristles headed down her throat. So as not to repeat that unique sensation while eating sanma she is very meticulous in how she debones the fish. She did not like the way I was "going at" this sanma so she took over the exercise and deboned the fish very neatly for me. Still you need to be careful of small bones.

This tasted Ok but not as good as I remembered it in Japan. Although I removed the innards, the belly portion of was slightly bitter.

P.S. We stopped by Tako Grill the other evening and Chef Kudo told us that they had fresh sanma. He offered sanma sashimi (I do not think I ever had sanma as sashimi). It tasted like "saba" サバ or mackerel but a bit more gentle tasting, quite oily but absolutely no fishy smell. It was surprisingly good. The head and bones were later served to us simply deep fried (This is called "hone senbei" 骨煎餅 "bone cracker", because of its crunchy crispy texture resembling Japanese crackers or "senbei"). We ate them all except for the very tip of the tail. Since the sashimi was excellent, we had to have grilled sanma. They kept the head but innards were cleaned (which is to our liking). This was by far the best sanma we have eaten. My wife said that after all these years she finally understands what sanma is all about. Only problem is that this is not a lowly cheap fish any longer. It is almost as expensive as Toro.

Thursday, October 7, 2010

Monkfish karaage アンコウの唐揚げ

We used to get monkfish or anglerfish 鮟鱇 tail meat fillet at our nearby fish market but, for some reason, we have not seen it for some time. Since we now occasionally go to a different grocery store to get pasteurized shell eggs, we checked their fish department and found monkfish.

Monkfish is an interesting deep water fish and Japanese eat almost every part of this ugly fish. I posted several Ankimo 鮟肝 or monkfish liver dishes--the liver is the best part of the monkfish. One of the most popular Japanese ways to cook monkfish is as a nabe 鍋 dish called "Ankou nabe" アンコウ鍋 in which the meat, liver, skin and even cartilage are cooked in miso flavored broth with vegetables. This fish has a very firm texture somewhat resembling lobster tail but does not have a strong taste. I used to bake this fish fillet imitating lobster tail by using paprika to give it a red "lobster" color. This time I decided to make a portion of it as "karaage" 唐揚げ. It is very similar to chicken "Tatsuta-age" 竜田揚げ in terms of how this is made.

The fillet has a slimy membrane covering the surface. Although once cooked, it is not too bothersome, it is best to remove most of the membrane. I used my fingers to pinch, pull up, and raise the membrane from the surface and slice it horizontally using a fillet knife. This way you could remove most of it without slicing off too much meat but you can decide if this is worth the effort. I cut the fish meat into bite sized chunks and marinate them for several hours in the refrigerator in a mixture of soy sauce, sake and mirin (2:1:1) with grated ginger. Just before cooking, I drain and pat dry with a paper towel and dredge the pieces in potato starch or "Katakuriko" 片栗粉 shaking off any excess flour. Meanwhile I heat up the peanut oil to about 170C (350F). I deep fry the fish until the surface is set and the meat is done (2-3 minutes depending on the size of the chunks).

Although I served this with green tea salt, it has enough seasoning so just lemon juice was fine. It has a nice crunch on the surface with firm texture and very nice flavor. We restrained ourselves and only enjoyed a small amount.

Tuesday, October 5, 2010

Matsutake rice 松茸ご飯

This is the last installment of Matsutake dishes. Because Japanese consider rice to be the main stay of the meal or "shushoku" 主食, "Takikomi goahnn" 炊き込みご飯 or rice seasoned with other ingredients is something special, especially if seasonal items are incorporated such as mushrooms (especially matsutake 松茸) and chestnuts 栗 in fall and bamboo shoots in spring. As I mentioned earlier, we got 1 Lb of of North American (Oregon) matsutake mushrooms. One of the dishes I made was a type of seasoned rice, "Matustake rice" 松茸ご飯. I made this with only matsutake so as not to cover up the subtle but distinctive aroma and flavor of the mushroom.
Matsutake: Among the matsutake we got, I picked a very large one for this dish (left upper in the image below). After clearing the matsutake as I described before, I separated the stem and the head since this was a large one. I torn the stem in the direction of the fibers (right upper in the image below). I made rather fine shreds of the stem and then halved the head and sliced it (left lower). I doused the pieces with sake and light-colored soy sauce or usukuchi shouyu 薄口醤油 and let it be absorbed for few minutes.
Cooking liquid: I could have used just water but it is better to use a very mild dashi broth and sake to enhance but not cover up the flavor of the matsutake. I soaked 5-7 inches of dried kelp 昆布 in about 500ml of cold water (I used filtered water) and let it stand overnight or, at least, several hours. The kelp will absorb water and assume its original state. It imparts a subtle kelp flavor to the broth. For 360 ml of rice, I used 400ml of the cooking liquid consisting of the kelp broth, 2 tbs of light colored soy sauce and 2 tbs of sake.
Rice: Many people like to add a small amount of glutenous rice (mochigome もち米) but I only used regular short grain Japanese rice from California (a brand called "Kagayaki"). I washed 2 cups (Japanese cups) or 360ml of rice. I washed the rice until the water came out clean not turbid. In the last few washes, I again used filtered water and drained the rice in a fine mesh strainer. I let it sit for 20-30 minutes. This appears to let the rice grains absorb just the right amount of water before cooking.
Cooking rice using an earthenware rice cooker:  I could certainly have used my electric rice cooker but this time I used "Donabe" 土鍋 or earthenware rice cooker called  "Kamado san". You can see the final product (right lower in the above image). When I removed the outer lid (see image below), I could really smell the matsutake. This type of rice cooker has an inner lid and an outer lid which make the pot act somewhat like a pressure cooker. As per the instructions that came with the cooker, I added the washed and drained rice (the original 2 Japanese cups or 360ml) and the cooking liquid (400ml). I placed the pot on a medium flame for 14 minutes and then turned off the heat and let it stand for 20 minutes.
I do not use the donabe cooker that often just because it is a bit of work to clean and dry (especially drying) it after use.  But there is no doubt it produces better cooked rice. The matsutake rice turned out really well with lots of flavor and a nice slightly firm texture-- it was perfect. Usually a special Japanese herb called "mitsuba" 三つ葉 is called for but I did not have any. I used the thinly sliced green part of a scallion instead for garnish. We were not able to finish all the rice, so we put the leftovers into small packages and froze them. We'll let you know how that works out. You should taste this at least once a year.

Sunday, October 3, 2010

Auntie N's no-crapple scrapple with Pennsylvania Dutch sweet coleslaw スクラップルとペンシルバニアダッチコールスロウ

We were expecting a visiting dignitary to come to "Chez Norio" recently, Jon of EOITWJ, but things did not work out and we will have to wait for another chance. In any case, said dignitary is quoted as saying  "Now Scrapple, it's cool because you know it's full of crap, or rather is made of nothing but crap, and that's expected". In response to this statement, I let him know of the existence of Auntie N's no-crapple scrapple. So, we thought it would be most appropriate that our visitor should try her scrapple. Since it is a two-day process to make no-crapple scrapple and weekends are the only time she can do it, I asked my wife to make her specialty before we learned that our visitor could not make it. Actually, she made the best scrapple ever.

We had this as a part of an eclectic series of small dishes for the evening (mostly leftover from the weekend). The other small dishes included Yakitori-style drummetts and wings, and stewed daikon, pork spare rib (left over from the scrapple making) with the addition of tofu and broccoli. Since I had only a small amount of tofu left after the daikon, pork spare rib, tofu and broccoli dish, I made it as tofu dengaku (in a toaster oven) to use it all up. I served it with the scrapple and Pennsylvania Dutch sweet coleslaw (it may look too eclectic but, at least, it has about the same dimensions as the scrapple) as shown below.
This was the best scrapple ever! Nice mix of spices and porky flavor. Jon, you missed a good one. But don't worry there is more where that came from.
Look at this lovely mud/sewer water color. The addition of buckwheat flour really added flavors and made the color authentic but since this is no-crapple scrapple, no mystery meat or crap is in this one.

Friday, October 1, 2010

Shrimp boil at Hilton Head Island ヒルトンヘッド島での茹で海老

We stayed on Hilton Head island in South Carolina for one week for our vacation. Numerous shrimp boats were visible in the coastal waters. Sometimes, they came very close to shore during the day. At night, they tended to stay off shore with their lights visible beacons on the horizon.


On a previous visit several years ago I saw they were having a special on local white shrimp at the grocery store. I put two and two together figuring that with all these shrimp boats around, the shrimp should be pretty good. I suggested we buy a pound and my wife who had experienced only previously frozen shrimp in the grocery store at home suggest a 1/4 pound.  We settled on 1/2 pound. We cooked them up and discovered one of the absolute delights of the region. The shrimp were very, very fresh, very sweet, tender and succulent--we had never tasted anything like it before. We were hooked. We now buy them by the pounds. They became a culinary focus of our visits to the island. 
The best way to eat this fresh shrimp is to simply boil them in salted water with the shells on. I sometimes de-vein the shrimp (without taking the shells off) but other times, I do not. The secret to de-veining shrimp without removing the shell is to use a serrated small knife to cut into the back side of the shrimp through the shell. If I see a dark vein (intestine, actually), I take it out. To boil the shrimp, I use just enough salted water to cover them. After the water comes to the boil, I put the shrimp in and cook them for 1 minute or less. I sometimes make a separate dipping sauce but I usually just pour melted butter over the cooked shrimp, add more salt if needed, and freshly squeezed lemon juice. Just shell the shrimp and eat.This is such a good dish because the basic ingredient is so fresh and special it shines even with the simplest preparation. This is also a classic American finger food, "Peel 'n Eat shrimp". For example local bars along the beach have "shrimp by the bucket" specials. It's great fun to sit in the sun, next to the beach peeling and eating shrimp. The shrimp makes this a particularly wonderful appetizer or, in our case, even dinner with a good Ciabata bread from a local market. We use the bread to soak up the juices that gather in the bottom of the bowl. Beer or white wine, such as Sauvignon blanc, are the usual pairings but we stuck with a red wine, Orin-Swift Papillon 2007. This came in the heaviest body builder bottle for 750ml that I have ever known. It was overpriced in the local wine store to boot but it is a big wonderful red.