Sunday, December 31, 2023

Classic Pumpernickel Bread 伝統的パンパニッケル パン

We used to get Pumpernickel boule at Whole Foods. We used it for certain sandwiches such as beef tongue and Lebanon Bologna. We did not see Pumpernickel boule or Russian rye bread at Whole Foods for some time and my wife asked if they had any. The answer was that they are not making them any more.  When we asked, “Why” they didn’t give us an answer.  (Subsequently, we went to two other of our local grocery stores and found they didn’t have any rye breads either). So since we had recently gotten pumpernickel flour from King Arthur we resorted to making pumpernickel bread ourselves. This time I volunteered. It was by far the most convoluted bread I’ve ever made. The recipe also came from King Arthur and is titled as “classic” Pumpernickel. The recipe also warned that this bread was dense and suggested slicing it thinly. I decided to make this as a baseline. Indeed this is dense but very flavorful bread.


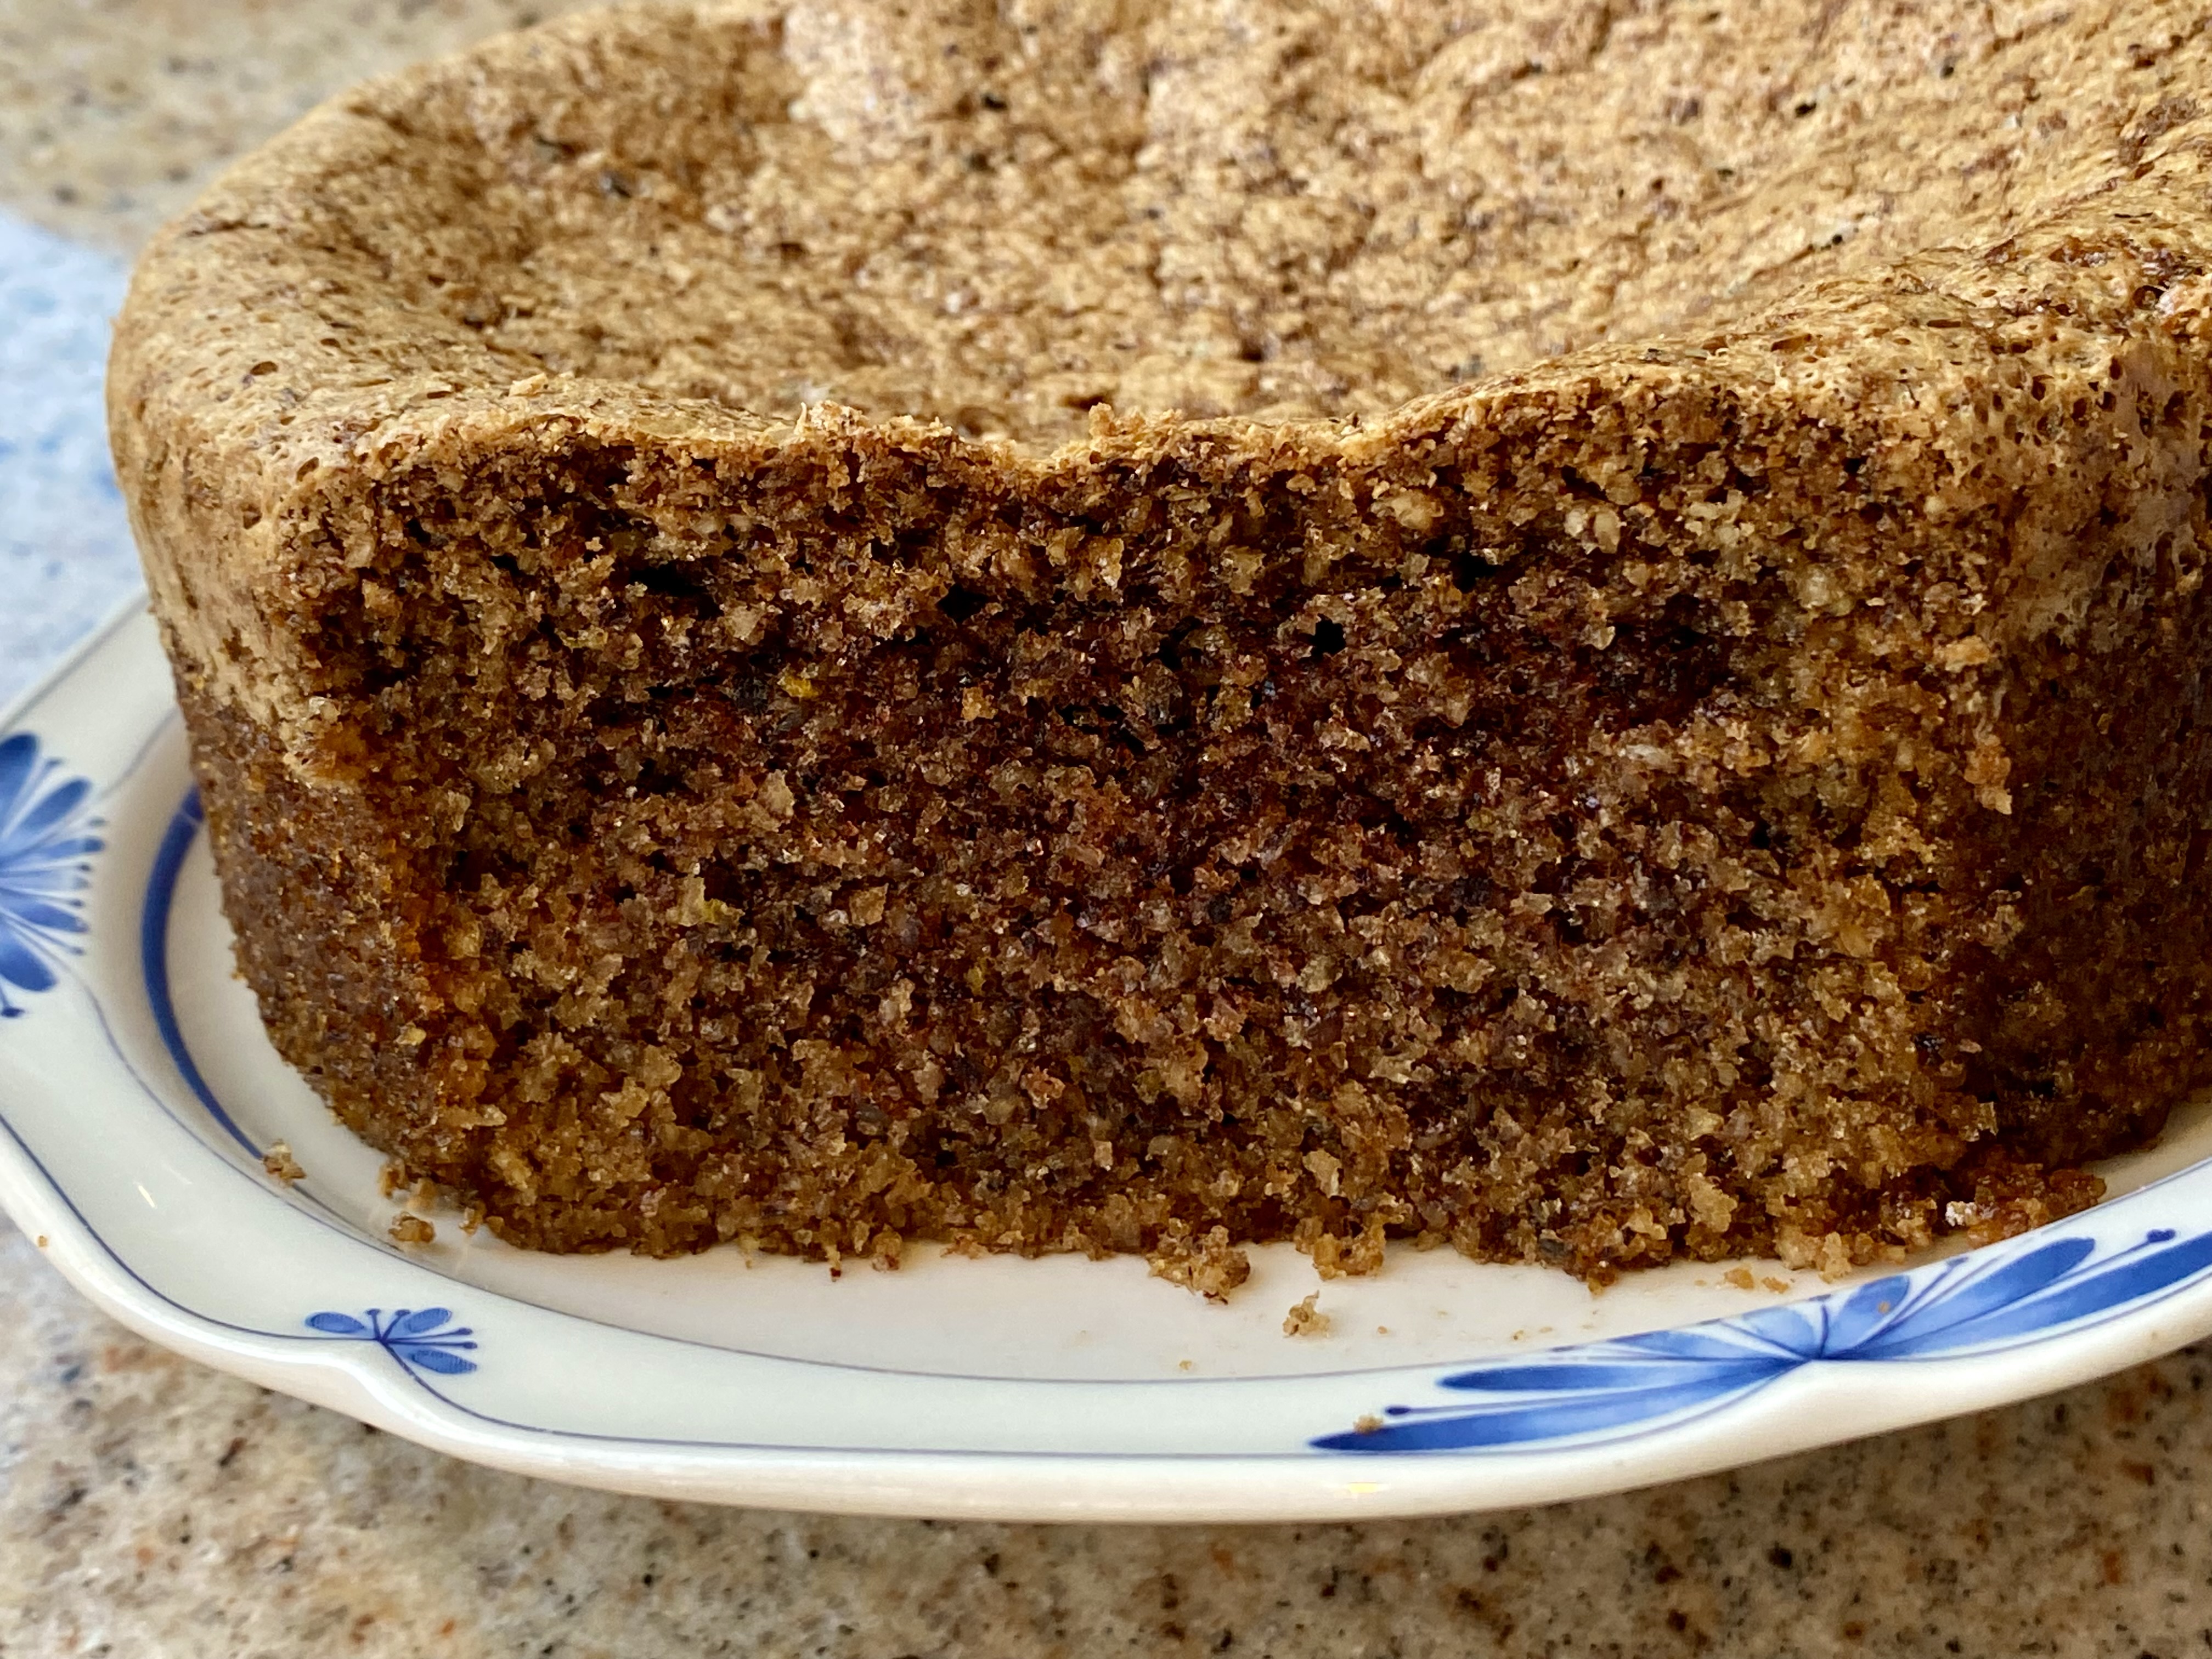
Next day when the loaf was completely cooled, I sliced it. It is very dense. As you can see below. I sliced it thinly and tasted. It has lots of flavors and the inside is moist.


The recipe is from King Authur. I followed the recipe weighing the ingredients. Exception was  mashed potato. Since we found that all our potatoes were sprouted, we used Japanese sweet potato instead. Some of the instructions appear to be missing the details. Maybe this recipe was meant for an experienced baker. (With common baker’s knowledge-CBK- I added a few extra steps and details in notes to myself).

Ingredients
1 1/2 cups (340g) water
1/2 cup (71g) yellow cornmeal
1/4 cup (85g) molasses
1 tablespoon butter
1 1/2 teaspoons (9g) table salt
2 teaspoons granulated sugar
2 teaspoons caraway seeds
1 tablespoon unsweetened cocoa, Dutch-process 
2 1/2 teaspoons instant yeast
3 cups (319g) King Arthur Organic Pumpernickel Flour
1 cup (113g) King Arthur Whole Wheat Flour
1 cup (170g) cooked, mashed potatoes

Instructions 
Combine 1 cup of water (the other 1/2 cup was supposed to be used to proof the yeast) * with the cornmeal in a saucepan and cook over low heat until thick, stirring often (about 5 minutes). Remove the pan from heat and add the molasses, butter, salt, sugar, caraway seeds and cocoa powder. Stir to combine and set aside to cool to lukewarm.

*I missed this instruction and used all 1 1/2 cups (or 340 grams) of water for making the cornmeal mixture but since we used “instant yeast” which does not require proofing, this worked out fine.

Add the cornmeal/molasses mixture and mashed potatoes in the bowl of standing mixer fitted with a dough hook.  Stir in the pumpernickel and whole wheat flours. Mix and knead the dough at medium speed for 10 minutes.

*To make the dough ball cling to the dough hook, I had to stop the mixer and push the dough toward the hook a few times and I also added a small amount of additional water.

Transfer the dough to a floured kneading board, quickly knead and make a ball (sticky but very dense dough). Transfer to a greased bowl, turn the dough ball to coat all surfaces. Cover the bowl, place in a 85Felectric proofing box. Let rise until the dough is not quite doubled; about 1 hour.

Shape the dough into a loaf and place in a greased (used butter) 8 1/2" x 4 1/2" loaf pan.

*Although no second rising was suggested, based on (CBK) I did place the loaf pan back in the proofing box and let it rise for 40 minutes (I am not sure this made any difference).

Slash the top*.

*As per instruction I did this but totally not needed. Only time this may make sense is for a decorative purpose after flouring the top of the loaf

Bake in a preheated 360 F oven* for 55 to 65 minutes, until the center measures 200°F when measured with an instant-read thermometer.

*Since I used my convection oven, again based on CBK, I reduced the temperature from the suggested 375F.

Remove from the oven, tip out of the pan, and cool on a rack completely before slicing.

As mentioned, this is a very dense bread but the inside is moist and very flavorful. Thinly sliced and cut into smaller squares, this may be good for making canapé but may not be appropriate to make a full sandwiches. Nonetheless it was extremely flavorful lightly micro-waved to warm it slightly for breakfast. We saw another recipe at the King Authur site called “Pumpernickel boule”. This may be very similar to what we used to get from Whole Foods. We (either my wife or I) will try this recipe next.

Friday, December 29, 2023

Tahini- Miso Cookies タヒニと味噌クッキー

As we mentioned before we are big fans of “savory” cookies which will go well with wine rather than as a dessert. My wife has made a few in this category before. Recently she I found her searching for savory cookie recipes. During this search, she came across “Tahini-Miso cookies” at a website called “kitchen stories”. Since we had tahini and miso, it was a “no brainer” to try making these. This recipe uses a lot of white sesame seeds. Good thing I just got a large jar of white sesame from Weee.  The cookies are great with a taste of saltiness from the miso and nuttiness from the tahini and sesame seed coating the surface of the cookies.


I will ask my wife for how this was made.

Ingredients (shown in the picture below)
225 g flour
¾ tsp baking soda
½ tsp baking powder
115 g butter (room temperature)
220 g brown sugar
100 g sugar
80 g white miso paste
80 g tahini
1  egg
1½ tsp vanilla extract
100 g sesame seeds


Directions:
Add flour, baking soda, and baking powder a bowl and mix to combine, then set aside. Add butter, brown sugar, and sugar to a separate bowl and beat with a hand mixer until very light and fluffy, approx. 5 min.

Add miso and tahini to the butter-sugar mixture and mix until combined. Scrape down the sides of the bowl and mix again. Add egg and vanilla and mix just to combine, then add some of the flour mixture and mix in on low speed. Add remaining flour and mix just until combined.

Add sesame seeds to a bowl. Use an ice cream scooper to scoop some of the cookie dough, then add to the bowl of sesame seeds and cover the ball with the sesame. Transfer to a parchment-lined baking sheet. Repeat until all the cookie dough is gone, (first picture below). Then cover the baking sheet with plastic wrap and chill dough for at least 2 hours, or overnight.

Preheat oven to 350F. Remove some cookies from the baking sheet so there’s enough room for them to spread out while baking. Bake the cookies for approx. 8 min., then use a fork to gently flatten them a bit. Continue baking for 8 - 10 more mins. Let cool completely.


I did not remove any of the cookie dough from the baking sheet as advised in the instructions. They seemed evenly spaced even if they spread a bit. In addition, the instructions said to flatten them with a fork half way through which implied they needed that additional step to spread at all. I tried flattening them as instructed but it was a complete waste because the soft dough just stuck to the tines of the fork making a mess of the cookie so I stopped and just put them back in the oven to finish cooking. At the correct time I opened the oven door and…SURPRISE! The cookies had flattened into an almost solid mass as shown in the picture below; completely unexpected. (Why in the world did the original recipe require flattening them during cooking when they would do this on their own?)


Nonetheless I was able to break them apart into irregular cookie like shapes. Despite the shapes they tasted pretty good. These were not really savory cookies but they also were not as sweet as a desert cookie. They had a slightly chewy texture and deep rich flavor from the miso and tahini. The sesame added an additional nuttiness but they tended to continually fall off the cookie creating a bit of a crumby mess. I’m not sure I will use them next time.

Tuesday, December 26, 2023

Blue Cheese Walnut Cookies ブルーチーズと胡桃のクッキー

This is an additional installment in the continuing tale of “we are big fans of “savory” cookies which go well with wine.” My wife saw this recipe for “blue cheese walnut cookies” in the Washington Post website and decided she had to make it. We used Cambozola cheese which is a mild blue cheese; sort of a cross between blue (Gorgonzola) and Camembert cheeses. The cheese tastes better than it smells and while the cookies were baking in the oven, the entire house was filled with the smell of the cooking cheese which was not totally pleasant. In any case, the end result is worth it. The cookie is a bit crumbly with a mild cheesy and walnut flavor.


I ask my wife to take over.

Ingredients
3 1/2 ounces good-quality, mild blue cheese (we used Cambozola cheese)
3 tablespoons unsalted butter, at room temperature
1/2 cup flour
1/4 cup cornstarch
1/4 teaspoon coarse salt
1/8 teaspoon freshly ground black pepper (we used cayenne pepper)
1/3 cup walnuts, finely chopped

Directions
Preheat the oven to 325 degrees. Line a baking sheet with parchment paper. Combine the flour, cornstarch, salt and pepper in a bowl and set aside.Combine the blue cheese and butter in the bowl of a food processor; pulse until thoroughly blended. We also added the walnuts to the mixture in the food processor and pulsed until they were cut up too. According to the instructions at this point we were to add the flour, cornstarch, salt and pepper into the cheese mixture and mix until a moist dough was formed. Since the food processor we were using was pretty small, we transferred the contents of the food processor to the bowl of dry ingredients to make the dough. Gather up the dough into a flat disk. Roll out the dough to a thickness of 1/4 inch. Use 2-inch cookie cutters to cut out shapes (We just cut the dough into 1 inch squares using a knife).

Transfer to the baking sheet, spacing the cookies 1 inch apart. Bake for 12 to 14 minutes until lightly golden on the edges. Transfer to a wire rack to cool completely before serving or storing.

As I mentioned earlier blue cheese cooking in the oven is not a pleasant smell. We were a little afraid of what the cookie would taste like after smelling it cook. (Not only did it smell bad but the smell permeated the entire house). Luckily the cookie tastes much better than it smelled. Initially the cheese taste was s bit strong but over time it mellowed into a tangy flavor that went very well with the included walnuts and above all goes well with the red wine we were having.

Saturday, December 23, 2023

Arancini and Mini-Scotch Egg アランチーニとミニスコッチエッグ

My wife ordered some small appetizers from Harry and David. We were already going to order dried fruit medley from them to make fruit cakes and bread. So she added an assortment of small frozen appetizers to the order which included “arancini” among the other items. I told her that arancini is typically made from left-over risotto and I could make it very easily as long as we had left-over risotto. We tried the arancini we had ordered. During the heating, the cheese came out and it was ok but not great. Since we had made shiitake risotto a few days earlier, my wife took me up on my boast about how easily I could make arancini as long as we had left-over risotto and challenged me to make some. So with my feet accordingly held to the fire by this challenge I made arancini from the risotto. Since I would need hot oil for frying to make the arancini, I decided to also make mini-Scotch eggs from quail eggs and ground chicken. The picture below is not a great presentation—the arancini with the melted mozzarella in the center is shown on the left and the scotch egg with the quail egg in the center is shown on the right. We ate this immediately hot out of the oil with some Tonkatus sauce. Both the arancini and Scotch eggs had fresh shiitake in them and both were great.  The arancini had the melted mozzarella cheese in the center, a crunchy outer shell and soft risotto with a strong shiitake flavor.


For arancini

Ingredients: (made 8 arancini as seen below, the round ones are arancini and oval ones are mini-Scotch eggs)
Shiitake risotto (left-over) about 2 cups
Mozzarella cheese, 10 small cubes, low-moisture
Flour, egg, and Panko bread crumbs for breading
Oil for deep frying (I used peanut oil)

Directions:
Moisten your hands and make a ball about 1 and half inches in diameter and insert the cheese and encase it completely. If needed lightly squeeze to make sure the cheese is completely encased.
Bread the balls as usual; first coat with flour, then egg water and then with Panko bread crumbs (see picture below).


Deep fry in 180C (350F) oil for 2-3 minutes or until the surface is golden (everything is already cooked inside). See below picture.


The arancini I made were great straight out of the hot oil but they also warmed up nicely in the toaster oven. I would say the ones I made were much better than the store-bought and accordingly my wife has conceded that I met her challenge and has now commissioned me to make arancini whenever we have left over risotto.

Wednesday, December 20, 2023

Beef Barley Soup 牛肉と大麦のスープ

We really like beef tongue which is not popular in general, not widely available in US and requires some “courage” to try it. But we like it very much either boiled and sliced for a sandwich or made into stew.  Recently, we found that our Asian grocery delivery service “Weee” had frozen beef tongue so we got it.  My wife suggested to have it instead of the usual turkey for Thanksgiving. So, we thawed the tongue and cook it up. For the dinner we had thick slices of boiled beef tongue, which were extremely tender and flavorful, with red wine cranberry sauce I made and a side of stuffing balls made by my wife, and blacked Brussel sprouts. This really “hit the spot” and as far as we are concerned is much better than ham or turkey for sure. Using the remaining beef tongue and the liquid in which the tongue was cooked, we made beef tongue stew which we really enjoyed. Still half of the boiling liquid remained which has the nice flavors of the beef and aromatics. So we decided to make “Beef and barley soup” from it. We made this soup/stew with meat from a beef chuck roast. It turned out to be an excellent soup. We looked at a few recipe on line but, at the end, we just made it our own way (not standard way) and this post is just for our own record.


The chunks of the beef were very tender and the barley gave the soup a nice unctuous texture.


We ended up with a quite large amount of soup, probably a bit over 3quarts (or 12 cups).

Ingredients:
2.3 lb package of bone-less chuck roast, seasoned with salt and pepper, seared on both sides and then cut into about 1 inch cubes
4 cups liquid from cooking the beef tongue (the liquid)
3 cups chicken broth
1/2 box (8oz) medium pearled barley, toasted in the toaster oven, rinsed and then cooked in the 4 cups of liquid from cooking beef tongue for 1 hour
2 large carrots, peeled and cut into half inch cubes
2 onions, cut into large dices
3 ribs of celery, cunt into 1/4 inch thick
2 bay leaves
salt and pepper to taste
2-3 tbs vegetable oil

Directions:
Add one cup of the liquid and cubes of the beef in Instant pot, cook for 25 minutes under high pressure and naturally depressurize (we used 2/3 for the soup and 1/3 was added to the tongue stew to supplement the tongue)*
Add the oil in the dutch oven on medium flame. Add the onion and celery and sauté for 5 minutes, add the carrots. Add the cooked beef and barley with their juice. Add 3 cups of chicken broth, the bay leaves and cook for 30-40 minutes
Season with salt pepper to taste

*We cooked the beef one day prior. Placed the liquid and meat in a plastic container and refrigerated. Next day, we removed layers of congealed fat from the surface before using the meat and juice.

This is a very hearty and filling soup. The barley adds a creamy texture and a slight nuttiness from being toasted. The combination of broth used to cook the tongue and the broth used to cook the supplementary beef adds an unctuous and very meaty flavor. Another great soup for lunch on a cold winter’s day.

Sunday, December 17, 2023

Burdock Root and Mushrooms 牛蒡とキノコの煮物

This is another dish I made to use up the mushrooms (Shimeji and shiitake しめじ、椎茸). I also had “gobou” 牛蒡  burdock root. I got the idea of cooking burdock root and mushroom together from a recipe I saw on line but I just made it in my own way. Burdock root can be very fibrous but this was a good one and the the combination of simmered burdock root and mushrooms worked very well. The shimeji was good but the shiitake caps worked well imparting very meaty texture and nice flavor.


The gobou gave a very distinctive flavor and nice crunchy texture but not fibrous. I seasoned it on the light and slightly sweeter side (than I usually do) and is a perfect drinking snack. As a side dish for rice, I would season it more strongly.


Ingredients: (The amount is arbitrary, I just used up all the mushrooms I had left)
10 inch long, medium-sized (diameter wise) “gobou” burdock root, skin scraped off using the back. of the knife, slice on angle 1/4 inch thick and immediately soak in acidulated water for 5- 10 minutes.
I package (100 gram) of shimeji mushrooms
4 caps of fresh shiitake mushrooms, quartered
300-400 ml Japanese dashi broth
2 Tbs. mirin
3 tbs x4 concentrated Japanese noodle sauce (or soy sauce with 1 tbs mirin)

Directions:
Drain the gobou and cook in a fresh water for 10 minutes and drain again
In a pan on medium low flame, add the broth, seasonings, the gobou, mushrooms and with a silicon otoshibuta, simmer for 20-30 minutes
Let it cool to the room temperature in the simmering broth
Serve at room temperature or warmed in a microwave oven especially after the refrigeration.

This is quite a robust dish. The mushrooms give it an almost meaty context. Especially the shitake mushroom which were very thick but tender and well seasoned. They tasted like a tender piece of meat. The burdock root was very tender and its distinctive flavor really came through. This is perfect for a cold evening with a warm cup sake.

Thursday, December 14, 2023

Butter Swim Biscuit バターに泳ぐビスケット

Previously my wife made butter dip biscuit which may not be good for you but certainly tasted “good”. So when she saw the recipe in the Washington Post called “Butter swim biscuit”,  she had to try it. Is “swimming” in butter better than “dipping” in butter??? They are both basically a form of oven fried bread although butter “swimming” does it on steroids. “swimming” in butter has a soft, moist (absorbing the butter) pleasingly almost spongey center. The bottom and top are very crispy.


In this close-up of the cut surface, you could appreciated fluffy texture.


As usual, I will ask my wife to take over.

Ingredients
8 tablespoons (1 stick/113 grams) unsalted butter
2 3/4 cups (345 grams) all-purpose flour
4 teaspoons baking powder
1 tablespoon granulated sugar (or more for a sweeter biscuit. I added two Tsp.)
2 teaspoons salt 
2 cups (480 milliliters) well-shaken whole buttermilk

Directions
Position a rack in the middle of the oven and preheat to 450 degrees. Add the butter to a 9-inch square baking dish or cast iron frying pan and place in the oven while it preheats. (We did not have a 9-inch square baking dish so we used a 10 inch cast iron frying pan instead.) (If the oven is very slow to heat up, wait a few minutes to put in the baking dish so the butter doesn’t burn. Just keep an eye on it as it melts.)

In a large bowl, whisk together the flour, baking powder, sugar and salt until combined. Add the buttermilk and stir gently with a spatula just until combined. Do not overmix.

Remove the hot baking dish from the oven and gently pour the batter over the melted butter. Use a knife or offset spatula to spread the batter evenly in the dish (see picture below).

Quickly and confidently, use a knife to “cut” the dough into 9 squares. If the lines close up, go back and take another pass through, though you shouldn’t expect them to remain completely distinct. It can help to wipe or rinse off the knife in between cuts.


Bake for 20 to 25 minutes, rotating the pan halfway through, or until the tops of the biscuits are golden brown and the edges crisp. Following your scored lines, cut and serve.


As can be seen in the pictures above this bread is truly swimming in butter. It would be helpful if there was some way to turn it over half way through cooking because the bottom became almost too high done while the top was not yet brown. Although it is made with a few simple ingredients the flavor is fairly complex. The sweetness of the sugar combines with the taste of the butter, some of which gets browned and there is the pervasive undertone of the sharp taste of the buttermilk. In my humble opinion, both are good but “swimming in butter” is better. My wife said this one is easier to make

Sunday, December 10, 2023

Eggplant, Avocado and Nagaimo Gratin ナスとアボカドの長芋グラタン

I made this dish for lunch one day from what we had on hand and what we need to finish before it went bad. I just winged it without any particular recipe. As a result I was not sure how it would come out but it was certainly edible and quite interesting (in a good way).


The main items are Asian eggplant, avocado and grated nagaimo mixed with an egg (in leu of Béchamel sauce). I also added tomato and shiitake mushroom sautéed with shallot, just because I had them.


Ingredients:
One Asian eggplant (pale purple and long), cut into a bite size by cutting at 45 degree angle as I turned the egg plant (“Rangiri” 乱切り)
One avocado, cut into a bite size pieces similar to the eggplant (I only had half of a leftover avocado).
Nagaimo, about 200grams, peeled and grated
One large egg
3 skinned Campari tomatoes, seeds removed and cut into small cubes
1 tbs of chopped shiitake mushroom and shallot sautéed in olive oil (I made this few says ago mostly from the stems of the shiitake mushrooms)
Cheeses (I used sharp cheddar and parmesan but any melting cheese will do), the amount is arbitrary
2-3 tbs olive oil

Directions:
Sauté the eggplant in 2 tbs of olive oil the skin side down first then brown all other sides (4-5 minutes)
Place the eggplant and the avocado in the bottom of a small Pyrex baking dish.  Add the remaining 1tbs olive oil.
Mix the grated nagaimo and the egg and pour over (see below)


Top with the mushroom mixture, the tomatoes, and the  cheeses and bake for 30 minutes at 350F (I used the toaster oven in convection mode) (see below).


Let it stand for 5 minutes and serve (the first picture).

I was not sure the grated nagaimo and egg ratio but it came out ok. This is a sort of healthy Béchamel sauce substitute. The eggplant and avocado went well together. The next day, we placed the remaining dish in smaller individual ramekins and added a bit more cheese and toasted it in the highest setting. It heated up very nicely.

Thursday, December 7, 2023

Electric Sake Warmer 電気酒燗器

We usually drink sake cold. For drinking sake cold, we like a crisp, clean, and fruity flavor profile of daiginjo 大吟醸. Some junmai 純米 and junmai ginjo 純米吟醸 sakes also have this flavor profile. Our house sake, curretly, is “Tengumai 50 Junmai Daiginjo” 天狗舞純米大吟醸. We enjoy it cold and it has a nice clean, dry,  crisp, and fruity flavor. Now, not going into the details, somehow, by mistake (not mine), we ended up with a case of “Tengumai yamahai-shikomi junmai”天狗舞山廃仕込純米 instead of our favored house sake.  As I mentioned previously this sake has a more savory, yeasty and mushroomy flavor when tasted cold or at room temperature. Then I read that this sake changes its flavor profile if heated. Almost in desperation, we tried it warm (at 120F or “Atsu-kan” 熱燗). We were pleasantly surprised that the flavor profile changed completely and became smooth and mild. We thought “Ah-Ha” the secret is that this sake should be consumed warm which would be particularly appropriate during the winter months when we have dishes like hot pot “nabe” 鍋 dishes, “sukiyaki“ すき焼き, or  “oden” おでん. But the main reason we rarely drink sake warm is that one additional step of warming it up and the difficulty of maintaining the temperature while enjoying it warm.  So, we decided to splurge on an electric sake warmer 電気酒燗器.


We bought it at Amazon but it came from a seller in Japan. The sake warmer sits on top of the heating unit. The server holds about 240ml (1号半). It heats up to the specified temperature in10-15 minutes. The temperature control is continuous (not discreet steps) and ranges from about 35C to 60C (95F to 140F). Using my digital thermometer and water, the actual temperatures are higher (by about 5-10F) than it indicated. We usually like “Atsu- kan” *.

*ranges of warm sake temperature
“Jouon” 常温, room temperature 20℃ (68F)
”Hinata kan” 日向燗 sunny side 30℃ (86F)
”Hitohada kan” 人肌燗 skin temperature 35℃ (95F)
”Nuru kan” ぬる燗 luke warm 40℃ (104F)
”Jou kan” 上燗 warm 45℃ (113F)
”Atsu kan” 熱燗 hot 50℃ (122F)

The sake warmer works extremely well. We can have it sitting next to us and as we are enjoying the warm sake, we can add more sake to the server. By the time we are ready for the next serving, the sake has reached the proper temperature. The only challenge is to warm up enough but not too much sake and to consume it at just the peak of time it has been warming. This is because any leftover sake once heated will not be good the next day for example. Also,warming up the sake and keeping it warm more than 1 hour is not good either. In any case, this was a great improvement break through.  We are glad that we can now enjoy Tengumai junmai sake this way. So the mistake which had us end up with a case of tengumai-junmai instead of our favored house sake was indeed a “blessing in disguise”. It introduced us to a sake variation which we now enjoy but would never otherwise thought of trying.

Sunday, December 3, 2023

Hazelnut Olive Oil Cake ヘーゼルナッツ、オリーブオイルケーキ

The other day, while we were grocery shopping at Whole Foods, my wife came back with “Hazelnut meal” and “Coconut flour”. She was obviously very curious about these fancy flours; specifically, what were they used for and what did they taste like? It appears that these nuts meal/flours are mostly used for gluten free (GF) cakes and cookies. In any case, she looked for recipes using that used hazelnut meal and found  this hazelnut olive oil cake recipe. This is a very moist cake with a distinctive hazelnut flavor and also slight olive oil flavor. We really like it and the flavors got better with time.


The cross section shows very moist and succulent interior.


This gluten-free and daily-free (GF, DF) recipe came from an on-line site called the recipetineats. I will ask my wife to take over.

Ingredients
150g / 5oz hazelnut meal (1 3/4 cups firmly packed) (almond meal can be substituted)
1/2 tsp baking soda sifted
Zest of 1 lemon, finely grated (about 2 teaspoons or so)
Pinch of salt
1/2 cup + 1 1/2 tbsp extra-virgin olive oil (medium quality is OK)
1 cup sugar
3 large eggs , at room temperature
2 tsp vanilla extract

Directions
Preheat oven to 340°F. Grease a 20 cm/8" springform pan with olive oil then line with baking paper (parchment paper), then grease the paper. In a medium bowl, mix the hazelnut meal, baking soda, lemon and salt. In a large bowl, beat the olive oil, eggs and sugar for 2 to 3 minutes on speed 7 or 8 until it becomes pale and thick (like pouring cream or runny mayonnaise). Add vanilla and beat on speed one for 10 seconds. Add the Dry ingredients and mix in gently using a rubber spatula. Pour the batter into the prepared pan and bake for 45 minutes. It will puff up dramatically in the oven but it collapses as it cools. Remove from the oven and allow the cake to fully cool in the pan before releasing from the springform pan. This is a rustic cake that has higher edges and a flatter centre.

This cake is very moist and has a lovely slightly sweet nutty hazelnut flavor with a background flavor of olive oil. The olive oil adds to rather than overwhelms the overall experience. Interestingly, although this cake was very good right out of the pan it got better and better with time. The flavors melded together and got richer. This went very well with a morning cappuccino.