Thursday, March 31, 2011

Burdock "gobo" beef roll 牛蒡の牛肉巻き

When I made sukiyaki 鋤焼, I used a portion of the sukiyaki beef to make this dish. This type of roll is very common in Japanese cooking and they are popular in izakaya as well as side dishes in a bento box. This time I used gobo and carrot in the center and seasoned it in a teriyaki style.  I could have used asparagus, green beans, scallion (famous "negimaki" 葱巻き) or other vegetables by themselves or in combination. This dish can also be made with chicken or pork as well (pound it thin). Other options are to season it with a miso-based sauce or breading it to deep fry. My version is a relatively healthy drinking snack.

To make this dish I prepared the vegetables ahead of time (1 day before) which makes this dish quicker and easier.

Vegetables: I scraped the skin off the gobo with the back of my knife and cut it into small batons (2-3 inches long and 1/3 inch thick). I soaked it in acidulated water for 10-15 minutes with several changes of water. I cut the carrot in the same shape and size. I cooked the gobo and carrot together in salted water for 15-20 minutes and then drained. I let them cool.

Meat: I used the kind of very thinly sliced beef used for sukiyaki. If this is not available, you may have to pound the beef into very thin pieces.

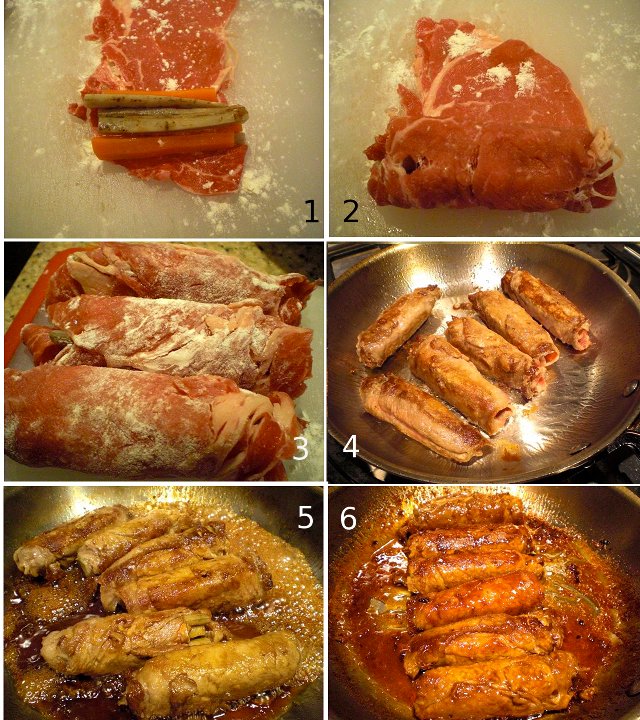
Assembly: I spread out one sheet of beef and dusted it lightly with flour. I placed 3 gobo and 3 carrot sticks on the near end (#1) of the meat and started rolling as tightly as possible (#2). I also dusted the outer surface of the rolls with flour as well (#3). I made a total of 6 rolls.

In a frying pan, I added vegetable oil (2 tbs) on a medium flame. I browned the surface of the rolls (#4) starting from the seam side. You have to make sure all the surfaces are browned by turning the rolls 90 degrees after browning one side. I then added sake (1 tbs), mirin (1 tbs) and soy sauce (2 tbs) (#5).( Be careful about flare-ups). I shook the pan and turned the rolls so that all the surface was coated with the sauce. After 4-5 minutes, the sauce reduced and caramelized (#6). I made sure all the roll surfaces were evenly coated.

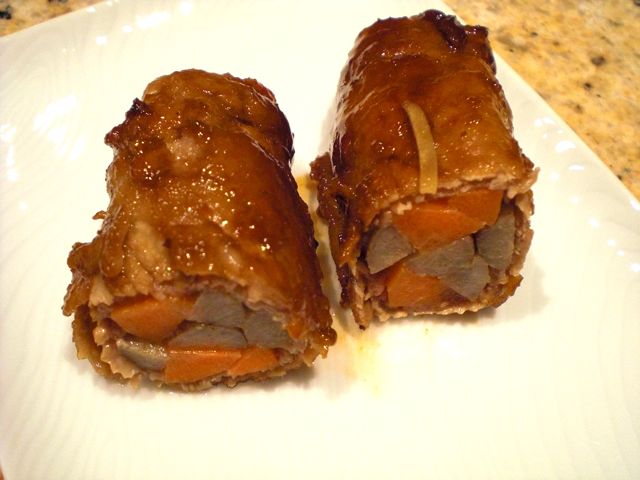
Here is the cut surface.


I cut the roll into 4 pieces and served.  It was nice eating this hot but this also tastes great at room temperature or even cold. The gobo has a nice crunchy consistency and all the flavors are very nice. After wolfing down the roll I served as a starter dish, my wife asked why I was being so stingy only serving one roll per person as a teaser. I told her that more dishes were coming and we did not want to fill up with this one dish. After a pause she said that was OK because the remaining rolls would only taste better the next day after the flavors had more time to meld...and she was correct. This dish will go with any drink perhaps a good sturdy Cabernet but we are partial to cold sake here.

Tuesday, March 29, 2011

Tofu steak 豆腐ステーキ

This is a fairly common Izakaya dish. It is easy and quick to make but tastes good. Again, there are a few variations to this dish. This is how I did it this evening.
I first made 1/2 inch thick slices (I made 4 for 2 servings) of firm tofu. I put them between paper towels and removed the excess water. Although, you do not have to, I decided to dredge them in potato starch or Katakuri-ko 片栗粉.

I added vegetable oil (2 tbs) in a frying pan (in retrospect I should have used a non-stick pan) on medium heat. I fried one side for 1 minute or until it was nicely browned. I then turned it over and cooked the other side for 1 minute. I drizzled undiluted "Mentsuyu" 麺つゆ (2x concentrate) from the bottle on the tofu slices. (You could use just soy sauce.) It sizzles vigorously. I turned down the heat and turned over the tofu slices one more time to coat all the surfaces with the sauce. Essentially no liquid remained in the pan.

I served this with a dab of grated ginger root, an put a little bit more "Mentsuyu" over the tofu slices. This is a simple but perfect Izakaya dish. This will go with almost any drink but we went for cold sake (again). I garnished with a plum blossom from the backyard where the tree just started to bloom. Spring is near.

Sunday, March 27, 2011

Sukiyaki すき焼き

When I think of Sukiyaki, it conjures up two unrelated memories in my mind. One is a Japanese popular song called "Ue-o muite arukou" "上を向いて歩こう"; translated into English, as "Let me gaze up while I am walking (and holding back my tears)". This was sung by Kyu Sakamoto 坂本九, who was later killed in a tragic commercial airplane crash in 1985. This is a melancholic song without any reference to food but, for some reason, was named "sukiyaki" when it was introduced to the U.S. The lyrics of the song and this English title have absolutely no relation to each other whatsoever except that both were from Japan--it is the equivalent to introducing "Moon River" as "Beef Stew".) Despite this, it was reportedly #1 on the Billboard magazine hit chart in June 15 of 1963.

Sukiyaki also reminds me of the very first time my wife and I visited Kyoto together so many years ago. Although we had visited Japan frequently we usually headed straight to Hokkaido occasionally staying only a few days in Tokyo. So the Japan my wife knew consisted of only Tokyo, Sapporo and other parts of Hokkaido. For her, Kyoto was an eye-opening experience--until then she thought all of Japan was like Hokkaido and was surprised to see how different it was. 

On that trip, one evening, we stolled along a narrow and crooked alleyway in Pontocho 先斗町. Since I did not do good research ahead of time (this was a time way before internet Tabelog and food blogs), we did not have any idea which restaurant we should try. Then, I found what appeared to be an old Kyoto house with a small wooden sign saying "Sukiyaki". Although it looked more like a residence than a restaurant, I made an executive decision and we went in. As we said "hello" or "konbanwa" at the small and deserted  "genkan" 玄関 entrance, a kimono clad "nakai" san 仲居さん or waitress, came out from behind the sliding "shoji" screen and greeted us. After removing our shoes, we were ushered up into a large Japanese room (10 tatami-mat room or 十畳間) upstairs which was just for us. We did not see any other customers and the "nakai" san made conversations with my wife (through my translation) and I while preparing sukiyaki at the table. It was such a different and pleasant eating experience. The room was elegant in a slightly shabby chic. It was so quiet and peaceful after the bustle on the streets below. I do not remember exactly but it was not outrageously expensive. (In later years, we visited Kyoto many more times. Every time we visit Pontocho, we see that the stores in the alleys have changed and new (chain?) restaurants and girly bars have started replacing old traditional restaurants and drinking places. Although we tried, we were not able to find our "sukiyaki" restaurant again. That meal turned out to be one of those poignant but fleeting experiences--kinda like the song. 
(Image borrowed from http://shigeking.exblog.jp/10388168/). 

This dish, sukiyaki, was invented after the Meiji restoration (1868) when Japanese adapted to eating meat (beef) and also is one of the Japanese foods accepted and popularized in the U.S. long before sushi and sashimi became popular. Sukiyaki 鋤焼 (suki means a type of Japanese spades and "yaki" 焼き means to grill or cook. But I am not sure that was how this dish was originally cooked.) has two distinct styles; Kansai 関西 (includes Kyoto) and Kanto 関東 (Tokyo) -styles. Mine must be a Hokkaido 北海道 style. Actually, when I was growing up, my mother used to make sukiyaki with thinly sliced pork rather than beef, which was (and maybe still is) common in Hokkaido.

We have not made sukiyaki for ages but I found thinly sliced sukiyaki beef (frozen), which was not as nicely marbled as Japanese beef, at a Japanese grocery store and decided to make sukiyaki. Sukiyaki is traditionally cooked at the table and "the man of the house" is supposedly in charge of cooking and seasoning sukiyaki even though he usually does not cook. A traditional sukiyaki pot or すき焼き鍋 is made of cast iron、round and shallow with folding handles like one you see here. 

Ingredients: Besides thinly sliced beef, the most common items include tofu (especially grilled tofu or 焼き豆腐), Konnyaku thread or shirataki (白滝) (boiled for few minutes in water and washed in cold running water to remove its distinctive (read:awful) smell, shiitake mushroom (I used shimeji here), onion (either regular, thinly sliced, or Japanese "negi" scallion cut in 1-2 inch long on a slant), some type of greens such as spinach (I used a mixture of spinach and arugula here, which were very briefly blanched). My wife likes the more traditional edible chrysanthemum or shungiku (春菊)*. As seen on the left in the image below, I arranged the ingredients on a large plate before starting.

(*We love shungiku for its distinctive taste and even tried to grow it without much success. You could occasionally get it fresh at the Japanese grocery store but the availability is sporadic at best.)

Seasonings: You should have your seasonings handy while cooking sukiyaki; soy sauce, sugar, and sake. I do not use a premixed seasoning liquid or warishita 割り下. Just add these seasonings as you add more ingredients; sprinkle sugar, splash soy sauce and then sake. Since this is done by the man of the house, he does not measure anything (right, image above).

Cooking:  We did not cook the sukiyaki at the table this time. I placed a sukiyaki pot on the stove on medium low heat. I first melted a bit of butter (or you could use a chunk of beef fat) and spread the beef over the butter. The proper and traditional way of serving sukiyaki, is to season the meat after it has browned with sake, sugar and soy sauce. Then all the diners taste a small portion of this first cooked meat, since this is the only time browned meat was available to taste. (The rest of the beef added later is just cooked in the seasoning liquid). I do not see much advantage in this custom and I cooked everything together as you see on the right in the picture above. The vegetable and tofu exude water but if the liquid is not enough or the seasoning is too strong you could add more sake or dashi. I put on the lid and cooked it for 5 minutes or until the onion was done.

Serving: The classic way is to serve a raw beaten egg in the bowl as a dipping sauce (shown in the second picture above.) (of course, I used pasteurized shell eggs for this). The egg will cool the suskiyaki and make it taste better for sure. We just had this as a drinking snack rather than a meal with cold sake. This is such a classic dish and even the inferior quality of the beef did not detract.
Friday, March 25, 2011

"Tarako" cod roe omelet 鱈子のだし巻き

This is another "teiban" 定番 or regular item in Izakaya. Although using a spicy tarako or "(karashi) mentaiko" 辛子明太子 appears to be more common than using regular tarako roe. I like using regular tarako with Tabasco mixed in, so I can control the spiciness.  I am not sure you will find this dish in any place other than an Izakaya or similar low-key eatery unless you make it at home. Some variations exist including adding a nori sheet or cream cheese.

It was a Tuesday night. I thawed a package of tarako the previous weekend but I did not get around to using it. So, I had to start using the tarako soon, hence, this dish.

I usually make a dashimaki with three eggs but this one required 4 eggs and I could have done a better job forming the roll.

Eggs: I used large brown eggs (4). I added dashi broth (4 tbs, leftover from making another dish), sugar (2 tsp) and a pinch of salt and mixed well in a bowl.

Takako: I opened one roe sac by cutting the membrane along the long axis. Using the back of my knife, I scraped off the roe from the membrane and placed it in a small bowl. I then added sake (less than 1 tbs) and Tabasco (as much as you like) and mixed well to attain the degree of spiciness and consistency I wanted. I then made it to a rectangle with the width equivalent to that of a square Japanese Omelet pan. If you like, you could roll this in a nori sheet (if you do this step, wrap the tarako-nori roll in a plastic wrap for few minutes until nori sheet gets moist and keeps its form before placing it on the omelet).

On a low flame, I heated a square Japanese omelet pan and added vegetable oil (my pan is non-stick and I added oil to just barely coat the surface). The pan should be hot enough so that the eggs start cooking immediately but not too hot for the eggs to start bubbling. I poured enough egg mixture to thinly coat the bottom. When it was half cooked, I added the tarako mixture, about one inch from the far edge of the pan. Using a spatula (one wide enough almost encompassing the width of the pan is best), I lifted and draped the 1 inch portion of the omelet over the tarako, and started rolling (You also need to tilt the pan to help with the rolling action. I did not do as well as I could have). I repeated the same process three more times, adding vegetable oil to the pan as needed. I ended up with a rectangular omelet which looks exactly like a Japanese dashimaki omelet from outside (albeit a bit fatter). But, of course, when you slice it, you will see semi-cooked spicy tarako inside.

This is a sublime dish; nice salty taste and interesting texture of tarako in the center with mild spiciness and the surrounding omelet has nice conforming sweetness. We did not need any soy sauce because of the enough saltiness from the tarako. You need to have sake for this dish. Good effort by me on weekday night. Only problem may be that this dish is high in cholesterol.

Wednesday, March 23, 2011

All leftover mini-casserole 残り物キャセロール

This is not really blog worthy but we liked it very much. One evening my wife gave me a list of small odds and ends leftovers which she tasked me to "clean up". The list consisted of: 1) cooked Spanish flavored rice, less than 1 cup, 2) one small cooked lamb chop, 3) 4 asparagus previously sauteed in butter, 4) two florets of cooked cauliflower (a part of baked veggie dish). I did not ask why such small amounts were left over or why she didn't just throw them away--my task was to come up with something using them.

I first buttered two small ramekins and packed each in layers from the bottom up, starting with the Spanish rice, followed by the cauliflower finely chopped, the lamb finely diced, and the asparagus chopped. I then beat one egg and seasoned it with salt and pepper, added tiny cubes of cold butter (1 tsp) and poured it over the top layer of asparagus. I then grated Parmigiano Reggiano cheese over it. I baked in a toaster oven for 10 minutes at 400F.

This was surprisingly good. With very interesting layers of flavors. It turned out to be very satisfying dish. We used up all the leftovers--my task was completed.

Monday, March 21, 2011

Chicken Patty, miso flavored, with pine nuts 鶏の松風焼き

This is a variation of chicken "tsukune". The addition of pine nuts and miso make this dish distinctive. I used 1/2 lb ground chicken. Add white miso (2 tbs), mirin (2tbs), panko (1/2 cup), flour (2 tbs) and toasted pine nuts (3 tbs) and 1 egg. Mix and put in small square baking dish (I sprayed with "Pam" to prevent sticking) so that the thickness is about 1/2 inch. Put it in a 350 F oven for 15 minutes.

I think this was in one of the recipes for "Osechi" お節料理 or New Year Dishes which I saw on-line some time ago. I have made this for New Year. In that case, I cut the loaf into the shape of "Hagoita" 羽子板 and insert tooth picks to mimic the real thing and brush mirin and add "aonori" 青のり for green "pine" needle color as instructed in the original recipe (left in the above picture).

The taste is great and goes well with any drinks including red wines.

Saturday, March 19, 2011

Duck breast salad with grilled shiitake 鴨胸肉と焼きシイタケのポン酢酢の物

This is another quick dish I made from the leftovers we had as a starter dish of the evening. There is no recipe for this, I just concocted it on a whim. I had roasted duck breast leftover and I thought the combination of onion and ponzu with duck will be good.

The amounts are for two small servings as seen above. I fist thinly sliced red onion (1/3 medium). I salted, kneaded, and soaked it in water for 5 minutes and wrung out the moisture with a paper towel. Cucumber was sliced obliquely very thin. I salted and squeezeed out the excess moisture (one small American mini-cuke). I thinly sliced the duck breast (cooked to medium rare with nice uniform rosy color) and then cut it into wide strips (4 thin slices per serving). I also found fresh shiitake mushroom (4, small) left in our refrigerator and decided to include it in this dish. I washed and broiled them in a toaster oven (it is sort of steam broiled). After a few minutes before it gets dried up, I removed the shiitake and cut into thin strips and dressed with a small mount of soy sauce.

I mixed all the ingredients except for the shiitake in a bowl and dressed them with ponzu shoyu ポン酢醤油 (from the bottle) and a splash of a good olive oil. I topped it with the grilled shiitake and sprinkled roasted white sesame seeds on top.

For an impromptu dish, this was a great success. The onion is strong enough but not too assertive because of the salting and soaking in water. The addition of the olive oil contributes depth of the dish. We had this with "G sake" from SakeOne. The very first US brewed sake we really like. This is a wonderful pairing. I should have made more since we had more duck breast.

Thursday, March 17, 2011

Crudités with moromi miso もろみ味噌のクルデテ

Probably this is not even worth posting but just in case I run out the items to post. This is obviously the same as "morokyu" もろきゅう but given a French name. For cucumber, I used American mini-cucues which was cut into a flower-shaped cup so that it can hold moromi miso もろみ味噌. I also made small boats of celery after I removed the strings or veins. As usual, I also used Campari tomatoes after skinning and cutting the top criss-cross halfway through. My wife particularly liked tomato and miso combination.

You could use other vegetables such as carrot, cabbage leaves, lettuce, radish etc. Besides moromi miso, you could make other flavored miso for dipping.

Tuesday, March 15, 2011

Pork pot roast salad 焼豚のサラダ

This is yet another quick starter dish. Even for us (small eaters), I should have made more in retrospect. We got a whole pork loin since the price was really good. I roasted half (in the oven). I made Sino-Japanese style pot roast 焼豚/煮豚 and several chops from the remainder. Since the cooking liquid for the pot roast is so flavorful, I  made "seasoned" eggs or 味付け卵 (as usual) by marinading soft boiled eggs in the pot roast cooking liquid. This is a salad made of these leftover items.

This is for two tiny servings as seen in the picture. I sliced and cut the pork in rather wide strips (4 slices). I skinned and sliced Campari tomatoes (4). I sliced scallions (two) on a slant. For dressing, I mixed mayonnaise (1 tbs) and the cooking liquid of the pot roast (1/2 tbs or so) and  dressed the above ingredients. I added the seasoned egg cut into quarters as garnish.

This is a small quick and nice dish. The addition of the pot roast cooking liquid, which has now congealed into a soft jell, has a nice sweetness, saltiness and the flavor of star anise 八角 which makes this dish really good. The flavors permeate the egg as well as the dressing. I should have made more.

Sunday, March 13, 2011

Eggplant caviar 茄子のキャビア

Every time I see a good eggplant, I can not resist getting it. I saw some nice looking small Italian eggplants at the grocery store and bought two. Since I occasionally forget what I bought and find the liquefied remnants later in the fridge, my wife kept the eggplants out on the counter for me to cook that evening (translation: immediately!). After I considered making my usual suspects, I realized I have not blogged this dish and decided to make it. I first saw this in one of the Silver palate cookbooks many years ago and made it several times since then but not recently. My recipe is loosely based on the recipe from the book. This time I did not check the original recipe and made it from memory. As usual, I made some of my own contributions (read modifications) to the dish. Why is this called "caviar"? I am not sure. But the seeds of eggplants may look like "caviar" with some, no, lots of  imagination. Japanese have "tonburi" とんぶり, a type of grass seeds prepared a specific way, which is sometimes called a "land" caviar and is more similar in appearance and texture (not taste) to real caviar than this dish.

 The amount is an appetizer for two.

Eggplant: I used two small Italian eggplants. I pricked the skin with the tines of a fork so that it will not explode during baking. (A digression: One time I was barbecuing small Japanese eggplants and did not think to prick the skins. I put them in a very hot weber grill with the lid on. My wife and I sat back with a nice glass of wine to relax and wait for things to cook when suddenly there was a very loud "whumph" from inside the grill followed by a large puff of ash out the bottom. I jumped up and removed the lid...there was absolutely no trace of the eggplants. They had exploded so violently there was nothing left; not even bits plastered on the lid. Lesson learned: prick the eggplant.) Back to the recipe: I baked the eggplant for about 15 minutes in a preheated 450F toaster oven turning once half way through the time. The eggplant should be totally soft, otherwise bitter taste may remain. I suppose you could microwave the eggplants as well. I let it cool down and removed the stem end and skin. I cut it in thin strips lengthwise and cut into small dice but I do not like to totally mash it.

I finely diced one small shallot, zest (using a micrograter) and juice of half a lemon, a few sprigs of chopped parsley (or other fresh herbs such as fresh basil if available). I mixed this into the eggplant above and season it with salt, pepper and a good olive oil (2-3 tbs). I tasted it and I thought that pine nuts would go well with this dish. So I dry roasted pine nuts (2 tbs) in a dry frying pan and mixed in (optional).

I let it sit for 10-15 minutes before serving so that the tastes amalgamate and the shallot become less sharp. I served this with more olive oil on the top. Thinly sliced small baguette rounds or good crackers will be good with this. We had this with crackers. The nice soft texture of the eggplant, the fresh taste of the lemon (especially the zest) and parsley all worked together. My addition of roasted pine nuts added richness and some different texture.

This is fairly easy to make but tastes really good. Some fruity white wines will go well with this but, as usual, we drank a red.

P.S. In view of the catastrophic tragedy in Tohoku-Sendai area, we offer our sympathy and support for the survivors. All my family and the friends we contacted are Ok but our thoughts and prayers go out to those who were not as fortunate. We were in the Sendai, Matsushima and Kinkazan areas in 2006, which makes watching these images and videos much more difficult.

Friday, March 11, 2011

Pork Cutlet ポークカツレツ

This dish is looking into a bit of history on Japanese "Western" dishes. This dish may look like "Tonkatsu" トンカツ but this is the predecessor of Japanese tonkatsu and called "poku katsuretsu" ポークカツレツ and it is closer to Western "cutlet" than tonkatsu. ("katsu" in "ton-katsu" is a short for "katsuretsu" but you do not say "tonkatsuretsu" to mean "tonkatsu"). When a famous and pioneering yoshoku restaurant, "Renga tei" 煉瓦亭 in Ginza, opened in 1895 (it is still in business today), started serving Western cuisine to Japanese, they had to make some modifications to the original Western dish to accommodate Japanese taste. These variation reportedly formed the basis of Japanese "yoshoku". For example, instead of sautéing breaded thin pieces of meat in a small amount of oil or butter in a frying pan as Western cutlets are usually prepared, they deep dried them as though making tempura (another foreign derived Japanese dish which was introduced to Japan from Portugal much earlier). They also used pork instead of veal for this dish. This eventually became tonkatsu トンカツ using pork fillets or chops rather than thinly pounded meat.

I used a pork fillet cut into small medallions (1 inch thick) and then pounded very thin. I also used some end pieces and trimmings of pork fillets (this time I used mostly trimmings). I breaded them in the standard way; seasoned with salt and pepper, dredged in flour, dipped in egg water and coated with Panko bread crumbs (left upper in the image below). I used a small amount of light olive oil (less than quarter of an inch deep) on medium low flame as seen in the right upper of the image below. After a few minutes, I turned them over and fried the the other sides until browned and the meat was done (few more minutes, left lower image below) and drain excess oil (right lower image below).

I served this with Pennsylvania Dutch noodles and steamed broccoli. On the side I put, Japanese hot mustard and tonkatsu sauce. Because the breading/meat ratio is different from tonkatsu, this tastes different from tonkatsu. It is dominated by the crispy crust and is very good in its own right. Leftovers make a mighty fine sandwich particularly if the mustard/tonkatsu sauce is used on the bread.

We had this with a decent Napa Cab from wine reseller Cameron Hughes wine called "lot 200". Cameron Hughes supposedly buys excess "juice" from "famous", "big-name" wine makers (mostly Napa) and bottles it under his label with a simple designation of a "lot number". We first tried CH wines after reading a WSJ article. The idea is that the original big name wineries get cash they needed but do not ruin their reputations by fire sales of their wines. We consumers get a good deal and CH makes money in the process. So everybody wins. We tried a few CH wines and most of them are decent and worth the price. This lot 200 is one of the higher priced CH wines and is a classic Napa Cab with a medium body. Not quite a high-end Napa but a very pleasant wine. Only problem with CH wines is, when you find something you like, you can never go back and buy the same wine again.

Wednesday, March 9, 2011

Homemade cottage cheese with olive oil and chives 自家製カッテージチーズ

Coagulated milk protein is the base of any cheese. Trying not to be too indelicate in discussing this; the only way a calf (or any other mammalian baby including humans) can digest mother's milk is to coagulate the milk in the stomach. Babies have a special enzyme called "rennet" in their stomachs. Although rennet derived from plants is available, many traditional cheeses are made using calf rennet. Rennet is also used to make a very old fashioned custard dessert called "rennet custard" or "junket". My wife loves junket and used to get "junket custard mix" This mix is very difficult to find and she had to mail order her supply. As a result she was very reluctant to make this desert lest she deplete the cache. On a recent trip to the grocery store, she found "rennet" tablets. She started reading the recipes in the back of the box and decided to make cottage cheese.

She used 1 gallon of 1% milk warmed to 70 degrees in a pan.  She added 1/4 rennet tablet dissolved in water, and 1/4 cup buttermilk mixing well. She removed it from the heat, covered the pan with a dish towel and let it sit on the counter at room temperature for 18 hours. The next day, a nice curd had developed. She cut the curd into small 1/2 inch pieces using a long blade knife. She put the pan in a bain marie and slowly heated it to 110F and held it at that temperature for 20 to 30 minutes stirring every 5 minutes to make sure the curd heated evenly. She drained the curd using colander lined with a moistened cheese cloth. After draining several minutes she lifted the curd in the cheese cloth and immersed it in cold water stirring and pressing with a spoon to break the curd into smaller pieces. She placed the curd in a bowel added 1 tsp salt and 1/3 cup cream stirring until everything is mixed in.

After the cheese cooled down in the refrigerator, we served it with a drizzle of good extra-virgin olive oil, freshely cracked black pepper and chopped chives. The texture was a bit spongy but sort of between commercial cottage cheese and mozzarella. We liked this. Compared to "acid" coagulated curd, we like rennet coagulated curd. My wife said she was making cheddar cheese next. So please keep an eye on this blog for home-made cheddar.

Monday, March 7, 2011

Simmered vegetables with chicken 鶏と根菜の煮付け

This is a typical home cooked dish. Similar dishes, but more sophisticated ones, are called "umani" 旨煮 and "chikuzenni" 筑前煮, which are often served as New Year's dishes. The type of dish I made here is generally called "nitsuke" 煮付け and is a homey toned-down version of these two dishes. It has a wider range of vegetables and all the ingredients are cooked together in one pot.

The reason for making this dish was to clean up some ingredients I had in our refrigerator. I deboned chicken thigh several days ago and it had been marinating in sake for several days. I had to use it or lose it. I also had a half daikon and burdock root or "gobo" 牛蒡. You could use any combination of root vegetables for this dish.

The amounts of each ingredients are totally arbitrary. You can make it with lots of chicken or chicken can be just a flavoring or no chicken. I used three chicken thigh (skinned and deboned) cut into large bite sized pieces. The vegetables included daikon (3 inch long, medium, peeled and cut into a half inch thick disk cut into quarters), gobo (half, skin scraped off under running water and cut into small "rangiri*" 乱切り pieces, soaked in acidulated (with rice vinegar) water, and carrots (two medium, peeled and cut into medium "rangiri" pieces).

*rangiri: This is a type of cut used often in Japanese cooking especially for long root vegetables. After peeling, you lay the vegetables flat on the cutting board and cut the first piece on a slant from the end, turn 90 degree and making another cut on a slant until it is completely cut up. Here is a visual aid.

I placed all the root vegetables in cold water in a pan and cooked them for 20-30 minutes or until the daikon and gobo are soft (they take the longest to cook). I drained and placed the vegetables in a pan and poured in dashi broth (about 3 cups, again I made dashi using a dashi pack) to just cover the vegetables. When the broth came to boil, I added the chicken pieces and turned down the heat to simmer with "otoshibuta" 落とし蓋. When the chicken pieces became opaque, I skimmed off the scum and fat that formed on the top of the liquid and added mirin (3 tbs) and soy sauce (2 tbs). I kept simmering occasionally skimming more scum and fat. After 10 minutes, I added more soy sauce (1 tbs) and checked the seasoning. I let it cool down. I reheated it before serving and garnished it with boiled green beans. I think, in a more traditional way, the seasoning of nitsuke is stronger with mirin, sugar and soy sauce. I tend to make the seasonings light, so you have to experiment to find the best seasoning for you. To make it simpler, you could cook everything using broth and seasoning but gobo and daikon will be milder if you precook as I did here.

This is again nothing special but very comforting (at least for me) food.

Sunday, March 6, 2011

Finally, our blog cookbooks are here!

My wife really wanted to have a book of our blog. Finally here it is! A two volume compendium of Norio on Wine and Food Cookbooks. Please click the  rightmost tab above "NOWAF cookbooks etc" to view.

Saturday, March 5, 2011

Amuse-buche, Smoked salmon on potato スモークサーモンとジャガイモのアミューズブーシュ

Like "Otoushi" お通し in Izakaya, many restaurants in the U.S. and elsewhere are now serving a small appetizer, before the start of the actual dinner or even the delivery of the "real" appetizer. This little morsel is call "amuse-bouche" or translated "entertain the mouth". This is my version of an amuse-bouche. Since we only had a very small amount of left-over smoked salmon, I made it into a one-bite appetizer.
I microwaved two small new red potatoes. I then removed the skin and carved it into two small cylinders. I placed this on a very small dish and seasoned it with salt, layered it with creme fraiche and garnished it with chopped chives. I put two small squares of smoked salmon on top and topped it with more chopped chives. We popped the morsels into our mouths and let the layers of flavors and textures tantalize the tongue. The combination of potato and smoked salmon was very nice. The bouche was amuzed...and thanked us for it.


Thursday, March 3, 2011

Shimeji mushroom and Canadian bacon stir-fry しめじとハムの炒め物

I had a package of fresh shimeji mushroom ホンシメジ and leftover Canadian bacon. Using these two items, I came up with this small dish. I could have used good quality ham rather than Canadian bacon. I did not know of the existence of Canadian bacon (as it is called in the U.S. but not in Canada) until I came to the U.S. it appears you can get it in Japan.

I just cut the root end of the shimeji mushroom and separated the stalks (1 package). I cut the Canadian bacon  (4-5 slices) into half inch strips. I added olive oil (2 tsp) and butter (1 tsp) to a frying pan and sauté the shimeji for a few minutes and added the Canadian bacon. I seasoned with a splash of sake, soy sauce, salt and pepper to taste. Finally, I add finely chopped parsley just before shutting off the heat. Somehow, the Canadian bacon just tasted off (may be it wasn't in its prime) which ruined the dish somewhat. The idea was good and I am sure better quality Canadian bacon or ham would have made this dish much better. Although I ate everything, my wife only ate the mushrooms (she is a picky eater).

Tuesday, March 1, 2011

Simmered squid with daikon イカ大根

I found a package of cleaned frozen squid in our near-by gourmet market's freezer case.  I decided to give it a try. I found that it was OK in a pinch but they were small squid and it was not as good as "Japanese" frozen squid. Since I had only a few inches of daikon left, I made this simmered squid with daikon dish, which is a rather common homey dish and also perfect for Izakaya.


The recipe is found in "Otsumami Yokocho" Volume 1, page 40. I used my own way to make this dish but it is essentially the same dish.

For 2 servings, I used one package of frozen cleaned squid with tentacles thawed (2/3 of 8 oz or about 200 grams; 1/3 was used for the "sunomono" 酢の物 dish below) cut into half inch wide rings.

Daikon: I used daikon about 3 inches long. I peeled and cut it into 1 inch thick rounds and then quartered. I precooked the daikon in water with one pinch of raw rice for about 20 minutes and then washed it in cold running water. Although I have not done any scientific comparison, adding raw rice or using rice washing liquid or 米のとぎ汁 to precook daikon is traditional and is said to reduce the strong smell of daikon, make it softer, season better, and also prevent the cut surface from concaving during cooking. With so many claimed benefits, why argue? I just followed tradition.

Cooking liquid: I added water (1.5 cup), sake (2 tbs), mirin (2 tbs) and soy sauce (2-3 tbs) and a few thin slices of fresh ginger root into a pot on a medium flame. 

I added the precooked daikon and squid rings and tentacles to the cooking liquid. When it came to a boil, I turned down the heat to simmer and skimmed off any scum that developed on the surface several times. I put the lid askew and let it simmer for 30 minutes.

Just for color, I garnished with chopped chives. This is a classic home-cooked dish. Despite not-really-good quality squid, this was a good dish and perfect for sake.

In addition, I made "karashi sumiso-ae"  芥子酢みそ和え of squid, cucumber, and wakame, which I posted before. For this dish, I used 1/3 of the body of the squid, which was cut into rings, cooked in salted and sake-added boiling water for 30 seconds and drained. I immediately seasoned them with "sushi vinegar" (from the bottle) while it was cooling.


I made "Karashi sumiso" or hot mustard miso vinegar sauce and dressed all the ingredients. I made the "sumiso" dressing a bit too "mustardy" this time (i.e. hot, since Japanese mustard is really hot). These two dishes only go with sake, which is not too difficult to accommodate for us.