Tuesday, March 29, 2022

Shepherd's pie

It was St. Patricks day so what would be the best way to celebrate? My wife suggested that at the very least a shepherd's pie should be involved. Since St. Patricks day fell on a weekday, we made this shepherd's pie on the following weekend. I theoretically knew what shepherd’s pie was but I had never made it and I do not think I ever even tasted one. In any case, here is a Shepherd's pie made from ground lamb in small individual ramekins topped with cheddar cheese.  This one really tasted lamb-y/mutton-y with nice mashed potatoes on top. So to continue, shouldn’t a traditional Irish meal include some cabbage?  My contribution was a Japanese-style cabbage dish. (This is a simple home style dish my mother used to make. I realized I never posted it. Therefore, subject for future post).  This Irish celebration was rounded out with the addition of a slice of Irish soda bread my wife made recently. 


Ingredients: (from Washington Post, for 4 servings which made 8 small ramekins, see below #1)
1 tablespoon canola oil
1 pound ground lamb
1/2 teaspoon table salt
Freshly ground black pepper
1 medium onion, chopped (about 3/4 cup)
1 large carrot, peeled and diced (I chopped it in fairly small dice)
1 teaspoon minced thyme (I used dried thyme since we did not have fresh one)
1 tablespoon flour
1 1/2 cups low-sodium beef broth (I used chicken broth)
2 tablespoons minced flat-leaf parsley (Our parsley in the fridge was too old and we did not have dried one, so we skipped this altogether).

--The potato topping was my wife's territory---
2 russet potatoes
4 tablespoon unsalted butter
4 tablespoons onion & chive cream cheese
1 cup cheeses, grated (optional) (we used cheddar and smoked gouda).

Directions:
Position a rack in the middle of the oven and preheat to 425 degrees.

In a large skillet over medium heat, warm the oil until shimmering. Add the lamb and cook, stirring occasionally, for 5 to 7 minutes or until browned. Season with 1/4 teaspoon salt and pepper to taste. With a slotted spoon, transfer the meat to a medium bowl. Drain all but 1 tablespoon of fat from the pan. Stir in the onion and cook for 3 to 5 minutes, or until soft but not browned. Add the carrot and thyme. Cook, stirring occasionally, for 2 to 3 minutes. Add the flour and cook, stirring constantly, for 1 to 2 minutes. Gradually add the broth, increase the heat to medium-high and bring to a boil, stirring.

Return the meat to the pan, reduce the heat to medium-low and cook, uncovered, stirring occasionally, for 10 to 15, or until the lamb is cooked through and the sauce has slightly thickened. Stir in the parsley and adjust the seasonings to taste.

Meanwhile, for the potatoes: Cook in the microwave with skin on for about 10 minutes (5 minutes turn and another 5 minutes) until a screwer goes in easily. Peel and put in a bowl. Add the butter, cream cheese, salt and stir until smooth.

Using a large spoon, transfer the meat mixture to a medium casserole dish or 4 ovenproof 8-ounce ramekins (As you can see below, we used small ramekins which made total of 8 servings, #1). If there is any sauce left in the skillet, add it to the casserole or divide it among the individual ramekins. Drop spoonful of the mashed potatoes on top, then spread the potatoes across the meat mixture, forming peaks, and to the edges of the dish(es) (#2). Add the cheese (#3). Bake at 450 for 20 minutes (#4).


This was a great meal of Irish dishes (with a slight Japanese twist on the cabbage dish). The lamb/mutton taste was very pronounced (read: STRONG). My wife really likes lamb and thought it was great but it was a bit too strong for me. We think with this celebration we adequately honored St. Patty and his day. 


Monday, March 21, 2022

Bluefin tuna chunks 黒鮪チャンク

Recently while browsing online purveyors of sashimi-grade tuna I noticed advertisements for bluefin sashimi tuna "imperfect cuts" or " chunks". I surmise this may be something to do with increased popularity of "poke" which, unlike Japanese sashimi, does not require uniform sized blocks of fish. Since I myself make dishes such as "imitation negitoro" 擬制ネギトロ, and "namerou", which do not require perfect cuts, I decided to try it. This one came from our old, tried and true Catalina Offshore products. As you can see in the picture below, there are several chunks of frozen bluefin tuna. The majority is “akami” red  meat and some are “chu-toro” medium fatty. I divided the shipment into three portions. I thawed one in the refrigerator and vacuum packed the other two and put them in the freezer. Since they are chunks, it is very easy to apportion whatever amount I would like to thaw and prepare.


I decided to taste the tuna as sashimi first. I sliced one chunk which looked like chu-toro 中トロ and another which looked like akami 赤身. Since the shipment also included Ikura salmon roe いくら and my wife made blini a few days ago, we served a blini topped with cream cheese (home made), smoked salmon, ikura and chopped chives.


Both the toro and akami were very good. For us, this is just perfect, just a little bit of tastes.


This blini with ikura is one of our favorite appetizers. We tried caviar but we like ikura better. This ikura (came frozen) also from Catalina tasted very good and fresh.
  

This combination of appetizers can go well with both red wine or sake but on this occasion, we had cold sake. After this, we had imitation negitro made from akami chunks with cucumber slices and nori. I also served our usual “yamakake” after marinading the akami cubes for 30 minutes. The yamakake was quite filling. 

So our assessment of the bluefin sashimi-grade tuna chunks is very positive. They are very reasonably priced and tasted good. They can be served as sashimi. Even though the slices are not perfect, they tasted perfect.


One of the cherry trees in our backyard bloomed almost overnight. This particular cherry tree has really grown since we removed the enormous ash tree that over shadowed it. We had to remove the ash because it succumbed to the "emerald borer". This cherry tree always blooms first (we have three cherry trees including the replacement for our old tree which was destroyed during the Nor'Easter storm in 2018). As the "first bloomer", it is in step with the cherry trees at the tidal basin; blooming at about the same time. The remaining trees in our yard are more leisurely in their approach; blooming about 1 week later. These blossoms are really a treat. Finally Spring has sprung.

Friday, March 18, 2022

Miso maple syrup loaf 味噌メープルシロップローフ

I saw this interesting quick bread in one of the food blogs I follow (in Japanese) using “miso” and “maple syrup”.  This recipe was credited to Dorie Greenspan and it was easy to find the recipe in English in the New York times cooking section among other sites. So, I commissioned my wife to make this bread loaf. While baking, it definitely had the smell of  nutty miso. It is mildly sweet and salty with nutty overtones. It’s quite unique (in a good way) and nice. We had this as an ending dish the evening she baked it and also as a breakfast bread.


Ingredients: (Pictures #1 & #2) (Makes one loaf)
4 ounces (113g) unsalted butter, at room temperature
1¾ cups (238g) all-purpose flour
1¾ teaspoons baking powder
¼ teaspoon baking soda
¾ cup (150g) granulated sugar
¼ teaspoon salt
Finely grated zest of 1 orange or 2 tangerines (or 1 tsp. Orange flavoring)
¼ cup (70g) white miso
¼ cup (60ml) pure maple syrup
2 large eggs, at room temperature
1½ teaspoons vanilla extract
⅓ cup (80ml) buttermilk (well shaken before measuring)

Recipe doubled (makes 2 loaves)
8 ounces (226g) unsalted butter, at room temperature
31/2 cups (476 g) all-purpose flour
3 ½ teaspoons baking powder
1/2 teaspoon baking soda
1 1/2 cup (300g) granulated sugar
1/2 teaspoon salt
Finely grated zest of 2 orange or 4 tangerines (or 2 tsp. Orange flavoring
1/2 cup (140g) white miso
1/2 cup (120 ml) pure maple syrup
4 large eggs, at room temperature
3 tsp. teaspoons vanilla extract
2/3 cup (160 ml) buttermilk (well shaken before measuring)

Directions:
Whisk together the flour, baking powder and baking soda. Put the sugar, salt, and zest in the bowl of a stand mixer. Rub the ingredients together until the sugar is moist and fragrant; it may even turn orange. Add the butter, miso, and maple syrup to the bowl. Beat on medium speed for about 3 minutes, scraping down the bowl and beater(s) as needed to form a creamy mixture. One by one, add the eggs, beating for a minute after each. Beat in the vanilla. The mixture might curdle, but this is a temporary condition. Mix the wet ingredients into the dry ingredients alternately with the buttermilk and mix until they are incorporated.


Scrape the batter into the greased loaf pan, working it into the corners and smoothing the top (#3). Cook in a 350 degree oven for 50 to 55 minutes. Check the loaf after 40 minutes and cove the top loosely with a foil or parchment tent if it’s browning too fast. The loaf is properly baked when it pulls away from the sides of the pan and a tester inserted into the center comes out clean. The top will be flat and most likely cracked down the middle (#4). Transfer the pan to a rack and let the bread rest for 5 minutes, then run a table knife around the edges of the loaf and unmold onto the rack; turn it right side up.


This was quite an engenius flavor combination. The bread has a very tender texture and the maple/miso combo plays extremely well together. Praise-be to whom ever thought of combining maple syrup and miso. (Side note: My wife made the bread in the late afternoon and it came out of the oven just before dinner. That night my wife woke up smelling miso. Her first thought was, ‘someone is making miso soup…who would be making miso soup at this hour?’ Then it dawned on her. It was the residual smell of the bread she had just baked.) We highly recommend this bread.


Our plum tree has been blooming recently in response to several warm days we had. It was a nice reminder that spring was indeed on its way. It looked beautiful and it had a lovely fragrance that was wonderful wafting on the breeze. Then a “bomb cyclone” whipped through, dumping snow, ice and cold temperatures. We woke up to a white winter wonderland. Everything, including the plum blossoms covered in snow and ice. But our plum tree stood fast. We still had plum blossoms even after the snow melted. Spring was not to be deterred by the late winter icy temper tantrum of a mean old bomb cyclone! 

Tuesday, March 15, 2022

Uni shutou with salmon roe 雲丹酒盗いくら入り

The last time we bought fresh uni from Maruhide 丸秀, we also got a few “uni shutou” 雲丹酒盗including one with salmon roe 雲丹酒盗いくら入り which was a new choice for us. So, one weekend evening, I served this with our usual squid shiokara イカの塩辛. I also served chawanmushi 茶碗蒸し and simmered Kabocha squash カボチャの煮物. These were nice starters.


Left in the picture below is uni shutou with ikura. Obviously, this is a great combination and we, especially my wife, loves uni-ikura donburi ウニいくら丼. Right is our usual squid shiokara. Both are perfect for sipping sake, although you do not need much, just a bit of taste to go with sake.


I served this chawanmushi cold. I often top this with ikura or uni or both but not this time. I made the dish with shrimp and chicken in addition to shiitake. I added scallion and sugar-snap towards the end of cooking.


The picture below shows simmered Japanese kabocha squash カボチャの煮物. It’s a classic.


This was great start of the evening and the combination of uni and ikura shutou is definitely a favorite.

Saturday, March 12, 2022

Pirogi ピロギ

One day, my wife made these pirogi. She was inspired after reading a recipe in the Washington Post at the start of the Russian war with Ukraine for Ukrainian "pierogi". Somehow this triggered a memory of the pirogi she used to eat as a young child. They were part of special family dinners out, in the summer, after an afternoon spent swimming. In rural Pennsylvania, at that time, dinner out often consisted of stopping at the local Tastee Freez and consuming your purchases in the car in the parking lot. (According to my wife, at least the scenery overlooking the beautiful Pennsylvania farmland from the parking lot was quite nice.) For some reason, this Tastee Freez sold food items other than just ice cream; one of which was pierogi. My wife clearly remembers how good they tasted, particularly when she was hungry after an afternoon of swimming. 

(Note from me: Just to bring the record up to date, I researched Tastee Freez and there are presently none located in PA. In addition, pirogi are not on the menu of those not located in PA.). (Note from wife: I was very young when we ate there. On reflection, maybe it was a Dairy Queen). (Note from me: There are lots of Dairy Queens in PA  but like Tastee Freez they don’t serve pirogi.) (Definitive note from wife’s older sister: It was not a Tastee Freez or Dairy Queen, it was a privately run food stand that subsequently went out of business and yes their pirogies were great.) (Note from wifey and me: Oh!)

In any case, my wife again raided my stash of gyoza/wonton skins instead of making the dough from scratch. I tasted the pirogi just boiled and it was quite good although the "cheese" flavors didn’t come through strongly. (My wife told me that she added a lot of cheeses). I recently saw a recipe for Japanese gyoza made basically by filling gyoza skins with potato salad. This sounds like a Japanese version of pirogi. Maybe, I should try this recipe. In any case, as a shime/ending dish one evening I cooked the pirogi my wife made in the style of ravioli. I made a quick tomato sauce from skinned Campari tomatoes and shallots.  I garnished with chopped fresh parsley and grated parmesan cheese. For good measure, I drizzled on some of our favorite Spanish olive oil. This was very carbo-intensive but tasted very good and was certainly rather filling.


The recipe is from Washington post. I am sure my wife modified the recipe. So I will ask her to take over.


Ingredients:
2 russet potatoes
4-6 tablespoons unsalted butter (or to taste)
1 small yellow onion, finely chopped and caramelized in a sauce pan.
2 cups of shredded sharp cheese (I used a combination of smoked gouda, Monterey Jack and Irish cheddar)
Salt to taste
1 teaspoon freshly ground black pepper
Chopped fresh chives, dill or scallions, for garnish (optional)
1/2 package (about 20) gyoza skins

Directions:
To make the filling: Cook the potatoes, skin on, in the micro wave (about 10 minutes). Peel and mash in a bowl adding all the other ingredients (#1).

To assemble the pierogi: Wet the edges of the wonton skin with water. Add about 1 tablespoon of the potato filling to the center of the Wonton skin. (I used the smallest ice cream scoop). Fold over the skin to enclose the potato mixture and press firmly to seal making sure there are no air pockets. (I used the handy-dandy presser (see picture below).


Repeat with the remaining dough and filling (#2). The pierogi can be frozen at this point.

To finish, bring a large pot of well-salted water to a boil. Drop the pierogi in a few at a time, so as not to crowd the pot, gently stirring them so they don’t stick together (#3). Cook until they begin to bob to the surface, about 4 minutes. Remove with a slotted spoon. Drain them on a rack (#4) While still hot coat with olive oil so they don’t stick together after they cool.


My wife admitted that while good, these pirogi were only vaguely reminiscent of the pirogi of her childhood. (Maybe an afternoon spent swimming is required seasoning for this dish?) Although the cheese flavor wasn’t pronounced, the overall flavor was very rich. The caramelized onions were very nice. Served this way with the tomato sauce, the pirogies were more like ravioli (can’t go wrong with that). 

Monday, March 7, 2022

Mini Lasagna cups ミニロザニアカップ

One day, all of a sudden, my wife asked if we still have wonton or gyoza skins. I said we had leftover gyoza skins frozen. I was not sure why she was asking this. I found out that she saw a recipe for “mini-lasagna cups” which uses wonton skins as the pasta. This is a good dish to make since I have been reheating my marinara sauce once a week for several weeks now to make it last. It was time to use it up. In any case, the picture below shows the mini-lasagna cups she made. They are perfect for a lunch or appetizer. The combination of flavors is very nice.


You can see the layers in the picture below; layers of ricotta cheese and spinach and alternating layers of marinara sauce (actually one time when I reheated it I put in chopped up cooked chicken) separated by the wonton skins. She ran out of the wonton skins and some of the lasagna cups ended up having a layer of Pennsylvania Dutch noodles instead. (Because she had those and hey, they are a form of pasta).
 

I am not sure where she saw this recipe but I’ll ask my wife to take over. (Note from wifey: I found the recipe in the Washington Post and as usual treated it as just advisory.)

Ingredients:
1 cup cooked spinach
1 cup ricotta cheese
1/2 tsp. salt
2 cups shredded cheese (I used a combination of dry mozzarella, smoked gouda and cheddar.)
1 1/2 cups husbandito’s marinara sauce
36 wonton skins (3 per 12 muffin cup tin)

Directions:
Mix the spinach, ricotta cheese and salt together. Put half of it in a separate bowl and stir in 1/2 of the shredded cheese. Fit a wonton skin into the bottom of a 12 cup muffin tin. (I used muffin papers to make it easier to get the finished product out but it turned out they weren’t necessary.) Evenly divide the ricotta spinach blend into each cup (#1). Fit another wonton skin on top. Spoon the marinara sauce on top (#2). Cover with another wonton skin. (Note that at this point I ran out of wonton skins so I used cooked pasta as shown in the left side of #3) Evenly divide the ricotta shredded cheese on top (#4). Top the mixture with remaining marinara sauce and grated cheese (#5). Cook in a 375 degree oven for 12 to 15 minutes until cheese on the top is melted, browned and bubbling (#6). 

These were a bit tedious to put together but they were worth it. They had all the satisfying complex flavor of a full lasagne with all the elegance of a single portion. They made a perfect lunch with a salad or a small bowl of soup. 

Friday, March 4, 2022

Home-made cream cheese 自家製クリームチーズ

 Recently there has been a shortage of cream cheese . For several weeks we tried to order cream cheese from our regular grocery store and found out all cream cheese and its derivative products were out of stock. Since making cheese has become my wife's thing, she decided to address this shortage the same way she addressed other shortages during covid by making her own. She searched the web for a cream cheese recipe. One thing she noticed was that the recipes for buttermilk on the web were basically ‘take milk and add acid (lemon juice, vinegar, etc). Then the recipes on the web for cream cheese were also basically ‘take milk and add acid.’ Huh? Acidulated milk is the panacea for all things cheesy on the net? She also noticed that other recipes involved such things as rennet or cream cheese cultures that she didn’t have. 

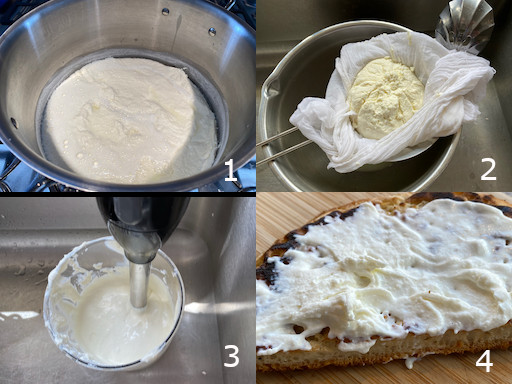
She decide to make her own recipe incorporating various aspects of the recipes she read and her own experience making cheese curd. The basic approach seemed to be combine milk and cream and curdle. She had success making cheese using buttermilk to curdle the milk so she decided to use a variation on that technique. For example, she saw that the rennet based recipes used a ratio of milk to cream of 4:1. She also used an approximation of the ratio of buttermilk to other ingredients that worked for the other cheese she made. She used those ratios to make the cheese (see the ingredients listed below). Then instead of pressing the curd as she did before, as per some of the recipes she read,  she whirred it in a food processor to make it creamy and the consistency of cream cheese. The result was really fantastic. If she can make this, we do not need to buy commercial cream cheese. The picture below is "schmear" of the cream cheese she made on a crumpet she also made. It was very good!


Ingredients:
8 cups whole milk
2 cups cream (I used light cream)
5 cups buttermilk
2 Tbs. salt

Directions.
Combine the ingredients in a large heavy bottomed pan. Slowly heat mixture until it starts to separate into curds and whey (#1). (This will start to happen just before the mixture reaches 212 degrees.) Remove from the heat and let rest for 10 minutes. Ladle the curds into a colander lined with 3 layers of cheese cloth (#2). Squeeze out as much whey as possible. Then add the curds to a food processor (I used a motorboat blender) and whir until the curds reach creamy consistency. Stir in salt to taste. The consistency will become thicker as the mixture cools. Spread a “schmear” on a piece of toast and enjoy. 

This cheese was very good. The taste of the cream really came through followed by a slight tanginess of the buttermilk. The flavor got better over the next few days. This tasted great on a cracker with a glass of wine.

Tuesday, March 1, 2022

Octopus and cucumber in sumiso dressing 蛸のぶつ切りと胡瓜の酢味噌あえ

This is nothing new; just a continuation of frozen and boiled Spanish octopus from Great Alaska Seafood. This is a good example of how an octopus leg cut can make a big difference in texture.  Boiled octopus can be sliced thinly with a wave cut or cut into chunks called "Butsu-giri" ぶつ切り. The cut that is used depends on the firmness of the cooked octopus meat. Firm texture octopus it is quite chewy. A thick slice would be too difficult to eat. The thin wave cut provides a manageably chewy piece and the wave pattern catches any sauce that is used. Alternatively if  the octopus meat is soft, the thinly slice wave cut doesn’t have any texture and basically dissolves when eaten so cutting it into chunks is the better choice. Since this octopus was a bit on the soft side, I opted for the chunky cut and made this classic "octopus and cucumber  sumiso-ae" 蛸のぶつ切りと胡瓜の酢味噌あえ. I served this with store bought squid shio-kara (right)


Since this octopus leg was more tender than ones from Japan, this "Butsu-giri" cut really worked. It is not too chewy but has nice texture.