Friday, December 23, 2022

Fruitcake フルーツケーキ

My wife likes to have special baked goods for the Xmas season. After several attempts, we gave up on making panettone and now buy it. For stollen bread, she made  it a few times but now we also buy it. This year we got two different brands of panettone from Amazon and a large stollen from Williams-Sonoma.  We also used to buy fruitcake (Claxton Fruit Cake) in the past. We were not planning on including fruitcake in this year’s line-up but I came across a recipe for fruitcake on the WashingtonPost website. Supposedly this one goes well with cheese. So I mentioned it to my wife and she went into action. (Note from Wifey: We had bought various candied fruit from Harry and David. While munching on them as a snack I thought, ‘These would be perfect for a fruitcake. So when I was presented with the fruitcake recipe, it was ‘all-systems-go”.) As usual, she made some modifications due to availability nuts and dried fruit. I helped her by cutting up the dried fruit. It was remarkably good and indeed went well with cheese (and a glass of red wine). 


Ingredients (shown in the picture below)
2 cups (180 grams) walnuts halves
1 cup (140 grams) dried mission figs, chopped into ½-inch pieces
1 cup (140 grams) dried fruit medley from Harry and David cut into 1/2 inch pieces (Original recipe called for dried dates.)
1 cup (140 grams) combination candied pineapple and mangos from Harry and David cut into 1/2 inch pieces. (Original recipe called for dried cherries)
½ cup (170 grams) honey, (I used buckwheat honey which is very strong in flavor and dark in color)
½ cup (118 grams) brandy
Zest and juice of 1 lemon
1 teaspoon ground cinnamon
½ teaspoon grated nutmeg
¼ teaspoon ground mace (may substitute with ground allspice)
1 cup (220 grams) packed light or dark brown sugar
1 cup (125 grams) all-purpose flour
1 teaspoon baking powder
½ teaspoon fine salt
1 stick (4 ounces/113 grams) unsalted butter
2 large eggs.


Directions:
Toast the walnut then roughly chop and place in a small bowl. In a medium bowl, toss together the figs, dates and dried fruit until combined. Whisk together the honey, brandy, lemon juice and lemon zest until combined, and set aside. In a small bowl, whisk together the cinnamon, nutmeg and mace. In a medium bowl, thoroughly whisk together the sugar, flour, baking powder and salt to combine then set aside.

Melt the butter in a sauce pan. Heat slowly to let the water in the butter boil off without exploding and then cook until the solids turn brown, about 5 minutes. Turn off the heat and stir in the spices (this will help bloom the flavor of the spices and suffuse them into the fruitcake). Carefully, add the honey mixture — the contents of the pot may bubble up — and stir to combine. Add the dried figs and stir to coat. Turn off the heat and let the mixture cool.

Once the mixture has cooled, stir in the eggs, one at a time, and mix thoroughly to incorporate. Stir in the dry ingredients until no trace of flour remains, then fold in the remaining dried fruit and walnuts. Grease a 9-by-5-inch loaf pan then line it with a piece of parchment paper long enough to have a generous overhang on each of the long sides. (Word of advice; be sure the parchment paper covers the entire bottom of the loaf pan because the cake really sticks to any exposed surface.) Grease the parchment as well. Scrape the batter into the prepared loaf pan and smooth out the top with an offset spatula or spoon, if needed. (Next picture below) Bake for 1 hour 35 minutes in a 300 degree oven or until the fruitcake has just begun to pull away from the edges of the pan. Transfer the fruitcake to a wire rack and let cool in the pan for about 20 minutes. Use the parchment sling to lift the fruitcake from the pan, and let cool completely before serving. (Second picture below.)


This is a really surprisingly great fruit cake. Probably the best we ever tasted. (Yes I know the baseline for fruit cake is very low, but this one stands up to any baseline for pastry.) It is very moist. The brandy, browned butter and honey really work well together to create a very complex pleasing taste. The dried fruit is slightly firm and adds another taste dimension. It also goes extremely well with a slice of cheddar cheese. The gentle sweetness of the fruit cake juxtaposed to the rich saltiness is the cheese is very nice. Next time we’ll make the fruitcake in several smaller loaf pans. The smaller pieces are just the right size for a fruitcake cheese appetizer and that combination goes very well with red wine. 

Tuesday, December 20, 2022

Nattou ball 納豆つくね

This recipe also came from a YouTube episode by the original Japanese Iron chef Rokusaburo Michiba 道場六三郎. He made two dishes from nattou 納豆, the infamous sticky and smelly Japanese dish of fermented soybeans, which often appears as part of breakfast. Nattou is most commonly eaten over rice for breakfast. Another less common but popular way is in miso soup for a dish which is called “Nattou-jiru” 納豆汁. Even among the Japanese, some (especially from “Kansai” 関西 west part of Japan) do not eat it and some love it. (I belong to the latter category). 

For many years my wife referred to nattou as the one Japanese food she just could not eat—the smell, the sliminess, the fermented taste.  (Every culture seems to have a dish like this; an acquired taste developed in childhood. Think ripe French cheese or Australian vegemite. And for me, believe it or not, cooked oatmeal).  Then my mother learned that the natto-nastiness could be alleviated by stirring it. She recommended several hundred turns would do the trick. The stirring apparently enters air into the natou that helps remove the smell and stringy sliminess. All of a sudden natto was on my wife’s menu. 

I have made quite a few dishes with nattou, many of which are focused on reducing the stickiness and the smell. In any case, Michiba made a miso soup but, instead of mixing nattou into the soup, he made nattou into balls which he called “nattou-tsukume*”  and then put it into miso soup. I made it as a small appetizer one evening.  I put a small amount of miso soup (made it a bit stronger) as a sauce and topped it with Japanese mustard (see picture below)

* “Tsukune”, “Tsukuneru” which means “knead” or “mix”, and is usually made from ground chicken and a most common item in “Yakitori” 焼き鳥.


I served two other small dishes; from left to right simmered “Kabocha” squash, miso simmered mackerel and nattou tsukune.


Ingredients (4 tsukune balls):
2 small individual packages of nattou (if frozen, thawed) with packets of sauce and mustard
1 stalk of chopped scallion
1 tbs katakuriko potato starch
2 cups of Japanese dashi broth
1-2 tbs miso
Japanese hot mustard (from tube) slightly diluted with water for topping

Directions:
Prepare the natou by adding the sauce, mustard and the scallion. Mix well (stir over 100 time if you have the time), add the potato starch and mix.
Using two spoons, moistened, I made four quenelles (or moisten your hands and make small balls) and drop them in the simmering broth.
Cook it for several minutes (see below).
You could dissolve the miso and serve this as “miso soup”. I wasn’t ready to serve the dish so I separated the nattou balls and the broth and placed them in a sealed containers and in the refrigerator.
Before serving, I warmed up the nattou balls in the preserved broth. I took out a small amount of broth and dissolved the miso to taste.
I served the miso broth in a small dish, with the nattou ball and topped with the mustard


This is a very interesting dish. The hot Japanese mustard made this dish. Although the nattou balls tasted like nattou to me, the texture and smell is quite acceptable (especially for my wife’s palate). “Mikey liked it!”

Saturday, December 17, 2022

Mini-honey corn muffin ミニハチミツコーンマフィン

This is another one of my wife’s baking projects. This time it’s mini honey corn muffins. They have a pleasant sweetness and corn flavor. The texture is coarse and they are a bit on the dry side. So, my wife concocted honey butter (shown on the muffin on the left below). This picture shows the butter before the muffin is toasted. We made the picture this way so the congealed honey butter is visible. The small muffins are quite nice as a breakfast with other assorted baked goods.


As usual, I will ask my wife for the recipe.

Ingredients:
1 cup whole wheat pastry flour (1/2 cup AP flour and 1/2 cup whole wheat flour can be used as a substitute.
1 cup yellow corn meal (corn flour might be another substitute).
3 Tbs. Sugar
2 tsp. Baking powder
1 teaspoon salt
2 eggs
3/4 cup milk (or buttermilk)
1/3 cup vegetable oil
1/3 cup honey
1 cup fresh corn (optional, I didn’t use it)

Directions:
Mix the dry ingredients (flours through salt) in a bowl. In another bowl mix the wet ingredients (eggs through honey). Add the wet ingredients to the dry and fold in the corn kernels if using them. Put into mini muffin tins lined with paper muffin cups. Bake in a 350 F oven for 18 to 23 minutes or until a skewer inserted in the center of the muffins comes out clean. Cool in the pan for 5 to 10 minutes (picture below).


These make a nice little bite. The corn and honey flavor really comes through. Not sure what the whole wheat pastry flour brings to the show. The texture is a bit coarse and dry. This situation is rectified with the application of honey butter melted on a warmed muffin. 

Wednesday, December 14, 2022

Basil panna cotta バジルパンナコッタ

This is one of my wife’s panna cotta projects. Actually this is the second try making this basil panna cotta to use the basil forest growing on our kitchen window sill. The first time she made it, she followed a recipe she found on the internet. There was way too much gelatin. The panna cotta came out solid and rubbery—like a rubber ball.  It would have bounced if dropped. We declared it a failure. So this is her second try. This time she used the tried and trusted ratio of 2 cups of liquid to 1 tsp of gelatin and it was a resounding success. It has a subtle but distinctive basil flavor and the texture was just right and melted in your mouth.

.


Ingredients:
1/2 cup cream
1/4 cup fresh basil crushed (or more to taste)
1/4 cup sugar
1 1/2 cup milk
1 tsp gelatin

Directions:
Put the cream, basil and sugar in a sauce pan. Bring to a boil then remove from the heat, cover, and let steep for 30 minutes. Pour through a fine mesh sieve to remove the solids. Press the solids to release as much flavor and liquid as possible. Bloom the gelatin over 1/2 cup of the milk. Put the bloomed gelatin in the top of a double boiler. Heat until it fully melts. Stir in the still warm basil/cream. Then the rest of the milk. Distribute it into the containers that are going to be used to chill the mixture. We used mini milk jars. Refrigerate until set.

What a major improvement over the previous attempt. The sweet, creamy, basil taste was a bit of a pleasant surprise. The texture was perfect. It was firm but very smooth and melted in the mouth. Overall this was a rather sophisticated desert just the right size to finish a dinner.

Sunday, December 11, 2022

Clam Chowder 子ハマグリのチャウダー

 Recently while talking to my wife’s sister, she mentioned that she had made clam chowder using frozen baby clams. In the past, we used canned baby clams to make clam sauce for pasta as well as chowder. We always avoided using canned chopped clams which were very chewy and rubbery. Since we could not get our preferred brand of canned whole baby clams, we have not made either pasta sauce or chowder for a long time. We checked our regular grocery store (home delivery) and found that they carry frozen baby clams from Pana Pesca. We have had frozen squid and octopus from them before. We decided to try the clams. Around the same time, I came across YouTube video of New England clam chowder by Kenji Lopez-Alt. So it appeared that all the stars and the moon were aligned for me to make clam chowder. I made a chowder based on Kenji’s and my old recipes. I used a strip of bacon and used the bacon bits and chopped parsley as garnish.


The baby clams are pretty good and the best among the PanaPesca frozen seafood we tried.


Ingredients:
10.6oz (300gram) frozen baby clams, thawed and juice preserved
One medium onion, finely chopped
3 stalks of celery, finely chopped
1/4 cup of AP flour
2 bay leaves
5-6 baby red potatoes, peeled and cut into small dice
1 medium carrot, peeled and cut into small dice
1-2 strips of bacon (or salt pork)
2, 8oz bottles of clam juice
2 cups or less whole milk (amount adjusted based on the thickness of the chowder you like)
3 tbs olive oil + 1 tbs butter
Salt and pepper to taste
Fino sherry (optional)

Directions:
In a soup pot, add the bacon and cook until crispy and set it aside leaving bacon fat in the pot.
Add the butter and oil and sauté the celery and onion until cooked but not browned (4-5 minutes on medium to low flame. I also seasoned this with salt and pepper)
Add the flour and cook for a few minutes (do not brown), add the clam juice and about1 cup of milk and stir on medium flame until thickened add more milk to adjust the thickness to your taste.
Add the bay leaves, the clams and simmer for 7-8 minutes.
Meanwhile cook the potato and carrot in a separate pot in salted water (I would have cooked the potato and carrot in the same pot in which chowder was cooking but I took the suggestion from Kenji to cook them separately so that the potatoes would not dissolve).
Drain the potato and carrot and add to the chowder.
Season with salt and pepper (you could use white pepper but I used black pepper)

For garnish, I crumbled the bacon strips and finely chopped the parsley
I also added a small amount of Fino sherry to the bottom of the soup bowl.

We were quite pleased with the quality of the clams. We had this as a lunch with several slices of rustic apricot cranberry bread which went very well.


Thursday, December 8, 2022

Black bean pumpkin gyoza 黒豆かぼちゃ餃子

My wife wanted a seasonal quesadilla which is composed of pumpkin puree, black beans, cheese, and roasted pork. After enjoying the quesadilla as a lunch, a good amount of the filling remained.  My wife suggested we use it to make gyoza. It sounded a bit like an odd combination for gyoza but I have seen a recipe for gyoza stuffed with potato salad so I complied. I added more finely chopped BBQed pork . Since we ended up with quite a good number of gyoza, we realized we couldn’t possibly eat them all before they went bad so we decided to freeze some. Then the next question was how? In the past I made up some gyoza and without any additional preparation froze them. The shells became brittle and shattered apart. So we decided some degree of preparation was required to keep that from happening again. So I boiled them first and froze a number of them that way. Then we realized that we would have to fry them before serving. So we got the (brilliant) idea that if we boiled, fried and then froze them, all we would have to do is toaster-oven them (the verb form of noun toaster oven) without thawing and then serve. In any case, the pre-boiled gyoza were fried in a small amount of peanut and sesame oil to produce nice brown crispy shells, frozen than toasted in the toaster-oven as shown below. (Easy-peasy). 


You can see, on the cut surface, small cubes of pork, black beans and pumpkin puree. It is not typical gyoza flavors but it worked. 


We have two frozen batches; one boiled but not fried and the other boiled and fried. Any bets on which batch gets eaten first?


Monday, December 5, 2022

“Canned mackerel and hanpen” Satsuma-age like fish cake 鯖缶とはんぺんの薩摩揚げ

Canned mackerel or “saba-kan” 鯖缶 is a very popular canned fish item in Japan and is readily available in the U.S. Upon inspection, of the canned mackerel in our pantry, I realized that the “Best used by” date had just passed on one of the cans. (I thought canned food lasted forever but that is apparently not the case). I needed to use this can fast and I then saw a perfect  recipe of fried fishcake on the Japanese website I follow using canned mackerel and “Hanpen” fishcake はんぺん.  This type of fishcake is called “Satsuma-age” さつま揚げ, which is a very common dish served grilled in Izakaya. Although I attempted to make Satusma-age from scratch, it was not quite authentic due to the lack of appropriate kinds of fish. The current version is interesting because instead of using ground fish meat “surimi” すり身 which is the authentic way to make Satuma-age this recipe used a mixture of canned mackerel and hanpen.  I served this with the usual grated ginger and soy sauce. It does not have the texture of authentic Sastuma-age but this was good; crispy outside and tender inside with the firmer texture of edamame and carrot. It all worked. The inclusion of ginger and deep frying toned down the otherwise strong flavor of the mackerel. This is a perfect dish with sake.


Ingredients:
One can of boiled (Mizu-ni 水煮) mackerel (190 grams with the liquid, about 150 grams fish meat), drained and crumbled
2 hanpen steamed fish cakes, frozen, thawed (240 grams), cut into small pieces.
1 tbs potato starch
1 tsp sugar
30 grams julienned carrot(1/3 of medium carrot), boiled or microwaved for 30 seconds
60 grams cooked and shelled edamame
1/2 tsp grated ginger

Peanut oil for shallow frying

Directions:
Mix all the ingredients until completely incorporated (The original recipe placed everything in a plastic bag and hand massaged it to make the dough, I did not have the patience to do that so I used an immersion blender, #1).
Mix in the edamame and carrot and make flat ovals (I made 8) (#2)
Add the oil to the frying pan to the depth of 5mm and heat to around 350F and shallow fry for 3 minutes (#3)
Turn over and fry the other side for 3 minutes (#4)
Drain and serve immediately (or once refrigerated, toaster-oven to warm).


This is not Satsuma-age but it is a nice fishcake and we really like it. Since the ingredients (hanpen and canned mackerel) are easy to get, this is a good and easy dish to make.

Friday, December 2, 2022

Tuna, avocado and nagaimo cubes まぐろ、アボカドと長芋の角切り

One evening, we defrosted Chutoto bluefin tuna まぐろの中トロ from Great-Alaska-Seafood. I divided it into 4 parts thinking that I will make 4 different dishes. I served one part of it as straight sashimi, and second part as imitation negitoro 擬制ネギトロ. I made the third part as “zuke” marinated slices of tuna 漬けマグロ.  I planned to make the 4th part to our usual Yamakake 山かけ but we had freshly cooked rice, so instead, we went for a small tuna donburi using the marinated tuna sashimi or “Zuke”  漬け鮪丼. This was quite filling and we decided to keep the tuna prepared for Yamakake for the next day. This was cubes of tuna marinated in x4 concentrated Japanese noodle sauce (short-cut version of “Zuke”).  Next day, instead of making Yamakake, I came up with this hybrid of Yamakake and tuna avocado cubes マグロとアボカドの角切. This turned out to be quite good with similar soft consistency of tuna and ripe avocado and crunchy refreshing cubes of nagaimo 長芋.


Ingredients:
Tuna Sashimi, 1/4 block, cut into small cubes and marinated in x4 concentrated Japanese noodle sauce (few hours but in this case 24 hours).
Half ripe avocado, cut into similar sized small cubes and dressed with lemon juice to prevent discoloration.
I inch nagaimo, peeled and cut into small cubes
One clove of garlic finely chopped
two scallion, finely chopped

Dressing:
1/2 tsp dark sesame oil
1 tbs soy sauce with dissolved wasabi
I topped with dried nori strips.

This was a quite good appetizer with cold sake.

Tuesday, November 29, 2022

Ikura and smoke salmon appetizer イクラと冷製スモークサーモン前菜

 We have been getting keta-slamon roe “Ikura” from Vital Choice. The available packages vary in size; sometimes only a tray of one kilograms is available and other time 6oz jars. In any case, we like keta-salmon roe the best among other trout and salmon roes. Our most common way to serve ikura is on blini with cream cheese and smoked salmon. This time, only small amount of ikura was left, so we made cream cheese wrapped with smoked salmon topped with ikura placed on a slice of cucumber.


This had most of the flavor and mouth feel of the blini. (Can’t beat the lovely salty burst of the salmon roe). But the cucumber was much less filling than one with blini.


Saturday, November 26, 2022

Cranberry tassie (mini-pie) クランベリーミニパイ

This is another one of the mini-pies or tassies my wife likes to make. Since the holiday season is upon us, we got fresh cranberries and I made my usual “figgy cranberry” sauce. My wife saw this and asked if she could use some for the tassie. I agreed but once she measured out the amount she needed I found I was left with a basically empty bowl and I had no choice but to make another batch. According to my wife, the original recipe was rather too simple calling for just finely chopped fresh cranberries with sugar. She thought this figgy cranberry sauce was much better. (So I decided the empty bowl was worth it.) She also added the crumble topping. The combination really worked. This is a wonderful small two bite dessert. The flavors are complex; slightly tangy and sweet cranberry with a fig aftertaste. As was the case  with the pumpkin tassie, this is a perfect small dessert for Thanksgiving and Xmas. We really like it.


Ingredients: (make 24)
For the crust
8 tablespoons (4 ounces/120 grams) unsalted butter, softened, but still cool to the touch
3 ounces (80 grams) cream cheese, softened, but still cool to the touch
1 cup plus 2 tablespoon (140 grams) all-purpose flour

For the topping:
1/2 cup (62.g) AP flour
6 Tbs. sugar (1/4 cup + 2 Tbs.)
1/4 tsp. salt
4 Tbs. (60 g) butter

For the filling:
2 cups of the figgy cranberry sauce*
2 eggs

*To make the figgy cranberry sauce: (#1)Frozen or fresh cranberries (12oz bag) (Do not thaw if you are using frozen).
Dried figs, coarsely chopped (1 cup)
Sugar 1/2 cup
White wine 3/4 cup
Orange peel, 2 long strips without pith
Salt, a pinch
Orange flavored liquor (I used triple sec), 2 tbs

1. Soak the figs in hot water for 20 minutes.
2. In a sauce pan, add the wine and sugar on medium flame. Once it starts to boil reduce the heat and mix to dissolve the sugar.
3.Add, the cranberries, drained figs, orange peel and cook for 10 -15 minutes stirring occasionally until the sauce thickens.
4. Cut the flame and add a pinch of salt and the orange liquor and mix.

Directions:(If you have read the other tassie recipes you may have “an acute sense of Deja Vu all over again” in reading this one).

To make the crust: In the bowl of a stand mixer fitted with the paddle attachment beat together the butter and cream cheese until smooth, about 2 minutes. Stop the mixer and add the flour. On low speed, mix until no streaks remain and the dough starts to come together, about 1 minute. Scrape any stray dough from the sides of the bowl, gather into a ball and flatten into a smooth rectangle or disc.

Cut the cold dough into 24 equal pieces. I did this by dividing the total weight of the dough by 24 to get the gram weight of each piece. (It came out to about 14 grams per piece). Make a small ball out of the dough, put it in the cup then using your thumb push down on the center of the ball forcing a depression in the center and the displaced dough up the sides of the cup. Use your thumb and fingers to further spread the dough up the sides of the cup. There is enough butter in the recipe that the papers were not necessary. Refrigerate uncovered, while making the filling.

To make the topping:
Mix all the ingredients together using your fingers until they form small pea sized clumps (#2). Set aside

For the filling: Add two eggs to 2 cups of the figgy sauce.

To assemble:
Scoop the figgy cranberry sauce into the pastry shells (#3). (I used the smallest ice cream scoop to fill the cups about 3/4 full.) Top each cup with the topping (#4 & #5) Bake in a 350 degree oven for about 15 to 20 minutes until the crumble and crust are golden brown (#6). Cool completely before removing from the pan.


These are a great seasonal two bite dessert. The flavor is surprisingly complex. The sharp freshness of the cranberries is followed by a lingering flavor of the figs combined with the yuzu orange rind and triple sec liquor. The pie crust and crumble top add two separate crunch dimensions. The crust is firmer than the crumble with a predominant butter/cream cheese flavor while the crumble is softer and much sweet further offsetting the tartness of the cranberries.

Wednesday, November 23, 2022

Pumpkin tassie (mini-pie) パンプキンミニパイ

 This is another example of a small bite tassie (pie) my wife made. This time it was a type of pumpkin pie (in keeping with the Thanksgiving holiday season) and  more of a dessert than an appetizer. She served this two ways. One was topped with cream cheese and toasted (grilled) (left) and the other as is. The pumpkin filling has all the seasoning of pumpkin pie, so this tasted like one bite pumpkin pie. The cream cheese butter crust added a nice crunch. The browned cream cheese topping definitely made it better.


Ingredients: (makes 24)
For crust:
8 Tbs. Butter
80 g Cream cheese
140 g AP flour

For the filling:
2 large eggs
1 cup brown sugar
1 cup pumpkin puree
2 Tbs. Evaporated milk
1 tsp. Cinnamon
1 tsp. Ginger
1/2 tsp nutmeg
1/4 tsp salt
(2 tsp. Of pumpkin pie spice could also be used instead of the cinnamon, ginger and nutmeg)

For topping
Small slice of cream cheese

Directions:
In a stand mixer with a paddle beat the butter and cream cheese until smooth, about 2 minutes. Stop the mixer and add the flour. On low speed, mix until no streaks remain and the dough starts to come together, about 1 minute. Scrape any stray dough from the sides of the bowl, gather into a ball and flatten into a smooth rectangle or disc.

Cut the cold dough into 24 equal pieces, (I did this by dividing the total weight of the dough by 24 to get the gram weight of each piece. That way they would at least be somewhat equal). Using your fingers, evenly press each piece into the bottom and up the sides of the 24 mini muffin cups, making sure there are no holes. I found the best way to get the dough into the cups was to make a small ball out of the dough, put it in the cup then using my thumb push down on the center of the ball forcing a depression in the center and the displaced dough up the sides of the cup. Then using my thumb and fingers spread the dough evenly up the sides of the cup. (First picture below). There is enough butter in the dough that the cups don’t need to be greased or paper cups don’t have to be used. Refrigerate for at least 1 hour. (I refrigerated over night).


For the filling if using canned pumpkin cook it in a sauce pan for several minutes until it turns darker in color and pulls away from the sides. (This helps remove the canned taste, moisture and concentrates the flavor). Let the pumpkin cool than mix in all the remaining ingredients together. It will look like the picture below. Scoop the filling into the prepared crust cups. (I used the smallest ice cream scoop). Cook in a 350 degree oven for 15 to 20 minutes until the crusts are golden brown and the filling has set. 


These are wonderful mini pumpkin pies which bear all the flavor of the fall season. They are good just eaten plain or topped with a small piece of cream cheese. They are best when toaster-ovened until the cream cheese becomes soft and develops caramelized spots.


Sunday, November 20, 2022

Daikon and Cheese dressed in umeboshi 大根とチーズの梅肉和え

I saw this dish on one of the YouTube episodes by the first Iron chef Japanese Rokusabuto Michiba 道場六三郎. Although he is now 91 he has a YouTube channel. In that episode, he oversaw the production of ultimate sake and, while visiting the brewery, made two dishes that go well with sake. This one is very simple and I had all ingredients so I decided to make it. This is essentially cubes of daikon and cheese dressed in salted “Umeboshi” sauce. I served it with cold sake and it surprisingly went very well.  


Ingredients:
Daikon, peeled and cut into small (5mm) cubes, amount arbitrary
Cheese (I used smoked gouda) cut into small (5mm) cubes, amount arbitrary
Two umeboshi, fresh (“bainiku” 梅肉) and skin removed and cut into paste, add a small mount of sugar (I sometimes add mirin but Michiba-san suggested to add sugar.

Directions:
Simply dress the cubes of cheese and daikon.

I kept this in the fridge for a few hours. This was a very simple dish to make and as Michiba-san suggested it went well with cold sake.


Wednesday, November 16, 2022

Feta, spinach and pine nuts in phyllo dough フェタ、ほうれん草と松の実フィロ包

This is a small finger food based on a recipe from “Frog Commissary Cookbook“. It is phyllo-covered spinach, cheese and pine nuts filling. This is very good with crispy multiple layers of phyllo and cheesy savory center. As good as it is, this was a quite tedious work to make. Unfortunately, even for my wife who patiently makes various baked goods requiring tedious multiple steps, folding the phyllo dough was a bit too time consuming and tedious. I helped toward the end since she was getting very tired. When we finally got them in the oven we concluded that in the future it may be easier to buy this type of appetizer from a holiday season gourmet catalog rather than making it ourselves. 


Ingredients: (makes about 30)
Spinach-cheese filling
1/4 lb feta cheese
1/2 log (4oz) fresh goat cheese
2 bags of baby spinach, cooked covered over low flame without adding water, squeezed and finely chopped
1/4 cup dill (we used a bit more), finely chopped
1 medium onion, finely chopped
2-3 scallion finely chopped
1/2 cup pine nuts, dry roasted in a frying pan
Olive oil for sautéing

Directions:
Sauté the onion and garlic in olive oil for few minutes and let it cool in a bowl
Add the spinach and dill
Flake and mix the feta and goat cheese
Add the pine nuts
(we made this one day before and refrigerated)

Assembly:
One roll (15 sheets) frozen phyllo dough, thawed. Cut the 15 sheets in half making 30 half sheets.
Separate one of the 30 1/2 sheets of phyllo, paint with melted butter and fold it lengthwise in half (#1) and paint again with butter. Place one tsp of the filling (approximately shaped like an Isosceles Right Triangle i.e. a right-angle triangle with two equal sides) on the left corner of the beginning of the phyllo (#2) Fold like folding a flag until to the end (#3) and paint more butter.
Bake it in a 375F oven for 25 minutes (#4).


The folding process made multiple layers of phyllo dough which was very light and crispy in contrast to the cheesy savory filling. The combination of feta and goat cheese really worked. After enjoying these for several days as appetizer, we may have modified the opinion we expressed earlier and decided it was worth it to make them again ourselves rather than buying them from the holiday gourmet catalog. Next time we will divide up the folding. My wife will fold 15 of the 30 phyllo half sheets and I will fold the other 15. If we manage to do this simultaneously it should take only 1/2 the time. Wish us luck.

Sunday, November 13, 2022

Avocado Panna Cotta アボカドパンナコッタ

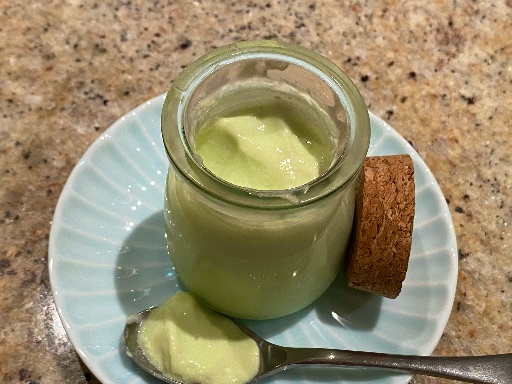
 My wife is into panna cotta and aspic. She has been collecting panna cotta recipes and some days ago, she made basil panna cotta based on one of those recipes since we have a small forest of basil on our kitchen window sill. Although she followed the recipe, it called for way too much gelatin. The end result congealed all right—in fact it solidified. It tasted pretty good. The basil flavor really came through. But it was extremely hard in texture and would have bounced like a tennis ball if dropped.  After struggling with it for a while we declared it inedible and threw it out. Somewhat in despair over the less than successful basil panna cotta she went back to the collection of recipes and decided her revenge panna cotta would be the one that  featured avocado. (Even this recipe called for too much gelatin. After the experience with the basil panna cotta and consulting the panna cotta recipes that were successful, my wife has decided the “rule-of-thumb” she will use is 1 tsp of gelatin for every 2 cups of liquid. So she reduced the amount of gelatin for this dish accordingly.)  It came out perfectly. The consistency was very creamy and with a good flavor of avocado. She made this in a small glass jar with cork lid and it was just the right amount. This is a perfect light dessert.


This recipe is from on-line but as usual, she made significant modifications.

Ingredients: (made enough for 6 small jars)
500 ml.milk
75ml cream
1 tsp. gelatin
1 ripe avocado
23 g. Sugar
1 teaspoon of vanilla extract

Directions:
Bloom the gelatin in the cream. Put the bloomed gelatin in the top of a double boiler and heat until it melts. Slowly add the milk and sugar. Allow the mixture to come close to boiling stirring constantly until all the gelatin and sugar are dissolved. Allow the mixture to cool. Add the vanilla. Pour all the mixture in an immersion blender tube container together with the avocado meat. Blend until smooth. Sieve the mixture to ensure smooth and creamy texture. Then pour the mixture into a mold or ramekin. (In this case small jars as shown in the picture below.) Chill for at least 2 hours before serving.


This panna cotta was the perfect consistency. It was congealed but very tender and smooth. It just melted in the mouth. The flavor was very subtle and sophisticated. The taste of avocado came through and went well with the subtle vanilla. My wife felt very relieved and vindicated. From here on out: 1 tsp gelatin for every 2 cups of liquid. 


Thursday, November 10, 2022

Chilean Sea bass チリアン・シーバス

 We eat lots of fish. When we lived in California many years ago, we really liked  “Chilean sea bass” which is buttery moist yet flakey and very difficult to overcook and make dry. Then we learned the real name of this fish is ‘Patagonian toothfish” and, at that time, that the fish was frequently illegally poached. So we stopped buying it and forgot about it for a long time. Then, my wife found Chilean sea bass available at Vital Choice which came from MSC (Marine Stewardship Council) -certified sustainable fishery. We remembered how wonderful it was and ordered it, although  it was a bit on the expensive side.

Digression alert: “Chilean sea bass” is said to be the most popular in US, and EU as well as in Japan. (Although when I was in Japan I did not know about this fish.) In Japan, this imported fish is reportedly called “mero” メロ or “ginmutsu” ギンムツ.

The fish was as wonderful as we remembered. Actually the first time I cooked this fish, I did not take a picture. So, I made the same dish a second time in an identical fashion. This was simply sautéed in butter with a caper lemon butter sauce. The sides were  cauliflower purée and haricot vert (pre-blanched) and Campari tomato (skinned) sautéed in butter. Everything went well together but the combination of cauliflower puree and Chilean sea bass was sublime.


Ingredients (2 servings):
2 4oz frozen Chilean sea bass, thawed, seasoned with salt and pepper

For Caper lemon butter sauce
2 tsp pickled capers (from a jar)
1 tbs unsalted butter
1 tsp lemon juice (half lemon)

Directions:
Cook the filets in melted butter on medium flame, turn once after 5 minutes and cook another 5 minutes (I put on the lid since one of the filets was rather thick)
Once cooked, set aside on a plate
In the same pan add the butter. capers and lemon juice and quickly warm them up then pour over the filets

We also served small slices of mini-baguette I baked to soak up the sauce. The fish is buttery, flakey but moist. Somehow it went so well with the cauliflower puree. The green beans can be “a hit” (nicely crunchy after few minutes of steaming) or “a miss” (fibrous skin no matter how you cook) but this one was definitely “a hit”.

Monday, November 7, 2022

Pickled “Takuan” daikon and cream cheese 沢庵とクリームチーズ

 Among the Japanese pickles, “Takuan or Takuwan*” 沢庵 is common and traditionally made from “Daikon” 大根. My mother (and many other “mothers’) used to make it at home in the traditional way. First the daikon was hung to dry and then mixed with salt, rice bran and other ingredients in a wooden tub. Weights (often river rocks) were placed on a wooden lid which was slightly smaller than the opening.  It was then left to ferment for several months.  (In my mother’s case, it was left in the root cellar). In my childhood, it was a common fall scene to see daikon out hanging to dry often on the rack used to dry clothes. Nowadays, the vast majority of takuwan is produced commercially. The takuwan has a characteristic yellow color which traditionally came from a type of fruit called “Kuchinashi” クチナシ or “Gardenia” (this is just for color not for flavor) but commercial products may use other yellow food coloring.

*Growing up in Sapporo, Hokkaido, we always pronounced it “Takuwan” but elsewhere in Japan, it may be pronouced as “Takuan”.

In any case, when I was picking up our take-out order of sashimi and sushi at Tako Grill the other day, I saw a package of “Takuwan”. I have not had takuwan for many years but I am sure I was influenced by seeing a YouTube episode which featured a dish made of takuwan with cream cheese which the host clearly announced he did not like and thought it was very strange. I thought it was a very interesting combination and wanted to try it. After coming home, I tasted the takuwan and it was kind of salty and sweet at the same time and nicely crunchy. After a quick Internet consultation, I made two variations and served them with crackers.


The first one (shown on the left) is cream cheese flavored with miso mixed with juliennes of takuwan and carrot. The second shown on the right is made with cream cheese, soy sauce, and takuwan.

Ingredients and Directions (Miso flavored):
50gram cream cheese, softened at room temperature
1 tsp of miso (I used “awase miso” 合わせ味噌 or mixture of “red” and “white” miso)
Takuwan and Carrot , thin juliennes, arbitrary amount
Mix everything.


The second one is a soy sauce flavored cream cheese with small dice of takuwan and topped with freshly cracked black pepper.


Ingredients and Directions (soy sauce flavored):
50gram cream cheese, softened at room temheprature
small dices of takuwan, amount arbitrary
A mixture of soy sauce and wasabi to taste
Freshly cracked black pepper to taste
Mix everything.


Unlike the YouTube sequence which inspired me to try this dish, our assessment which differed from that of the host was that both were quite good and went well with the Cabernet we were having. The first one with miso has more complex flavors and lots of umami. The second one definitely needed the cracked pepper. Sweet and salty and peppery with some crunch from the takuwan went well.

Friday, November 4, 2022

Salmon-Spinach Tortas 鮭とほうれん草のケーキ

My wife is into making small appetizers. When she saw the recipe called “Tuna-Spinach tortas” at Washington Post on-line, it was a “must-do”. Although she liked the idea of a small tortas, canned tuna does not grace our pantry…ever.  (Instead, we keep frozen sashimi-grade tuna in the freezer). We also like salmon and almost every other week we get a half-salmon filet (A special available from the local grocery store only through home delivery). I scale it and using the main portion, make several fillet portions. I then separate the belly portion for an appetizer and use the resulting small irregular trimmings including the tail portion of the filet to make salmon cakes. After we cook the fillets (usually cooked in a frying pan to make crispy skin), I make salmon salad from the leftover portions.

This time my wife used the salmon salad I made from the left over salmon fillets instead of the canned tuna called for in the original recipe. The salmon salad was a bit different from what I usually make since we did not have enough cooked salmon fillets so I oil-poached the irregular bits of fresh salmon to make about 5oz of salmon. The oil poached salmon was much softer and more moist than our usual cooked salmon.  In addition, we did not have home-made Greek yogurt. So I used all mayo instead of mixture of mayo and Greek yogurt.

The tortas came out very nice and the salmon filling was moist but made a nice crispy shell. Although we cannot tell how the original canned tuna version would have been, this is pretty good.


As you can see in the picture below, the top portion is mixture of spinach, tomato and egg. The bottom is mixture of cheese and the salmon salad.


Ingredients: (12 cupcake sized servings)
2 bags of baby spinach cooked and drained
5 oz. Cooked salmon made into salmon salad (end amount about double the amount of salmon)
1/4 cup Parmigiana-Reggiano cheese grated
1/4 cup smoked gouda grated
3/4 cup plain panko (bread crumbs)
4 large eggs
4 Campari tomatoes
1 teaspoon kosher or sea salt
1/8 to 1/4 cayenne pepper

Directions:
Preheat the oven to 400 degrees. Grease the wells of the muffin pan with cooking oil spray. Combine the salmon salad, cheeses and panko in a mixing bowl. Divide it equally among the muffin pan wells, packing it in firmly. (I used second to largest ice cream scoop).

Lightly beat the eggs in a bowl. Coarsely chop the tomatoes (to taste), then add to the eggs, along with the salt and pepper. Add the spinach to the bowl. Stir until well incorporated, then spoon equal amounts of the mixture on top of each tuna portion in the individual muffin pan wells (#1). Bake for 15 to 20 minutes, until set and lightly browned (#2). Let cool for a few minutes before carefully inverting the tortas on individual plates. (#3 & #4)


This makes a great little dish that can be used as an appetizer or even part of a lunch. We were amazed at how it came out. Somehow the panko combined with the egg mixture makes a nice crisp crust on the bottom so the salmon salad seems like it is a pie filling. The salmon salad itself made a great filling. It was moist but held together. The flavors of the celery, onion and mayo used in the salad fused beautifully. The topping added a fresh note of tomato which went very well with the salmon filling. Overall this is an amazing little torta. 

Tuesday, November 1, 2022

Salmon-Scallop Spinach pate 鮭と帆立のパテ

 My wife’s sister mentioned that recently she made a great carrot cake and apple pie. She said the recipes came from a cookbook called “Frog Commissary Cookbook” by Steven Poses which was published in 1985 (and presently out of print). While we were talking about the cookbook, I quickly searched for it and found a used one in good condition at Amazon and ordered it.

Digression alert: My wife’s sister originally lived in the Philadelphia area and was familiar with the Frog Commissary when it was in vogue back in the 1980’s. It was an exclusive catering service for the Franklin Institute which is the science museum in Philadelphia. The cookbook is based on Steven Poses former restaurant (called “Frog”) and his catering experience at the Franklin. Although we had never heard of it, back-in-the-day, the Frog Commissary Cookbook” was a “must have” in the Philadelphia area much like San Francisco a la Carte by the Junior League of San Francisco was about the same time while we were living in the San Francisco area. 

As my wife and I were browsing through the book we both thought this seafood pate recipe was worthwhile to try. The recipe as shown in the cookbook is of catering proportions and large enough to serve a multitude of people. As a result it required some scaling down. In my scaled down version, however, I was not aggressive enough in the seasoning; more seasoning would have been better. Although nothing was listed as a possible sauce in the original recipe we felt it called for one. After some experimentation I came up with two sauces that worked pretty well.  I served it with a side of tomato and cucumber dressed in olive oil and balsamic vinegar.  In any case, it is rather good looking and subtle flavored pate.


As I mentioned I thought the original recipe was sort-of a restaurant size and I reduced it by 1/4. This was not easy since the original amounts were not in metric. I first converted the non-metric weight and volume to metric and then divide those by 4. The seasoning should have been more than just 1/4 of the original recipe. (The seasoning amounts below reflect the suggested increase).

Ingredients: (makes one mini-loafpan)
Salmon-scallop mixture
85 g scallops
85 g salmon filet
1 egg white
1/8 tsp nutmeg (or to taste)
1/2 tsp. salt (or to taste)
1/4 tsp pepper (or to taste)
1/8 tsp cayenne (or to taste)
1/2 tbs (7ml) brandy
100 ml heavy cream

Spinach-scallop mixture
3 g butter
3.7ml minced shallots (half of medium shallot)
1/2 cup packed fresh spinach (30 g, cooked, moisture squeezed out, finely chopped)
1/8 tsp salt
1/16 tsp pepper
1/2 tbs minced dill
25 g scallop
15 ml heavy cream

Directions:
Salmon-scallop mixture
Cut up the salmon and scallops into a small size and place in a food processor (I used a mini-food processor) and process for 1 minute or until all chopped up
Add the seasonings, egg white and brandy and process 10 seconds
Place in a bowl and add the cream in several increments and mix until smooth.
Cover and refrigerate.

Spinach scallop mixture
Sauté the shallot in butter for 4-5 minutes (I seasoned this with salt and pepper), let it cool.
I cooked the spinach in a wok, lid on, at very low heat without any liquid (our usual way) for 7-8 minutes occasionally mixing top and bottom portions of the spinach until completely wilted and cooked. Cool, squeeze out the moisture and cut it up.
Place the shallot, spinach, and dill in a food processor and process for 10 seconds, add the chopped scallop and process additional 30 seconds or util smooth.
Transfer to a bowl and mix in the cream and mix until smooth

Assembly:
I first lightly oiled all surfaces of the loaf pan with olive oil. I lined the loaf pan with two portions of parchment paper in the shape of a cross with all sides covered (#1 picture below).
Add half of the salmon-scallop mixture, make shallow trough using the back of a wet spoon and add the spinach scallop mixture to the center in a log shape (I used a spatula and spoon to do this) (#2).
Add the remaining salmon-scallop mixture and smooth the surface.
Cover the surface with parchment paper (which I forgot but no ill effect) (#3) and then cover the loaf pan with aluminum foil (#4).
Bake in the toaster oven on convection mode at 350F using a bain marie (larger pan with hot water covering at least half of the depth of the loaf pan) for 35 minutes or internal temperature registers 135F.
Remove the aluminum foil and let it cool on the rack until reaching room temperature.
Unmold the pate by gently lifting the ends of the parchment paper lining (#5).
I placed folded paper towel on the bottom of a tight fitting sealable plastic container and refrigerated.
The cut surface is very attractive with green center (#6).


This was very elegant and very good. But I think we can improve on this. Although the color contrast is nice, we are not sure if we need the spinach in the center. Just all salmon-scallop pate could be nicer and easier to make. In terms of the sauce, we tried three sauces; aged Balsamic vinegar, wasabi soys sauce, and yuzu-kosho ponzu. All worked well but we liked the classic wasabi-soy sauce best. The amount we made is just right for most people. I think the usual wine pairing would be a dry white or sparkling wine. We had it with our usual red.

Saturday, October 29, 2022

Tako rice and Matsutake soup for lunch タコ飯と松茸のお吸い物昼食

 This was a lunch we had one day. We had leftover frozen octopus rice or “Tako meshi” たこめし made from a kit we got from the  Rice factory. Although the original was not bad, the amount of octopus was rather small. Since I made tender simmered octopus タコの柔らか煮 a few days ago, I added slices of octopus legs to the previously made rice. Also we had matsutake mushroom 松茸 from Maine and made clear matsutake soup 松茸のお吸い物. I added a dish of salted vegetable or “asazule” 浅漬け and simmered root vegetables and chicken similar to “Chikuzen-ni” 筑前煮.


I  just microwaved the rice to thaw it then added slices of tender simmered octopus with a small amount of the simmering liquid and further heated it. I also garnished it with fresh “myouga” 茗荷 from our garden. The addition of the simmered octopus made the Tako rice much better than the original.


I made this clear soup from broth made from a dashi pack (kelp and shiitake), with mirin みりん and light colored soy sauce 薄口醤油. I also added shrimp (sunk in the bottom), scallion and flower-shaped “fu” 花麩 gluten cake. I also added frozen zest of yuzu 柚子 citrus. This is a lidded soup bowl and when the lid was opened the subtle but distinctive aroma of matustake and yuzu wafted out. (The aroma of matustake is one of the joys of the matusake season).  I think Maine matsutake appears to have a better aroma than the ones we used to get from Oregon.


The below are basic simmered root vegetables including daikon 大根, carrot 人参, bamboo shoot 筍, shiitake mushroom (I used dried) 椎茸, lotus root 蓮根, kon-nyaku 蒟蒻 and sugar snap スナップ豌豆 (for garnish). This time I also included chicken thigh.


This is my usual “asazuke” 浅漬け. I just made myouga in sweet vinegar 茗荷の甘酢漬け. I thinly sliced and served next to the vegetables.


For a lunch, this was quite good. 

Wednesday, October 26, 2022

Spinach cheese puffs ほうれん草チーズパフ

This is one of those small cheesy appetizers my wife likes to made. She saw this recipe on line and also realized that one of the boxes of frozen puff pastry was getting old. On the top of that, she cooked 2 packages of baby spinach and was looking for the best way to use them. So, all converged to result in this dish. I helped in preparation and clean-up. This is cheesy with a nice lemony flavor from the lemon zest. The puff pastry was still good and made a light crispy shell. This is a bit on the larger side and half  per person is just perfect size for us.

As usual, I ask my wife to take over.

Ingredients:
One sheet of puff pastry
2/3 cup onions finely diced
4 garlic cloves finely diced
8 oz. Cream cheese
2 eggs
2 packages of fresh spinach, cooked and drained
1 1/2 cup feta cheese finely crumbled
4 tbs. Dill
4 tsp. Lemon zest

Directions:
Cook the onion and garlic in a frying pan. Set aside to cool. Soften the cream cheese by lightly microwaving it under the defrost setting. Cream the softened cheese together with the eggs. Add the rest of the ingredients and stir until completely combined.

Cut the puff pastry into 9 squares. Roll out the squares so they are large enough the put in the greased cups of the muffin tin with the edges hanging over the sides (#1). (It was a bit tedious convincing the pastry to go into the cups. Also, the 9 filled cups would leave 3 unfilled in the 12 cup muffin tin. So I thawed some regular pie crust dough and used it for the remaining 3 cups.) (Digression: I made the remaining pie dough into impromptu cookies; roll out pastry, put butter and cinnamon sugar on half, fold the other half over, cook in toaster oven 400 degrees 15 minutes.)

Fill the pastry shells with the cheese mixture(#2) and fold the pastry hanging on the side over the cheese filling (#3). (Cover the cups with the pie dough with a round piece of dough like a pie topping.) Refrigerate 30 minutes. Bake in a 400 degree oven for about 20 to 25 minutes until the tops are golden brown (#4). Picture #5 shows the puff pastry puff while #6 shows the one made with pie dough.

Whether made with puff pastry or pie dough the result is highly acceptable. Lemon was the first taste to come through which melded into a savory onion, garlic cheese combo. Both pastries added a nice buttery crunch. Interestingly, the cream cheese mellowed out the feta very nicely. After biting into it you wouldn’t say “oh cream cheese and feta” instead you would say, “ a nice creamy savory cheese combination. What cheese would that be?”

Sunday, October 23, 2022

Chicken, navy and green bean curry 白インゲン豆、サヤインゲン入りのチキンカレー

This is my wife’s curry project. This chicken curry is based on the recipe in Madhur Jaffrey’s “Quick and Easy Indian Cooking”. The original recipe is called “Chicken, Red lentils and Green beans in one pot” (or “ek handi ka murgh aur masoor”). Of course due to the ingredients we did not have, this recipe was modified to “Chicken, navy beans and green beans”. We thought this was a quite good curry. We served it over rice with the side of cold cucumber buttermilk soup whch went extremely well.


I added blanched green beans (haricot verts) just before serving (so that they would not become “grey” beans instead of green beans). The navy beans mostly melted into the sauce and made it nicely smooth and thick.

As usual, I will ask my wife to continue. I have to say the numbers of different spices and herbs are quite impressive.

Ingredients:
6 tbs vegetable oil
3 bay leaves
5 whole cloves
1 tsp ground cardamon
2 inch stick of cinnamon
3 onions, roughly chopped
2 cloves of garlic, finely chopped
1/2 tsp ground turmeric
2 tsp salt
1 1/2 tsp garam masala
1 1/2 tbs lemon juice
generous pinch of asafetida
1 1/2 tsp cumin seeds
1 tsp ground cumin
1 tsp ground coriander
1/8 tsp cayenne pepper
14 oz can of navy beans
24 oz can of whole plum tomato, stem end removed and crushed
6 chicken thighs (we put them in a pan whole without skinning or deboning. After they are cooked and cooled down we removed the bones)
(Juice from the plum tomatoes reserved to provide added liquid later as the dish cooks)

The picture below shows the line-up of spices and herbs; from left to right are whole cloves, bay leaves, ground cardamon, sticks of cinnamon, turmeric, salt, gram masala, asafetida, cumin seeds, ground cumin, ground coriander, and cayenne pepper.

Among the spices, was garam masala (we use an authentic Indian brand). The asafetida is a little unusual (at least for us). It comes from the rhizome of the ferula plant (or giant fennel plant). It is used in Indian cooking as a flavor enhancer. It is supposed to add a smooth flavor reminiscent of leeks and onions (although we are not sure we could identify what it added to the dish.)


Directions:
Put the oil in a pan and when it is shimmering add the bay leaves through cinnamon and bloom them until the bay leaves turn slightly brown and the smell becomes fragrant. Remove the cloves (so no one eats them by accident.) (The bay leaves and cinnamon stick are large enough it is not likely someone would eat them if left in the sauce). Add the onions and fry until translucent and slightly browned. Add the garlic and cook until it becomes fragrant (but not burnt). Add the spices ground turmeric through cayenne pepper. Bloom the spices until fragrant. Add the beans and tomatoes and stir until blended. Add the chicken, skin side down and cover with the sauce. Cook on low simmer for 1/2 hour. Turn the chicken over and cook for another 1/2 hour. Add the reserved tomato juice as needed to keep the sauce from scorching.

This is another really good curry. All the spices blend and meld together making for a complex dimension of flavor. It is not hot but the cayenne pepper gives it a pleasant slight “buzz”. The beans basically melted into the sauce making it very rich and creamy. The spices infused the chicken meat which was very tender and basically fell off the bone.