Showing posts sorted by relevance for query aspic. Sort by date Show all posts

Sunday, May 24, 2015

Red snapper in aspic 鯛の煮こごり

I did not make this dish, the dish made itself! We recently had simmered red snapper. (This was the second time we had this dish in recent weeks). We could not finish one whole fish so my wife carefully removed the meat sans bones and placed it in a sealable container, poured in the left over simmering liquid and placed the container in the refrigerator. A few days later, when I tried to serve this leftover fish, I was pleasantly surprised to find this dish; simmered red snapper aspic. In Japanese, this type of jell or aspic is called "nikogori" 煮こごり. When I was a kid this usually happened in winter when our kitchen was very cold and the leftover simmered fish (I remember it was often sand dabs) was covered with its own natural aspic. The best way to eat this was to put it on the top of hot steamed rice. The aspic started melting immediately and seasoned the rice nicely. When I saw what had happened with the red snapper that came out of our fridge, I quickly changed gears and served this eclectic dinner featuring red snapper aspic as the main dish. The rest of the plate came from whatever we had in our refrigerator.


Here is a close-up of the aspic. Although we did not intend to make this dish, this was nicely done.


I made Chinese -style "nibuta" 煮豚 sometime ago and last weekend I also made "ajitsuke tamago"  味付け卵 and served that.


I also served a small slice of Chinese simmered pork and cucumber/onion salad with fresh dill dressed in rice vinegar and Greek yogurt (my wife made the Greek yogurt by draining regular yogurt through cheese cloth in the fridge overnight).


Ajitsuke tamago:
This is the most common topping for ramen noodle. I made soft boiled eggs from home pasteurized shell eggs using my sous vide machine. I then soaked the eggs in the simmering liquid of the pork and let it sit for a few days. This process seasoned the eggs as well as changed the consistency of the egg yolks. I could have made "softer" boiled eggs but this was just fine.

I also served steamed green asparagus that I prepared the prior weekend with mayo. Since we did not have a time to prepare rice, I microwaved leftover rice and garnished with dried ao-nori. By the time, we were ready to eat, the rice was not hot enough to melt the aspic but it was good. Since the seasoning was on the light side, this worked better. This was a rather well balanced eclectic meal

Saturday, September 23, 2023

Creamy Tomato Aspic Salad クリーミートマトアスピックサラダ

My wife is a great fan of ribbon or aspic salad which now appears to be out of fashion. I also developed a liking for these aspic salads. Somewhere on-line, she came across a recipe for “creamy aspic salad”. She also had some V-8 juice left over from when she made ribbon salad so she decided to use it making this creamy aspic. As usual, although she got the idea to make the aspic from the recipe she modified it to her liking to accommodate the ingredients that were available. The most difficult part of making aspic is determining the correct amount of gelatin to use. Too much gelatin makes it like rubber and too little and it won’t hold together and keep its shape. This one was a bit on the softer side but had nice flavors and texture from using ricotta cheese and some crunch from celery.


Beside the celery, it has sliced and chopped green and black olive which gives a burst of salty flavor.


Ingredients:
3 cup V8 juice
2 packets of powdered gelatin (the end result was a bit soft so maybe another 1/2 packet of gelatin would make it firmer)
1 tbs sushi vinegar
2 tbs Worcestershire sauce
1/4 tsp salt
1 cup Ricotta cheese (I used 3/4 cup ricotta and 1/4 cup sour cream)
1 small onion (sweet or Vidalia onion), grated
2 stalks of celery, finely chopped
5 each Kalamata and oil cured olives, stone removed and chopped
5 pimento stuffed green olives, thinly sliced

Directions:
Soak the powdered gelatin in a cup of the V8 juice. Mix the remaining V8, vinegar, Worcestershire sauce and salt. Combine the ricotta and sour cream. Mix the cheese into the V8 vinegar mixture. Cut up and prepare the vegetables. Heat the soaked gelatin in the top of a double boiler until completely dissolved. (This is the only way I found to make sure all the gelatin is dissolved.) Add to the cheese mixture and stir to combine completely. Pour into the 9 X 13 pyrex pan and refrigerate. When the mixture becomes semi-solid stir in the vegetables. (This will encourage them to spread through out the mixture instead of sinking to the bottom.) Chill until fully set.

This is a very refreshing dish served cold on a hot summer day. The cheese and sour cream tone down the acidity of the V8 juice while ironically the sushi vinegar adds a nice acidic sharpness. The grated onion completely blends nicely into the mixture rather than standing out. The chopped veggies add a nice texture and the celery in particular really makes the dish. This is a good summer salad.

Tuesday, October 11, 2022

Cold cucumber soup and aspic addendum 冷製胡瓜スープと胡瓜ゼリー

 Because we got 4 large American cucumbers instead of the 4 mini cucumbers we ordered for our recent groceries delivery, we decided to use them to make cold cucumber soup and cucumber aspic. We served the aspic with dill sauce. Although both dishes were very good and we ate each one individually for several lunches, my wife came up with the idea of combining the two. She placed the aspic in a bowl, poured in some of the soup and topped it with the sauce.


The result was an example of “the whole being greater than the sum of its parts”. The soup combined with the dill topping acted like a sauce which perfectly complemented the aspic. Cucumber was the predominant flavor but subtle differences in the flavors of the various ingredients that went into the soup versus the aspic added a pleasing complexity. In the future, we think this would be the preferred way to serve these two dishes so we decided to write this addendum to make that point. This cucumber combination also worked very well especially with the chicken curry we had with it for lunch. 

Saturday, October 8, 2022

Cucumber aspic 胡瓜のゼリー

This is the second dish we made using the large American cucumbers we got through grocery home delivery by mistake. Since my wife is into anything “aspic”, this was “the dish” for her. It turned out to be remarkably good. For the picture I added slices of Japanese cucumber as a topping garnish and made an instant dill sauce. My wife later made a different sauce for this dish which is based on dressing for cucumber salad. and it worked well. The cucumber flavor of the aspic was very subtle. Most of the cucumber flavor seems to have come from the garnish of Japanese cucumbers but the aspic had a nice texture and fairly complex flavors.


This is based on the recipe on cooks.com.

Ingredients:
2 large American cucumbers, peeled and seeded, grated (I used a Japanese grater to get a fine grated texture)
1/2 c. cold water (We felt that plain water brings nothing to the “show” so we used lightly sweetened cold mint/black tea that my wife makes for the summer months because it was available. Chicken stock would probably work too).
1/2 c. boiling water
2 tbsp. Knox gelatin
1 tsp. grated onion (we used Vidalia onion)
2 1/2 tsp. salt
1 tsp. sugar
2 tbsp. vinegar (we used sushi vinegar)
2 tbsp. lemon juice
Dash of Tabasco sauce (we used Sriracha)

For sauce
Version 1
1tbs Greek yogurt
1tbs sour cream
1 tsp lemon juice
1tbs chopped dill

Version 21/4 cup sour cream
1/4 cup Greek yogurt
1/4 cup Mayonnaise
2 Tbs. sushi vinegar
1 Tbs. Worcestershire sauce
1/4 tsp. sugar
1/2 tsp. salt
1tbs chopped dill

Directions:
Bloom the gelatin by soaking it in the cold water for 5 minutes. Then add the boiling water, stir until thoroughly dissolved, then add all the other ingredients. Put into molds and set in refrigerator to congeal. Yield 6 servings.

This was a very light refreshing dish perfect for a hot summer day. Although the cucumber taste was very subtle the entire refridgerator smelled of cucumber as the aspic was solidifying (which was a very pleasant smell). The flavors were subtle but complex. No single one stood out. For example there was a slight hint of the mint from the tea and a slight hint of the onion. We could have used a bit more hot sauce. The texture was very smooth and pleasing. The sour cream based sauce with the dill really finished the whole dish nicely. Maybe getting the wrong cucumbers wasn’t such a bad mistake after all. 

Thursday, September 8, 2022

Tomato ribbon salad version 2 トマトリボンサラダ V2

This is another variation of my wife’s famous ribbon salad. The red layers are tomato juice based aspic but  the cream cheese-based white layers are a bit more complex than the previous version. I helped by chopping up and slicing the ingredients. Initially, my wife was dissapointed since she expected the white layer to be more flavorful. But a few days later when we had this again, the ingredients had melded together and we could taste much more flavor.


Ingredients for Tomato aspic:
3 cups tomato juice (we used V-8)
1 tsp. salt
1 tsp. sugar
2 tsp. Sushi vinegar
1 Tbs. Worcestershire sauce
Onion juice to taste (About 3 Tbs.
2 envelopes gelatin

Ingredients for white section
1 envelope of gelatin
1/4 cup cream
1 tub (8 oz.) or 1 block (8 oz.) Philadelphia cream cheese
1/4 cup sour cream
3 tbsp. mayonnaise
2-3 ribs celery, minced
1 med. green pepper, (jalapeño) finely chopped
2 med. onion, finely chopped
1/4-1/2 cup pimento stuffed olives, sliced
1/4-1/2 cup ripe (black) olives, sliced (we didn’t use because we didn’t have) 
(Optional) 1 ripe avocado, peeled & sliced (we did not use) 

Directions:
Soften gelatin in 1/2 cup of the tomato juice. Add mixture to the top of a double boiler. Heat until the gelatin melts. Put the rest of the tomato juice in a pan. Heat until all ingredients dissolved. Add the gelatin that has been melted in the double boiler. Chill 1/2 of the tomato aspic until set, in a 9 x 13 inch pyrex dish (below).


Soften the gelatin in the cream. Add mixture to the top of a double boiler. Heat until the gelatin melts. Mix cream cheese, sour cream and mayonnaise until smooth. Add the melted gelatin then the chopped celery, jalapeño, and onion. Spread cheese mixture over the congealed aspic. Add the olives on top of the cheese mixture. (Next time it would be better that the olives are finely diced.  Cut like this they made it hard to slice the ribbon salad into servings). (If using avocado lay the slices on top of the cheese mixture.) Refrigerate until firm (below).


Pour the second half of the tomato aspic gently over the avocado slices, to cover all. Cover with saran wrap and refrigerate until set.


Although this is a variation on the previous tomato ribbon salad, it is clearly in the same tradition. The red layer is much the same. The white layer is much softer. The olives are a great addition. They add a burst of saltiness. The flavors get much more pronounced after a day or two when the ingredients have had a chance to meld together. In general, this salad and its precursor are a light cool refreshing addition to a meal on a hot summer day.

Monday, September 7, 2015

Chicken aspic terrine 鶏肉のジェルテリーヌ

When we barbecue chicken in the Weber grill, we usually cook two birds since the effort to add another chicken is minimal once the Weber is set up. We eat only a small fraction of the two birds on the day we cook them. We removed the meat and use it for other dishes such as the sandwiches we take to work. I also use the cooked chicken in small dishes such as chicken with sesame sauce or chicken quesadilla. The easiest way to use up the cooked chicken meat before it goes bad is in chicken noodle soup. I wanted to come up with some other dishes I could make using the cooked chicken. I was thinking of making some kind of terrine and came across this recipe on the Web.  The original recipe uses uncooked chicken breast to start but I modified it to use our cooked chicken.

The image below is the "remake" of my first attempt. I missed one sentence in the recipe "Terrine will be quite fragile: If slicing, use an electric knife; otherwise, serve with a spoon". The first terrine (see picture below, the second from the bottom) was so fragile and I could not slice it using a regular (very sharp I might add) knife.

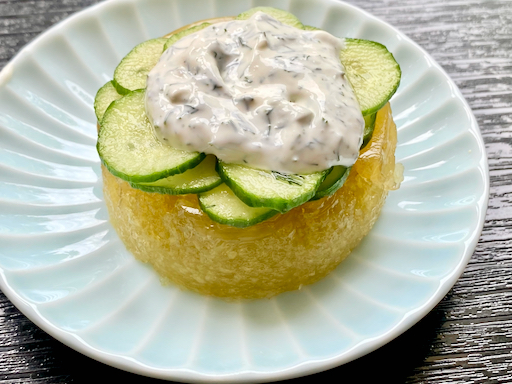
After the remake, I could slice it and present it on the plate. I served it with fresh cilantro and the sauce  (hoisin and rice vinegar) (below).


I served this with soba noodles which was suggested in the original recipe. I did not think the hoisin sauce would be suitable for soba so I served the usual dipping sauce with the addition of nori and scallion.


Come to think of it, we have not eaten soba for some time. But in hot summer this is a good especially in combination with the chilled and jellied chicken terrine.


This was a cold plate lunch on another day. I served this terrine with my potato salad, grilled corn and black bean salad, bulgur wheat salad and Montparnasse cauliflower.


I made some modifications the the original recipe especially since the chicken meat I used was already cooked.

3 cups chicken broth, fat skimmed (I used low fat low salt Swanson chicken broth).
1/2 cup medium-dry Sherry (I used half and half of sake and mirin, instead)
2 teaspoons soy sauce (I used light colored soy sauce to keep jell light in color)
1 1/2-inch piece fresh ginger root, cut into 1/4-inch-thick slices
6 scallions, each cut crosswise into thirds and flattened with the flat side of a large knife
1 1/2 tablespoons star anise pieces, crushed lightly
1/2 teaspoon salt
1 pound skinless boneless chicken breasts*(about 3 breast halves) (I used both white and dark meat from barbecued chicken, hand shredded about 2 cups).
1 envelope plus 1 1/2 teaspoons (about 4 1/2 teaspoons total) unflavored gelatin (I added one more package when I remade the terrine).
1/2 cup fresh cilantro  leaves, washed well and spun dry

*If using uncooked chicken, porch in the broth for 15 minutes and after removing the chicken, add water to make the amount of the liquid to 3 cups.

For sauce
2 tablespoons hoisin sauce
4 teaspoons rice vinegar (not seasoned)

I put the chicken broth in a pan with sake, mirin, ginger root, scallion, star anise, and light colored soy sauce (I did not add the salt). I simmered it for 25 minutes, strained and removed the solids and returned the broth in to the pan and added shredded chicken (both breast and dark meat). After 15 minutes of simmering, I separated the meat and broth using a sieve. I tossed the chicken meat with cilantro leaves and placed it in a terrine as seen below.


Meanwhile, I sprinkled the gelatin powder in 1/4 cup of water and let it bloom. I put the broth back in the same pan on simmer and whisked in the bloomed gelatin. when the gelatin melted completely, I cut the flame and poured the mixture over the chicken meat and cilantro. After the mixture came to room temperature, I moved it to the fridge and let it cool  over night. I un-molded the terrine (by soaking the bottom of the pan in hot tap water for a few seconds). It looked nice as seen below. But it was too fragile to slice. We ended up tasting (as the original recipe suggested) using a spoon. It was remarkably good. The star anise and cilantro and soy sauce all went together.


The next day, I remade this terrine. I placed the jelled terrine in a pan and warmed it until the gelatin melted. I then removed the chicken meat with a tong and placed it in the loaf pan. I bloomed an additional package of unflavored gelatin in 1/4 cup of cold water. I whisked in the bloomed gelatin and after it melt completely, I poured it over the chicken meat. This time, all the chicken pieces were coated with gelatin-broth mixture and the additional gelatin made the terrine firmer. After over night refrigeration, the terrine was formed (below).


This time, the terrine was firm enough and the all chicken pieces were coated with the gelatin-broth. I could slice it nicely without tearing the entire thing apart.  The hoisin sauce and rice vinegar combination made a nice sauce which complimented the flavor of the jellied chicken terrine very well. The addition of fresh cilantro added fresh flavor. This is rather delicate "Asian" flavored chicken terrine.  

Friday, April 16, 2010

Simmered daikon and pork 大根と豚肉の煮物

This is something I made without any particular recipe one weekday evening. The weekend before, I got pork spareribs, not because we had something in mind to make but because I could not resist the good amount of front portion, i.e. pork belly or "sanmai niki" 三枚肉 in the package. Unfortunately we did not have enough time to make any particualr dish such as "Kakuni" or Pork baked in barbecue sauce. So, my wife decided to cook it like she did for making scrapple. Quoting from the scapple post; "Parboil for about 5 minutes. Put into a Pyrex baking dish with some onions and carrots, a bay leaf and several pepper corns. Cover the ribs half way with boiling chicken stock. Cover and place into a 350 degree oven and cook for 1 1/2 to 2 hours (until the meat is tender and falls off the bone)." We figured that once it is cooked this way, we may be able to use it more easily in some dish during the week and, at worst (a figure of speech, not really worst, actually it will be "best") case scenario, my wife can make it to scrapple next weekend.

I think I was loosely basing this dish on "simmered daikon and pork" or 大根と豚肉の煮物. The way the pork was cooked to this point is not much different from the first portion of the preparation (traditional recipe) for "Buta no kakuni" 豚の角煮. I just took out one rib (removing any congealed fat) and cut the meat into 1 inch cubes. Meanwhile, I peeled and cut daikon (about 3 x 2 inches) into 8 pieces. I sauted the daikon with a small amount of peanut oild and a dash of dark sesame oil for 1-2 minutes in a small deep pot on a medium flame. I added the pork cubes (also some of the pork aspic that accumulated on the bottom of the baking pan for good measure), mirin, soy sauce (3 tbs each) and water to cover (probably about 1 cup). When it came to the boil, I turned it down to simmer and cooked for 30 minutes (We went out to the back deck to enjoy the last of the cherry blossoms with a glass of wine at this point, so it may have cooked longer than 30 minutes). In the last 3 minutes, I added broccoli. This was a surprisingly good dish especially for a weekday evening. The daikon was well cooked, soft, and a good match for the fatty pork. The pork is unctuous and flavorful similar to "Kakuni".

Thursday, May 19, 2011

Chicken wings simmered in soy sauce and vinegar 手羽の酢醤油煮

This is another variation on the ever popular bar/Izakaya chicken wing dish. I bought a package of chicken wings that had six wings in it. I removed the drumetts and used them to make  "curry flavored baked chicken drumetts". I made this dish from the remaining chicken wing tips but we did not eat it immediately. I reheated it the following evening. Although simmering (with or without vegetable) is a rather common Japanese way to cook chicken wings, I have not made this dish. I suggested this dish to my wife several times but my description of it did not elicit an ounce of enthusiasm. So I kept making baked, deep dried, or grilled wings with crispy skin instead.  This time, I showed my wife the picture from the Otsumami Yokocho Page 55 and convinced her to try this dish so that I could also blog about it. (I think the blogging ploy is what actually swayed her and she consented to eat the wings if I made them). I did not follow the recipe (for the simmering liquid) in Otsumami Yokocho thinking that it would be way too sweet for us. Instead, I used the same concoction I use to make poached chicken breast.

This dish is actually rather simple. For two small servings, I used 6 chicken wings after drumetts were removed.

Simmering liquid: Most of the recipes including Otsumami Yokocho's used either sugar or honey but I used mirin instead. I made a mixture of soy sauce, mirin, and black vinegar (Japanese style lighter kind or you could use regular rice vinegar or balsamic vinegar) (1/4 cup each or in equal amounts). I added ginger (several thin slivers) and garlic (one small clove, crushed). 

Cooking: In a small pan in which all six wings snugly fit, I poured the simmering liquid. It should just cover the wings. Initially, I put the pan on medium-high flame. As soon as it boiled, I tuned it down to simmer. (If any scrum forms on the surface, skim it off).  I put an otoshi-buta on the pot (Instead of a wooden lid, I used a newly acquired silicon lid called "pig cooking lid"*) and a regular tight fitting lid on the top. I simmered it for 30 minutes (turning once in the middle). After 30 minutes, I let it cool down to room temperature in the liquid.

*Digression alert: This silicon lid has a face of a pig with two small holes of the nostrils as steam vents and two ears as knobs to hold the lid. Japanese for lid is "futa" 蓋 but when you make a composit word with "Otoshi" meaning "to drop" in front, it will change to "buta" ("f" to "b" which is called "dakuon" 濁音) as in "Otoshi-buta" 落とし蓋. "Buta" 豚 also means "pig" in Japanese. So this is a whimsical "puny" product and works well.

Seasoned eggs: I also made seasoned eggs or 味付け卵. For this, I simply made soft boiled eggs (cooked for 8 minutes in simmering water). I used pasteurized eggs since I wanted to keep the yolks still a bit runny. I simply added the boiled eggs (shells off, of course) to the room temperature simmering liquid along with the chicken wings. You could serve the chicken wings and eggs after soaking the eggs in the simmering liquid for 30 minutes or so but I put the pan into the refrigerator at this point to eat it the next day.

The next evening, when I opened the pot I found that the liquid was completely jelled. This is because of all the collagen and protein that came from the chicken while it simmered. The liquid had become aspic or "nikogori" 煮凝り in the refrigerator. The surface also was thinly covered with chicken fat. Using a spoon, I scraped off all the visible fat from the surface and put the pan on the lowest flame to warm up. It's not necessary to boil it, just gently heat it to make the jelled liquid warm so it melts.

This was a bit messy to eat since you have to use your fingers but it was wonderful. The skin is totally different from the skin of grilled or baked chicken wings. It is very soft, unctuous with a nice smooth texture and taste. As Japanese often say, it has a lots of collagen and your skin will feel smooth after eating this. The egg was also wonderful (although soaked in seasoning liquid from pork pot roast may be slightly more flavorful). This also passed the "Mikey likes it" test with my wife. She expressed a great deal more enthusiasm than when I suggested making the dish. She ate every bit and then asked if there was any more. She suggested I make this dish again and in a much larger quantity. She also suggested I add red (hot) paper flakes (I was not expecting this kind of suggestion from her).

We started this evening with my potato salad (I used red onion this time) as an otoushi お通し.

Sunday, November 13, 2022

Avocado Panna Cotta アボカドパンナコッタ

 My wife is into panna cotta and aspic. She has been collecting panna cotta recipes and some days ago, she made basil panna cotta based on one of those recipes since we have a small forest of basil on our kitchen window sill. Although she followed the recipe, it called for way too much gelatin. The end result congealed all right—in fact it solidified. It tasted pretty good. The basil flavor really came through. But it was extremely hard in texture and would have bounced like a tennis ball if dropped.  After struggling with it for a while we declared it inedible and threw it out. Somewhat in despair over the less than successful basil panna cotta she went back to the collection of recipes and decided her revenge panna cotta would be the one that  featured avocado. (Even this recipe called for too much gelatin. After the experience with the basil panna cotta and consulting the panna cotta recipes that were successful, my wife has decided the “rule-of-thumb” she will use is 1 tsp of gelatin for every 2 cups of liquid. So she reduced the amount of gelatin for this dish accordingly.)  It came out perfectly. The consistency was very creamy and with a good flavor of avocado. She made this in a small glass jar with cork lid and it was just the right amount. This is a perfect light dessert.


This recipe is from on-line but as usual, she made significant modifications.

Ingredients: (made enough for 6 small jars)
500 ml.milk
75ml cream
1 tsp. gelatin
1 ripe avocado
23 g. Sugar
1 teaspoon of vanilla extract

Directions:
Bloom the gelatin in the cream. Put the bloomed gelatin in the top of a double boiler and heat until it melts. Slowly add the milk and sugar. Allow the mixture to come close to boiling stirring constantly until all the gelatin and sugar are dissolved. Allow the mixture to cool. Add the vanilla. Pour all the mixture in an immersion blender tube container together with the avocado meat. Blend until smooth. Sieve the mixture to ensure smooth and creamy texture. Then pour the mixture into a mold or ramekin. (In this case small jars as shown in the picture below.) Chill for at least 2 hours before serving.


This panna cotta was the perfect consistency. It was congealed but very tender and smooth. It just melted in the mouth. The flavor was very subtle and sophisticated. The taste of avocado came through and went well with the subtle vanilla. My wife felt very relieved and vindicated. From here on out: 1 tsp gelatin for every 2 cups of liquid.