Saturday, February 26, 2022

Tender simmered octopus たこの柔らか煮

I have to admit that I really like octopus (tako) and am on a constant prowl to find places to get decent tako. I have gotten octopus from a few different places with varying success and I’ve cooked it several different ways over the years. Among the seafood vendors, recently, we have been getting fairly good frozen  seafood from  Great Alaska Seafood . This time, they were selling frozen Spanish octopus legs and we tried them. (At another time, they were also selling Alaskan octopus -uncooked and frozen- but we did not try it.) The legs were from Spanish octopus, boiled and frozen (see the picture 2nd from the last below). It came as 4 pounds of octopus in 8 half pound vacuumed sealed packages. After thawing a package in the refrigerator, I thinly sliced it and tasted it. It was fresh tasting but compared to Japanese products, it was much softer. So I decided the first dish I would make would be simmered octopus  or “Tako-no-yawaraka-ni” 蛸の柔らか煮 literally meaning “tender simmered octopus”.  I tried this before with tako from other sources and despite long simmering, the octopus never got really tender. This time I have two elements which would make this dish successful; 1. This particular octopus had been pre-cooked before we received it and it was much more tender than the boiled and frozen octopus I tried before and 2. I now have a Instant pot which allows me to make this dish using pressure cooking. The combination of these factors resulted in a dish that was quite a success. The octopus was very tender and flavorful. 

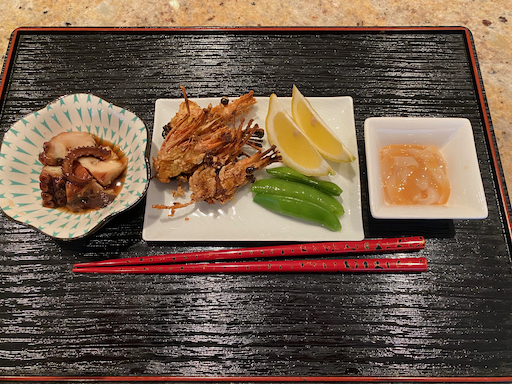
I served this with fried shrimp heads (they were from Tako Grill takeout). Whenever we have shrimp (“bonanebi“ 牡丹海老) sashimi, we get fried heads which we heat up in the toaster oven and serve with wedges of lemon and salt broth soaked sugar snaps. On the right in the picture below is squid shiokara イカの塩辛 (frozen which comes in a plastic pouch). This is certainly a good line-up for starting the evening.


Here is the close up of the octopus.


The picture below shows how the octopus legs came. Two good sized legs in one package.


Since this was a trial, I used only one leg for this dish.

Ingredients:
Boiled octopus leg, thawed
200ml Japanese dashi (I made this from dashi pack).
1tbs soy sauce
2tbs mirin
2tbs sake
several think ginger slices

Directions:
I used an Instant pot with a small metal container insert with a silicon lid (you could use the inner pot of the instant pot).
I added the octopus and the seasoning liquid into the insert and put on the lid.
I added 1/2 cup water to the pot and using the metal holder that came with the insert, lowered it into the instant pot.
I cooked it on high pressure for 30 minutes with natural depressurization.
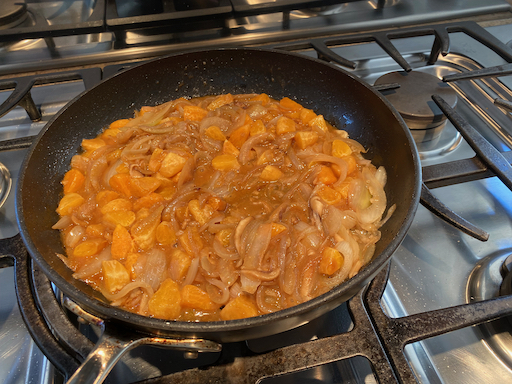
The picture below is after cooking.
One of the problems with the Instant Pot cooking is that the simmering liquid does not reduce at all.
So I decided to put the leg and the simmering liquid in a frying pan and cook it on medium flame for 15-20 minutes until the liquid reduced by half.


I cut the leg into bite sized pieces and served it at  room temperature. This is a most tender and flavorful octopus leg. Next time I will make a larger amount since the entire leg was just enough for two small servings.

Tuesday, February 22, 2022

Crumpet Version 4  クランペット 第4弾

This is the 4th version of crumpet we (my wife) made. She essentially combined V2 ingredients with  V3 cooking method. She got much better at regulating the flame and made really good crumpets. Compared to thin and small crumpets (V2), V4 has nice crunchy crust but much softer inside. We liked V2 flavors and liked cooking method of V3 (using an 8 inch frying pan). So, this is culmination of all the good aspects of crumpets we made.


Ingredients:
(makes 7, 8 inch crumpets)
2 cups AP flour
1 cup plus 2 Tbs. cake flour
600 ml. warm water
1 1/2 tsp. Salt
2 tsp. Sugar
3 tsp. Baking powder (The recipe said baking soda doesn’t work as well)
3 tsp yeast
3 tbs. warm water

Directions
Bloom the yeast in the warm water. Put the flour, water and salt in the bowl of an electric mixer and beat on speed 5 for 1 minute until smooth paste forms. Add the yeast mixture, sugar and baking powder and mix on speed 5 for another 30 seconds. Cover with cling wrap and put in a warm place for 15 to 30 minutes. The surface should get foamy but it will only increase in volume by 10 to 15 % (#1 picture below). 

The whole secret of getting the little holes in the crumpets is in the cooking. (They need a burst of heat at the beginning of the cooking process for the water in the batter to form steam bubbles which create little holes when they burst on the surface of the cooking batter.)  Put 1 tsp. butter in an 8 inch skillet and heat on low for at least 5 minutes.  Increase heat to medium and heat skillet for an additional 1 minute.  Increase the heat to high and immediately pour enough batter into the skillet to cover the bottom. (This will give the batter a burst of heat to start the bubbles forming.) After the batter is in the pan quickly reduce the heat to medium low and contiue cooking until the edges are risen, set and beginning to dry out (about 4 minutes). Keep checking the bottom to make sure it isn’t burning. Take skillet off the heat. Place a dry flat spatula on top of the crumpet and pull up sharply to remove the excess batter and reveal the underlying holes (#2). Turn the crumpet over (#3). Return to the heat on medium until the edges on the second side are lightly browned. Remove to cooling rack (#4). Wipe any crumbs out of the pan. Add a little more butter. Turn heat to high pour in more batter and repeat cooking process.


As can be seen in the picture 3 the bottom of these crumpets came out nicely lightly browned. These crumpets were really good. They had better flavor than V3 because the batter was cooked in butter, which gave it a browned butter taste. In addition we avoided the last step in V3 of adding additional water. We used the batter straight from the proofing stage. As a result it still made the required bubbles but the lovely yeast flavor came through. The texture of V4 was better than the texture in V2 because of the addition of the cake flour. When toasted the surface was crunchy with a browned butter taste. The interior was soft with a nice yeasty flavor. Slathered with butter that dripped into the many holes that formed in the cooking process this made a really nice breakfast bread. 


Friday, February 18, 2022

Crumpet version 3 クランペット 第三弾

We have made crumpets a few times. The first attempt was basically a failure. They were certainly edible but did not develop the small multiple holes which makes a crumpet a crumpet. The second attempt was a great success.  Using a “platar” resulted in small crumpets which were the right size but the cooking process was kind of tedious. My wife found a recipe in "Cooks Illustrated 2020" using an 8 inch frying pan to make a large crumpet. It is served cut into wedges. So, she tried it. The serving is shown in the picture below liberally slathered in butter; Yum. 


Ingredients
1 cup (5 oz) AP flour
1 cup (4 oz) cake flour
2 tsp. yeast
3/4 tsp baking powder
1/2 tsp salt
1 1/2 cup warm water (1 1/4 into dough before rising, 1/4 into dough after rising)

Directions:
Combine AP flour through salt in an 8 cup measuring cup (the measuring cup makes it easier to pour the batter into the pan). Add 1 1/4 warm water and mix until smooth. Cover and let rise until double (about 40 minutes). The whole secret of getting the little holes in the crumpets is in the cooking. Put oil in an 8 inch skillet and heat on low for at least 5 minutes. Meanwhile add the remaining 1/4 water to the batter and mix until smooth. Increase heat to medium and heat skillet for an additional 1 minute. Using a paper towel wipe the excess oil out of the skillet. Pour 1/3 of the batter into the skillet. Increase the heat to high and cook on high for 45 seconds. Reduce heat to medium low and contiue cooking until the edges are risen, set and beginning to dry out (about 4 minutes). Take skillet off the heat. Place a dry flat spatula on top of the crumpet and pull up sharply to remove the excess batter and reveal the underlying holes. Turn the crumpet over. Return to the heat on high until the edges on the second side are lightly browned. Remove to cooling rack. Immediately add half of the remaining batter to the pan, turn up the heat and repeat the cooking process.

The picture below shows the crumpet soon after it comes out of the skillet. As you can see there are many nice holes to collect the melted butter or honey. 


The method works well to elicit the necessary nooks and crannies to collect the toppings. The picture below however shows what happened to the underside that was exposed to the high heat to create those lovely holes. No matter how we did it this happened with the batter actually smoking. The good news is that although the surface turned black it apparently was not burned and tasted just fine.

This process of cooking the crumpet is certainly less tedious than our previous method. The crumpet was very nice; crunchy on the outside and soft on the inside. It also held what ever topping we used very well. It tasted pretty good although I think the previous recipe we had tasted better. Also, I'm not sure about adding the additional 1/4 cup of warm water after the batter has risen to double. The recipe says the water in the batter converts rapidly to steam when the high heat is applied creating the bubbles that form the holes before the batter firms up. But this would also have the effect of deflating the rise created by the yeast. The next step would be to use the previous recipe with this cooking method to see what we get. 

Tuesday, February 15, 2022

Edamame hummus 枝豆フムス

 We usually stock frozen edamame since it is a good and healthy snack. Recently, we found the frozen edamame from a frozen case at Tako Grill to be the best. My wife, found a recipe for "edamame hummus" in the cookbook called "Smoke and Pickles" by Edward Lee which we recently acquired. It used shelled edamame. My wife wanted to make this dish but she thought rather than using our stash of edamame which was in the shell and would have to be shelled it would be better to order some frozen edamame that was already out of the shell.  So we ordered some from our regular grocery store. When deciding what to order we could not figure out if the packages available were edamame shelled or in pods. We took a chance and ordered one anyway and it turned out they were in the pods so they had to be shelled anyway. My wife cooked up the package and shelled them making about 1 cup. She turned the prepared edamame over to me to make the hummus. I diverted from the original recipe a bit but the resulting dip/hummus was quite good.


Ingredients:
1 cup edamame, cooked and shelled
1/2 shallot, finely chopped
3 garlic cloves,
1/4 cup lemon juice
1/2 tbs soy sauce
1/4 cup smooth peanut butter (or tahini or Japanese nerigoma sesame paste)
1/2 tsp ground cumin
1tsp salt
1/2 cup water (I did not add the water but I added hot water -may be 1-2 tsp to the peanut butter mixutre to make it looser)
2 tbs olive oil (1/2 tbs to sautee shallot and the remaining mixed into the final product)

Directions:
Mix the peanut butter, soy sauce and hot water to make smooth loose paste.
Heat the olive oil and sauté the shallot and then garlic, add the peanut butter mixture, the edamame and heat up (below).
Using a beaker and emersion blender, process the above mixture. I added additional olive oil to make the mixture a bit smoother. Add lemon juice and cumin. Taste and add a small amount of salt to taste.


This is a unique dip/hummus. The edamame flavor really comes through. Substituting, peanut butter for the tahini (we did this before) worked well. We really like this as a hummus variation. 


Saturday, February 12, 2022

Smothered chicken with miso and bourbon

We saw an interesting recipe for chicken that used a sauce made of miso and bourbon.  With such an eclectic combination of ingredients particularly the use of miso, we had to try it. We first saw the recipe in Milk Street which led us to the cookbook by Edward Lee called "Smoke and Pickles". The sauce is made of miso, soy sauce and orange juice and also included bourbon during the cooking. I used the Instant pot for the pressure cooking but not the sauté function. Instead I used a regular frying pan for that function. The smell of bourbon comes through very clearly but unless you were told you would not even know there was miso and soy sauce involved. This is a good dish.

We made this with chicken thighs. Since we did not have any orange juice, we used mandarine orange sections cut up into small pieces. Since we believe in adding potatoes in this kind of dish, we added potatoes and omitted thickening the sauce with corn starch.

Ingredients:
2 medium onion, thinly sliced
3 garlic cloves, peeled and finely chopped
2-3 shiitake mushrooms, caps thinly sliced
3 mandarine oranges, peeled, separated and cut into small chunks (original recipe calls for 1/2 cup orange juice).
2 tbs miso and 3 tbs soy sauce
2 tsp olive oil for sautéing the vegetables.
2/3 cup bourbon (we used Early times).
1 cup water (we used chicken broth)
4 chicken thighs, skin on and bone in, excess skin and fat trimmed.
4 small red potatoes, peeled and cut into bite sized pieces (see the second picture below).

Directions:
Mix the miso, soy sauce (and orange juice if using) in a small bowl and set aside.
Sauté onion in the olive oil for 5-7 minutes until soft and edges slightly browned add the garlic, mushroom, and mandarin oranges and sauté for 4-5 more minutes.
Add the bourbon (turn down the flame and be careful since the alcohol in the bourbon may cause a flare up), cook for several minutes or until the bourbon almost entirely reduces.
Add the soy sauce and miso mixture and cook for a few more minutes (see pictures below).

Add this mixture to the Instant pot, arrange the chicken thighs, skin side down, add the chicken stock.
Put on the lid, make sure venting is sealed, set to manual, high pressure and 15 minutes. I let it de-pressurize naturally (15-20 minutes).

The original recipe calls for thickening the sauce with corn starch and garnishing it with chopped scallion which we skipped.


The potatoes are our addition.

We served this with rice, blanched broccoli and skinned Campari tomato. Before eating, we mashed the potatoes to make the sauce thicker. This was a quite good dish. The chicken was tender and had a distinctive aroma of bourbon. The miso and soy sauce flavors did not come through strongly. We both felt that compared to the different versions of curries my wife makes this was a bit bland.

Monday, February 7, 2022

Mayonnaise muffins マヨマフィン

 I am wondering if I should change the name of the blog since my wife’s baking is more frequent than my Izakaya dishes these days. In any case, here is another of my wife’s baking projects. This is an installment of what she is now calling her new series “cooking with mayonnaise” which evolved after she made the mayo/miso peanut butter cookies logged onto the Hellmans mayonnaise web site and found more baking recipes.** This is a mini muffin. It has a relatively dense texture and sweet taste including the topping. We think it makes a nice sweet mouthful as a desert rather than as a breakfast As usual I ask my wife to provide us with "how-to"s.

**Note: we just found out this mayo is called Hellman’s in the eastern U.S. and Best Foods in the western U.S. 


Ingredients: Makes 24 mini muffins
For the muffin
1 cup AP flour
1 cup sugar
1/2 cup mayonnaise
2 eggs
1/2 tsp. Vanilla

For the topping
(Original recipe) (I recommend reducing the amount of topping. See below)
1/2 cup AP flour
1/3 cup sugar
1/4 cup mayonnaise
1/2 cup toasted walnuts finely chopped
1/4 tsp. Cinnamon

Half quantity of topping
1/4 cup AP flour
1/6 cup sugar
1/8 cup mayonnaise
1/4 cup toasted walnuts
1/8 tsp. Cinnamon

Directions:
To make the topping, combine all the topping ingredients in a bowl. Using your fingers mix into crumbs and then set aside. For the muffin, beat together the sugar through vanilla until completely combined. Whisk in the flour until combined. Pour into greased muffin tins (I recommend using mini muffin papers. It will make it much easier to get the muffins out of the pan.) Top with the prepared crumbs. Cook in a 350 degree oven for 20 minutes or until a toothpick inserted in the centers comes out clean. Cool 5 minutes in the pan. Remove from the pan an cool further on a wire rack.


The next picture shows the muffins right out of the pan. 


I recommend reducing the amount of crumb topping because the next picture shows what happened to the topping when I tried to take the muffins out of the tin. It mostly all came off and went all over everything. But not to despair. I did not throw it away. I gathered it up and I am using it as a topping for yogurt in the morning which is working out well. Maybe because of the flour/mayo combo the crumbs don’t dissolve in the yogurt and they add a nice sweet crunch. 


I see why the recipe calls for making these as mini rather than full sized muffins. They are very rich and sweet.  A full muffin could easily be “too much of a good thing”. The muffin has a moist dense texture and pleasant vanilla flavor. The topping adds a nice crunch element and the nutty flavor of the toasted walnuts. The combination makes the perfect desert bite. 

Friday, February 4, 2022

Uni appetizers two kinds 雲丹の前菜2種

As I mentioned previously, Maruhide 丸秀 is the best place to get consistently high-quality uni and uni products. I wanted to get some fresh uni for the New Year. Although I checked the web site regularly fresh uni was not available for some time. So when I saw it became available recently, I could not resist and ordered fresh uni (both regular and in salt water or "Kaisui-uni" 海水うに). I also ordered some "uni shuto " ウニ酒盗 which is preserved and frozen and lasts longer than fresh uni. This is second best (compared to fresh uni) but among the class of "preserved" uni, this is the best by far. We had an uni tasting the evening the uni arrived. It consisted of regular uni and uni in salt water. We also included some ikura like we did before. We finished the evening with a small uni and ikura "donburi" rice bowl 雲丹いくら丼. 

The next evening, I made a small uni appetizer dish. Although it is hard to see in the picture, I put cubes of avocado dressed in lemon juice in the bottom of the bowl then topped them with uni, "kinshi-ran" 金糸卵 golden thread egg and nori strips or "kizami-nori" 刻み海苔. I added wasabi-jouyu わさび醤油 (mixture of wasabi and soy sauce just before serving). Since the texure of avocado resembles fatty tuna sashimi, this combination went very well together. The avocado really complemented the uni.


The next evening I served the last of the salt water uni “as is” garnished with a small dab of wasabi and the finely chopped green part of scallion.  I included a small "cucumber and wakame seaweed salad" dressed with "sumiso" 酢味噌 dressing. Again, I added wasabi-jouyu just before serving.


As before both the regular and salt water uni were excellent. Just a bit of uni and cold sake, the flavor lingers in the mouth. This is such a luxury.