Wednesday, May 30, 2018

Burdock root wrapped in prosciutto プロシュート巻きごぼうの照煮

This is a modification of a Japanese recipe. Japanese really like to wrap cylindrical vegetables in meat or ham. I read a recipe in which whole burdock root or gobo 牛蒡 was first simmered in seasoned broth and then wrapped in thinly sliced pork belly and cooked in "teriyaki" 照り焼きsauce. Since I bought a package of gobo which contained 2 good sized root stalks, I needed to come up with new way of serving it. So, inspired by the recipe I had read I made this wrapped gobo. Since I didn't have thinly sliced pork belly, I used prosciutto as the wrap. This was the first dish for one evening. It went fairly well with the red wine we were having.


I used whole gobo cooked skin on.


Since I also made my usual "Kinpira-gobo"金平ごぼう, I served it as well.


Ingredients (for 2 servings seen above):
Gobo, three 3 inch lengths, skin scrubbed with a vegetable brush but skin not removed.

For initial cooking:
3-400 ml of water
1 tbs rice vinegar

For final cooking
Japanese dash broth about 300 ml (I used my usual bonito flakes and kelp dash pack)
Soy sauce, 1 tbs
Mirin 1 tbs
Sake 1tbs

Prosciutto, three slices

For Teriyaki sauce
Soy sauce 2 tbs
Sugar 2 tsp (Optional, I did not use).
Mirin 2tbs
Sake 2 tbs

Directions:
1. Cook the pieces in water with vinegar (to prevent darkening) for 10 minutes on low flame.
2. Wash the pieces in cold running water and cook it in plain water for 10 minutes to remove the vinegar taste (water may turn dark).
3. Simmer in the seasoned dash broth for another 10 minutes (#1) and let it cool down in the broth.
4. Separate one thin slice of prosciutto (#2) and wrap the gobo (#3 and #4)


5. In a dry non-stick frying pan, brown the prosciutto starting with the seam side down (#5).
6 Add the teriyaki sauce and cook shaking and rolling the gobo rolls until the sauce thickened (#6).
7. Let it cool and cut each gobo roll into 4 pieces and serve.

Despite the rather long cooking the gobo maintains a nice crunch and the prosciutto added nice flavor as well as some saltiness. I could have used more prosciutto to make a thicker layer but this was just fine as it was. The original recipe used thinly sliced pork belly which may have been better but we really liked this version.

Sunday, May 27, 2018

Japanese "Kabocha" pumpkin salad カボチャサラダ

I occasionally see Japanese pumpkin which is a type of winter squash in our regualr grocery store and when I see it I buy it. This time, I made pumpkin salad with the squash I brought home. I read the recipe somewhere but I could not find it again when it came time to make the salad so I made it from memory.  It came out quite good and its easy to prepare especially since I used the microwave to cook the squash. Since I had a "Kabocha"-shaped "hashi-oki" 箸置きor chopstick pillow that we bought in Kyoto last year, I used it in this picture to complete the Kabocha theme.


I added cottage cheese on top (I remember this was a part of the recipe I read). I added freshly ground black pepper.


Ingredients :
Kabocha pumpkin, half, innards removed and skin shaved off but leaving some (or you could just leave the skin), cut into a bite sized pieces, microwaved in a silicon container for 3-4 minutes or until a bamboo skewer went through easily.
Salt and pepper for seasoning while it is cooling.

For dressing:
Mayonnaise 2tbs
Greek yogurt 2tbs (my wife makes it by straining regular yogurt).
Cottage cheese 2-4 tbs
Soy sauce to taste (optional and our addition)

Directions:
When the pumpkin cooled to room temperature I dressed it with the mayo and greek yogurt (see below). Taste and add salt or soy sauce to taste. I served it with topping of the cottage cheese and freshly grated black pepper (my addition).


This is a really good salad. The natural sweetness of the pumpkin really comes through. We found out it is actually rather filling--a small serving goes a long way for us. Since I microwaved it, it was really easy to make.

Monday, May 21, 2018

Pistachio nut bread ピスタチオナッツ入りパン

My wife has been making different kinds of  breads from a bread cook book entitled "Beard on Bread". This bread is a very interesting bread with pistachio nuts. It is a kind of a sweet bread but not too sweet and perfect for breakfast. You can see pistachio nuts on the cut surface.


One morning, we had a combination of the blueberry bread my wife made (it was frozen) and the pistachio nut bread. They went very well with a cup of cappuccino.


Ingredients
for bread 
1 Package active dry yeast
1/4 cup warm water
1 Tbs. sugar (to bloom the yeast)
1/2 cup granulated sugar
1 cup warm milk
1/4 cup butter softened
2 tsp. salt
3 to 4 cups all purpose flour

For filling 
1/4 cup melted butter
1/3 cup (additional) sugar
1 cup shelled salted pistachio nuts roughly chopped

1 egg lightly beaten for egg wash

Directions
Bloom the yeast. In the bowl of a stand mixer with a mixing paddle add the milk, softened butter, salt and 1/2 cup sugar, yeast mixture and stir. Change to a dough hook. Add the flour one cup at a time until dough forms around the hook. Form into a ball and put into a bowl with a small amount of vegetable oil. Coat the surface of the dough with the oil (so it doesn't dry out) cover with plastic wrap and let rise until doubled.

Punch dough down. On the floured board covered with parchment paper roll it into an 18 X 12 inch rectangle. (Since the dough is very tender, to make the transfer to the cookie sheet easier,  I measured a piece of parchment paper the same size as the sheet I was going to use to cook the bread. I rolled out the rectangle and formed the loaf on the parchment paper. Then I dragged the parchment paper over onto the cookie sheet. I did not remove the paper, I cooked the loaf on it. ) Brush the surface of the rectangle with the 1/4 cup melted butter. Sprinkle on the 1/3 cup sugar and the pistachio nuts. Beginning with the long edge roll the dough like a jelly roll pressing the seams and edges together. Form into a circle. At 3/4 inch intervals slice 2/3 of the way down into the ring (#1). Twist each slice to the right so the interior the slice is facing up (#2 & #3). Let the ring rise until doubled. Brush with egg wash. Bake in a 375 degree oven for 30 to 35 minutes until browned (#4).


I was not around when she started and I have no pictures of the rolled out dough, filling or rolling up process. In any case, this was rather elaborate and will have some impact if it was served whole and cut into individual servings. Of course, for us, my wife cut them into a manageable size, double wrapped in a plastic wrap and then aluminum foil and froze it. This bread has a fairly dense but still soft texture. It is slightly sweet. The saltiness from pistachio  appears to enhance the sweetness despite relatively small amount of sugar in it. This bread is extremely good and would be perfect for a holiday.

Friday, May 18, 2018

Spinach Spaetzle ホウレン草スペーツル

After a great success of making spaetzle using our newly acquired spaetzle maker, my wife made this spinach spaetzle. (What's the old adage, "the right  tool for the job"). She made this basically because we had a bit of spinach left over from another dish. This was light supper and I served spinach spaetzle with meat balls in tomato sauce and green beans.

With the spaetzle maker, the size of the spaetzle is just right and it is much easier to make. By-the-way, it may look like there are peas on the plate in the picture above but it is actually the spaetzle as shown in the close-up below. I heated it up by sautéing in a bit of olive oil.


Ingredients:
1/2 cup thawed, drained frozen spinach (we used fresh spinach cooked without any addition of water).
1 cup low-fat (1%) milk
1 egg
1 tablespoon extra-virgin olive oil
1/8 teaspoon grated nutmeg
2 1/4 cup all-purpose flour
1 teaspoon Kosher salt
2 tablespoons unsalted butter, for cooking spaetzle

Directions:
Bring a large pot of lightly salted water to a boil.

In a blender, combine spinach, milk, egg, oil and nutmeg (#1 and #2); blend until spinach is puréed. Whisk flour and salt together in a large measuring cup (using a measuring cup makes it easier to pour the batter into the hopper of the spaetzle maker). Stir in spinach mixture. (#3).  In several batches pour the batter into the hopper of the spaetzle maker.  Slide the hopper back and forth over the base plate with holes (#4 & #5). Cook until noodles float and firm up, about 1 minute. Lift spaetzle out with a strainer and transfer to a colander to drain and drizzle on some olive oil to keep them from sticking together. (#6)  Repeat with remaining dough.

When ready to serve, melt butter in a large skillet over high heat. Add spaetzle and cook, tossing frequently, until spaetzle just begins to brown.


Although we really did not taste the spinach, it adds a nice green color. This is a welcome change from our usual forms of pasta. Despite a good amount of nutmeg, it is not at all overwhelming. The texture was firm enough to hold together but still very tender.

Tuesday, May 15, 2018

"Kawaki-mono" dry Japanese drinking snack 乾き物酒の肴

I found "Assorted Japanese Junk Food for Sake" at the Amazon website through a 3rd party vendor.  The advertisement said, "Japanese junk food to go with Alcohol"--a somewhat literal translation of the more polite expression  "drinking snacks". Somehow, for Japanese, "Junk food" or drinking snacks may not have the same negative connotation it has for the U.S. audience. In general Japanese don't drink without eating something, so at the very least, such a snack is a "must have" to go with sake. In any case, this product on Amazon is "known as "Kawaki-mono" 乾き物 or "dry drinking snacks". This type of snack or "otsumami" おつまみ is widely sold in Japanese convenience stores and stand-up drinking joints called "Tachinomi-ya" 立ち飲み屋 or "Kaku-uchi" 角打ち.

Digression alert: On our last trip to Japan, in the evening, when we had a several hour train ride from our site seeing destination back to our hotel, we really liked stopping at the convenience store usually located next to the station before boarding the train to purchase some sake and snacks to eat on the ride. It was a mobile cocktail hour (imbibing sake on the train is completely legal, acceptable and civilized. If you don't have time to stop at the convenience store before boarding you can even buy some from a cart on the train). It was a great way to relax after a hard day sight seeing--munching on flavored dry squid or cheese snack thingies sipping sake watching the sun go down. Come to think of it, our experience in Japan may have led us to try the snack sold on Amazon.


This package consisted of 10 different kinds of snacks. The individual packages are rather small and we could finish one or two packages easily in one sitting. It is rather expensive since one package is about $3 but they are rather authentic Japanese snacks.

1. Grilled dried squid strips (it is labeled as "hand-grilled" with "direct (charcoal) flame".
2. Grilled dried fins of ray ("soft finish").
3. Spicy dried and grilled squid legs.
4."Kimuchi" flavored dried "himo*" or gills of scallops.
5. "Spicy cod roe" flavored grilled squid legs.
6. "Otsumami" dried small flying fish (lots of calcium!).
7. "Butter and soy sauce" flavored dried squid strips.
8. Dried and grilled sea eel.
9. Sea urchin flavored grilled and dried squid strips.
10. Dried squid strips in squid ink.

* membranous tissue on the periphery of the scallop muscle .

Many of these items tout that they used all domestic (Japanese) ingredients. As you may or may not have noticed "dried squid strips" with different flavors are the most popular snacks in this round up.

We tasted several of these snacks. In our opinion, they go best with bourbon and water and certainly sake but definately not with wine. In general the items we tasted so far, were pretty good, the only one we did not like was #4. It was extremely chewy even for me. My wife characterized it as chewing a rubber band and just could not handle it. In addition, its "kimchi" or "kimchi" flavor is not one we liked.

The picture below shows the amount you get in one bag. So this is a bit on expensive side ($3 per pack). But on the "up-side" they are exactly like the ones available in Japan which are generally not available here. #1 is "Butter and soy sauce" flavored dried squid strips. #2 is dried and grilled sea eel. #3 Spicy dried and grilled squid legs. #4 "Kimuchi" flavored dried "himo*" or gills of scallops.


They are good and available on Amazon. With the small packages, my wife and I can have two different kind in one sitting. We are not sure if I will reorder, however.

Saturday, May 12, 2018

Crumbled tofu with miso and sesame くずし豆腐汁

I again got silken tofu labled "Sincere silken tofu, just right firmness 誠実の絹" the last time I made a dish on a whim without following any recipe. This time, I used 1/4 of the tofu in mackerel ball soup. I decide to use up the remaining tofu the next day. This is based on the recipe but with some modification. It is sort of a soup with tofu, deep fried tofu, shiitake mushroom and seasoned with miso and sesame.


Ingredients:
Silken tofu 3/4 (this tofu come is a smaller package)which is roughly equivalent to 1/2 for regular size tofu)
Fresh Shiitake, 3, stem end cut away, stem torn along it's length in thin strips and the caps sliced in thin strips.
Deep fried tofu pouch or abra-age 1/4, cut into small strips.
Japanese dashi broth, 400ml (I made this from my usual dash packs)
Miso 2 tbs
Roasted sesame seeds, 3 tbs, dry roasted in a frying pan and ground with a Japanese pestle and mortar or suribachi すり鉢.
Egg, medium, beaten

Directions:
Add the mushroom to the broth and simmer for a few minutes and add the deep fried tofu pouch (below).


Add the tofu by crumbling by hand (below).


Simmer for a few minutes and add half of the sesame and the scallion (below).


Mix and cook for few more minutes and resolve the miso. At the last moment, add the egg and mix.


Serve immediately and add the remaining sesame.

This is a very gentle conforting dish with a nice sesame flavor. This can be a drinking snack or even ending "shime" dish.

Wednesday, May 9, 2018

Dill onion wheat roll ディルオニオン全粒小麦ロール

This is another contribution from my wife. This is a dill onion wheat roll. Although this is a whole wheat roll, it is soft and moist with nice flavors of dill and onion. This roll can be eaten on any occasion but we really enjoy it for breakfast. Although, we put in lots of chopped fresh dill, you cannot see it in the cut surface yet the flavor is unmistakable. Since it is so soft and moist with lots of flavors no need for butter.


Ingredients:
2 package of active dry yeast
1/4 cup warm water
1/4 cup honey
2 cups cottage cheese
2 Tbs. grated fresh onion
4 Tbs. butter melted
1 cup dill weed
3 Tsp. salt
1/2 Tsp. baking soda
2 eggs
4 - 4 1/2 cups whole wheat flour


Directions:
Put cottage cheese, honey, onion, butter, dill weed, salt and soda in the bowl of a stand mixer. Using a paddle beater mix thoroughly. Add the eggs and continue stirring. Dissolve yeast in warm water with 1 tsp. sugar dissolved to bloom. Add the yeast to the other liquid ingredients. Switch to a dough hook and add 3 cups of whole wheat flour. (my wife forgot to switch to the dough hook and continued kneading with the paddle. The mixer made a really strange racket but it processed the dough anyway) Add the remaining whole wheat flour. If more flour is needed to make the dough come together use regular white bread flour. When the dough comes together knead for 7 to 10 minutes until smooth. (Dough may not form a ball on the hook but as long as it comes in contact with the hook it is being kneaded). Place in a greased bowl, cover and let rise until doubled. Punch down and make into 3 Oz. round balls. Place in a greased baking pan with enough room for them to continue rising. Cover and let rise until doubled. Bake in a 400 degree oven for 18 to 20 minutes until they are browned and sound hollow when tapped. Remove from pan immediately and cool on a rack.


Although we put a large amount of fresh dill, as the picture shows it is hardly visible but the flavor is definitely there along with a pleasant muted flavor of onion. It also had a slight sweetness. When my wife realized that the bread had been kneaded with the paddle instead of the dough hook she was worried the rolls might turn out dry and dense. Yeast bread, however, is very forgiving and the rolls were really soft and moist especially for whole wheat bread. We really like this bread. This can be good for breakfast or with dinner.

Sunday, May 6, 2018

salmon tataki 鮭のたたき

This is the last of the salmon sashimi we defrosted for hanami. I served it with small baby arugula, tomato, and red onion salad.


Just for variation, I made one portion as "Tataki".


I seasoned the small block of salmon with Kosher salt and freshly ground black pepper and using a kitchen torch, I seared one side and sliced. This treatment works well with oily fish in general and added nice flavor and texture. This was quite good and finally we finished the frozen salmon sashimi.

Thursday, May 3, 2018

Mackerel meatball soup 鯖のつみれ汁

My wife really likes mackerel simmered in miso sauce or "Saba-no-misoni" 鯖の味噌煮. So,  every time we see fresh whole Spanish mackerel for sale at the near-by Whole Foods store, we get it to make this dish. This time we got two good sized mackerels. I had them gutted with heads off. I filleted them myself. If I do this myself, I can save more fish meat and I can scrape any remaining meat from the bone using a spoon. I also removed the meat from the tip of the tails since it is too narrow to make into "misoni". Using these scraps, I made fish meatball soup or "saba-no-tsumire-jiru" 鯖のつみれ汁. This was a lunch on one weekend. In addition to the fish meatball soup (lower left), I served blanched rapini with scrambled eggs (upper left), mackerel simmered in miso sauce with broccoli (upper right), and butter and soy sauce rice (lower right).


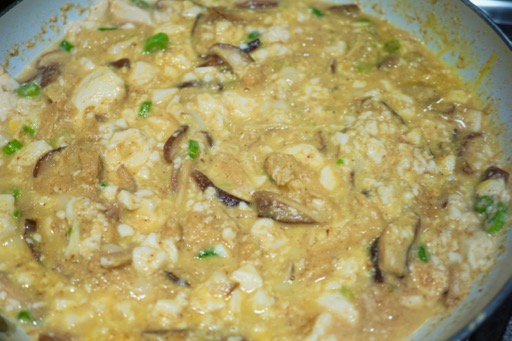
I made clear soup with mackerel meatballs, silken tofu and sliced scallion and added (frozen) yuzu zests just before serving.


Ingredients: (the amount is for two servings from the recipe I saw on line as a reference. The amount of mackerel I used was less than indicated in the recipe and, as usual, I did not precisely measure quantities. I also made minor modification.)
For the meatballs:
Mackerel, skimmed from backbone or filet with skin removed (160 gram or 5.6oz)
Salt, scant pinch
Sake or water 1 tbs
Miso and potato starch, 1/2 tbs each
Sesame oil, 1 tsp
Scallion, 1/2 finely chopped
Ginger root, skin removed and finely chopped, 1/2 tsp

For broth:
Japanese dashi broth, 3 cups (I used my usual "dashi pack" with bonito and kelp).
Light colored soy sauce, 1 tbs
Scallion, 1 stalk, thinly sliced on bias.
Silken tofu 1/4 block, cut into bite-size cubes
Yuzu zest (I used frozen ones)

Directions:
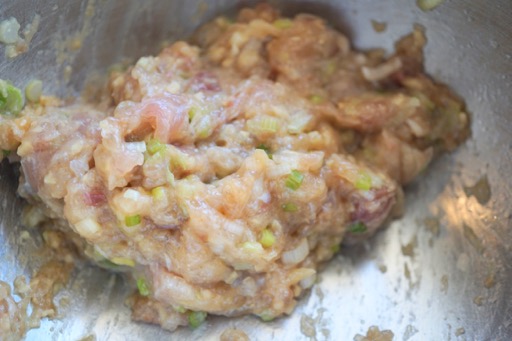
Using a chef's knife, mince the fish meat and mix in all the ingredients for the meatballs.
Mix well (see below). Adjust the liquid (either sake or water, I used sake) to make the consistency (not too firm and no too soft, it has to stay together when cooked in broth but you want it to make soft tender meatball).


Bring the broth to a gentle simmer and using two teaspoons first dipped in the broth to prevent sticking, make small balls (or quenelles) and gently drop it into the broth (below) and let it cook through (a few minutes).


When the meatballs are cooked, season the broth with light colored soy sauce. Taste and if you need more saltiness, either add more soy sauce or add salt if you do not want the broth to become too dark.
Add the tofu and the scallion. When the tofu warms up, serve in a bowl and garnish with the Yuzu zest.

For a starch side, I served a variation of butter and soy sauce rice. Since I only had cold leftover rice, I first melted butter in a non-stick frying pan, added the cold rice and fried it to warm it up. Then I added a small amount of soy sauce to finish. I garnished with nori.


I have posted that the substitute for "Nanohana" 菜の花 in the U.S. is either rapini or broccolini. I like rapini since it has a slight bitterness similar to Nanohana. To complete the spring theme (color-wise) I added the bright yellow of scrambled eggs seasoned with sugar and salt. The rapini was blanched, cooled in cold water, drained and dressed with a mixture of Japanese mustard, sugar and soy sauce or "Karashi-jouyu" 辛子醤油.


Of course, we had to test some of the mackerel in miso. I served it with blanched broccoli for color.


Although I served this with only a small amount of rice, this was quite filling for us. The soup and fish balls were really good with ginger and yuzu flavors coming through but not at all "fishy".