Monday, May 31, 2021

Tarako from Korean grocery store Hmart 焼きたらこ

 Lightly grilled salted "tarako" たらこ cod roe is not really a new dish as I posted it many years ago,  but it is a very common dish in Izakaya and goes perfectly well with sake. I usually get tarako (frozen) from our Japanese grocery store, but this time I got it from Hmart, the Korean grocery store, through Instacart.  The groceries were delivered while I was not at home so my wife received them. During a subsequent phone call,  she mentioned that it was not a completely successful grocery run since the three types of fresh mushrooms and the mackerel we ordered were not available. The good news was that the "tarako" did arrive. She said something was wrong, however, because it was covered with a red goopy stuff and suggested that maybe the little egg sacks had somehow ruptured spilling their contents. (Not good!) So when I got back in the evening and inspected the tarako I found it was coated with a Korean hot sauce "gochujang". We were both relieved and had a good chuckle. Since we are not into very hot spicy food, I quickly rinsed off the hot sauce. I made "Tarako" pasta たらこスパゲッティwith it and it was just fine. I made the dish shown below from the last sac of tarako. I just cooked it in the toaster oven until the surface was cooked but the insides were still raw. I served it with a Dashimaki omelet だし巻き I had made.


This was a part of several appetizers I served that evening (second picture). From left to right; Eggplant in seasoned broth 茄子のお浸し、deviled egg from pickled eggs my wife made,  salmon in sweet vinegar 鮭の南蛮漬け. The bottom right are oven-baked potato chips which my wife is in the process of perfecting and which will be subject of another post. The dish on the bottom left is a dipping sauce my wife made to go with the potato chips.


In any case, we started the evening with these small appetizers.

Friday, May 28, 2021

Eggplant in seasoned broth 茄子のお浸し

We got 2 fairly large Japanese (or also called Chinese or Asian) eggplants (long and light purple colored). So, one evening, I made this dish from one of them. This is based on a recipe I found on-line. It was a shortcut recipe since the eggplant was microwaved but it turned out pretty good.


I topped this with dried bonito flakes or "Kezuri-bushi" 削り節.


Ingredients: (makes about 6 small appetizer servings like in the first picture)
One Japanese eggplant (this was large about 10 inch long)

For seasoned broth (mix first two items)
1/4 cup Bonito dashi broth (As usual I made this from a dashi pack).
1/4 cup or "to taste" concentrated Japanese noodle sauce (from the bottle)
Dried bonito flakes for topping.

Directions:
Remove the stem end of the eggplant and remove the skin in stripes using a vegetable peeler,
Cut lengthwise into two pieces.
Cut the two pieces further into bite sized pieces (called "ran-giri" 乱切り, cut in 45 degree angle as you rotate 90 degree).
Immediately soak in salted cold water for 10 minutes (water darkens).
Wash in cold running water.
Place the eggplant in a silicon container for microwave cooking and microwave for 1 minute (depending on the size of the eggplant and the wattage of the microwave oven).
Let it cool down until it can be safely handled.
Place the eggplant in the seasoned broth and refrigerate for a few hours.
Top with the bonito flakes just before serving. 

Since this type of eggplant is not as "bitter" or astringent as Western eggplant, soaking in salted water and microwaving worked. The skin is also much more tender than that of Western  eggplants. The seasoned both really made this dish. Perfect gentle cold dish for summer.

Tuesday, May 25, 2021

Scalloped potato with cauliflower puree

My wife came up with this dish one day. A few days before I had made my usual Cauliflower puree. Beside eating it as an “adult baby” food, we have made Mac-and-cheese using the puree instead of Béchamel sauce. I am not sure how she came up with this dish but, it is essentially scalloped potatoes made with the Cauliflower puree, cheese, onion and jalapeño pepper. This was topped with several kinds of cheese and baked.


After the servings were cut out, you could see multiple layers of thinly sliced potato with cheesy sauce. The green bits are chopped Jalapeño pepper. She ended up making a quite large amount but we managed to enjoy it all as a side for lunches and dinner and also as appetizers. Probaly not as rich as if we made this with full-fledged Béchamel sauce but it was quite good.


I ask my wife to provide the recipe. I help her by slicing potatoes, onions, and chopping up Jalapeño pepper.


Ingredients:
Two russet potatoes thinly sliced
2 onions thinly sliced
2 jalapeño pepper
1 cup of cheddar cheese grated
1 cup monterey Jack cheese grated
1/2 cup parmesian cheese grated
Several slices of smoked gouda to top.
Enough cauliflower puree to cover several layers


Directions:
Cover the bottom of an oven casserole dish with the puree. Distribute a layer of potatoes (#1) then the sliced onions, jalapeño pepper and the various cheeses (# 1&2) then the cauliflower pure (#3) Keep layering until all the ingredients have been distributed. End by putting on slices of smoked gouda (#4). Cook in a 400 degree oven covered for 30 minutes. Remove the cover and continue cooking for 30 minutes until the potatoes are tender and a knife slides in easily. Let cool for 15 minutes before serving.


This is a very comforting dish with thin layers of potatoes between custard like layers of warm cheese. The jalapeño peppers and onion give a nice flash of flavor. You would never guess that cauliflower was one of the main ingredients. It heated up nicely in the microwave. This would the a staple for any menu. 

Saturday, May 22, 2021

Warm tofu with shiitake sauce 豆腐の椎茸あんかけ

 For some reason, it is getting more and more difficult to get fresh whole shiitake mushrooms. Our regular grocery store used to carry them but now only pre-sliced shiitake are available.  Whole foods used to have them regularly but it is now hit or miss. This time, we tried Hmart, Korean grocery store, through Instacart. Despite  the specific instruction that we wanted only whole fresh shiitake, we got pre-sliced. I decided to cook them so that they would keep longer and if needed I could also freeze them. So I just sautéed the mushrooms with olive oil, finely chopped red onion (I happened have extra finely chopped red onion left over from another dish). Several days later, I made this warm tofu dish from silken tofu (right, in the first picture). I also served fried salmon in sweet vinegar 鮭の南蛮漬け topped with ikura (left in the first picture)


I garnished it with chiffonade of perilla.


This is our stand-by dish but the ikura was soaked in a mixture of Japanese bonito broth and concentrated noodle sauce which makes the individual ikura swell up and give a nice snap with more flavor. 


Ingredients:(two small servings)
1/4 silken tofu, cut into two cubes
1 inch long dried kelp (for making broth)
Water

For "ankake" 餡掛け sauce
1/2 cup (arbitrary) sliced fresh shiitake mushroom (in my case mixture of finely chopped onion and pre-sliced shiitake sautéed in olive oil)
1/2 cup dashi broth (I used bonito broth using dashi pack)
1 tsp potato starch ("katakuri-ko")
1 tbs sake
1-2 tsp of concentrated noodle sauce (from bottle) to taste.
1/4 tsp grated ginger
chiffonade of perilla (optional)

Directions:
Wipe the kelp with a wet towel. Put in a pan and add water. When it comes to boil turndown the flame to simmer and add the tofu cubes to warm (5-10 minutes)

In a small sauce pan, add the bonito broth and the shiitake. Let it come to boil then turn down the flame to simmer. Cook for a few minutes. Add the concentrated noodle sauce to taste. Thicken the sauce by mixing in the potato starch slurry (with sake) and cook for few more minutes. Add the grated ginger and cut the heat.

In a bowl, carefully scope up the warm tofu cubes with a slotted spoon draining water. Pour over the "ankake" sauce and garnish with chiffonade of perilla (if using).

This is a nice, very gentle dish with soft and warm silken tofu with mild flavors of soy sauce, broth and shiitake. Although the day was not cold, we enjoyed this with cold sake.

Wednesday, May 19, 2021

Blueberry pancake v2 ブルーベリーパンケーキ V2

We always associate fresh blueberries with early summer, although they are now available year-around because they are also produced in South America. One way we enjoy blueberries is by making blueberry pancakes. Recently my wife was talking to her sister, and mentioned that we had just enjoyed blueberry pancakes for breakfast that day. Her sister asked for the recipe and my wife said it was in "The Joy of Cooking" (JOC). (This cookbook is a quintessential fixture of American kitchens and has been continuously published since 1936.) Sometime later her sister mentioned that she had made blueberry pancakes and they were really gourmet because of the addition of cornmeal and lemon zest. My wife was confused because  the JOC recipe she was familiar with did not include cornmeal or lemon zest. As a matter of fact there was no recipe in the pancake section of her JOC that mentioned those two items. So she went back to her sister and asked how she had calculated the amount of cornmeal to substitute for the regular flour called for in the recipe. Her sister replied that she had just followed the recipe in the cookbook. Then it dawned on my wife that her sister was using a different edition of JOC than the one my wife was using. It turns out that my wife's blueberry pancake recipe is from the 1980 edition and the recipe her sister used was from the 1997 edition, (which my wife also has). (I think the newest edition is 2019)**. In any case, my wife decided to try the 1997 edition blueberry pancake recipe her sister had used.

**Digression alert. We basically stuck with the older version of the cookbook because it was the one we were familiar with and particularly once we noticed that some of our favorite recipes from the old cookbook were not in the new cookbook. From an esoteric point of view, I particularly missed the section on how to prepare wild game that was in the old cook book. Although I may never have to use the knowledge that grey squirrels taste better than red squirrels because red squirrels are quite gamy in flavor or that squirrels should be skinned while wearing gloves to prevent possible tularemia infection, it is nice to know such information is available.  Not to mention the "must have" recipes for opossum, porcupine, raccoon or muskrat. 


As before, we "install" the blueberries individually rather than mixing into the batter to ensure even distribution. My wife is in charge of preparing the batter and I am in charge of cooking it.


Here I asked my wife to take over.


Ingredients:
2 cups AP flour
1 cup yellow cornmeal
1/2 cup sugar
2 1/2 tsp baking powder
1/2 tsp baking soda
1/2 tsp salt
2 1/2 cups buttermilk
8 Tbs. (one stick) butter melted
4 large eggs separated
3 tsp lemon zest

Directions:
Mix the dry ingredients flour through salt in a mixing bowl.
Mix the wet ingredients, buttermilk through the 4 egg yolks in another bowl.
Add the lemon zest to the wet ingredients.
Whip the 4 egg whites until peaks are stiff but not dry.
Mix the wet ingredients into the dry ingredients until just combined.
Carefully fold the whipped egg whites into the batter.
Put a teaspoon of olive oil in a frying pan then scoop a ladle full of batter into the preheated pan and cook until done flipping once.


These pancakes, like the previous version, are very good. Both are nicely fluffy and have a pleasant mildly sweet taste with a lovely burst of flavor from the blueberries. This version has the addition of a mild lemon flavor. We didn't detect any addition flavor added by the cornmeal. Both recipes make a mighty fine pancake.

Sunday, May 16, 2021

Salmon "ruibe" frozen sashimi 鮭のルイベ

One evening, we wanted to have one more appetizer to go with the cold sake we were enjoying. I remembered that we had frozen sashimi-grade salmon from Catalina Offshore products in the freezer but it was a one pound piece and would take too long to defrost. Then, it occurred to me that we could have "ruibe" ルイベ which is frozen raw salmon shaven into thin pieces to eat as a kind of sashimi. This dish is supposedly derived from the way the indigenous people who lived in Hokkaido 北海道 known as "Ainu" アイヌ used to eat salmon. Since I am originally from Hokkaido, I was familiar with this dish. In the “old” days salmon harvested in the fall could be stored frozen during the hard cold Hokkaido winter without the need for modern freezers. My understanding is that the Ainu people just shaved pieces off the frozen salmon and ate the shaved pieces. (Hopefully, the long and deep freezing in the cold Hokkaido winter was sufficient to kill the parasite endogenous to salmon making it safe to eat raw.) The salmon we had was sashimi-grade and frozen, (also from Norway ??) so it is safe to eat. Thus the only question was "Could I, in fact, shave pieces off the frozen salmon?" So I tried it using a heavy chef's knife. Amazingly, I could as shown in the next picture. 


 When I served this it was still frozen but quickly melting on the edges. We dipped the slices in soy sauce with wasabi. It quickly melts when held momentarily in the mouth. Initially it is crunchy ice coldness followed by the slow unfolding of fresh salmon taste; quite a unique and interestingly pleasant sensation not previously experienced elsewhere. We found this is a very good way to enjoy salmon sashimi “on the fly” without having to thaw it ahead of time.


The one pound frozen salmon sashimi block from Catalina tends to be too big for us to eat in one sitting so once it is thawed I am hard pressed to come up with multiple ways to serve it. (Eating the whole thing as sashimi demonstrates that it is possible to have “too much of a good thing”.)  I had contemplated cutting the large piece into smaller manageable sizes but didn’t think I could cut through the block while it was still frozen. After having successfully sliced the frozen salmon for the ruibe, however, I tried to see if I could divide up the frozen salmon block. Surprising success!! Using a heavy chef's knife and warming the blade a few times in hot water, I did cut the frozen salmon into two pieces. I vacuum packed both pieces and placed them back in the freezer. This was an additional side benefit of my experiment with ruibe. Now I can divide the frozen sashimi salmon so we can thaw the amount reasonable for one sitting.

Thursday, May 13, 2021

Carrot cake with pineapple muffin パイナップル入り人参ケーキマフィン

 Recently we received two pineapples as a gift. They were probably the best pineapples we have ever had. They were certainly much better than the ones from the grocery store. They were very sweet, juicy and not fibrous except for the center cores towards the top and bottom. Although they were good, it was a lot of pineapple. Then, my wife found a recipe for carrot cake muffins in the recently re-discovered cookbook “Mostly Muffins” which uses pineapple and she went for it. This was a delicious most tender soft muffin. It did not taste of pineapple; but it must have contributed to making the muffin extra-tender. The amount of carrot that went into the batter was also quite large. Both the pineapple and the carrots basically disappeared into the muffin. This is another excellent muffin.


As usual, I ask my wife to provide the recipe.

Ingredients:
1 3/4 cup AP flour
2/3 cup light brown sugar
1 tsp. baking powder
1/2 tsp. baking soda
1/2 tsp salt
1 tsp. ground cinnamon
1/8 tsp. mace
1/2 cup crushed pineapple including juice
1/2 cup vegetable oil
1 egg, lightly beaten
1 1/2 tsp. vanilla
2 cups shredded carrots
1/2 cups raisins

Double recipe
3 1/2 cup AP flour
1 1/3 cup light brown sugar
2 tsp. baking powder
1 tsp. baking soda
1 tsp salt
2 tsp. ground cinnamon
1/4 tsp. mace
1 cup crushed pineapple including juice
1 cup vegetable oil
2 egg, lightly beaten
3 tsp. vanilla
4 cups shredded carrots
1 cup raisin

Directions:
Put the pineapple in the bowl of a food processor with a blade and puree. Shred the carrots in a food processor. Set both the pineapple and carrots aside. In a bowl mix the dry ingredients (flour thru mace). In a separate bowl mix the wet ingredients (pineapple thru vanilla). Mix the wet ingredients into the dry ingredients. Stir until just mixed then add the carrots and raisins. Mix until incorporated. Scoop the batter into 12 heavily greased muffin tins. (I used the 2nd largest scoop). Bake in a 400 degree oven for 15 to 20 minutes until a tester put into the middle muffin comes out clean. These muffins are exceedingly tender. They have to be cooled completely before attempting to take them out of the muffin tins. (The first batch I made fell apart into large crumbs when I tried to remove them from the tins soon after they came out of the oven. The second batch was fully cooled and came out just fine.)


These are really good muffins. As stated previously they are very tender with a mild cinnamon sweetness and a nice firm texture element from the raisins. Great for breakfast.

Monday, May 10, 2021

Potato dill muffin ポテトとディルのマフィン

 This is another muffin from the “Mostly muffin” cookbook. My wife made this since we had leftover mashed potatoes made from russet potatoes baked (in Weber grill with pork roast). The mashed potatoes were seasoned with buttermilk, butter, salt and pepper. This is a very nice muffin with a clearly identifiable dill flavor but also a hint of the mashed potato.


Here again, I ask to my wife to take over.


Ingredients
2 cups AP flour
1 1/2 tsp. baking powder
1/4 tsp. baking soda
1/2 tsp. salt
3/4 cup milk
1/2 cup sour cream
1/2 cup cooked mashed potatoes
1/4 cup lightly salted butter melted and cooled
1 egg lightly beaten
1/4 to 1/2 tsp. Sriracha hot sauce
1 1/2 tsp. dried onion (or onion powder or 2 Tbs. chopped scallions)
2 Tbs. dill chopped

Directions:
Mix the dry ingredients in a bowl (Flour thru salt). In another bowl mix the wet ingredients (i.e. the rest of the ingredients). Add the wet ingredients to the dry ingredients and mix until incorporated. Scoop (using 2nd largest scoop) into 12 heavily greased muffin tins. Bake at 400 degrees for 15 to 20 minutes until a cake tester in the middle muffin comes out clean. Let cool for about 5 minutes before removing them from the muffin tin.

These were very hearty muffins. The dill flavor was the most noticeable. The rest of the flavors were a bit muted. Next time I might increase the hot sauce and onion. Nonetheless this was a good muffin for breakfast or even lunch. 


Friday, May 7, 2021

Three appetizers with two new ones 新しいお通し2種

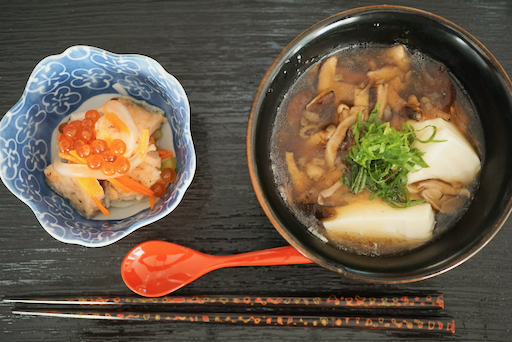
 I served these three appetizers one evening. The dish shown on the left in the first picture is my stand-by fried salmon in sweet vinegar or “salmon nanban” 鮭の南蛮漬け. The new ones are the one in the center “dried persimmon and daikon in sweet vinegar” 干し柿の大根なます and the one on the right, “udon noodle salad with peanut butter dressing” うどんのピーナッツバター和え.


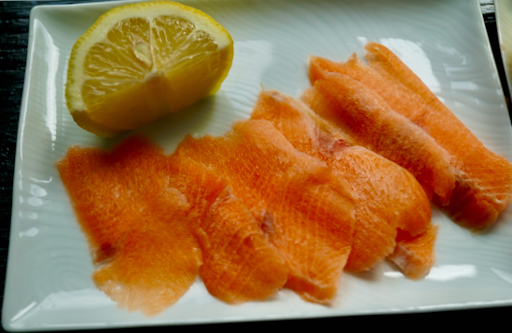
The second picture is a close up of the dried persimmon and daikon in sweet vinegar sauce. This is loosely based on my compiled version of various recipes. I actually used the leftover marinade and vegetables from the previous batch of salmon nanban. (If I made this from scratch, I would make it close to the traditional New Year dish “daikon namasu” 大根なます and just add strips of dried persimmon). For a change, I also added roasted and ground sesame (fine grind but not paste) and a small amount of dark sesame oil. The combined taste of sweet and sour with added sesame flavor and refreshing daikon went well with the soft and sweet dried persimmon. Over time the persimmon got softer in the marinade. This is a good refreshing dish.


These are the ingredients and directions to make this dish from scratch (not reusing the vegetable and marinade of the salmon nanban).


Ingredients
2 dried persimmon, stem end and seeds removed and cut into strips.
1 inch segment of daikon, peeled, and cut into buttons then julienned.
Carrot and/or celery julienned (optional)
1/2 cup sweet vinegar (1/2 rice vinegar, 1/4 cup sugar or 2:1 ratio, pinch of salt, heat until dissolved. Then let it cool)
1 Tbs roasted white sesame seeds, fine ground (I used a Japanese mortar and pestle or suribachi.
1/2 tsp dark sesame oil

Directions:
Salt the daikon pieces and knead, then let it stand for 5-10 minutes.
Add all the ingredients and the sweet vinegar.
Let it marinate for at least 30 minutes in the refrigerator.

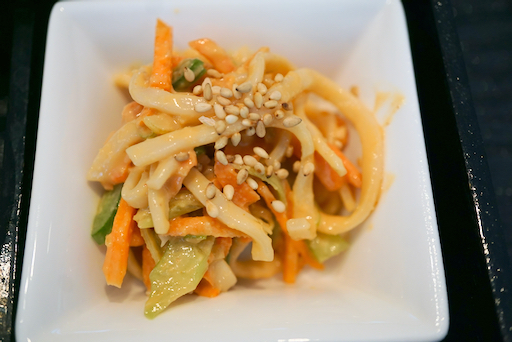
The next dish is a variation of sesame noodle salad. Since we had home-made peanut butter, instead of sesame paste or “neri-goma” ねりごま, I used the peanut butter. This was very similar but different because of the rather intense peanut flavor. I have not made the sesame noodle salad for sometime and never made it with peanut butter. This is a good salad as an appetizer, I should make it more often.


Ingredients: (amount is all arbitrary)
Cooked thin udon noodle
Carrot, julienned
Scallion, sliced thinly diagonally
Sesame seeds for garnish (or crushed peanuts)

For Dressing:
Peanut butter, soy sauce, and rice vinegar in 2:1:1 ratio
Dash of dark peanut oil
Sugar and sriracha to taste
Minced ginger and garlic to taste
Add warm water if the consistency is too thick

Directions:
Cut the noodles into 1-2 inch lengths (optional but for ease of eating)
Dress with the peanut dressing.
Garnish with sesame seeds or crush peanuts.

Tuesday, May 4, 2021

Peanut butter muffin ピーナッツバターマフィン

This is another one of my wife’s muffin projects. The original muffin recipe came from “Mostly Muffins” published in 1984 which we rediscovered recently tucked away on a bookshelf. The original recipe used peanut butter in the dough and called for a stuffing made of semi-sweet chocolate chips made into a fudge. (The peanut butter chocolate combo reminiscent of Reeses Butter Cups?) But my wife thought that a stuffing of chocolate candy would be too sweet for us so she came up with a stuffing made of a mixture of cream cheese and peanut butter. We have jars of peanuts used to feed squirrels but we did not have any peanut butter. So we ended up making peanut butter as well. (Sorry squirrelys) The muffin came out nice and very peanut-y.


Actually, although the stuffing is almost 1/2 cream cheese, it has a very strong and pure  peanut flavor.


Ingredients:
For muffin
1 2/3 cups AP flour
1/2 cup brown sugar
1 Tbs. baking powder
1/4 tsp. salt
3/4 cup milk
1/2 cup peanut butter
1/3 cup peanut oil (to accentuate the peanut flavor. Vegetable oil is OK too.)
1 egg lightly beaten
2 tsp. vanilla

for peanut butter filling
1 block cream cheese
enough peanut butter to bring the total weight of the cream cheese and peanut butter to 225 gm.
2 tsp. sugar
2 tsp. salt

For chocolate fudge filling (I did not use this but it is another alternative filling)
1/3 cup semisweet chocolate chips
1 tbs. butter

In a small saucepan melt the chocolate chips and butter until melted then set aside

Directions:
To make the peanut butter filling: Put the peanut butter (#1) and cream cheese in a stand mixer with a paddle and beat first on lower speed to incorporate. Add the sugar and salt and beat on a higher speed to whip until light and slightly fluffy. Set aside

for the Muffins:
In a bowl mix the dry ingredients (from flour thru salt). In another bowl mix the wet ingredients (i.e the rest of the ingredients) (#2). Put 1/2 of the dough into the bottom each of 12 heavily greased muffin tins (2nd smallest scoop). Top with about 16 gm of the peanut butter filling (smallest scoop). Make sure none of the filling touches the side of the muffin tin. Cover the filling with the remaining batter (#3). Bake in a 400 degree oven for 15 to 20 minutes until the surface feels firm when lightly touched. Cool 5 minutes before removing from the tins. 


These are muffins for the tried-and-true peanut butter devotee. The muffin has a tender texture and a very mild slightly sweet peanut flavor. The peanut butter cream cheese stuffing adds an additional slightly creamy texture and a very pleasant pure peanut kick. The cream cheese does a good job of making the peanut butter a manageable addition to the muffin. This is the kind of muffin where you eat the first one and say “um...pea-nutty” then, “could I have another one”?

Saturday, May 1, 2021

Homemade peanut butter 自家製ピーナッツバター

 My wife wanted to make some peanut butter muffins from a recipe she found in a long forgotten and recently re-discovered "Mostly Muffin" cookbook. We did not have any peanut butter (I can't even remember the last time we even had a jar of peanut butter in the house) but we did have jars of roasted peanuts which we keep to feed the squirrels and friendly birds. My wife suggested, "we have peanuts, we should be able to make our own peanut butter". A quick search on the internet produced many recipes/instructions on how to make peanut butter from peanuts. This is the result. It came out really well.


Ingredients and directions for peanut butter.
1 16 oz. jar of dry roasted unsalted peanuts
Place the peanuts in a food processor with a cutting blade.
Keep the food processor running. The peanuts will go from light crumb, to clumps and finally to a smooth peanut butter consistency. This will take some time and is a bit nerve wracking to have the food processor running for so long and the way it thumps and bumps through the various stages.

This peanut butter was the epitome of peanut-buttery-ness. It was characteristically sticky with a clear deep flavor of peanuts which lingered long on the tongue.  The taste evoked childhood memories of PB&J lunch sandwiches for my wife. (Not for me since peanut butter was not a childhood delicacy in Japan when I was growing up).  My wife came up with her "adult" version of PB&J; a peanut butter canapé to have with wine. 


Ingredients: for PB&J canapé
1 slice of white bread toasted and cut into 4 piece
A slather of homemade peanut butter on each piece
Top 2 with Strawberry puree (I made this with strawberries, sugar and triple sec whirred in the food processor).
Top 2 with fig puree (this was a leftover of fig stuffing my wife made for the fig muffin).

My wife declared "Yup this was prototypical PB&J all right". It was astounding at how well the peanut butter went with the red wine. Needless to say the wine component bumped it up to "adult" status.