Sunday, November 29, 2020

Yellowtail marinaded in sake lee ハマチの粕漬け

This was the last of the whole fresh yellowtail. I marinated the filet in sake lee 酒粕 or "Kasu-zuke" 粕漬け. Since I did not have a time to cook this during the week, the fish marinated for a week which was a bit too long. I also made Japanese stewed vegetable  "nituske" 煮付け as a side.


I broiled the fish in our toaster oven.


The Japanese vegetable stew included lotus root  or "renkon" レンコン, daikon 大根、carrot, and "konnyaku" こんにゃく. I added blanched and salt broth sugar snaps スナップ豌豆の塩びたし at the time of serving.


Ingredients:
Sake lee 300grams
Red miso 30grams
Sugar 3 tbs
Salt 1/2 tsp
Sake to loosen up the marinade if too stiff,

Directions:
I added half of the sake lee mixture in the bottom of a sealable container and placed cheese cloth (after washing to remove any lint). I put in the filets and then covered them with another layer of cheese cloth. I put the remaining sake lee mixture on top. I let it marinate in the refrigerator (for a week as it turned out).


This was a bit over-marinated. I started broiling on the flesh side first as shown below in the toaster oven.


When the fish is 70% done, I flipped it and broiled the skin side. This would have been perfect if I cooked the fish after 2-3 days. Nonetheless this was good . The fish flesh was firmer than if it was marinated for less time (moisture was leached out). Still, we enjoyed this.

Thursday, November 26, 2020

Yellowtail burger はまちバーガー

 I was trying to use all parts of the whole yellowtail I got from Hmart through Instacart. I scraped off all the meat from the bone as well as the meat close to the end of the tail. I minced it but the amount was not enough to make a substantial dish. So I decided to make a yellowtail burger. As a binder and to make the "meat" go further I added “hanpen ” はんぺん. It is steamed Japanese fish cake made of white fish meat and egg white and came pre-made in a package. I served the resulting burger as a lunch with leftover shiitake mushroom risotto, sautéed pencil asparagus and scrambled egg with tomato.


The yellowtail hamburger came out rather soft and tender thanks to the hanpen but the surface was nicely browned with a slight crunch. 


Ingredients:
Yellowfin meat scraped off from the bone and the end of the tail, finely minced (I am not sure how much this was but probably less than 200 grams)
1/3 hanpen, thawed, cut into small cubes
1/2 egg, beaten
2 shiitake mushroom, both stalks and caps finely chopped
1 tsp of red miso
1/2 tsp mirin
Pinch of salt
Vegetable oil for cooking

Directions:
In a plastic cylinder (which came with the emersion blender), add the hanpen and the egg. Using the emersion blender make a smooth mixture. Add the miso and the seasoning and blend. Add the yellowtail meat and mix with a silicon spatula. Dump the mixture on a lightly oiled plate, divide in half and form two oval disks, half inch thick. In a non-stick fry pan, on medium-low heat add the oil and slide in the disks. I cooked one side about 5 minutes and turned the burger over and cooked another 3-4 minutes until done.


This was rather gentle tasting and tender fish burger. The miso flavor really made it. This was nice light lunch.

Monday, November 23, 2020

Simmered yellowtail head ハマチの兜煮

For many non-Japanese (and even for some Japanese I suppose), this may not look attractive but stewed fish head is a classic Japanese dish and does have a quite good amount of meat to enjoy. Even my wife likes stewed fish heads. I made this from the yellowtail fish I bought recently from Hmart and was part of my effort to make sure none of the fish went to waste.  The classic fish used for this dish is perch or “Tai” 鯛. I have made this using salmon head which was very good. This yellowtail head was not very big (I should not have removed the collar or “kama” which I froze for later use. It would have added more meat). I simmered the head in seasoned broth with daikon.


Ingredients: (for two servings)
One yellowtail head, cut into two lengthwise (requires a heavy chef’s knife)
Daikon, peeled and cut into 4 one inch thick rounds
Ginger, 4-5 slices
100ml sake
100ml water
2tbs mirin
2tbs soy sauce
1 tsp sugar

Directions:
Place the two halves of the fish head in a sauce pan (they should fit snuggly).
Add the sake and water and simmer for 10-15 minutes with folded aluminum foil as an inner lid or “otoshi-buta” until cooked through. 
Add the mirin, soy sauce and sugar (I also added rounds of daikon which were precooked in water with some rice grains). I cooked until only a small amount of liquid remained (15-20minutes).

I served the fish heads with daikon and added sugar snaps cooked in salt broth スナップ豌豆の塩びたし. This was quite good. The seasoned broth was a flavorful part of the serving as were the daikon which absorbed the flavor or the broth and were nice and tender. The fish cheek meat, as is the case with other meat sources such as beef or pork was the best part of the stew. Next time I will not remove the collars since they would have provided a bit more meat.

Friday, November 20, 2020

Shelled ginko nuts 殻付き銀杏

Because of Covid, it is not possible to go to a restaurant for a “sit down” meal so, instead, we are doing “take-out” sashimi and sushi from Tako Grill regularly. Since Mr. Segawa’s restaurant is essentially closed for  sit down customers, he expanded his business into groceries by adding frozen and refrigerated cabinets stocked with many Japanese grocery items. Every time I go there, I get some of  these in addition to the take-out. One such time, Mr. Segawa was kind enough to include some matsutake soup that he made. It was really good. Besides all the lovely ingredients such as matsutake  松茸,  chicken,  "edamame"  it also included "ginnan" ginko nuts. We love ginko nuts! Having them in the soup reminded us that we used to get canned  boiled "gin-nan" 銀杏 ginko nuts. For some reason they have totally disappeared and we have not had ginko nuts for quite some time. I asked Mr. Segawa, if we could buy ginko nuts as groceries from him. He was good enough to provide some with the shells on (see below). We were delighted but, to be honest, I have never dealt with ginko nuts in the shell.


So I quickly searched on-line and found three ways to prepare them: 1. Place the ginko nuts in a paper envelope and microwave it until the shell cracks. 2. Dry roast them in a frying pan until the shell cracks, 3. Crack the shell remove the nuts and gently boil for few minutes making sure the nuts are submerged all the time and then remove the brown inner skin while hot. I tried the 2nd method on some of the nuts, i.e. dry roasting them in a frying pan.  The shells did not crack (although one did "explode"—quite impressive). I cracked open the remaining un-cracked nuts but they were over cooked, dry, with burned spots and taste. So, I decided to try the third method.

I cracked the shells using the kitchen scissors which has a nut cracking device near the handles. It was not too difficult but I had to be careful not to damage the nuts inside. Some of the brown inner skin came off when the shell was remove but, for many, the brown skin remained (picture below).


I then placed the nuts in salted gently boiling water. They stayed submerged without much intervention.


After few minutes, I drained the nuts and using a sheet of paper towel, removed the inner brown skin.


This was a success. Here I used them to top cold chawanmushi 茶碗蒸し along with edamame 枝豆 and ikura.


 We really enjoyed this. Definitely the taste of autumn.

Tuesday, November 17, 2020

Two premium types of Japanese rice from "The rice factory" 北海道ななつぼしと富山県コシヒカリ

When COVID pandemic started, we tried to buy a bag of rice at our Japanese grocery store and realized all  15 Lb. bags of the rice we usually use were sold out. The only rice left was a 5 pound bag of very expensive imported Japanese "Koshihikari" コシヒカリ rice from Niigata 新潟県. Since we did not have any choice, we bought it. But when we cooked the rice, we realized it was much better rice than our usual California Koshihikari rice "Kagayaki" かがやき which is grown on dry field (so called "Okabo" 陸稲) rather than paddy. Later  15 Lb. bags of Kagayaki rice were again available but we decided to finish up the expensive rice first. After we finished it, I was curious about what other kinds of Japanese rice may be available. So I started looking on the internet and came across a store in New York called "The rice factory". This store imports unpolished rice from Japan and as the orders come in they polish the rice to the customer's specifications (brown, 50%, 75% and white rice). Since the 2020 new crop rice is about to come in (according to the site, they start selling new-crop in January 2021), many of the varieties they advertise were out of stock. I ended up getting "Hokkaido Nanatsu-boshi" 北海道ななつぼし(meaning 7 stars) (Hokkaido for obvious reasons, also see addendum below) and "Toyama Koshihikari" 富山県コシヒカリ.


This site also includes rice charts akin to the sake charts at Tippsy sake. I wanted "Hokkaido Yume Pirika" which was out of stock. "Nanatsuboshi" according to this chart is in the bit "tough" or "firm" category and not as sticky as other rice. "Kosjihikari" on the other hand is more sticky and soft.


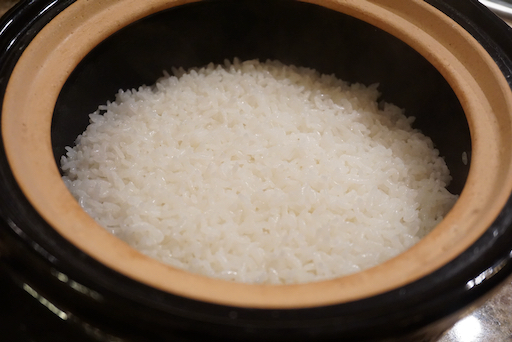
So, we decided to do some rice tasting. I wheeled out our "Kamado-san" かまどさん earthen ware rice cooker and cooked the "nanatsuboshi" first.


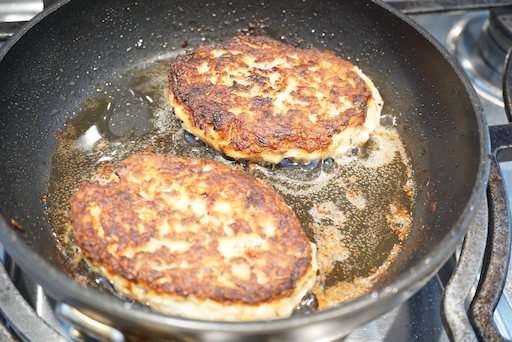
It is quite shiny and the rice kernels were separate; not sticking together too much. The texture is exactly a the chart indicated. We did not dislike it but we prefer rice that is a bit softer. We did discover however, that when we re-heated this rice (microwave), it came out much better than our usual California rice. We also found it made excellent risotto. We used it to make Shiitake mushroom risotto from the leftover cooked rice and it was really good. Since the rice kernels kept their consistency, it added a good (not quite al-dente) texture.

Few days later, we tried the "koshihikari". 


We enjoyed Koshihikari with salmon belly , salt broth soaked sugar snap, skinned and sliced Campari tomato with Yuzu mayonnaise and cucumber and wakame dressed is sumiso as a shime one evening. It was softer and stickier than the previous Hokkaido rice; definitely better but less than our expectation. 


I think, when the new crop becomes available we should try "Yume Pirika" ("Yume" means "dream" in Japanese and "pirika" is "beautiful" in Ainu, the original native language of  Hokkaido.

Addendum: One more interesting fact about Hokkaido rice is that when I was growing up, because of the harsh cold, Hokkaido was not the optimum place to grow rice. As a result the rice that was produced was very low quality. But, in recent years, because of the new cultivars and, maybe, because of global warming, Hokkaido rice is now being hailed as one of the best in Japan such as "Yume Pirika". At least one small benefit from global warming ?

Saturday, November 14, 2020

Grilled yellowtail filet ハマチの塩焼き

Choosing among the whole fresh fish available from HMart Korean grocery store, we tried "yellowtail" this time. The Japanese name may be "hamachi" ハマチ  but the Japanese name changes as this fish grows. If the fish is over 80 cm, it is called "Buri" ブリ which appears to be the uniform nomenclature throughout Japan.  The younger, smaller yellowtail, however, has many different names depending on the locale. The one we got may have qualified as a small "hamachi". Of course, the best way to enjoy hamachi is as sashimi, but this one was not fresh enough for that. So, after I cleaned the fish I made what is known in Japanese as sannmai-oroshi 三枚おろし  or “three layers” which consist of two filets and a central layer of bone with bits of meat still attached between the bones. I cut one of the filets into serving size, salted it and let it stand in the refrigerator for several hours. I blotted the surface with paper towel, re-salted and cooked it. It would have been best grilled over a charcoal fire but I simply cooked it in a frying pan with a small amount of olive oil. I served it with salted vegetables 浅漬け (Cucumber, nappa cabbage, thick rectangles of daikon), myoga in sweet vinegar 冥加の甘酢漬け and blanched broccoli. I found that we had a chopstick rest shaped like myoga so in keeping with the theme included it for the chopsticks on the tray. This dish was quite good with cold sake.


When we received the fish, it was about 30cm in length and came gutted with tail and fins cut off but the head was still on. After I prepared the fish, we had two half heads (cut in half along the spine,) two collars and two filets.

I cut the two filets into small serving size. I cooked one of the filets as shown here. I marinated the other filet in sake lee ハマチの酒粕味噌漬け. I simmered the heads as "Kabuto-ni" 兜煮, and the collars or "Kama" カマ were frozen for later. I also scraped off all the meat from the bone and also removed the meat from skin of the tail portions and used it to make a yellowtail burger ハマチバーガー (all the subjects of future posts). So every part of the fish, except the bones and fins was used— nothing was waste. In so doing I hope we did justice to what this lovely fish had to offer.

Wednesday, November 11, 2020

Banana carrot muffin バナナニンジンマフィン

 This is another muffin my wife made. We thought it was a bit unusual since it uses grated fresh carrot and banana. My wife got this recipe from her sister. It came from “Wild about muffins” by Angel Clubb.  Although we do not know the published date, this book appears old. After just a quick search on the internet, however, it appears that there are quite a few muffin recipes using bananas and carrots. So, apparently, although we have not heard of it before,  this is not such an unusual combination.


Some recipes add nuts but my wife added raisins as per the recipe she used.


Ingredients: (Makes 12 muffins)
Dry ingredients
1 1/2 cup (210g) AP flour
1/2 cup (85g) sugar
2 tsp baking powder
1 tsp baking soda
1/4 tsp salt
1/2 tsp nutmeg
One pinch of ground cloves
1 cup (125g) grated carrot

Wet ingredients
2 eggs
1 Tbs. molasses (this plus the white sugar results in brown sugar)
1/2 cup(125ml) oil
1/2 cup (125) buttermilk
1/2 cup (125ml) mashed banana
1 tsp vanilla

Other ingredients 
1/4 cup (40g) raisins (optional)
nuts (optional)

Directions:
Combine the dry ingredients and add the carrots stirring until they are coated with the flour. This helps keep them from sinking to the bottom of the muffin. Mix the wet ingredients together and combine them with the dry ingredients. Add the raisins and mix until they are incorporated. Using a large scoop put the batter in a well greased muffin tin. Cook in a 400 degree oven until a skewer comes out clean about 18 to 20 minutes.


These muffins were quite good. They were very moist with a mild nutmeg banana flavor. The raisins are a nice addition. They are a nice addition to any breakfast. Next time we might add some nuts.

Sunday, November 8, 2020

Chocolate vanilla panna cotta チョコレート、バニラ パンナコッタ

As I mentioned before, my wife grew up with desserts as the end to a dinner. It was a kind of parental bribe, "eat all your dinner or you won't get dessert." So for a little kid the dessert was almost the goal of the meal. As I also mentioned I did not grow up with desserts so if my wife wants one usually she has to make it. (I, however, am not the least bit averse to helping her eat any dessert she may come up with) She makes a buttermilk panna cotta that we really like. With this success and after cruising several recipes on the internet, she was inspired to try a variation. She came up with this two layer, chocolate and vanilla panna cotta. She served it in a small double walled espresso glass. This makes a nice dainty dessert that is perfect for us. The recipe, however, can be scaled up for larger servings. 


Ingredients:
1 tsp. gelatin
3 Tbs. water
3/4 cup 4% milk
3/4 cup cream
1/4 cup sugar

for flavoring:
1/2 tsp vanilla
3 Tbs. cocoa powder

Directions:
Bloom the gelatin in the water and set it aside for a few minutes. Add the milk, cream and sugar to a sauce pan and heat gently until the sugar melts (don't boil). Take a ladle of the warm milk mixture and add to the gelatin mixture until the gelatin is completely melted into the milk. Add the melted gelatin into the rest of the milk mixture. Divide the milk mixture in half. Add the vanilla to one of the halves. Pour into a glass container that has been tipped on its side. See picture below.


Put into the refrigerator until it becomes firm. Meanwhile put the cocoa powder in a small bowl. Scoop in some of the milk mixture and stir to form a paste. Add back into the milk mixture. Stir to fully incorporate. When the vanilla mixture become firm add the chocolate mixture on top. Put back into the refrigerator until everything becomes firm.

This is a lovely little dessert. The texture is very creamy and smooth with a nice chocolate flavor contrasted with the vanilla. Just a few sweet bites to round out any dinner.

Thursday, November 5, 2020

Cream cheese and chive with white bread muffin

This is one of my wife's baking projects. She likes cream cheese with onions and chives. It come in a small plastic tub. She usually uses it for mashed potatoes. She noticed that there were several containers in the fridge that were not getting any younger. She also like muffins stuffed with a “surprise” such as sweet potato or flavored ricotta cheese. So she decided to use the cream cheese in muffins. She used her favorite white bread recipe (which surprisingly we have not blogged before) and filled it with cream cheese as shown below.


I will turn the next part over to her

Ingredients
1/2 cup milk
3 Tbs. sugar
2 tsp. salt
3 Tbs. butter
2 packages yeast
1 1/2 cup warm water
4 -6 cups bread flour

for the filling:
1 tub of Philadelphia cream cheese with chive

Directions:
Combine the milk, sugar, salt and butter in a sauce pan and heat up until the milk is scalded and the other ingredients have melted or dissolved. Add the water and let the mixture cool. Add 4 cups of bread flour and yeast to a stand mixer. When the milk mixture has cooled add it to the flour while stirring on speed 2 with the bread hook. Add more flour as needed to make a smooth workable dough. Put dough in a bowl and coat the surface with vegetable oil to keep it from drying out. Let rise until doubled.

Form the muffins by punching down the dough. I weighed the dough and decided to make muffins weighing 2 1/4 or 63.78 grams. With this dough I got 20 muffins. I then used a small ice cream scoop for the cream cheese and made 20 balls weighing about 11 grams. I folded the dough over the individual cheese balls and placed the muffins in a heavily greased pyrex baking dish. I baked them at 400 degrees for 18- 20 minutes or until they sounded hollow when tapped.

These muffins were pretty good. As usual an air space developed above the cheese. I fully expected the cheese would melt into the bread but was surprised to find it sitting there about the same consistency as when I put it in the dough. (Made me wonder what the cream cheese was actually made of). The bread was good as always and the cream cheese flavor was very pronounced. But I have to say in all honesty the easiest thing to do in the future if we want this flavor combination is just to make the muffins and smear the cheese on with a butter knife.

Monday, November 2, 2020

Baguette bake in ceramic baker version 4

This is the 4th installment in the continuing saga of trying to bake baguette using the Emil-Henry ceramic baguette baker. I think this time, it came out best among the 4 tries. Again, I made sure we only used 3 cups of flour in total, otherwise the baguettes become too large and fuse together.  The below is when it came out of the oven. The center portions of each baguette still stuck to the baker.


So we decided to let them cool before trying to remove them. Although, even then, we had to use a small spatula to “encourage” them to give up their stronghold on the baker. We were finally able to take them out without breaking the crust (below).


Here is the summary of tips for using the Emil-Henry ceramic baguette baker.
1. The total amount of flour is 3 cups. In our case we used a biga starter (1 cup bread flour, 1 cup buttermilk and 1/8 tsp instant yeast, let it ferment overnight). I added 2 cups more of bread flour). This time I had to add a bit more water.
2. Baked 25 minutes450F with lid on and an additional 10 minutes with the lid off. The additional 5 minutes of baking without the lid on made the crust more brown and harder. The harder crust appeared to help in removing  he baguette without breaking the crust.
3. Let it cool down before removing the baguette.
4. As suggested by a friend, I dusted the baker with cornmeal. I am not sure whether this helped or not. The cornmeal did not stay in the area that stuck the most since the baguettes are not flat.

In any case, we had the best baguette so far without a broken crust. Because of the slightly longer baking time, the crust was browner and a bit harder than in the previous tries. Nonetheless it tasted really good and the crust was just nicely crunchy not too thick or hard. They should have included better instructions with the baker. It should not be this difficult but, in the end, you cannot beat the crust this baker produces

Addendum (10/26/2022)
Despite all the tips described above, the next time I made baguette the center baguette stuck to the two on either side. So, this time, I made only two baguettes and left the center slot empty. This worked much better. There was some minor sticking but the baguettes came off the baker with intact crust. Finally perfection has been achieved. 


Ingredients for two mini-baguettes
2 cups bread flour
1 cup water 
1 tsp active yeast
1 tsp salt

Bake 450F with the lid on for 25 minutes and with the lid off for 5 minutes.