Showing posts with label garlic chive. Show all posts

Wednesday, July 31, 2024

Tofu, Egg and Garlic Chives Stir Fry 豆腐ニラ玉、木耳入り

This is one of the left-over control dishes. I had a package of “medium firm” tofu 豆腐 which just reached “BUB” (Best Used By) date, the last of garlic chive ニラand wood ear mushroom 木耳. So, I made this dish for lunch one day. I sort of got an idea from some of the recipes I saw on the Web and YouTube. Based on my memory and CCK (Common Culinary Knowledge) I  winged it. The seasonings could be improved but overall this was a quite good satisfying dish and fairly healthy and nearly vegetarian (I am not sure if oyster sauce really contains oysters or their derivatives). Depending on how much seasoning you add, this could be a side dish for rice but I seasoned it lightly and we had it as a main dish for lunch.


Ingredients:
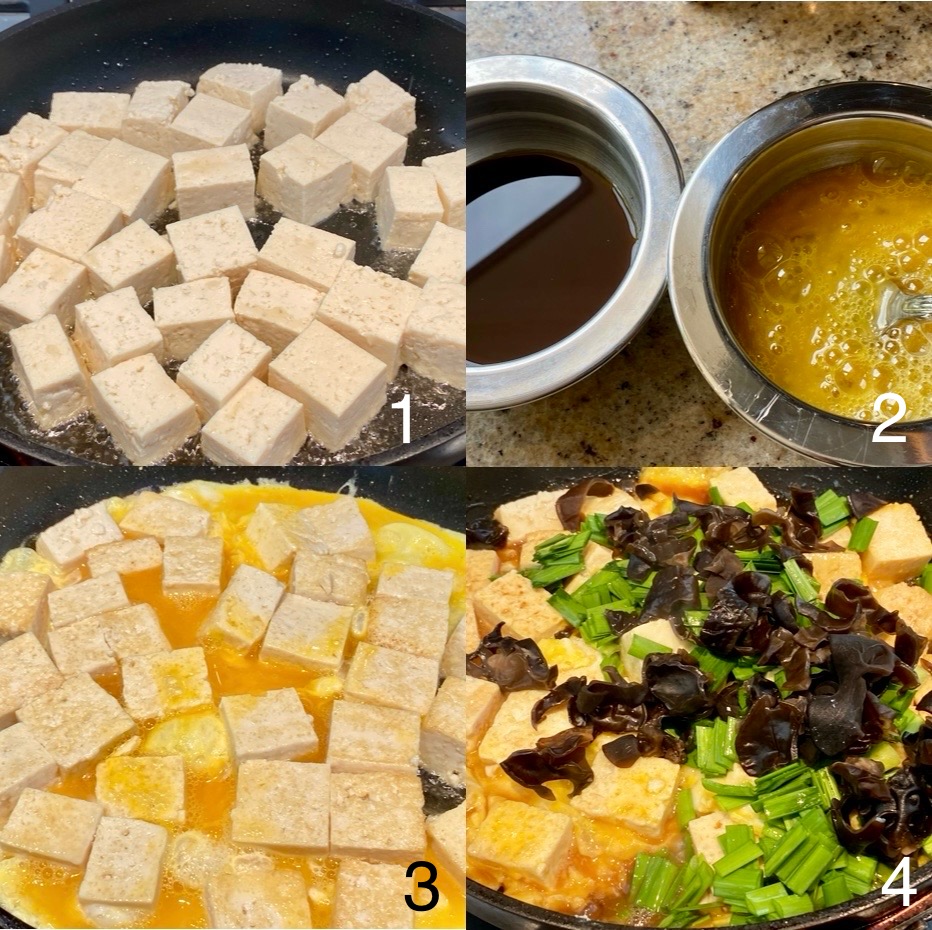
One package of tofu (I used medium firm but firm would be good), drained and cut into cubes (#1 in the composite picture).
Two eggs, beaten and seasoned with a pinch of salt (#2)
Wood ear mushroom (optional, this was leftover, I blanched, washed it previously and cut into small trips, the amount is arbitrary) (#4)
Garlic chive, washed and cut into short segments, the amount arbitrary (#4)
2 tbs vegetable oil or peanut oil and a splash of dark sesame oil

Seasonings (#2): (premix, #2)
2 tbs oyster sauce
2 tbs soy sauce
2 tbs Shaoxing wine (or dry sherry or mirin, which makes it sweeter, or sake)

1 tsp Ponzu sauce


Directions:
Add the oil to the non-stick frying pan on medium high flame and cook turning once or twice until the surface is lightly browned (2-3 minutes) (#1 in the composite picture)
Reduce the flame to medium and pour in the egg mixture (#3) cook until the edges are set and gently turn and coat the tofu cubes
Add the seasonings and cook for 30 seconds mixing gently
Add the garlic chive and wood ear mushroom (#4)
Mix and toss to combine for 30 seconds to 1 minute
Splash the ponzu sauce and a small amount of sesame oil and mix to finish

I felt a bit self righteous finishing up the tofu, garlic chive and wood ear mushrooms by making this dish and nothing wasted. But better yet it was pretty good. The tofu went extremely well with the egg coating. The tofu and egg had similar texture but each brought a slightly different taste which was interesting in the same bite. The wood ear mushroom brought its own element to the dish in the form of a slight crunchiness that offset the tofu/egg texture. The garlic chive contributed a distinctly but mild garlic taste. Not a bad left-over control dish which can bear repeating. 

Thursday, July 11, 2024

Garlic Chive Dumpling ニラ頭饅 or 韮菜万頭

We used to grow garlic chives or “nira” ニラ in our herb garden but it failed in two ways: 1) the garlic chives were very fibrous except when we harvested them very young and 2) they grew like weeds taking over the entire herb garden. The plant had deep roots that were very hard to extract. It was quite a lot of work to get rid of it and we are not completely successful even now. (Digression alert: Some years ago we hired a gardener to do the spring clean up which included the herb garden. When he found out the herb garden contained garlic chives he specified the clean up would include everything EXCEPT the garlic chives.) Although we did make quite a few garlic chive dishes, we gave up growing our own. We have been shying away from even buying garlic chive for a while (besides it is not readily available). Since Weee almost always carries garlic chives, we tried them. They came in quite a large bundle (about 1 lb). We tried it in several dishes and, even though they were fully grown, the garlic chive were not fibrous at all.  We added garlic chives to our stir-fried dishes, soup and as a “ohitashi” ニラのお浸し. We still had some garlic chives left so I started looking for new recipes to use them. I came across a recipe by Koh Kentetsu on YouTube.  I was not familiar with this dish. I am not sure if this is based on a known Chinese dish or invented in Japan but it is apparently very popular. 

A quick internet search indicated that “nira-manju” or “garlic chive dumpling” was “invented” in a Chinese restaurant called “Niramanju Fussa” or “韮菜万頭福生” near the Yokota American military base 横田米軍基地. In any case, I have not tasted or seen the “original”. I made this based on the Koh Kentetsu recipe but I ended up making some changes (in the seasonings, not intentionally. Since I made this dish from memory after I saw the YouTube video). This is in the similar ilk as gyoza 餃子 and shumai  焼売 but maybe even better. We really like the garlic chive flavor and cripsy skin (picture #1). It re-heated nicely in the toaster oven. Since I seasoned the filling adequately, we did not use dipping sauce.


The innovations of his recipe is to use two sheets of store-bought wonton skin to encase the filling and the instructions of how to encase the filling very easily for a home cook. It was cooked exactly like gyoza producing a nice crispy skin on both sides (picture #2) and juicy inside.


Ingredients: (made 10 good-sized dumplings, see picture #2)
1/2 lb ground pork
1/4 lb garlic chive, finely chopped (about 1/5 in)
6-7 medium shrimp, thawed, and minced (optional)
1/2 tsp minced/graded ginger (original recipe used only ginger juice)
1/2 tsp minced/grated garlic (optional,  original recipe does not use this. My wife felt this added too much garlicky flavor)
1 large cap of fresh shiitake mushroom, finely chopped

Seasnings:
1 tsp Shao Xing wine
1 tsp oyster sauce
1 tsp soy sauce
1/2 tsp dark sesame oil

20 Wonton skins

Directions:
Add the meat, shrimp, garlic, ginger and seasonings in a bowl and mix well
Add the mushroom and garlic chives and further mix and cover. Let it stand in the refrigerator for a few hours
Using a medium sized ice cream scoop, make balls of the filling and place them on a rimmed baking sheet.
Place the wonton skin on top of the filling balls (I moistened all the edges to make sure it would stick)
Using all five fingers, press down on the edge and turn several times until the sides of the wonton skin adhere to the filling. Then flip it over (picture #3). (If you just steam this, you are making “garlic chive shumai” ニラシュウマイ).


Place the second set of wonton skin on top (I also moistened the outer edges). Using the same process, turn and totally encase the filling to make sure all sides are attached to the filling and each other
Press gently to make a disk (picture #4)


(I covered the dumplings with a plastic wrap and refrigerated 1-2 hours before cooking but this is not needed. I just wanted to have all the dumpling assembled before cooking them in the evening.)
Using a 12 inch non-stick frying pan, I added the vegetable oil with a splash of sesame oil on medium flame and browned one side (2-3 minutes) and turned it over to brown the other side for another 2-3 minutes (picture #2)
Add a small amount of water (about 1/4 cup). Cover with a tight fitting lid to steam for 2-3 minutes or until the steam stops coming out.
Remove the lid and let the moisture evaporate. Keep browning the bottom and the other side with the addition of a small amount of sesame oil toward the end of cooking.

This is a really nice dish and easier to make compared to gyoza (because you do not have to clip the edges). A good amount of garlic chive adds a nice flavor (my addition of garlic was a bit too much for my wife, I will omit it next time). This is a perfect small dish with drinks.