Showing posts sorted by relevance for query gyoza. Sort by date Show all posts

Thursday, November 26, 2009

Gyoza pork dumpling 餃子 and Celery salad セロリの昆布茶サラダ

Gyoza 餃子 (known in the U.S. as "Pot sticker") is a very popular Sino-Japanese dish and certainly a regular or "teiban" 定番 dish in any Izakaya. Any culture seems to have some kind of "dumpling" dish which is typically a homey comfort food and gyoza belongs in this category. I understand that there is a significant difference between gyoza and "wonton" 雲呑 in the original Chinese dish but most Japanese, including myself, appear to consider both dishes as variations of "gyoza".  As usual, there are Japanese modifications and variations to this dish transforming it into a Japanese dish distinct from the original Chinese.

The skin or casing is made of wheat flour and water and it can be thick, thin, round, or square. There are also several different ways to form and seal the dumplings. Fillings for gyoza can be shrimp, meat (mostly pork) which are mixed with finely diced vegetables or all vegetables or even tofu. Gyoza can be cooked in, at least,  4 different ways, 1. combined pan-fried/steamed, 2. deep fried, 3. cooked in soup, and 4. steamed. In addition, you may have many choices for dipping sauces. So the combination of these factros can create quite a large variation in gyoza. Some locales in Japan have made "gyoza" as their local specialities. For example, Utusnomiya 宇都宮 is famous for the local versions of gyoza and even has an annual gyoza festival. We tried Utsunomiya gyozas in the past but we were not too impressed, which may have been due to our poor choice of restaurant.

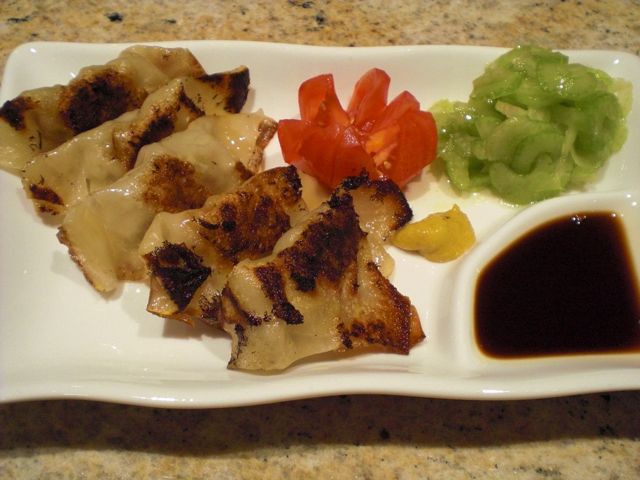
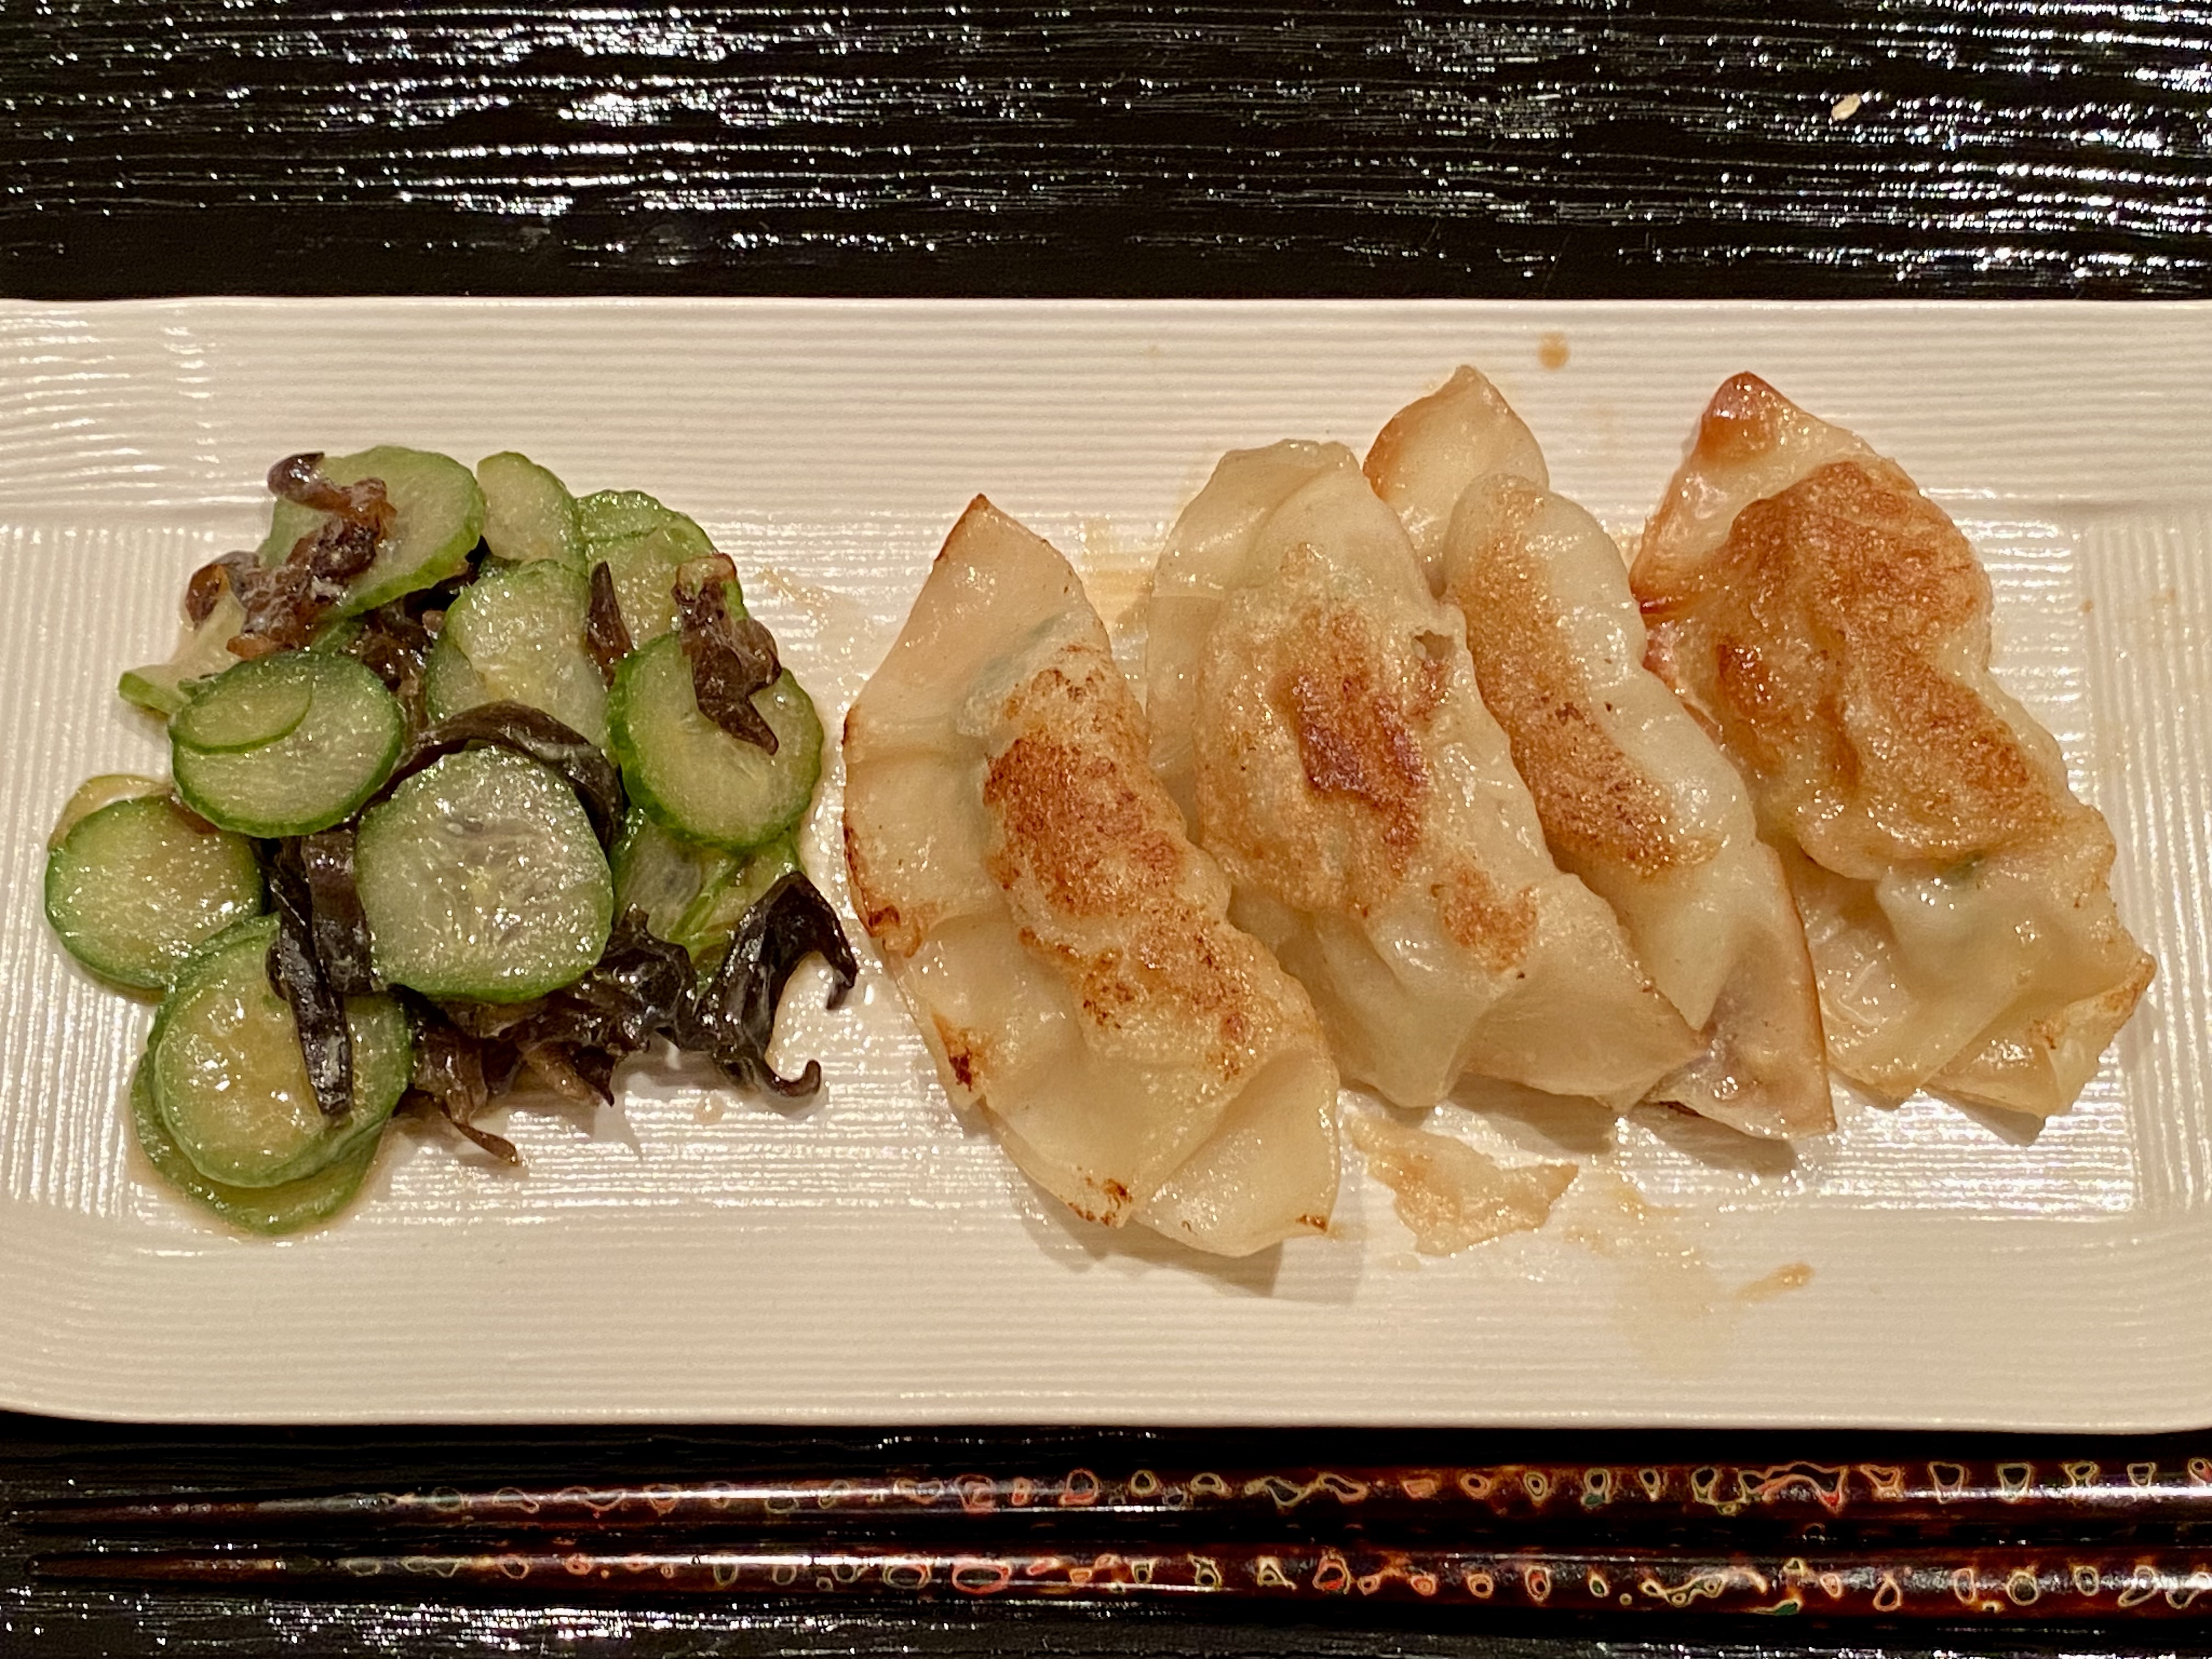
In any case, this is my version of a pork gyoza which is probably very similar to what my mother made and it is also similar to the ones we had in a Izakanya in Japan last time. The skin or casing available in a regular grocery store in the U.S. is called "Wonton" skin and is rather thin and square as opposed to a Japanese version which is round (you could buy them at a Japanese grocery store frozen). I do not see much difference except for the cosmetic appearance and am happy with the American version of "wontan" skins for my gyoza.

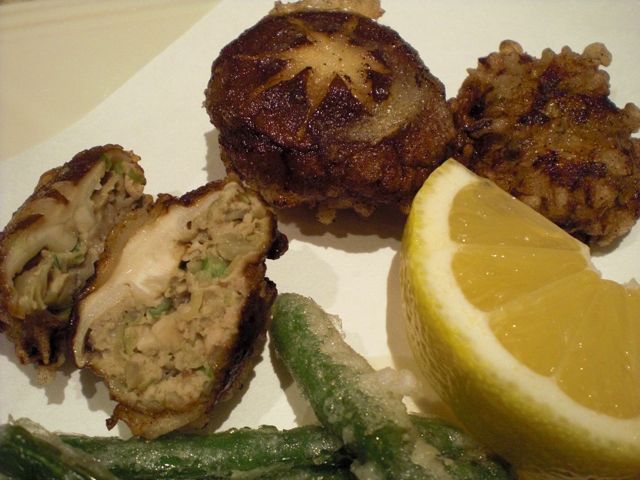
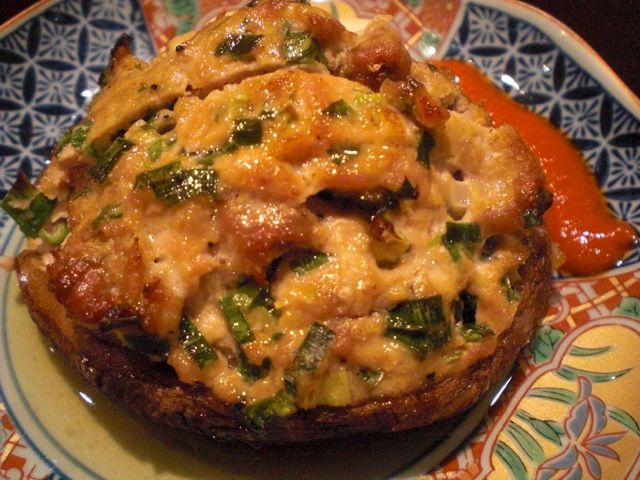
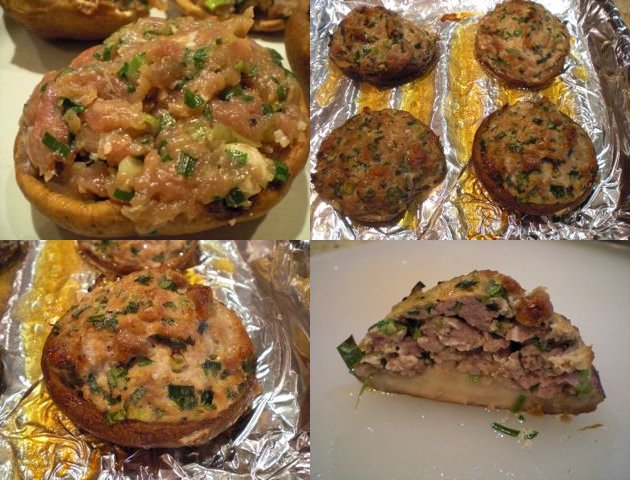
 For a filling, I use pork (usually the trimmings of the pork tenderloin which I hand chop). I mix the pork with finely chopped precooked cabbage leaves, grated ginger root, finely chopped garlic and scallion with a dash of dark sesame oil, soy sauce, mirin, cracked black pepper and salt. I also sometimes add finely chopped shiitake mushroom. (Unfortunately I usually "eyeball" all the ingredients but the proportion of vegetable and meat can be varied). I try not to over season since it is eaten with an additional dipping sauce and Japanese hot mustard. Knead or mix the meat mixture well.

To form the gyoza, take one sheet of the wanton skin in your left palm (I am right handed) and wet two neighboring edges with water using your finger tip. Put scant 1 tsp of the filling in the center and fold to make a triangle so that the two wet edges are pressed against the two dry edges. Try to squeeze out any trapped air around the filling and press the edges to seal. Using your right thumb and index finger pinch and make several crimps along the sealed edges. You should assemble the gyoza just before cooking otherwise the skin will get wet and sticky.

Place the gyoza in a large enough non-stick frying pan (large enough so that gyoza can be placed in one layer comfortably) on medium high heat. Add 1tbs of peanut oil and a splash of dark sesame oil. When oil is hot add gyoza in one layer without touching each other one at a time. When one side is browned (1-2 minutes) turn them over to brown the other side (This is not the traditional way of doing this. Traditionally, the gyoza are placed together to make a neatly arranged circle to fill the pan and only one side is browned. After cooking is completed, they are inverted on a serving plate en mass but I like to brown both sides). Then add 1/3 cup of hot water into the pan (be careful, it will boil and steam immediately) and put a tight lid on. Steam will come out from the edge of the lid or steam hole if your lid has one. (I sometimes have to put the measuring cup on the lid to hold the lid down against the force of the steam). Cook for about 5 minutes or until the amount of steam decreases. Open the lid and the water should be almost all gone. Make sure all the water is gone and the bottom becomes brown and crispy again. For dipping sauce, I make a traditional mixture of rice vinegar and soy sauce (half and half) with Japanese hot mustard.

I served this with a celery salad. We had this celery salad for the first time in Kurashiki  倉敷 in south western mainland Japan, when we went to a smoke-filled small hole-in-the-wall drinking place just across from the train station. Thinly sliced celery was simply dressed with powered kelp tea or "kobucha" 昆布茶 instead of using salt.I also add a very small amount of olive oil.

Sunday, October 4, 2020

Eggplant gyoza 茄子餃子

Last weekend I made gyoza 餃子. As usual, I used the trimmings from pork tenderloin. I made up a batch using wonton skins but I had more gyoza stuffing leftover. Then, I saw a Japanese recipe using thin slices of eggplant instead of Wonton or Gyoza skin. Since I happened to have a Japanese eggplant (one we can get here is a small diameter elongated eggplant. I only rarely see the other varieties of eggplant available in Japan such as "Kamo-nasu" 賀茂茄子 or "Mizu-nasu" 水茄子).  So, I made gyoza with this eggplant. A small amount of gyoza stuffing still remained after I made this dish so I stuffed a fresh shiitake mushroom to finish it up. I served this with some veggies as a starter one evening.


Since only enough leftover stuffing for one shiitake mushroom, I served three eggplant gyoza and half each of the shiitake gyoza. The veggies are sliced cucumber dressed in sushi vinegar 胡瓜の酢の物, skinned Campari tomato with sesame dressing トマトの胡麻和え, braised crunchy cauliflower モンパルナスのカリフラワー and sugar snap in salt broth スナップ豌豆の塩びたし.


Ingredients:
Gyoza stuffing is my usual. Hand chopped pork tenderloins trimmings, boiled and chopped cabbage, chopped scallions, garlic, ginger, seasoned with sesame oil, salt, and soy sauce. As I mentioned this was the leftovers after making regular gyoza.
One Japanese eggplant (one with small diameter and very long),
Potato starch (Katakuri-ko 片栗粉).
Peanut oils and sesame oil for frying

Directions:
Skin the eggplant using a peeler on both sides lengthwise, cut crosswise into 2 inch long pieces and then slice lengthwise into 3mm thick pieces and soak in about 5% salted water (#1) until the eggplant pieces get soft/limp (It took more that 30 minutes).
Drain in a colander and press using the back of a ladle to press out excess moisture and line them up on paper towels (#2) and press with another sheet of paper towel to blot.
Sprinkle potato starch or Katakuri-ko (#3)
Wrap the gyoza stuffing by folding the eggplant in half (#4).
Since I still had some gyoza stuffing left, I stuffed one fresh shiitake mushroom (#5)
Add 1tbs peanut oil and splashes of dark sesame oil in a frying pan on medium flame and place in the eggplant gyoza (#6).
After a few minutes when the eggplant is browned, turn it over and put on the lid for several minutes and finish with the lid off for 1 more minute (#8).

This time, the stuffing was well-seasoned and did not need any dipping sauce. This is not bad but both my wife and I prefer regular gyoza. We both missed the lovely crunch of the crispy wonton skin.

Saturday, January 4, 2014

Boiled Gyoza dumpling 水餃子

Gyoza are very popular in Japan. There are even chain restaurants specializing in gyoza as well as ramen noodle restaurants serving them. There are three main ways to cook gyoza; (1) fry-steam-fry (most common), (2) steam or boil, (3)deep fry. Some time ago I posted pork gyoza which was first browned and then steamed by adding water (and covering with a lid). After the water evaporates, it again browns and crisps up. This time, I decided to boil the dumpling in chicken broth. This type of gyoza is called "Mizu gyoza" 水餃子 ("mizu" means water).

I served boiled gyoza with a dab of yuzukoshou 柚子胡椒 and ponzu sauce ポン酢.

In this version, I added slices of ginger, soy sauce and mirin to the chicken broth in which the gyoza were cooked and used it as a sauce.

Stuffing: This is same as before. I mixed  ground pork (I hand cut the trimming of the pork tenderloins as usual) with sautéed finely chopped onion and shiitake mushroom, boiled and finely chopped cabbage (after they cooled down to the room temperature). The amounts are all arbitrary (if you are “rich” of course use more meat). I seasoned with a small amount of soy sauce, roasted sesame oil, ground ginger and garlic, salt and pepper. I mixed well using my hand until the meat became sticky and the ingredients were bound together.

Gyoza skin: I used American wonton skin (square in shape). I moistened the two adjacent edges of the wonton skin with water. After I placed a teaspoonful of the stuffing in the center, I folded the skin diagonally, pressed it together, and then made a few pleats. This time in order to make the gyoza into pleasing shapes, I used a round cookie cutter to cut off the the edges of the skin after folding it to make a perfect half moon shape but this is optional.

I added chicken broth (my usual low-salt no fat version from Swanson) to a sauce pan and let it come to a boil, I added slices of fresh ginger, soy sauce (I used light-colored soy sauce  or "Usukuchi" 薄口醤油), mirin and sake. I dropped the gyoza into the boiling broth and cooked it for several minutes until the skin became semitransparent and the stuffing was cooked.

I scooped them out using a slotted spoon, placed them on the plate without overlapping. Although we could eat them immediately, I prepared this on a weekend morning when I had some free time. So, I let it cool and covered it with plastic wrap and put in the refrigerator for the evening meal.  In the evening, I warmed them up by dropping them in the warm broth and served as seen in the two pictures above.

By boiling, the skin attained a slightly slippery texture which is quite different from either steam-fried or deep fried gyoza. It seemed reminiscent of ravioli somehow. We still like gyoza made in a traditional fry-steam method but the boiled one could be made in large numbers and even can be frozen. This was a perfect small snack to start the evening.

Wednesday, June 5, 2024

Gyoza made with New Round Gyoza Skin 日本風の餃子の皮で作った餃子

When I make gyoza, I use “wonton skin” which is readily available at a regular grocery store. The wonton skin is square and a bit thicker than a classic Japanese-style gyoza skin. Japanese-style gyoza skin (picture #2) is available (most are frozen) but I did not bother to get it until now. Since we were getting groceries from Weee anyway and they had Myojo brand 明星食品 frozen Japanese-style gyoza skin, I ordered this with frozen ground pork for making gyoza.  The result is definitely worth it (for us). Since it is round, the gyoza looks nicer and the thin skin makes a nice crispy outside without being too heavy or filling (#1). I served the gyoza with pickled daikon, cucumber and marinated quail egg. 


The filling is my usual. Finely chopped cabbage which I blanch and squeeze out moisture, finely chopped scallion, ground pork, grated garlic and ginger. I added soy sauce and small amount of sesame oil. 

Cooking is also as usual. First, brown all sides of the gyoza (the standard method is brown only one side but we like brown and crispy on all sides) with vegetable oil with a splash of dark sesame oil. Once all sides are brown, add a small amount of water and place on the lid. Steam for 1-2 minutes or until no more steam is coming out. Remove the lid and crisp up the skin again.


I made quite a few gyoza. We keep them in a sealable container in the fridge and warm them up in the toaster oven. It works well and the gyoza tastes almost exactly like they were just cooked.


Monday, May 28, 2012

"Teba gyoza" stuffed chicken wings, baked and BBQed 手羽餃子オーブン焼きとバベキュー

Sometime ago when I posted "Teba Gyoza" 手羽餃子, which was deep fried, I promised that I would try baking or grilling it to see what happens. Finally I had a chance. Here I cooked teba gyoza two ways; the left in the image below was hot smoked/grilled using a Weber kettle and the right baked in a toaster oven.
The version which was hot smoked/grilled in the Weber kettle looked much nicer with its mahogany color, crispy skin and juicy meat stuffing inside with a good smoky flavor (below).
The oven baked one was not bad at all either, although it did not look as good and lacked the smoky flavor.
Although the preparation process is almost identical to the previous post, I added more visual aids.

Gyoza stuffing: I did not use boiled shredded cabbage this time. As usual, I made the hand chopped ground pork from the trimmings of two pork tenderloins. This time I weighed the trimmings and they were 12 and 3/8 oz (or about 300 grams). I mixed in garlic chive (from our herb garden, finely chopped, 2 tbs), scallion (finely chopped, 2tbs), ginger (1/2 tsp, grated or from the tube), garlic (1/2 tsp grated or from the tube) salt (1/2 tsp), sesame oil (1-2 tbs), black pepper (1/2 tsp) and soy sauce (1 tsp). I mixed them well by hand until the texture was elastic and holding together (#1 in the image below). Half of this amount was sufficient to stuff 6 wings (i.e. this amount would be sufficient for 12 or more wings).

Preparation of the chicken wings: This is the most tricky step. I started with cutting around the bone (humerus) to separate the meat from the bone (#2). Holding the end of the bone in vertical position, I scraped the meat from the bone until I reached the joint (elbow joint equivalent). During this process, I made sure not to poke any holes into the skin. I then grabbed the bone and, with bending and twisting motions, removed the bone from the joint (#3).  Before stuffing, I put my finger into the cavity and separated the skin and and bone as much as I could without breaking the skin and stuffed the cavity with the gyoza mixture (#4).
Using a tooth pick and a sewing motion, I closed the opening (#5). I prepared 6 wings (#6). More than half of the gyoza stuffing remained which will be used for another dish.

Baking: The first day, I baked the wings in a 450F toaster oven for 30 minutes turning them over once after 15-20 minutes.

Hot smoking and grilling: The next day, we barbecued two whole chickens in our usual way. I added teba gyoza to the area of indirect heat and cooked for 30 minutes. I used hickory wood chips soaked in water for hot smoking.

Either way, the teba gyoza were great. They were much better, in fact, than the deep fried ones. The hot smoked version is better in appearance and flavors of the two but the baked one is much easier to cook.
Here is the cross section showing the gyoza stuffing in the baked version. This is a great dish for beer and sake. Since the stuffing is well seasoned, there is no need for a sauce but I served this with a side of Sriracha hot sauce. If you like spicy flavors, this really enhances all the flavor of this dish.

P.S. The leftovers heated up very well in the toaster oven but the difference between the baked and hot smoked versions became more pronounced, i.e., the hot smoked ones were much better or even better than when they were originally cooked since reheating in the toaster oven made the skin really crispy. Now my wife is asking how many wings I can prepare and cook at one time in the barbeque.

Wednesday, May 30, 2012

Baked shiitake mushroom stuffed with pork 椎茸の豚肉詰めオーブン焼き

This is a dish I made from the leftover gyoza stuffing from making teba gyoza 手羽餃子. I happened to have fresh large shiitake mushrooms (about 3 inch diameter) and decided to stuff them with the gyoza stuffing and bake them. This is a variation of the dish I posted before. Becase the mushrooms were very large and meaty, this dish came out very well. I again, served this with a side of Sriracha hot sauce.


Pork stuffing: I used up a bit over half of the gyoza stuffing left over from making the teba gyoza.

Shiitake mushroom: I found these large fresh mushrooms in our near-by gourmet grocery store a few days ago and bought them thinking I would make some kind of stuffed and baked dish. I washed and removed the stem and squeezed out the extra moisture. I put a small amount of olive oil in the cap (which was promptly absorbed) and simply stuffed the caps with the gyoza mixture (left upper in the image blow).


I baked them in a 400F toaster oven for 30 minutes (right upper and left lower in the image above). Some juice, which was nicely seasoned, came out. I cut the stuffed mushrooms in half showing the bottom shiitake and top gyoza stuffing (right lower in the above image).

I served this with some of the juice accumulated in the bottom of the baking dish and a side of Sriracha hot sauce. The shiitake mushrooms gave a nice meaty texture which soaked up the meat juice. This is a very satisfying dish. 

(A few days later we made a meal by combining several of these left over stuffed mushrooms with the barbecued gyoza chicken wings--it was a mighty fine combination).

Although this will go with any drinks, we were having this with an interesting Sonoma red blend called "The Barrister 2010". They equate this to Orin-Swift "The prisoner", which we rather liked (I am not sure the "Barrister" was so named because they were comparing this wine to the "Prisoner" and indicating "barrister" is better than "prisoner"???). This is a red made of many varietals but the kitchen sink. Although I could not find what kinds of grapes were in it, we definitely tasted and smelled black pepper indicating a good amount of syrah component. This is a good food wine and great with the this dish.

Thursday, December 8, 2022

Black bean pumpkin gyoza 黒豆かぼちゃ餃子

My wife wanted a seasonal quesadilla which is composed of pumpkin puree, black beans, cheese, and roasted pork. After enjoying the quesadilla as a lunch, a good amount of the filling remained.  My wife suggested we use it to make gyoza. It sounded a bit like an odd combination for gyoza but I have seen a recipe for gyoza stuffed with potato salad so I complied. I added more finely chopped BBQed pork . Since we ended up with quite a good number of gyoza, we realized we couldn’t possibly eat them all before they went bad so we decided to freeze some. Then the next question was how? In the past I made up some gyoza and without any additional preparation froze them. The shells became brittle and shattered apart. So we decided some degree of preparation was required to keep that from happening again. So I boiled them first and froze a number of them that way. Then we realized that we would have to fry them before serving. So we got the (brilliant) idea that if we boiled, fried and then froze them, all we would have to do is toaster-oven them (the verb form of noun toaster oven) without thawing and then serve. In any case, the pre-boiled gyoza were fried in a small amount of peanut and sesame oil to produce nice brown crispy shells, frozen than toasted in the toaster-oven as shown below. (Easy-peasy). 


You can see, on the cut surface, small cubes of pork, black beans and pumpkin puree. It is not typical gyoza flavors but it worked. 


We have two frozen batches; one boiled but not fried and the other boiled and fried. Any bets on which batch gets eaten first?


Tuesday, May 25, 2010

Chicken wing "Teba" Gyoza 手羽餃子

This dish must have been invented after I left Japan. It is a wonderful dish except for being rather fatty or, if I borrow the expression from the Japanese food critic who appears on Iron Chef America, "too oily". We first had this in a small Yakitori place (now defunct) run by a middle-aged husband and wife team, on a narrow alley way near the downtown "Yon-chome" 4丁目 intersection in Sapporo 札幌 some time ago while we were visiting Japan. Essentially this dish is a Japanese sausage with the skin of chicken wings as the casing. After removing the bones from the chicken wing, stuff the wing part with the pork gyoza mixture (leaving the wing tip as a handle so that you can hold it while you eat). Somehow, this dish reminds me of a "Turducken". The original recipe is to deep fry this to make it really deadly. This time, I followed the original way of cooking but I promise I will work on making this less deadly by either baking it in a high temp oven or grilling it. If I am successful you will see it in my future postings.

Chicken wings: I remove the drummetts (use for another dish) but leave the wing tips. Using a small knife, separate the meat around the two bones (equivalent to the "ulna" and "radius", if you would like to know) and pull the skin and meat down to expose the joint. I grab the ends of the bones and rotate and wiggle until both come off the joint. Please take care not to cut or break the skin. Now you have created the pocket.

Gyoza stuffing: This is the usual pork stuffing for gyoza. I made much more than I intend to use for this dish so that I could make regular gyoza later. We happened to grow garlic chives in our herb garden, so I added that as well. As usual, I used the trimming from a pork tenderloin and, by using a chef's knife, chopped up finely into ground pork (probably 1 cup). I added chopped garlic chives (probably 3 tbs), blanched and finely chopped cabbage (4 tbs), finely chopped scallion (2 tbs), crushed garlic (1 fat clove), grated ginger (1 tsp), salt (1/2 tsp), black pepper (1/2 tsp), mirin (2 tbs), soy sauce (1 tbs), sesame oil (2-3 tbs) and knead by hand until it become nicely elastic and bound together.

Assembly and frying: Stuff the wing pocket with the gyoza mixture and close it by inserting a tooth pick through the skin at the opening. I shallow fry as usual rather than deep dry. At about 160F (I actually did not measure but used the stick-bamboo-chopsticks-in-oil method as usual) for 5-7 minutes turning several times. I took them out of the oil. I then cranked up the flame and, briefly, re-fried to make the skin crispy. I cut into the fattest one to make sure the pork is thoroughly cooked (which it was).

My wife made baked green beans (just coat them with olive oil, salt and black pepper and spread in one layer in the cookie sheet and bake them for 30 minutes at 350F), which is the best way to cook green beans. They become very sweet and better than boiling or steaming. So, I added the green beans as a side after I took the first picture.

This dish is very good, although the skin was "oily" and could have been crispier. Since it is a type of sausage with a Japanese twist, it will go well with a cold beer but we had this with a red wine, Brookdale Cab Sauv from Napa, to counteract the effect of the fat.

Tuesday, February 7, 2012

Rice cake "mini" spring roll 餅のミニ春巻き

I saw this one in e-recipe. I meant to make a similar dish with cheese but I thought this was very interesting and perfect for using up the left over mochi 餅 or rice cake from New Year. I made this one weekend as a starter dish. Since I did not have spring roll wrap or skin, I used an American style square "gyoza" or wonton skin instead.
The inside has mochi wrapped in a seasoned nori sheet which was smeared with yuzu-koshou 柚子胡椒. I served the rolls on a bed of baby arugula. I poured a small amount of the peanut oil in which the rolls were cooked plus a splash of soy sauce over the arugula to make an impromptu dressing and to slightly wilt it. 
Mochi: I cut a square of mochi or kiri-mochi 切り餅 into 5 equal size sticks.
Nori: I just used a prepackaged and precut "ajitsuke-nori" 味付け海苔.
Since, the gyoza skin was a bit too small to wrap the mochi sticks or the nori, I used two together staggered like seen in image #1 below. I moistened the overlapping parts with water so that two sheets would stick together. I placed the nori on the gyoza skin (#1) and smeared Yuzu-koshou on the nori then put on the mochi stick (#2). As I rolled I moistened the overlapping gyoza skin and made tightly wrapped mochi sticks (#4).
Using a small non-stick frying pan with peanut oil (1 tbs) on low heat (#5). I turned them every 30 seconds or so initially so that all the overlapped skins got cooked evenly and held together (#5). Once all the sides were fried, I let it cook a longer time on one side (1 minute or so on each side) until the skin was brown, crispy, and the mochi was soft (total of 5-7 minutes). When I saw soft mochi starting to come out from the seam and knew it was done (see the very first picture in the beginning of the post).

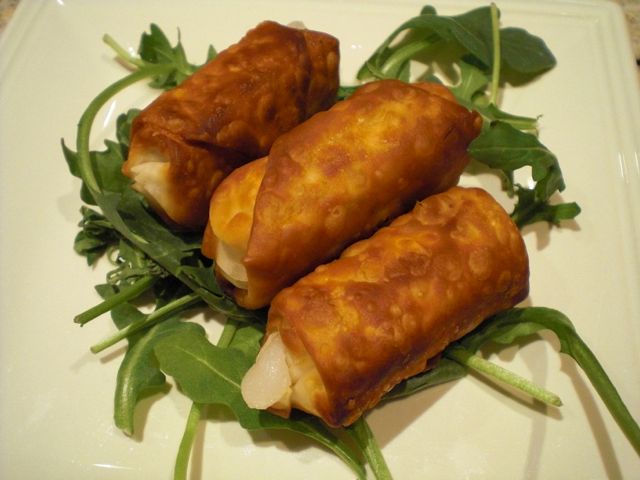
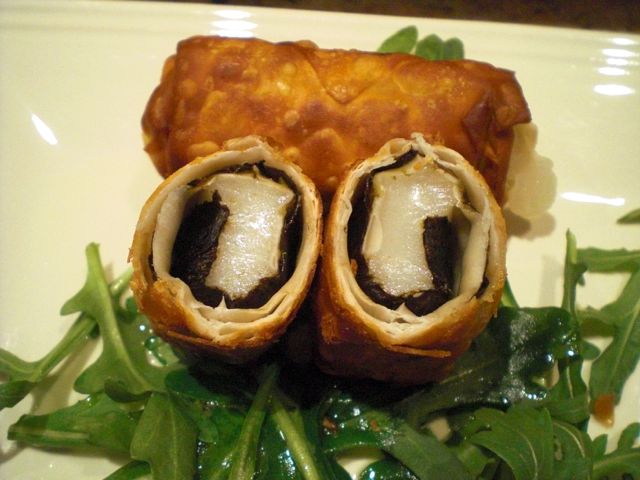
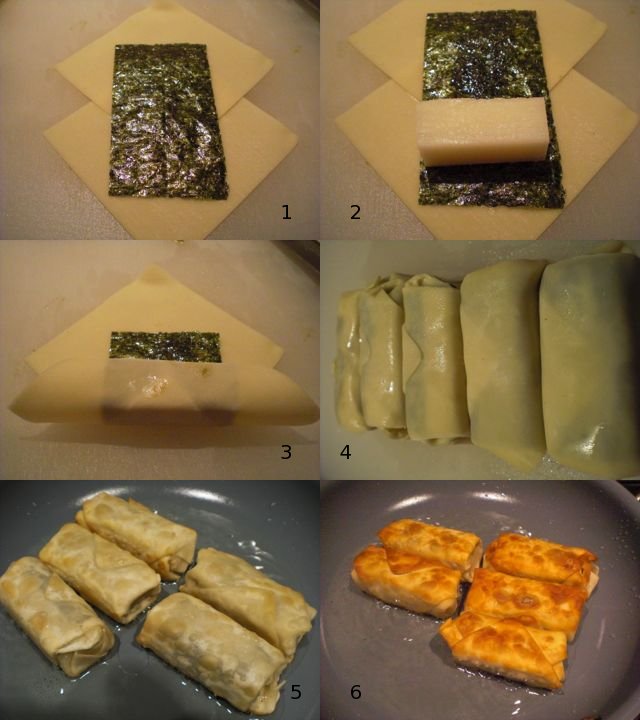
This is a very nice dish. The gyoza skin was very crispy and the mochi was nicely soft but not too soft or too sticky. The nori and yuzu-koshou added some spiciness to the nice flavor. My wife could not figure out what was inside. She thought it was some kind of cheese. This is a very good way to use up left over mochi.

This dish will go with any drinks but we happened to be having Ladera Howell mountain Cab 2007. This wine was an excellent California Cab (I will give 91-92) but it is overhyped and 2007 may not be the best year for them.  At this price point, it is not cost effective (low PQR or Price-Quality-Ratio). We can have a similarly good Cali cab at 1/3 of the price for that matter.

Monday, September 15, 2014

Tofu pouch gyouza 焼き油揚げ餃子

I am always looking out for interesting drinking snack recipes. When I saw the gyoza in deep fried tofu pouch ( or "abura-age" 油揚げ), I had to try it. I served this with a garnish of chiffonade of perilla leaves and myouga 茗荷. As a side, I also served beer-picked daikon and carrot and  Japanese-style sweet vinegar cucumber pickles.


The below shows the gyoza stuffing better.


Gyoza stuffing: The recipe I saw used onion, garlic chive, and fermented squid and guts (or "Shiokara" 塩辛) but I stuck to my original gyouza stuffing of ground pork, finely chopped cabbage and scallion seasoned with salt pepper, soy sauce and sesame oil.

Tofu pouch: I used small rectangular tofu pouch called "sushi age" which is meant to be used to make "Inari sushi いなり寿司".  This is much smaller than regular abura-age. I used frozen ones I had in my freezer. I thawed it at the room temperature for 30 minutes and then poured hot water over them in a colander to completely thaw and remove excess oil ("abura nuki" 油抜き). I pressed them between the paper towels to remove any excess water. Using a rolling pin, I went back and forth over the tofu pouch which helped separate the two layers. I opened the abura-age from the shorter end and using my fingers separated the two layers to make a pouch.

Assembly: I put in the gyouza stuffing in the pouch and flattened it to make sure the stuffing is evenly distributed.

Cooking: I suppose I could have cooked these in a toaster oven but I cooked then on a dry non-stick frying pan. Turning several times on low flame, I cooked them until the surface was brown and the meat stuffing completely cooked.


I cut them diagonally and served it with chiffonade of perilla and myouga. I poured on a small amount of noodle dipping sauce (from a bottle).

We were not impressed with this dish. The tofu pouch was not crispy enough and we much prefer the regular gyouza skin. Maybe, cooking this in a toaster oven could have been better. At least, I got one post from this dish.

P.S. Few days later, we heated the leftover tofu pouch gyoza in the toaster oven. We placed them on a rack over a small cookie sheet and warmed them up in the 350F preheated oven for 5-6 minutes. Then, switched to the broil mode, turning once, until both sides browned(1 minute each, be careful of over broiling and causing them to smoke). The result was much better. The abura-age skin got very crispy. In addition, I made a dipping sauce (equal mixture of soy sauce and rice vinegar, Japanese red pepper powder, sesame oil, and finely chopped scallion). This rather assertive dipping sauce made this dish even better. So next time we make this, I will bake it rather than pan-fry.

Saturday, March 12, 2022

Pirogi ピロギ

One day, my wife made these pirogi. She was inspired after reading a recipe in the Washington Post at the start of the Russian war with Ukraine for Ukrainian "pierogi". Somehow this triggered a memory of the pirogi she used to eat as a young child. They were part of special family dinners out, in the summer, after an afternoon spent swimming. In rural Pennsylvania, at that time, dinner out often consisted of stopping at the local Tastee Freez and consuming your purchases in the car in the parking lot. (According to my wife, at least the scenery overlooking the beautiful Pennsylvania farmland from the parking lot was quite nice.) For some reason, this Tastee Freez sold food items other than just ice cream; one of which was pierogi. My wife clearly remembers how good they tasted, particularly when she was hungry after an afternoon of swimming. 

(Note from me: Just to bring the record up to date, I researched Tastee Freez and there are presently none located in PA. In addition, pirogi are not on the menu of those not located in PA.). (Note from wife: I was very young when we ate there. On reflection, maybe it was a Dairy Queen). (Note from me: There are lots of Dairy Queens in PA  but like Tastee Freez they don’t serve pirogi.) (Definitive note from wife’s older sister: It was not a Tastee Freez or Dairy Queen, it was a privately run food stand that subsequently went out of business and yes their pirogies were great.) (Note from wifey and me: Oh!)

In any case, my wife again raided my stash of gyoza/wonton skins instead of making the dough from scratch. I tasted the pirogi just boiled and it was quite good although the "cheese" flavors didn’t come through strongly. (My wife told me that she added a lot of cheeses). I recently saw a recipe for Japanese gyoza made basically by filling gyoza skins with potato salad. This sounds like a Japanese version of pirogi. Maybe, I should try this recipe. In any case, as a shime/ending dish one evening I cooked the pirogi my wife made in the style of ravioli. I made a quick tomato sauce from skinned Campari tomatoes and shallots.  I garnished with chopped fresh parsley and grated parmesan cheese. For good measure, I drizzled on some of our favorite Spanish olive oil. This was very carbo-intensive but tasted very good and was certainly rather filling.


The recipe is from Washington post. I am sure my wife modified the recipe. So I will ask her to take over.


Ingredients:
2 russet potatoes
4-6 tablespoons unsalted butter (or to taste)
1 small yellow onion, finely chopped and caramelized in a sauce pan.
2 cups of shredded sharp cheese (I used a combination of smoked gouda, Monterey Jack and Irish cheddar)
Salt to taste
1 teaspoon freshly ground black pepper
Chopped fresh chives, dill or scallions, for garnish (optional)
1/2 package (about 20) gyoza skins

Directions:
To make the filling: Cook the potatoes, skin on, in the micro wave (about 10 minutes). Peel and mash in a bowl adding all the other ingredients (#1).

To assemble the pierogi: Wet the edges of the wonton skin with water. Add about 1 tablespoon of the potato filling to the center of the Wonton skin. (I used the smallest ice cream scoop). Fold over the skin to enclose the potato mixture and press firmly to seal making sure there are no air pockets. (I used the handy-dandy presser (see picture below).


Repeat with the remaining dough and filling (#2). The pierogi can be frozen at this point.

To finish, bring a large pot of well-salted water to a boil. Drop the pierogi in a few at a time, so as not to crowd the pot, gently stirring them so they don’t stick together (#3). Cook until they begin to bob to the surface, about 4 minutes. Remove with a slotted spoon. Drain them on a rack (#4) While still hot coat with olive oil so they don’t stick together after they cool.


My wife admitted that while good, these pirogi were only vaguely reminiscent of the pirogi of her childhood. (Maybe an afternoon spent swimming is required seasoning for this dish?) Although the cheese flavor wasn’t pronounced, the overall flavor was very rich. The caramelized onions were very nice. Served this way with the tomato sauce, the pirogies were more like ravioli (can’t go wrong with that). 

Tuesday, June 5, 2012

Beef back rib BBQ on Memorial day 牛バックリブのバーベキュー

On Memorial day, we like to barbecue particularly if the weather allows. We tend to be in a rut and cook whole chickens served with sides of potato and macaroni salads. We have done roast pork, beef, lamb etc and wanted to do something different this year. So we cooked beef back rib this year.
We fired up two Weber kettles. One was used for baking pizzas and the other was used to cook the ribs. Oh, we also made teba gyoza. The answer to my wife’s question how many wings can I prepare and cook one time; twelve! (see below).


I removed the wingtips to save space on the grill. I ended up cooking the teba gyoza in two batches but if we were not cooking the ribs, I could have cooked all 12 at once.  I did not take a picture of the final and cooked teba gyoza but it is the same as before but lacking the handle (i.e. wingtips) to hold onto.

The recipe for the ribs is based on ones listed in the  Weber webpage.

Ribs: I got center back ribs (with 6 ribs). I removed excess fat and rubbed the dry rub below I placed the ribs in the Ziploc bag and refrigerated for 8 hours.

Dry rub: Dried oregano (2 tsp), smoked paprika (2 tsp), dried granulated onion  (2 tsp), brown sugar (1 tsp), kosher salt (1 tsp), and ground black pepper (1 tsp).

Barbecue sauce: Initially I was to use store bought Mango BBQ sauce (which had been given to us sometime ago) but, upon tasting, I decided it was too sweet and my wife decided to make her own BBQ sauce. Here is the recipe my wife made which is a “classic” ketchup based sauce. Her recipe is based on one in “Joy of Cooking” but with her own variations. It is also very similar to the one used in pork spare rib.
For the sauce; Two medium onions were coarsely diced and sauteed in a small amount of olive oil until soft and caramerized (15-20 minutes). One cup of ketchup was added to the pan and cooked, scraping the bits left behind from cooking the onions, until the sugar in the ketchup was caramelized (the color will change from red to more dull brownish color). Combine, the onion and the ketchup in a sauce pan with a mixture of rice vinegar (2 tbs), water (1/2 cup), lemon (1/4 cup), paprika powder (1/2 tsp), Worcestershire sauce ( 1 tbs), salt (1 tsp), brown sugar (1 tbs) and mustard (1 tbs.) and simmer for about 15 minutes. I added about ½ cup of red wine (since we did not have wine which did not pass our Wednesday wine drinkability criteria - lowest-, we used one we will be drinking in the near future) to the sauce and simmered it for 5-6 minutes and kept it warm.

I took the ribs from the refrigerator 30 minutes before cooking to come to room temperature. I prepared the grill for indirect heat and added soaked apple wood chips for smoking. Using the direct heat part of the grill, I seared both side 5-6 minutes each. I then transfer the ribs (I had to cut it in half) to a Pyrex baking dish and poured the wine/BBQ sauce mixture over the ribs and covered it tightly with aluminium foil. I placed it in the indirect heart area and further cooked it for 1 more hour (see picture below).

As you can see the sauce reduced and the meat was almost coming off the bones. It is usual to serve it with the bone on, but the meat just came of the bone as I was serving. So I just served the meat sans (without) bone (the first picture).

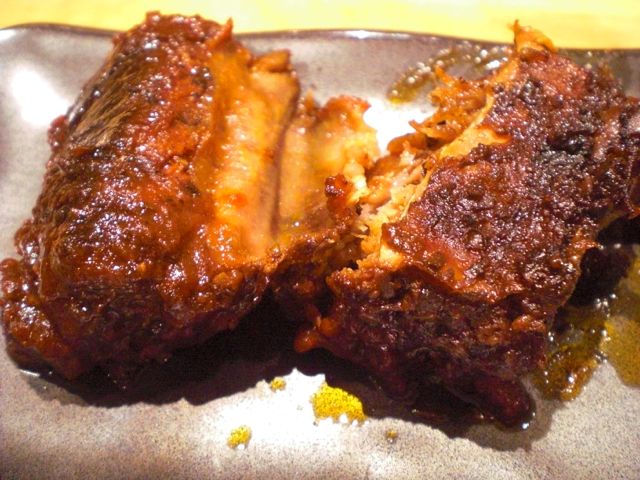
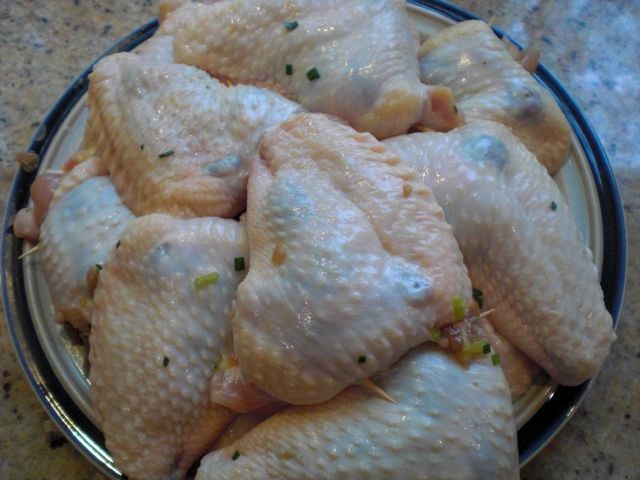
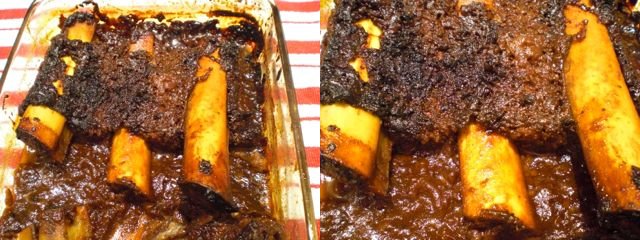
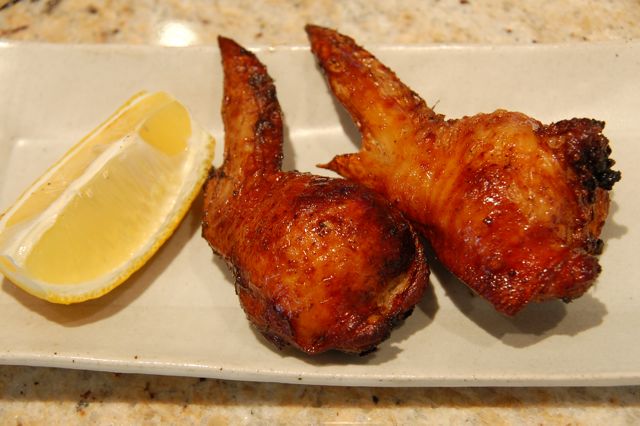
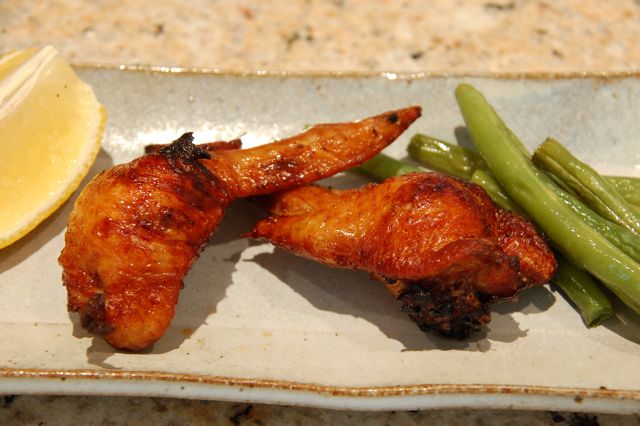
We are not connoisseurs of BBQ as they are in the South and Texas, but we thought these were mighty good ribs with BBQ sauce. The sauce; caramelized with the juice from the meat was just the right consistency--ooey-gooey, mildly smokey sweet and sour. The meat had a nice crust and melted in your mouth. We had our usual macaroni salad (Memorial day would not be Memorial day without that) with the addition of black bean corn salad. But this combined with the pizza, and the chicken wings--which had to be tasted as they came off the grill, of course, was way too much food.


As and antidote/libation, we chose shiraz from Maclaren valley, Australia called Clarendon Hills McLaren Valley Piggott Range Vineyard, Syrah 2005. This is a very nice heavy duty shiraz. It stood up against the strong flavorof the BBQed ribs. This one got 97 from Wine Advocate.
97 Points - Wine Advocate
Deep crimson in color with mineral notes, violets, spice box, black pepper, espresso, smoked game, and blueberry aromatics. Deceivingly opulent, it has enough structure to merit 8-10 years of cellaring and should make old bones. Drink it through 2035."

Monday, January 7, 2019

Mozzarella cheese mochi マッツレラチーズもち

We used to have "Isobe -maki" grilled mochi (grilled mochi coated with  sugar-soy sauce mixture wrapped with a sheet of nori) for lunch on the second day of New Year but now we (especially my wife) like grilled cheese mochi. This year, we used low-moisture cow-milk Mozzarella cheese (from Whole Foods) and it worked very well. It came out almost like gyoza with wings or "Hane-tsuki gyoza" 羽根つき餃子. The "wings" of this type of gyoza dumpling are made by adding cheese or a thin flour/starch batter that creates the crunchy fringe when cooked. I also served soup and other items for this second-day lunch.


This is double wing version with cheese wings both top and bottom. We had this with a bit of soy sauce. My wife precut her piece into small pieces using a pizza cutter. I posted how to make this before.


The soup is leftover from zoni 雑煮 or new year's day soup. I added more vegetables (shiitake mushroom, snow peas, carrot) but no mochi.


To help digestion, diakon namasu 大根なます (daikon in sweet vinegar) is a must with mochi. As usual, I also added boiled octopus leg and ikura salmon roe.


This small plate has red and white fish cake (with wasabi and soy sauce), date-maki omelet roll (this is one I made), Russian marinated salmon and marinated herring roe.


This was a rather filling lunch because of the mochi (one mochi must be equivalent to, at least a full bowl of rice). The low-moisture mozzarella made a nice crunchy crust which contrasted with the soft texture of cooked mochi.

Saturday, December 26, 2009

Deep fried stuffed Shiitake mushroom 椎茸の肉詰め揚げ

This is a variation from "Deep fried stuffed peppers" (Mark's book p20). This is also a fairly common dish. Actually, one of the reasons I made this dish is (like Pork meat ball nabe dish) to use up the meat stuffing I made for gyoza. Somehow we did not feel like having gyoza repeated for a few days. In any case, the recipe is rather simple.
For the meat stuffing, you could use any kind of ground meat such as pork, chicken or even beef or a mixture of beef and pork. Here, since I used gyoza stuffing, it is made of pork, minced cabbage, scallion, ginger, garlic and seasoned with soy sauce, mirin and black pepper. You could use just meat but I prefer to lightly season it, at least with salt and pepper. Since this is a type of tempura, you could eat this with a tempura dipping sauce with grated daikon or graded daikon with red pepper "momijo-oroshi" 紅葉おろし as suggested in the recipe in the Mark's book or with a lemon and salt or just with a lemon juice as we did here because the meat stuffing was seasoned.

I used small fresh mushroom (about 2 inch in diameter). Although it is optional, I made a traditional decorative star-shaped cut on the surface of the shiitake mushroom as seen above. Take the meat stuffing and put it against the gill side of the mushroom and make a small mound. The amount of the stuffing depends on the size of the mushroom, I used 1-2 heaping tsp for each mushroom. I used a rather thin tempura batter. I made about 1/3 cup of the batter with 2tsp each of cake flour and potato starch and added cold water (from the refrigerator dispenser) to make the rather loose batter.

I heated peanut oil or vegetable oil in a pan to 375F (or you could use the more imprecise but easy method of judging the oil temperature as I described before). I used green beans as an accompaniment. I snipped both ends of green beans and coated them with batter. I fried the beans for 1 minute. Then, I coated the stuffed shiitake mushrooms with the batter and fried them meat stuffing side down first and after 2-3 minutes flipped them over and fried another 2 minutes on the mushroom side. I drained the stuffed mushrooms on a pepper towel or on a metal grate.

Small Japanese green peppers called "pea-man" ピーマン required in the recipe in Mark;'s book are difficult to get here in the U.S. and certainly, western green peppers are too thick and too strong in flavor for this dish. Especially since my wife does not like green peppers, shiitake mushroom is better choice for us. Shiitake mushroom has a nice meaty texture and we really like this combination.

Thursday, July 11, 2024

Garlic Chive Dumpling ニラ頭饅 or 韮菜万頭

We used to grow garlic chives or “nira” ニラ in our herb garden but it failed in two ways: 1) the garlic chives were very fibrous except when we harvested them very young and 2) they grew like weeds taking over the entire herb garden. The plant had deep roots that were very hard to extract. It was quite a lot of work to get rid of it and we are not completely successful even now. (Digression alert: Some years ago we hired a gardener to do the spring clean up which included the herb garden. When he found out the herb garden contained garlic chives he specified the clean up would include everything EXCEPT the garlic chives.) Although we did make quite a few garlic chive dishes, we gave up growing our own. We have been shying away from even buying garlic chive for a while (besides it is not readily available). Since Weee almost always carries garlic chives, we tried them. They came in quite a large bundle (about 1 lb). We tried it in several dishes and, even though they were fully grown, the garlic chive were not fibrous at all.  We added garlic chives to our stir-fried dishes, soup and as a “ohitashi” ニラのお浸し. We still had some garlic chives left so I started looking for new recipes to use them. I came across a recipe by Koh Kentetsu on YouTube.  I was not familiar with this dish. I am not sure if this is based on a known Chinese dish or invented in Japan but it is apparently very popular. 

A quick internet search indicated that “nira-manju” or “garlic chive dumpling” was “invented” in a Chinese restaurant called “Niramanju Fussa” or “韮菜万頭福生” near the Yokota American military base 横田米軍基地. In any case, I have not tasted or seen the “original”. I made this based on the Koh Kentetsu recipe but I ended up making some changes (in the seasonings, not intentionally. Since I made this dish from memory after I saw the YouTube video). This is in the similar ilk as gyoza 餃子 and shumai  焼売 but maybe even better. We really like the garlic chive flavor and cripsy skin (picture #1). It re-heated nicely in the toaster oven. Since I seasoned the filling adequately, we did not use dipping sauce.


The innovations of his recipe is to use two sheets of store-bought wonton skin to encase the filling and the instructions of how to encase the filling very easily for a home cook. It was cooked exactly like gyoza producing a nice crispy skin on both sides (picture #2) and juicy inside.


Ingredients: (made 10 good-sized dumplings, see picture #2)
1/2 lb ground pork
1/4 lb garlic chive, finely chopped (about 1/5 in)
6-7 medium shrimp, thawed, and minced (optional)
1/2 tsp minced/graded ginger (original recipe used only ginger juice)
1/2 tsp minced/grated garlic (optional,  original recipe does not use this. My wife felt this added too much garlicky flavor)
1 large cap of fresh shiitake mushroom, finely chopped

Seasnings:
1 tsp Shao Xing wine
1 tsp oyster sauce
1 tsp soy sauce
1/2 tsp dark sesame oil

20 Wonton skins

Directions:
Add the meat, shrimp, garlic, ginger and seasonings in a bowl and mix well
Add the mushroom and garlic chives and further mix and cover. Let it stand in the refrigerator for a few hours
Using a medium sized ice cream scoop, make balls of the filling and place them on a rimmed baking sheet.
Place the wonton skin on top of the filling balls (I moistened all the edges to make sure it would stick)
Using all five fingers, press down on the edge and turn several times until the sides of the wonton skin adhere to the filling. Then flip it over (picture #3). (If you just steam this, you are making “garlic chive shumai” ニラシュウマイ).


Place the second set of wonton skin on top (I also moistened the outer edges). Using the same process, turn and totally encase the filling to make sure all sides are attached to the filling and each other
Press gently to make a disk (picture #4)


(I covered the dumplings with a plastic wrap and refrigerated 1-2 hours before cooking but this is not needed. I just wanted to have all the dumpling assembled before cooking them in the evening.)
Using a 12 inch non-stick frying pan, I added the vegetable oil with a splash of sesame oil on medium flame and browned one side (2-3 minutes) and turned it over to brown the other side for another 2-3 minutes (picture #2)
Add a small amount of water (about 1/4 cup). Cover with a tight fitting lid to steam for 2-3 minutes or until the steam stops coming out.
Remove the lid and let the moisture evaporate. Keep browning the bottom and the other side with the addition of a small amount of sesame oil toward the end of cooking.

This is a really nice dish and easier to make compared to gyoza (because you do not have to clip the edges). A good amount of garlic chive adds a nice flavor (my addition of garlic was a bit too much for my wife, I will omit it next time). This is a perfect small dish with drinks.

Monday, March 7, 2022

Mini Lasagna cups ミニロザニアカップ

One day, all of a sudden, my wife asked if we still have wonton or gyoza skins. I said we had leftover gyoza skins frozen. I was not sure why she was asking this. I found out that she saw a recipe for “mini-lasagna cups” which uses wonton skins as the pasta. This is a good dish to make since I have been reheating my marinara sauce once a week for several weeks now to make it last. It was time to use it up. In any case, the picture below shows the mini-lasagna cups she made. They are perfect for a lunch or appetizer. The combination of flavors is very nice.


You can see the layers in the picture below; layers of ricotta cheese and spinach and alternating layers of marinara sauce (actually one time when I reheated it I put in chopped up cooked chicken) separated by the wonton skins. She ran out of the wonton skins and some of the lasagna cups ended up having a layer of Pennsylvania Dutch noodles instead. (Because she had those and hey, they are a form of pasta).
 

I am not sure where she saw this recipe but I’ll ask my wife to take over. (Note from wifey: I found the recipe in the Washington Post and as usual treated it as just advisory.)

Ingredients:
1 cup cooked spinach
1 cup ricotta cheese
1/2 tsp. salt
2 cups shredded cheese (I used a combination of dry mozzarella, smoked gouda and cheddar.)
1 1/2 cups husbandito’s marinara sauce
36 wonton skins (3 per 12 muffin cup tin)

Directions:
Mix the spinach, ricotta cheese and salt together. Put half of it in a separate bowl and stir in 1/2 of the shredded cheese. Fit a wonton skin into the bottom of a 12 cup muffin tin. (I used muffin papers to make it easier to get the finished product out but it turned out they weren’t necessary.) Evenly divide the ricotta spinach blend into each cup (#1). Fit another wonton skin on top. Spoon the marinara sauce on top (#2). Cover with another wonton skin. (Note that at this point I ran out of wonton skins so I used cooked pasta as shown in the left side of #3) Evenly divide the ricotta shredded cheese on top (#4). Top the mixture with remaining marinara sauce and grated cheese (#5). Cook in a 375 degree oven for 12 to 15 minutes until cheese on the top is melted, browned and bubbling (#6). 

These were a bit tedious to put together but they were worth it. They had all the satisfying complex flavor of a full lasagne with all the elegance of a single portion. They made a perfect lunch with a salad or a small bowl of soup. 

Saturday, April 20, 2019

Chicken tulip drummets with Gorgonzola dip 手羽元チューリップとゴルゴンゾーラディップ

I have not made "Teba-gyoza" 手羽餃子 for some time but recently when I did a barbecue pork roast in the Weber grill, I also made teba gyoza.  I had to remove the drummets to make the teba gyouza, so, I used them to make these tulip of drummets.  Just as a minor variation, I marinated the tulips in "Shoyu ko-ji" 醤油麹 overnight before baking.  I did not make my own Shoyu koji but I used a store-bought package.


As before, I coated the tulips with yellow cornmeal and baked them in our toaster oven on convection mode at 450F for 15 minutes.


My wife made Gorgonzola dip for this, which worked very well.


For the Gorgonzola dip

Ingredients
1 cup blue cheese (gorgonzola) crumbles (about 4.5 oz)
1/2 cup sour cream
1/4 cup mayonnaise
 1/4 cup Greek yogurt
3 tbsp buttermilk (or however much is needed to get the desired consistency)
1 tbsp freshly squeezed lemon juice
1/4 tsp salt
1/8 tsp pepper

Directions:
Just mix and refrigerate before serving.

I served the chicken tulips with carrot and celery sticks. Deep frying may be better but high temp baking made it rather crispy on the outside. The dip went very well.  (We decided that if it was made with a looser consistency it would also make a nice dressing for salads). We are not sure that the "Shoyu koji" marinade made a big difference but the meat was reasonably tender.