Showing posts sorted by relevance for query konnyaku. Sort by date Show all posts

Sunday, July 22, 2012

Fried Marinated "Kon-nyaku" こんにゃくの竜田揚げ

Kon-nyaku. 蒟蒻, some times spelled “konjac ”, and  called “Devil’s tongue” in English, is a rather peculiar food item made out of the starch extracted from a particular vegetable root. It has the consistency of hard jelly and practically no taste and no calories. Japanese traditionally use it as an oden おでん item. I have posted a few dishes using konnyaku. This is another konnyaku dish but, with the deep frying it loses its no calorie status. You do not find this type of dish anywhere but at an Izakaya.


I made two different versions which mostly provide differences in texture rather than taste. I served this dish on a funky triangular shaped plate on which a folded “tempura shikishi 天婦羅敷き紙 paper fits perfectly. I garnished it with deep fried and crispy parsley and sprinkled single flavored  Japanese red pepper flakes or “Ichimi tougarashi” 一味唐辛子.


Preparation of konnyaku: I first washed and drained one cake of konnyaku (#1 below). To make two versions, I first divided one cake into two equal portions. For one half, I halved the thickness by slicing horizontally as I pressed down using my palm flat on the surface of the konnyaku. I then applied a series of shallow cuts obliquely in one direction, turned it around and added another series of cuts perpendicular to the previous cuts (#2 below). I then turned the pieces over and did the same cuts on the other side. You need to be careful not to cut through. I then cut it into I inch wide strips (#3 below). The other half of konnyaku, I just cut into 1 x 1.5 inch rectangles and poked multiple holes using a fork (#4 below). The idea here is to change the texture of knonyaku as well as make it absorb the marinades (see below) better. After this preparation, I placed the konnyaku pieces in a pot with amplen a amount of water on medium flame. I allowed it to come to the  boil and cooked it for 2-3 minutes. I then drained and washed it in running cold water. This process removed a the peculiar (and rather unpleasant) smell characteristic of konnyaku.

Marinades: I made two marinades. Since no matter how you do it, konnyaku will not absorb marinades or any seasoning easily, I use undiluted soy sauce; one with grated ginger and one with yuzu-koshou. The amounts are again arbitrary but I used about 4 tbs soy sauce and 1/2 tsp each of grated ginger or yuzu-koshou. I marinated the cross hatched ones with the ginger and the rectangular ones with the yuzu koshou. I ended up marinating this for two days in the refrigerator for reasons beyond my control. Ordinarily just a few hours of marination would suffice. There is no worry of over marinating since the konnyak itself does not absorb, instead, the marinades are held in the holes and crevices I created in the konnyaku.

Just before frying, I took the konnyaku pieces out of the marinades and blotted the surface with a paper towel but did not squeeze out the absorbed marinades. I then dredged in potato starch or katakuriko 片栗粉.

Deep frying: I put peanut oil in a frying pan to the depth of about 1 inch on a medium flame. When the oil was 170C (325F), I deep fried the konnyaku pieces for 3 minutes or until the surface got crispy.

I served this piping hot with a sprinkling of one flavor Japanese red pepper flakes 一味唐辛子. The marinades provide enough saltiness and I did not serve this with any dipping sauce. The difference between the two marinades was very subtle but the yuzu-koshou version added more heat and a citrus note. Although it was not bad—how can anything deep fried be bad, we quickly dispatched the entire dish between two of us. Considering the rather tedious preparation and the fact this is “deep fried”, we are not sure if this dish is worth making often. We prefer a simpler dish such as spicy konnyaku stir fry I made previously.

Monday, June 14, 2010

Spicy Konnyaku stir fry コンニャクのぴりから炒め

Spicy Konnyaku stir fry コンニャクのぴりから炒め

Since I have been posting non-Izakaya items for some time, I am going back to a simple Izakaya affair here. This is another very quick dish using Konnyaku 蒟蒻 and a perfect small dish with sake. I used a dark unbleached version of konnnyaku. After I wash and blanch the cake of konnyaku, I cut the thickness into two by cutting through horizontally as I press the cake of konnyaku against the cutting board. I then make shallow crisscross cuts on both sides as you can see in the above image. This is to make any seasoning penetrate the konnyaku. I cut them into a bit less than one inch wide strips.

I put 1/2 tbs of peanut oil with a dash of dark roasted sesame oil in a frying pan on medium flame. I fry each side of konnyaku strips for 1-2 minutes so that the surface become slightly congealed and crunchy (small bubbles will come out on the surface). I then add 1/2 tbs of soy sauce and quickly sauté until soy sauce become fragrant and absorbed. I sprinkle a Japanese 7 flavor red pepper powder 七味唐辛子. This is a sort of nothing dish but nice to have with sake. This time I made it a bit too spicy and registered a mild compliant from my wife. Sorry.

Saturday, November 14, 2009

Pork and Vegetable Stew 豚と野菜の煮込み

Pork and Vegetable Stew 豚と野菜の煮込み (Mark's book Page 28)

This is from Mark's cook book (P28). This dish definitely resembles a very popular homey dish called "buta jiru" 豚汁; a Japanese soup containing various root vegetables and pork seasoned with miso. I remember this was one of the most common dishes we made when we had a school cookout picnic on the floodplain 河原 of a nearby river when I was in grade school. This was called "suiji ensoku" 炊事遠足. The cookout was a traditional event and was meant to be educational as well as fun. A group of pupils had to plan what to cook and buy ingredients within a given budget.  On the floodplain, we set up a fire and arranged large stones around it to make an outdoor cooking pit. We usually cooked a one-pot meal using a large cook pot. I do not remember whether we used a charcoal or wood fire. I just googled "suiji ensoku" (in Japanese)  and learned that it appears to be peculiar to Hokkaido (the northernmost island of Japan). That makes sense since I grew up in Sapporo, Hokkaido. It also appears this wonderful tradition is still carried out in Hokkaido.

Again, I have to start by saying, I deviated from the orginal recipe, not intentionally but by necessity. I usually have "konnyaku" コンニャク in our refrigerator and I did not even check before starting this dish. It turned out that I did not have regular konnyaku but had "shirataki" 白滝 which is a konnyaku made into thin noodles (the most common use of this is in "sukiyaki" すき焼き). So, I had to substitute konnyaku with shirataki.

The specific cut of the pork, pork belly, required in the recipe ("bara-niku" or "sanmai-niku" バラ肉、三枚肉), which is a very common cut in Japan, is difficult to get here in a regular grocery store (bacon and salt pork are made from pork belly. I think that salt pork can be used for this dish after soaking it in water and parboiling it but I have not tried it yet). you could buy fresh (not smoked and/or salted) pork belly from speciality butcher stores or over the internet (sometimes from the producers directly) but I have not tried it. I found that meaty pork spareribs, after removing the bones, comes very close to this cut which I used here. Otherwise I followed the recipe in Mark's book.

To briefly reiterate, cut pork (1/2 lb.), daikon (1 lb.), carrot (1 medium) in 1/2 inch cubes. Boil the pork cubes in water (starting from cold water) for 10-15 minutes skimming the scum which floats on the surface, then, rinse the pork in running water. Cook 1 pkg of shirataki in boiling water for 5 minutes and rinse in running water. Combine all the ingredients and cover them with "konbu" or kelp broth (about 1 qt or liter). Add 1 crushed garlic clove, 2tbs soy sauce and 1tbs sugar. Cook for several hours until all all ingredients are soft. Just before serving,  dissolve yellow miso (2-3 tbs) for the desired saltiness. To dissolve the miso paste, I use a Japanese contraption called "misokoshi" 味噌濾し, but you can use a small strainer and a spoon. Garnish with chopped scallion and Japanese seven flavored hot pepper (Sichimi Tougarashi).

We like this very comforting dish. The original "buta jiru" is also equally good but this one is a bit more refined and the pork melts in the mouth. But, my wife said that this dish cries out for potatoes. Next day, I added cubed potatoes, more parboiled pork, and additional Kelp broth to the leftover soup (before adding miso) and cooked another 30 minutes or so and finished with miso. It tasted much better with a nice texture and added sweetness from the potatoes. Now I said, I should have added onions! I think we are converting this dish to the more classic "buta juru"!

Monday, October 19, 2015

Another otoshi threesome 又々お通し三種類

These are, again, an otoshi threesome I served one evening.


One of the times I made  cold simmered vegetables which we like to have on hand in the summer, I  included renkon  レンコン or lotus root and kon-nyaku コンニャク or devil's tongue. Both were too much to use in the vegetable dish so I made a small dish of kinpira of renkon and konnyaku.  The konnyaku was par boiled and I cut it into small long strips. The renkon was just sliced thinly. I put a small amount of vegetable oil with a splash of dark toasted sesame oil in a frying pan on medium heat and added flakes of dried red pepper. Then I added the renkon and konyaku and sautéed them until the oil coated the surface. I then braised by adding mirin and soy sauce. I braised it until only a small amount of liquid remained in the pan. I added white roasted sesame seeds and cut the fire. This is a variation of kinpira but the contrast of texture between renkon (firm and crunchy) and the konnyaku (soft but elastic) was perfect.


Since I had pork loin barbecued in my Weber grill (trussed, seasoned with salt, black pepper and finely chopped fresh rosemary and hot smoked/barbecued to the internal temperature of 145F) and also my potato salad, I made rolls. This combination cannot go wrong.


Since I prepared (boiled) harcoverts over the weekend, I just dressed it with sesame paste/mayo dressing (Mayonnaise, white sesame paste, and soy sauce) to complete my threesome.


These were good starters for the evening.

Sunday, May 23, 2010

Braised Fiddlehead fern with Konnyaku and aburaage ぜんまい、コンニャク、油揚の炒め物

Japanese like to eat seasonal "Sansai" 山菜 or mountain vegetables. These are wild vegetables collected from the mountains. One of them is furled fern leaves called "Zenmai" ぜんまい (which means a spring such as those used in wind-up toys--for it's obvious resemblance) or "Warabi" 蕨 (Both are ferns but with some subtle difference). As a kid, I was not crazy about this vegetable but as you get older (as I am), you remember and get nostalgic about the food you tasted as a kid. In North America, Fiddle head fern (which is very similar to the Japanese Zenmai) is harvested (very seasonal) from the wild and eaten especially in Eastern Canada and New England. When I saw fresh Fiddle head fern in our neighborhood gourmet supermarket, I decided to make a small dish in the Izakaya food category. In its raw form, fiddle head ferns contain some toxins and need to be prepared properly before being consumed.

I wash the Fiddle head ferns well in several changes of cold running water and remove discolored ends of the stems. I boil the fern in a large amount of salted water for 5 minutes (The water browns in the first boil). I drain them in a colander, then wash in cold water. Repeat this process twice more (total of 15 minutes cooking or boiling time and three changes of water). This process is called "nikobosu" 煮こぼす  (boil and drain) in the Japanese cooking parlance. After the last boiling and draining, place them in a sealed container with an ample amount of cold water. I leave it in the refrigerator overnight. Once this preparation is done, it is fairly easy to use the Fiddle head fern in a dish. I decided to make a rather rustic Izakaya or home style dish.

I am not sure how much Fiddle head ferns I had but they are just enough for two small servings (probably 15-20 heads). Devils tongue or konnyaku (alternative spelling=Konjac) 蒟蒻 (I used about half) is blanched for a few minutes and sliced into thin strips. Two aburaage 油揚げ (small koage 小揚げ or ianari 稲荷 kind) were also blanched and the water squeezed out, then cut into thin strips. I put peanut oil (1tbs) with a dash of dark sesame oil in a frying pan. When the oil was hot, I added the drained Fiddle head fern, sauteed for 1-2 minutes and added the strips of konnyuaku and aburaage and sauteed another minute or two. I added mirin (1tbs) and soy sauce (1 tbs) and Japanese 7 flavor red pepper powder 七味唐辛子 to taste and braised until the liquid was almost all gone.

The Fiddle head fern has an interesting texture and flavor. With a combination of konnyaku and aburaage and some spiciness, this is a good rustic dish but given the amount of preparation required, I am not sure if I will make this often (probably once a year).

Saturday, October 23, 2021

Chicken and chestnuts stew 鶏肉と栗の煮込み

For some years we have gotten fresh North American chestnuts from California. It is a lot of work to peel/clean chestnuts. It is particularly hard to remove the internal brown membrane or “shibukawa” 渋皮 that extends into the meat of the chestnut and is a particular characteristic of North American chestnuts.  The chestnuts we got from California last year were a bit disappointing. They were kind of dry and chalky. So this year we got prepared chestnuts in a jar. According to the label they appear to have been packaged/processed in France but the chestnuts themselves originated in unspecified EU countries. It said “roasted chestnuts” but in fact they were steamed. When we opened the jar, many of the chestnuts were fragmented with a few whole intact chestnuts tucked in at the top. They were not sweetened and tasted fairly good with nice texture**. So I decided use the chestnuts for this stew dish I saw on line. Since I had leftover daikon and burdock root I need to use up this recipe was a perfect choice. Although the recipe calls for “renkon” 蓮根 lotus root, I did not have it. I made this one weekend morning and served this as a lunch with kinpira-gobou 金平牛蒡 and rice.

**Interestingly, my wife discovered while eating the dish I made that several of the chestnuts indeed had the internal  brown membrane. These membranes were left in the nut and the nut was just processed as if they weren’t there. It was a rather unpleasant surprise to bite down unexpectedly on the hard shell-like substance. After that she recommended checking the chestnuts as they come out of the jar and if necessary dismantling them to remove any membrane left. We saw this as a sloppy element of the processing. 


Not all the items I put in the dish are seen in the picture. I also put in konjack or konnyaku こんにゃく.The seasoning is typical Japanese but the kobou flavor comes through strongly. While simmering, the chestnuts broke into large chunks but tasted good.


According to the recipe the chicken was to be cooked in water with sake and scallion before adding to the rest of the ingredients. I would have just put the cut up chicken into the stew. I suppose this extra process would reduce “chicken-ness”.


Ingredients (at least 4 fairly good size servings).
For pre-cooking of the chicken
Two chicken thigh, bone removed (I left the skin on) .
2 tbs sake
2 scallions
several slices of ginger
12000 ml water

For stew
2-3 inch daikon, peeled, cut into 1/2 inch thick rounds and then quarters
2-3 carrots, peeled and cut into bite sized pieces (“rangiri” 乱切り cut at 45 degree angle as you rotate the carrot)
1/2 “gobou” burdock root, skin scraped off using the back of the knife and also cut into bite sized pieces using “rangiri”
2 inch long renkon, skin peeled and cut into 1/4 inch thick half moon (I did not have renkon).
1/2 Konnyaku, torn into small bite sized pieces by hand (irregular shapes increase the surface areas), parboiled and drained
10-15 parboiled green beans
12-15 chestnuts (original recipe calls for roasted and sweetened chestnuts called “Tenshin amaguri” 天津甘栗.

For cooking liquid
250ml of the water in which the chicken was cooked
250ml dashi broth
100ml sake
3 tbs mirin
3 tbs soy sauce
1-2 slices of ginger cut into julienne


Directions:
For pre-cooking the chicken
Add the sake, ginger and scallion to the water and let it come to a boil then place the chicken into the water.
Turn down the flame to simmer and let it cook for 5 minutes and then turn off the flame. Let it stand for 15 minutes (the original instructions said cook for15 minutes but I thought that would be overcooking especially since the chicken will be simmered again with the vegetables).
Take out the chicken and cut into bite sizes pieces.
Keep the water which was used for cooking the chicken to  cook the vegetables.

For stew
Add the chicken cooking liquid to a pan
Add the chicken, vegetables and konnyaku
Cook them on medium high flame
Once it starts boiling, turn down to simmer, add the chestnuts and cook for 20 minutes.
Add the green beans in the last 5 minutes.

This has a typical Japanese flavor profile. I am not sure pre-cooking the chicken is necessary. The prepared chestnuts had a natural sweetness and the entire dish was really nice if not outstanding. The quality of the jarred chestnuts was not the best we have ever had but it was still a lot easier then trying to process the raw chestnuts and tasted better too. 

Friday, March 5, 2010

Japanese winter stew おでん

"Oden" おでん is classic Izakaya food. Yakitori 焼き鳥 and oden are the two main pillars of drinking food in Japan.  Although any given Izakaya may serve up oden and/or yakitori among other items,  there are drinking places specialized just in "oden" or "yakitori".  Often I used to go to a drinking place that specialized in oden, "oden-ya" おでん屋, in Sapporo, called "Katsu-ya" かつや.  The original and name-sake proprietor has passed away, and it has moved from a quaint blind alley off the Oodouri 大通 to the basement floor of a building near Sapporo train station. One of her daughters has taken over the business. It appears that the quality of the oden and atmosphere are unchanged. It is still a very cosy welcoming place and always very crowded with salary men on the way home. I found the image of inside Katsuya on the Internet in one of the blogs (hope the author will not mind my using his picture here). Once, my wife and I visited Katsuya in this new location long time ago when we visited Sapporo. This picture really brings back memories.
かつや

"Oden" was said to be derived from "dengaku" 田楽 which I posted before. Dengaku is skewered squares of tofu, konnyaku and vegetables grilled and then eaten with miso-based sauce. Later, after the invention of soy sauce, instead of grilling, skewered items are cooked in a soy sauce flavored broth. Eventually, it lost even the skewers (some oden items, such as meatballs-- two or three skewered together, still keep their skewers). There are many variations including regional differences in oden. My oden is definitely influenced by the types of oden Katsuya served. In commercial establishments like Katsuya, they have a large stainless steel vats with multiple segments so that different items will not mix and cook properly as seen above, but at home, it is most common to use a large donabe 土鍋 or earthen pot like the one I used (below). You could use any pot with a wide opening. You could place a portable cooker on the table, place the pot on the cooker and let diners serve themselves. I ususally cook oden on the stove and serve whichever items I like on a plate returning frequently for a subsequent selection of different items. One of the reasons for this is that we rarely sit at the table to eat. I cut some of the items such as eggs and "Kinchaku" (see below) using a pair of kitchen scissors to make it easier to eat with chopsticks.

I usually prepare oden in the order below at least several hours before serving.

Broth: I used a piece of kelp (2x8 inches) which was first soaked in water for 30-40 minutes or longer (4 cups or about 1 liter) or whatever amount is appropriate for your vessel. I then put the pot on a medium low flame. When it comes to a boil, I reduce the flame to very low and add dried bonito flakes or "Kezuri (katsuo)bushi" 削り(鰹)節. I use a special large teabag-like bag called "Dashi bukuro" だし袋 in which the bonito flakes are placed and the opening sealed (about 20 grams). This is just for convenience so that I do not have to filter the broth later (I usually take out the bag with bonito flakes when the vegetables are all cooked). You could just put the bonito flakes in the pot and simmer for 10-20 minutes and then strain using a fine mesh strainer. You could also set aside a portion of unseasoned broth just in case the broth get too salty.

Daikon 大根: Daikon is a must in any oden and requires some preparation. I peel the skin and cut the peeled diakon into 1 to 1.5 inch thick rounds and bevel the sharp edges, mentori 面取り. I pre-cook the daikon in a separate pot with enough water to cover the daikon and one pinch of raw rice grains for 20-30 minutes and then transfer to the oden pot.

Carrot and potato: These items may not be most common items in oden but "Katsu-ya" served them and we like them very much. Just peel and cut into the size you like (not too small) and bevel the sharp edges and place it in the oden pot.

Boiled eggs: This is also the must-have item. I just boil eggs for 10 minutes, peel and place them in the oden pot.

Konnyaku コンニャク: It does not have much taste on its own and it is mostly for texture.  most of Westerners will not appreciate this item but it is nonetheless a classic oden item. I make multiple shallow crosshatch cuts on both sides so that the broth will penetrate better. I then cut it into bite sized pieces (I cut this into a triangle which is traditional) then, par-boil it in plenty of water for one or two minutes. I drain the konnyaku and then place it in the oden pot.

Seasoning: At this point, I  season the broth. I use soy sauce, mirin, sake and salt (I use salt to prevent the broth from becoming too dark which would happen if I added too much soy sauce to get the desired saltiness especially because I usually use a reduced salt soy sauce. Alternatively, you could use "light colored" soy sauce or "usukuchi shouyu" 薄口醤油. You may even like a dark broth, in that case, just use soy sauce. I cannot give you an exact amount but I will err on the side of under seasoning and go light on mirin (Vegetables add some pleasant natural sweetness). You can always adjust the seasoning later.
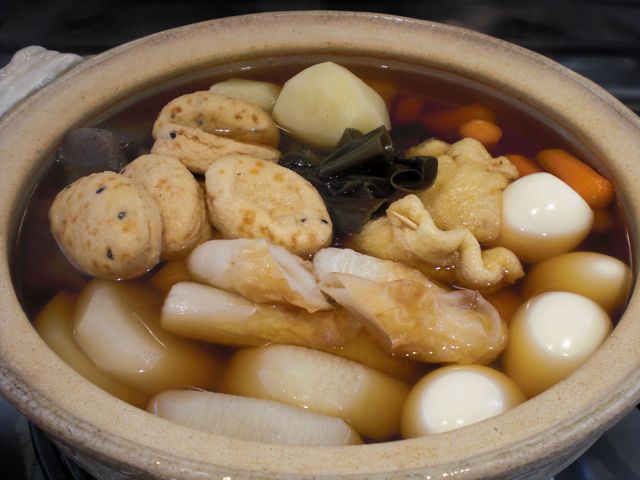
Now, I put on the lid and let it simmer about 1 hour. It really should not boil at any time. After the vegetables are cooked and soft, I add more items listed below which do not require long cooking. If they were frozen, thaw first and the items which have been previously deep fried should be treated by pouring hot water over them in a colander (called "abura-nuki" 油抜き) to remove any excess oil and off flavor before adding to the pot.

Chikuwa 竹輪: Cylinder-shaped fish cake (ground white fish meat with some binder and seasoning is boiled and lightly grilled and is sold frozen here in the U.S.) with a hole in the center shaped like a bamboo. Cut diagonally in the center (in the picture above it is shown in the center of the pot above the Daikon.  In the picture below it is shown on the lower right).

Ganmodoki がんもどき: Deep fried oval patty made of tofu, egg white, black sesame seeds and other shredded vegetables (tan oval item with black specs -sesame seeds- in the picture below). Often, this is shortened as "ganmo".

Mochi in fried tofu pouch or mochi kinchaku 餅巾着
: "Kinchaku" is a transitional Japanese purse. If you stuff anything in a tofu pouch or "Abura-age" 油揚げ, it is called "Kinchaku". Mochi 餅 is a rice cake made of pounded cooked rice.  I cut one end of a small rectangular abura-age and place mochi inside and close the pouch with tooth picks (This pouch is shown between the eggs and kelp in the picture above). This is the same type of preparation I do for the new year soup. (If you are an oden officinado, you would order this item using its short form name "mochikin"). After 5-10 minutes, the mochi will become soft and sticky but contained in the tofu pouch it is easier to eat. (They are seen in the picture above between eggs and kelp.)

Tied kelp 結び昆布: I happend to find this kelp preparation in a bag (cut in small size, tied in knots, steamed and dried) called "Musubi Konbu" or tied kelp at a Japanse grocery store. I put them in the pot after hydrating for 15 minutes. It does not taste that good and disintegrated after some time so this is the first and will be the last time I use this.

In the above picture, the dark triangles are konnyuku, tan oval ones with black specks (sesame seeds) are ganmodoki and tubes on the right are chikuwa. In the back, you see potato, kelp,  and carrot.
Just 10 minutes before serving, I add large cubes of tofu. Tofu should just be warmed through.  As seen in the above picture, I garnish the tofu with chopped chives (or scallion). the daikon here is very soft and you can cut it with just chopsticks. The yellow stuff at the far right corner is Japanse mustard which is very hot but a necessary condiment for oden.

Eggs are wonderful especially the egg yolks mixed into some of the broth and mustard. In the above picture, on the right is "mochi kinchaku", which is cut and showing the mochi inside. Between the eggs is chikuwa and the center front is potato.

This is a perfect dish for cold winter days with sake. Warmed sake is the classic accompaniment but we like cold sake even with oden. Depending on what you like, you could use many other items in oden such as tough sinewy parts of beef, "Gyu-suji" 牛筋 cooked for long time, octopus leg "Tako" 鮹 (these are Kansai 関西 or West of Japan items), thick Japanese omelets with crab meat ("Kanitama" かに玉), many other types of fishcakes especailly white soft square ones called "Hanpen" はんぺん, and satsuma-age 薩摩揚げ. A bit unusual are "tara no shirako" タラの白子, which is the sperm sac of cod fish (It does not sound appetizing but it does taste very good), a Japanese style stuffed cabbage ロールキャベツ, a type of small conch or sea snail called "Tsubu" つぶ and so on. We really like oden but only problem for us is that there are so many goodies in one pot and it fill us up too quickly.

Saturday, July 17, 2010

Braised Shirataki with Tarako roe 鱈子と白滝の炒り煮

This is another small dish perfect for "Otoshi" お通し. It is made of "shirataki" 白滝 (a noodle form of konkyaku 蒟蒻) and "tarako" 鱈子 roe.  I often had this dish with additional ingredient of sliced "chikuwa" 竹輪 fish cake and seasoned with soy sauce and mirin as a side dish when I was a child (obviously not as "Otoshi" for a drink). I modified the way my mother used to make this dish and seasoned it with soy sauce and sake but no sweetness added (no chikuwa, either), so that it may go better with a drink of cold sake.

I decided to make this dish because I found frozen tarako in our freezer which appears not to be high in quality (I must have bought it frozen sometime ago). Shirataki, which means "white cascade" in Japanese, is Konnyaku or Konjac made into thin noodles by extrusion and is often used in Sukiyaki. It does not have many calories and, for that matter, not much taste but can absorb any flavor you add to it.

Tarako mixture: First, remove the tarako roe by slicing the membrane and, using a back of the knife, scrape off the roe from the membrane and put it in a small bowl. For the one package of shirataki, I used two small sacs of tarako but the amount is totally arbitrary. I add 1-2 tbs of sake and a dash of Tabasco (optional) and mix so that it will have nice thick saucy consistency.

Shirataki: I drain and wash one package of shirataki and cut into three portions to make the noodles more manageable and cook it in a boiling water for 1 to 2 minutes (mostly to remove the peculiar smell konnyaku and shirataki always have) and drain. Put the shirataki noodle in a dry non-stick frying pan on a medium flame. Stir to let the excess moisture evaporate (so that it can absorb more liquid seasoning). I add sake and soy sauce (1 tbs each) and stir until the liquid is almost all gone. You could add mirin here to make this dish a bit sweet. 

Add the tarako mixture and keep stirring until the color of the tarako become white and cooked through. Since tarako is salty you may adjust the amount of soy sauce accordingly. I mix in chopped chives (or scallion). I garnish with chopped chives when serving.

This dish has an interesting texture contrast of cooked roe and shirataki noodle. The addition of Tabasco adds a  very slight and slow acting pleasant heat to the dish. Sake is definitely called for.

Wednesday, March 3, 2010

Beef and potato stew 肉じゃが

I meant to make this dish much earlier and I finally managed to make it now. This is a Japanese version of "meat and potatoes" and is the ultimate home cooked comfort dish. As such, it is also one of the most popular Izakaya dishes. As usual some variations exist but I think my recipe is middle-of-the-road. One of the major variations of this dish is what kind of meat to use. Most commonly it is thinly sliced beef (for sukiyaki) but some make it with pork (bara or sanmai niku バラ肉、三枚肉). Actually, when I was growing up, my mother made it with pork. Here I took a more traditional way and used beef.

The ingredients are 1) potates, 3-4 medium size, peeled and cut into a large bite size, and sharp edges beveled (called "mentori" 面取り to prevent the potatoes from crumbling while cooking), 2) beef, thinly sliced for sukiyaki, 250 grams, cut into a bite sized pieces, 3) onion, 2 large, cut in half and then cut into half inch wide wedges, 4) carrots, 2 small, cut into small half moon bit sized pieces, 4) "konnyaku" thread 糸蒟蒻, one package, cut into 2-3 inch long and parboiled for 1 minutes and drained, 5) green beans or snow peas (I used snow peas 15-20), ends trimmed.

In a large sauté pan, add 2-3 tbs of light olive or vegetable oil on a medium high flame. When the pan is hot, I first saute the onion until it is wilted (4-5 minutes). Then add and saute the beef until it loses its red color.  Add the carrot, konnyaku thread, potatoes (including the scrap from beveling the sharp edges of potatoes) and coat the vegetables with oil. Since some brown "fond" will develop on the bottom of the pan, I deglaze using 2-3 tbs of sake and then add dashi broth to cover the vegetables (I did not measure but I guess about 500ml or more). As it started boiling I turn it to simmer and skim off any scum that floats to the surface several times and let it cook for 15 or more minutes until the potates are cooked (test with a skewer). Now it is time to season. I often "eyeball" everthing and add sugar, mirin, sake, soy sauce directly into the pan but this time I tried to measure and premix the seasoning; sake, mirin, soy sauce (3 tbs each) and sugar (1 tbs). I added the seasoning mix to the pan and, with the lid off, cooked another 20 minutes on a medium flame, occasionally shaking the pan. The liquid should be reduced in half or more at the end of cooking. I taste and add more soysauce and/or sugar if needed (I added a few more tbs of soy sauce toward the end). I then add snow peas and cook an additional five minutes (you could pre-cook green the beans or snow peas, in that case, add just at the very end and mix).

This is a classic! Such a wonderful combination of flavors and textures. For potatoes, the starchy kind such as white or Russet works best. We ended up getting a second helping and filled ourselves up. This is a whole meal in a bowl. This goes well with any drink.

Friday, March 3, 2023

Sukiyaki Made with Beef and Edible Chrysanthemum from Weee すき焼き

We have not had “sukiyaki” すき焼き for a long time. One of the reasons is that two of the main ingredients “shungiku” 春菊 edible chrysanthemum (edible mum)*  and thinly sliced beef for sukiyaki or sukiyaki-meat すき焼肉 are generally not readily available. Although frozen sukiyaki meat is available at our Japanese grocery store, it is rather expensive and appears to be just thinly sliced rib eye steak. I considered getting a meat slicer which could slice a frozen block of beef so I could make my own sukiyaki beef but decided it was not worth it. Every-now-and-then, our Japanese grocery store has shungiku but it is “ hit or miss” with mostly miss.

Recently, we started getting Asian groceries from Weee, and found a leafy green vegetable called “Tang Ho 茼蒿, chrysanthemum green”. In addition, I also found they had a product called “Little Sheep Marbled Beef Sliced for Hot Pot”. So we got both to try them for sukiyaki. The package indicated the beef was sold by a company called Little Sheep Company (子羊). We learned that this company runs Mongolian hot pot chain restaurants and also sells meat like the one we just got. The Chinese writing on the package indicated the meat was “Wagyu 和牛” or Japanese beef but did not indicate what country the meat actually came from. Nonetheless it was just the right thickness for sukiyaki and had some marbling, (although not as much marbling as shown in the Weee website picture).

*Although spinach can be substituted for edible chrysanthemum it does not have the unique flavor which characterizes shungiku and is such an integral component of the sukiyaki taste experience. Shungiku is relatively easy to grow from seeds and we were able to raise it for some years in our herb garden. Then the rabbits discovered they liked it too. They ate not only all the edible mum out of the herb garden but every other chrysanthemum related plant we had in the yard edible (for us) or not. As a result we have not been able to raise mums of any kind.

The below are the ingredients I prepared for the sukiyaki. From 12 O’Clock clockwise are sliced onion, Tofu, “fu” 麩 gluten cake (flower-shaped), shira-taki*, shimeji and shiitake mushrooms and the center is enoki mushroom, beef and the green is chrysanthemum.

*Thread form of  konnyaku, washed and blanched and cut into shorter segments.


The picture below shows a detail of the meat. It is frozen in rolls. I served half of the package (about half a pound).


For the chrysanthemum green, I removed the leaves from the stem, washed and blanched them. Although the plant looked slightly different it tasted exactly like Japanese “shungiku”.


Using these ingredients we had sukiyaki using a cast-iron sukiyaki pot and our new table-top induction cooker. The seasonings were  my usual sugar, soy sauce, and sake (Kansai style 関西風) as opposed to using the premixed seasoning liquid “warishita” 割下  (Kanto style 関東風).


We really enjoyed this sukiyaki. The meat was not the best but certainly much better than what we had been previously getting. In addition, the price was very reasonable. Although the shungiku looked different, it tasted the same as the Japanese version and was very good. The assorted mushrooms (all came from Weee) are also very good. So, we are happy that the ingredients essential for making good sukiyaki can be bought at Weee.

Thursday, April 3, 2014

Party platters from Tako Grill タコグリルからのパーティープラター

On our last trip to Japan we, of course, visited my mother. We offered to take my mother and her two sisters (my aunts) out for lunch, but she said it was easier and more relaxing if we just stayed in and had the get-together at the house. My mother then produced a flyer she had just received from a chain sushi restaurant called "Kaisen-maru" 海鮮丸. Although she had not tried them before, she suggested that we order a sushi platter for our “aunts’ luncheon party. Just one phone call and a few hours later, a very polite and professional young man appeared at the front door with a large sushi platter and an order of chawanmushi 茶碗蒸し(still warm). (The choice of '”side” was miso soup or chawanmushi). He collected the money (a very reasonable price) and said "please leave the empty sushi-oke and bowls outside the front door when you finish". He added that he would come back later and collect them; which he did--they quietly disappeared soon after we put them out. The degree of service was just amazing (the sushi came in real "sushi-oke" 寿司桶 not a disposable plastic plate and the chawanmushi came in real porcelain bowls). My mother made miso soup using baby clams which happened to be one of my Aunt’s absolute favorite. The quality of sushi was pretty good considering it was a delivery from a chain sushi restaurant. We had a quite a feast and a very relaxing good time.

March is a busy birthday month for us with 3 to celebrate including our best friends. Using the Aunt’s party as a prototype my wife suggested we order a sushi platter from our Tako Grill for a “March Birthday” party. To “increase my enjoyment and relaxation” my wife forbade me from cooking for the occasion.  So we ordered a sushi platter from Tako Grill.

Since one of the guests was a vegetarian, I asked Mr Segawa of Tako Grill to include more vegetable rolls than usual.

It was very nicely presented and even the "gari" ginger was arranged like a yellow rose. California roll in the front and "kankyou" maki かんぴょう巻き (vegetarian)  in the back (above picture).

As you can see, sushi included tuna, yellow tail, flounder, eel, mackerel, salmon roe, California roll and few interesting vegetarian rolls. In addition to the sushi platter, we also asked Mr. Segawa to prepare Japanese-style appetizers.

The above is konnyaku dengaku (vegetarian) こんにゃくの田楽; the darker one are with peanuts sauce and the lighter ones (right) is more traditional miso sauce.

In the back, these are very nice and crispy chicken kara-age 鳥の唐揚げ, the front right are  pork and onion kushiage 串揚げ and the front left are grilled marinated cubed steak サイコロステーキの串焼き. Mr Segawa also gave us asparagus dressed in tofu dressing (vegetarian) アスパラの白和え, which I forgot to take a picture.

As a desert, my wife ordered a dozen cupcakes on the internet from Georgetown Cupcake for pick-up at the Bethesda store. I am not sure why cupcakes are so popular now-a-days but Georgetown cupcake appears to have started this trend. My wife said she has even seen a pink truck labeled Curb-side cupcakes selling cupcakes in downtown DC and people line up on the side walk to buy them. When we arrived at the store for pick-up, the line extended out of the store and half-way down the block. This was despite a very heavy rain.


Everything was wonderful. The chicken, pork and steak were flavorful—the chicken especially crispy. The vegetarian rolls were creative and plentiful. Even the non-vegetarians were satisfied.  We all had a wonderful time and was indeed the best birthday party ever.

Disclaimer: Although Tako Grill has its party platters including sushi, rolls, and appetizers, the platter shown here included some personal modifications Mr. Segawa made for us that may not be available on the usual menu.  

Sunday, June 14, 2015

Cold salmon and simmered vegetables 冷製サーモンと野菜の煮付け


This was a starter dish for one evening made up of leftovers. Cold salmon was leftover from pan fried and oven finished salmon filets. Straight out of the oven,  the skin was nicely crispy and we preferentially ate all the skin leaving good sized chunks of meat behind as leftovers. I simply served these salmon chunks cold with baby arugula dressed with honey mustard dressing.


On the right are simmered vegetables which started life as "oden" おでん. I served the oden several times stretching it out by adding boiled eggs, tofu, and fish cakes. These carrots, daikon, and konnyaku コンニャク were the remaining survivors of this never ending oden, I added a top portion of boiled bamboo shoot (leftover from when I made mu shu pork). I seasoned the oden broth further by adding soy sauce and mirin and made the remaining veggies to "Nitsuke" 煮つけ (compared to oden, nitsuke usually has much stronger seasoning).

Finally all the leftovers have been accounted for and served. I do not remember what we drank with this but either red wine or sake would be just fine.

Sunday, December 26, 2021

“Shoga-yaki” ginger pork bowl “tei-shoku” lunch 豚の生姜焼き丼定食

A few weeks ago, my wife suggested that it has been quite a while since we had sukiyaki すき焼き and it would be nice to have some. I agreed, but when I went to the Japanese grocery store, I forgot to get the frozen "Sukiyaki meat" すき焼肉. So, the next time I went I was proud of myself for not forgetting the meat. But apparently I picked up the wrong thing. My first clue was when my wife said, “I didn’t know sukiyaki is made with pork, I thought it was beef.” Instead of sukiyaki beef, in my haste I had picked up thinly sliced pork for "shouga-yaki" 生姜焼き. Since this package was next to the "shabu-shabu" シャブシャブ beef, I assumed it was also beef but for sukiyaki. In my enthusiasm I bought not one but two packages of the stuff. All was not lost, however, as I may have mentioned before, in Hokkaido 北海道, where I am originally from, many families use pork instead of beef for sukiyaki as was the case in my family. So, we went ahead and used one of the packs of pork to make sukiyaki. It was not good. The pork was too lean and too thickly cut. It got hard when cooked as sukiyaki. (So note to self: next time when at the Japanese grocery store get appropriate sukiyaki beef). Meanwhile, since I had bought two packages of this pork, I had one package left and it was clear that it would not be used for sukiyaki. So, one weekend I decided to use the pork as originally intended and made “shoga-yaki” ginger pork. Pork shoga-yaki 豚の生姜焼き is a very popular dish in Japan. When I was a college student, coffee shops near the university served lunch in addition to tea and coffee. In addition to  “Western-style” lunches such as sandwiches or spaghetti, most of the coffee shops also served Japanese-style  bento 弁当 or teishoku 定食* and shoga-yaki was among the popular ones. I am sure this has not been changed even now.

*Digression alert: I am sure it is no need to explain “bento” but here it goes anyway. When “bento” is served in restaurant/coffee shop, it is usually a lidded rectangular box which contains the entire meal but unlike pre-packaged bento, the rice and dishes are warm or just made. "Teishuku" (please follow the link for illustrated guide) is the Japanese concept of a "complete" meal or "meal set" which includes a bowl of  rice, soup, tsukemono 漬け物 (pickled or more likely salted vegetables), main dish (protein) and small "kobachi" 小鉢 side dish or bowl. In many "Taishu-shokudo" 大衆食堂 or "public" eateries which serve those who want drinks with food and those who want a complete meal, many different teishoku are available (the main protein dish varies and can be grilled fish, sashimi, or meat etc) but the remaining items, or “sides” such as soup, tuskemono, are usually the same for each available teishoku. The main and side dishes can be had as a single dish without other items (this is great especially if you are just drinking). It could also be "teishoku" for the price of a few more yen. 

So, this is  my rendition of "shoga-yaki" donburi teishoku 生姜焼き丼定食. In this case, the main protein and rice were combined as a donburi.


The main dish shown in the next picture is a bed of rice to which I added pork shouga-yaki with onion, seasoned shiitake mushroom (this was from dried shiitake and seasoned in "ama-kara" 甘辛 or sweet and salty with mirin and soy sauce) and blanched broccoli.


Miso soup is wakame ワカメ sea weed, "abura-age" 油揚げ fried tofu, silken tofu 絹ごし豆腐 and chopped scallion ネギ.


The "Kobachi" side dish was simmered root vegetable including "renkon" lotus root, "gobo" burdock root, "takenoko" bamboo shoot, shiitake mushroom, and "konnyaku" devil's tongue and blanched sugar snap in salt broth.


The tsukemono is cucumber, daikon, nappa cabbage, jalapeño pepper, and ginger (I salted this a bit stronger than I usually do; with salt 3% of the weight of the veggies instead of usual 2% and also added a dash of Vodka which makes it last much longer without changing the taste. (With this preparation it can easily last for at least one week in the refrigerator).


How to make pork shouga-yaki ginger pork (Although I posted "shouga-yaki" over 11 years ago, this time,  I am using a more appropriate, albeit not perfect, cut of meat). I am sure that there are so many variations and preferences and, of course, you could use other meat such as beef but this is what I made.

The essence of this dish is thinly sliced meat sautéed and seasoned sweet soy sauce flavored with ginger. Using lean meat can make tough shouga-yaki and using fatty cuts such as thinly sliced pork belly will prevent that but the traditional cut to be used is "pork roast" meat 豚のロース cut thinly (thin enough but not paper thin).

Ingredients:
Thinly sliced pork, 4-5 slices for one meal size serving (in Japan, specially packaged "shouga-yaki" pork is available widely. The one I got here is a bit too lean, the perfect cut has more fat. I used the entire package which is about 20 slices).
2-3 tsp neutral oil
Onion slices, optional

For marinade:
Mirin, soy sauce, and sake (1:1:1) ratio, enough to marinate the meat plus more to add while cooking.
Grated ginger (amount arbitrary, totally depends on your taste, I used whole grated ginger but you can use just the juice from grated ginger).
Dash of dark sesame oil
(optionally, grated onion).

Directions:
Marinate the meat. The amount of the marinade is enough to cover all meat slices and a bit more (additional 1/4 cup). I marinaded for 1 hour in the refrigerator.
I drained the marinade (the excess marinade reserved) and spread the meat slices on a paper towel to remove excess marinade.
In the non-stick frying pan, add 2 tsp neutral oil on medium flame. 
Add onion slices and cook until soft and somewhat transparent, set aside
Cook the meat slices, spread out without over lapping, in batches. One side 30 seconds and the other side 15 seconds. Do not overcook (the meat will finish cooking when cooked with the marinade later).
Set aside the cooked meat slices.
When all the slices are cooked, add the marinade to the pan (if not enough add more sake, mirin and soy sauce).
Add back the cooked meat with the accumulated juice and the onion .
Quickly cook and coat each slice with the marinade. Take it out and set aside.
Since I was planning to make a doumburi, I added a small amount of water at the end and heated the marinade to make sauce.

Assembly:
Top the rice with the shouga-yaki pork slices (I used 3 slices per bowl).
Pour in the sauce from the frying pan (just slightly moisten and season the rice).
Add any other garnish or topping (such as ginger julienne in vinegar or "benishouga" 紅生姜). I added seasoned shiitake mushrooms and blanched broccoli.

Compared to the sukiyaki we made with this pork, the shouga-yaki came out much better. The meat was tender and well seasoned. Perfect lunch for the weekend.

Monday, January 27, 2014

Japanese winter stew with octopus legs たこ入りのおでん

I posted that we got 2lb whole octopus for the New Year. I made this Japanese winter stew or "oden" おでん with the octopus. The way oden was made is exactly the same as my previous post, but I added the tips of the octopus legs on skewers to the oden. When octopus legs are cut for sashimi or other use, the tips remain. I usually cut the tips into small chunk or "butsu-giri" ぶつ切りand dress them with "sumiso" 酢味噌. I serve them as contrast in texture with the sliced octopus. This time, I decide to use the tips of the legs in oden.

As I add items to the oden pot, I usually end up having too much oden. So I restrained myself and did not add any fish cakes just the octopus legs, boiled eggs, tofu, daikon, konnyaku 蒟蒻, and shiitake mushroom.


This one small serving with a dab of Japanese hot mustard. Since I left the octopus legs for long time in the pot, they were rather tender and also imparted a nice “fresh ocean” flavor to the broth.


The picture below shows how I cut the tips of the legs and then skewered them. You do not have to skewer them but it looked nice and it prevents them from curling up when they cook.


This is a very good way of using tips of the octopus especially on a cold winter day.

Tuesday, June 2, 2015

Pork and Potato 豚肉じゃが

Nikijaga 肉じゃが is traditionally made from thinly sliced beef and potato which I posted some years ago. As usual, when I prepared pork tenderloins, I hand-chopped trimmings into ground pork. After consulting with my wife, I made two dishes; mapo tofu 麻婆豆腐 (which I will posted soon) and nikujaga made from ground pork. Either using beef or pork, this is a Japanese version of meat and potato comfort food.


For green, I added steamed green beans at the very end and the noodle is "shirataki" 白滝 or threads made of konnyaku コンニャク (devil's tongue).


The amount of ingredients is arbitrary but these are the estimates.

Potato: 4 large Yukon Gold potato, peeled, eyes removed and cut into 1 inch chunks.
Onion: 2 medium, cut into small wedges.
Pork: about 150grams or 1/3 lb (you can use whatever amount and also thinly sliced rather than ground).
Green beans: Either boiled or steamed, still crispy.

Seasoning:
Dashi broth: 250-300ml or about 1 cup, just enough to cover the ingredients. I used one I previously made from a dashi pack (Bonito and kelp).
Sugar: 1 tbs
Mirin: 2 tbs
Sake: 2tbs
Soy sauce: 2-3 tbs, I added in several increments as I tasted.
Vegetable oil: 1 tbs

In a pot, I added the vegetable oil on medium flame. When the oil was hot, I added the ground pork and cooked until the color chanced (2-3 minutes) and it was done. I added the onion and sautéed until soft (3 more minutes), then added the potato, mixed and added the broth to cover.  When the broth came to a boil I turned down the flame to simmer and added the seasoning. I added the soy sauce in several increments tasting the broth each time. I cooked with a lid on for 20 minutes until the potato was cooked through. I removed the lid and reduce the broth a bit, gently shaking the pot for 5-7 minutes. I added a small amount of soy sauce to give a fresh taste and then added the green beans. After a few more minutes, I turned off the fire and served warm.

I think this is perfect for a small dish served with either wine or sake. I must say, I rather like the pork version of this dish since that is how my mother used to make it and I generally like pork more than beef.

Wednesday, August 26, 2015

Myoga flower ミョウガの花

This year we were a bit late in harvesting myoga (myouga) ミョウガ.  The area of our backyard where the myoga is growing is solidly in the domain of mosquitoes and requires some resolve and protective gear on our part to enter their territory without paying inordinate “blood tribute” (literally).  Usually, my wife bravely volunteers for the task but that was slow in coming this year (I do not blame her).  This year, we kept postponing the harvest until my wife pointed out she could see little white flowers surrounding some of the myoga plants (meaning that the myoga, which is best used before it flowers, was moving past its prime). So, one weekend we donned protective clothing and together we harvested the myoga. Of course, my wife is a much better myoga harvester than I am (it is not easy to find the myoga buds that have not yet-flowered since they are buried below the surface of the soil and the soil can be almost hard as rock). Many of the ones we (especially "I") found had already blossomed. In previous years we discarded those. This year, however, my wife advised that once we had suited up and were scrabbling with our noses in the dirt we should retrieve every myoga we could find regardless of its condition and we could sort them out later. As we sorted through our haul we realized that even if the myoga has blossomed, we could eat it as long as the bud was still solid; once the bud becomes "hollow" or soft, it can not be used. Since we usually discarded the myoga with blooms, we never really paid any attention to how the flowers might be used. Although the flowers generally wilt quickly, this year we had more flowers than usual and many of them had just opened so we decided to eat them rather than discard them.

Here I used myoga flower to garnish my cold simmered vegetables. This time the cold veggies included daikon, carrots, renkon (lotus root) and konnyaku (devil's tongue). I garnished it with blanched haricoverts  and myoga flower.


Here are two flowers open from a single bud.


We removed the flowers and washed them in cold water.


The below are "good" myoga before blossoming.


The myoga flowers are usually not available in stores even in Japan since they are very perishable and probably not worth harvesting or selling. The flowers do have a nice ethereal quality. They have a distinctive myoga taste but are very delicate in texture without the somewhat hard or fibrous texture of the buds. They may also be slightly bitter. They can be used as a garnish or just eaten as a part of a salad.

Sunday, November 29, 2020

Yellowtail marinaded in sake lee ハマチの粕漬け

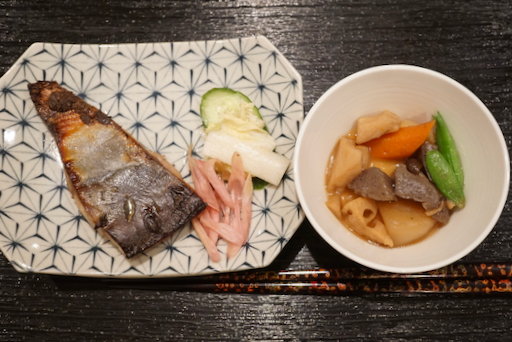
This was the last of the whole fresh yellowtail. I marinated the filet in sake lee 酒粕 or "Kasu-zuke" 粕漬け. Since I did not have a time to cook this during the week, the fish marinated for a week which was a bit too long. I also made Japanese stewed vegetable  "nituske" 煮付け as a side.


I broiled the fish in our toaster oven.


The Japanese vegetable stew included lotus root  or "renkon" レンコン, daikon 大根、carrot, and "konnyaku" こんにゃく. I added blanched and salt broth sugar snaps スナップ豌豆の塩びたし at the time of serving.


Ingredients:
Sake lee 300grams
Red miso 30grams
Sugar 3 tbs
Salt 1/2 tsp
Sake to loosen up the marinade if too stiff,

Directions:
I added half of the sake lee mixture in the bottom of a sealable container and placed cheese cloth (after washing to remove any lint). I put in the filets and then covered them with another layer of cheese cloth. I put the remaining sake lee mixture on top. I let it marinate in the refrigerator (for a week as it turned out).


This was a bit over-marinated. I started broiling on the flesh side first as shown below in the toaster oven.


When the fish is 70% done, I flipped it and broiled the skin side. This would have been perfect if I cooked the fish after 2-3 days. Nonetheless this was good . The fish flesh was firmer than if it was marinated for less time (moisture was leached out). Still, we enjoyed this.