Showing posts sorted by relevance for query bamboo. Sort by date Show all posts

Monday, February 14, 2011

Simmered Bamboo shoot with Wakame 若竹煮もどき

Newly harvested bamboo shoots are a sign of spring in Japan (not in Hokkaido, though, it is too cold for big bamboo to grow). When bamboo is cooked with fresh wakame sea weed, it is called "Wakatake-ni" 若竹煮 and is considered the ultimate combination of two seasonal food items in spring. My dish is not quite authentic; first of all, I made this from a vacuum packed boiled bamboo shoot and second, the wakame I used is not fresh or even salt preserved but dried. "Otsumami yokocho" volume 1 on page 44 has a similar but more simplified version of this dish. In the U.S., both bamboo shoot and fresh wakame are "out of season" so this is the best I can do for this dish.


The boiled bamboo shoot I bought at a near-by Japanese grocery store had "Himekawa" 姫皮 attached (left image). Himekawa is the very soft top inner part of bamboo shoot. I removed this first and cut it into strips. I was initially thinking of using this for a different dish such as a Japanese "ae-mono" salad but I got lazy and decided to use it in this dish as well. I added "himekawa" to the pot just before serving to warm it up and season. You need not really cook this part further.

I cut off the lower 1/3 (I intended to use the lower part for other dish) and cut the top portion in quarters lengthwise. Then I further cut it into small wedges. You may find chalky white stuff between the segments of bamboo shoot. This is an amino acid (tyrosine) congealed. Tyrosine is not water soluble and is contained abundantly in the bamboo shoot itself.  As such, it is not harmful and OK to eat but, for a better presentation, you may want to wash off most of the visible ones.

I put dashi (1 cup), mirin (1 tbs), sake (1 tbs) and soy sauce (2 tbs) in a small pan on medium flame. If you want to keep the light color of the bamboo shoot, use a light colored soy sauce or "usukuchi shuyu". When it comes to a boil, turn the heat down to simmer. I cook it for about 20-30 minutes or until the cooking liquid is reduced in half. Just 1 minute before serving, I add "himekawa" and hydrated wakame to warm them up but not really "cook" them. To serve, I first place the wakame (left, back in the above picture) and "himekawa" (right, back) in a sallow bowl. I took out the cooked bamboo shoot in another bowl and added bonito flakes and mixed to coat (optional) and served them next to the wakame and himekawa as seen above.

For dried wakame and vacuum packed bamboo shoot, this was not bad. We had this with cold sake as a second dish after we had the avocado and tunas sashimi cubes, a very nice contrast.

Friday, February 18, 2011

Broiled bamboo shoot with sumiso sauce 焼きタケノコの酢みそがけ

This is from "Otsumami Yokocho" Volume 1, Page 63. When I made the simmered bamboo shoot with wakame seaweed dish, I set aside the bottom 1/3 of the bamboo shoot and made this dish the next day. I never had a bamboo shoot this way before. I was curious to see how it would turn out. It turned out to be a very simple but good dish.

Bamboo shoot: I used the bottom 1/3 of a vacuum packed boiled bamboo shoot (top 2/3 was used for another dish). I cut the bottom in half lengthwise and then made thin (1/4 inch) half moon slices. I washed off the chalky white stuff (congealed tyrosine) so that the dish would be more presentable. I blotted the shoot dry with a paper towel. I used my toaster oven to broil the bamboo shoot. I broiled it for about 5 minutes. When the edges became brown, I turned them over and broiled them another 4-5 minutes.

Sumiso sauce: I added Saikyo miso 西京味噌 (1 tbs), mirin (1 tbs) and rice vinegar (1/2 tbs) in a suribachi or Japanese mortar and mixed them until it became a smooth sauce.

I arranged the broiled bamboo shoot on a small plate, poured the sauce over and garnished with finely chopped chive as seen above.

This is a nice way to enjoy bamboo shoot. You can really experience the subtle flavor and nice crunchy texture of the shoot. The sauce was very complimentary to the bamboo shoot. It went perfectly with the cold sake we were having.  

Wednesday, June 8, 2016

Bamboo shoot Tosani 筍の土佐煮

Spring and early summer are the season for fresh bamboo shoots or takenoko 筍 in Japan but I have never seen fresh takenoko on sale at the grocery store here in the US. So, I have to use the pre-boiled and packaged variety. I have posted few bamboo shoot dishes in the past. This one is called "Tosa-ni" 土佐煮. Tosa is southernmost prefecture in the island of shikoku 四国 which is famous for bonito or katsuo 鰹 and dried and shaven bonito flakes called "katsuo-bushi" 鰹節.  Simmered vegetable especially bamboo shoot in broth made of bonito flakes seasoned with soy sauce is often referred as "Tosa-ni". I also added additional bonito flakes after the bamboo shoots were cooked and seasoned.


Ingredients: (for two small serving as a drinking snack) and directions:
  1. Bamboo shoot, pre-boiled and vacuum packed (#1). I used only the bottom 1/3 for this dish and the rest was used to make something else.
  2. Bonito broth, I made about 3 cups with two dashi packs with bonito and kelp which is much stronger than usual broth.
  3. I sliced off the bottom 1/3, quartered and sliced into 1/2 inch quarter rounds (#2).
  4. I cooked it in plain boiling water for 3 minutes and drained.
  5. I put them back in a dry pan and added the bonito broth just covering the bamboo shoot (around 1/2 cup).
  6. I added light colored soys sauce (1/2 tbs) and a splash of mirin (or you could omit the mirin).
  7. Simmer with lid on until most of the liquid has evaporated (#3).
  8. I added two small packages (or whatever amount you like) of bonito flakes and mixed to coat. If the moisture is not enough, you could add a splash of the broth or soy sauce depending on the taste of the cooked bonito (I added the broth).


Although I took several shortcuts (not using fresh bamboo shoot and not making broth from freshly shaven bonito flakes), it tasted very good. The bonito flavor combined with the savory saltiness of the soy sauce permeated the bamboo shoot and was further boosted with the additional bonito flakes on the surface. The bamboo shoot was tender but some firmness still remained. This is a perfect small "otoshi" dish to start the evening.

Friday, June 17, 2016

Fried bamboo shoot stuffed with pork and shrimp たけのこの贅沢揚げ

This recipe used the top 2/3 of the bamboo shoot left over after I made "Tosa-ni"土佐煮. The bamboo shoot is stuffed with a mixture of pork and shrimp based on a recipe I saw on line. Since I did not have access to "kinome" 木の芽, I simply added fried green beans as a green.


Here is a close up of another serving.


Ingredients (2 servings):
Bamboo shoot, one package, pre-boiled, top 2/3 (or "Hosaki" 穂先), cut into 6 wedges (#1), carefully cut from the outer surface to make a pouch but not cut it through.
Ground pork, 40g (I hand chopped pork butt I had).
Shrimp, 60g (I used frozen, thawed and chopped finely until it had a paste like consistency)
Scallion, one, white part, finely chopped.
Ginger root, finely chopped (to taste)
Salt, to taste
Soy sauce, 1/2 tsp
Sake, 1/2 tsp
White pepper, to taste

Flour for dredging
Oil (I used peanut oil) for frying

Directions:
Mix all the ingredients above except for bamboo shoot (by hand or using a silicon spatula) until everything sticks together (#2)
Dredge the wedges of bamboo shoot with flour including inside the slits and stuff the meat (#2) into the slits. Dredge the surface of the stuffing as well (#3).
Shallow fry (1/2 inch deep oil), turning frequently to slightly brown the stuffing and to make all sides crispy (flour makes thin crust).
Drain the oil and serve hot.


This is a very nice dish. It was very hot and my wife had to wait several minutes for it to cool down. By frying, bamboo shoot developed very good strong bamboo shoot flavor while still retaining a nice crunch. The stuffing of pork and shrimp is very flavorful with a nice texture. The shrimp really give a nice firmer texture.  We had this with cold sake which was a perfect match.

Monday, April 21, 2014

Cherry blossom gazing, Day2 花見2日目

The cherry blossoms this year will not last long. This is the second day of hanami.

DSC_0047

It was a nice sunny warm day requiring a "fan" and umbrella.


My wife wanted red wine rather than sake to start. So we started with my wife’s miso-flavored carrot and cashew nut spread on crackers. I asked my wife to fill in the recipe.

The amounts are basically arbitrary:
Four carrots peeled, cut into pennies and microwaved until soft. About 3/4 cup of salted cashew nuts gently toasted to golden brown in the toaster oven (even though they came toasted in the jar the additional toasting really brings out the flavor). I pureed the carrots and cashews in the food processor using several tablespoons of chicken broth until the mixture reached a spreadable texture. We then stirred in miso and soy sauce to taste. This mixture was particularly good the second day when the flavors had a chance to meld. The carrots added a sweetness and the cashews their usual nuttiness. The miso and soy sauce added an additional dimension that was pleasant but indefinable. This tasted really good with sesame crackers.

heaves black and blue
We started with  a glass of Havens Black and Blue 2011, Mt. Veeder, Napa Valley which is a cabernet sauvignon and syrah mix like the ones from Australia. This is not bad as an everyday wine.

Although I was planning a line up of dishes for sake, I had to make some changes to accommodate the red wine.

For the first dish, I had to use up the leftover portion of frozen yellow fin tuna block I thawed yesterday.  I was going to make “namerou” なめろう initially, but since we started with red wine, I decided to make tuna “carpacccio. I make carpaccio without any particular recipe and on a whim so that every time I make it, it is slightly different.

I started out drawing lines on the plate using a good fruity extra virgin olive oil (EVOO) and syrupy aged balsamic vinegar. This time I happened to have smoked sea salt (which has a wonderful smoky aroma). I ground the salt scattering it on the bottom of the plate. I then layered paper-thin slices of sweet onion (like Vidalia but since it was not from vidalia was labeled generic “sweet onion”) using a Japanese mandolin "Benriner".


I then put on a layer of thinly sliced tuna. I added more thinly sliced sweet onion, garnished with thin slices of American mini-cucumber. I then again dribbled zig-zag lines of the EVOO and balsamic vinegar. I added fresh grinds of black pepper and the smoked sea salt on the top.

This carpaccio was very good. The balsamic vinegar was sweet and not too acidic and did not compete with the red wine. The coarsely ground smoked sea salt gave a burst of saltiness with a smoky note which added a lot to this dish. The onion was very mild.

Now for the second dish for red wine. I had a left over bamboo shoot “wakatake-ni” 若竹煮 in the broth I made yesterday. Since a repeat of yesterday’s dish would not do especially since we were having a red wine, I came up with this Italian stir fry of bamboo shoot, asparagus and tomato.


Bamboo shoot, asparagus and tomato stir fry Italian-style:
Bamboo shoot:  I just removed the bamboo shoot I made the previous day from the pan and blotted off the broth (which is soy sauce, mirin and Japanese dashi flavor) and cut them into smaller pieces.

Asparagus: These were rather thin pencil aspara-gi (guses). I blanched these the previous day thinking I would make sesame dressing for it. I just cut them into 1 inch lengths.

Tomato:I skinned and cut it into small wedges.

I first put olive oil in a frying pan on low heat with flakes of dried red pepper, I also added crushed whole garlic and slowly cooked in the oil for 5 minutes and removed the garlic (I wanted some subtle garlic flavor but not too much for this dish). I then added the bamboo shoot, asparagus and tomato and stir fried them for a few minutes then seasoned with salt and pepper. I served this with freshly grated Parmigiano Reggiano cheese on the top.

My wife was impressed with this dish especially that I made an Italian-style dish from bamboo shoots. The bamboo shoot was still crunchy with a nice slow heat from the red pepper flakes. With green asparagus, this dish represented spring. This went very well with the red wine we were drinking.

At this point we are getting filled up. We sipped more wine (we opened Heavens Cabernet sauvignon 2010, which was better – a classic Napa Cab wine profile). We enjoyed the cherry blossoms and the rest of the warm evening. A beautiful full moon (paschal moon; harbinger of Easter) rose in the clear sky making the cherry blossoms glow in the soft moon light. Unfortunately this will probably be the end of this year’s hanami. But what a fitting ending!

Monday, August 20, 2012

Beef stroganoff with bamboo shoot 竹の子入りビーフストロガノフ

This is a hybrid Western-Japanese dish that I concocted one evening. I had frozen Sukiyaki beef in our freezer which I decided to use before it got any more freezer burned than it already was. Instead of regular Sukiyaki すき焼き, I used about 1/3 for beef negimaki ねぎ巻き or beef scallion rolls. I suggested several dishes to my wife which were essentially Sukiyaki-like dishes to use up  the remainder of the beef. She challenged me to think outside the box and come up with something different. I also found a package of vacuum packed boiled bamboo shoots in the refrigerator which I bought few month ago.  This is what I came up with.
CIMG5184
I was thinking of some kind of stir fried dish. This dish had morphed during the cooking since I changed my mind midway through but the end result was something akin to beef stroganoff.

Beef: This was what left of the sukiyaki meat. It was thinly sliced and previously frozen. I thawed it completely in the refrigerator over night (about 300 grams or about 10 oz). I seasoned it with soy sauce (1 tbs), mirin (1 tbs), and sake (1 tbs) I also mixed in potato starch or katakuriko 片栗粉.

Bamboo shoot: I quartered the bamboo shoot along the length and washed away the white chalky substance from the inside of the bamboo shoot. I then thinly sliced crosswise.

Onion: I had leftover onion (small, half) which I sliced into thin strips.

I added light olive oil to a frying pan on medium flame and sautéed the onion until soft. I then added the seasoned beef and cooked until the color changed. Next I added the bamboo shoot and sautéed for one more minute. Then I thought the seasoning was too close to Sukiyaki. I added Worchester sauce (2 tsp), chicken broth (3-4 tbs) and added florets of broccoli. I stirred and put on a tight fitting lid and let it braise/steam for 2-3 minutes. When I removed the lid, because of the potato starch, the sauce/liquid was slightly thickened. I added cream (3-4 tbs) and reduced it further to make a relatively thick sauce. I tasted it and adjusted the seasoning with salt and black pepper.

Since I did not have cooked rice or noodles, I just served this as is as a small drinking snack. Although it tasted OK, unfortunately, the broccoli was too crunchy for my wife’s taste. I get some points, however, for comeing up with this unique dish. The texture contrast of the beef and bamboo shoot and an interesting hybrid taste of the sauce were OK, however, I think, I will not make this dish again. I like a more traditional Japanese style seasoning (sweet and salty or “ama-kara” 甘辛) for thinly sliced beef.

Wednesday, June 12, 2019

Simmered bamboo shoots and chicken

This is a small dish commemorating spring that I made recently. Since we cannot get fresh bamboo shoots, I made this from packaged boiled bamboo.


As a substitute for "nanohana" 菜の花 I used blanched rapini. For protein, I used chicken drumettes leftover from making "Teba-gyoza" 手羽餃子.


Ingredients:
1 package of small boiled bamboo shoots, cut into small wedges.
6 chicken drumettes
Blanched rapini tips for garnish
1 cup dashi (made from kelp and bonito flakes)
3 tbs light colored soy sauce
3 tbs mirin

Directions:
In a non-stick dry frying pan, I placed the drumettes on a low flame until the oil came out. Then I turned up the heat to medium and browned all surfaces. I transferred the drummettes from the frying to a sauce pan and added the bamboo shoots, dashi broth and seasoning. I simmered it with a "otoshi buta" 落し蓋 for 30 minutes or longer or until the liquid reduced somewhat, mixing several times. I refrigerated it overnight (although it could have been served immediately). Before serving, I warmed it up (either in a microwave oven or in a pan).
I garnished it with blanched rapini tips.

The bamboo shoots absorbed all the flavors but were still crunchy in texture. The addition of chicken added a nice umami flavor. The drumettes were tender enough that the meat fell of the bone and could be eaten with chopsticks. This is a nice small side dish/appetizer.


Thursday, September 16, 2010

California roll and smoked salmon sushi カリフォルニア巻きとスモークサーモン寿司

When I posted tekkamaki 鉄火巻き, I said that I often make  California roll. My wife corrected this statement by reminding me that I have not made this for ages. So here it is. This was the shime 締め dish for the evening. We also had some leftover smoked salmon (just enough to make two nigiri) so I made two smoked salmon nigiri sushi or nigirizushi にぎり寿司.

The ingredients are crab meat (I got nice jumbo lump crab meat in a small container), avocado, nori sheet, sushi rice and sesame seeds. I did not have tobiko とびこ or masago roe まさご. I do not like to use imitation crab or "kanikama" カニかま for my California rolls or, for that matter, in any dishes calling for crab meat.  At sushi bars, we ask for real crab meat (if they have it) in our California roll instead of the imitation crab (for an extra charge, of course). If they do not have real crab, we order something else

This time, I recruited my wife to take the pictures so that I can show each step, (although anybody in their right mind should not follow my instructions for this or any dish).

Since this is uramaki 裏巻き (the rice layer is outside), I spread a thin layer of sushi rice to the edges of the nori sheet (I need not to leave a strip of nori without the rice layer like tekkamaki) (below left). I sprinkle white sesame seeds on the rice (below middle). Now, since this is uramaki, you have to flip over the nori-rice combination. There are several way to do it; 1). Covering one of the bamboo mats or makisu 巻き簾 with plastic wrap on both side and dedicating that mat strictly for uramaki, 2). using a sheet of plastic wrap, and 3) using a moist tea towel. I used the last method but any one of these will work. I align the edge of the tea towel with the edge of the rice/nori (below right) and flip over the nori and tea towel together.
Make sure the edge of tea towel/nori-rice is aligned with the front edge of the bamboo mat (above left). I smear real wasabi down the center of the nori and put strips of avocado and crab meat as shown in the image above on the right.
While trying to hold the crab and avocado in the middle of the roll, start rolling by lifting the edge of the makisu (#1 below). When I reach the other side of the nori surface (#2), I ease the bamboo mat and pull the tea towel from underneath the roll and while holding the tea towel and the bamboo mat together, roll forward to complete the roll. I grab the far end of the tea towel with my right hand and squeeze the bamboo mat and pull toward me using my left hand while keeping the tea towel in place with my right hand (#3) to make sure it is tightly rolled. I make sure the roll is securely together by evenly squeezing the makisu with both hands (#4). Remove the bamboo mat and the tea towel and you see the completed roll emerges (#5). Slice it using a narrow blade knife (#6) in the same manner as tekkamaki (actually I should have made 4 pieces from the half of the roll instead of three; this tells you I have not made this for a long time.

We happened to find wooden sushi serving boards called "sushigeta" 寿司下駄 which we forgot we had in the back of the drawer earlier in the day. It looks like traditional Japanese wooden sandals called "geta" hence its name. I used this to serve the California roll. The avocado was OK but not the best. The crab meat, however, was excellent and (as per my wife), the sushi rice was better than what we often get in sushi bars. Somehow the combination of crab, avocado, sushi rice and nori with soy sauce works very well. No doubt, it is one of the great American contributions to the world of sushi.

Monday, April 18, 2016

Simmered Taro and bamboo shoot 里芋とたけのこの煮物

Before we started getting Sushi Taro's New Year's osechi box, I used to make a three tier osechi box myself. I filled the bottom layer with simmered vegetables and chicken dish called chikuzen-ni 筑前煮. The type of potato used in that dish is sato-imo 里芋  which was always available in my old Japanese grocery store. I see sato-imo at our new Japanese grocery store very rarely. The other day, when I was in our regular grocery store, I saw sato-imo which was labeled as "Malanga" and "Eddoe" (its scientific name Colocasia esculentafrom Costa Rica (#1 in the composite picture below). Taro is slightly different but the most common variety in the US. Common among these variations is that it is taste like potato but it is a thickened underground stem called corms. I am sure different cultures have different cultivars and names other than those I just mentioned but whatever the name, they appear to be essentially similar in texture and taste. Even in Japan, there is another variation of sato-imo called ebi-imo 海老芋 , ("ebi" means shrimp. It is long and curved resembling the tail of a shrimp). This is famous for its use in traditional Kyoto cuisine 京料理.  Actually, the one I got this time is more similar in shape to ebi-imo than Japanese sato-imo.

I made this classic New Year simmered vegetable dish. This time, I did not include any protein such as chicken.


I also added bamboo shoots or takenoko 竹の子, kon-nyaku こんにゃく, carrot and garnished with blanched snap peas or sugar snaps.


Ingredients: (for 10 small servings like shown in pictures above).
Taro (sato-imo): 10 (see directions below for preparation).
Bamboo shoot: one package, previously boiled and packed in a plastic pouch, cut into 4 pieces lengthwise, then the bottom thick portions cut into half inch thick cross pieces and the top cut lengthwise.
Kon-nyaku (Konjac): 1 cake, hand torn into small bite sized pieces and par-boiled and drained (#5).
Carrots: 2-3 large, peeled and cut in bite size ("Ran-giri" 乱切, cut on the bias as you turn 90 degree).
Bonito and kelp broth (3-400ml, enough  to cover the vegetables).
Sake
Mirin
Soy sauce (I used light colored soy sauce or "Usukuchi" 薄口醤油).
Sugar snap peas: ends trimmed, blanched, for garnish

Directions:
The classic Japanese satoimo is usually shorter than the one I got this time. This "Malanga" or "Eddoe" from Costa Rica (#1 in picture below) may more closely resemble "Ebi-imo" 海老芋. If this is more uniform rounder Japanese sato-imo, you could remove the skin by rubbing against each other in water which makes a nice rounded shape but I removed the skin by cutting off the top and the bottom and making hexagonal cylindrical shapes (making 6 faceted cylinders, a bit similar to making "tourne"). This is  called "Roppou-muki" 六方むき meaning six facet peeling in Japanese culinary parlance (#2, I now realized this one only has 5 facets!). 

I soaked them in cold water and washed them changing the water few times (#3). 

I made broth from a dashi pack (bonito and kelp), seasoned with sake, mirin and light colored soy sauce (#4). Some may add sugar and the amount of soy sauce could be variable depending on your preference. I made it more Kyoto style or "usu kuchi" meaning mildly seasoned. I added soy sauce in several increment as I tasted.


I placed the satoimo in the broth (#4) when it started simmering I added the carrot, bamboo shoot and kon-nyaku (#5 and #6). I let it gently simmer with a lid on for 30 minutes or until sato-imo is cooked.

This is a very subtle dish but has so many different textures. Sato-imo has very unique texture (creamy slightly viscous), which is difficult to describe.  The small serving in the picture is perfect for a drinking snack for us.  For a side dish eaten with rice, I will served at least twice as much and probably add more soy sauce and/or salt.

Sunday, September 6, 2009

Yakitori 焼き鳥 Part 1

Our first posting of a dish has to be Yakitori. It simply means "grilled bird". It is skewered small morsels of meat (mostly chicken) or vegetable grilled on a charcoal fire (or any other direct heat sources). Some Yakitori chefs prefer electric far-infrared heating elements for precise temperature control but charcoal is most authentic. Offal are also frequently used such as chicken liver, gizzard, pope's nose (if you know what this is), testes (did you know chicken has testes), skin, even cartilage and pork intestine etc. The seasoning are usually  "Tare (sauce)" or "Shio (salt)". "Tare" sauce main flavors are soy sauce and sugar (some yakitoti places may have a secret "tare" sauce which is said to have been used for generations. New ingredients are added to the old and the bottom of the "kame" or earthenware vessels where tare is kept may contain mysterious "sludge" imparting the  je ne sais qua character to the "Tare" sauce (although this is most likely just a myth) or simply salted ("Shio"). We prefer salt and lemon for most yakitori items.

Although Yakitori-ya or Yakitori restaurant specializes in this one particular type of cuisine and is not a traditional Izakaya, the idea is the same. The classic yakatori-ya is  small, shabby (it has to be) smoke filled (both from cigarette and yakitori grilling) noisy places. They are getting increasingly rare in Japan and are being replaced by more sanitized versions including (again) Yakitori chain stores. In any case, our fond memory of Yakitori goes back 25 years in Sapporo where my wife had first tasted Yakitori with turbid sake ("nigori zake").


Equipment: At home, we use a special Yakitori grill purchased from Korin. Bincho charcoal, which you can purchase from Korin as well, is said to be the best but we use lump hickory charcoal with good results. One can use any direct heat source including gas, charcoal or even electricity. A Weber grill works well but you certainly loose some of the enjoyment of cooking at the table as you eat.

For skewers we use both bamboo and metal. The metal skewers are specifically designed for Yakitori (purchased in one of the stores in Kappabashi district, Asakusa, Tokyo). They are much shorter than regular metal skewers and also flat preventing soft items such as chicken liver from rotating while being turned. You can use two bamboo skewers with the same results. Bamboo skewers, however, need to be pre-soaked to prevent them from burning.

In this picture, taken in our back yard at home, from right to left, we have chicken thigh, pork with onion (this is said to be in a "Muroran" style named after a port town in Hokkaido and eaten with hot mustard), eggplant, shishito (small green Japanese pepper) chicken wings and drumettes. The shishito pepper is usually not hot. However, it is somewhat like playing Russian roulette because some may be unexpectedly "atomic" hot. While this occasionally happens in Japan for some reason it is much more frequent in the United States.

Tuesday, March 31, 2015

American Mu Shu Pork アメリカ風ムシューポーク

When I was browsing through the printed version of “Cook's Illustrated”, I came across this Mu Shu Pork recipe. I was particularly intrigued to try making the thin Chinese pancake. Mu Shu pork must be one of the quintessential American Chinese dishes (like chop suey). I remember I made this dish once many years ago when we lived in California for our American friends (I used wood ear black fungus and dried day lily buds which appear to be more authentic and I served it in  a Chinese pancake, probably store-bought). I asked our Chinese friend and confirmed that the authentic Mu Shu pork uses wood ear and lily buds but it is served on rice not a pan cake. (I suppose the Chinese pan cake is for Peking duck). In any case, the whole point of this exercise for me was to make a thin Chinese pancake, so I followed the American recipe in “Cook’s Illustrated”.

Here is the final product. Looking at it brings to mind an oriental burrito perfect for an American Chinese dish.


I am fairly proud, if I do say so myself, for successfully making this thin stretchy Chinese pancake. I smeared store-bought Hoisin sauce on the pancake and topped with the filling then wrapped it in a burrito-style.


The filling looked like this. I deviated a bit but mostly followed the recipe (in the recipe below, many parts are directly quoted from the original recipe with my added modifications).


Ingredients for stuffing:
3 large dried shiitake mushrooms, rinsed
1/4 cup soy sauce
2 tablespoons mirin
1 teaspoon grated fresh ginger
1/4 teaspoon white pepper
1 (12-ounce) pork tenderloin, sliced thin against grain
2 teaspoons cornstarch
2 tablespoons plus 2 teaspoons  peanut oil)

2 eggs, beaten (I seasoned it with 2 tsp of sugar and a small pinch  of salt)
6 scallions, white and green parts separated and sliced thin on bias
1 (8-ounce) can bamboo shoots, rinsed and sliced into matchsticks (I used Japanese boiled bamboo shoot in a pouch)
3 cups thinly sliced green cabbage
1/4 cup hoisin sauce

  1. I soaked the dried mushrooms in cold filtered water, enough to cover, in a sealable container and left them in the refrigerator for 24 hours. I removed the stem, thinly sliced and place them in a small sauce pan with the soaking liquid and cooked for 30 minutes (I could have lightly seasoned  with soy sauce and mirin but I did not) on simmer and let it cool (right middle in the picture above). I strained and reserved 1/3 cup of the soaking liquid (for making the final seasoning liquid mix).
  2. I marinated the pork in 2 tablespoons soy sauce, 2 tablespoon mirin, ginger (right top).
  3. I mixed the reserved mushroom liquid, remaining 2 tablespoons soy sauce, and 1 tbs of mirin (left upper). I mixed the corn starch in a small amount of sake (or water) in a separate container for thickening the sauce (not shown).
  4. I heated 2 teaspoons of oil in a skillet over medium-high heat until shimmering. I added eggs and scrambled quickly until set but not dry, about 15 seconds. I transferred these to bowl and broke the scrambled eggs into 1/4- to 1/2-inch pieces with a fork.
  5. I returned the now-empty skillet to medium-high heat and heated 1 tablespoon of oil until shimmering. I added scallion (left bottom) whites and cooked, stirring frequently, until well browned, 1 to 1 1/2 minutes. Next came the pork mixture. Spread into an even layer and cooked without moving it until well browned on 1 side, 1 to 2 minutes. I stirred and continued to cooking, stirring frequently, until all the pork was opaque, 1 to 2 minutes longer. Then transferred it to the bowl with eggs.
  6. I returned the now-empty skillet to medium-high heat and heated the remaining 1 tablespoon oil until shimmering. I added the mushrooms and bamboo shoots to the skillet and cooked, stirring frequently, until heated through, about 1 minute. I added the cabbage, all but 2 tablespoons scallion greens, and mushroom liquid mixture and cooked, stirring constantly, until the liquid evaporated and the cabbage was wilted but retained some crunch, 2 to 3 minutes. Then I added  the pork and eggs and stirred to combine followed with the cornstarch slurry (enough to thicken the sauce). All this was transferred to a platter and topped with scallion greens.
  7. I spread about 1/2 teaspoon hoisin sauce in the center of each warm pancake then spooned on the stir-fry over the hoisin sauce and served.
Ingredients for pancake
1 1/2 cups (7 1/2 ounces) all-purpose flour
3/4 cup boiling water
1/2 teaspoons toasted sesame oil
2 teaspoon vegetable oil

chinese pancake composit
  1. These are the instructions: Using a wooden spoon,  mix the flour and boiling water in a bowl to form a rough dough. When cool, transfer dough to a lightly floured surface and knead until it forms a ball that is tacky but no longer sticky, about 4 minutes (dough will not be perfectly smooth). Cover loosely with plastic wrap and let rest for 30 minutes.
  2. Roll dough into a 12-inch-long log on a lightly floured surface and cut into 12 equal pieces (I cut in half, then cut into 3 equal pieces, then cut in half to make 12 pieces, #1 above)). Turn each piece cut side up and pat into a rough 3-inch disk. Brush both sides of 6 disks with vegetable oil with a splash of sesame oil added (The original recipe calls for all sesame oil but sesame oil is too strong for us); top each disk with oiled sides facing each other,  press lightly to form 6 pairs (#2). Roll disks into 7-inch rounds, lightly flouring work surface as needed (#3).
  3. Heat vegetable oil in a 12-inch nonstick skillet over medium heat until shimmering. Using paper towels, carefully wipe out the oil. Place pancake in the skillet and cook without moving until air pockets begin to form between the layers and underside is dry, 40 to 60 seconds (#4). Flip pancake and cook until a few light brown spots appear on the second side, 40 to 60 seconds. Transfer to a plate and, when cool enough to handle, peel apart into 2 pancakes (#5). Stack pancakes moist side up  (#6) and cover loosely with plastic. Repeat with remaining pancakes. Cover pancakes tightly and keep warm.  (Pancakes can be wrapped tightly in plastic wrap, then aluminum foil, and refrigerated for up to 3 days or frozen for up to 2 months. Thaw wrapped pancakes at room temperature. Unwrap and place on plate. Invert second plate over pancakes and microwave until warm and soft, 60 to 90 seconds.)
The below is the finished stack of the pancake. It is thin with a nice elastic texture. But, I had to confess that this is my second try. The first try did not work out. I did not make the size of the initial disks large enough and I oiled only one side (as instructed in the recipe) which made it very difficult to peel the two disk pair apart after cooking. Also the sesame oil flavor was too intense. So on the second try, I made sure I started out with 3 inch diameter disks (#1) and I brushed oil on both pancakes with vegetable oil plus a splash of sesame oil and made 6 pairs (#2).


We really liked this American Chinese Mu Shu Pork. Since I substituted mirin for dry sherry and omitted the sugar called for in the original recipe, by itself, the stuffing may have needed a bit more sweetness but once put together on the pancake, the hoisin sauce provided the sweetness which made the overall dish well balanced. I used freshly ground white pepper (instead of usual black pepper) which gave some heat. The use of good quality dried shiitake mushrooms is also important giving tons of "umami" flavor to the dish. In my opinion, the best way to hydrate dried mushrooms is to soak them in cold water in the refrigerator for 24 hours but not in the microwave oven as suggested in the original recipe. The pancakes are really good and this recipe works. At least for us, reducing the sesame oil flavor was an improvement. The pancake had a nice, unique stretchy consistency which cannot be substituted by using flour tortilla.

Since I made Chinese pancake successfully, maybe my next challenge will be making Peking duck but that will be difficult.

Sunday, September 4, 2011

"Chikuwa" fish cake "isobe" fry 竹輪の磯辺揚げ

I was pleasantly surprised to discover I have not already blogged this item. This is another classic Izakaya fare. You will never see this in fancy or (not even fancy) restaurants. You have to make it at home or have it at an Izakaya. To make this you need a type of fish cake called "Chikuwa" 竹輪. Chikuwa literally means "bamboo ring" since traditionally it was made by putting fish meat paste or surimi すりみ around a small stick of bamboo and steaming it first then grilling it (if grilled it is called "yaki-chikuwa"). The bamboo stick left a hole in the center of the cylinder of fish cake. I am sure it is now mass produced using an extruder. Chikuwa is an essential item in oden. I can buy frozen chikuwa at the Japanese grocery store.

To make this dish, I cut chikuwa (2 for 2 small serving) into 4 pieces lengthwise and cut its length in half producing 8 small sticks from one chikuwa.

Batter; I used cake flour (3 tbs) and rice four (1 tbs, optional) and dried aonori  青海苔 (1 tsp, optional) and cold water to make a rather loose batter.

After coating each piece of the chikuwa sticks, I fried them in 170C or (340F) vegetable oil for 1-2 minutes or until a crispy crust formed (it doesn't have to cook long because chikuwa is already cooked). Serve hot with a lemon wedge and salt (optional).

This is a quick but perfect small dish for your sake. Nice crunchy crust has oceanic taste of aonori with soft but slightly chewy fish cake inside.

Saturday, October 12, 2013

Grilled walnut miso 焼きクルミ味噌

One of the things I like best about “eating out”, in addition to the food itself of course, is the inspiration I get from finding new dishes. This is an example of one such inspiration. It is my attempt to reproduce the grilled walnut miso we had at Honoka. I made two attempts and the second one was much better which is the one shown below. It tasted very similar to what we had at Honoka.

Miso: For this, I used "awase-miso" 合わせ味噌 made of soy bean but using both rice and wheat "kouji" 米麹、麦麹 thinking this kind of miso would be savory and a bit sweeter but not too sweet for this dish but, I am sure, any good quality miso will do.

Walnuts: I used American black walnuts (whole). My wife toasted them in the toaster oven for me and rubbed the skin off using a dish towel. I chopped up half.  I ground the remaining half in a Suribach すり鉢 mortar to make smooth walnut paste.

The amount is arbitrary but for two small bamboo spatulas (below), I used about 2tbs of the miso and 1 tbs of the walnuts paste. I mixed in mirin to adjust the consistency and sweetness (about 1-2 tbs). I tasted this mixture and was satisfied with the balance of saltiness and sweetness and did not  add any sugar. I then mixed in the chopped walnuts (2 tbs).

I smeared the miso mixture thinly on both bamboo spatulas (these are a bit larger than ones at Honoka). I grilled the miso using a direct gas fire. I used a low flame and grilled them from few inches above the flame. I did it slowly and it took about 5 minutes as I moved the spatulas to make sure the entire surface was evenly grilled and not too quickly charred (see below).

This was not bad for a quick re-production. It had plenty of walnut flavor and savory miso was not too sweet or salty which was enhanced by the grilling process. This was indescribably good between sips of sake. It also took us back to the great time we had at Honoka.

Friday, October 18, 2019

Pork belly chasu and miso ramen 三枚肉チャーシュー と味噌ラーメン

Although we can get ”pork belly” or "Sanmai-niku" 三枚肉 (meaning "three layer meat" referring to alternating layers of fat and red meat) at  specialty grocery stores such as Whole Foods, it has not been available at our usual grocery store. But the other day, I found a large package of pork belly (probably 2-3 lb). I could not resist getting one. It was rather large and I made  "Kakuni" 角煮 from half and made pork belly chasu 三枚肉チャーシュー from the other half.  Since this is usually served as a ramen topping, I made miso ramen with pork belly chasu as a lunch one weekend.


I also made "ajitama" 味玉 or seasoned soft boiled egg. I also opened a jar of store-bought "Menma" メンマ seasoned bamboo shoot. I added nori seaweed and finely chopped chives as toppings.


As before, the ramen noodle is  American-made frozen  ones from "Sun Noodle". I also used "miso" seasoning that came with the noodles but instead of hot water, I used Japanese broth made from a "dashi pack" to make the soup.

Pork Belly chasu

Ingredients:
1 lb pork belly (half of the piece of pork I got), thinner portion (I assume this is  towards the front) which I rolled tightly and trussed.
3 tbs soy sauce
1 tbs mirin
1 tbs sake
1 scallion, bruised with back of the knife
2 cloves garlic, crushed and skin removed
5 black pepper corns
3 star anises (optional)
Water to cover

Directions:
Place the pork in a pot (in which the pork snuggly fits), add the soy sauce, mirin, sake, scallion, garlic, black pepper corns, and star anise. Marinate for a few hours at room temperature turning a few times.
Add water so that the pork is just barely covered. Cover the pork with either a silicon "otoshi buta" 落し蓋 or aluminum foil.
Put on the lid and simmer for several hours turning a few times.
Let it cool in the simmering liquid and then put into the refrigerator for overnight.
Skim off fat.

To serve:
Remove the pork from the now congealed marinade (#1 and #2).
Slice it to 1/4 to 1/2 inch thick (#3)
Meanwhile, soft boiled egg was marinated in Japanese concentrated noodle sauce in a Ziploc bag for overnight or longer in the refrigerator (#4).
Cut the egg in half (#5).  After 24 hours, the yolk is still liquid but the more you marinate, the more yolks will jell.
I have "pork belly chasu", "menma" seasoned bamboo shoots, "ajitma" seasoned boiled egg and chopped chives for toppings (#6).


I boiled one serving of the ramen noodle as per the instructions and drained (this is half ramen 半ラーメンfor each of us).
Divide the miso seasoning package into two portions and place it in the bowls. Pour in hot dashi broth and dissolve the miso seasoning.
Add half of the package of noodles into each bowl.
Garnished it with the toppings above and the nori sheet.

This was rather decadent ramen. Compared to pork loin or even shoulder version of chasu, this is much more unctuous.  On other occasion, I made "chasu and egg" チャーシューエッグ using this which was also really good. We have to be careful that all this lovely pork belly will be "too much of a good thing"...Not likely!

Monday, February 8, 2010

Ramen noodle Part2 ラーメン その2

I just read an interesting article on Ramen noodles in Japan (Tokyo) in New York Times. I learned from this article that there are quite a few blogs both in English and Japanese on Ramen. In the previous ramen post, I also mentioned that you could get famous and regional ramen (at least soup and noodles) by mail order in Japan but apparently there is a specialized website for oversea Ramen fans.  I am not obsessed about or a connoisseur of ramen noodles but what an amazing world of the ramen noodles and the ramen obsessed! I also promise that this will the last post on ramen noodles.

When I posted "Japanese pork pot roast" 焼豚, I was trying to make it last until the next weekend so that I can make an example of a classic ramen noodle. It was miraculous that we still had the pork left on the next weekend. I also made another classic ramen topping, "seasoned" soft boiled eggs 煮卵 or 味付け卵  by simply marinating soft boiled eggs in the reduced marinade of the Japanese pork pot roast for several hours to overnight. 

Here I served "seasoned" (this one is overnight marinating) soft boiled egg and the roasted pork with "jabara" 蛇腹 cucumber as a starter. We actually had this with California Cab Salvestrin 2005 and both pork and egg went very well with it.

I made a sort of classic and simple "shio" 塩ラーメン or "salt" ramen in which "soup" is chicken broth with salt without soy sauce or miso paste. Again, the way I made the broth is my own short-cut method. I try to enhance flavors of a store-bought chicken broth. I saute one small onion thinly cut in a sauce pan with a small amount of vegetable oil and a splash of dark roasted sesame oil. I brown or caramelize onion with several thin slices of fresh ginger. When the onion is browned and "fond" has developed on the bottom of the pan, I add chopped garlic and saute for few more minutes. I then deglaze with sake (2 tbs or so) and scrape off the "fond" as much as I can. Then I add chicken broth (I used a 16oz box, which is about 470ml, of Swanson zero-fat, 33% reduced salt chicken broth). I let it simmer until I am ready for the noodles and toppings. Just before serving, I taste and add salt if needed (It has reduced to about 400ml, this is one of the reasons I use a low-salt variety). I pour only the broth through a strainer into the two bowls, discarding the solids. The resulting broth has a nice chicken flavor with some sweetness from the onion and a slight ginger note and is not bad. I used the same dried ramen noodles I used before and divided one serving into two small portions.


For toppings, two thick slices of the pork pot roast 焼豚 or チャーシュー, half of "seasoned" egg (marinate for 1 hour), seasoned bamboo shoots called "menma" メンマ or "shinachiku" 支那竹 (meaning chinese-style bamboo shoots) (see below image), thinly sliced scallion, and Nori 海苔 seaweed. I add freshly ground black pepper, although traditinally Japanese uses finely ground white pepper.

These toppings are classic. Slices of the Japanese pork pot roast definitely make this dish. The egg is also excellent.

Thursday, November 12, 2015

US-made Ramen noodle #3 ラーメン その3 アメリカ製

Last time I posted ramen noodle ラーメン, I promised that it would be the last post on ramen but I lied. We only rarely eat ramen noodles and, by no means, we are aficionados (Japanese expression would be ramen-otaku ラーメンオタク, which sounds a bit more sinister), not even close.  For that matter, usually neither of us can finish one traditional Japanese sized serving of ramen and end up splitting the package of noodles between the two of us. The last several times I made ramen was when my mother sent me a box of ramen noodles from Nishiyama seimen 西山製麺 in Sapporo 札幌.

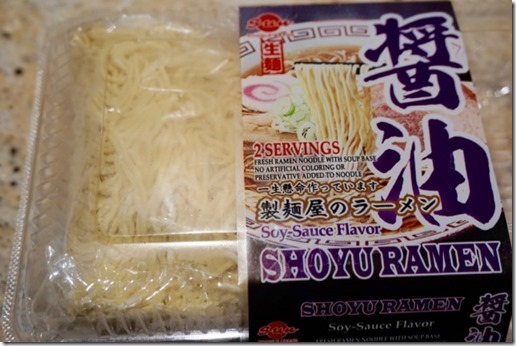
This time, my excuse for posting another ramen is that recently at my Japanese grocery store I found frozen ramen noodles which are made in US . This company called Sun Noodle appears to have originated in Hiro, Hawaii by a Japanese American who was born there. They have facilities in other locations including Los Angeles and New Jersey. They also run a pop up ramen restaurant in New York and give ramen classes. Besides specialty retail stores, they provide ramen noodles to restaurants and appear to be very dedicated to introducing authentic ramen noodles to Americans. I was curious about how good these noodles would taste. This particularly package came with seasoning packets. I chose a classic "shoyu" or soy sauce flavor.


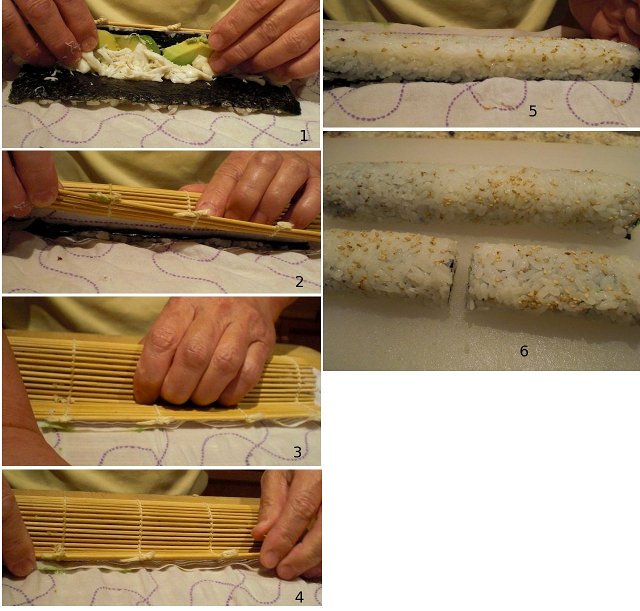
I divided up one serving of the noodles into two and made two half ramens or "han-ramen" 半ラーメン.


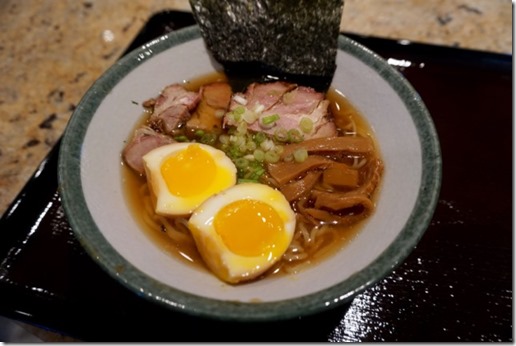
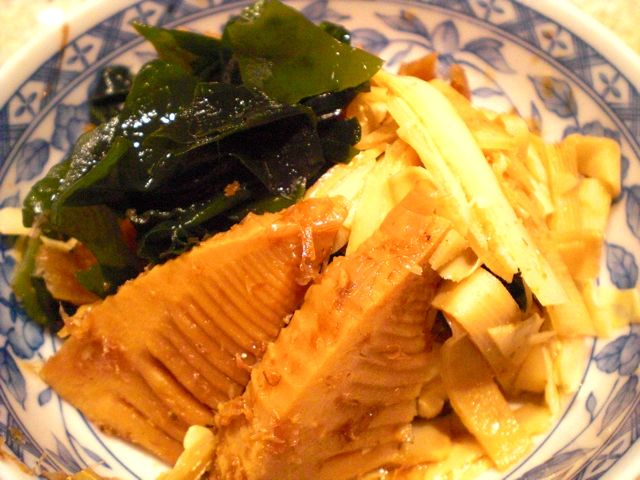
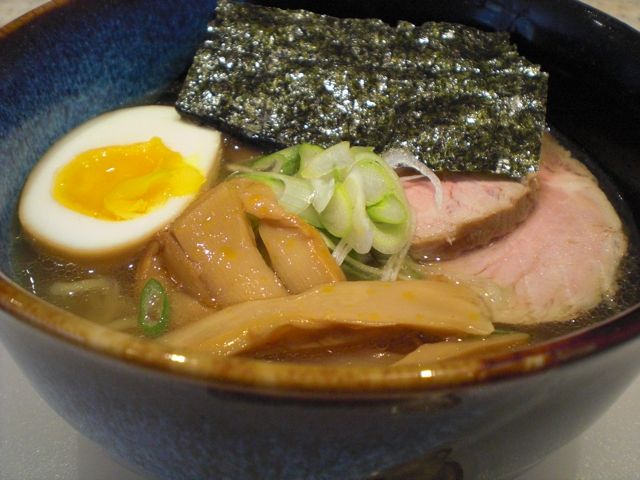
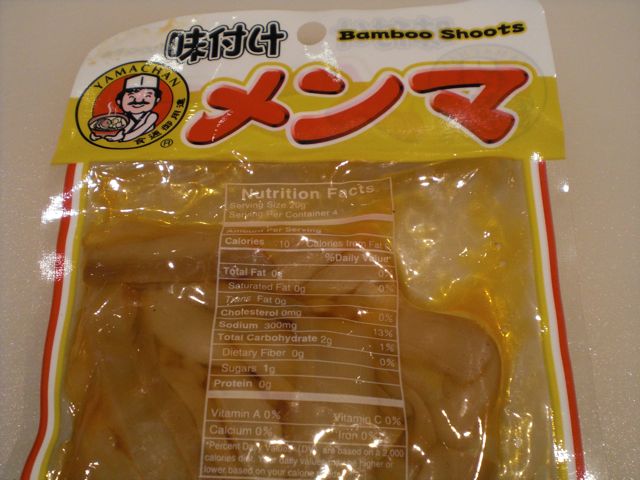
I made sort of classic ramen toppings with roasted pork チャーシュー, seasoned bamboo shoot or menma めんま, seasoned soft boiled egg or "ajitsuke tamago" 味付け玉子, nori and chopped scallion.


Of course, I used pasteurized eggs for this.


Some years ago, we bought sporks, a hybrid fork and soup spoon designed specifically to eat ramen in chain noodle restaurants called "Sugakiya",  from the  museum store of MOMA . I got the sporks out since I remembered that we had them. This spork is very awkward to use and we switched to chop sticks. Good idea but not really practical.


Toppings:
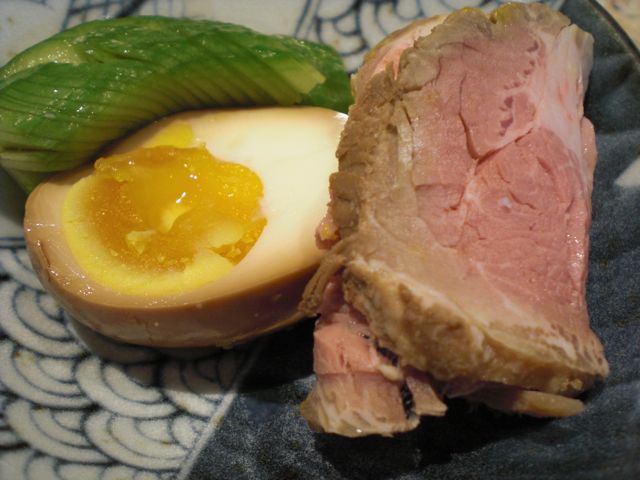
Pork: This was re-purposed left-over barbecued pork. The weekend before we barbecued pork loin on our Weber grill. It was hot smoked and seasoned with salt, black pepper and fresh rosemary. Since I had a one inch thick end piece left, I decided to make it into a ramen topping. I had left over clear soup which was based on broth made from a "Dashi pack" with dried bonito and kelp. I reused this soup by adding more mirin, soy sauce, and sake. I also added one star anise and slices of ginger. I made this simmering sauce rather strong. I then simmered the barbecued pork in it for 30 minutes. I let it cool down to room temperature and placed it in the refrigerator. Just before serving, I sliced it to make 4 good sized portions (2 per person).

Seasoned eggs: I made two soft boiled eggs (7 minutes in simmering water) using pasteurized shell eggs. I peeled the shell and placed the shelled egg in the simmering sauce I used for the pork (above).  I placed it in the refrigerator and marinated overnight.

Seasoned bamboo shoot: I just used a commercial product that came in a jar which I bought at the Japanese grocery store when I got the ramen noodles.

Ramen Broth: I made broth from a dashi pack which contained dried fish (bonito, sardine, kelp). I made it rather strong. I had a choice of adding the pork simmering sauce I made or the seasoning packet that came with the noodles. Since this exercise was to see how good these US made ramen were, I added the seasoning packet to the broth. I did not add the entire package at once but in increments as I tasted it. I used about 70%. This made a rather classic shoyu ramen broth. With my strong fish based broth, it had a clean classic taste.

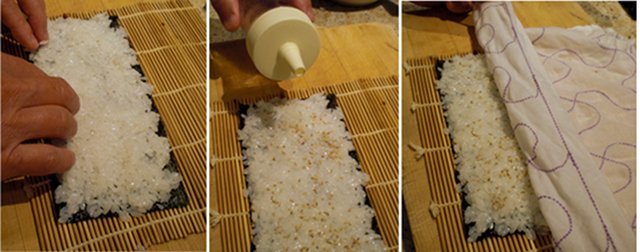
Ramen noodles: I followed the instruction on the package. After I thawed the noodles, I boiled the them but rather than timing it, I checked the doneness as I cooked the noodle. Some ramen fans really like "hard" or undercooked ramen noodle but we like an properly cooked (just a bit al dente) noodle. I then drained the noodles and placed them in the ramen broth.

We were quite impressed with the quality of these US made ramen noodles. The noodle was straight (not curly) and had a nice toothyness. I assume they were in the style of "Tokyo straight noodles". The company makes 6 different ramen noodles. The slices of pork were also unexpectedly good despite my impromptu repurposing especially since the slices had more fat than the rest of the loin. The best was the egg.  The egg yolk was still runny and the white absorbed the nice flavor of the pork simmering sauce. We were quite satisfied with this ramen.

Thursday, January 1, 2015

Happy New Year 2015 新年おめでとう 2015

Happy New Year 2015. Fourteen hours behind Japan, we welcomed the year 2015 the traditional way here in the U.S. by watching the drop of the ball in Times Square. (This happened well past my bedtime and I had nodded off. My wife, however, was much more alert and woke me with a New Year’s kiss). Does this delegate me to official “senior” status? We all grew older in 2014 as we witnessed those in the generation before us blaze the trail we will inevitably tread ourselves one day. But despite some surgery and other issues it was nonetheless a good year and for that we are thankful. The very first day of 2015 is cold but very sunny for a change in the Washington DC area. As usual, I displayed a “Plastic” Kagami-mochi 鏡餅 decoration containing packaged round mochi inside in our tokonoma 床の間.
IMG_3044
2015 is a year of “ram” or “sheep” 羊. So, we took out our “ram” and “sheep” zodiac figures.
IMG_3029
Since we are having a cold but sunny day, instead of staying in our “tea room” to imbibe and indulge like we have done most years, we decided to stay under the sun in our sunroom (we prefer to call it conservatory) for our new year’s ozouni お雑煮 soup. We postponed hitting our Sushi Taro supplied “osech” box 寿司太郎のお節重箱 until evening when sun has set. So, I served only items I made with our new year’s soup.

Again, the soup is the same as before. This year, I cut the carrot into plum flower shape, the daikon into pine and bamboo leaf-shape to make “Shou-chiku-bai” 松竹梅 or “pine-bamboo-plum blossom”, an ultimate combination of good luck and fortune in Japan.

As usual, I encased the rice cake “mochi” 餅 in a deep fried tofu pouch 油揚げ tied with gourd peel or Kampyou 干瓢  to accommodate my wife’s request.  I think it is a great way to eat mochi in oden or soup.

On the left, behind the perrila leaf 青紫蘇 is daikon namasu 大根なます garnished with salmon “ikura” イクラ roe. In front is thinly sliced boiled and vinegared octopus ( I got a whole 2 lb boiled and frozen octopus from Fish-For-Sushi). On the right, in the back are kelp-salmon rolls 鮭の昆布巻き, In the middle is simmered “Kabocha” カボチャの煮付 and in the front is “Datemaki” 伊達巻 or sweet egg roll which came out a bit pale this year.

We postpone our indulgence until evening to enjoy a bright day and sunshine.