Sunday, November 28, 2021

Swedish cardamom buns カルダモンロール

This is one of my wife's baking projects. She saw this recipe in the "Milk Street” magazine. It is a sweet roll seasoned with ground cardamom. We were not sure whether we would like the cardamom flavor in a  sweet roll but my wife decided to try it. This was a great success. It is sweet and the sugar/cardamom mixture melted and made a nice crust especially on the bottom.


Ingredients:
For the dough:
390 grams (3 cups) AP flour
103 grams (3/4 cup) bread flour
80 grams (6 Tbs.) White sugar
1 Tbs. Yeast
1 tsp. Ground cardamom (more if you want stronger cardamom taste)
3/4 tsp. Salt
1 1/4 cup whole milk warmed to 100 degrees F.
113 grams (8 Tbs. Butter) melted and cooled
1 large egg separated (yolk for dough. White to brush on buns before baking)

For filling
170 grams (12 Tbs.) Salted butter at room temperature (maybe try less butter to keep it from running out and puddling during cooking.)
163 grams (3/4 cup) packed light brown sugar
2 tsp. Ground cardamom
27 grams (2 Tbs.) white sugar

Directions:
To make the dough: in a stand mixer with dough hook mix AP flour through salt to combine. Add together the wet ingredients (milk through egg yolk). Then with mixer running slowly add the wet mixture into the dry ingredients and mix until the ingredients form a sticky dough. Increase mixer’s speed and knead until the dough becomes smooth and elastic (about 10 minutes). Line a 9 X 13 baking dish with parchment paper (#1). Put in the dough and press it with your hand to flatten it into an even layer. Cover with plastic wrap and let rise until almost doubled in size (about 1 hour). Transfer to a refridgerator and chill for at least 2 hours or up to 24 hours. (I chilled the dough overnight.)

When ready to fill and shape the rolls first make the filling by mashing the butter through cardamom together to form a well combined paste. Set aside. Turn the chilled dough onto a large cutting board. Roll out into a 12 X 16 rectangle. Spread the filling in a even layer on the dough spreading out to edges (#2). Do a three envelope fold with the dough (fold bottom third to middle then top third over that fold (#3). 

Rotate the dough 180 degrees so the short side is facing you. Roll the dough out into a 12 X 16 rectangle and repeat the envelope fold.

To form buns: Rotate the rectangle so the long side is parallel with the counter’s edge. Cut the dough crosswise into 16 even strips (#4). Pick up one strip by the ends and gently stretch it to about 16 inches by gently bouncing it against the counter while very gently pulling on the ends. At the same time twist the ends of the strip in opposite directions while gently stretching to create a looose spiral about 16 inches long. While holding one end of the strip in place between your thumb on one side of the dough strip and index, middle and ring fingers on the other side of the strip wrap the strip around your 3 fingers (index, middle and ring) without untwisting the spiral. Then tuck the end under and up into the center while sliding the resulting turban shaped knot off your fingers (Rt. Side of #4). Using 2 cookie sheets lined with parchment paper put 8 of the buns on one sheet and 8 on the other sheet using the pattern shown in #5 below. (Using this pattern is helpful because the muffins expand and they can cook without touching.) Cover and let rise until doubled. When doubled in size add 1 Tbs of water to the egg white beat the mixture together and then brush on the buns. Top with 1/2 of the white sugar listed in the filling ingredients list. Bake each sheet one at a time in a 400 degree oven for 15 to 18 minutes until the buns are a deep brown (#6). (When the trays are cooked separately it allows the muffins to be exposed to equal heat all around and helps caramelize the sugar to make a crunchy candy like crust.) 


As shown below it is a good thing to cover the sheets with parchment paper because it is normal for some of the filling to seep out and caramelize on the baking sheet.


Once the overflow cooled it became a nice candy/caramel with crispy texture (as shown in the next picture). We enjoyed some of it as a snack.


This is a perfect roll for breakfast. It is best soon out of the oven because it is covered in a crispy light caramelized candy crust both top and bottom. While not too sweet, the crust provides a wonderful crunchy texture over the softly chewy bread inside. Although the bun tends to lose its crispy candy crust over time as it melts into the bread and  it is still extremely good. Although we were initially unsure of whether we would like the cardamon flavor, it was gentle and went extremely well with the buttery caramelized flavor coming from the sugar. This bun has everything going for it as a breakfast. 


P.S. As I was browsing a Japanese newspaper web site (Asahi Shinbun 朝日新聞), I came across a series of articles describing a number of amazing bakeries in Japan. One of the articles was about a family-run bakery in Urawa ward of Saitama city さいたま市浦和 called "Bake house Yellow knife".  Among the amazing breads they bake was Swedish cardamon rolls. It appears that this kind of artisanal bakery with dedicated bakers paying attention to every detail is becoming more common in Japan now-a-days.

Thursday, November 25, 2021

Pork with chickpeas and potato curry 豚肉、ジャガイモと雛豆のカレー

This curry is a variation of "Pork with chickpea curry". This time, in addition to the chickpeas, she added black beans (left over from making pumpkin and black bean quesadilla) and potato. We decided having potato in any curry is a nice addition reminiscent of any good Japanese-style curry.  We added skinned Campari tomato and blanched broccoli before reheating and serving the curry.


Ingredients
1 can black beans
1 can of chickpeas
3 small red potatoes peeled and cut into pennies
3 garlic cloves
1 1/2 inch cube of ginger sliced
3 Tbs. chicken stock
1/4 tsp. cardamom
4 bay leaves
1 inch cinnamon stick
3 medium onions peeled and coarsely chopped
1 Tbs. ground cumin
1 Tbs. ground coriander
1 Tsp. ground turmeric
3 medium tomatoes peeled
1 Tbs. salt
1/2 tsp. cayenne pepper or to taste

Directions:
Put the ginger, garlic, and chicken stock in a food processor with a blade. Pulse until it forms a paste.
Put several Tbs. oil in a frying pan. Add the cardamom, bay leaves and cinnamon. Heat until the spices bloom and become fragrant. Add the onions and stir until they are partially caramelized. Add the ginger garlic paste and stir until the garlic smells fragrant and the mixture has been incorporated with the onions. add the cumin, coriander, and turmeric stirring until they become fragrant. Add the potato and tomato. Mash the tomato. Cook gently until the potatoes become soft. Add the chickpeas, beans and the stewed pork with the liquid in which the pork was cooked. Cook for 20 minutes until all the flavors meld. If the curry looks too soupy reduce it on low heat until the desired consistency is reached.


Although this a variation of a previous curry recipe the slight variations makes it different somehow. The chickpeas add a slightly firm texture while the black beans add a creaminess. The potatoes absorb the curry flavor and add yet another texture. This makes a very satisfying dinner or even lunch.

Monday, November 22, 2021

Buttermilk biscuit バーターミルクビスケット

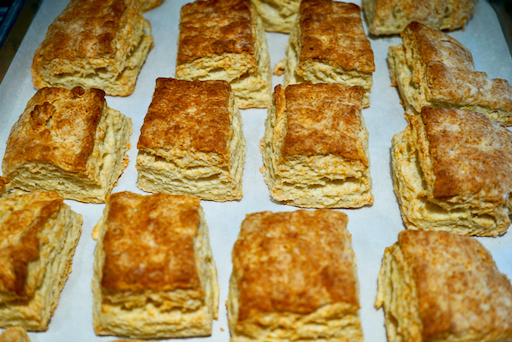
This is another one of my wife's baking projects. She used to make these biscuits (and tarts) often but she has not made them for quite some time. Since she started making buttermilk using the heirloom starter from "Culture for health", she has to make it regularly to keep the culture healthy and productive. So she has to make the next batch before the current batch gets too old. With this constant stream of buttermilk, she also has to find ways to use it. She remembered our old favorite; buttermilk biscuits. Then we realized she used to make them BB (before Blog). So that synched it. It was a “two-fer”; a way to use the buttermilk and a new blog entry. This was the perfect one to make. Back in the day she used  to  make them with "crisco" but she stopped using hydrogenated fat and now uses real butter instead. In any case, these biscuits came out really nice and flakey.


Ingredients:
2 1/2 cups AP flour
1 cup plus 2 Tbs. Cake flour
1 tsp salt
4 tsp baking powder
3 tsp sugar (or more for sweeter biscuit)
1 tsp baking soda
10 tbs. Butter
1 1/2 cups buttermilk 

Directions:
Sift together the dry ingredients (flour through baking soda). Cut in the butter. Add the buttermilk and lightly mix. Turn out onto a cutting board. (The dough will look dry and like it won’t possibly come together but don’t panic keep gently kneading it and it will). Roll out into a square about 1/2 inch thick. Make an envelop fold (bottom third over middle third and top third over both). Turn 180 degrees roll out to 1/2 inch thick again and do another envelop fold.. After rolling it out again, cut into squares of desired size (first picture below). (I cut the dough into squares instead of rounds because it requires less working of the dough. With a round you have to roll out the dough that remained after cutting out the circle. The less the dough is worked the flakier it will be). Put on a baking sheet covered with parchment paper. Cook in a 450 degree oven for 10 to 12 minutes or until golden brown (second picture).


Oh what an old classic friend these biscuits are. They are multilayered flakey. The crust has a satisfying crunch and the interior is soft and buttery. The buttermilk gives it a slight tang.  Can’t be beat for breakfast or any other meal. 

Friday, November 19, 2021

Skillet caramelized cabbage スキレットカラメライズドキャベツ

My wife and I are always looking for new and interesting recipes. One day, we simultaneously and independently both came up with the same cabbage recipe that appeared in the Washington Post. The article touted how glorious this cabbage dish was. Although, in general, we are not fans of cooked cabbage, we thought this might be an exciting new preparation which would significantly change our opinion much like blackened  Brussels sprouts revolutionized our appreciation of that vegetable. The picture below shows the dish just as it came out of the oven after one hour of baking.


We served a portion as recommended in the article with a dollop of Greek (strained) yogurt and dill (we did not have fresh dill so we used dry dill).  To our disappointment after all was said and done this dish was just "cooked cabbage" with a slight caraway flavor.  If you are a fan of cooked cabbage this is the dish for you. We, on the other hand, were much less than impressed. My wife said she will attempt to transform this it to something better (subject of future post).


Ingredients
1 medium head green cabbage (about 2 1/2 pounds)
4 tablespoons olive oil, divided
1 medium yellow onion (about 8 ounces), halved and sliced
2 cloves garlic, minced or finely grated
1 teaspoon caraway seeds
1/2 teaspoon fine sea or table salt, plus more to taste
1/4 teaspoon freshly ground black pepper
1 1/2 cups low-sodium chicken or vegetable broth
1 tablespoon apple cider vinegar
1/4 cup fresh dill fronds
3/4 cup plain Greek yogurt (nonfat, low-fat or whole)

Directions:
1. Position a rack in the middle of the oven and preheat to 350 degrees.
2. Cut the cabbage in half through the core, then cut each half into four wedges, making sure that each wedge retains some core to hold it together, so that you have 8 wedges.
3. In a large, ovenproof, high-sided skillet over medium-high heat, heat 1 tablespoon plus 1 1/2 teaspoons of the oil until shimmering. Add four wedges of cabbage to the skillet and sear until the cabbage is well browned and slightly softened, 3 to 4 minutes per side. Transfer the cabbage to a plate, and then repeat with another 1 tablespoon plus 1 1/2 teaspoons of the oil and the remaining cabbage, transferring the cabbage to the plate once browned.
4. Add the remaining 1 tablespoon of the oil to the same skillet. Add the onion and cook, stirring, until softened, about 3 minutes, then stir in the garlic and caraway and cook, stirring, until aromatic, 30 seconds more. Return the cabbage to the skillet, overlapping the wedges as needed. Season with the salt and pepper, then add the broth and vinegar and bring to a simmer.
5. Transfer the skillet to the oven and bake, uncovered, for 60 to 75 minutes, or until the cabbage is very tender and the liquid has reduced to about half.
6. Serve garnished with dill fronds and dollops of yogurt, and seasoned with additional salt, if desired.

We were a bit underwhelmed since our expectations were high. It was another cooked cabbage. As I mentioned, my wife is going to "make it better". She is threatening to make "cabbage curry". We will have to see.

Tuesday, November 16, 2021

Japanese egg plant stir fry with cumin 茄子のクミン炒め

As I mentioned previously Tako Grill started a mini-Japanese grocery store in addition to take-out. Occasionally I get some Japanese groceries when I stop by for take out. This time I got Asian (Japanese) eggplant (slender long eggplant with light purple color). I decided to make something a bit different and came across this recipe in e-recipe. It is interesting since it uses bacon and cumin seeds not ususal Japanese seasoning. 

The recipe also said this will go with wine; a major encouragement so I decided to make it. Initially when I tasted it I did not taste much cumin but later it became more pronounced and I am glad I did not add the additional ground cumin I contemplated. 


Ingredients:
One Asian (Japanese) egg plant, cut in half lengthwise and then sliced into 1/4 inch thick half-moon slices.
2 strips of bacon, cut into small pieces
1/2 tsp cumin seeds
1 tbs olive oil
Salt and pepper

Directions:
Add the olive oil in a frying pan on medium flame
Add the cumin seeds and fry until fragrant and starts making popping noises.  But be careful not to burn it. 
Add the eggplant and the bacon
Keep stirring until the bacon gets crispy and the eggplant gets soft and cooked.
Season with salt and pepper.

These are not the flavors you would expect in a  Japanese eggplant dish but they are a great combination. The eggplant is unctuous in texture and picks up the smokiness of the bacon. The bacon itself adds a burst of saltiness. The hint of cumin adds another taste dimension that “plays well” with the eggplant and bacon. As indicated this does go very well with red wine or sake. We really like this dish.

Saturday, November 13, 2021

Hiyaoroshi sake ひやおろし

When we traveled to Japan, we ususally chose late spring early summer to avoid the rainy 梅雨 and typhoon 台風 seasons.  We could not handle the heat and humidity of summer months.  Over the years, we made some exceptions. We visited Japan once in winter to attend New Year with my family and twice in late September and October just barly evading typhoons (in 2013 and 2017). It is nice to visit Japan in fall, since it is the harvest season with great produce especially fruits and vegetables. Seeing golden rice paddies at sunset from the Shikansen is something to remember.  In addition, we could enjoy seasonal sake only available in the fall which is the main point of  this post.

In 2013, we visted “Tako Grill” in Kuroishi 黒石, Aomori 青森. Chef Kudo 工藤 opened this Japanese Tako Grill after he left “Tako Grill” in Bethesda and went back to his home town in Japan. When we visited, he served us local Kuroishi sake  “Kikunoi Akiagari”  菊乃井 秋あがり. We really liked this sake.  We liked it so much Chef Kudo had to send a waitress out to get more from the brewery since we drank what he had at hand. 

The “Hiyaoroshi” 冷やおろし or “Akiagari” 秋あがり is a seasonal sake and is only available in the fall. My undestanding is that the sake is brewed during the winter and bottled in the spring. It is pasturized or “hi-ire” 火入 and then stored in a cold environment until fall when outside temperatures get cold.  Up until now we thought the only way we could enjoy “hiyaoroshi” was to go back to  Japan in the fall. Now, we discovered we can get “hiyaoroshi” sake in the U.S. from  Tippsy sake.  Recently we got two hiyaoroshi from them; one is “Otokoyama” from Asahikawa, Hokkaido 男山、旭川 (right) and Koshi-no-homare from Niigata 越の誉, 新潟 (left). Both are junmai class sake.


We first tasted "otokoyama" (meaning "manly mountain") . The label shows what looks like baby seals drinking sake. (We momentarily contemplated whether this image suggested under-age drinking…by seals)? This is a very nice sake. Although it is "tokubetsu junmai",  it does not have any yeasty smell/taste but is rather dry with rich complex flavor and some fruitiness up-front. We had this with imitation negitoro and it went very well.


The next evening, we had "Koshi-no-homare" (meaning "pride of Echigo 越後" - old name for Niigata). Reportedly, this sake was buried under snow for 250 days. A snow crystal is the only image on the label. This sake tasted a bit lighter up-front than the "otokoyama". It has nice after-taste flavors. We had this with an assortment of drinking snacks.


Although we tend to favor "Otokoyama" (and that is not just because I am from Hokkaido), we are very happy with either one. It is so nice that Tippsy sake brought "hiyaoroshi" sake to U.S.

Wednesday, November 10, 2021

Negitoro from "nakaochi" tuna 中落ちでネギトロ

 Our Japanese grocery store "Maruichi", gets a bluefin tuna for sale once a month (I assume from NY).  The date is not fixed and you have to look it up on their website. Since it often arrives on a Friday and because of my work schedule I shop on a Saturday I usually get there the day after they received the tuna. As a result I have the “pick” of what is left over from the previous day and the types of tuna portions and quality available are a bit unpredictable. Nonetheless, I was able to get some pretty decent tuna sashimi. On one of such expedition, I got a segment of tuna back bone with some meat attached. We had a similar item at "Maguro Ganchi" まぐろがんち in Kanazawa 金沢 some years ago. The dish called "negitoro" ネギトロ is supposedly made from "nakaochi" 中落ち and "sukimi" すきみ tuna meat. Sukimi is the fatty meat just under the skin. I made "negitoro" from this nakaochi tuna.


Using a spoon (or more traditionally using a shell), you can removed most of the meat from the back bone and ribs. As you can guess, this is very reasonably priced but tastes good. Many Japanese Izakaya often serve this nakaochi as a sashimi or Korean style marinaded tuna called "Yukke".


Since this nakaochi was not really fatty, I made my usual pseudo-negitoro with the addition of mayonnaise. 

As usual, we had this with a slice of cucumber wrapped up in small rectangle of nori. We had this with "Otokoyama hiyaoroshi"男山ひやおろし...a perfect match!