Showing posts with label cabbage. Show all posts

Monday, September 14, 2026

Okonomi-yaki, Osaka-style Summary 大阪風お好み焼き総括

Here is a summary of the various “Osaka-style” okonomi-yaki we have experimented making recently. The picture shows an approximately 8 inch okonomi-yaki made with pork belly and all the toppings. I just wanted to post a summary of where we were able to get all the Japanese ingredients for an okonomi-yaki as well as the standard way to cook and top it.


Ingredients (basic or essential):
Cabbage キャベツ: Japanese or Taiwanese cabbage work best. Japanese cabbage is available from Suzuki Farm and Taiwanese from Weee. Compared to the American variety, the cabbage heads are flatter and not as round. We also think the leaves are more tender, sweeter and easier to separate than the american variety.

Scallion ねぎ: Chopped scallion either mixed into the batter, added as a topping or included both ways. 

Batter: There are two main ways to prepare the batter
Using either “Okonomiyaki” flour (#1 in the composite) or regular cake flour. The main difference is that the Okonomi-yaki flour already has kelp powder in it (which is one of the primary flavor elements, in addition to bonito, in Japanese dashi broth). So the batter can be made just using water instead of Japanese broth.  In addition because it does not include bonito, it is vegetarian. Cake flour can also be used as the base for the batter. While just plain water can be used as the moisture element in batter made with cake flour, it does not have any additional flavoring, either kelp or bonito, the resulting batter will not taste the same as one made with the Okonomi-yaki flour. So Japanese broth (made traditional style with kelp and bonito, or vegetarian style with kelp and dried shiitake mushroom) is generally used to achieve a similar flavor profile when using cake flour. The Okonomiyaki flour is available either from “Otafuku” US web site or “Weee”. Also vegetarian Japanese broth can be made with kelp and dried shiitake instead of bonito. In addition, (to make things even more complicated) both flour versions can also include grated “nagaimo” Japanese mountain yam which, while not adding additional flavoring, makes the texture more moist. (But I only used it in the cake flour version)

Tenkasu” 天かす Tempura bits (#2). These bits can be either vegetarian or flavored with dried squid or shrimp.  Otafuku offers only vegetarian while Weee offers both. Although this can be omitted it is a standard ingredient. We like putting this on the pancake rather than mixing it in the batter because when you flip it, the tenkasu gets browned and crispy. Otherwise if you mix it in the batter, it sort of disappears

Toppings:(we got these toppings from Weee. Some are also available from Amazon)
1. Kizami shouga 刻み生姜. Julienne of pickled  ginger. This gives a nice ginger taste (#6)
2. Aonori 青海苔. Dried green laver. 
3. Katsuo-bushi flakes 鰹節 or kezuri-bush 削り節 which is thinly shaved fermented dried bonito and is the main ingredient of Japanese dashi broth. (Since it is made from dried fish, it is not used in the vegetarian version of okonomi-yaki).
4. Mayonnaise, specifically Japanese Kewpie mayonnaise (#5) which we got from Weee. Since we have never used Kewpie mayo, we were interested in how it compared to our standard American Hellman’s mayo. We found Kewpie mayo is smoother, slightly tangier and sweeter than Hellmann’s. Hellmann’s can be made to emulate Kewpie by adding rice vinegar and sugar. Conversely, we read, there is an American Kewpie, (which we have not tried). It is made differently from the Japanese variety. but was reported to taste like any other American mayo.

Sauce:
The mayo can be omitted but the okonomi-yaki sauces are a must. As far as we are concerned they make the dish. In general, regular okonomi-yaki sauce is available at Otafuku, Weee or any Japanese grocery store. However the Otafuku website also offers a spicy version (#4) in addition to the regular (#3) both of which are vegan. I also saw a “deluxe” version of the sauce at Otafuku which is not vegan and much more expensive. 

I suppose it is easy to make “regular” sauce into “spicy” sauce by adding your favorite hot sauce to the regular okonomi-yaki sauce.


Basic Directions to make okonomi-yaki

Directions for batter I made:
1) with water:
56g “Otafuku” okonomiyaki flour
92g water
1 egg

2) with Japanese broth and grated nagaimo:
50 grams cake flour 
40 grams Japanese broth (either vegetarian or traditional)
1 egg
40 grams grated Nagaimo 長芋 (which is available from Weee or a Japanese grocery store)

Directions for assembling the pancake:
1. Mix the batter, egg, cabbage, and scallion
2. Add the oil to an 8 inch frying pan on medium-low heat and pour in the batter to form a round disk about 2 cm by pressing the batter lightly with a spatula. 
3. Add the tempura bits and spread the pork belly on top if using. (#1 in the composite below)
4. Cook uncovered for 4 minutes
5. Flip and cook for 4 more minutes (you can either put on the lid or not as your preference.) We did not think the lid made much difference to the final product but most of the instructions include placing the lid (#2) in the composite below. We also found that when cooked with the lid on the pork belly was less crispy and more chewy. 
6. Flip the pancake again. The meat and tempura bits should be brown and crispy. (#3 in the composite below) Cook uncovered (if used the lid in the step 5) for 2-3 minutes
7. Remove the pancake to a plate or cutting board. Spread the mayo and sauce and top with the ginger, aonori, and bonito flakes (#4 in the composite below).


After making several version of okonomi-yaki, we learned;

1. Cake flour with graded nagaimo and broth (either vegetarian or bonito and kelp) vs. Okomoni-yaki flour mix (from Otafuku which is vegan containing just powdered kelp) did not make a big difference. Actually we may slightly prefer using the Otafuku flour mix which is also much easier to prepare. 

2. Rather than mixing tempura bits into the batter, it is better to layer them on the top. Otherwise, they totally disappear where as they become nicely crunchy when layered on the top.

3. We found whether or not a lid should be used after the first flipping is debatable.  Although, some recipes indicate placing the lid will make it more tender and fluffy, we found that it may also make the pork meat (if using) less crispy and more chewy. We did not see any significant difference in the okonomi-yaki itself.

4. Using Japanese Kewpie mayonnaise may be authentic but not essential

5. In terns of proteins, thinly sliced pork belly is the standard. We also tried substituting smoked bacon for the pork belly. (We call an okonomi-yaki made with smoked bacon “Bethesda Maryland style” which we like better than one made with pork belly). Seafood versions can be made with shrimp, scallops etc. A vegetarian version can be made with the addition of mushrooms such as shiitake, carrot etc and/or abura-age deep fried tofu as vegetarian simulation of the traditional pork belly

In any case, this dish is quite forgiving and you can make it with less or more ingredients once the base of the batter and shredded cabbage has been made. 

Monday, September 7, 2026

Pork Okonomi-yaki 豚バラお好み焼き

This is a probably the most standard version of Osaka-style okonomi-yaki which is made using pork belly. As you can see, after placing sauces and toppings on the pancake it is difficult to see which version of okomoni-yaki this is (although, it can’t be vegetarian since the toppings include bonito flakes). As usual, this is topped with mayo, okonomi-yaki sauce (we used Otafuku brand, both regular and spicy), pickled and julienned red ginger, aonori dried laver and finally bonito flakes. Actually, this is the third time we tried okonomi-yaki with pork belly. We were trying to find a way to make the pork crispy rather than chewy. This time, the result was the best. We’re really starting to like okonomi-yaki.


Ingredients: (makes one 8 inch pancake)
For batter
56g “Otafuku” okonomi-yaki flour (or you can just use cake flour)
92g water
1 egg

150g shredded cabbage
3 scallions, finely chopped
Tenkasu tempura bits
1/2 tbs vegetable oil (for cooking)

4 slices of thinly sliced pork belly (or smoked bacon; to make “Bethesda Maryland style” okonomi-yaki)

For toppings
Mayonnaise
Okonomi-yaki sauce (I used a mixture of regular and spicy sauces)
Julienned ginger in sweet vinegar or “Kizami ginger 刻み生姜”
Dried “aonori 青海苔” laver
Kezuribushi 削り節 bonito shavings

Directions:
Mix the flour, water, and egg, add the cabbage and scallion and mix. Add the oil in the frying pan on medium-low flame (400F using laser thermometer). Add the batter mixture into the frying pan and press into 2cm thick round. Top it with the tempura bits and thin slices of pork belly seasoned with salt and pepper (#1). Cook for 4 minutes. Flip it (#2). Put on the lid and cook for 4 minutes. Remove the lid and flip again (#3). Some of the tempura bits will get browned. Cook without a lid for another 3 minutes. Take it our to the cutting board or plate.

Smear the surface with the mayo (I added a small amount of sugar and rice vinegar to emulate Japanese Kewpie mayo) and sauce (#4). For toppings, scatter the ginger and aonori (#4). Finally add the bonito flakes (the first serving picture).


This version really worked. The pork came out more crispy than the previous pork versions of okonomi-yaki (which we did not blog about). The oil of the pork belly adds additional flavor to the pancake. (We found using the smoked bacon used for the Bethesda style okonomi-yaki came out more crispy than the pork belly. The bacon also added more rich meat flavor.)

Tuesday, September 1, 2026

Okonomi-yaki Vegetarian Version ベジタリアンお好み焼き

Okomoni-yaki お好み焼きis a type of a Japanese savory pancake. It is especially popular in the cities of western Japan such as Osaka 大阪 and Hiroshima 広島 where many restaurants specialize in okonomi-yaki. Many years ago we had okonomi-yaki for lunch when we visited Himeji castle 姫路城. We went to a  local  okonomi-yaki restaurant we happened to see on our way to the station. The okonomi-yaki we had there must have been “Hiroshima-style”. We don’t remember the details of the dish we ate but we were both seriously under-whelmed. So, we have not tried it since then even on subsequent visits to Japan.

Recently, we got together with some good friends, who had recently visited Japan. They mentioned that they really liked okonomi-yaki. The wife is a vegetarian and, apparently, she had vegetarian okonomi-yaki in Japan and really liked it.  When they got back home they tried to recreate their enjoyable Japanese experience. Her husband called around to various Japanese restaurants in the area and while okonomi-yaki was on the menu of several of them none of them offered “vegetarian” okonomi-yaki.  They were extremely disappointed. Seeing how disappointed they were, my wife suggested that even though we were not particularly wild about the okonomi-yaki we had in Japan, maybe, given our access to Japanese ingredients and our experience in using those ingredients, we could make a vegetarian okonomi-yaki for our friends. Since we have never made one before, we had to study and experiment with this a bit.

We learned that there are two basic styles; Osaka and Hiroshima-styles. In both, two essential ingredients are a batter made of dashi broth and flour and shredded cabbage. In the Osaka style, the ingredients are mixed into the batter and cooked like a pancake. Hiroshima-style makes a thin pancake and layers it with the cabbage, noodles, and fried eggs. To make this at home, Osaka-style is easier, so that’s what we decided to make.

In terms of getting the sauce and premixed flour for okonomi-yaki, “Otafuku” U.S. web site is the best place. The “Otafuku” Japanese web site has instructions (in Japanese) and videos on how to make either Hiroshima or Osaka-style okonomi-yaki at home. It appears most of the items such as vegetarian sauces, and tempura bits are available from the US Otafuku site. We got their okonomi-yaki kit (which included a vegetarian “Otafuku” pre-mixed flour and two vegetarian sauces; one the traditional sauce and one a spicy sauce) as well as a bag of vegetarian tempura bits. (Traditionally the tempura bits have dried squid or shrimp in them so it required some effort of make sure the tempura bits I got were vegetarian.)

As a test, we first made an okonomi-yaki in the non-vegetarian traditional style with thin strips of pork belly. Although the “Otafuku” pre-mixed flour I bought was vegetarian this was the first okonomi-yaki I ever made and I wanted to see how something made with the correct mixture of ingredients would turn out. The resulting okonomi-yaki was pretty good. So, I got adventurous and decided to make a vegetarian version from scratch using a recipe I found on the internet. I made the pancake batter with cake flour, grated nagaimo 長芋 (Japanese mountain yam) and homemade vegetarian broth. We topped this with mayo, spicy “otafuku” sauce, “aonori” 青のり dried laver, and “kizami shoga 刻み生姜” julienned pickled ginger. The “spicy” sauce was not too spicy but gradually the heat creeps up on you. Although, the pancake we made was the size usually served to one person, we divided the pancake between the two of us and it was more than enough. This was quite a decent okomomi-yaki. (Infinately better than the one we remembered). The difference between using the “Otafuku” pre-mixed flour vs homemade vegetarian batter was subtle but the homemade one was a bit more moist maybe due to the grated “nagaimo”.


Ingredients (makes one 7-8 inch pancake)
50 grams cake flour
40 grams vegetarian broth*
1 egg
40 grams grated Nagaimo 長芋
100 grams shredded cabbage (I basically eyeballed the amount)
4-5 fresh shiitake mushroom caps, thinly sliced
Abura-age 油揚げ, half (optional, I used it to suggest the flavor of pork meat in a vegetarian version)
finely chopped scallions (3-4 tbs but the amount is arbitrary)
1 tbs vegetable oil

Tenkasu 天かす tempura bits (3-4 tbs but the amount is arbitrary)

Topping
Mayonnaise (the authentic Japanese mayo is Kewpie)
Okonomi-yaki sauce (I used the ones I got from Otafuku; one regular and the other spicy, both are vegetarian)

Julienned ginger in sweet vinegar (Kizami-shouga 刻み生姜), store bought
Dried “Aomori 青のり” laver 

* I made this from kelp and dried shiitake mushrooms. Add dried kelp (3x2inch) and 3-4 small dried shiitake mushrooms to cold water and let hydrate for 30 minutes. Then place the pot on a low flame. When it starts boiling, turn off the heat and let it steep for 1-2 hours until the broth cools to room temperature. Remove the kelp and shiitake mushrooms.  

Directions:
Mix the flour, broth, and egg to make a batter, add the cabbage and mushroom and cook in an 8 inch non-stick flying pan with vegetable oil on medium low flame, Top with the tempura bits and, (if using) place the fried tofu on the top (#1 in the composite picture) and continue cooking for 3-4 minutes. and then flip the pancake (#2). Place the lid on the pan and continue cooking for 3 more minutes then flip it again (#3). Let it cook for 3 more minutes with the lid off . 

Smear on the mayo, scatter the ginger (#4). Smear on the sauces and sprinkle on the aonori. Serve hot (the first picture).


The two versions of okonomi-yaki we made (the non-vegetarian version is the subject for a separate post) were much better than what we remembered. The pickled ginger and a combination of the traditional and spicy sauce are a “must have” really making the entire enterprise. 

Wednesday, September 24, 2025

Cabbage and pork belly stir-fry キャベツと豚バラの炒め物

In Japan, one of the popular cuts of pork is thinly sliced pork belly 豚バラの薄切り. As in other Asian dishes, the meat/pork is used basically as a “seasoning” in vegetable dishes rather than as an “entrée” on its own. Weee sells thinly sliced pork belly (6mm in thickness) which is a bit thicker than Japanese style sliced pork belly (picture #3). After debating for some time I finally decided to get it. It comes in a one pound package (about 450 grams) which was a bit larger than we would use for one meal so I separated it into three portions (about 115-120 grams each). I vacuum packed and then froze them. These packages were the right amount to make one dish. I used one of the packages to make this stir-fry dish for lunch one day from whatever I had in the fridge which turned out to be mostly cabbage. But cabbage and pork go well together. The seasoning was totally ad-hoc. Besides salt and black pepper, I used oyster sauce and soy sauce. I topped this with a fried egg (picture #1) (since I was out of pasteurized eggs, I had to cook the yolk. A runny yolk would have been much better in this dish). In any case, this was a fairly low-carb lunch.


Picture #2 shows the dish just finished in the wok. You can see the ingredients better including small pieces of pork.


This is not a recipe per se but just a note to myself.

Ingredients (two servings):
1/3 lb (or more) pork belly, (skin off) and thinly sliced (in this case it was 6mm thick but thinner is better), cut into 1 inch long pieces 
1/4 head of cabbage, thick center removed and leaves cut into 1/2 inch squares
1 large onion, halved and cut into small wedges
2 small carrots, peeled and cut into large match sticks
10 green beans, blanched and cut into 1 inch segments
1tsp each of garlic and ginger,  minced
2 eggs (optional)
2 tbs vegetable oil

Seasoning:
1 tbs “shoko” Chinese cooking wine 紹興料理酒
1 tbs soy sauce
1 tbs mirin
1 tbs oyster sauce
salt and pepper to taste


Directions:
In a wok or frying pan on medium high flame, add the 2tbs oil, when heated add the ginger and garlic until fragrant. Add the onion and stir for a few minutes. Add the pork and cook until the color changes.
Add the vegetables and stir for a few minutes until wilted and soft.
Add the seasoning and stir. Add salt and pepper to taste.
(optional) Cook the eggs and top the servings. The best is fried eggs with runny yolks but I cooked the yolk through since we did not have pasteurized eggs.

The flavors in this dish worked well together.  The pork was good but it was a bit chewy compared to Japanese thinly cut pork belly.

Saturday, August 2, 2025

Chilean Sea Bass in Sweet “Saikyo” Miso メロの西京味噌焼き

We have posted about Chilean sea bass or Patagonian tooth fish* previously. This time, I made sweet “Saikyo-miso 西京味噌” marinated Chilean sea bass. I am experimenting with various methods to “grill” fish in a frying pan using parchment paper. This method worked very well and emulates grilling. The miso marinade made a nice brown crust but did not burn. The fish meat came out flaky, moist and pleasantly oily. The sweet miso made a nice savory crust and the flavors really went well together. I served this with shredded cabbage (lately I have been using Taiwanese cabbage which is closer in texture to the Japanese variety) with Campari tomato dressed with a mixture of ponzu shoyu ポン酢醤油, olive oil, and a splash of dark sesame oil and Dijon mustard which I added to the dressing mostly as an emulsifier.  In the picture the dark object on the left lower part of plate is boiled edible chrysanthemum 春菊 dressed with concentrated Japanese noodle sauce and topped with bonito flakes 鰹節. We also had a bowl of freshly cooked rice. We really enjoyed this combination.

*Japanese name is “Mero メロ” which appears to originate from a spanish name in Chile or “Gin-mutsu 銀ムツ”.


This time we had an appropriate sweet white miso called “Saiyo miso 西京味噌 (#1 in the composite picture)” famous in Kyoto. So this dish is called “Saikyo miso marinated” without qualification.

Ingredients (two servings):
2 filets of Chilean sea bass, thawed and patted dry

Marinade:
3 tbs Saikyo miso
2 tsp sugar
1 tbs Mirin (or more until the marinade consistency is spreadable but not too runny)
Yuzu zest (optional, I used the last of the frozen yuzu zest)

Directions:
Cover the cutting board with plastic wrap. Place the filets on the plastic wrap and smear the marinade thinly on the back of filets. Turn them over and smear the marinade covering the rest of the filets. Wrap the marinade covered filets tightly in the plastic wrap (#3). Marinate in the wrap at least 20 minutes to a few hours in the refrigerator. 
Cut a piece of parchment paper to cover the bottom of a frying pan (#2)
Unwrap the filets and scrape off the majority of the excess marinade from the surface of the filet leaving only a thin layer of the marinade on the fish (#4)
Place the filet on the parchment paper in the pan.
Cover the pan with a lid and cook on a medium low heat for 5-7 minutes (#5), the surface should brown but not burn.
Flip the filets over and cook another 3-4 minutes with the lid on.
You can judge the doneness by looking at the breaks of the flesh of the fish which develop during cooking. (#6) When they are opaque the fish is done.


The parchment covered frying pan method works well. Since no oil was used, it emulates grilling. The pan  remains clean. I think this is a better method than baking to cook fish especially marinaded fish which can burn easily.

Saturday, March 22, 2025

Nappa Cabbage Cream Stew 白菜のクリームシチュー

This is my effort to use up whatever we had on hand. The first item was nappa cabbage or “hakusai 白菜” I got from Weee. It was fairly big and it was time for me to start using it. We also had one link each of chicken and pork sausages which we got from a local gourmet grocery store fresh (uncooked). I boiled them few days ago. Several carrots started sprouting and needed to be used. After some thought, I decided to make “cream stew”. I did not follow any specific recipe. This was our lunch one day and it was quite good, very comforting dish. The chicken sausage flavors were apple and sage but in the stew, a subtle, pleasant spiciness which we hadn’t noticed before came out and was very pronounced. 


This is not really a recipe but notes to myself.

Ingredients: (makes about 6 servings)
6 leaves of nappa cabbage, the white stems and leaves separated. The stems halved lengthwise and then cut in an angle (“sogi-giri” or “shave-cut” 削ぎ切, see #1 in the composite on the right most side), the separated leaves (#2)  cut into about 1 inch wide
1 each chicken and pork sausages (previously boiled) cut into medallions (#3)
4 caps of fresh shiitake mushrooms, cut into small bite size
1 tbs olive oil
2-3 cups of chicken broth

For béchamel sauce** (#4)
One shallot, finely chopped (#1 on the left)
2 tbs finely chopped shiitake stems and shallot, sautéed in olive oil, seasoned with salt and pepper* (optional)
4 tbs flour
2 tbs butter
salt, pepper and nutmeg to taste
about 100 ml or so milk

*When I receive fresh shiitake mushrooms (from Weee), I separate the caps and stems. The caps are packed in a ziploc bag with paper towels which makes the fresh shiitake last longer. For the remaining stems, I cut off the very ends, then shred and finely chop them. I saute this in olive oil with chopped shallots. This concoction is handy to have for making other dishes such as mushroom risotto. 

**The usual béchamel uses same amount of butter and flour but by adding finely chopped onion/shallot  in butter before adding the flour, you can reduce the butter in half. The flour clings to the surface of the onion/shallot which prevents the flour from clumping up. No need to add the milk gradually. Just dump all at once.


Directions:
For béchamel sauce
Melt the butter in the non-stick frying pan on medium-low flame, sauté the shallot until soft, add the shiitake stems and shallot mixture and sauté for one more minute. 
Add the flour and cook until no dry flour is visible, add the milk (at once) and start mixing (first with a whisk and then with a silicon spatula) until thickened. Season with salt, pepper and nutmeg and set aside (#4)
In a pan on medium flame, add the olive oil.  When hot, add the sausages and lightly brown both sides, add the cabbage stems, carrots, shiitake mushrooms and sauté for few minutes (#5)
Add the chicken broth so that the vegetables and sausages are just covered and cook 20-30 minutes.
Add the béchamel sauce and mix. Simmer fro 5-10 minutes and add the nappa cabbage leaves (#6)
Season with salt and pepper if needed.

I made the stew several hours before serving. The green color was nicely vibrant right after I finished cooking the stew but the green color faded (the top serving picture) before I could serve it. This was a rich savory stew with a complex range of flavors. The creamy texture was luxurious. The combination of the precooked shitake mushrooms and shallots was an outstanding addition to the soup. The sausage was a nice meaty addition as well. This was a very comforting soup.     

Tuesday, July 2, 2024

Egg roll 春巻き

Although I posted a few egg rolls 春巻, none are traditional/classic. So, I tried to make something close to “classic”. After consulting several recipes, I came up with this one. The filling is mostly vegetables (cabbage, carrot, bamboo shoot, rice noodle, shiitake mushroom, and a small amount of pork that I had roasted (in Weber with some smoke). It came out ok but we decided we are more used to and probably prefer gyoza 餃子 and shumai 焼売. We had fried shrimp heads from when we took out sashimi and sushi from Tako Grill. We re-fried and served them with the egg rolls. Sweet and sour sauce must be the most common dipping sauce but I did not make any sauce and instead, served this with green tea salt. 


Since I did not measure the ingredients, this is not recipe but note to myself. The filling made a total of 14 egg rolls.

Ingredients:
3-4 leaves of cabbage, thick ribs removed and cut into small rectangles
1 small carrot, peeled, sliced and Julienned
Half of a package of boiled  bamboo shoot, sliced and julienned
Ginger, skinned and thinly julienned
2 caps of fresh shiitake mushroom (dried could be better but I did not have time to rehydrate them )
1/4 package of dried rice “harusame” 春雨 noodle, soaked in boiling water for 5 minutes, cut into bite sized pieces
1 tbs vegetable oil plus a splash of sesame oil
4-5 slices of roasted pork julienned (or uncooked julien or ground pork and shrimp)

Egg roll wrappers
Mixture of water and flour to make a slurry/glue (to fasten the ends of the egg roll wrapper)

Seasonings:
2 tsp oyster sauce
2 tbs Xiaoshing wine
2 tbs Soy sauce
2 tsp potato starch + water to make slurry
Salt and pepper
1 tsp sesame oil

Directions:
In a wok on medium-high flame, add the oil and sauté the ginger, vegetables and the pork. Season with the salt and pepper. When, the vegetables are cooked add the seasonings and mix. Add the starch slurry and splash in the sesame oil and mix.
Spread the filling on a metal cookie sheet to cool to room temperature and then refrigerate covered.
(I made the egg rolls several days after I made the filling)

Assembly:
Place the wrapper diagonally and place the filling near center but more toward the bottom, fold the bottom corner over the filling and then both sides and roll. Paint the flour/water mixture on the far conner of the wrapper and complete the roll (see picture below). (I made the rolls 1-2 hours prior to cooking. I covered  them and placed them in the refrigerator).


Instead of my regular “tempura” set up, I used a 10 inch frying pan for to  “fry” them.  Place the rolls with the end seam side down first and turn it over after the bottom is brown and continue cooking until the wrapper is all brown and crispy.


These were pretty good. The filling was adequately seasoned and the wrapper was crispy. Initially we thought there is too much wrapper as compared to the filling since we were more used to the proportions of gyoza. But over time the flavors melded together and actually tasted better. We discovered one egg roll made a nice lunch. Also they crisped up very nicely in the toaster oven.

Wednesday, June 5, 2024

Gyoza made with New Round Gyoza Skin 日本風の餃子の皮で作った餃子

When I make gyoza, I use “wonton skin” which is readily available at a regular grocery store. The wonton skin is square and a bit thicker than a classic Japanese-style gyoza skin. Japanese-style gyoza skin (picture #2) is available (most are frozen) but I did not bother to get it until now. Since we were getting groceries from Weee anyway and they had Myojo brand 明星食品 frozen Japanese-style gyoza skin, I ordered this with frozen ground pork for making gyoza.  The result is definitely worth it (for us). Since it is round, the gyoza looks nicer and the thin skin makes a nice crispy outside without being too heavy or filling (#1). I served the gyoza with pickled daikon, cucumber and marinated quail egg. 


The filling is my usual. Finely chopped cabbage which I blanch and squeeze out moisture, finely chopped scallion, ground pork, grated garlic and ginger. I added soy sauce and small amount of sesame oil. 

Cooking is also as usual. First, brown all sides of the gyoza (the standard method is brown only one side but we like brown and crispy on all sides) with vegetable oil with a splash of dark sesame oil. Once all sides are brown, add a small amount of water and place on the lid. Steam for 1-2 minutes or until no more steam is coming out. Remove the lid and crisp up the skin again.


I made quite a few gyoza. We keep them in a sealable container in the fridge and warm them up in the toaster oven. It works well and the gyoza tastes almost exactly like they were just cooked.


Thursday, March 28, 2024

St. Patrick’s Day Dinner, Lamb Chops and Cabbage with Bacon セイント パトリクス デイ

While taking inventory of the deep depths of the freezer, my wife came upon 2 thick cut lamb chops; perfect for St. Patrick’s day dinner.  So we cooked the lamb chops and served them with a side of cabbage and bacon as well as rice pilaf (#1). For a change, I managed to cook the lamb to near perfect medium rare. After seasoning with salt and pepper, I seared the chops without any oil on both sides and finished them in a 350F oven. After 5 minutes I started measuring the temperature at the center of the chops. Around 10 minutes, it reached 135F.


We also made cabbage, onion with bacon.


We just cooked this without any particular recipe.

Ingredients:
4 cabbage leaves, center thick veins removed and cut into 1/2 inch squares
1 medium onion, sliced
3 strips of bacon
3 tbs chicken broth or water
Salt and pepper to taste

Directions:
Fry the bacon strips until crispy and set aside on a paper towel lined plate leaving the bacon dripping in the pan
Sauté the onion until well cooked and brown
Add the cabbage and mix
Add water or chicken broth, place the lid and steam until liquid almost all gone
Add the crumbled bacon and season with salt and pepper to taste

This was a great somewhat traditional way to celebrate St. Paddy’s day. Even though it was completely spontaneous and not planned, things don’t get better than this. Next stop the spring equinox.

Sunday, September 3, 2023

Simmered Pork and Nappa Cabbage 豚肉と白菜の煮物

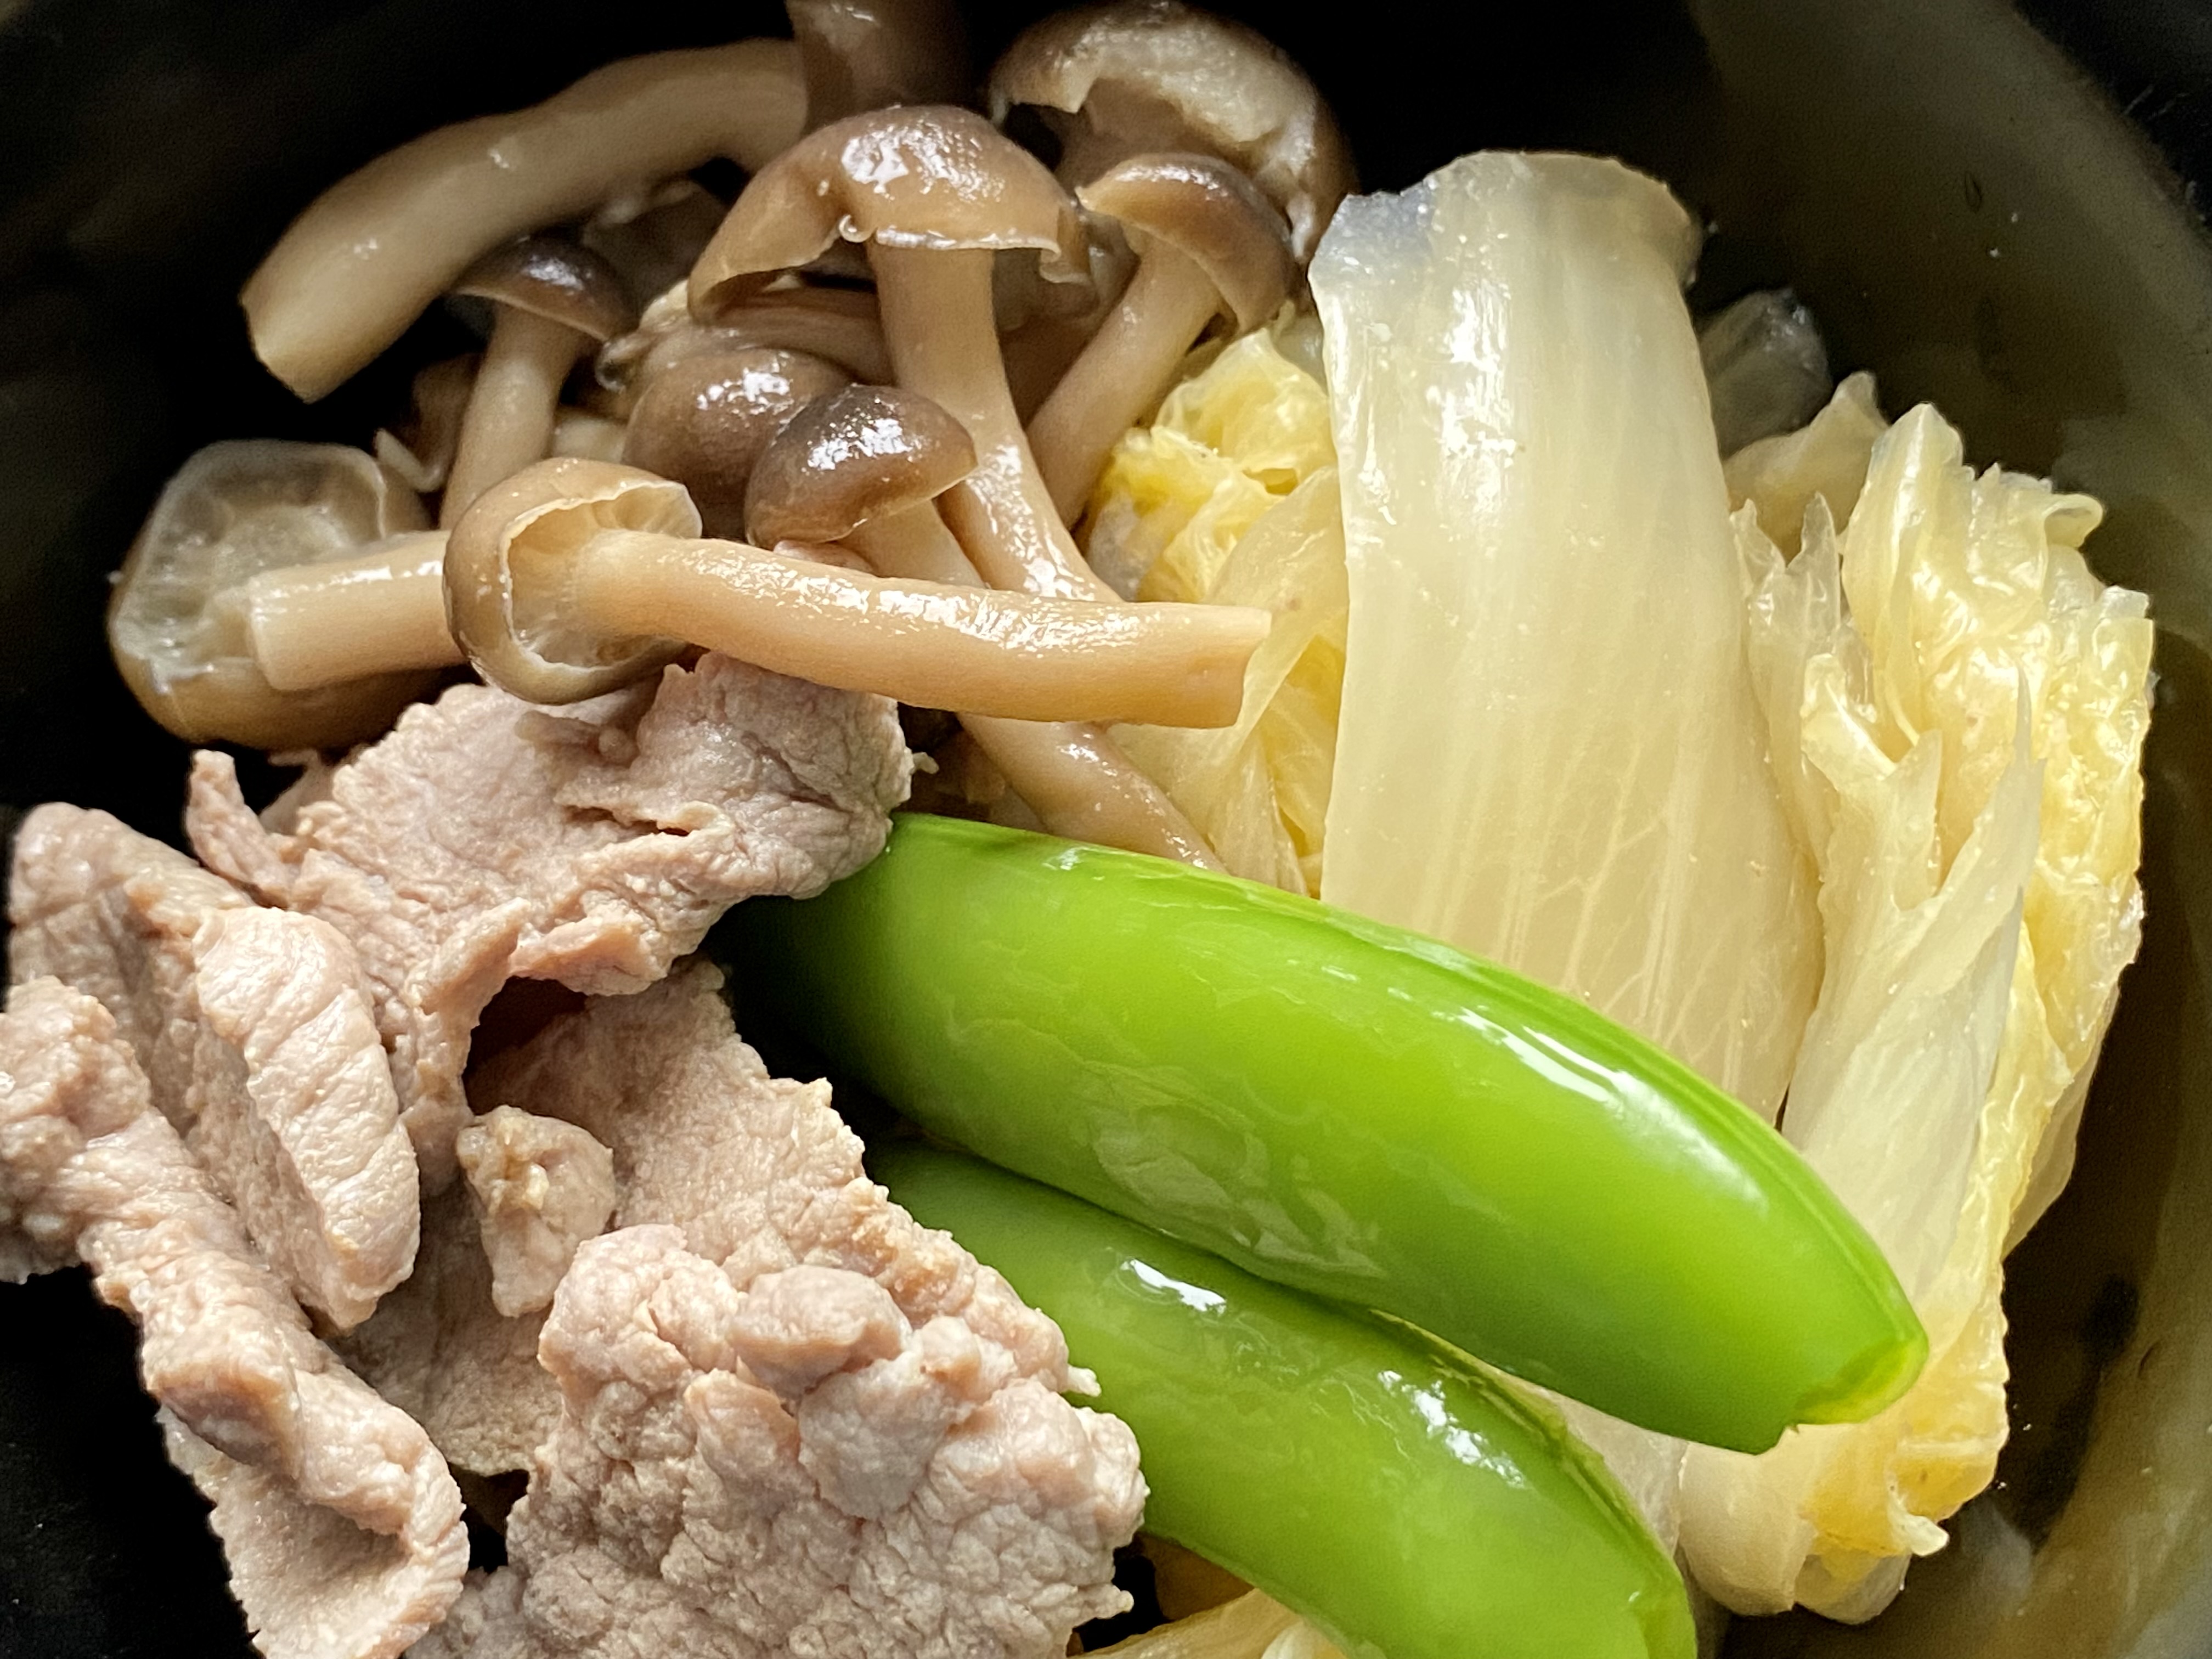
When we get a large bone-in skin-on piece of pork (either fore- or hind-quarter), I do secondary butchering to remove the skin and bone. With the meat I usually make one large roast for barbecuing in our Weber grill, and one smaller roast for making simmered pork or “Nibuta” 煮豚 in the Instant pot. I usually hand-chop the remaining trimmings into ground pork which I use to make “mapo tofu” 麻婆豆腐, “niku-miso” 肉味噌 or other dishes.  This time the pork came from the fore-quarter and after I did all my usual preparations additional small blocks of pork remained. So I sliced them very thinly and made two dishes; one was a classic homey dish of meat and potato stew or “nikujaga” 肉じゃが and the other was this nappa cabbage dish. I made this dish since I had quite a good amount of left-over nappa cabbage or “hakusai” 白菜 and also brown shimeji mushroom or “bunashimeji” ぶなしめじ.


I added sugar snaps スナップ豌豆の塩びたし for color.


This is based on a recipe I saw on-line but because of the ingredients I had (or didn’t have), I had to make some modifications.

Ingredients:
4 leaves of nappa cabbage, bottom trimmed, cut in half lengthwise. I cut the bottom half thick portion on a slant (45 degree against the cutting board surface) 1 inch long (called “sogi-giri” 削ぎ切). This makes a slightly thin segment). The leafy tops were cut into 1 inch long pieces.
120 grams of thinly sliced pork (the amount is arbitrary. More the better?)
1 package (150 grams) of brown shimeji mushroom, bottoms removed and separated
400ml Japanese dashi broth
1 tbs each of sake and soy sauce (to marinade the pork)

Seasoning
2 tbs sake
2 tbs x4 Japanese noodle sauce (or 1 tbs each of mirin and soy sauce)
1/2 tsp ginger juice (from grated ginger root)

Direction:
Marinate the pork in the mixture of sake and soy sauce for 5-10 minutes.
Put the dashi broth in a pan on medium heat. When it boils add the marinated pork. When the meat changes color, add the nappa cabbage and mushrooms. Cook for a few minutes and add the seasoning. Cook for 10-15 minutes or until the hard part of the nappa cabbage is cooked through.
Serve warm with topping of blanched green beans or sugar snap or chopped scallion (optional).

Although this dish uses the combination of seasoning similar to “niku-jaga”, this dish came out much more mildly flavored and gentle. This is a good dish for drinking snack or the accompaniment for rice.

Saturday, June 3, 2023

Canned Mackerel, Cabbage and Egg Stir-fry サバ缶とキャベツの卵炒め

We found a few cans of mackerel (Japanese.style cooked in water) which were approaching the BUB (best-used-by date) tucked away in the pantry. We bought these and other canned items during the height of COVID when protein shortages started to materialize. Those times have thankfully passed so I decided I could use the “emergency” mackerel to make a small appetizer. I have made and posted a few dishes made from canned mackerel. This is not particularly original but it worked well. Since I recently got fresh quail eggs, I used them to make miniature fried eggs and topped this dish. As a result, in the picture the mackerel part of the dish, is a bit obscured by the fried quail egg.


The below is the picture of another serving a few days later. I added boiled quail eggs which had been marinated.


This is based on the recipe on line (in Japanese).

Ingredients:
One can of mackerel in brine or “Saba-no-mizuni” 鯖の水煮
3-4 leaves of cabbage, thick vein removed and cut into bite-size square
2 shiitake mushrooms, stem removed and sliced (optional)
1 egg
1 tbs vegetable or olive oil
salt and pepper

Directions:
Make scrambled egg and set asdie
sauté the cabbage for few minutes
Add the mackerel and stir for few more minutes
Plate and top with the scrambled egg
Season with salt and pepper

This is an ok dish to use up the canned mackerel…actually tasted pretty good. It was even better the next day with the marinated quail eggs.

Tuesday, April 5, 2022

Cabbage stir fried Japanese style 日本風キャベツと油揚の炒め物

This is a simple Japanese family-style cabbage dish which my mother used to make. I thought I must have posted this before but obviously I did not. When we celebrated St. Patrick’s day this year we had a sort of Irish dinner with Shepherd pie, Irish soda bread, and I contributed this cabbage dish to complete the meal. This is a vegetarian dish since instead of meat, deep fried tofu or “abura-autge” 油揚げ is used. I also added onion but it was most likely not included in the original recipe. The seasoning is a typical Japanese one; soy sauce and mirin. This can be a drinking snack or accompaniment for rice (in that case, more soy sauce is called for). 


 I made. this with the center portion of cabbage I had left in the refrigerator. Since I was trying to use up the last of the cabbage, I made a bit more than I intended.


Ingredients: (The amount of the ingredients are arbitrary)
Cabbage, thinly sliced, soaked in water for 10 minutes and then moisture removed in a salad spinner (#1).
Deep fried tofu (abura-age), rinsed in hot water to remove excess oil, cut in half and sliced into thin strips (#2).
Onion, cut in half and thinly sliced (#3).
Vegetable oil with a dash or dark sesame oil for stir flying (#4)
Soy sauce and mirin as seasoning.

Directions:
Add the oil to a wok on medium-high flame
Stir fry the onion for a few minuets and then add the cabbage and continue cooking or few more minutes or until the cabbage softens.
Add the mirin and then soy sauce. Add the seasoning to taste.


This is a nice side dish and a nostalgic reminder from my childhood. 

Wednesday, December 8, 2021

Cabbage curry salad (or rescued caramelized cabbage) カレー味のキャベツのサラダ

Making good on her threat to rescue the somewhat less than successful “skillet caramelized cabbage” my wife transformed it into curry flavored cabbage. Getting a cue from coleslaw, she added carrots and raisins. Then she further transformed it by turning it into a salad using mayo and strained (Greek) yogurt as a dressing. I think this dish may have been inspired by a recipe in her favorite Indian cookbook by Madhur Jaffrey’s called “Quick and Easy Indian Cooking”. Even so, I am certain, the recipe would not have called for the use of failed skillet caramelized cabbage. Nonetheless this was much better than the original.


Ingredients:
1/2 head of cabbage (about 1 1/2 lbs.) (I used the previously made caramelized cabbage)
3/4 tsp. Cumin seeds
1/2 tsp. Fennel seeds
1 tsp. Sesame seeds
1 cup raisins.
1 medium or large onion diced
2 to 3 carrots julienne
1 tsp. Salt
1/8 to 1/4 tsp. cayenne pepper
1 tbs. Lemon juice (I used sushi vinegar)
1/2 tsp. Garam masala

Directions.
Put some oil in a frying pan on medium high heat. When the oil gets hot add the cumin, fennel and sesame seeds to bloom the spices. When the sesame seeds begin to pop quickly add the raisins. They will essentially fry puffing up and turning light brown. Then add the onions and sauté until they have browned a bit. Add the carrots and cook until they soften somewhat. Add the cabbage. Stir and cook until blended and the cabbage has become soft. Add the salt and cayenne. Then at the very end add the lemon juice (or sushi vinegar) and the garam masala.


This was a major improvement over the sorry caramelized cabbage dish. The spices had depth of flavor and some zing but were not too hot. The raisins gave it sweetness that contrasted well with the tangy note added by the vinegar. The garam masala gave it a bright spark at the end of the bite. I would almost go so far as to call it a coleslaw curry. It tasted great both hot or cold. Although this can be eaten hot or cold, we further morphed it to salad.

I served this dish with sweet potato croquet, French fries made from sweet potato. I think this was a small dish that went with a drink in the evening.


This was a lunch over the weekend. I served the cabbage curry dressed with the mayo greek yogurt combo. The plate included a curry flavored chicken salad, cantelope and grapes (chicken was leftover breast meat from the whole chicken we cooked on the Weber grill) and Angel biscuit.  Both salads were curry flavored but tasted quite different.


I think my wife was indeed successful rescuing the cabbage from the original dish. 

Friday, November 19, 2021

Skillet caramelized cabbage スキレットカラメライズドキャベツ

My wife and I are always looking for new and interesting recipes. One day, we simultaneously and independently both came up with the same cabbage recipe that appeared in the Washington Post. The article touted how glorious this cabbage dish was. Although, in general, we are not fans of cooked cabbage, we thought this might be an exciting new preparation which would significantly change our opinion much like blackened  Brussels sprouts revolutionized our appreciation of that vegetable. The picture below shows the dish just as it came out of the oven after one hour of baking.


We served a portion as recommended in the article with a dollop of Greek (strained) yogurt and dill (we did not have fresh dill so we used dry dill).  To our disappointment after all was said and done this dish was just "cooked cabbage" with a slight caraway flavor.  If you are a fan of cooked cabbage this is the dish for you. We, on the other hand, were much less than impressed. My wife said she will attempt to transform this it to something better (subject of future post).


Ingredients
1 medium head green cabbage (about 2 1/2 pounds)
4 tablespoons olive oil, divided
1 medium yellow onion (about 8 ounces), halved and sliced
2 cloves garlic, minced or finely grated
1 teaspoon caraway seeds
1/2 teaspoon fine sea or table salt, plus more to taste
1/4 teaspoon freshly ground black pepper
1 1/2 cups low-sodium chicken or vegetable broth
1 tablespoon apple cider vinegar
1/4 cup fresh dill fronds
3/4 cup plain Greek yogurt (nonfat, low-fat or whole)

Directions:
1. Position a rack in the middle of the oven and preheat to 350 degrees.
2. Cut the cabbage in half through the core, then cut each half into four wedges, making sure that each wedge retains some core to hold it together, so that you have 8 wedges.
3. In a large, ovenproof, high-sided skillet over medium-high heat, heat 1 tablespoon plus 1 1/2 teaspoons of the oil until shimmering. Add four wedges of cabbage to the skillet and sear until the cabbage is well browned and slightly softened, 3 to 4 minutes per side. Transfer the cabbage to a plate, and then repeat with another 1 tablespoon plus 1 1/2 teaspoons of the oil and the remaining cabbage, transferring the cabbage to the plate once browned.
4. Add the remaining 1 tablespoon of the oil to the same skillet. Add the onion and cook, stirring, until softened, about 3 minutes, then stir in the garlic and caraway and cook, stirring, until aromatic, 30 seconds more. Return the cabbage to the skillet, overlapping the wedges as needed. Season with the salt and pepper, then add the broth and vinegar and bring to a simmer.
5. Transfer the skillet to the oven and bake, uncovered, for 60 to 75 minutes, or until the cabbage is very tender and the liquid has reduced to about half.
6. Serve garnished with dill fronds and dollops of yogurt, and seasoned with additional salt, if desired.

We were a bit underwhelmed since our expectations were high. It was another cooked cabbage. As I mentioned, my wife is going to "make it better". She is threatening to make "cabbage curry". We will have to see.

Monday, September 7, 2020

Cabbage and perilla in brine キャベツの青じそ漬け

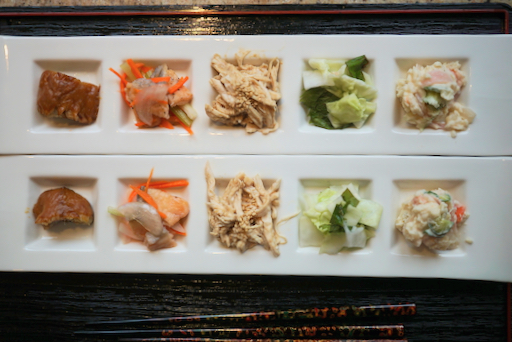
These were five small appetizers we had one evening. Among these five appetizers, one is new and another is sort of new (a variation).


From the left, three kinds of protein. In the picture below which is the close up of the individual dishes, the left is smoked mackerel with miso sauce (since it is difficult now to get fresh mackerel, we got a package of smoked mackerel). My wife suggested serving it with the miso sauce I use to simmer the fresh mackerel サバの燻製味噌ソース. Unfortunately, this batch of the smoked mackerel was a bit too salty and the addition of the miso sauce did not improved the situation by adding more saltiness. The center is vegetables and fried salmon in sweet vinegar 酒の南蛮漬け and the right is chicken dressed in sesame dressing 酒蒸し鶏胸肉の胡麻和え.


Below, from  left to right is the previously mentioned chicken with sesame dressing, the center is a new small dish which is cabbage and perilla in brine キャベツの青じそ漬け.  There are many variations on this theme but I used a recipe from the on-line version of the Japanese newspaper "Asahi shinbun" 朝日新聞. (The recipe follows below the picture). The right is my usual potato saladポテトサラダ. 


Ingredients for cabbage dish
150 grams cabbage, cut into 1 x 3-4 cm strips
4-5 Green perilla leaves, cut into 1cm square

For Brine (mix the below and let it cool to room temperature)
1/2 cup hot water
1 tsp salt
1/2 tsp sugar
1/2 tsp rice vinegar


Directions
In a Ziploc bag, add the cabbage and green perilla, pour in the brine, remove the air as much as you can and seal. Sandwich the bag between two plates and put the weight and let it stand for 30 minutes until more water comes out and the cabbage becomes soft. It will keep several days in the refrigerator.

The brine was rather gentle and the cabbage tasted fresh and had a nice crunch. eating it with the perilla pieces really made it. This is a nice refreshing dish.

Tuesday, July 7, 2020

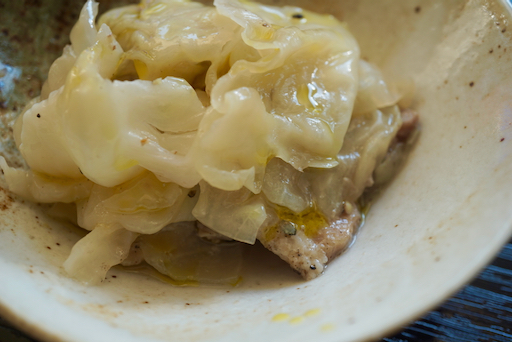
Pork belly and cabbage steamed in wine 豚バラとキャベツの塩蒸し

Because of COVIDー19, we have started using grocery home delivery. One of the problem is that when ordering on line using the descriptions and images provided we may not always end up with exactly what we wanted. This is one case in point; I thought I ordered a block of pork belly but instead, we got sliced pork belly. The slices are thicker than we expect to use in Japanese "Buta-bara" 豚バラ or "Sanmai-niku" 三枚肉.  I proposed several different dishes from the sliced pork belly but my wife wanted "Kaku-ni" 角煮 style preparation. So although I have never made kakuni from slices of pork belly before, I made that for her plus one other dish. Since I had jelled left over simmering liquid in the refrigerator from the previous pork belly (block) kakuni it was easy. I just cut the slices of pork belly into bite sized pieces and marinated them in a small amount of soy sauce for a few minutes. I then browned both sides and simmered it in the leftover simmering liquid for 2 hours. This was as good as my usual made from a block of pork belly.


The second dish I made was based on a recipe I saw on line. Since the slices of pork belly I got were thicker than Japanese buta-bara, I flattened the pieces with a meat pounder. Since we had leftover rose wine from Provence, I used that for this dish.


This is a simple dish but quite good. I splashed it with our favorite spicy Spanish olive oil before serving.


Ingredients
1/4 Cabbage, small head, leaves separate and washed and torn into bite sized pieces.
1lb slices of pork belly (They were a bit thicker than Japanese bura-bara. I pounded them thin, and cut into a bite sized pieces).
3 tbs white wine (We had a small amount of rose from Provence left over so I used that. It was more than 3 Tbs. more like 1/3 cup).
1/3 tsp salt
2 tsp oilve oil
slat and pepper for the meat.

Directions
Season the pork with salt and pepper.
In a pan, make alternating layers of cabbage and pork.
Add the wine, salt and olive oil, put it on medium flame with a lid.
Turned down the flame to low when it starts boiling.
Cook until the pork is cooked and cabbage is soft.
Serve hot, if needed season with additional salt and pepper (I sprinkled on our favorite Spanish olive oil)

This is a simple but good dish. Since the pork was well seasoned no additional seasoning was needed. It was good that I used up the cabbage I had, the left over wine and the last of pork belly slices.