Hope we can do this in a bit larger scale when the weather gets warmer and we can fire up the charcoal grill.
Monday, January 31, 2011
Baked oyster 牡蛎焼き
We usually make this dish on the grill but grilling was not an option in the bitterly cold weather we are having at the moment. I decided to do a small scale grilled (baked) oysters using the oven. Due to the simplicity of preparation this dish totally depends on the availability of good fresh live oysters. This is a very nice dish and perfect for an Izakaya feast.

At the near-by gourmet grocery store, they had live oysters but many were rather small (I assume they were Chesapeake bay oysters). I only got 4 (they were rather expensive). I first pre-heated my convection oven to 450F. I washed the oysters in running water using a small brush to remove any dirt or seaweed attached to the shell. In a small frying pan, I added Kosher salt about a half inch thick (if you do not want to use salt, you could use crumpled aluminum foil instead). I placed the oysters on the salt with the pointed or deep side of the shell down (left in the image below). The salt help hold the oyster shells upright and also conducts the heat evenly. I made sure that the oyster shells were horizontal so that the juice wouldn't run out once the shells open. I placed the pan on the upper rack of the oven for 7-8 minutes*. I try not to over cook the oysters. You may have to remove the smaller ones earlier. All live oysters will open up like the one seen in the middle of the image below. If the shell does not open the oyster was dead and you should not attempt to eat it. Unfortunately that was the case with one of these. So four became three and we felt cheated. Taking care not to burn myself and not spill the juice, I grabbed the open edge of the upper shell and removed it. The shells can be removed very easily, usually without any tools. The larger oysters may still be attached to the shell but it is easy to detach them with a small knife. During this process it is important not to spill any of the liquid gathered in the lower shell. As you can see the oyster was done and sitting in a nice pool of briny oyster liquor (right in the image below).

*Although I have not tried, I remember seeing or reading that you could put the oysters in an oven for a short period (1-2 minutes??) to make the shells open without cooking them. Then, it is much easier to remove the oysters from their shells.
You could eat these with ponzu or lemon juice but the oyster liquor has its own flavor of the ocean itself and you may not need anything. Just slurp the liquor and eat the luscious plump oyster.
Saturday, January 29, 2011
Herring roe with cucumber in wasabi mayonnaise 数の子とキュウリのわさびマヨネーズあえ
This is another dish I made from the "kazunoko" 数の子 herring roe which did not arrive in time for New Year. This is a dish, again, I just whipped up. This turned out to be pretty good.
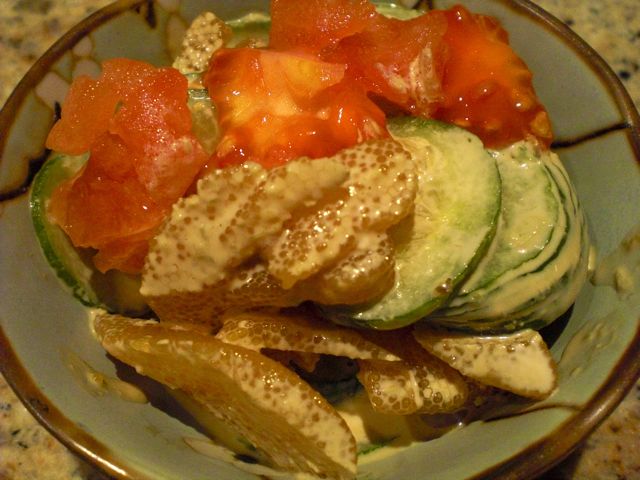
These herring roe were the last three we had left (of the batch I prepared) and had been marinated fairly long. Nonetheless, the seasoning was very light and subtle. I simply cut it up in small bite sized pieces. The cucumber is the usual American mini-cucumber, sliced thin, salted with the excess liquid squeezed out. The dressing is a mixture of real wasabi (almost 1 tsp), mayonnaise (1 tbs) and soy sauce (1/2 tsp). When mixing wasabi in mayonnaise, you can add quite a lot because the Mayonnaise dampens the wasabi's sharpness. I just dressed the cucumber and kazunoko with the wasabi-mayonnaise. I garnished it with tomato (this was a regular hydroponically grown tomato which was rather tasteless).
This was quite a success. The kazunoko and wasabi mayo go very well together--perfect with cold sake.
Friday, January 28, 2011
Salmon chanpuru 鮭のチャンプルー
I had leftover grilled salmon. I often cut it into good size cubes and just reheat it in a frying pan and season with mirin and soy sauce. With a sprinkling of sancho powder 山椒, it is quite good. I also made another dish with grated daikon and ponzu from leftover salmon. You could also make salmon salad. This time I wanted to make something different. Chanpuru is an Okinawan stir-fry. The most popular variety of this dish includes bitter melon which I posted previously.
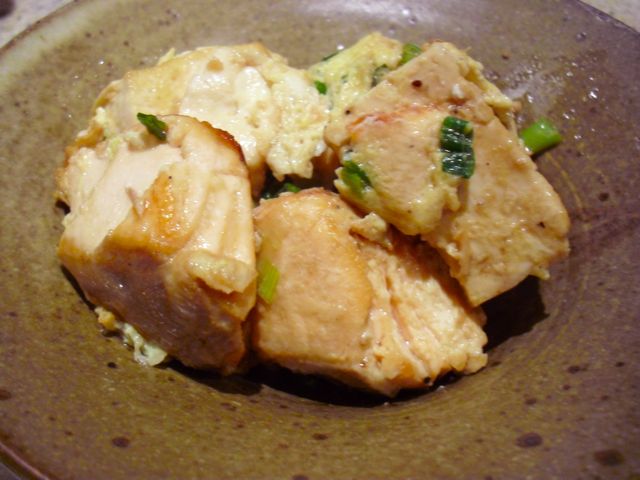
Use of tofu and egg may qualify this dish as chanpuru. I cut the leftover grilled salmon into large cubes. I am not sure about the amount but 6-7 half inch salmon cubes. I drained 1/3 block of tofu and wrapped it in paper towels. I weighted it down for 10-15 minutes with a plate on top to remove excess moisture. I then cut the tofu in cubes similar in size to the salmon.
I added sesame oil (2 tsp) to a frying pan on a medium flame. I first fried the tofu cubes to make all four sides slightly brown (1 minute each side). I added the salmon and stir-fried for several minutes. The tofu cubes may crumble but that is OK. I then added finely chopped scallion and beaten egg (one large). As the egg was cooking I seasoned the dish with salt, pepper and a small splash of soy sauce to taste.
I am not sure this was a great success. Somehow this combination does not work as well as a classic goya chanpuru. Still, this is something different using leftover grilled salmon.
I am not sure this was a great success. Somehow this combination does not work as well as a classic goya chanpuru. Still, this is something different using leftover grilled salmon.
Thursday, January 27, 2011
Roasted duck breast with grated daikon in ponzu sauce 鴨の胸肉のポン酢紅葉おろし
I grated daikon (daikon-oroshi 大根おろし) and squeezed out the excess moisture. That left me with about 4-5 tbs of grated daikon but again, the amount of each ingredient is totally arbitrary. I mixed about 1/2 tsp of 7 flavor Japanese red pepper 七味唐辛子 powder into the grated diakon. You could use one flavor pepper 一味唐辛子 or regular red pepper flakes. You could also add more pepper to make it spicier. Then I added ponzu shouyu (from the bottle, about 2 tbs). If you squeeze out the excess water from the grated daikon properly, it should absorb all the ponzu liquid and not get too runny. I made a mound of the flavored diakon on the center of the plate (or shallow bowl as seen above). I surrounded it with thinly sliced roasted duck breast and garnished with julienne of cucumber, Campari tomato and finely chopped chives.
This is a rather classic combination. The daikon I used was a very nice one and was not too pungent or hot on its own. The addition of ponzu and red pepper powder made it nicely spicy with citrus flavor. The diakon served as a refreshing counter-point to the richness of the duck breast--it served as an excellent dressing for the duck. Grated daikon is not one of my wife's favorites but she finished everything including the grated daikon. We had this with our newly discovered Gekkeikan "Black and Gold".
Tuesday, January 25, 2011
"Kazunoko" Herring roe 数の子
This year, my mother's "care" package for New Year was delayed because she could not send it by air due to the package bomb scare (which is now lifted according to my mother). In any case, her package finally came rolling in after almost one and half months at sea. We fully expected the package to be a complete "write-off" but surprisingly, everything she sent including the salt-preserved kazunoko 数の子 or herring roe was still in good shape and edible. This was probably because the majority of the "goodies" consisted of some form of dried or otherwise preserved fish. Although the kazunoko did not make it to the new year's day feast, I decided to prepare it for a post-New Year's feast to celebrate its belated arrival.
Nishin 鰊 or herring was abundant in Hokkaido in the past and some master fishermen or "amimoto" 網元 made fortunes from them. They built large buildings on the beach called "Nishin goten" 鰊御殿 or "Herring castle". After the world war II, over-fishing and changes in the cold currents almost totally decimated the once abundant herring fisheries on the coast of Hokkaido. In those hay days, herring and their roe were cheap and abundant. Once the schools of herring disappeared from waters of Hokkaido, both herrings and, especially, herring roe became luxury items. Since it is golden in color and made of numerous eggs, it is a symbol of prosperity and wealth and considered good luck food for new year.
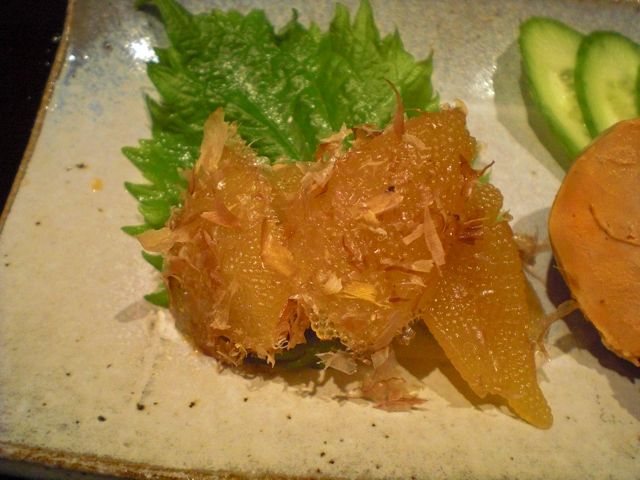
I served kazunoko as a part of a starter dish this evening. In the image below, the left is kazunoko, the center ankimo with grated daikon and ponzu soy sauce and the right is boiled octopus leg sliced with vinegared daikon and renkon garnished with salmon roe.

Since I did not post how I prepared kazunoko last year, I decided to post it this year.
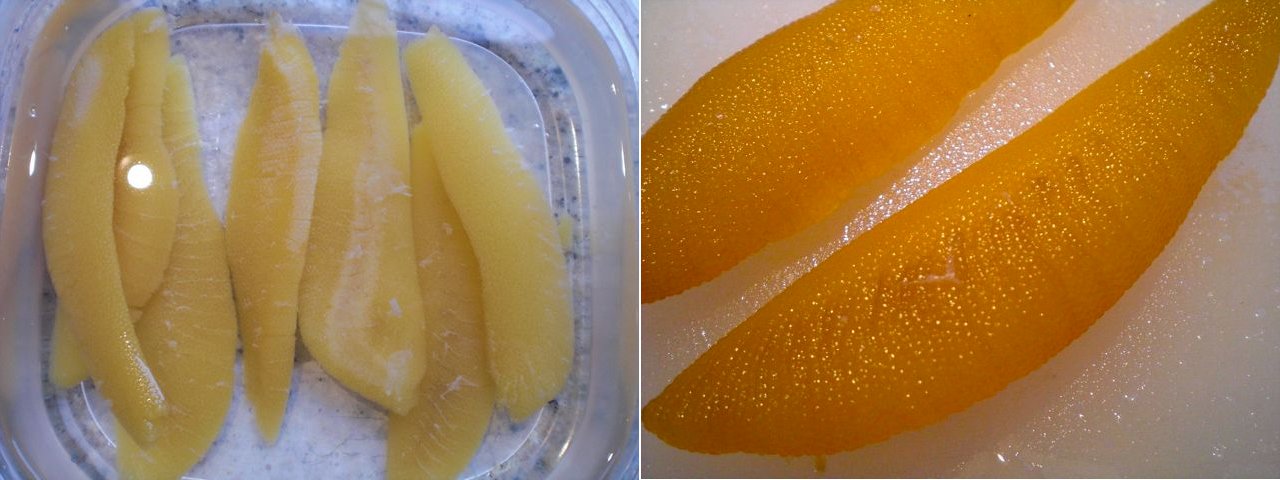
First, I have to remove the salt from the kazunoko (called "shionuki" 塩抜き) by soaking it in weak salted water (I taste the salted water; just a nice salty taste you can drink if you wanted to). Although you could start with water and then finish "shionuki" with salted water. I prefer to use salted water from the beginning and change it several times in 3-4 hour periods. The reason is that if you remove the salt completely, kazunoko will taste "bitter". So, you need to leave some saltiness behind. Using salted water prevents the complete removal of the salt even if you forget and soak it too long. While soaking, I removed the thin white membrane which covers the roe by rubbing the surface with my finger tips under water. After "shionuki" and removing the membrane, herring roe is ready as shown in the lower left image. I tasted a small piece from the edge to make sure it is not too salty. I sometimes thinly slice this and serve it like sashimi with wasabi and soy sauce but I usually marinate it.
For the marinade, I make dashi broth from a kelp and bonito dash pack. I season with light colored soy sauce (to preserve the golden color) and sake. The amount of sake (or mirin if you like it sweet) and soy sauce are up to your taste but I tend to make a strong dashi packed with "umami" and go light on soy sauce. I gently boiled the mixture for few minutes to make sure the alcohol has all evaporated and tastes amalgamated. I let it cool to the room temperature and then refrigerate. I marinated the prepared herring roe for, at least several hours or over night in the refrigerator (The right lower image shows the roe after marinading). You should eat this in few days.
Sunday, January 23, 2011
Sauteed "Ankimo" Monkfish liver with simmered Nagaimo 鮟肝と長芋
Last time we had a shipment of sashimi from Catalina, as usual, we also got frozen ankimo 鮟肝 or monkfish liver. I thawed it one weekend thinking we would eat it that evening. But we had impromptu dinner guests who, most likely, would not have appreciated ankimo and we did not serve it. So, the next day and the day after, we had to finish it before it went bad (eating that much ankimo was tough job but someone had to do it). Besides my usual ankimo with grated daikon and ponzu sauce or with orange marmalade sauce, I needed to come up with a new way to eat ankimo. I got an idea from the sauteed ankimo and simmered daikon dish that I saw on the web (It came from a beautifully done blog, I highly recommend the blog but it is in Japanese). I also remembered that I had said I would post a simmered nagaimo dish next after posting several ways to enjoy Japanese slimy potato "Nagaimo" 長芋 or "Yamaimo" 山芋. All this led me to come up with this dish.
Sauce: This is a variation of the orange marmalade sauce. I borrowed the broth from the nagaimo simmering liquid (2 tbs) and dissolved orange marmalade (2 tbs) in a small sauce pan on a very low flame. After the marmalade completely dissolved, I added soy sauce (2 tsp). The sauce is slightly thick because of the marmalade. I kept it warm.
Ankimo: I sliced the ankimo into disks about the same thickness as the nagaimo (1 inch thick which is thicker than I would have cut it for the other presentation). I dredged it in flour and sauteed it in a frying pan with butter (1/2 tbs) on a medium flame. I browned the surface (the butter browned as well but did not burn) for 1-2 minutes and flipped over and browned the other side as well.
Assembly: I reheated the nagaimo before sauteing the ankimo. After placing the sauteed ankimo on the top of the simmered nagaimo, I put the sauce on and garnished with thinly sliced scallion.
This is an extremely satisfying dish and perfect for cold sake but I think it will go very well with good sturdy reds such as Cabernet or Syrah or even crisp whites with some acidity such as Sauvignon blanc. Another good pairing will be dry or semi-dry sparkling wine. (In other words it will go with almost anything.)
Friday, January 21, 2011
Stuffing cake スタッフィングのケーキ
This is a mere leftover control dish but it tasted pretty good. We had leftover stuffing which my wife made for Christmas. I needed a shine dish to end a meal and this was a perfect solution.
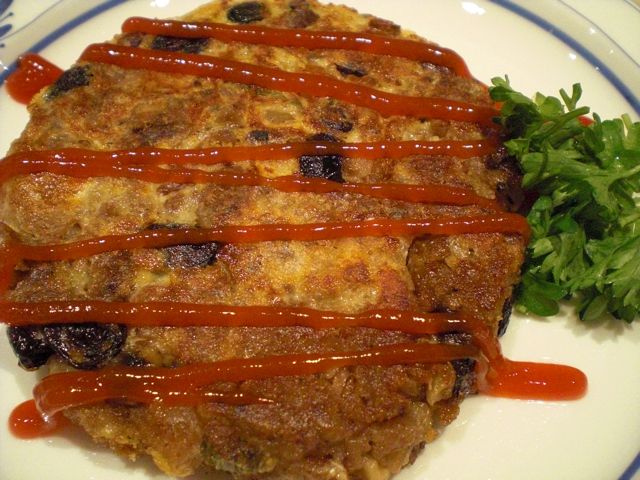
I added one beaten egg to whatever amount of the leftover stuffing we had. I melted butter and placed two ring molds in a frying pan on a medium-low flame. I made two thin disks (1/2 inch) of the stuffing by pressing it firmly into the ring molds using a silicon spatula. I fried one side for one to two minutes. I then removed the molds (the disks should hold shape) and flipped them over and cooked the other side for 1 more minute. I garnished it with good old fashioned American ketchup. This retained the stuffing taste but had a nice crunchy crust while still being moist on the inside. It is a quite nice "shime" 締め or ending dish.
Subscribe to:
Comments (Atom)

