Showing posts with label bread. Show all posts

Sunday, April 28, 2019

Easter breakfast 2019 イースター朝ごはん2019

This is a sort of regular menu for Easter breakfast. My wife baked hot cross buns for Easter this year as usual but without the representative icing cross. Instead, she put icing on the side so that we could "smear" it on the bun however and wherever we wanted.  In addition, she made a new cream cheese based icing. She also has a collection of "bunny" plates (bunny seen here peeking out from behind the food) that add to the occasion.


To complete the spring theme, I made creamy scrambled eggs which was supposedly made by Chef Patrick O'Connor of Inn at Little Washington when Queen Elizabeth visited some years ago. Since I did not have green aspraragus, I garnished with blanched sugar snaps and rapini.


The hot cross buns are made with a recipe from King Arthur flour.


Instead of confectionary sugar icing, she made cream cheese based icing with honey and cinnamon.  This was much better and much easier to handle.


Ingredients for the icing:
1 package of Philadelphia cream cheese
1 tsp cinnamon powder
3 tsp. honey
3 tbs. butter

Directions: Cream the butter in a mixer. Add the cream cheese and mix until it is fluffy. Add the honey and cinnamon until completely blended.

This is not as sweet as a sugar based icing and it comes out like a spread so it is easier to use on the muffin. The cream cheese gives it a slight tartness offset by the honey. The cinnamon goes so well with the spices used in the hot cross buns. This is certainly something worth getting up for in the morning.


Friday, March 8, 2019

Potato and salmon salad filled rolls ポテトとサーモンサラダ入りのパン

Since my wife had just made sweet potato bread stuffed with a mixture of Japanese sweet potato puree and ricotta cheese (which was excellent BTW) I mentioned in passing that stuffed breads (for example breads filled with curry sauce "kare-pan"カレーパン, sweet red beans "An-pan" あんぱん, custard cream "Kuri-mu-pan" クリームパン and so on) were very popular in Japan.  I even sent her the link to a recipe for potato salad filled rolls. The recipe was in Japanese but it included pictures and I verbally translated how the bread was made. To my surprise she took to the project of "stuffed bread" like a piranha.

I regularly make potato salad and salmon salad over the weekend because they are good staples to have; the potato salad as a side for any main dish or by itself as a snack. The salmon salad is great on crackers or bread as canapés or sandwiches.  I came home one day and the kitchen was filled with the nice smell of baking bread. My wife had noted that I made more potato salad than we could reasonably eat before it went bad so she put together potato salad stuffed bread as per the Japanese recipe. Then noting a similar surplus of salmon salad decided to "go for broke" and put together salmon salad stuffed bread. Based on my description of the Japanese recipe she took her favorite white bread dough as the base. The main element she learned from the recipe was to cut the top of the rolls to form a vent for the steam from the filling to escape. This would prevent the development of a large void in the bread covering the filling .

 In the picture below, the left front is the salmon salad filled and the right back is the potato salad filled rolls.


Here are the cut surfaces. The left two are the salmon salad and right two are potato salad. Probably, she could have put more fillings but this is her first try and never having made this kind of bread was not the least bit sure it would turn out.


The picture below shows the salmon and potato salad filled rolls just after they came out of the oven.


Both rolls were really great. It was amazing that the flavor of the salads remained fresh and permeated the bread. The salmon salad filled roll had the assertive salmon and dill flavor of the salad which we thought would be good for lunch or even breakfast. The potato salad filled one was a bit more subdued but this starch-on-starch approach really works. Now my wife has ideas about other fillings she could use. Did I mention that, in Japan, filled breads even made of "pasta" (such as spaghetti  or fried Japanese noodles) are very popular. The possibilities are limitless. I "tremble in fear" at the thought of what kind of filling my wife will come up next...but I will be first in line to try whatever she makes.

Tuesday, February 26, 2019

Quick cheese bread クイックチーズブレッド

My wife found this recipe in Cooks Illustrated "All Time Best Bread Recipes" and decide to make it one afternoon. I helped her by dicing and grading the cheeses. This is a quick bread but came out really nice with cheesy flavor. Deviating a bit from the original recipe, we used two kinds of cheeses; cheddar and smoked gouda.


This is just after the bread cooled down to room temperature. Some cheddar has melted but gouda remained. As usual, even distribution of the cheeses did not happen.


Ingredients:
3 oz Parmesan Cheese, shredded (1 cup) (We grated and used 1/2 cup)
1 1/2 cups (12 1/2 oz) AP flour
1 tbs baking powder
1 tsp salt
1/8 tsp cayenne pepper
1/8 tsp black pepper
4 oz extra-sharp cheddar cheese, cut into 1/2 inch cubes (1 cup) (we used 1/2 cup cheddar and 1/2 cup smoked Gouda)
1 cup whole milk
1/2 sour cream
3 tbs unsalted butter, melted and cooled
1 large egg, lightly beaten

Directions:
Heavily grease a loaf pan. Spread half the parmesan on the bottom of the pan. Mix the dry ingredients; flour, baking powder, salt, peppers together in a bowl. Mix the wet ingredients, milk, sour cream, melted butter, and egg together in another bowl. Mix the cheddar and gouda cheese into the dry ingredients and mix until they are coated with the flour. Add the wet ingredients to the dry ingredients. The batter will be very heavy (don't over mix). Put the batter into the loaf pan and cover with the remaining parmesan cheese. Cook in a 350 degree oven for 40 to 45 minutes or until it is golden brown and a skewer comes out clean (the skewer may have residue on it if it hit a pocket of cheese. In which case move to another central area and try again.)


Another variation would be to add bacon and caramelized onions omitting the butter. (How could that possibly taste bad?)

This bread was extremely good with a very cheesy flavor. The peppers added a nice little zing that kinda caught up with you after several bites. The cheddar melted entirely and disappeared into the bread. The smoked cheese did not melt completely (as is the case with smoked cheeses) leaving a pocket of concentrated smoked cheese flavor that was very nice. The parmesan cheese on the top did not form a crust and it mostly fell off when the bread came out of the pan. Next time it would probably be better to add the parmesan to the batter. This bread works well. I can already taste the bacon in the next loaf.

Thursday, February 7, 2019

Refrigerator Potato Bread/muffin 冷蔵庫ポテトパン/マフィン

This is the second potato bread we made. This time my wife did everything herself from the beginning to the end. So, her arm is definitely improving as well as she is determined to accomplish what she wants to do. This is called "refrigerator" bread since it rises over night in the refrigerator. The recipe also came from "Beard on Bread" cookbook. Again, it is a nice rustic bread with integrity and perfect for toasting with butter for breakfast.


Ingredients:
1 pkg. yeast
1/2 cup sugar (plus 1/2 tsp additional to proof the yeast)
1/2 cup warm water
1 cup warm milk
1 1/2 sticks ( 3/4 cup butter softened)
2 tsp. salt
2 eggs
1 cup mashed potatoes (make link to my potato recipe) run through a food mill to eliminate any        chunks that may remain after the potatoes have been mashed.
4 cups bread flour (with more as needed)

Directions:
Day1:
1. Proof the yeast in the warm water and 1/2 tsp. sugar.  Warm the milk with the butter in it. Dissolve the sugar in the milk mixture.
2. Using a mixing paddle on the stand mixer add the warm milk butter mixture, eggs and mashed potatoes blend thoroughly. Add the proofed yeast and salt. Mix completely.
3. Switch to a dough hook and add the flour one cup at a time until the dough clings to the hook and is smooth and springy to the touch. Knead on speed 2 for 7 to 10 minutes.
4. Form into a ball and put into a bowl with a small amount of vegetable oil turning the dough to cover with a coat of the oil. Cover tightly and place in the refrigerator overnight (or as the recipe says up to 16 to 18 hours).

Day2:
1. Next morning punch down the dough. (It will extremely cold and dense). Let rest for about 5 minutes (picture below).


2. Knead vigorously until it becomes soft and pliable (about 6 minutes).
3. Shape into 2 loaves of equal size and place into 2 heavily greased loaf pans. Cover and let rise until doubled in bulk  (the recipe says this could take up to 4 hours. This bread rose in 2 hours).  Make shallow slashes using a bread lame (see picture below).


4. Bake in a 375 degree oven for 40 to 45 minutes until browned and sounds hollow when tapped.
5. Remove from the pans immediately when they come out of the oven. (When I removed the loaves they seemed a bit soft on the underside so I put the loafs back in the oven outside the pans directly on the oven rack for about 5 minutes. This made the crust nice and crunchy).


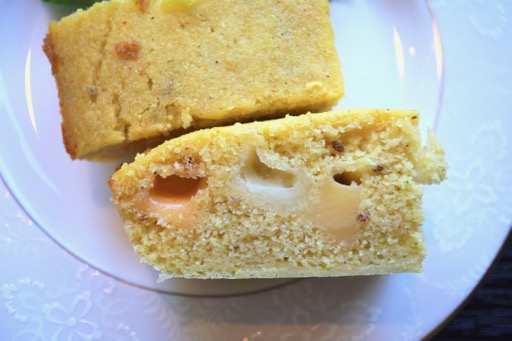
This bread has a very pleasing dense but fine texture. It has a slightly sweet taste and the taste of the cream cheese and chives used in the mashed potatoes came through adding a pleasant dimension.


We are glad that my wife is up to baking again. I am certainly benefitting from having good breads to enjoy.

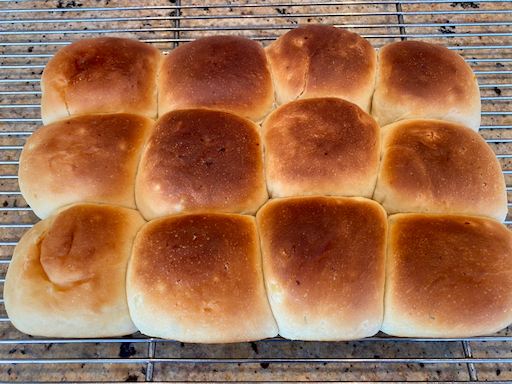
Addendum (1-22-22): This bread can also be made into muffins as shown in the next picture. These muffins were weighed at 76 grams and produced a total of 23 muffins. They were cooked in a 400 degree over for 20 to 25 minutes or until golden. When turned out of the pan the underside was very soft and white so I turned them upside down on a cookie sheet and cooked them for another 5 to ten minutes until they formed a light brown crust. 


Monday, February 4, 2019

Dill-weed bread ディル入りパン

I helped to make this bread with my wife since she is still having problems with her arm. This bread is very unusual in that it has only one rise. Nonetheless, the texture is very delicate almost cake like. The original recipe is for one loaf. So we doubled the recipe and made two loaves. This is also from "Beard on Bread" cookbook. The original recipe indicated a choice of using dill weeds or dill seeds. We used fresh dill weed in this bread.


Ingredients (2 loaves):
2 packages yeast
4 tsp sugar (1/2 tsp. additional to proof yeast)
1/2 cup warm water
16 oz. cottage cheese
2 eggs
4 tsp grated onion
4 tbs melted butter
2 tsp salt
1/2 tsp baking soda
2 cups whole wheat flour
3 cups All Purpose flour
4 Tsp fresh dill weed finely chopped

Directions:
1. Proof the yeast in the 1/2 cup warm water with 1/2 tsp sugar.
2. Using a mixing paddle on the stand mixer add the cottage cheese, eggs and blend thoroughly.
3. Add the grated onion, melted butter, dill weed, salt and baking soda. Mix completely.
4. Switch to a dough hook and add the flour one cup at a time until the dough clings to the hook and is smooth and springy to the touch. Knead on speed 2 for 7 to 10 minutes.
5. Heavily butter two loaf pans. Distribute the dough into the pans (it will be very sticky and difficult to divided up).
6. Cover and let rise until doubled in bulk.
7. Bake in a 375 degree oven for 35 to 40 minutes until it sound hollow when tapped.


The crust appears rather rustic but the bread has a very nice tender texture with a distinctive dill smell and flavor. (The crust came out "rustic" because the dough is very sticky and was a little difficult to get into the loaf pan.)


This is a great bread toasted with butter and perfect for breakfast. It is interesting that with only one rising, the texture of the bread is very fine and tender. It has nice dill tastes but onion flavor is very subtle.

Tuesday, January 29, 2019

Potato bread with caraway seeds ジャガイモ入りパン

I am stepping up to bake more than I used to; filling in the gaps left by my wife during recovery from her injury. This is one such baking projects. I did the "grunt" work under her supervision. Since we had leftover mashed potatoes from a barbecue (when we do a chicken or pork roast in our Weber grill, we often also roast potatoes) she wanted to use them to make this rustic bread (supposedly of Hungarian origin). This is also from the "Beard on Bread" cookbook. Since the original recipe asked for 8 cups of flour, we halved the recipe to make a smaller loaf as seen below. The recipe involves a starter (this starter only fermented for 30 minutes). It produced a very good rustic bread. Instead of just mashed potatoes, we used the mashed potatoes my wife makes with cream cheese (with onion and chive) which we had with the barbecued pork. We are not sure how much difference the cream cheese makes to the bread.


The black specks are caraway seeds. We are not sure if this is needed. The bread itself has nice flavors.


I slashed and sprayed with water to make "rustic" look and a good crust.


The "slashes" were supposedly to be "deep" so instead of a bread "lame", I used a kitchen knife which appeared not to cut as cleanly as it should have.


Ingredients
for starter:
1 package of dry yeast
1/2 cup of warm water with a pinch of sugar
3 tbs of flour

Additional 3/4 cup of warm water
1/2 cup  mashed potatoes (We used leftover mashed potatoes. My wife mixed in chive-and-onion cream cheese, 3/4 container for 2 large cooked russet potatoes).
3/4 tsp salt
1/4 tsp caraway seeds
2-3 cups of bread flour

Times 2 
for starter:
2 packages of dry yeast
1 cup of warm water with a pinch of sugar
6 tbs of flour

Additional 1 1/2 cup of warm water (or warm milk) 
1 cup  mashed potatoes (Or a mixture of mashed regular and sweet potatoes)
1 1/2 tsp salt
1/2 tsp caraway seeds
4  cups of bread flour

Directions
1. Dissolve the yeast in the warm water with the sugar and let it proof until bubbly.
2. In a bowl, mixed the the yeast mixture and flour. Cover with plastic wrap and then towels and let it stand for 30 minutes until the starter bubbles up (starter).
3. In a stand mixer, add the starter, water, mashed potatoes, salt and mix well using a paddle. Switch to the dough hook, add the flour one cup at a time at low speed until the dough forms and cleans the side of the bowl (in the end, we estimate we added about 2 and half cups of flour). Let the mixer knead the dough for 7 to 10 minutes.
4. Place the dough on the floured board and hand knead for a few minutes to make a tight ball.
5. In a large bowl, add a small amount of olive oil, place the dough, turn over to coat all sides and cover with a plastic wrap and then with towels and let it rise until the volume doubles (about 1 hour).
6. Punch it down and fold a few times to make a free formed round loaf.
7. Coat the wooden pizza paddle with corm meal and place the formed dough on it. Slide the dough back and forth to make sure the dough moves easily.
8. Cover the dough with a plastic wrap and then a towel and let it rise for 30-40 minutes.
9. Remove the towels and plastic wrap. Using a sharp knife, cut a deep cross on the surface of the dough.
10. Using a sprayer, spray water on the surface of the dough and slide it on the baking stone.
11. Bake at 400 F for 30-25 minutes (or until done depending on the size of the loaf).

This is a really good rustic bread. It has a nice firm consistency with crust and good flavor. We are not sure we really need Caraway seeds.


The bread is great toasted.We just ate as is with butter but this could make a good sandwich. It was a success with this modified recipe.

Friday, October 5, 2018

Honey corn muffin 蜂蜜とコーンフラワーのマフィン

This is my wife's baking. This is a corn muffin using finely milled corn flour and honey. She made in two different sizes.


To the left are larger ones and to the right are smaller ones.


Ingredients:

2 cups pastry flour
2 cups corn flour
6 Tbs. sugar
4 Tsp. baking powder
2 Tsp. salt
4 large eggs
1 1/2 cup buttermilk
2/3 cup vegetable oil
2/3 cup honey

Directions:
 Mix the dry ingredients in a bowl (four to salt). Mix together the wet ingredients (eggs to honey). Mix until blended. Scoop into greased muffin tins. Bake at 350 for 18 to 20 minutes until skewer comes out clean. Let cool for 5 to 10 minutes before attempting to take out of pan.

This is something between desert and breakfast. It has a nice delicate (not crumbly) texture with strong corn flavor but it is a bit sweet. Since my wife used buckwheat honey, the assertive taste of honey is apparent. We really like this muffin. We can choke it down either as a breakfast or desert.

Tuesday, October 2, 2018

Pistachio nut bread ピスタチオのパン

This is another of my wife's baking projects. This is unusual since half of the flour is actually ground pistachio nuts and Greek yogurt is used as a part of the wet ingredients. It has a very nice unique taste and we love it as a breakfast bread.


You can see small pistachio nuts on the cut surface of the bread.


When finished baking some fissures appeared on the surface but the texture was quite tender and delicate.


Ingredients:

1 cup sugar
4 tsp. orange zest
1 tsp. orange flavoring
1/2 cup orange juice
2 2/3 cup pistachios roasted
2 cups all purpose flour
4 tsp. baking powder
2 tsp. cardamon
1 tsp salt
8 eggs
1 cup greek yogurt (my wife strained the regular yogurt).
1/2 cup olive oil
4 tsp. vanilla

Directions:
Roast the pistachios. Don't skip this step the flavor and texture of roasted pistachios is different from un-roasted. Grease and flour 2 bread loaf pans. Cut some parchment paper to fit the bottom of the pans and grease it on both sides. (This will make it easier to get the bread out of the pan).

In a food processor combine the sugar and orange zest. Process until the sugar is damp and fragrant Put aside in a bowl (#1). Add the pistachios to the food processor and pulse until coarse. Add the flour, baking powder, cardamon and salt and process with the nuts until finely ground (#2). Whisk the eggs, yogurt, oil, orange juice, orange flavor and vanilla into the sugar mixture previously set aside. (#3).  Add the wet ingredients to the dry ingredients. Fold until blended. Put into the previously prepared bread pans (#4). Cook in a 325 degree oven for 50 to 55 minutes until a skewer comes out with moist crumbs. Cool in pan for about 15 minutes before removing. Let cool completely before cutting into pieces.


This bread has a nice orangey overtone from orange zests, juice bolstered by the flavoring. My wife reduced the cardamon so that this was not too overwhelming. The texture is extremely rich and moist. The flavor is very complex. The pistachio nuts added some nuttiness but we could not pinpoint that this is the taste of pistachios. Nonetheless, this is very flavorful bread with nice texture.

Thursday, September 6, 2018

Sally Lunn bread サリーラン ブレッド

This is again my wife's baking. This is a very usual and good bread called "Sally Lunn" bread. The original "Sally Lunn bun" was reportedly served in the spa town of "Bath" in England in the 18th century. In the U.S., the same name appears to be attached to breads that are dissimilar from the ones served originally in Bath. This recipe came from "Beard on Bread" and probably represents the latter category.  While the leavening agent is yeast it is a batter bread. This means that the texture of the dough is very unusual and not like regular yeast dough. It is wet, sticky and has to be "poured". My wife never made a bread like this before and wasn't quite sure how to handle it but in the end everything worked out just fine.  Lightly toasted and buttered, this is wonderful.


As you can see lots of holes which make this bread so light.


This is how it looks before toasting. Since it was baked in a tube pan, you have to cut it into wedges which is a bit awkward.


Ingredients:

1 package active yeast
1/4 tsp. sugar (to bloom the yeast)
1/2 cup warm water
1/2 cup lukewarm milk
1 stick butter melted in the milk
1 tsp salt
1/3 cup sugar
3 eggs
3 1/2 to 4 cups all purpose flour

Directions:

Bloom the yeast. Melt the butter in a sauce pan add the milk, sugar and salt. Stir until the sugar and salt melts. Let cool to lukewarm. Add the eggs and stir to combine. Add 3 cups of  flour to the bowl of a stand mixer with a paddle. Add the liquid ingredients to the dry ingredients and mix to incorporate. Slowly add more flour in small amounts at a time to make a "stiff but workable batter" (whatever that meant). (I ended up using a total of 3 1/2 cups flour until I declared the batter "workable".  It was very thick, wet, stretchy and somewhat stringy). According to the recipe: Pour it into a bowel. (Pouring was a bit of a euphemism. It was more like battling it into the bowl against its will.) Let rise until doubled.  Then, again according to directions, beat it down with a wooden spoon for about 1 minute. (Beating it down was the appropriate term here). Scrape it into a heavily buttered tube pan. (This took some doing, particularly to get it evenly distributed around the tube.) Cover and let rise until it reaches the top of the pan. (Initially I did not think that would be possible given the volume shown in the picture below, but to my surprise it not only reached the top but was trying to bust out of the cover by the time I captured it from going over the edge.)


Bake in a 375 degree oven for 45 to 50 minutes or until the bread is dark, golden on top and sounds hollow when rapped. (I thought this may have been a bit too high done next time I may try a shorter time). Turn out onto a rack to cool. (I was amazed at the final result shown below and even more amazed when we cut it into wedges and tasted it...what a beaut!)


Slice into wedges as shown below.


This was a remarkable bread making experience. This bread is very light and airy as you can see in the picture. I has a nice mild slightly sweet flavor. The crust is nice and crunchy especially when toasted. Who would have thought yeast bread could be made like this?

Friday, August 31, 2018

Cheese muffin チーズマフィン

This is another one of my wife's baking. The original recipe is from the "Beard on Bread" cookbook. This is a very cheesy muffin and we really like it.


Since this is very cheesy, it is best suited as a dinner roll rather than a breakfast roll. But it works for us either way.


Ingredients:
 1 package yeast
1/4 cup warm water + 1/2 tsp sugar to bloom the yeast
4-6 cups bread flour
1 Tbs. sugar
2 tsp. salt
1 1/2 cup water
1/4 cup (one half stick) butter softened
1/4 tsp. cayenne pepper (more or less depending on taste)
1/4 cup grated Parmesan cheese (or slightly more to taste)
3/4 cup shredded Gruyere cheese.

Directions:
Bloom the yeast in the 1/4 cup water and 1/2 tsp sugar. Add 4 cups of the bread flour (to start) to stand mixer with dough hook. Add the sugar, salt, 1 1/2 cup water. While mixing on speed 2 add the butter cut into smaller pieces, the pepper, the cheeses and amalgamate after each addition, . Keep adding flour until a soft smooth dough is formed around the hook. Then knead for 7 to 10 minutes.

Place the dough in a warm bowl and coat it with a small film of vegetable oil. Let rise until doubled. Punch down the dough.  If making loaves form dough into two loaves of equal weight and put into heavily greased loaf pans. Cover and let rise until dough is slightly higher than the edges of the loaf pan. Bake in 375 degree oven for 30 minutes or until golden brown and sound hollow when tapped.

 If making rolls use a heavily greased medium sized Pyrex baking pan. Make rolls weighing 2 1/2 oz. each. Bake at 400 for 18 to 20 minutes until golden brown and sound hollow when tapped. For both the loaves and rolls immediately remove from the pans and cool on a rack.

These rolls are full of savory flavor. First the cheesy, parmesan flavor steps forward followed by the pleasant zing of the cayenne pepper. They have a lovely tender texture.  This is a great accompaniment for brunch or lunch

Saturday, August 25, 2018

Corn bread with raw corn and sage セージ味コーンブレッド

This is another one of my wife's baking. The recipe is based on one from La Brea Bakery Cookbook. We had this cookbook for many years but we did not really made anything from it until now. This is an interesting corn bread which uses raw corn and also fresh sage (from our herb garden). My wife also used corn flour instead of cornmeal which made the texture of the bread much more tender.


I did not take a special serving picture and we couldn't restrain ourselves so we nibbled the nice crunchy top crust off one of the loaves right after the bread came out of the oven and before taking this picture which explains the missing crust portions in the picture below.


The interesting part of this recipe is that you cook graded raw corn, butter and sage (almost polenta) to make dough for this bread. We liked the first batch so much my wife made a second batch and we restrained ourselves from eating the crust so the picture below is intact.


The recipe called for putting sage leaves in the bottom of the bread pan. The notation suggested this was better than putting it on the top where it would burn while the bread cooked. The end result as shown below may add to the sage flavor but at the very least it is decorative.


Ingredients:

1 1/2 cup grated corn
1 stick butter
6 large sage leaves (or several sprigs of rosemary)
1 1/2 tsp salt
2 large eggs
1 cup buttermilk
3/4 cup corn flour (or corn meal)
2 cups All Purpose (AP) flour
1/2 tsp baking soda
2 tsp baking powder
1/4 cup sugar (or more for a slightly sweeter muffin)

Directions:
Grate the ears of corn on a stand grater. Scrape the ears with the back of the knife to get the remaining "corn milk" (#1).  Melt the butter in a saucepan (do not allow it to boil or brown). Mix in the grated corn, salt, and sage leaves. Cook until creamy and thickened, making a kind of polenta (shown below). Remove the sage leaves. To achieve a really smooth emersion blend it further in a “motor boat” blender. Allow the mixture to cool. Add the buttermilk and eggs and mix until blended.


In a large bowl sift together the corn flour (#2)(or corn meal), AP flour, baking soda, baking powder, and sugar (#3). Add the liquid ingredients (#4) and stir until blended. Add to greased loaf pan. (either small individual sized loaf pans or one large pan) (#5 & #6). As suggested by the original recipe, I put a sage leaf on the bottom the the loaf pan (#7) and poured the batter on top (#8). (I'm not sure if this added to the sage flavor or was just for decoration.) Cook in 400 degree oven for 18 to 20 minutes for muffins, 20 to 25 minutes for small loaves and 30 to 40 minutes for large loaf or until a skewer comes out clean and the loaves are nicely browned.


This bread is lovely. As it cooked the smell of corn, butter and sage filled the house. It's flavor reflects these smells and is a very pleasant combination of corn and sage flavor. The texture is very tender. It is wonderful lightly toasted with melted butter.

Wednesday, August 1, 2018

Indian-style pork "Vindaloo" curry with pickles インド風ポークカレー

I asked my wife to make this curry from leftover barbecued pork butt since it was getting to the end of it's life. This is my wife's version of pork "Vindaloo" which we posted few years ago. Instead of using uncooked pork, she used barbecued pork cut into cubes this time. Since I used dry rub (roasted cumin, smoked paprika, salt and pepper) for the barbecue, these spices were automatically added to the curry.


She added roasted mustard seeds, you can see the seeds in the curry which gave small pops and bursts of mustard  flavor. Instead of coconut milk, she used yogurt (since we do not particularly fond of the taste and flavor of coconut milk), it broke a bit but still tasted good. Despite the addition of yogurt and reduce cayenne pepper to 1/4 of the lower end of the amount suggested in the original recipe (about 1/4 tsp), this curry was hot enough for us. Despite using cooked pork, it was tender and quite enjoyable. This is another way for taking care of leftovers.


Since I had a fresh green and yellow zucchini (really yellow zucchini not yellow squash), I added panfried coins of zucchini seasoned with salt and pepper, grilled fig with balsamic vinegar. In addition, I added pickled cucumber and carrot I made.


I just used the sweet vinegar I used to make pickled myouga since we used up the pickled myouga from this container. I placed cucumber (American minicucu), carrot and skinned Campari tomato into the leftover sweet vinegar. I let it pickel for several days in the refrigerator.


We decide to have a store bought mini baguette (which was partially baked and frozen). I  finished baking in 350F toaster oven in convection mode for 15 minutes. This went well with the curry. Next time, we will make naan, though.

Saturday, July 14, 2018

Bolivian spicy cheese cornbread ボリビアのスパイシーなチーズコーンブレッド

It would appear that my wife is "binge baking"...something I fully endorse. This recipe comes from "Milk Street". She decided to make it because we had several ears of fresh corn left over after making corn souffle and she thought this would be an interesting way to use them. We've never seen a corn bread recipe that used raw fresh corn this way.


On the cut surface, you can see the melted cheeses. You can also see the hole that is left when the cheese melts into the bread. The original recipe calls for Monterrey Jack. Maybe we will use that next time.


Ingredients:
2 1/2 cups cornmeal
1/3 cup white sugar
1 Tbs. aniseed
2 1/2 Tsp kosher salt
2 Tsp. baking powder
1/4 tsp. cayenne pepper (or more if a hotter bread is preferred)
3 cups corn kernels
1 jalapeno pepper diced
1 1/2 cups whole milk
4 large eggs
1 1/2 sticks salted butter melted and slightly cooled
8 Oz. pepper jack cheese cut into 1/2 inch chunks (we used double Gloucester, smoked Gouda and Gruyere)

Directions:
Grease a 9 x 13 baking dish. (I greased the dish then added parchment paper cut to size and greased it as well. I have found this is a sure proof way to keep the bread from sticking.)

Put the cornmeal, sugar, aniseed, salt, baking powder, and cayenne pepper in a mixing bowl and stir to combine. Combine the corn, jalapeno and milk in a food processor. Process until very smooth. Add the eggs and butter and process until smooth again. Pour the corn mixture into the flour mixture and mix until smooth. Add half the batter into the prepared baking dish. Dot the surface with the cheese squares (#1) then cover them with the rest of the batter.


Cook in a 375 degree oven for 30 to 35 minutes until a toothpick inserted at the center of the bread comes out clean (#2). Let the bread rest for 20 minutes before serving.


This is  a pleasantly spicy bread with a rich moist texture. The cheese chunks add a nice burst of cheese flavor. (We suggest using cheeses that hold their form when heated like the smoked Gouda. We found the melting cheeses such as Gruyere melted into the bread leaving a small hole behind.)