Showing posts sorted by relevance for query shiitake. Sort by date Show all posts

Friday, April 8, 2022

Salmon cake with rapini サーモンケーキ

 After we switched to grocery home delivery, we realized some of the items were different from the ones available at a physical store. One of them is a whole half filet of salmon with skin on (around 2.5 lbs.) which appears to be only available for home delivery. The price per pound is more reasonable compared to smaller filets available in the store. We like every part of the salmon even the skin particularly when cooked to crispiness.  Interestingly the salmon is not scaled when it arrives. So one of the first things I have to do is to scale it using a handy-dandy Japanese fish scaler. (I guess the grocery store reasons that most customers don’t like the skin. They just remove it and throw it away so why take the time to scale it.)  Another part of this type of fillet that we particularly like is the belly portion which we eat as a small hors d’oeuvre . We also like the main portion of the fillet dried in the fridge for a few days before panfrying it .  (Drying the salmon in the fridge was a technique my mother introduced to us. On one of our visits to Japan my mother offered to cook some salmon she dried with the enticing phrase “Totemo oishi WA” delivered with an emphatic nod of her head. Even my wife knew this meant, “it’s really good” and it was.) Drying the fish obviously removes some of the moisture and in so doing improves the flavor. 

I usually end up with several portions of salmon in irregular shape from both the belly and tail end of the fillet. I remove the skin and and make salmon cakes with these portions. I usually make 4 cakes which are perfect for lunch or snack. This time, I served this as a small dish to go with red wine. I heated up the cakes in a frying pan, added blanched and chopped rapini and made sauce with brown butter and lemon juice. To make it more interesting, I added yuzu-kosho 柚子胡椒 which went remarkably well with this dish.


I followed this with fried shrimp heads  reheated in the toaster oven (this was a part of take out sashimi/sushi combination from Tako Grill the night before)  and the usual simmered root vegetables I make (lotus root, burdock root, carrot, bamboo shoot, and shiitake mushroom (dried). The greens are blanched sugar snap in salt broth.


Salmon cakes

Ingredients: (make 4 small salmon cakes)
150 gram salmon meat, half finely chopped (to hold the cakes together) and another half coarsely chopped (to add texture), amount is variable, whatever I have when preparing the whole half filet of the salmon.
1 small shallot (or onion) finely chopped (#1)
1 jalapeño pepper, seeded and deveined, chopped finely (#1, optional)
2 fresh shiitake mushrooms, stems removed and caps finely chopped (optional, this time I did not have fresh shiitake)
2-3 tbs of panko Japanese bread crumbs (#4, adjust the amount based on the consistency of the mixture)
1 tbs mayonnaise (#2)
1 1/2 tsp Dijon mustard (#2)
Lemon juice from half a lemon
1 tbs chopped fresh dill (#2), I use the dill I cleaned and froze)
Olive oil for frying the vegetables and the salmon cakes


Directions:
Sauté the onion, pepper and shiitake mushroom in olive oil, season with salt and pepper, let it cool down before mixing with other ingredients.
Mix the remaining ingredients except for the panko (#3), add panko to adjust the consistency of the cakes (#4).
Make round disks (#5) and cook with olive oil in a frying pan, several minutes on each sides until brown and cooked through (#6).

This is a good dish to have. The leftover cakes can be warmed up in a frying pan or in a toaster oven. You could make some kind of sauce as I did here or just a squeeze of lemon juice. They go great with red wine.

Saturday, December 23, 2023

Arancini and Mini-Scotch Egg アランチーニとミニスコッチエッグ

My wife ordered some small appetizers from Harry and David. We were already going to order dried fruit medley from them to make fruit cakes and bread. So she added an assortment of small frozen appetizers to the order which included “arancini” among the other items. I told her that arancini is typically made from left-over risotto and I could make it very easily as long as we had left-over risotto. We tried the arancini we had ordered. During the heating, the cheese came out and it was ok but not great. Since we had made shiitake risotto a few days earlier, my wife took me up on my boast about how easily I could make arancini as long as we had left-over risotto and challenged me to make some. So with my feet accordingly held to the fire by this challenge I made arancini from the risotto. Since I would need hot oil for frying to make the arancini, I decided to also make mini-Scotch eggs from quail eggs and ground chicken. The picture below is not a great presentation—the arancini with the melted mozzarella in the center is shown on the left and the scotch egg with the quail egg in the center is shown on the right. We ate this immediately hot out of the oil with some Tonkatus sauce. Both the arancini and Scotch eggs had fresh shiitake in them and both were great.  The arancini had the melted mozzarella cheese in the center, a crunchy outer shell and soft risotto with a strong shiitake flavor.


For arancini

Ingredients: (made 8 arancini as seen below, the round ones are arancini and oval ones are mini-Scotch eggs)
Shiitake risotto (left-over) about 2 cups
Mozzarella cheese, 10 small cubes, low-moisture
Flour, egg, and Panko bread crumbs for breading
Oil for deep frying (I used peanut oil)

Directions:
Moisten your hands and make a ball about 1 and half inches in diameter and insert the cheese and encase it completely. If needed lightly squeeze to make sure the cheese is completely encased.
Bread the balls as usual; first coat with flour, then egg water and then with Panko bread crumbs (see picture below).


Deep fry in 180C (350F) oil for 2-3 minutes or until the surface is golden (everything is already cooked inside). See below picture.


The arancini I made were great straight out of the hot oil but they also warmed up nicely in the toaster oven. I would say the ones I made were much better than the store-bought and accordingly my wife has conceded that I met her challenge and has now commissioned me to make arancini whenever we have left over risotto.

Sunday, December 26, 2021

“Shoga-yaki” ginger pork bowl “tei-shoku” lunch 豚の生姜焼き丼定食

A few weeks ago, my wife suggested that it has been quite a while since we had sukiyaki すき焼き and it would be nice to have some. I agreed, but when I went to the Japanese grocery store, I forgot to get the frozen "Sukiyaki meat" すき焼肉. So, the next time I went I was proud of myself for not forgetting the meat. But apparently I picked up the wrong thing. My first clue was when my wife said, “I didn’t know sukiyaki is made with pork, I thought it was beef.” Instead of sukiyaki beef, in my haste I had picked up thinly sliced pork for "shouga-yaki" 生姜焼き. Since this package was next to the "shabu-shabu" シャブシャブ beef, I assumed it was also beef but for sukiyaki. In my enthusiasm I bought not one but two packages of the stuff. All was not lost, however, as I may have mentioned before, in Hokkaido 北海道, where I am originally from, many families use pork instead of beef for sukiyaki as was the case in my family. So, we went ahead and used one of the packs of pork to make sukiyaki. It was not good. The pork was too lean and too thickly cut. It got hard when cooked as sukiyaki. (So note to self: next time when at the Japanese grocery store get appropriate sukiyaki beef). Meanwhile, since I had bought two packages of this pork, I had one package left and it was clear that it would not be used for sukiyaki. So, one weekend I decided to use the pork as originally intended and made “shoga-yaki” ginger pork. Pork shoga-yaki 豚の生姜焼き is a very popular dish in Japan. When I was a college student, coffee shops near the university served lunch in addition to tea and coffee. In addition to  “Western-style” lunches such as sandwiches or spaghetti, most of the coffee shops also served Japanese-style  bento 弁当 or teishoku 定食* and shoga-yaki was among the popular ones. I am sure this has not been changed even now.

*Digression alert: I am sure it is no need to explain “bento” but here it goes anyway. When “bento” is served in restaurant/coffee shop, it is usually a lidded rectangular box which contains the entire meal but unlike pre-packaged bento, the rice and dishes are warm or just made. "Teishuku" (please follow the link for illustrated guide) is the Japanese concept of a "complete" meal or "meal set" which includes a bowl of  rice, soup, tsukemono 漬け物 (pickled or more likely salted vegetables), main dish (protein) and small "kobachi" 小鉢 side dish or bowl. In many "Taishu-shokudo" 大衆食堂 or "public" eateries which serve those who want drinks with food and those who want a complete meal, many different teishoku are available (the main protein dish varies and can be grilled fish, sashimi, or meat etc) but the remaining items, or “sides” such as soup, tuskemono, are usually the same for each available teishoku. The main and side dishes can be had as a single dish without other items (this is great especially if you are just drinking). It could also be "teishoku" for the price of a few more yen. 

So, this is  my rendition of "shoga-yaki" donburi teishoku 生姜焼き丼定食. In this case, the main protein and rice were combined as a donburi.


The main dish shown in the next picture is a bed of rice to which I added pork shouga-yaki with onion, seasoned shiitake mushroom (this was from dried shiitake and seasoned in "ama-kara" 甘辛 or sweet and salty with mirin and soy sauce) and blanched broccoli.


Miso soup is wakame ワカメ sea weed, "abura-age" 油揚げ fried tofu, silken tofu 絹ごし豆腐 and chopped scallion ネギ.


The "Kobachi" side dish was simmered root vegetable including "renkon" lotus root, "gobo" burdock root, "takenoko" bamboo shoot, shiitake mushroom, and "konnyaku" devil's tongue and blanched sugar snap in salt broth.


The tsukemono is cucumber, daikon, nappa cabbage, jalapeño pepper, and ginger (I salted this a bit stronger than I usually do; with salt 3% of the weight of the veggies instead of usual 2% and also added a dash of Vodka which makes it last much longer without changing the taste. (With this preparation it can easily last for at least one week in the refrigerator).


How to make pork shouga-yaki ginger pork (Although I posted "shouga-yaki" over 11 years ago, this time,  I am using a more appropriate, albeit not perfect, cut of meat). I am sure that there are so many variations and preferences and, of course, you could use other meat such as beef but this is what I made.

The essence of this dish is thinly sliced meat sautéed and seasoned sweet soy sauce flavored with ginger. Using lean meat can make tough shouga-yaki and using fatty cuts such as thinly sliced pork belly will prevent that but the traditional cut to be used is "pork roast" meat 豚のロース cut thinly (thin enough but not paper thin).

Ingredients:
Thinly sliced pork, 4-5 slices for one meal size serving (in Japan, specially packaged "shouga-yaki" pork is available widely. The one I got here is a bit too lean, the perfect cut has more fat. I used the entire package which is about 20 slices).
2-3 tsp neutral oil
Onion slices, optional

For marinade:
Mirin, soy sauce, and sake (1:1:1) ratio, enough to marinate the meat plus more to add while cooking.
Grated ginger (amount arbitrary, totally depends on your taste, I used whole grated ginger but you can use just the juice from grated ginger).
Dash of dark sesame oil
(optionally, grated onion).

Directions:
Marinate the meat. The amount of the marinade is enough to cover all meat slices and a bit more (additional 1/4 cup). I marinaded for 1 hour in the refrigerator.
I drained the marinade (the excess marinade reserved) and spread the meat slices on a paper towel to remove excess marinade.
In the non-stick frying pan, add 2 tsp neutral oil on medium flame. 
Add onion slices and cook until soft and somewhat transparent, set aside
Cook the meat slices, spread out without over lapping, in batches. One side 30 seconds and the other side 15 seconds. Do not overcook (the meat will finish cooking when cooked with the marinade later).
Set aside the cooked meat slices.
When all the slices are cooked, add the marinade to the pan (if not enough add more sake, mirin and soy sauce).
Add back the cooked meat with the accumulated juice and the onion .
Quickly cook and coat each slice with the marinade. Take it out and set aside.
Since I was planning to make a doumburi, I added a small amount of water at the end and heated the marinade to make sauce.

Assembly:
Top the rice with the shouga-yaki pork slices (I used 3 slices per bowl).
Pour in the sauce from the frying pan (just slightly moisten and season the rice).
Add any other garnish or topping (such as ginger julienne in vinegar or "benishouga" 紅生姜). I added seasoned shiitake mushrooms and blanched broccoli.

Compared to the sukiyaki we made with this pork, the shouga-yaki came out much better. The meat was tender and well seasoned. Perfect lunch for the weekend.

Monday, November 30, 2015

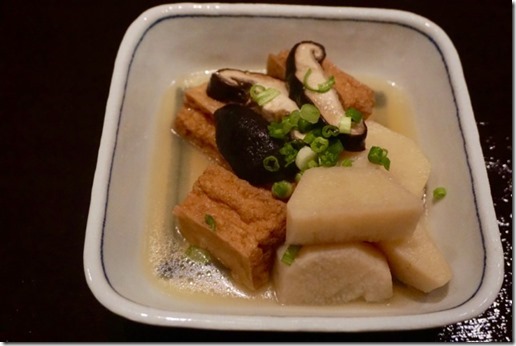
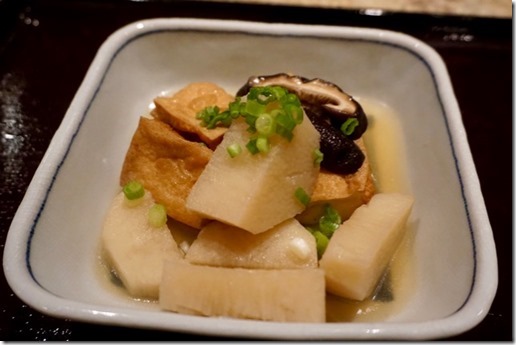
Simmered Nagaimo and Fried tofu 厚揚げと長芋の煮付け

I bought atsu-age 厚揚げ at our Japanese grocery store one weekend thinking I would either add it to oden おでん or just grill it in the toaster oven but neither happened.  I realized "the best tasted before date" was a few day AGO. So, instead of grilling, I switched to “emergency mode” and quickly made this dish which is like oden but has only a few items.


Again, I made this with what I had on hand.  I had half a nagaimo 長芋 in the refrigerator left over from when I made yamakake  山かけ more than a week ago. I also had some nice thick shiitake mushrooms which I also bought at the Japanese grocery store sometime ago that needed to be used.


So this is the dish I came up with.

Broth: I made broth from dashi pack (dried bonito and kelp), added sake, mirin, light colored soy sauce. I supplemented the soy sauce with salt added in increments as I tasted. I used the salt because I did not want the nagaimo to become too dark as it would have if I used all soy sauce but I also wanted properly seasoned simmering broth. (I ended up using about 1/2 tsp of Kosher salt).

Atsu-age: I placed them in a colander and poured hot water over them (from the instant hot water dispenser which is connected to Culligan reverse-ososis filtering system) to remove excess oil. I then cut them in half.

Nagaimo: I peeled and cut into 1 inch-thick rounds and then halved them. I immediately soaked in water with a splash of rice vinegar.

Shiitake mushrooms: I removed the stems and cut into half inch slices (this was rather large and thick shiitake, possibly from Japan).

I placed the nama-age, nagaimo and shiitke in the broth and gently simmered it for 40-50 minutes. I served it in a bowl with a bit of the simmering broth and garnished it with chopped scallion.

This was a good combination. When cooked, the nagaimo looses it's sliminess and has a nice crunchy texture. This was perfect for cold sake.

Friday, April 27, 2018

Pork chops Japanese style ポークチョップ

Pork chops are a rather popular cut in the US. Most popular are loin chops with rib attached (rib chops). One weekend, I bought a rather large pork loin without bones. Since it was large, I decided to cut off 4 loin chops before I trussed and seasoned the remaining loin for our usual  hot smoked pork on our Weber grill.  I wondered how I should cook the chops and decide to use a Japanese recipe. I grew up with simply sautéed pork chops in Japan but I wanted to do something a bit different. After reading through a few recipes, I made modified Japanese pork chops. I served them with sautéed pencil green asparagus and  corn shuffle my wife made unmolded and cut in half.


The sauce also included onion and shiitake mushroom.


I probably over cooked it and it came out a bit dry but the sauce helped.


Ingredients: (for 4 servings).
Four Pork loin chops (or rib chops).
Salt and pepper for seasoning
Flour for dredging
Olive oil

For sauce
One medium onion, halved and sliced
4 tbs ketchup
4 tbs worchestershire sauce
1/3 cup dry red wine
3 fresh shiitake mushroom, stem removed and sliced
2 tbs butter (or olive oil).

Directions:
Season both sides of the chops with salt and pepper, dredge them in flour.
Cook in a small amount of butter or olive oil until nicely browned (see below), turn them over and repeat.
Set the chops aside on a plate
Add the onion in the same pan and sauté until cooked and add the shiitake mushroom and continue cooking for several more minutes,
Put the vegetables in on the side of the pan, add the ketchup and cook it while stirring until the ketchup becomes caramelized and dark.
Add the red wine and Worcestershire sauce and mix and cook for a few minutes until the sauce lightly thickens.


Put back the chops and coat them with sauce (see below) to complete cooking the chops.


Serve hot with the sauce on the top. In Japan, the chops are served precut into bite sized pieces for ease of eating with chopsticks. This was not bad but the chops were a bit on the dry side.

Saturday, October 18, 2014

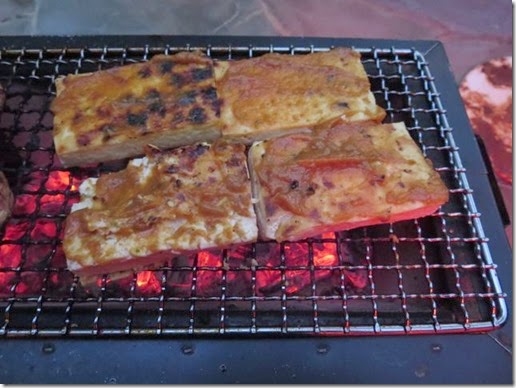
Grilled Tofu, shiitake mushroom, and rice balls 焼おにぎり、焼しいたけ、焼き豆腐

This is continuation of our ad hoc grilling one fine fall day. These are the ending dishes. After enjoying grilled squid and capelin with roe, we grilled tofu with miso sauce, large thick and meaty fresh shiitake mushrooms with soy sauce and mirin and our usual grilled rice balls.  I prepared the tofu by wrapping it in paper towels, sandwiched it between two plates with a weight on top. I left it in the refrigerator for several hours to remove extra moisture. I probably should have brushed the tofu with oil since it tended to stick to the grill.

After the surface of the tofu developed a nice char mark, I flipped it over and smeared on the miso sauce (mixture of miso, mirin, and sugar  with micro grated zest of lime). After the other side was grilled, I briefly (30 seconds) grilled the side with the miso sauce  and served.

I put the mushrooms gill side down on the grill. After several minutes, I turned them over and added soy sauce and the mirin mixture on the grilled side of the mushroom. Then I added finely chopped scallion. The mushrooms absorbed the sauce adding to the flavor. While we enjoyed the grilled tofu and shiitake mushrooms, as you can see, the rice balls were getting cooked.I grilled the rice balls with all sides and they developed a lovely crunchy crust. I finished it with the miso sauce.

We really enjoyed grilling outside and when we finished, it was completely dark and we were basking in a warm red light of our infrared heater. This was definitely a bonus grilling day which we enjoyed.

Sunday, December 17, 2023

Burdock Root and Mushrooms 牛蒡とキノコの煮物

This is another dish I made to use up the mushrooms (Shimeji and shiitake しめじ、椎茸). I also had “gobou” 牛蒡  burdock root. I got the idea of cooking burdock root and mushroom together from a recipe I saw on line but I just made it in my own way. Burdock root can be very fibrous but this was a good one and the the combination of simmered burdock root and mushrooms worked very well. The shimeji was good but the shiitake caps worked well imparting very meaty texture and nice flavor.


The gobou gave a very distinctive flavor and nice crunchy texture but not fibrous. I seasoned it on the light and slightly sweeter side (than I usually do) and is a perfect drinking snack. As a side dish for rice, I would season it more strongly.


Ingredients: (The amount is arbitrary, I just used up all the mushrooms I had left)
10 inch long, medium-sized (diameter wise) “gobou” burdock root, skin scraped off using the back. of the knife, slice on angle 1/4 inch thick and immediately soak in acidulated water for 5- 10 minutes.
I package (100 gram) of shimeji mushrooms
4 caps of fresh shiitake mushrooms, quartered
300-400 ml Japanese dashi broth
2 Tbs. mirin
3 tbs x4 concentrated Japanese noodle sauce (or soy sauce with 1 tbs mirin)

Directions:
Drain the gobou and cook in a fresh water for 10 minutes and drain again
In a pan on medium low flame, add the broth, seasonings, the gobou, mushrooms and with a silicon otoshibuta, simmer for 20-30 minutes
Let it cool to the room temperature in the simmering broth
Serve at room temperature or warmed in a microwave oven especially after the refrigeration.

This is quite a robust dish. The mushrooms give it an almost meaty context. Especially the shitake mushroom which were very thick but tender and well seasoned. They tasted like a tender piece of meat. The burdock root was very tender and its distinctive flavor really came through. This is perfect for a cold evening with a warm cup sake.

Monday, January 25, 2010

Simmered "kiriboshi" daikon 切り干し大根の煮物

"Kiriboshi" daikon is an old fashioned preserved vegetable in which daikon is cut into thin, long strands and dried. I bought a package some time ago in the Japanese grocery store. Obviously I had forgotten about it but found it while I was going through my Japanese food items in the pantry. I decided to make some dishes using this. It is rather odd looking and it doesn't smell particularly pleasant (all cruciferous vegetables appear to have similar smell but drying makes it stronger). The drying, however, does add more sweetness. To use this, wash briefly in cold running water and rehydrate in enough water for 20-30 minutes.

Simmered "kiriboshi" daicon 切り干し大根の煮物

This is a very typical way of using "kiriboshi" daikon. After re-hydration, I squeeze water from it and set aside. I thinly slice carrot and julienne. I also julienne abura-age 油揚げ or deep dried tofu pouch. The amounts are totally arbitrary. You could also add shiitake mushroom (dried and re-hydrated shiitake is the best for this but I did not have enough time to re-hydrate dried shiitake this time). In a pan, I add a small amount of vegetable oil and a dash of dark roasted sesame oil and add few flakes of dried red pepper. I then sauté daikon and carrot. When the oil has coated the each vegetable pieces, add abura-age and enough "dashi" stock to cover (In my case,  I used about 200ml). I place an "otoshi buta" and simmer for 10-15 minutes. "Otoshi buta" 落とし蓋 or "drop lid" is frequently called for in Japanese simmered "nimono" 煮物 recipes. It is a lid (often wood) that is smaller in diameter than that of the pan used. This way, the ingredients will cook evenly while allowing evaporation of the simmering broth. Instead, you could use a kitchen parchment paper cut slightly smaller than the opening of the pan (called "kami buta" or paper lid). You do not need a special wooden lid (I have one but it was too big for this pan). A plate or a regular metal lid smaller in diameter than the pan's opening will do as shown here.


After coming to a boil, simmer for 10-15 minutes. For seasoning, I add 3 tbs of mirin and 2-3 tbs of soy sauce (for 200ml of dashi). I add soy sauce in two increments, tasting each time, to adjust the seasoning. Addition of soy sauce just before completing cooking gives fresh soy sauce flavor as well. If you are having this dish with sake, I use less soy sauce and for rice condiments, I use more soy sauce. Simmer for another 10-15 minutes and cut the flame and let it cool in the broth. I garnished with snow peas blanched, shocked in cold water and then julienned.

"Kiriboshi" daikon and celery in vinegar dressing 切り干し大根のハリハリ

This is another classic way of using this ingredients. "Harihari" is a Japanese word to indicate "crunchy".  Beside dried daikon, this dish usually calls for julienned cucumber. While I was making this, all the mini-cucumbers I had (although I bought them just few days ago) had brownish discoloration around the seeds and did not taste right (This appears not to be the usual brand I get. It said "seed-less" but it definitely had seeds). So after cutting all 5 cucumbers, I had to discard all of them.  Without cucumbers, I rummaged in the refrigerator and found celery. 

After re-hydration, I squeezed out the excess water and put the "kiriboshi daikon" in the bowl. I sliced a celery stalk diagonally and thinly. I mixed a small amount of Chinese red pepper paste "Toubanjan" 豆板醤 (1/5 tsp), sushi vinegar (3 parts)  and mirin (1 part) and dressed.

The kiribishi daikon definitely has a crunch as name "harihari" indicates. It is a very simple (especially if you have a cucumber) and refreshing dish. Even with substituting with celery, it was not so bad.

Thursday, April 21, 2016

Seasoned rice and sake lees marinated cucumber 炊き込みご飯,胡瓜の粕漬け

One evening, I made a short Japanese course dinner for a visiting friend. Among the dishes we served, I made a type of seasoned rice which I served with grilled salmon. I posted a similar dish previously (scattered sushi cooked in Donabe). In this version, the ingredients that went into the rice was not pre-cooked. The next day, we had the rice that was left over from the dinner for lunch. I served it with my sake lees cured cucumber and garlic chives, tofu and egg clear soup.


For this seasoned rice or "Takikomi gohan" 炊き込みご飯, I used burdock root ごぼう, carrot 人参,  shiitake mushroom 椎茸and hijiki seaweed ひじき. I could have added more items such as abura-age 油揚げ and proteins such as chicken but I restrained myself.


When I made sake lees marinade, I mostly marinated fish but I also tried cucumber called cucumber kasu-zuke 胡瓜の粕漬け . This is my truncated version.


Since we have new tender garlic chives coming up in our herb garden, I made this classic clear soup with garlic chives, silken tofu and egg.


1. Seasoned rice (Takikomi-gohan) 4-6 servings:

Ingredients:
Rice, 2 cups (by the small 180ml cup came with the rice cooker), washed, and drained.
Shiitake mushroom, dry, 4, hydrated by soaking in warm water for 2-3 hours,  moisture squeezed out and sliced into small strips. I reserved the soaking liquid.
Burdock root, 1/3, skin scraped off with the back of the knife, thinly sliced on the bias, cut into fine strips, immediately soaked in acidulated water (I used a splash of rice vinegar) for 10-15 minutes, washed and drained.
Carrot: 1 medium, peeled, sliced on the bias and then cut into thin strips.
Hijiki: I soaked dry hijiki in plenty of water. Washed them and changed the water a few time until they were hydrated (20-30 minutes). I drained and washed and set aside.

I placed washed and drained rice in the rice cooker and added the shiitake soaking liquid (through a fine meshed strainer). I added mirin (1tbs), sake (1tbs) and light colored soy sauce (1 tbs). I could have added salt but I did not since I could always add more salt after it was cooked. I added water to make the specified amount required (in this case, the water level mark "2"). I then added the vegetables into the rice. I turned on the rice cooker.

After the rice was cooked, I let it steep for 10-15 minutes. Using a rice paddle, I mixed the cooked rice and served. 

2. Cucumber kasu-zuke:

The formal way of making this dish, requires making salted cucumber or "shiozuke". I took a short cut. I coated the surface of the cucumber with Kosher salt and placed them in a Ziploc bag and let it sit in the refrigerator for several days.

Ingredients:
Cucumbers, I used American mini-cucumber but Japanese cucumber would be the best, washed, I used the short cut method described above and let it stand in the refrigerator for several days.  The cucumbers look shriveled and the bag had a quite a good amount of exuded water. 
Kasu-doko,   This is the same one I used when I made "cod kasuzuke". I just placed the salted cucumbers into the kazu-doko. I dug it out after 3 weeks (below).


I removed the sake lees and washed.


The rice was quite good but my wife added a pat of butter. She thought the butter made it it much better. The cucumber was not like real kasuzuke but it had rather strong sake lees flavor and was qualified success.

Sunday, December 10, 2023

Eggplant, Avocado and Nagaimo Gratin ナスとアボカドの長芋グラタン

I made this dish for lunch one day from what we had on hand and what we need to finish before it went bad. I just winged it without any particular recipe. As a result I was not sure how it would come out but it was certainly edible and quite interesting (in a good way).


The main items are Asian eggplant, avocado and grated nagaimo mixed with an egg (in leu of Béchamel sauce). I also added tomato and shiitake mushroom sautéed with shallot, just because I had them.


Ingredients:
One Asian eggplant (pale purple and long), cut into a bite size by cutting at 45 degree angle as I turned the egg plant (“Rangiri” 乱切り)
One avocado, cut into a bite size pieces similar to the eggplant (I only had half of a leftover avocado).
Nagaimo, about 200grams, peeled and grated
One large egg
3 skinned Campari tomatoes, seeds removed and cut into small cubes
1 tbs of chopped shiitake mushroom and shallot sautéed in olive oil (I made this few says ago mostly from the stems of the shiitake mushrooms)
Cheeses (I used sharp cheddar and parmesan but any melting cheese will do), the amount is arbitrary
2-3 tbs olive oil

Directions:
Sauté the eggplant in 2 tbs of olive oil the skin side down first then brown all other sides (4-5 minutes)
Place the eggplant and the avocado in the bottom of a small Pyrex baking dish.  Add the remaining 1tbs olive oil.
Mix the grated nagaimo and the egg and pour over (see below)


Top with the mushroom mixture, the tomatoes, and the  cheeses and bake for 30 minutes at 350F (I used the toaster oven in convection mode) (see below).


Let it stand for 5 minutes and serve (the first picture).

I was not sure the grated nagaimo and egg ratio but it came out ok. This is a sort of healthy Béchamel sauce substitute. The eggplant and avocado went well together. The next day, we placed the remaining dish in smaller individual ramekins and added a bit more cheese and toasted it in the highest setting. It heated up very nicely.

Saturday, July 3, 2021

Warm tofu with mushroom sauce 豆腐のキノコあんかけ

This was a dish I made sometime ago but somehow I did not post it. I made this dish one day to use up ingredients which need to be used quickly. I had portions of silken tofu which I kept in a sealable plastic container with water in the fridge, shimeji mushroom and fresh but pre-sliced shiitake mushroom (We specified whole fresh shiitake but we got a package of presliced shiitake mushrooms through the Instacart.) So, I came up with this dish which is a rather standard Japanese dish but I did not follow any recipe.


The sauce is thickened with potato starch slurry.  Dishes made with this kind of sauce are often called “an-kake” 餡掛け. This is a warm and soothing dish. It is basically vegetarian except for bonito in the dashi broth.


Ingredients (2 servings):
Half silken tofu divided into two portions
1 cup Japanese dashi broth (I made this from kelp and bonito flakes).
1/4 cup (or to taste) concentrated Japanese noodle sauce (from bottle)
1/2 scallion finely sliced
1 tsp potato starch or “Katakuri-ko” 片栗粉 make into “slurry” by adding 1 tbs water or sake.

Directions:
Heat the tofu in the simmering broth until warm (5-6 minutes).
Place the warmed tofu in bowels
Add the mushrooms to the broth and cook for 3-4 minutes
Add the noodle sauce and the starch slurries and thicken the sauce.
Add the scallion.
Pour the “ankake”sauce over the tofu and serve.


This is best served in cold weather but this is a very gentle smoothing dish with soft tofu and gentle taste of broth and mushrooms.

Sunday, February 5, 2012

Soba roll sushi 蕎麦寿司

You may ask, "Why would you make rolled sushi from soba noodles?" I am not sure why but the answer may be because we can or this is a more portable form of soba. For example, you could take this one more easily than traditional soba as a lunch. In any case, I had left over seasoned kanpyou かんぴょう and shiitake mushroom 椎茸 from making "futomaki" 太巻き roll and decide to make this dish. I have made it several times in the past and have seen recipes in a Japanese noodle cook book (in English) but two crucial pieces of information or steps, in my opinion, are missing. So I decided this is a good time to share how I assemble sobazushi 蕎麦寿司. This was an endng dish one evening.
Preparing kanpyou, dried shiitake mushroom, Japanese omelet, and spinach is described in the roll sushi post.

Preparing soba noodle: I used packaged dried soba noodle (#1). The first secret is to tie off one end with bucher's twine. I left enough length of the twine on one end after making a knot. I then cooked the noodles in boiling water but I kept the end of the twine outside the pan (#2) Be careful not to set the twine on fire, though. You could put the end of the twine in the water and later fish it out. I loosened the noodles as they became more pliable using a pair of cooking chopsticks. After the noodles are cooked, I pulled the end of the twine to lift them out of the water and washed it under cold running water but took care not to break the tied end (#3). After I aligned the noodle in one bundle (#4), I squeeze the extra moisture using paper towel. The second secret is to let it sit on the cutting board loosely covered with a plastic wrap for at least 30 minutes or 1 hour before rolling it. If you try to roll it immediately, the noodles have too much water on the surface and just fall apart.
After the noodles have rested and are slightly drier, I spread the noodles on a sheet of nori (#5). I first placed the bundle of noodles on the nori sheet with the tied end still intact. Once the noodles were in place, I cut the tied end (the noodles were still dry and uncooked in the very center of the tied end) and spread it evenly leaving about half an inch of nori sheet in the far end (#5). Like regular futomaki, I placed the omelet, kanpyou, shiitake mushroom and spinach near the edge of the nori sheet (#6). Using a sushi mat, I rolled it to make sure the end of nori sheet is over wrapping. At this point, I did not take off the sushi mat but just let it sit for 5-10 minutes before removing the sushi mat so that the moisture from the noodles made the ends of nori sheet adhere (#7) and the noodles did not fall apart. I cut off both ends of the roll for a snack for my wife and I (#8). 

After slicing the roll like a futomaki, I served the pieces with a side of vinegared "gari" ginger and a dab of real wasabi. I served a dipping sauce (diluted from the bottle of a noodle sauce) in a shallow bowl with a wide-opening instead of a regular soba noodle dipping bowl. So that you could dip the roll of soba more easily.

This is definitely much easier to eat than slurping the soba noodles; granted, slurping may be an important part of enjoying soba. The combination of all the different tastes in one mouthful is kind of nice. Is it worth the effort? Maybe on certain occasions.

Friday, June 14, 2013

Vermilion Snapper baked in miso and butter 鯛のバーター味噌味オーブン焼き

Since the "nitsuke" or simmered vermilion snapper was not a great success, I was pondering what I would do with the second fish. I thought of "papillote" (baked in parchment paper) but the fish was too big for the width of parchment paper I had. So I abandoned that idea. I could just bake or grill it but that was too mundane. So at the last moment, I used aluminum foil to make a pouch and seasoned it with miso and butter as I often cook shimeji or enoki mushrooms on the grill.

I used whatever vegetables were at hand; I used onion, shiitake mushroom, and green asparagus. I first put a long piece of aluminum foil on a large, rimmed cookie sheet (just in case juices spilled out). I made the piece long enough so that after folding it in half it would accommodate the entire length of the fish. I then made a bed of sliced onions (1 small or 1/2 large), asparagus, stem ends removed and skin peeled from the stalk, and sliced fresh shiitake mushrooms (5 large) (#1 below). I then placed the fish on top of the bed of vegetables (#2).
Miso sauce: In a small bowl, I added brown miso (4 tbs), sugar (1 tbs), mirin and sake in 1: 1 ratio until the miso reached a consistency I could smear on the skin of the fish without having it run down the sides. I also added a small amount of soy sauce for no reason. I smeared the miso concoction on the top of the fish and placed thin pats of cold unsalted  butter on top (total of about 2 tbs) (#3 below).
I folded the aluminum foil in half which covered the fish and vegetables loosely leaving enough space for expansion. I crimped the two wider sides and the end to make a tightly sealed pouch and baked it in a preheated 400F convection oven for 30 minutes. After 30 minutes, some of the miso mixture was still clinging to the top of the fish but a nice sauce had developed on the bottom of the pouch with liquid coming from the vegetables and fish (#4). I gently scraped the miso from the skin of the fish and mixed it into the accumulated liquid on the bottom to further expand the sauce.

After placing the fish on a serving plate, I served the vegetables on either side of the fish (the first picture).

This turned out to be a much much better way to cook this fish than the previous method I had used (simmered or "nituske"). After my wife deboned the fish and served the meat and the vegetables on individual plates, I added a small mound of rice on the side and poured the sauce from the bottom of the aluminum foil pouch over the rice and fish.

The fish tasted much richer than it had when cooked the previous way--with sweet (not too sweet) miso flavor. We did not actually taste the butter but it definitely added to the rich flavor and texture to the fish. This was a very satisfying dish.

Tuesday, October 31, 2023

Mushrooms Udon Bowl きのこ沢山のかけうどん

“Udon” うどん are thick Japanese noodles made from wheat flour, salt and water. I’ve posted many udon dishes over the years. We usually use dried udon noodles because it is convenient. Udon appears to have many regioanl varieties. In Shikoku 四国 and Kansai 関西 (Osaka area),  Sanuki (-style) udon 讃岐風うどん is famous and is characteristically “chewy” as opposed to southern Kyushu 南九州 or Fukuoka 福岡 udon which is famous for its softness. The udon we usually get is somewhere in between. We tend to like thin udon such as “Inaniwa” 稲庭 udon or “Harima thread uson” 播磨糸うどん. I’m not sure what triggered it but we decided to get  frozen Sanuki-style  udon from Weee. The noodles are a bit on the thicker side with a square shape and straight edges (see 2nd picture below) which are characteristics of Sanuki udon or udon in the Kaisai region in general. For lunch, I made “kake-udon” かけうどん which is warm udon in broth. I used whatever was available for topping indluding three kinds of mushrooms (shiitake, maitake and simeji), soft boiled duck egg, simmered pork and edible chrysanthemum.


Underneath the toppings are the Sanuki-udon.


Ingredients: (2 small or half servings)
Mixed fresh mushrooms (I used shiitake sliced, mitake torn into small pices, and shimeji separated)
One package of frozen Sanuki udon, thawed and cooked in boiling water for 3-4 minutes
2 slices of simmered pork
Edible chrysanthemum, blanched
One soft boiled (pasteurized) duck egg, halved
Blanched sugar snaps
Dashi broth
X4 concentrated Japanese noodle sauce

Directions:
Sauté the mushrooms in olive oil for a few minutes, add the broth (enough for two bowls) and simmer for a few minutes, add the noodle sauce to taste, place the pork, egg, chrysanthemum, and sugar snaps on the top to warm them up for few minutes
Divide the udon into two bowls, arrange the toppings and pour in the seasoned broth.
Add 7 flavored pepper flakes or “shichi-mi tougarashi 七味唐辛子 (optional)

The udon was really chewy. We like it but it requires a bit of effort (chewing). This type of udon may be perfect for “Nabeyaki udon” 鍋焼きうどん.

Tuesday, February 23, 2010

Grilled chicken salad with white sesame dressing 鶏肉と椎茸の胡麻和え

This another example of making-a-dish-from-whatever-we-have. We had a left over grilled chicken thigh with salt. I decided to make a small Japanse-style salad with sesame dressing or "goma-ae" ごま和え. I often make similar dishes with some variations depending on what I have at a given moment.
Dressing: I first saute white sesame seeds (3 tsp) in a dry frying pan for a few minutes (although the sesame seeds are bought already roasted) this brings back the fresh toasted flavor. I tip the sesame seeds (reserving a few for a garnish) into a Japanese mortar or "Suribachi" すり鉢 and, with a pestle, grind the seeds until they are coarsely cracked and some oil comes out. You can smell the nice roasted sesame. Then, add 1 tsp of tahini or "shiro negi-goma" 白練りごま and 1/2 tsp of sugar, 2-3 tsp of soy sauce. I also add a very tiny amount (1/2 tsp) of rice vinegar but this is optional. The vinegar will add a subtle sourness as wel as lighten the color of the dressing.
Chicken: I just slice the one left over grilled chicken thigh with salt into small strips.
Scallion (1-2): I char the outer skin of a large scallion (white parts) over a direct gas flame for 2-3 minutes. Let it cool a little, remove the charred skin and cut into 1 inch long segments. I slice the remaining green parts into thin strips diagonally for a garnish. 
Cucumber (1 mini or 1/3 Japanese cucumber): I thinly slice one mini cucumber, salt and mix and let it stand for few minutes. I ring out the excess moisture and dress it with a small amount of sushi vinegar. 
Shiitake mushroom: I happened to have fresh shiitake mushrooms. I grilled 3 with the stem removed in a toaster oven for few minutes and cut into small strips and dressed it with a small amount of soy sauce while hot.

Mix all the above ingredients and dress with the sesame dressing. Garnish with thinly sliced scallion, Campari tomates, and sesame seeds. It is an extra step but dry roasting the sesame seeds makes a big difference.

Friday, March 9, 2018

Pork-Ricotta meatballs リコッタチーズ入りミートボール

I often make pork or chicken meatballs. I usually add eggs and panko to make them light and tender. Instead of frying, I usually bake them. I came across this recipe in the Wall street Journal. The original recipe was for lamb meatballs. Since I had my usual hand-chopped ground pork from the trimmings of pork tenderloin, I made meatballs with pork and my usual seasoning but added Ricotta cheese instead of bread crumbs. I served the meatballs with tomato sauce I made from fresh and skinned Campari tomato. I added blanched broccoli as a side.


My wife added some sweet potato Gnocchi she made some time ago and froze. She just cooked them simply in butter. This made it a complete dinner but I took the picture before the gnocchi was added so it does not appear.


Ingredients:
For meatballs:
1 lb ground pork (I used  hand chopped trimmings of pork tenderloins.)
1/3 lb whole milk Ricotta cheese
1/4 cup grated Parmesan cheese
1 small onion, finely chopped
1 jalapeño pepper, seeded, de-veined and finely chopped
3 fresh shiitake mushrooms, stem removed and finely chopped
2 eggs
1 tsp smoked paprika
Salt and freshly ground black pepper

For tomato sauce:
1/4 cup olive oil
6 skinned fresh Campari tomatos, quartered  (I usually have this prepared over the weekend but when we do not finish them during the week, I use them to make tomato sauce)
3 cloves of garlic, finely minced
1/2 medium onion, finely minced
1/2 tsp each of dried oregano and basil
2 bay leaves
Pinch of red pepper flakes
Kosher salt
(Optional) 1/4 tsp baking soda (Although made form fresh Campari tomatos and the sauce is not too acidic I still add baking soda to further reduce acidity) and 1/4 tsp of sugar.

Directions:
For meatballs:
Sautee the onion, jalapeño and shiitake mushroom in olive oil until the onion is transparent. Season with salt and pepper. Let it cool to room temperature.
Mix all other ingredients into the onion mixture (I was going to adjust the consistency if it was too soft by adding bread crumbs or flour but it was just right and I did not add them).
Using a medium size ice-cream scoop, make meatballs and place it in a baking sheet lined with aluminum foil coated with olive oil.


The green is from jalapeño pepper.


I cooked it in a preheated 350F oven toaster in convection mode for 30 minutes. The bottom became flat but that does not bother me.


For tomato sauce:
Put the olive oil in a deep sautée pan on low heat and add the red pepper and garlic.
When the garlic is fragrant, add the onion and sautée for several minutes on medium flame until soft and transparent, add the campari tomatos with its juice, add the oregano, basil and bay leaves, mix and simmer until the sauce is reduced to the consistency you like (30-40 minutes).
Taste and add salt and sugar (optional).  I also added the baking soda. It causes the sauce to start foaming.  Keep stirring and let it simmer further until all the bubbles subside.

Adding Ricotta and Parmesan cheese made the meatballs very tender and flavorful. This is definitely more high fat meatball but certainly good. I may make this with ground lamb and more closely following the original recipe some day. By adding my wife's gnocchi, this was a well balanced and satisfying dinner that goes so well with red wine.