Wednesday, March 17, 2010

Sliced duck breast with orange marmalade sauce 鴨のオレンジママレイドソース

This is my simplified version of Duck a l'Orange. As Japanese believe scallions and ducks are the ultimate combo, the French view classic duck cuisine as canard a l'Orange. Since I was not up to going through with authentic recipes and a roasted duck breast is by itself quite wonderful even without a sauce, I just made an instant sauce using orange marmalade.


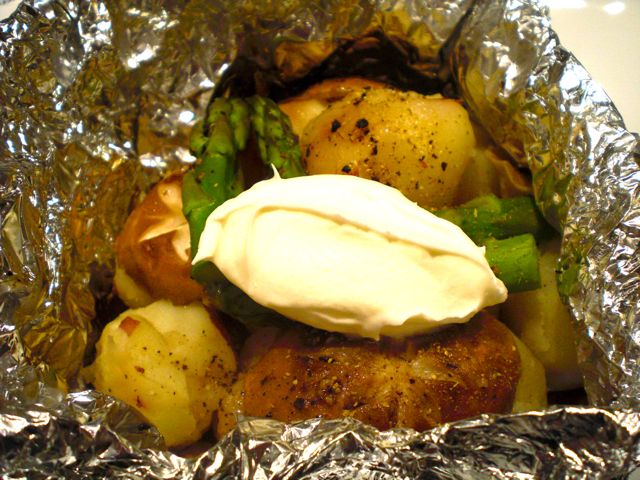
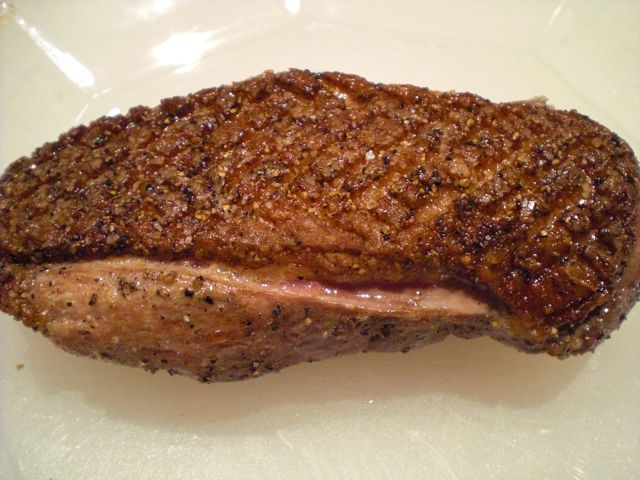
I cook duck breast in a classic way. I first clean the breast (remove excess fat and remove any silver skin still attached). I score the skin in a cross hatch pattern (see below) so that fat will render more easily. I rub it with salt (I use Kosher salt) and black pepper liberally since lots come off during the cooking. In a dry frying pan on a medium-low flame, put the duck breast skin side down, after few minutes, fat will come out. You have to remove the excess fat either by tipping the pan or absorbing it using paper towels few times. After 6-7 minutes and the skin is nicely brown and crisp like the image below, turn it over. I place it in a preheated 400F oven for 6-8 minutes or to the doneness of your liking (I cooked for 6 minutes to medium rare. The image below is when the duck just came out from the oven). I then remove the duck breast on a plate, cover it with aluminum foil. If you have rendered the fat properly and removed the excess fat before your place the duck in the oven, there should not be too much excess fat but if you do, leave only 1-2 tsp of fat in the pan. I add minced shallots (one small) and saute for a few minutes and then deglaze it with 1-2 tsp of red wine vinegar and let it reduce almost dry and add 4-5 tbs of port wine (I use a cheap Taylor ruby port) and reduce by half to 1/3 of the original volume. I finish the sauce with 2-3 tbs of orange marmalade. You could add pats of cold butter but I did not. I squeeze fresh lime juice or, if you have one, fresh orange juice, at the very end (just a splash) to add fresh citrus favor to the sauce.


This sauce has enough orangy, citrus flavors with sweet and sour tastes. It is definitely a classic combo and will particularly go well with red wines, especially syrah or shiraz. We had this with d'Arenberg "The Dead Arm" Shiraz McLaren Vale South Australia 2006, a perfect pairing!

Monday, March 15, 2010

Stewed pork belly redux 豚の角煮再登場

Last time I was experimenting with salt pork to make Pork "kaku-ni" 角煮, it turns out, although the meat was not too salty and the fatty part was cooked just fine, the meaty part became too dry and never got to a melt-in-your-mouth texture (it improved a bit after left in the refrigerator for few days in the broth and reheated before serving). This time, I used bone-in pork spare ribs instead of salt pork.  I selected the ribs with the meat from the front part of the pork, i.e. a portion close to the real pork belly. Still this meat is not quite a real pork belly. It does not have the complete layering of meat and fat. Although there is good amount of fat, it is more meaty than pork belly. As before, I used the recipes by Atsushi Tsuchiya 土屋敦.


I used two pork spare ribs (with bone, about 500 grams, meat alone may be about 300 grams). I first remove the bone and cut into 2 inch by 4 inch rectangles. In a small bowl, add 4 tbs of soy sauce (I used 1/3 low sodium soy sauce) and marinate the pork cubes for 10 minutes. Afterwards pat dry the surface of the pork. I brown all sides starting with the fatty side in a dry sauce pan so that some fat will render out first (2-3 minutes on each side).  I then add the remaining soy sauce, in which the pork was marinaded, in the pan. I put the pan on a low flame and cook for 5 minutes until the soy sauce reduces a little and becomes slightly viscous. I add abut 200ml of sake, increase the heat and cook 8-10 minutes, and add 3 tbs of sugar.

Meanwhile I soak about 5-6 inch long dried kelp in water and let it rehydrate for 30 minutes or more. Add the water in which the kelp was soaking to the pan above so that the meat is covered. As it comes back to the boil, I skim off the fat and scum which will appear on the surface. I placed the kelp to cover most of the meat and turn down the heat to simmer. I cook about 2 hours on simmer with a lid on, turning the meat over after about 1 hour, adding more water as needed. I let it cool to room temperature and place the pan in the refrigerator.

The next day, I skimmed off any congealed white pork fat and removed the kelp. I warmed up the broth and pork in a low flame for 10 minutes or until thoroughly warmed (avoiding boiling). This time, everything was wonderful. I served it with a dab of hot Japanese mustard, sliced scallion with simply boiled (still crispy) snow peas. The meat is so tender and flavorful. So, to make a Japanese-style stewed pork belly, use the front parts of the pork spare ribs. Salt pork does not work that well. The recipe I used appears better than more common recipes which suggest pre-boiling the pork belly in water before cooking in seasoned broth. As I mentioned before, you could get pork belly from on-line specialty stores, directly from producers, and some Asian markets, which I have not tried. Recently, more and more restaurants are serving Japanese style pork bellies. Our experience has been that the portions they serve is too big and the pork belly is not as tender as it should be. We just can not handle a large amount of this fatty meat, although a small amount is fabulous. 

Saturday, March 13, 2010

Scrapple スクラップル


Although my wife is not Pennsylvania Dutch, she grew up in the middle of Pennsylvania Dutch country in a small town near Philadelphia. While she was growing up people in her town still spoke mainly the 17th century german dialect know as Pennsylvania dutch in everyday conversation. English was a foreign language for them. She used to shop for food at Yoder's general store at the corner of 1st and Main street. As a result, many of the foods from her childhood are Pennsylvania dutch and unique to the region in which she grew up. These include pies and sweets such as shoo-fly pie, funny cake and this dish, scrapple. I was first introduced to this when we went to Philadelphia to visit her brother a long time ago while we were living in California. We had it in a small diner and I did not particularly like it then. It was unique to Pennsylvania and as far as I was concerned it could stay there. Later, when we visited one of the family's friends on their boat on the Chesapeake, they prepared wonderful scrapple which was much better than anything even my wife had before. 

For some reason, my wife wanted to make scrapple from scratch. The traditional recipe is made of scraps gleaned from the traditional fall hog slaughter (the Pennsylvania Dutch did not waste anything). The first recipe my wife read calls for a whole hog's head hacked in half (Although I may have the skill to do it, I would have refuse, if asked. Fortunately, she did not ask.) and boil it for long time and all the meat and bits are then removed from the hog's head and made into a loaf containing cornmeal, buckwheat flour and many spices. Since my wife has been making polenta in a loaf form and we really like it, she must have thought this is an interesting variation. Instead of a hog's head, she first boiled pork spareribs as though she was boiling the hog's head but the result was a bit disappointing with a sort of tired meat flavor. So she made some adjustments and perfected her recipe. We eat this most often for breakfast but sometimes for lunch over the weekend. We also enjoyed this as a part of Izakaya feast for evening. I will hand to my wife for the recipe and how to properly fry (sauté) it to get optimum crispy outside and creamy inside. Here, we served scrapple with a fried egg.

This is a very "sanitized" version of this dish because it does not use any pork offal or scraps. Start with 4 or 5 country style spareribs. Parboil for about 5 minutes. Put into a pyrex baking dish with some onions and carrots, a bay leaf and several pepper corns. Cover the ribs half way with boiling chicken stock. Cover and place into a 350 degree oven and cook for 1 1/2 to 2 hours (until the meat is tender and falls off the bone).

Remove meat from the bones and remove any excess fat. Chop the meat into very fine pieces but do not grind. Take 3 cups of chicken stock add 1 tsp sugar, 1/2 tsp salt, 1 bay leaf, 1/2 tsp dried sage, 1/4 tsp margoram, 1/8 tsp mace and several grinds of pepper. Boil for a while until the liquid has been infused with the taste of the spices. Strain the liquid, remeasure to get 3 cups total and put back into pot. Meanwhile mix 3/4 cup corn meal with 1/4 cup buckwheat flour until they are uniformly mixed.(The recipe can also be made with just 1 cup of cornmeal if buckwheat flour is not available. The buckwheat however seems to result in a finer texture and adds an additional element to the final flavor). Bring the infused chicken stock back to the boil. Lower the heat and slowly whisk in the cornmeal mixture. Keep stirring for about 5 minutes as it thickens. Toward the end add about 2 cups of the meat and continue stirring until the meat is completely incorporated (you shouldn't be able to distinguish any individual pieces of meat) . Turn the mixture into a loaf pan which has been rinsed in cold water (the water keeps the mixture from sticking).

After the scrapple has cooled (usually over night), it is ready to be cooked. Turn out the loaf and slice into 1/2 inch pieces. (The final cooking makes the difference between really good and really bad scrapple. The thickness of the piece is important to get just the right combination of crispy to creamy soft. If the pieces are too thick the overall texture is too mushy and much less pleasant.)  Lightly coat the pieces in flour with salt and pepper added. Heat several tablespoons of peanut oil in a saute pan on medium high heat (peanut oil is best because of its high smoke point). Put the pieces in the pan making sure that the sides of the pieces don't touch each other. Let 'er rip on that fairly high temperature with out touching for 5 minutes. This forms the nice crunchy crust. Lower the heat slightly and turn the pieces over and again let it cook undisturbed for another 5 minutes. (At this point the pan may be smoking a bit but don't let that bother you if it looks like it is getting too hot turn down the heat slightly.) If it looks like the first side needs more of a crust turn the piece back over and cook a bit longer. Drain the pieces on paper towels. 

The scrapple can be cut into individual pieces and frozen. If it has been frozen don't thaw before cooking. Just go ahead a dredge the pieces and put them in the pan. It will thaw in the cooking process and the cold keeps the interior creamy. 

The traditional way of eating this is with maple syrup but we like to eat it plain served with a fried egg on the side. It has a lovely porky spicy flavor and the crunch of the crust with the smooth creaminess of the inside is wonderful. Again there are many variations on this recipe. Some add liver, some add much much more pepper. This is a rather tame version but we like it. 

Friday, March 12, 2010

Sauteed squid and celery redux イカとセロリの炒め物 再登場


 This is a repeat of the squid and celery dish. The original recipe is from Mark's book p64. We really liked this dish. I got cleaned small squid and asked my wife how she would like this cooked. She suggested this dish. Since I did not have time to make the "garlic butter", I had to make some modification. First I added minced garlic in the oil as I sauteed squid and celery. Although I patted the squid dry before sauteing, more liquid came out than I expected. Since I did not want to over cook the squid, I removed the squid and celery and reduced the liquid a bit. Then I decided to make a type of beurre blanc. I just added pats of cold butter (1 tbs) to the reduction of squid liquid (somehow, it does not sound appetizing) to make an emulsion. I poured it over the squid and celery. I added cracked black pepper and a squeeze of lemon.

This modification is interesting. It gave a more unctuous mouth feel. The original was a bit more delicate. In any case, either way, this is a very good dish and so easy to make. It goes well with any drinks, including sake.

Thursday, March 11, 2010

Deep fried red snapper 鯛の唐揚げ

This dish is based on a recipe in Mark's book P40 "Deep-fried Tilefish" or "Amadai no Hana-age" 甘鯛の花揚げ. I never seen this type of preparation and I was just very curious and decide to try. It appears that "tilefish" includes quite a diverse species of fish. The Japansese name "amadai" 甘鯛 appears to represent Branchiostegus japonicus (most frequently) but there are many other species being called "amadai" or "tilefish". When we had an "omakase" おまかせ dinner at "Kurita" くりた in Kyoto last time, we enjoyed a slightly salted kelp flavored ("kobujime" 昆布締め) amadai sashimi (they call it "guji" ぐじ in kyoto which come from the near-by "Wakasa" bay 若狭湾). There is some description that tilefish scales can be eaten but exactly for which spices or genus (genera), their scales can be eaten is difficult to figure out. I vaguely recall seeing Chef Moriomoto deep frying large scales from a carp in one of the Iron Chef America episodes. So apparently some fish scales can be eaten if cooked properly. Since I could not get a tilefish, I got a whole red snapper instead. This may have been a big mistake since red snapper and tilefish are quite different except for the superficial resemblance of being red. Actually, I read somewhere that fish being sold in the U.S. as "red snapper" includes many different species of fish. I have no idea what kind of a "red" fish I got.

I prepared fillets with the skin and scales on. The scales were rather large. Although I followed the recipe closely, because the scales of red snapper may be different from those of tilefish (this appears most likely), or because the skin was not dry enough or because I did not deep fry correctly, the scales did not "blossom" (the name "hana-age" means "flower-fried" indicating that the scales opens up like flower petals which is pictured on p38 of Mark's book). 

I salted the fillets and loosely wrapped them in kichen preachment paper and let them sit in the refrigerator for several hours. I dusted the meat side only with cake four and deep fried with skin side up first for 3-4 minutes and turned it over once and fried another minute or so.

Since we have not ever seen or tasted this preparation with scales attached, we were not sure how the skin plus scales would taste, but, surprisingly, it just added nice crunch to the skin and the scales appear to be perfectly edible. Although it tasted OK, we were a bit disappointed that the scales did not open up as shown in Mark's book. As a fried fish with an extra crunchy skin, it is OK especially with squeeze of lime.

Tuesday, March 9, 2010

Minestrone soup ミネストローニ スープ

This is my version of Minestrone soup but it is more like a vegetable stew than soup. When I serve it in a small quantity, it is perfect as one of the small dishes in the Home Izakaya.

You can use any vegetables but these are ones I usually use.
1. onion, 2. garlic, 3. carrot, 4. yellow squash, 5. zucchini, 6. cabbage, 7. canned kidney beans (Other beans such as cannellini beans, navy beans, and chick peas can be also used instead or in addition), 8. canned Italian plum tomatoes. You could also add celery, green beans, peas etc. The vegetables are all cut into small cubes except for garlic which are finely chopped.

I first saute finely sliced and cut salt pork (or pancetta if you have one or bacon). The amount of the vegetables and salt pork is arbitrary. One of the problems of this type of soup is, as you keep adding the ingredients, the soup keeps increasing in volume.  It is difficult to control the final amount (at least for me, I even had to change the pot to a larger sized one during the cooking in the past). If the amount of fat rendered is not enough, add olive oil. I saute onion first, then add garlic, cabbage for 5 minutes or so and add other vegetables. I drain and rinse the canned beans under the running cold water before adding to the pot. I add half of the juice from the canned tomatoes depending on how acidic it is (you may want to add all the juices). Some acidity is good to counter balance with sweetness from the vegetables. I use my usual Swanson no-fat, low-sodium chicken broth to cover the vegetables. I add several bay leaves (do not forget to remove all of them at the end, I make a mental note of how many bay leaves I put in), dried majorum (or oregano), and basil (Do not overdo these herbs). I let it simmer for at least 30 minutes. I adjust seasoning by adding salt (if needed) and black pepper.

I like to cook the pasta separately rather than in the soup. I add a small amount of olive oil to coat the cooked pasta (to prevent them from sticking to each other) and put it in a sealed container after it is cool. I add it just before serving since pasta keeps absorbing water and will get very soft and soggy after some time in the soup. I suppose one can use any pasta but I happened to have "Rotini". I cook the pasta on al dente side and warm it up with a portion of the soup you are serving.

To serve: Here I used a small Japanese bowl to conform to the Izakaya theme and topped it with grated Parmigiano-Reggiano cheese and chopped chives  (or Italian parsley) and freshly cracked black pepper. Since it is rather like a stew, it will go with any drink but a nice Italian red may be the best match. Depending on the amount of vegetables, soup and pasta you serve, this could be a starter or an ending dish. Perfect for cold snowy days.

Sunday, March 7, 2010

Foil-baked potatoes じゃがいものフォイル焼き

Foil-baked potatoes じゃがいものフォイル焼き, Mark's book p44

The combination of potato, butter and soy sauce is a good one and if you add sour cream to this, how can it be bad. This can be a good side dish as well as as a nice accompaniment for a drink. Any drink will go well with this; beer, sake, or wine.

I followed the recipe on Mark's book fairly closely except for substituting sour cream with Crème fraiche which made this dish a bit more deadly. I used small red new potatoes (8). I microwaved the potatoes until done and removed the skin. I place the potatoes in double layered aluminum foils shaped into a box. I added fresh shiitake mushrooms (I used 4), asparagus tips (4), salt (1/3 tsp), butter (several thin pats, a bit less than 1tbs), and soy sauce (1 tsp). I deviated a little and also added sake (1 tsp) to make sure, all the ingredients will steam inside the pouch. I left some space for the steam to expand and closed the aluminum foil by double folding. I place the pouch directly on the cook top on the lowest flame and cooked it for 15 minutes. I opened the pouch and added a small quenelle of creme fraiche (using two teaspoons to make the quenelle) and freshly ground black pepper. The creme fraiche melts and makes a wonderful sauce on the bottom. This is a simple but very satisfying dish.