Saturday, August 27, 2011

Chicken thigh stewed in soy sauce, mirin and black vinegar 鶏腿肉の黒酢煮

I have found the simmering liquid made of equal parts soy sauce, mirin and black vinegar (the Japanese not Chinese kind) to be a very good universal stewing medium. I first used it to steam/poach chicken breast. I then used the same concoction to simmer chicken wings which is now one of our most favorite drinking snacks. I think I have now perfected it.

Here is my secret; I keep reusing the simmering liquid. I realized, especially after cooking the chicken wings, it became slightly viscous with a nice unctuous mouth feel because of the collagen dissolved into the liquid. It jelled in the refrigerator and, later, after cooking a few more batches of wings, it congealed even at room temperature. It makes a nice "gelee" when eaten alone. I often make it into small cubes and use it as a part of dressing/seasoning.

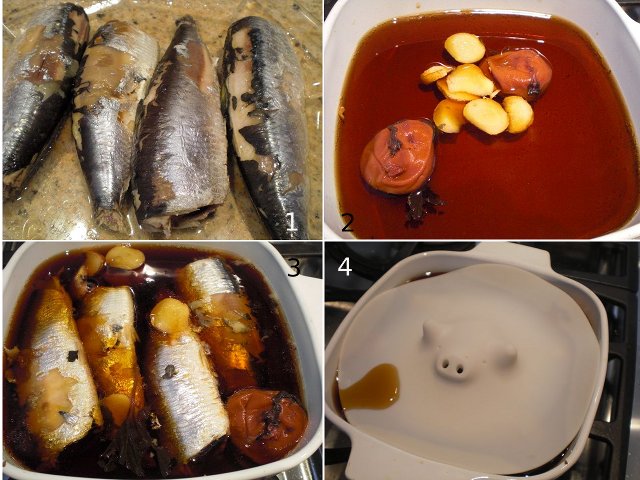
I decided to keep this liquid going much as some Yakitori joints do (making a sauce started when great grand dad started the place and spanning many generations) by adding new "tare' sauce to the pot. After stewing and consuming all the wings (I usually keep the cooked wings we did not eat in the jelled liquid reheating the leftovers), I strained the hot liquid to removed any debris and spent ginger slices and kept it in the sealed container in the refrigerator. Every time I cook a new batch of wings, I remove the congeal chicken fat from the surface of the jelled simmering liquid, heat it up, and add the appropriate amount (for whatever you are stewing) of soy sauce, black vinegar and mirin (1:1:1). I taste it and add water since water evaporates which makes the simmering liquid too strong. I also add new slices of ginger every time to renew a fresh ginger taste. This way, the simmering liquid can be perpetuated. The simmering liquid is getting better and better every time I cook a new batch of chicken. 

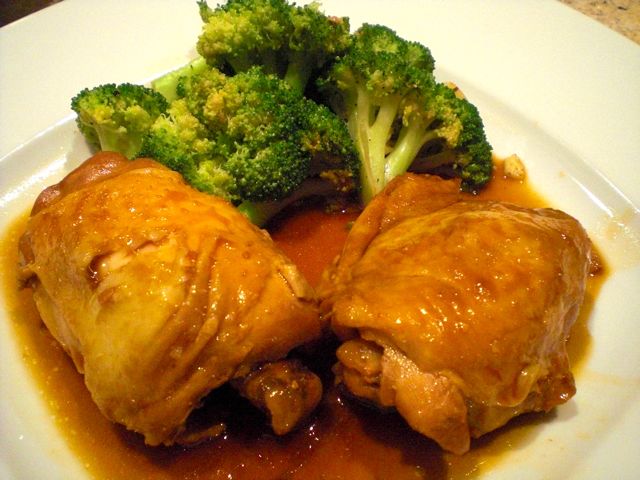
My wife suggested I cook chicken thighs in this simmering liquid. I said "Why not?" I just cleaned the excess fat and skin from the thighs but left the bone and most of the skin. I simmered it with an otoshi-buta for 40-60 minutes. We often let the cooked chicken cool in the liquid and then place it in the refrigerator rather than eating it immediately. This is much meatier dish than the wings. The texture is also very different from that of the wings but we really like this. The night I made this dish, I blanched broccoli florets and sauteed them in butter with chopped garlic and seasoned it with salt and pepper as an accompaniment.

This is sort of the dish without a particular citizenship. It can be served as a main dish with a starch in the Western-style or it can be a wonderful Izakaya style drinking snack. The chicken meat is so tender, you can remove the bones by hand (my wife) or using chopsticks (me), or before serving (guests). Although we considered having sake, we had this with Ridgeline Vineyards Alexander Valley Cabernet Sauvignon 2005. This is a very decent California Cab without any harsh edges and went very well with this dish. The black vinegar became very mild and and did not compete with the wine at all. After eating two thighs each, we did not need any more food.

Thursday, August 25, 2011

Cold "corncob" soup 冷製コーンコブスープ

This is my wife's creation and I just helped. This corn soup is a bit unusual. I am not sure where she originally got the idea to use corn cobs as the basis for a corn soup broth but she has been making corn soup this way for a number of years. (With corn cobs there are essentially two options; feed them to your horses or make this soup). After making fresh corn pudding, she used the left over corn cobs; boiling them to make corn broth much as you would use beef bones to make beef broth. This produced an amazingly sweet and "corny" soup. I finished it and served it as a cold corn soup for the summer.

She boiled 12 corncobs--the kernels removed as well as any green parts of the stalk below the cob, in water enough to cover the cobs (about 4 cups). She also added roughly chopped onion (2 medium sized). She simmered it for 40 minutes or so removing any "scum" that appeared on the surface. At this point she removed the cobs and let the broth cool. We kept it in the fridge until I stepped in to complete the soup. 

We like to add more fresh corn to finish this soup but the fresh corn at the market did not look good and decide to use frozen corn instead. I tasted the broth which had a nice corn flavor and was very sweet. I decided to strain out the old onion and some of the debris from the corn. In a pan, I sautéed or sweated finely minced onion (1 large) in a mixture of butter and olive oil. I then added back the corn broth and half a bag of the frozen yellow corn. I cooked it for 20 minutes and using the immersion blender, homogenized the corn kernels and onion. It is good to strain the soup again at this point to remove any tough skin that may have come from the new corn kernels. I then added the remaining frozen corn to the broth and cooked it for another 10 minutes. I seasoned it with salt and white pepper.

Corn is such an integral part of what summer is all about and while this soup is not very thick it has an amazing corn flavor--representing the very essence of corn-ness (if that is a word). The additional corn kernels add a nice element of texture. Since it has been an extremely hot and humid summer, we served this soup cold but it is also good hot. A very refreshing summer soup.

Monday, August 22, 2011

Chow-chow pickles チャウチャウ ピクルス

In the food section of Washington Post online, I found a recipe for scrapple (a fairly "refined" version) and sent it to my wife. Since she created Auntie N's no-crapple scrapple, I thought she would be most interested in this recipe. As she was looking through the scrapple recipe, she also came across a recipe for a dressing which is based on (store-bought) "chow-chow", Pennsylvania Dutch pickles.  Although she is not Pennsylvania Dutch, she grew up in the Pennsylvania Dutch country. She tells me that chow-chow was ubiquitous and appeared everywhere. It was even served in the school cafeteria.

Chow-chow is one of the classic Pennsylvania dutch "Seven Sweets and Seven Sours" which by tradition should be included in every dinner served to company. The seven sours included: pickled vegetables (such as pickled cauliflower, beets, or cabbage), coleslaw, dill pickles, green tomato relish, meat jelly and spiced cucumbers in addition to chow-chow. (For those who are interested the sweets included: jelly (currant or apple), apple butter or apple sauce, preserves such as quince, candied watermelon rind or wild strawberry, two or three pies such as schnitz, shoofly, funeral or montgomery and cheese cake). As a kid, my wife particularly liked chow-chow because she could pick out the veggies she liked best from the wide selection that made up the dish. Although my wife knew chow-chow as exclusively PA dutch, we found out that it is also a southern dish. The Pennsylvania version, however, is said to be much sweeter than the southern.  Over the years my wife has looked for but never found a recipe that reproduces the chow-chow of her childhood.  She searched on line and found this one based on an old Pennsylvania dutch cookbook from the 1930's.

Vegetables: Red and yellow pepper, cut in strips (one each), Cauliflower (one head, separated into small florets), celery (two stalks cut in to 3 inch buttons), green beans (on hand full), corn (kernels from 2 cobs, uncooked), kidney beans (one 15 oz can), black beans (one 15 oz can), Lima beans (one package, frozen thawed) (picture below upper left). The cauliflower and beans were precooked by steaming.

Pickling liquid: She used sushi vinegar (1 cup), (this is obviously her modification--sushi vinegar is not traditional to Pennsylvania Dutch cooking. She said she used it because it is milder than the traditional cider vinegar), sugar (1 cup), water (1 cup), kosher salt (2 Tbs.), ground turmeric (1 tbs), black pepper corns (1 tbs), cinnamon stick (one), whole all spice (1/2 tbs). She simmered these ingredients in a pot for about 30 minutes. (top right picture).  

Then she strained the syrup to remove the spices. She poured the strained syrup back into the pot and added whole bay leaves (3), hot red peppers (dried, 2), yellow mustard seed (2 tbs), celery seeds (1 1/2 tsp) and simmered the mixture for another 10 minutes. 

She arranged the vegetables in a glass baking dish (top left picture, since we did not have a glass pickling jar) and poured the hot liquid over the vegetables, stirred well and covered. After it cooled she put it in the refrigerator. The recipe said 'wait at least a week before serving. Because of the way these pickles were made they are considered "refrigerator pickles" meaning that they should be kept in the fridge and will not last more than a couple of weeks. The traditional PA dutch method is, of course sterilized, "heavy duty" canning.

After waiting a week my wife tasted the chow-chow...she was ecstatic!! This was the traditional taste of her childhood that she had been looking for all these years.  She was so excited she called me at work to tell me the pickles were a success. She said that the minute she tasted them she was instantly transported back to her childhood--summer picnics, dinners at friend's houses, cafeteria lunches, community suppers at the firehouse. As she said, Proust really knew what he was talking about with those madelaines.  

This is a very mild pickle with a pleasing sweet and sour taste. If truth be told, it is a little too sweet for me (my wife says that she probably liked it as a child because it was sweet--she said she still likes it a lot). All the additional spices give it a distinctive depth of flavor. The veggies are still very crisp and the diversity of ingredients makes it very interesting. Chow-chow is sometimes referred to as "the end of summer pickles". It includes such a variety of vegetables because these are all the veggies that are left over from pickling individual vegetables from the summer harvest. I suspect my wife will be making this again. It is certainly worth the effort.  

Sunday, August 21, 2011

Sardines escabeche イワシの南蛮漬け

This is the second dish I made from some fresh sardines we got. For this dish, I used two sardines. This is a classic preparation of "Nanban" 南蛮 or Japanese-style escabeche. Essentially, the fish was first fried and then soaked in sweet vinegar with other vegetables.

Preparation of sardines: For this dish, I decided to use filets rather than the bone-in whole fish. After scaling the fish, I filleted them into three layers; two fillets of fish flesh and one layer of back bone. In Japanese culinary parlance, this is called "san-mai oroshi" 三枚下ろし. I use my own quick way to do this which is more like the Western style of filleting fish than the more traditional Japanese way.  Using  a narrow-bladed boning or fillet knife (instead of more traditional "deba" knife), I cut across just under the gills until the blade hit the back bone (do not cut through). Then, I turned the blade, 90 degree towards the tail and sliced off the fillet along the back bone. I do not even bother to gut the fish beforehand. I turned the fish over and repeated. I ended up with two fillets and the head with back bone attached (hence "san-mai" or three "sheets").  Using a fish bone tweezers, I remove all visible small bones especially inside the belly portion of the fish (this is very tedious). I also cut off some of the edges. After that, I washed and patted the fillets dry. I seasoned them with salt and white pepper and sprinkled sake over everything and kept them in the refrigerator covered until I was ready to cook (#1 in the image below).

Sweet vinegar: Again there are many variations but, this time,  I used my short-cut method. I just mixed rice vinegar (3 tbs), soy sauce (3 tbs) mirin (2 tbs)  and sugar (1/2 tsp). I also added two dried hot peppers cut into small rings (removing the seeds).

Vegetables: I julienned carrot (one small) and celery (two stalks) in a slightly larger than match stick size. I also sliced Vidalia onion (1/2, medium). I like my vegetables to be "cured" so I added and soaked the vegetables several hours at room temperature in sweet vinegar in a sealed container.
Frying: I removed the excess sake on the fish filetts using a paper towel and dredged them in potato starch or "katakuriko" 片栗粉. I deep fried the fish in 170F or 340C vegetable oil for several minutes on both sides. I drained the excess oil by resting the fish on a wire rack (I use a small frying pan with just half inch of oil. I will not reuse this oil since the sardines make it taste "fishy").

Meanwhile, I removed the vegetables from the sweet vinegar and arranged them on two plates (#4 above). While hot, I soaked the fillets in the sweet vinegar and turned them over several times to coat nicely (#3 above). I placed the fillets over the vegetables and garnished them with finely julienned ginger and perilla leaves (#4).

It turned out that the red pepper I used (bought it in a Japanese grocery store) was atomically hot. Especially the vegetables got really spicy. The fish was nicely crunchy with a sweet vinegar taste. No need to worry about bones because of the preparation I did. For me, the spiciness was the higher boundary of "OK" but, for my wife, it was too much especially for the vegetables but she finished the fish with gusto. the only drink we can think of is cold sake for this dish.

Friday, August 19, 2011

Stewed sardines with pickled plums イワシの梅煮

Did I happen to mention that fresh sardines at our new grocery store often look like they just came out of a bar fight the night before? Well, today, they looked slightly better and I decided to go with the sardines. I got six and made two dishes. This is one of them.

Sardines and herrings are related but slightly different. For one, herrings can be rather large but sardines are usually smaller. The sardines we got today were larger than we see canned. So I decided to treat the sardines as though they were small herrings.


The first dish I made from four sardines is called "Umeni" 梅煮 meaning "stewed with plum". Since herrings/sardines are rather oily blue fish with a strong taste,  adding some sourness helps to cut the oiliness. This is very similar to the simmered Pacific saury or "sanma" which I posted before.

Cleaning sardines: The fishmonger at the grocery store was a bit surprised when I said I would do the cleaning myself--"so just give me the sardines as is." Scaling was rather easy since they have large, easy-to-remove scales. For this dish, I wanted to keep the shape of the fish. So I did not want to open the underbelly and gut it. Instead, I cut off the head first and from that opening, extracted the guts using a narrow blade boning knife (being careful not break the belly) and my fingers.

Pre-cooking: Some kind of preparation is in order to reduce oily fishiness of the sardines before the actual stewing. Some would just pour hot water over the fish and then washed in cold water. But I went further. I boiled them in vinegared water first. In about 1 cup of water I added rice vinegar (2 tbs) and placed the cleaned sardines. When it came to boil, I turned the flame down and simmered it for 5-7 minutes without a lid on. I poured the simmering liquid out and gently washed them in cold running water. The skin is very fragile as you can see image below (#1).

Simmering liquid: There are many variations but essentially soy sauce with some sweetness either from mirin, sugar or both. I used water (300ml), soy sauce (3 tbs), mirin (2 tbs) and sugar (1 tsp). I added two "umeboshi" pickled plums and several thin slivers of ginger root (#2) in a Pyrex pan in which 4 sardines snuggly fit (#3). I placed my favorite silicon "otoshi-buta" on the top. Since this is made of silicon, it conformed to even a square pan (#4). I put a reguar lid slightly askew over it on a medium flame. As soon as it started boiling, I turned it down to a gentle simmer and cooked it for about 40 minutes.

After 40 minutes, I removed the both lids and turned up the heat and let it boil gently so that the simmering liquid reduced a bit. I removed it from the heat and let it cool down with a lid back on for several hours to room temperature before serving.

As you can see in the first picture, I garnished it with thinly julienned ginger ("Harishouga" 針ショウガ) and perilla. If you do not like a strong ginger taste, you could soak the julienned ginger in cold water for 5 minutes or so and ring out the moisture before using. I also removed the meat of the Umeboshi and draped it over the fish.

This is another homey dish, probably only served at home, in a "taishu shokudou" 大衆食堂 (eatery for the public) or izakaya. This is a perfect side dish with rice or its liquified form, i.e. sake. We had this with the latter. To enjoy this dish, you need to be a chopstick jedi since the fish has  lot of small bones (remember the "herring-bone pattern"). My wife was not expecting so many bones. She described her first bite as like chomping into a toothbrush and having all the bristles come off the handle into her mouth. But once she realized the situation, she was an expert at removing all available meat from the bones. I admit this is a very labor intensive dish (both preparing and eating) but it is worth it especially if you do not have a neighborhood Izakaya or "taishu shokudou" to visit.

Wednesday, August 17, 2011

Grilled chicken and soba salad 焼き鶏胸肉のそばサラダ

Did I tell you we had three chicken breasts I had to dispatch quickly? I already made two dishes in the past two days and had one more breast to go. I decided to make some kind of salad with grilled chicken breast.

I used one bone-less and skin-less chicken breast (for two servings). I butterflied the thickest potion to make it even in thickness. I, then, smeared soy sauce and grated ginger root on both sides of the meat and let it stand for 5 minutes while my Foreman's grill preheated. I cooked the breast for less than 2 minutes or until just done.

The rest of the salad components were whatever was available in the fridge. I julienned carrot (one medium) and cucumber (one American Mini-cucu). I also finely chopped scallion (two). I also happened to have leftover cooked soba noodles.

Assembly: I placed the soba on the bottom of the plate and piled the carrot, cucumber and scallion on the top. I cut the grilled chicken in 1/2 inch strips and placed it around the periphery of the plate. 

Sauce: I just mixed "mentsuyu (x2 concentrated)", sesame oil, and grated ginger and poured it (not too much) over the salad. I garnished it with Wasabi flavored "frikake" which also contains sesame seeds and nori strips.

We had this as a lunch but this could be a perfectly good "shime' 〆 dish. Obviously you could make many variations of this type of Japanified salads.

Monday, August 15, 2011

Chicken breast scaloppini 鶏胸肉のスカルピニ

For some reason, we had excess chicken breasts which needed to be cooked before going bad. On a whim, I quickly made this dish.

I used one bone-less and skin-less chicken breast. I cut it into thin (1/4 inch) bite sized pieces using a shaving cut or "sogigiri" 削ぎ切り technique. I then seasoned it with dried basil, marjoram, salt, and pepper, dredged it in flour and sauteed it in olive oil in a frying pan. I used a bit more oil than for sauteing.

I served this with a side of onion-cucumber salad. This salad is very white, so for color, I sprinkled Paprika. If I made a caper lemon butter sauce, this could have been called "chicken piccata" but I did not make any sauce. This is one of making-something-from-the-chicken breast dishes but this was a good solid effort by me. I cannot remember, but we were having a red wine with this.