Friday, September 2, 2011

Rice cake "isobe" roll お餅の磯辺巻き

"Mochi" 餅 is steamed glutenous rice pounded into paste which is shaped into discs with one convexed side ("maru-mochi" 丸餅) or rolled out ("noshi-mochi" 伸し餅) and cut into small rectangles ("kiri-mochi" 切り餅). Instead of using a traditional wooden mallet or "kine" 杵 and mortar or "usu" 臼, nowadays, mochi can be made at home using a smal mochi making machine and, apparently, mochi can be made using a Kitchen-Aid mixer with a dough hook. The easiest way, however, is to buy packaged commercially produced mochi at a Japanese grocery store which is the route we usually take.

Especially If mochi is made at home, you could enjoy it while it is still warm and soft, however, more commonly, it is allowed to harden. Hardened mochi cakes can last at least a few weeks or longer and easily can be transformed back into a soft and edible state by boiling or grilling. After all, it does have its origins as a preserved food or emergency ration. Although it is eaten year around and many types of Japanese crackers are also made from mochi, it is a traditional New Year food (so that house wives do not have to cook rice for at least the first 3 days of New Year). I have posted mochi in New Year soup called "Zouni" 雑煮 and in a deep fried tofu pouch for "oden" おでん called "mochi kinchaku" 餅巾着 or "mochi-kin" for short.

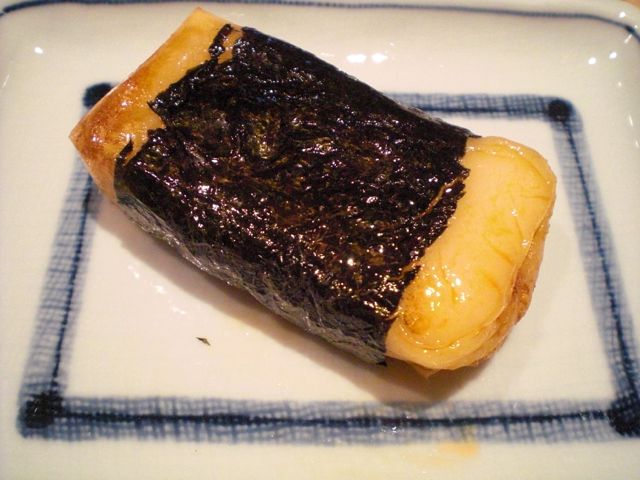
One of the simplest and quickest ways to prepare mochi, however, is this dish called "Isobemaki". "Isobe" means "seashore" and "maki" means "wrap" or "roll", since it is wrapped in dried nori sea weed. We had this "isobemaki" 磯辺巻き one evening (one each) as an ending dish or "shime" dish. The taste brought me back to my childhood. Most of the Japanese families used to eat mochi more in quantity, in frequency, and for a longer period in New Year. When I was a kid, we used to eat mochi for breakfast and lunch at least in the first 3 days of New Year. We used to eat "isobemaki" mochi as lunch.

We bought a package of "kiri-mochi" for the past New Year. This is individually sealed in a plastic wrap and lasts for long time in the refrigerator. So one night, I decided to make this dish. It is not even a recipe but here it is.

Toasting mochi: Traditionally, mochi is grilled on a charcoal braiser but, in modern days, a toaster oven is the best choice. It tends to become very sticky so I used a small removable metal grate which prevents the mochi from sticking to the grate of the toaster oven. The small grate can be easily cleaned by soaking in water first.  I toasted the mochi like a piece of bread but I kept an eye on it closely. When it started puffing up I stopped cooking and took it out.

Sauce: This is sometimes called "sato(u)jouyu" 砂糖醤油 and can be very easily made. It is a mixture of sugar and soy sauce. The ratio is up to your taste but I use 1:1 rato. I microwave it briefly (a few seconds) so that sugar melts completely.

After I coated all sides of the cooked mochi, I wrapped it with a rectagular portion of dried nori sheet. If you hold the nori sheet on the mochi for a few seonds with chopsticks, it will stick to mochi like you see above. As you eat, you could dip it in the sauce if you like.

My wife told me that this is the very first Japanese food she ever ate. While at college she shared a dormitory house with a girl who grew up in Japan. Her family sent her a "CARE" package for New Year which included "mochi" and nori to wrap it in. My wife tasted it and immediately liked it. In her enthusiasm to share her new discovery she raced to take a piece to another friend who scowled at it critically and said, "wait, take the paper off first," referring to the nori. Every time I serve this dish my wife nostalgically laughs about that comment. In any case, this is not a bad ending for the evening of an Izakaya feast, although I do not know any Izakaya which would serve a mochi dish like this.

Wednesday, August 31, 2011

Baked Stuffed "Giant" yellow squash イエロースクワッシュの肉詰め

This was a bit of a challenge. I was given this over-(and home-)grown yellow squash with a comment from my friend, Jimmy, "Maybe YOU can do something with it" implying he would not cook this giant.  I decided to make stuffed baked squash.

Here is the home (over)grown yellow squash (below, upper left). It is at least 10 inch long. I scooped out the seeds in the center and sliced the skin side so that the squash would sit flat inside the glass baking dish (below upper right).

Ground pork: My wife was making a scrapple from ground pork and I used whatever she did not use. Instead of buying ground pork, we bought 2.5 lb of a pork butt roast and ground it ourselves. I intentionally did not remove all the fat. I first cut the meat in small cube with a knife and then pulsed it in a food processor until I attained the desired texture.

Meat stuffing: I used about 1 lb of ground pork. I mixed in shallot (1 medium, finely chopped), garlic (1 fat glove finely chopped), fresh parsley (1 tsp, finely chopped), dried oregano (1/4 tsp), dried basil (1/4 tsp), black pepper (1/4 tsp) and salt (1/2 tsp), Japanese "panko" bread crumbs (about 1/2 cup), and egg (one large, beaten) and kneaded it by hand until it became a bit sticky and well mixed.

Sauce: I quickly made my marinara sauce from garlic (4 cloves finely chopped) and canned whole plum tomatoes (the tomatoes from 2 cans (8 oz. each) crushed into small chunks). I cooked the garlic in olive oil (3 -4 tbs) until fragrant (1 minute) and added the tomatoes with the  juice and turned the heat to simmer. I added salt, black pepper (to taste), bay leaves (2) and dried oregano and basel. After simmering for 5 minutes I tasted it and added sugar (1/4 tsp, optional) to cut the acidity.

Assembly: I stuffed the squash cavities with the pork mixture and spread the sauce over and around the squash (above lower left). I placed slices of fresh mozzarella cheese on top and baked it in 350F convection oven for 40 minutes (above lower right).

I served this with a chiffonade of fresh basel leaves. The squash was still a bit hard! I thought baking it for 40 minutes would make this giant squash soft but I was wrong. I should have pre baked or pre-cooked it. We only tasted small portions. The next day, I added a bit more sauce and a mixture of shredded aged cheddar and Mozzarella cheese and re-baked it for another 30 minutes in a 350F oven. This time, the squash was soft. Of course, you could stuff the squash with your favorite uncooked Italian sausage (out of its casing). This tasted pretty good especially with red wine. Since I did not have suitable Italian reds handy, we went for Califronia Cab Ridgeline 2004 from Alexander valley with this dish.

Monday, August 29, 2011

Auntie N's no-crapple scrapple redux スクラップル 再登場

We previously posted scrapple which is a well-known and somewhat dreaded Pennsylvania Dutch breakfast item widely served in diners in Philadelphia. The authentic recipe requires a hog's head but my wife made it from stewed pork spare ribs and since it is not made with any offal, we called it "Auntie N's no-crapple scrapple". I came across another "civilized" scrapple recipe in the Washington Post on line which does not call for a whole hog's head boiled for several days. I forwarded this recipe to her hoping she would try it--which she did.

Ingredients from the Post article:
1 1/2 pounds ground pork
25 ounces chicken broth, preferably homemade
1 cup yellow cornmeal
1/2 cup flour, plus 1/4 cup for dusting the scrapple
1 tablespoon minced garlic
1 tablespoon minced shallots
1 teaspoon Old Bay seasoning
1 teaspoon chopped fresh thyme
1 teaspoon chopped fresh basil
Salt
Freshly ground black pepper
2 tablespoons olive oil, or more as needed (may substitute butter)

The recipe calls for ground pork. Since this is "no crapple-scrapple" we didn't want to use ground pork from the market because then we couldn't guarantee it didn't contain any crapple. So we purchased a pork butt roast and ground the meat ourselves. Grinding the pork was the extent of my contribution to the dish. I handed the prepared pork to Auntie N and she took over the preparation.

Auntie N wrote: While I used the basic ingredients from the Post article I put them together differently based on previous experience making scrapple. I browned the pork in a saucepan then added the broth bringing the mixture just to a boil. I added the garlic and shallots. In a separate bowl I combined the cornmeal and flour. I slowly added the dry ingredients to the pork broth mixture whisking briskly to prevent lumps. As if making polenta I stirred the mixture until it got very stiff and pulled away from the sides of the pan. Then I added the old bay seasoning, chopped fresh thyme and basil as well as salt and pepper to taste. I poured the mixture into a bread loaf pan to cool.

To cook, I sliced the pieces that were about 1/2 inch thick, lightly floured the surface and pan fried them on medium high heat for about 5 minutes a side.

The pieces cooked up very nicely with a pleasing crust outside and soft center. It turns out that this is a much more refined scrapple than the one I am used to. While it had a pleasing pork taste it was not as permeating as the more traditional recipe. In addition the various herbs and spices are a very good combination in their own right but not the intense rustic flavors characteristic of traditional scrapple (which in fact many people don't entirely appreciate). If you are one of those people this is a nice variation and worth trying.

Saturday, August 27, 2011

Chicken thigh stewed in soy sauce, mirin and black vinegar 鶏腿肉の黒酢煮

I have found the simmering liquid made of equal parts soy sauce, mirin and black vinegar (the Japanese not Chinese kind) to be a very good universal stewing medium. I first used it to steam/poach chicken breast. I then used the same concoction to simmer chicken wings which is now one of our most favorite drinking snacks. I think I have now perfected it.

Here is my secret; I keep reusing the simmering liquid. I realized, especially after cooking the chicken wings, it became slightly viscous with a nice unctuous mouth feel because of the collagen dissolved into the liquid. It jelled in the refrigerator and, later, after cooking a few more batches of wings, it congealed even at room temperature. It makes a nice "gelee" when eaten alone. I often make it into small cubes and use it as a part of dressing/seasoning.

I decided to keep this liquid going much as some Yakitori joints do (making a sauce started when great grand dad started the place and spanning many generations) by adding new "tare' sauce to the pot. After stewing and consuming all the wings (I usually keep the cooked wings we did not eat in the jelled liquid reheating the leftovers), I strained the hot liquid to removed any debris and spent ginger slices and kept it in the sealed container in the refrigerator. Every time I cook a new batch of wings, I remove the congeal chicken fat from the surface of the jelled simmering liquid, heat it up, and add the appropriate amount (for whatever you are stewing) of soy sauce, black vinegar and mirin (1:1:1). I taste it and add water since water evaporates which makes the simmering liquid too strong. I also add new slices of ginger every time to renew a fresh ginger taste. This way, the simmering liquid can be perpetuated. The simmering liquid is getting better and better every time I cook a new batch of chicken. 

My wife suggested I cook chicken thighs in this simmering liquid. I said "Why not?" I just cleaned the excess fat and skin from the thighs but left the bone and most of the skin. I simmered it with an otoshi-buta for 40-60 minutes. We often let the cooked chicken cool in the liquid and then place it in the refrigerator rather than eating it immediately. This is much meatier dish than the wings. The texture is also very different from that of the wings but we really like this. The night I made this dish, I blanched broccoli florets and sauteed them in butter with chopped garlic and seasoned it with salt and pepper as an accompaniment.

This is sort of the dish without a particular citizenship. It can be served as a main dish with a starch in the Western-style or it can be a wonderful Izakaya style drinking snack. The chicken meat is so tender, you can remove the bones by hand (my wife) or using chopsticks (me), or before serving (guests). Although we considered having sake, we had this with Ridgeline Vineyards Alexander Valley Cabernet Sauvignon 2005. This is a very decent California Cab without any harsh edges and went very well with this dish. The black vinegar became very mild and and did not compete with the wine at all. After eating two thighs each, we did not need any more food.

Thursday, August 25, 2011

Cold "corncob" soup 冷製コーンコブスープ

This is my wife's creation and I just helped. This corn soup is a bit unusual. I am not sure where she originally got the idea to use corn cobs as the basis for a corn soup broth but she has been making corn soup this way for a number of years. (With corn cobs there are essentially two options; feed them to your horses or make this soup). After making fresh corn pudding, she used the left over corn cobs; boiling them to make corn broth much as you would use beef bones to make beef broth. This produced an amazingly sweet and "corny" soup. I finished it and served it as a cold corn soup for the summer.

She boiled 12 corncobs--the kernels removed as well as any green parts of the stalk below the cob, in water enough to cover the cobs (about 4 cups). She also added roughly chopped onion (2 medium sized). She simmered it for 40 minutes or so removing any "scum" that appeared on the surface. At this point she removed the cobs and let the broth cool. We kept it in the fridge until I stepped in to complete the soup. 

We like to add more fresh corn to finish this soup but the fresh corn at the market did not look good and decide to use frozen corn instead. I tasted the broth which had a nice corn flavor and was very sweet. I decided to strain out the old onion and some of the debris from the corn. In a pan, I sautéed or sweated finely minced onion (1 large) in a mixture of butter and olive oil. I then added back the corn broth and half a bag of the frozen yellow corn. I cooked it for 20 minutes and using the immersion blender, homogenized the corn kernels and onion. It is good to strain the soup again at this point to remove any tough skin that may have come from the new corn kernels. I then added the remaining frozen corn to the broth and cooked it for another 10 minutes. I seasoned it with salt and white pepper.

Corn is such an integral part of what summer is all about and while this soup is not very thick it has an amazing corn flavor--representing the very essence of corn-ness (if that is a word). The additional corn kernels add a nice element of texture. Since it has been an extremely hot and humid summer, we served this soup cold but it is also good hot. A very refreshing summer soup.

Monday, August 22, 2011

Chow-chow pickles チャウチャウ ピクルス

In the food section of Washington Post online, I found a recipe for scrapple (a fairly "refined" version) and sent it to my wife. Since she created Auntie N's no-crapple scrapple, I thought she would be most interested in this recipe. As she was looking through the scrapple recipe, she also came across a recipe for a dressing which is based on (store-bought) "chow-chow", Pennsylvania Dutch pickles.  Although she is not Pennsylvania Dutch, she grew up in the Pennsylvania Dutch country. She tells me that chow-chow was ubiquitous and appeared everywhere. It was even served in the school cafeteria.

Chow-chow is one of the classic Pennsylvania dutch "Seven Sweets and Seven Sours" which by tradition should be included in every dinner served to company. The seven sours included: pickled vegetables (such as pickled cauliflower, beets, or cabbage), coleslaw, dill pickles, green tomato relish, meat jelly and spiced cucumbers in addition to chow-chow. (For those who are interested the sweets included: jelly (currant or apple), apple butter or apple sauce, preserves such as quince, candied watermelon rind or wild strawberry, two or three pies such as schnitz, shoofly, funeral or montgomery and cheese cake). As a kid, my wife particularly liked chow-chow because she could pick out the veggies she liked best from the wide selection that made up the dish. Although my wife knew chow-chow as exclusively PA dutch, we found out that it is also a southern dish. The Pennsylvania version, however, is said to be much sweeter than the southern.  Over the years my wife has looked for but never found a recipe that reproduces the chow-chow of her childhood.  She searched on line and found this one based on an old Pennsylvania dutch cookbook from the 1930's.

Vegetables: Red and yellow pepper, cut in strips (one each), Cauliflower (one head, separated into small florets), celery (two stalks cut in to 3 inch buttons), green beans (on hand full), corn (kernels from 2 cobs, uncooked), kidney beans (one 15 oz can), black beans (one 15 oz can), Lima beans (one package, frozen thawed) (picture below upper left). The cauliflower and beans were precooked by steaming.

Pickling liquid: She used sushi vinegar (1 cup), (this is obviously her modification--sushi vinegar is not traditional to Pennsylvania Dutch cooking. She said she used it because it is milder than the traditional cider vinegar), sugar (1 cup), water (1 cup), kosher salt (2 Tbs.), ground turmeric (1 tbs), black pepper corns (1 tbs), cinnamon stick (one), whole all spice (1/2 tbs). She simmered these ingredients in a pot for about 30 minutes. (top right picture).  

Then she strained the syrup to remove the spices. She poured the strained syrup back into the pot and added whole bay leaves (3), hot red peppers (dried, 2), yellow mustard seed (2 tbs), celery seeds (1 1/2 tsp) and simmered the mixture for another 10 minutes. 

She arranged the vegetables in a glass baking dish (top left picture, since we did not have a glass pickling jar) and poured the hot liquid over the vegetables, stirred well and covered. After it cooled she put it in the refrigerator. The recipe said 'wait at least a week before serving. Because of the way these pickles were made they are considered "refrigerator pickles" meaning that they should be kept in the fridge and will not last more than a couple of weeks. The traditional PA dutch method is, of course sterilized, "heavy duty" canning.

After waiting a week my wife tasted the chow-chow...she was ecstatic!! This was the traditional taste of her childhood that she had been looking for all these years.  She was so excited she called me at work to tell me the pickles were a success. She said that the minute she tasted them she was instantly transported back to her childhood--summer picnics, dinners at friend's houses, cafeteria lunches, community suppers at the firehouse. As she said, Proust really knew what he was talking about with those madelaines.  

This is a very mild pickle with a pleasing sweet and sour taste. If truth be told, it is a little too sweet for me (my wife says that she probably liked it as a child because it was sweet--she said she still likes it a lot). All the additional spices give it a distinctive depth of flavor. The veggies are still very crisp and the diversity of ingredients makes it very interesting. Chow-chow is sometimes referred to as "the end of summer pickles". It includes such a variety of vegetables because these are all the veggies that are left over from pickling individual vegetables from the summer harvest. I suspect my wife will be making this again. It is certainly worth the effort.  

Sunday, August 21, 2011

Sardines escabeche イワシの南蛮漬け

This is the second dish I made from some fresh sardines we got. For this dish, I used two sardines. This is a classic preparation of "Nanban" 南蛮 or Japanese-style escabeche. Essentially, the fish was first fried and then soaked in sweet vinegar with other vegetables.

Preparation of sardines: For this dish, I decided to use filets rather than the bone-in whole fish. After scaling the fish, I filleted them into three layers; two fillets of fish flesh and one layer of back bone. In Japanese culinary parlance, this is called "san-mai oroshi" 三枚下ろし. I use my own quick way to do this which is more like the Western style of filleting fish than the more traditional Japanese way.  Using  a narrow-bladed boning or fillet knife (instead of more traditional "deba" knife), I cut across just under the gills until the blade hit the back bone (do not cut through). Then, I turned the blade, 90 degree towards the tail and sliced off the fillet along the back bone. I do not even bother to gut the fish beforehand. I turned the fish over and repeated. I ended up with two fillets and the head with back bone attached (hence "san-mai" or three "sheets").  Using a fish bone tweezers, I remove all visible small bones especially inside the belly portion of the fish (this is very tedious). I also cut off some of the edges. After that, I washed and patted the fillets dry. I seasoned them with salt and white pepper and sprinkled sake over everything and kept them in the refrigerator covered until I was ready to cook (#1 in the image below).

Sweet vinegar: Again there are many variations but, this time,  I used my short-cut method. I just mixed rice vinegar (3 tbs), soy sauce (3 tbs) mirin (2 tbs)  and sugar (1/2 tsp). I also added two dried hot peppers cut into small rings (removing the seeds).

Vegetables: I julienned carrot (one small) and celery (two stalks) in a slightly larger than match stick size. I also sliced Vidalia onion (1/2, medium). I like my vegetables to be "cured" so I added and soaked the vegetables several hours at room temperature in sweet vinegar in a sealed container.
Frying: I removed the excess sake on the fish filetts using a paper towel and dredged them in potato starch or "katakuriko" 片栗粉. I deep fried the fish in 170F or 340C vegetable oil for several minutes on both sides. I drained the excess oil by resting the fish on a wire rack (I use a small frying pan with just half inch of oil. I will not reuse this oil since the sardines make it taste "fishy").

Meanwhile, I removed the vegetables from the sweet vinegar and arranged them on two plates (#4 above). While hot, I soaked the fillets in the sweet vinegar and turned them over several times to coat nicely (#3 above). I placed the fillets over the vegetables and garnished them with finely julienned ginger and perilla leaves (#4).

It turned out that the red pepper I used (bought it in a Japanese grocery store) was atomically hot. Especially the vegetables got really spicy. The fish was nicely crunchy with a sweet vinegar taste. No need to worry about bones because of the preparation I did. For me, the spiciness was the higher boundary of "OK" but, for my wife, it was too much especially for the vegetables but she finished the fish with gusto. the only drink we can think of is cold sake for this dish.