Saturday, September 10, 2011

Baked Monk fish with smoked paprika (poor man's lobster) ベイクドパプリカアンコウ(擬製ロブスター)

Does this look like a nice lobster tail with caper butter lemon sauce? If it does, I was very successful in fooling you.
I usually do not get fresh fish at our regular grocery store since the fish does not look great most of the time. We go to (more expensive) gourmet markets to buy fish and some specialty meats. But today, they had monk fish which looked good and I got one. As you know, Japanese will make use of all parts of this deep water bottom feeder. Its liver is cherished and is called "ankimo" but here in U.S., the only part we see in the market is the tail meat. I pondered a while about how to cook this and decided to bake it with paprika. I do not remember where I got this recipe/idea. I used to cook Monk fish tails this way quite often  but I have not done this for some time. I have posted Monk fish cooked other ways but the end result of this method is that it looks like a nice fat lobster tail, although the texture and taste are not quite similar.
I had a 3/4 lb filet for 2 (small) servings. I first removed the thin membrane from the meat without wasting too much meat underneath. I then made a slit in the center lengthwise (left in the image above). I coated the filet with olive oil and season it with salt, black pepper, and smoked paprika powder (either Spanish or domestic, I used domestic). You need to use quite a good amount of paprika to get good end results. I then sautéd the bottom side in a mixture of olive oil and butter (2 tsp each) on a hot frying pan (medium high heat) for a few minutes. If you place the fish in the pan when the oil/butter is melted and hot, it will not stick. I also decided to cook/bake, green beans with it (right on the image above). I then placed the pan in a 350F oven for 10-12 minutes or until the inner temperature of the thickest part of the fish read 145-150F using a digital quick read thermometer. This is the only fish I know of, which needs to "rest'. I removed the fillets to a plate and loosely covered them with aluminum foil to let them rest at least 5 minutes.

Meanwhile I made lemon caper butter sauce. After the fish was out of the pan, I pushed the green beans on the side and added shallot (one, finely chopped) and sauteed for 1 minute or so and deglazed it with white vermouth (1 tbs). When the liquid reduced to almost dry, I added several  more small pats of butter (total of 2-3 tsps). When the butter melted, I added  lemon juice (2 tsp), capers (1 tsp) and chopped parsley. 

I sliced the cooked Monk fish into medallions and  poured the lemon caper butter sauce over them. The fish was not overcooked and very tender. Paprika is mostly for color but does add a nice slightly smoky flavor. The texture and taste are not quite like a real lobster tail but it is a very nice dish if a bit butter heavy. I could have had this with nice dry sparkling wine but instead we had cold sake.

Thursday, September 8, 2011

Pork tenderloin roulade with sun-dried tomato and olive 豚ヒレ肉のルーラード

I made this one evening and served it as the main course for dinner. The next day I served the leftovers as a drinking snack. I think this recipe is based on one in Cooks Illustrated.

Pork: I used my usual vacuum packed pork tenderloins. I trimmed and removed fat and sliver skin. I then cut it along the length of the tenderloin leaving 1/2 inch on the other side and opened it up like a book. Using a meat pounder, I flattened the tenderloin into a 1/2 inch thick rectangle. 

Stuffing: You can use any kind of stuffing but the amount you can use is rather small so you should make it highly flavorful. For these two tenderloins, I used sun-dried tomato (packed in olive oil, 6-7 chopped), black (Karamata) olive (8-9 pitted and chopped), lemon zest (one lemon using micro-grater), garlic (2 cloves), fresh thyme (3-4 sprigs, stem removed), anchovy fillets (4 packed in oil). I put everything in a mini-food processor and pureed it until it became a stiff paste. I added a bit of olive oil and black pepper (It was plenty salty from the anchovy and olive).

Assembly: Since the stuffing was rather strong, I did not season the inside of the meat. I spread a single layer of baby spinach leaves (if you have them, fresh basil leaves would work) and then spread the stuffing. In the same manner as when I make sushi roll, I made a tight roll trussed it with butcher twine in two inch intervals (see image below). I smeared the surface with olive oil and seasoned it with salt and pepper.

I could have grilled this on a Weber grill but I did not (not enough time). I just browned the surface in a frying pan with olive oil (1 tbs), turning 90 degree every few minutes. I then finished in in a pre-heated 400F oven for 8-10 minutes or until the center of the rolls registered 150F. I let it rest for 5-10 minutes. When I served this for dinner, I may have made red wine sauce (I think).

A few days later, I just sliced it and drizzled on a small amount of olive oil. I probably overdid the anchovy but otherwise the stuffing was very flavorful and no sauce was really needed . I served this on a layer of cucumber slices which added a nice fresh contrast in flavor and texture. 

Tuesday, September 6, 2011

"Chikuwa" stuffed with cucumber and cheese 竹輪のチーズとキュウリの射込み

When I made fried chikuwa sticks, I had two chikuwa leftover since one package contained 4 chikuwa. The next day, I decided to make this quick dish which is again a classic lowly Izakaya or homey dish which does not really involve "cooking". Since chikuwa has a convenient hollow center, it is perfect to stuff the space with something, which is called "ikomi" 射込み in Japanese culinary parlance. Actually some fish cakes are made with the center already filled such as "goboten" ごぼう天 (the center contains a burdock root).

Here, I made sticks of Raclette cheese and cucumber and filled the center holes of each chikuwa. Chikuwa is elastic so you do not have to carve the cheese and cucumber precisely. I just make sure the entire length of chikuwa is stuffed. I cut it in half first. I then cut the half obliquely into two pieces. You may have to shave the flat bottom to make it stand up like you see in the picture above for a better presentation.

I added the last of wasabi-zuke わさび漬け with soy sauce. You could serve this with wasabi paste and soy sauce as well. This is nothing special but serves well as a small snack which goes well with whatever you happened to be drinking.

Sunday, September 4, 2011

"Chikuwa" fish cake "isobe" fry 竹輪の磯辺揚げ

I was pleasantly surprised to discover I have not already blogged this item. This is another classic Izakaya fare. You will never see this in fancy or (not even fancy) restaurants. You have to make it at home or have it at an Izakaya. To make this you need a type of fish cake called "Chikuwa" 竹輪. Chikuwa literally means "bamboo ring" since traditionally it was made by putting fish meat paste or surimi すりみ around a small stick of bamboo and steaming it first then grilling it (if grilled it is called "yaki-chikuwa"). The bamboo stick left a hole in the center of the cylinder of fish cake. I am sure it is now mass produced using an extruder. Chikuwa is an essential item in oden. I can buy frozen chikuwa at the Japanese grocery store.

To make this dish, I cut chikuwa (2 for 2 small serving) into 4 pieces lengthwise and cut its length in half producing 8 small sticks from one chikuwa.

Batter; I used cake flour (3 tbs) and rice four (1 tbs, optional) and dried aonori  青海苔 (1 tsp, optional) and cold water to make a rather loose batter.

After coating each piece of the chikuwa sticks, I fried them in 170C or (340F) vegetable oil for 1-2 minutes or until a crispy crust formed (it doesn't have to cook long because chikuwa is already cooked). Serve hot with a lemon wedge and salt (optional).

This is a quick but perfect small dish for your sake. Nice crunchy crust has oceanic taste of aonori with soft but slightly chewy fish cake inside.

Friday, September 2, 2011

Rice cake "isobe" roll お餅の磯辺巻き

"Mochi" 餅 is steamed glutenous rice pounded into paste which is shaped into discs with one convexed side ("maru-mochi" 丸餅) or rolled out ("noshi-mochi" 伸し餅) and cut into small rectangles ("kiri-mochi" 切り餅). Instead of using a traditional wooden mallet or "kine" 杵 and mortar or "usu" 臼, nowadays, mochi can be made at home using a smal mochi making machine and, apparently, mochi can be made using a Kitchen-Aid mixer with a dough hook. The easiest way, however, is to buy packaged commercially produced mochi at a Japanese grocery store which is the route we usually take.

Especially If mochi is made at home, you could enjoy it while it is still warm and soft, however, more commonly, it is allowed to harden. Hardened mochi cakes can last at least a few weeks or longer and easily can be transformed back into a soft and edible state by boiling or grilling. After all, it does have its origins as a preserved food or emergency ration. Although it is eaten year around and many types of Japanese crackers are also made from mochi, it is a traditional New Year food (so that house wives do not have to cook rice for at least the first 3 days of New Year). I have posted mochi in New Year soup called "Zouni" 雑煮 and in a deep fried tofu pouch for "oden" おでん called "mochi kinchaku" 餅巾着 or "mochi-kin" for short.

One of the simplest and quickest ways to prepare mochi, however, is this dish called "Isobemaki". "Isobe" means "seashore" and "maki" means "wrap" or "roll", since it is wrapped in dried nori sea weed. We had this "isobemaki" 磯辺巻き one evening (one each) as an ending dish or "shime" dish. The taste brought me back to my childhood. Most of the Japanese families used to eat mochi more in quantity, in frequency, and for a longer period in New Year. When I was a kid, we used to eat mochi for breakfast and lunch at least in the first 3 days of New Year. We used to eat "isobemaki" mochi as lunch.

We bought a package of "kiri-mochi" for the past New Year. This is individually sealed in a plastic wrap and lasts for long time in the refrigerator. So one night, I decided to make this dish. It is not even a recipe but here it is.

Toasting mochi: Traditionally, mochi is grilled on a charcoal braiser but, in modern days, a toaster oven is the best choice. It tends to become very sticky so I used a small removable metal grate which prevents the mochi from sticking to the grate of the toaster oven. The small grate can be easily cleaned by soaking in water first.  I toasted the mochi like a piece of bread but I kept an eye on it closely. When it started puffing up I stopped cooking and took it out.

Sauce: This is sometimes called "sato(u)jouyu" 砂糖醤油 and can be very easily made. It is a mixture of sugar and soy sauce. The ratio is up to your taste but I use 1:1 rato. I microwave it briefly (a few seconds) so that sugar melts completely.

After I coated all sides of the cooked mochi, I wrapped it with a rectagular portion of dried nori sheet. If you hold the nori sheet on the mochi for a few seonds with chopsticks, it will stick to mochi like you see above. As you eat, you could dip it in the sauce if you like.

My wife told me that this is the very first Japanese food she ever ate. While at college she shared a dormitory house with a girl who grew up in Japan. Her family sent her a "CARE" package for New Year which included "mochi" and nori to wrap it in. My wife tasted it and immediately liked it. In her enthusiasm to share her new discovery she raced to take a piece to another friend who scowled at it critically and said, "wait, take the paper off first," referring to the nori. Every time I serve this dish my wife nostalgically laughs about that comment. In any case, this is not a bad ending for the evening of an Izakaya feast, although I do not know any Izakaya which would serve a mochi dish like this.

Wednesday, August 31, 2011

Baked Stuffed "Giant" yellow squash イエロースクワッシュの肉詰め

This was a bit of a challenge. I was given this over-(and home-)grown yellow squash with a comment from my friend, Jimmy, "Maybe YOU can do something with it" implying he would not cook this giant.  I decided to make stuffed baked squash.

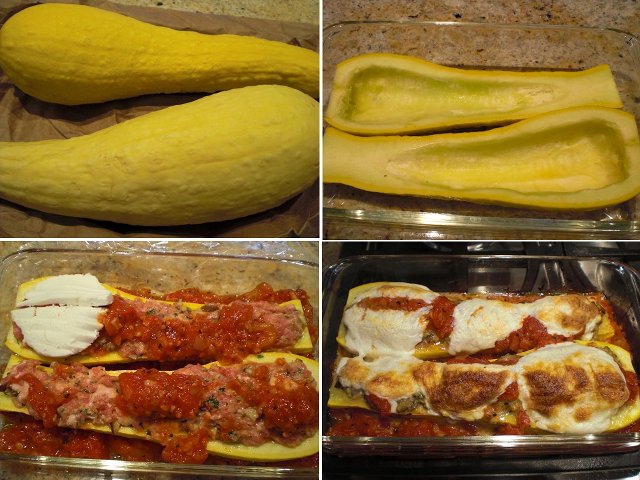
Here is the home (over)grown yellow squash (below, upper left). It is at least 10 inch long. I scooped out the seeds in the center and sliced the skin side so that the squash would sit flat inside the glass baking dish (below upper right).

Ground pork: My wife was making a scrapple from ground pork and I used whatever she did not use. Instead of buying ground pork, we bought 2.5 lb of a pork butt roast and ground it ourselves. I intentionally did not remove all the fat. I first cut the meat in small cube with a knife and then pulsed it in a food processor until I attained the desired texture.

Meat stuffing: I used about 1 lb of ground pork. I mixed in shallot (1 medium, finely chopped), garlic (1 fat glove finely chopped), fresh parsley (1 tsp, finely chopped), dried oregano (1/4 tsp), dried basil (1/4 tsp), black pepper (1/4 tsp) and salt (1/2 tsp), Japanese "panko" bread crumbs (about 1/2 cup), and egg (one large, beaten) and kneaded it by hand until it became a bit sticky and well mixed.

Sauce: I quickly made my marinara sauce from garlic (4 cloves finely chopped) and canned whole plum tomatoes (the tomatoes from 2 cans (8 oz. each) crushed into small chunks). I cooked the garlic in olive oil (3 -4 tbs) until fragrant (1 minute) and added the tomatoes with the  juice and turned the heat to simmer. I added salt, black pepper (to taste), bay leaves (2) and dried oregano and basel. After simmering for 5 minutes I tasted it and added sugar (1/4 tsp, optional) to cut the acidity.

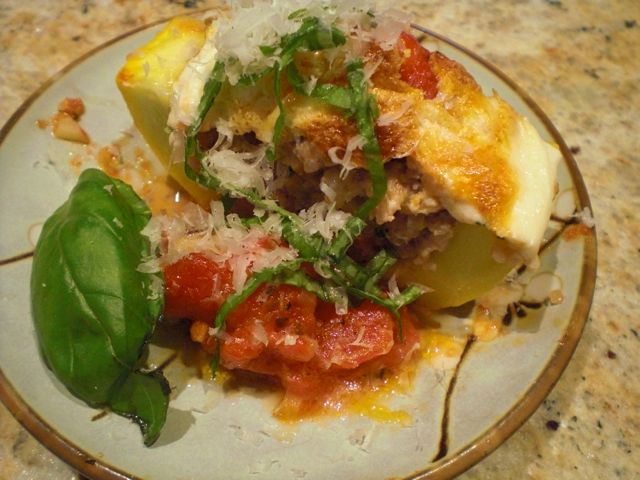
Assembly: I stuffed the squash cavities with the pork mixture and spread the sauce over and around the squash (above lower left). I placed slices of fresh mozzarella cheese on top and baked it in 350F convection oven for 40 minutes (above lower right).

I served this with a chiffonade of fresh basel leaves. The squash was still a bit hard! I thought baking it for 40 minutes would make this giant squash soft but I was wrong. I should have pre baked or pre-cooked it. We only tasted small portions. The next day, I added a bit more sauce and a mixture of shredded aged cheddar and Mozzarella cheese and re-baked it for another 30 minutes in a 350F oven. This time, the squash was soft. Of course, you could stuff the squash with your favorite uncooked Italian sausage (out of its casing). This tasted pretty good especially with red wine. Since I did not have suitable Italian reds handy, we went for Califronia Cab Ridgeline 2004 from Alexander valley with this dish.

Monday, August 29, 2011

Auntie N's no-crapple scrapple redux スクラップル 再登場

We previously posted scrapple which is a well-known and somewhat dreaded Pennsylvania Dutch breakfast item widely served in diners in Philadelphia. The authentic recipe requires a hog's head but my wife made it from stewed pork spare ribs and since it is not made with any offal, we called it "Auntie N's no-crapple scrapple". I came across another "civilized" scrapple recipe in the Washington Post on line which does not call for a whole hog's head boiled for several days. I forwarded this recipe to her hoping she would try it--which she did.

Ingredients from the Post article:
1 1/2 pounds ground pork
25 ounces chicken broth, preferably homemade
1 cup yellow cornmeal
1/2 cup flour, plus 1/4 cup for dusting the scrapple
1 tablespoon minced garlic
1 tablespoon minced shallots
1 teaspoon Old Bay seasoning
1 teaspoon chopped fresh thyme
1 teaspoon chopped fresh basil
Salt
Freshly ground black pepper
2 tablespoons olive oil, or more as needed (may substitute butter)

The recipe calls for ground pork. Since this is "no crapple-scrapple" we didn't want to use ground pork from the market because then we couldn't guarantee it didn't contain any crapple. So we purchased a pork butt roast and ground the meat ourselves. Grinding the pork was the extent of my contribution to the dish. I handed the prepared pork to Auntie N and she took over the preparation.

Auntie N wrote: While I used the basic ingredients from the Post article I put them together differently based on previous experience making scrapple. I browned the pork in a saucepan then added the broth bringing the mixture just to a boil. I added the garlic and shallots. In a separate bowl I combined the cornmeal and flour. I slowly added the dry ingredients to the pork broth mixture whisking briskly to prevent lumps. As if making polenta I stirred the mixture until it got very stiff and pulled away from the sides of the pan. Then I added the old bay seasoning, chopped fresh thyme and basil as well as salt and pepper to taste. I poured the mixture into a bread loaf pan to cool.

To cook, I sliced the pieces that were about 1/2 inch thick, lightly floured the surface and pan fried them on medium high heat for about 5 minutes a side.

The pieces cooked up very nicely with a pleasing crust outside and soft center. It turns out that this is a much more refined scrapple than the one I am used to. While it had a pleasing pork taste it was not as permeating as the more traditional recipe. In addition the various herbs and spices are a very good combination in their own right but not the intense rustic flavors characteristic of traditional scrapple (which in fact many people don't entirely appreciate). If you are one of those people this is a nice variation and worth trying.