Thursday, June 7, 2012

Coleslaw コールスロー

On Memorial day weekend, my wife wanted to have coleslaw to usher in the start of summer. In Japanese-Western dishes or "Yoshoku" 洋食 such as tonkatsu トンカツ, shredded raw cabbage is the most favorite accompaniment but my wife in general is not a fan of cabbage particularly shredded raw cabbage. I usually end up disguising the cabbage with some type of dressing. This time, she wanted classic unadulterated American style coleslaw—we’re talking the start of the summer season after all.

CIMG5004

By her direction, I played the role of a human cuisine art and sliced cabbage, carrot in thin strips and finely diced red onion for her. The amount is arbitrary but we used 7-8 leaves of cabbage, with thick veins removed and thinly sliced, and two medium carrots, thinly sliced on the bias and then finely julienned. She also added 1/2 cup of raisins in a large bowl as you see below.

CIMG4999
Dressing: There are many variations  but below is what she used.
Mayonnaise 1/2 cup
Plain yogurt 1/2 cup
Red onion 1 small, finely chopped
Sushi vinegar 1 Tbs.
Worcestershire sauce 1 tsp
Sugar 1/4 tsp
Kosher salt 1/2 tsp
Ground black pepper to taste

She dressed the coleslaw and let it sit in the refrigerator for, at least, several hours, before serving. The slaw will get better next day. This is near-classic American coleslaw and it was ridiculously good. I have to admit, even for me, I would rather eat this than just shredded raw cabbage. The finely chopped sweet red onion is what made the dish. Also, even though this type of coleslaw is usually made with a dressing of mayonnaise, the addition of the yogurt makes the dressing more healthy but oddly enough none of the mayo flavor is lost.

Tuesday, June 5, 2012

Beef back rib BBQ on Memorial day 牛バックリブのバーベキュー

On Memorial day, we like to barbecue particularly if the weather allows. We tend to be in a rut and cook whole chickens served with sides of potato and macaroni salads. We have done roast pork, beef, lamb etc and wanted to do something different this year. So we cooked beef back rib this year.
We fired up two Weber kettles. One was used for baking pizzas and the other was used to cook the ribs. Oh, we also made teba gyoza. The answer to my wife’s question how many wings can I prepare and cook one time; twelve! (see below).


I removed the wingtips to save space on the grill. I ended up cooking the teba gyoza in two batches but if we were not cooking the ribs, I could have cooked all 12 at once.  I did not take a picture of the final and cooked teba gyoza but it is the same as before but lacking the handle (i.e. wingtips) to hold onto.

The recipe for the ribs is based on ones listed in the  Weber webpage.

Ribs: I got center back ribs (with 6 ribs). I removed excess fat and rubbed the dry rub below I placed the ribs in the Ziploc bag and refrigerated for 8 hours.

Dry rub: Dried oregano (2 tsp), smoked paprika (2 tsp), dried granulated onion  (2 tsp), brown sugar (1 tsp), kosher salt (1 tsp), and ground black pepper (1 tsp).

Barbecue sauce: Initially I was to use store bought Mango BBQ sauce (which had been given to us sometime ago) but, upon tasting, I decided it was too sweet and my wife decided to make her own BBQ sauce. Here is the recipe my wife made which is a “classic” ketchup based sauce. Her recipe is based on one in “Joy of Cooking” but with her own variations. It is also very similar to the one used in pork spare rib.
For the sauce; Two medium onions were coarsely diced and sauteed in a small amount of olive oil until soft and caramerized (15-20 minutes). One cup of ketchup was added to the pan and cooked, scraping the bits left behind from cooking the onions, until the sugar in the ketchup was caramelized (the color will change from red to more dull brownish color). Combine, the onion and the ketchup in a sauce pan with a mixture of rice vinegar (2 tbs), water (1/2 cup), lemon (1/4 cup), paprika powder (1/2 tsp), Worcestershire sauce ( 1 tbs), salt (1 tsp), brown sugar (1 tbs) and mustard (1 tbs.) and simmer for about 15 minutes. I added about ½ cup of red wine (since we did not have wine which did not pass our Wednesday wine drinkability criteria - lowest-, we used one we will be drinking in the near future) to the sauce and simmered it for 5-6 minutes and kept it warm.

I took the ribs from the refrigerator 30 minutes before cooking to come to room temperature. I prepared the grill for indirect heat and added soaked apple wood chips for smoking. Using the direct heat part of the grill, I seared both side 5-6 minutes each. I then transfer the ribs (I had to cut it in half) to a Pyrex baking dish and poured the wine/BBQ sauce mixture over the ribs and covered it tightly with aluminium foil. I placed it in the indirect heart area and further cooked it for 1 more hour (see picture below).

As you can see the sauce reduced and the meat was almost coming off the bones. It is usual to serve it with the bone on, but the meat just came of the bone as I was serving. So I just served the meat sans (without) bone (the first picture).

We are not connoisseurs of BBQ as they are in the South and Texas, but we thought these were mighty good ribs with BBQ sauce. The sauce; caramelized with the juice from the meat was just the right consistency--ooey-gooey, mildly smokey sweet and sour. The meat had a nice crust and melted in your mouth. We had our usual macaroni salad (Memorial day would not be Memorial day without that) with the addition of black bean corn salad. But this combined with the pizza, and the chicken wings--which had to be tasted as they came off the grill, of course, was way too much food.


As and antidote/libation, we chose shiraz from Maclaren valley, Australia called Clarendon Hills McLaren Valley Piggott Range Vineyard, Syrah 2005. This is a very nice heavy duty shiraz. It stood up against the strong flavorof the BBQed ribs. This one got 97 from Wine Advocate.
97 Points - Wine Advocate
Deep crimson in color with mineral notes, violets, spice box, black pepper, espresso, smoked game, and blueberry aromatics. Deceivingly opulent, it has enough structure to merit 8-10 years of cellaring and should make old bones. Drink it through 2035."

Sunday, June 3, 2012

Pizza BBQed in Weber kettle ピッザバーベキュー

Although I generally don't do anything particularly extraordinary, it appears,  based on the reaction of my dinner guests, that my pizza is not bad, decent pizza. They appear to really like it and some have even been unabashed in trying to emulate what I do. (I suppose this is an ultimate flattery--which I fully support by coaching them in achieving good results). As I posted before, I use a hot oven with a pizza stone but for some time I’ve wanted to make pizza in the Weber kettle. I bought a pizza stone for the Weber more than 1 year ago but I did not have a chance to try it until this Memorial day. I decided to make a pizza Marguerite as shown below.  
Mine is very basic without any special ingredients. The amount here is more than enough to make two pizzas (about 8 inch in diameter). I first added light olive oil (4 tbs) in a pan on low flame. I then add chopped garlic (3 fat cloves, finely chopped) and let it fry slowly for several minutes or until fragrant but not browned. I added one can of whole Italian tomatoes with its juice (cut into small chunks, 15 oz). I seasoned it with dried oregano (1/2 tsp),  dried basil (1/2 tsp), black pepper, and salt. I simmered it  for about 1 hour with a lid off (left upper in the image below). I made a sauce dry without any extra moisture (right upper in the image below).

: There are quite a few different types of Pizza stones for grills being sold. What I got is semicircular shaped which fits into the 22.5 inch Weber Kettle perfectly and the bottom cutout precisely corresponds with the grill's hinged grate so that you could add coals and wood chips during the cooking. It came with instructions but I could not find them. So I used my common sense but obviously some more refinement is required to perfect pizza made on the Weber grill as you can see below. I prepared the lump hardwood charcoal using a Although I generally don’t do anything particularly extraordinary, it appears, based on the reactions of my dinner guest’s that my pizza is not bad chimney starter as usual. I spread the hot coals in the bottom of the grill, placed the grate and the pizza stone over them. I let the stone warm up with the lid on for 30 minutes. Just before putting on the pizza, I threw in apple wood chips soaked in water.


Dough: This is my usual pizza dough. I proof the yeast by dissolving yeast (1 package) in ⅕ cup lukewarm water with a pinch of sugar. After 5 minutes, the mixture got bubbly indicating good vigorous yeast. I added cold water to make it to 1 cup. In a food processor with a dough blade, I added bread flour (3 and ¼ cup) and salt (1/2 tbs). While on low speed, I drizzled olive oil (2 tbs) and then 1 cup of water and the yeast mixture. I watched until a dough ball formed on the blade and added a little more water (2-3 more tbs). I stopped the blade and touched the dough to make sure the dough was soft and slightly sticky. I let it sit for 5 minutes to distribute the water evenly. I turned on the food processor on low speed for 30 seconds or so. I dumped out the dough on a well floured board and kneaded for 5 minutes until the dough was nicely elastic and the surface was smooth. I sprayed the inside of a one-gallon size Ziploc bag with PAM and placed the dough inside and squeezed out the air as much as you could and sealed it shut. I let it raise for 1-2 hours on the counter top (the volume doubles). After deflating the dough, I divided it into 4 and made small balls. I let it rest for 5-10 minutes so that the dough will relax. I made it to a 8 inch round by stretching the dough (first the edge of the dough and then center which was repeated).

Cheese: For one pizza, I used fresh Mozzarella (high moisture content) and for another smoked one with low moisture content. Both are sliced but not shredded.

Assembly and baking for the first pizza: I first placed the stretched dough on wooden pizza peel which is covered with cornmeal. I brushed the dough with garlic infused olive oil (finely chopped garlic placed in olive oil. You should do this just before baking pizza. If you keep garlic under the oil too long, you may risk botulism). I first placed the slices of fresh Mazzerella cheese on top of the dough followed by my tomato sauce. I put the cheese next to the crust and the sauce on top of the cheese for several reasons. First it provides a barrier between the crust and the moisture of the sauce preventing the crust from becoming soggy. Second, if the cheese is put on top of the sauce the molten cheese sometimes slides off the pizza like a magma flow while you’re trying to eat the slice because the sauce underneath provides no traction for the weight of the cheese on top (common among chain-store pizzas). I slid the dough with the topping directly on the top of the stone (image above), closed the lid and baked it for 7-8 minutes.

Assembly and baking for the second pizza: For this one, I first baked the dough blank on the stone (This is what I do if I am not using the stone) for 3-4 minutes or until the bottom of the dough was firm and the surface started puffing up. I flipped it over and place the sliced smoked Mazzerella cheese and spread the tomato sauce on the top. I closed the lid and let it bake for another 5 minutes.

For both pizza, after baking, I grated Parmigiano-Reggiano cheese on the top and garnished it with chiffonade of fresh basil (top picture).

Well, both were more than edible but not my best. The bottom got a bit high-done on the first one--it was quite crispy but basically carbonized. The second one was much better. I may have to do some rearranging to the charcoal next time; maybe using semi-indirect heat. Both pizzas, did not have the wood smoke flavor I was expecting. I may have to add more wood chips and few minutes before baking pizza especially since the pizza does not stay in the Weber for long. But with a good red wine, the pizza was great. After two pizzas, I also baked a blank dough brushed with olive oil and torn leaves of fresh rosemary from our herb garden with some kosher salt sprinkled on after baking. This makes a sort of thin crunchy foccasia bread. Of course, we did not finish the pizza especially since we also cooked teba gyoza and beef back rib. The leftover pizza re-heated well in the toaster oven on ensuing weekday evenings which was a wonderful appetiser to come home to after a hard day of work.

Wednesday, May 30, 2012

Baked shiitake mushroom stuffed with pork 椎茸の豚肉詰めオーブン焼き

This is a dish I made from the leftover gyoza stuffing from making teba gyoza 手羽餃子. I happened to have fresh large shiitake mushrooms (about 3 inch diameter) and decided to stuff them with the gyoza stuffing and bake them. This is a variation of the dish I posted before. Becase the mushrooms were very large and meaty, this dish came out very well. I again, served this with a side of Sriracha hot sauce.


Pork stuffing: I used up a bit over half of the gyoza stuffing left over from making the teba gyoza.

Shiitake mushroom: I found these large fresh mushrooms in our near-by gourmet grocery store a few days ago and bought them thinking I would make some kind of stuffed and baked dish. I washed and removed the stem and squeezed out the extra moisture. I put a small amount of olive oil in the cap (which was promptly absorbed) and simply stuffed the caps with the gyoza mixture (left upper in the image blow).


I baked them in a 400F toaster oven for 30 minutes (right upper and left lower in the image above). Some juice, which was nicely seasoned, came out. I cut the stuffed mushrooms in half showing the bottom shiitake and top gyoza stuffing (right lower in the above image).

I served this with some of the juice accumulated in the bottom of the baking dish and a side of Sriracha hot sauce. The shiitake mushrooms gave a nice meaty texture which soaked up the meat juice. This is a very satisfying dish. 

(A few days later we made a meal by combining several of these left over stuffed mushrooms with the barbecued gyoza chicken wings--it was a mighty fine combination).

Although this will go with any drinks, we were having this with an interesting Sonoma red blend called "The Barrister 2010". They equate this to Orin-Swift "The prisoner", which we rather liked (I am not sure the "Barrister" was so named because they were comparing this wine to the "Prisoner" and indicating "barrister" is better than "prisoner"???). This is a red made of many varietals but the kitchen sink. Although I could not find what kinds of grapes were in it, we definitely tasted and smelled black pepper indicating a good amount of syrah component. This is a good food wine and great with the this dish.

Monday, May 28, 2012

"Teba gyoza" stuffed chicken wings, baked and BBQed 手羽餃子オーブン焼きとバベキュー

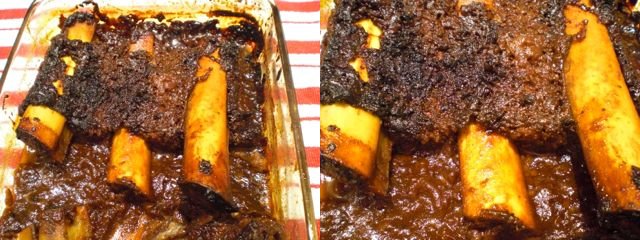
Sometime ago when I posted "Teba Gyoza" 手羽餃子, which was deep fried, I promised that I would try baking or grilling it to see what happens. Finally I had a chance. Here I cooked teba gyoza two ways; the left in the image below was hot smoked/grilled using a Weber kettle and the right baked in a toaster oven.
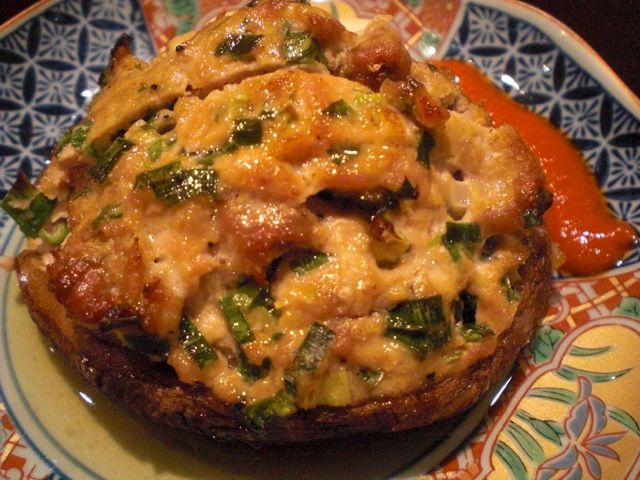
The version which was hot smoked/grilled in the Weber kettle looked much nicer with its mahogany color, crispy skin and juicy meat stuffing inside with a good smoky flavor (below).
The oven baked one was not bad at all either, although it did not look as good and lacked the smoky flavor.
Although the preparation process is almost identical to the previous post, I added more visual aids.

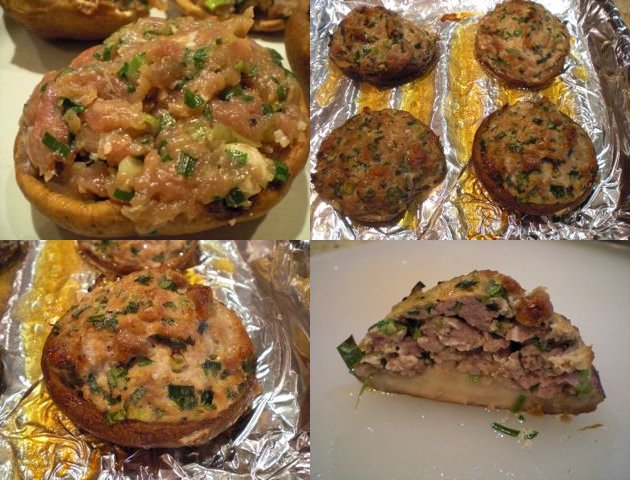
Gyoza stuffing: I did not use boiled shredded cabbage this time. As usual, I made the hand chopped ground pork from the trimmings of two pork tenderloins. This time I weighed the trimmings and they were 12 and 3/8 oz (or about 300 grams). I mixed in garlic chive (from our herb garden, finely chopped, 2 tbs), scallion (finely chopped, 2tbs), ginger (1/2 tsp, grated or from the tube), garlic (1/2 tsp grated or from the tube) salt (1/2 tsp), sesame oil (1-2 tbs), black pepper (1/2 tsp) and soy sauce (1 tsp). I mixed them well by hand until the texture was elastic and holding together (#1 in the image below). Half of this amount was sufficient to stuff 6 wings (i.e. this amount would be sufficient for 12 or more wings).

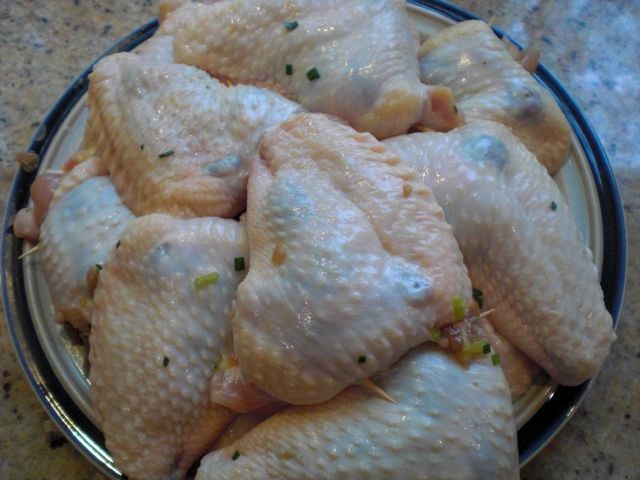
Preparation of the chicken wings: This is the most tricky step. I started with cutting around the bone (humerus) to separate the meat from the bone (#2). Holding the end of the bone in vertical position, I scraped the meat from the bone until I reached the joint (elbow joint equivalent). During this process, I made sure not to poke any holes into the skin. I then grabbed the bone and, with bending and twisting motions, removed the bone from the joint (#3).  Before stuffing, I put my finger into the cavity and separated the skin and and bone as much as I could without breaking the skin and stuffed the cavity with the gyoza mixture (#4).
Using a tooth pick and a sewing motion, I closed the opening (#5). I prepared 6 wings (#6). More than half of the gyoza stuffing remained which will be used for another dish.

Baking: The first day, I baked the wings in a 450F toaster oven for 30 minutes turning them over once after 15-20 minutes.

Hot smoking and grilling: The next day, we barbecued two whole chickens in our usual way. I added teba gyoza to the area of indirect heat and cooked for 30 minutes. I used hickory wood chips soaked in water for hot smoking.

Either way, the teba gyoza were great. They were much better, in fact, than the deep fried ones. The hot smoked version is better in appearance and flavors of the two but the baked one is much easier to cook.
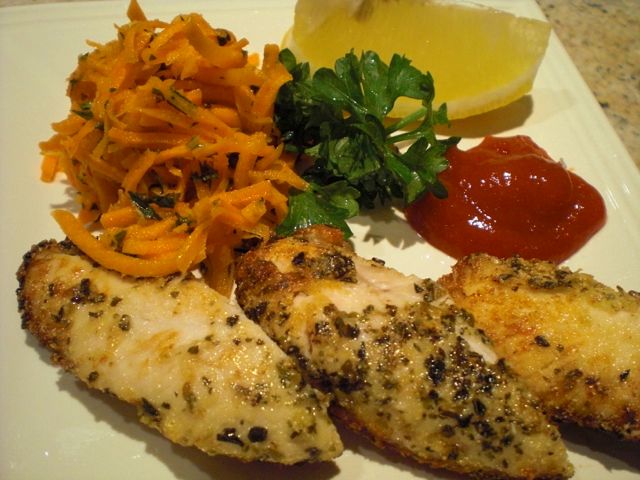
Here is the cross section showing the gyoza stuffing in the baked version. This is a great dish for beer and sake. Since the stuffing is well seasoned, there is no need for a sauce but I served this with a side of Sriracha hot sauce. If you like spicy flavors, this really enhances all the flavor of this dish.

P.S. The leftovers heated up very well in the toaster oven but the difference between the baked and hot smoked versions became more pronounced, i.e., the hot smoked ones were much better or even better than when they were originally cooked since reheating in the toaster oven made the skin really crispy. Now my wife is asking how many wings I can prepare and cook at one time in the barbeque.
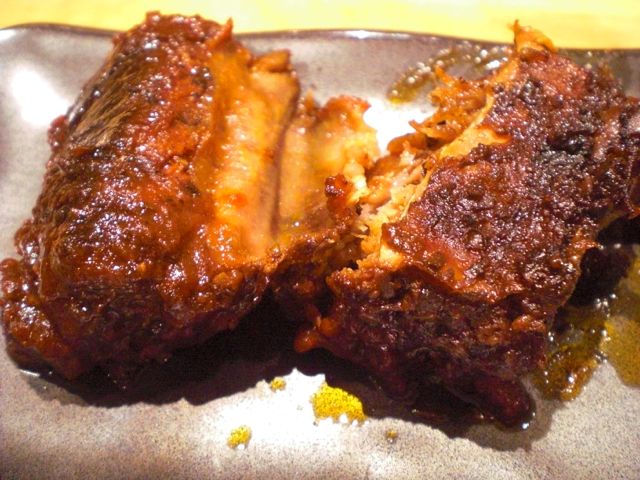
Saturday, May 26, 2012

Grilled soft shell crab ソフトシェルクラブの炭焼き

One nice sunny weekend, we stumbled onto a new farmer's market set up in the parking lot of a near-by strip mall. We bought some herbs to plant in our herb garden, nicely sweet and ripe strawberries, hot-house tomatoes (not as good as true summer tomatoes) and a few more items. One of the vendors was a fish monger selling fish from a refrigerated truck. Since they had soft-shell crabs, we could not resist and bought two.

Since it was such a nice sunny day, not too cold not too hot and no overt signs of mosquitos, we really wanted to stay outside. So, we decided to grill the soft-shell crabs instead of cooking them in our usual tempura method.

I somehow forgot to put my camera on "macro" mode and all the pictures I took except for the one (above) were out of focus and I cannot show you what the final servings looked like.

As usual, I started lump charcoal in a chimney starter and use our "Yakitori" grill for this. For basting, I made a mixture of melted butter (non-salted) and olive oil (about 1:1). I heated up the butter and olive oil for a few minutes and added finely chopped shallot. I then seasoned it with black pepper, salt, lemon zest and lemon juice and let it cool down to room temperature.

I brushed the butter mixture on the top side of the crabs and started grilling with the top side down (left in the above picture). After 4-5 minutes when the skin of the crabs turned red and blackend in spots, I basted the underside with the butter mixture and turned it over and cooked another 4-5 minutes (right in the above picture).

Although my picture did not turn out and I cannot show what the final servings looked like, I precut the cooked crabs and served it with grilled asparagus (using the same basting mixture) and grilled tomato halves (skinned, salted and coated with the same butter mixture) and a wedge of lemon. As usual, I also made grilled rice balls as an ending dish with cucumber slices in vinegar dressing with "jako" 胡瓜と雑魚の酢の物.

Although grilled soft-shell crabs are not bad, the skin does not get as crispy as in tempura and we both agreed tempura is the best way to enjoy soft-shell crabs. While edible, the crabs did not entirely meet my wife's standard of freshness, so we will probably not be buying anything else from that vendor. But, at least, we were outside cooking and enjoying the food and wine al fresco.

Thursday, May 24, 2012

Shredded carrot salad with Italian chicken tenderloin 人参のサラダ、鶏の笹身イタリアンソテー

This post is not for the chicken tenders but for the carrot salad which was made by my wife. She made it in a rather large quantity so that we could eat it as a "side" with our lunches during the week at work. She is known to have made shredded carrot salad in the past. It was one of the dishes she served when she first invited me for dinner to her apartment ions ago. Back then she used a blender with a bit of water to shred carrots but now she uses a food processor. As a accompaniment for her carrot salad, I made Italian style chicken tenderloin.

Chicken tenderloin: I used three tenderloins for two small servings. I just seasoned them with salt, pepper, dried basel and oregano. I then dredged in yellow corn meal and fried them in olive oil.

I have to ask my wife to fill in for this quite nice shredded carrot salad.

Again this is a recipe based on the one for spiced carrot salad found in the "500 appetizers" cookbook. As usual we could not resist making variations. I shredded a large bag of carrots in the food processor. (Cook the carrots in batches in the micro wave for 30 seconds, stir and cook about another 30 seconds until the carrots get a bit tender but still have crunch).  Then I made a dressing of: 1/2 tsp. ground ginger, 1 tsp. cumin, 1/2 tsp ground coriander, 1/2 tsp paprika, 1/8 tsp cayenne pepper, finely chopped candied ginger to taste, 4 tsp. sushi vinegar, 3 Tbs. olive oil, 2 tsp. chopped mint. I also added about 1 cup of raisins and the juice from 2 limes. I mixed all the spices together with the liquid ingredients and poured the dressing over the carrots and raisins. I let it sit for several hours for the flavors to marry (as a matter-of-fact the salad gets better every day). 

The sweetness of the carrots combined with the raisins and the dressing make a very sweet/savory combination. Over time the carrots exude juice which blends with the dressing. It is a great way to eat your veggies.