Wednesday, August 8, 2012

Beef scallion rolls 葱巻き

This is a classic home cooked dish, especially for bento boxes, as well as an Izakaya dish. It is also a very common item you will find in American Japanese restaurants. Since I had thinly sliced frozen beef for sukiyaki (#2 in the second picture) and it would not improve with time, I decided the time had come to thaw it.

Rolling thinly sliced meat, either beef or pork, around a core of vegetables or any cylindrical edible object (even a hotdog) is a very common Japanese technique.

It so happened that we were short of any vegetables except scallion so I made this scallion roll. The amounts are for three rolls perfect for two small servings (Picture above).

Scallion: I removed the outer layer, the root ends and green part of about a dozen scallions (#1).

Beef: This was thinly sliced beef for sukiyaki (frozen). I used 2-3 slices per roll depending on the integrity and size of the beef slice and 3-4 scallions in the center and made three rolls (#3).
With the seam side down, I seared the meat using a non-stick frying pan on medium flame with a small amount of oil (I used light olive oil) (#4). I seared all four sides and then added the seasoning.

Seasoning: This could be any store bought teriyaki-style sauce. I did not want to make it sweet so I used an equal amount of sake (2 tbs) and concentrated noodle sauce or “mentusyu” from the bottle (2 tbs). You could use mirin instead of sake to make it more classic teriyaki flavor (i.e. sweet). (#5).

I put a tightly fitting lid on the pan and steam/braised it for few minutes (#5). When the sauce was reduced, I remove the lid and moved the pan back and forth to roll the beef scallion rolls in the sauce to completely coat them(#6).

I sliced one roll into 4 pieces and served (the first picture). This is a rather mundane dish but my wife really liked it. If available, I would have used “Tokyo scallion” or “Naganegi” 長葱 but multiples of regular scallions is just fine and probably much more tender.

Sunday, August 5, 2012

Umeshu Highball 梅酒ハイボール

I usually make plum wine or plum liquor 梅酒 every year from the harvest of our plum tree in the backyard. Because we had to transplant our Japanese plum tree last year (which required some severe pruning), I did not make plum wine in 2011. Then I found some batches of plum wines which I started 2010 tucked away in a cabinet. They were still in the jars with the plums. There were three jars; one made with brandy, two with vodka. The plums had been submerged for 2 years instead of the usual one year. Even the ones with Vodka looked rather dark. I tasted them and they all tasted just fine and looked nice and clear. So I quickly bottled it. I used empty sake bottles with screw tops.


After filling quite few empty sake bottles, a small amount of the Vodka plum wine remained and I put it in a small carafe for immediate consumption (on the right in the picture below).

CIMG5202
Since it has been hot and muggy, I decide to serve this as a “High ball” (or Umeshu and soda). The alcoholic content of this Vodka and Brandy umeshu is rather high (40%), this is a perfect way to enjoy it.

umeshu hiball
This is the first time I left alcohol and plums together for 2 years but it appears the oxidation was accelerated judging from the dark color. The taste is also much mellower than I would expect from just bottled umeshu. This is perfect for summer days. This is a Japanese answer to Campari and soda. Within a few days, the umeshu in the carafe was gone...it has been rather hot summer.

Friday, August 3, 2012

Cold water melon soup with wasabi sauce 冷製スイカスープの山葵クリームソース添え

This is my wife's summery cold water melon soup. When we buy a whole water melon, even a miniature variety, two of us cannot possibly finish it before it goes bad. We eat some but what we can not eat, my wife often makes into a cold soup. This is a very refreshing soup and perfect for the hot muggy dog days of summer we are having.

We added wasabi cream swirls to the soup for a Japanese touch.
This is the easiest soup you could possibly make but you have to have a sweet and ripe water melon. We used a seedless melon but you could use seeded ones but you have to remove all the seeds. I usually remove the meat of the fruit from the rind and cut it into small cubes for the sake of convenience.

My wife just put the cubes of watermelon into a large stainless steel bowl and added butter milk* (enough but the amount is arbitrary)  and blended it using an emersion blender. She also added the juice from half of a lemon. That is about it. It makes a nice pastel pink color.

*Butter milk: I am not sure you can get buttermilk in Japan. I have never seen it but I lived there a very long time ago. Traditional buttermilk is a by-product of churning butter and cream from whole milk. The whey left after churning butter from milk is let to ferment and becomes “buttermilk”. The kind we can get at the grocery store, however, is “cultured” buttermilk in which a type of lactobacillus is added to milk to make it ferment. My wife actually drinks buttermilk and says she can identify the flavor of different brands. Me, I cannot touch the stuff (too acidic and strange tasting). It tastes awful to me but I love this soup.

Wasabi cream sauce: My wife originally concocted this; it is a mixture of grated wasabi (from a  tube), crème fraise and milk. Again, I never measure the amount but I aim for a nice saucy consistency and subtle but good amount of wasabi zing.

After I put the soup in a soup dish, I drizzled the wasabi cream sauce in circular motion and garnish it with chopped chives but if you have, fresh mint that would be better.

This is a such a wonderful cold sop for hot summer. Somehow the butter milk disappears cuts the sweetness of the watermelon and just adds a depth to the soup. The wasabi cream adds a zing to the refreshing taste.

Tuesday, July 31, 2012

Vidalia onion salad with garlic chive and chicken skin 玉ねぎのサラダ、ニラ、雛皮入り

This is another quick dish I concocted. The main ingredient is Vidalia onion which is known for its sweetness (Vidalia onion is a particular cultivar growing in low sulfa soil in Vidalia, Georgia). I am not sure if there is something similar in Japan. In any case, raw onion salad is a regular izakaya affair, a variation of which I have posted before. This is another variation of raw onion salad using Vidalia onion with the addition of blanched garlic chives and chicken skin which is the by-product of the sake-steamed or “sakamushi” 酒蒸しchicken.

The amounts are for two good sized servings (good size for us, any way).

Onion: I first halved the onion and then sliced very thinly (my ceramic “nakiri” knife is the best for this) to make long strips (half of medium sized  Vidalia onion). Although Vidalia onion is sweet and less astringent than regular or red onion, I added some salt, kneaded, let it stand for few minutes and then soaked  in cold water for 5 minutes or so, I drained and then wrung out the excess moisture in a paper towel. If you like the strong flavor of onion, you can skip this step.

Garlic chive: These are our home grown garlic chives. The amount is arbitrary but I used a half inch diameter bundle. I blanched it in rapidly boiling salted water for 30 seconds to 1 minute, drained and spread out on a paper towel lined plate to cool down quickly. I squeezed out the excess moisture and cut it in 2 inch segment.

Chicken skin: I just used the skin of the sakamushi chicken breast (from 4 breasts) cut into thin julienne. This is optional or can be substituted with julienned cooked meat, ham, or even with grilled deep fried tofu pouch “abura-age” 油揚げ.

Dressing: I was still out of Ponzu sauce, so I made dressing from semi congealed liquid in the container in which I kept the sakamushi chicken or you can use dashi broth (3 tbs), soy sauce (3 tbs, reduced salt kind), and rice vinegar (1 tbs). For good measure, I added Yuzu koshou (1/2 tsp).
I dressed the ingredients and garnished it with slices of Campari tomato (skinned).

This is nothing spectacular but mild raw onion and blanched garlic chive are a good combination. This is a very refreshing salad or sunomono 酢の物 to start the evening.

Saturday, July 28, 2012

Cold thin udon noodles with dipping sauce 冷たいうどん

We are having some very hot and humid days including a sudden big storm called a (derecho). The storm was incredibly violent. Large trees with trunks several feet in diameter were split in half by the high winds. This happened to a number of trees around us. All of the debris from the downed trees ended up in our neighbors yard but luckily they did not cause any significant structural damage. In addition we lost our power for just a short period of time. In our area, many other people were not so fortunate. Eleven people lost their lives due to the storm. In addition, many households went without electricity for almost a week in temperatures hovering around 100 F. One evening, I made a cool and easy to eat dish for the hot humid summer evening.
Initially, I thought I would like to make "soumen" 素麺  but I found out that I was totally out of it. The reason, I remembered, was that I threw away all the dried soumen I had few month ago. "Soumen"  has a coat of oil on the surface in the process of making noodles very thin without sticking together. The oil will eventually oxidize. So, soumen does not last as long as other dried noodles.  I looked around and found I had some very thin dried udon which was perfect for eating cold with dipping sauce. This one is called "Harima's thread udon" 播磨の糸うどん (see below left). I have to assume it came from Hyogo prefecture 兵庫県 area where the noodles, especially soumen, are one of their well-known local food items.
Udon noodles: I followed the package instruction and boiled the udon noodles for 8 minutes in rapidly boiling water (no salt) and then quickly rinsed in cold running water. I added ice cubes on top while it was in the colander to cool it down completely.

Condiments: This could be as Spartan as just chopped scallion to anything you like. I went for a rather deluxe (sounds dated) version and included the followings:
1. Chicken breast: This is the leftover barbecued chicken breast which was teased into thin strands.
2. Cucumber: One mini-cucumber was sliced on a slant and then julienned.
3. Golden thread omelet: "Kinshiran" 金糸卵 from one egg.
4. Scallion: Two, finely chopped.
5.  Nori: This is one package of seasoned nori cut into thin strips.

Dipping sauce: I used a bottle of concentrated noodle sauce. According to the instructions on the bottle label, I diluted it to 1 part sauce and 2 parts water. I tasted it. It was slightly less potent than I would have used for dipping sauce but I felt it was fine.
I could have placed the udon on a small serving bamboo basket which is called "zaru" ざる in Japanese (which I have and, if I did use it, this dish could have been officially called "zaru udon" ざるうどん (I did serve cold udon a few days later in a special serving dish with a bamboo mat on the bottom which qualifies this dish as "zaru udon" -see picture below- but, instead, I served these noodles in a rather cool looking square shallow glass bowl (see above picture). I topped the cold udon with slices of pickled okra and cherry*. Since I did not have perilla, I julienned fresh basil leaves and pretended it was perilla.

*Cherry: This is how my wife prepares cherry. She removes the stone or pit using a handy-dandy cherry pitter. She then cuts the pitted cherry in half to make sure no pits were left behind by the pitter (biting into an unsuspected pit is extremely unpleasant not to mention lethal to teeth). Then she marinates the cherries in a small amount of triple sac. This tends to preserve the fruit making it last longer while still retaining its fresh flavor and texture. We used this as our fruit with lunch etc.

The above picture is the "zaru udon" I served on a different day. This time, the green strip (2nd from the top) was indeed a julienne of perilla and the white strip (top) was Vidalia onion (salted, kneaded and briefly soaked in cold water) instead of scallion.  The 3rd strip was sake-steamed chicken, the 4th threads of omelet, and the last cucumber. The condiments were for two of us.

Back to the Udon dish: When I served the dish I of course, placed a bottle of  Japanese 7 flavored red pepper fakes 七味唐辛子 on the same tray to add a little kick (mostly for me). This was a perfect cold dish to finish. We liked this thin udon much better than soumen. It has a nice al dente texture and is nicely smooth as it comes into the mouth.  All the condiments made this noodle dish a full-fledged meal.

Wednesday, July 25, 2012

Baked chicken tenderloin with mayonnaise crust 鶏の笹身のマヨ焼き

This is another small and quick dish. Whenever I make sake steamed chicken, I use split, bone-in, skin-on, chicken breast. When I remove the meat from the bone, I also separate the tenderloins from the breast meat. So I often make a small dish from the tenderloins.

Japanese appear to like mayonnaise (so much so some call themselves “Mayoler” マヨラー or those who like mayo fanatically). Even if you are not “Mayoler”, many baked Japanese dishes call for mayo. This one is such a dish.

Tenderloin: I opened it along the long edge like a book and flattened and lightly salted both sides.

Mayonnaise sauce
: There are many variations but I added a bit of soy sauce and dried “aonori” 青海苔 into store-bought mayonnaise.

I smeared the mayo sauce on one side of the chicken and baked it in a 400F toaster oven for 10-15 minutes or until the surface browned and the meat was done.

I served this with our coleslaw and potato salad. This is a curiously good dish.The mayo forms a crust. It took some time before my wife realized the crust was mayo. She thought it was some kind of melted cheese.

Sunday, July 22, 2012

Fried Marinated "Kon-nyaku" こんにゃくの竜田揚げ

Kon-nyaku. 蒟蒻, some times spelled “konjac ”, and  called “Devil’s tongue” in English, is a rather peculiar food item made out of the starch extracted from a particular vegetable root. It has the consistency of hard jelly and practically no taste and no calories. Japanese traditionally use it as an oden おでん item. I have posted a few dishes using konnyaku. This is another konnyaku dish but, with the deep frying it loses its no calorie status. You do not find this type of dish anywhere but at an Izakaya.


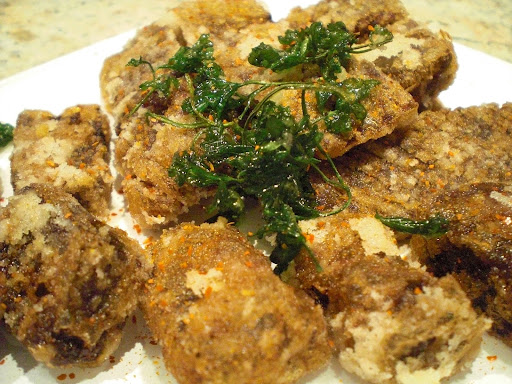
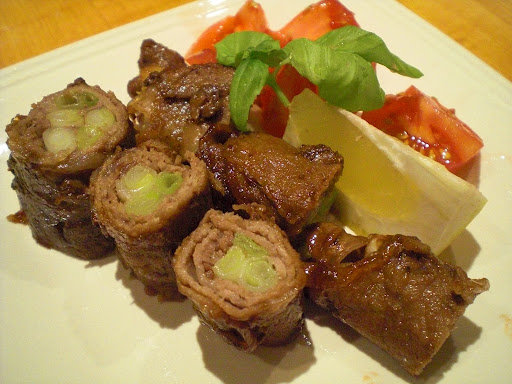
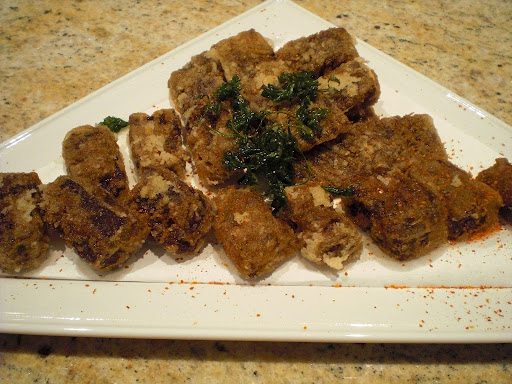
I made two different versions which mostly provide differences in texture rather than taste. I served this dish on a funky triangular shaped plate on which a folded “tempura shikishi 天婦羅敷き紙 paper fits perfectly. I garnished it with deep fried and crispy parsley and sprinkled single flavored  Japanese red pepper flakes or “Ichimi tougarashi” 一味唐辛子.


Preparation of konnyaku
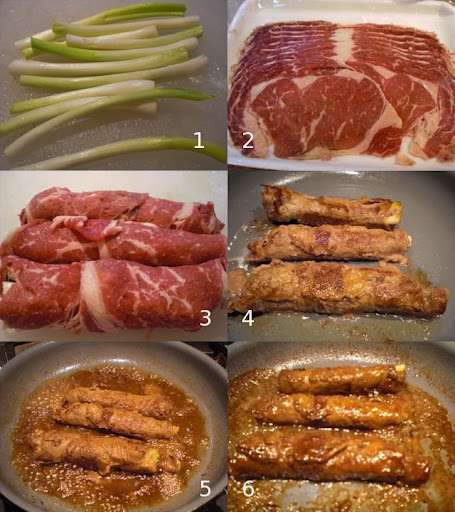
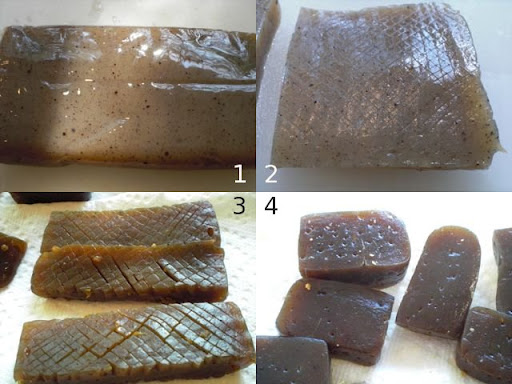
: I first washed and drained one cake of konnyaku (#1 below). To make two versions, I first divided one cake into two equal portions. For one half, I halved the thickness by slicing horizontally as I pressed down using my palm flat on the surface of the konnyaku. I then applied a series of shallow cuts obliquely in one direction, turned it around and added another series of cuts perpendicular to the previous cuts (#2 below). I then turned the pieces over and did the same cuts on the other side. You need to be careful not to cut through. I then cut it into I inch wide strips (#3 below). The other half of konnyaku, I just cut into 1 x 1.5 inch rectangles and poked multiple holes using a fork (#4 below). The idea here is to change the texture of knonyaku as well as make it absorb the marinades (see below) better. After this preparation, I placed the konnyaku pieces in a pot with amplen a amount of water on medium flame. I allowed it to come to the  boil and cooked it for 2-3 minutes. I then drained and washed it in running cold water. This process removed a the peculiar (and rather unpleasant) smell characteristic of konnyaku.

Marinades: I made two marinades. Since no matter how you do it, konnyaku will not absorb marinades or any seasoning easily, I use undiluted soy sauce; one with grated ginger and one with yuzu-koshou. The amounts are again arbitrary but I used about 4 tbs soy sauce and 1/2 tsp each of grated ginger or yuzu-koshou. I marinated the cross hatched ones with the ginger and the rectangular ones with the yuzu koshou. I ended up marinating this for two days in the refrigerator for reasons beyond my control. Ordinarily just a few hours of marination would suffice. There is no worry of over marinating since the konnyak itself does not absorb, instead, the marinades are held in the holes and crevices I created in the konnyaku.

Just before frying, I took the konnyaku pieces out of the marinades and blotted the surface with a paper towel but did not squeeze out the absorbed marinades. I then dredged in potato starch or katakuriko 片栗粉.

Deep frying: I put peanut oil in a frying pan to the depth of about 1 inch on a medium flame. When the oil was 170C (325F), I deep fried the konnyaku pieces for 3 minutes or until the surface got crispy.

I served this piping hot with a sprinkling of one flavor Japanese red pepper flakes 一味唐辛子. The marinades provide enough saltiness and I did not serve this with any dipping sauce. The difference between the two marinades was very subtle but the yuzu-koshou version added more heat and a citrus note. Although it was not bad—how can anything deep fried be bad, we quickly dispatched the entire dish between two of us. Considering the rather tedious preparation and the fact this is “deep fried”, we are not sure if this dish is worth making often. We prefer a simpler dish such as spicy konnyaku stir fry I made previously.