Saturday, September 15, 2012

Shio-koji marinated chicken thighs 鶏の腿肉の塩麹焼き

This is the third try marinading meat in shio-koji. This time I used chicken thighs. As a comparison, I also marinated half of the thighs in teriyaki style marinade. I think this was a success although the surface got totally blackened as you can see.

Chicken thighs: I used 1 pack of chicken thighs (4 in a pack). I removed the bone and excess fat. I butterflied the thick part to make the thickness even and then shallowly cross hatched to increase the contact surface for the marinade. I trimmed the skin but left it on.

Marinades: For the two thighs I marinated teriyaki-style (1 part soy sauce and 1 part mirin with grated ginger root), for the other two I coated the surface with shio-koji. Both were placed in Ziploc bags and marinated over night in the refrigerator.

The next day, I removed the thighs and blotted off any excess surface moisture (#1 below,  lighter ones in the front were shio-koji marinated). I cooked both in an identical way for comparison with small amount of light olive oil in non-stick frying pans on medium-low flames (#2, shio-koji and #3 teriyaki). After a few minutes, I turned them over. The shio-koji ones are much darker (#2) than the teriyaki ones (#3). I kept cooking with the skin side down with identical sized frying pans on the top to press the skin surface down to the bottom of the pans (I was hoping to make the skin crispy all around). I was expecting the shio-koji ones might burn (because they cooked so dark on the first side) but was surprised. The shi-koji marinated ones came out with blackened skin (#4 left) but for the teriyaki ones, the skin was totally burned and melded to the bottom of the pan. I had to remove the thighs abandoning the charred skin leaving it behind in the pan. (My wife would refer to this calamity as “sacrificing the skin to the “pan god”) (#4 right). I have to fine tune the way I cook these thighs.

I served both thighs cut into four equal pieces side-by-side for comparison with our home made potato salad. Our verdict is that the shio-koji ones were very tender and good, although the flavor is not as distinct as the teriyaki ones. For the shio-koji ones, the skin was blackened but crispy and quite edible. So, shio-koji marination worked best for chicken thighs among the kinds of meat we tried (chicken tender and Flat iron steak).

Wednesday, September 12, 2012

Shio-koji marinated flat iron steak フラットアイアンステーキの塩麴焼き

This is the second try on marinating meat in shio-koji. I thought about using skirt steak but settled on flat iron steak which is flavorful but not known for being tender. I thought this would be a good cut to try the effect of shio-koji marination.

I divided the flat iron steak into two equal pieces; one was seasoned with just salt and pepper and the other marinated in shio-koji. This time I marinated the steak for only one hour before cooking since we thought the shio-koji marinated chicken tenderloin was perhaps “over marinated”.

In the picture below, the regular steak is on the left and the shio-koji marinated steak is on the right.

CIMG5261
I cooked both pieces of steak in an identical fashion in the same pan (the left is shio-koji marinated and the right just salt and pepper in the picture below). I seared the surface for a few minutes each and finished it in a 400F oven for 5 minutes.

CIMG5260After I let them rest for a few minutes, I sliced both pieces and served side-by-side with my wife’s oven “fried” potatoes (The first picture). I could have improved on the presentation but I was anxious to taste them. As you can see, although both pieces of steak were cooked identically, the shio-koji marinated steak on the right of the first picture), was less pink and looked more done.

On tasting, the result was the same as the chicken tenderloin. The consistency of shio-koji marinated steak was a bit weird. Again, the steak developed a doughy consistency. We would not call this more “tender” just doughy. We much preferred the salt and peppered piece which was done perfectly in medium rare.

Sunday, September 9, 2012

Blueberry and peach cobbler also known as crips or brown betty ブルーベリーとピーチコブラー

You may have noticed my wife's non-izakaya items started appearing more often. It is getting more difficult for me to come up with new Izakaya style dishes and an occasional entry from my wife is a great help. This is one such post. In the summer when berries and fresh fruit are in abundance my wife makes cobblers. This day she made cobbler out of leftover blueberries and peaches.


This recipe can be made in individual serving dishes or as one large baking dish. I tend to like individual servings because it gives a nice ratio of crunchy crust to cooked fruit. For this recipe I used individual dishes. 

Topping: 2 cups flour, 1 cup sugar, 2 tsp. baking powder,1/4 tsp cinnamon, 1/8 tsp. nutmeg, 2 beaten eggs (plus a 3rd egg set aside to use if needed), 1 tsp of vanilla, one stick of butter melted, 2 pints blueberries, several peaches sliced.

topping halved

1 cups flour, 1/2 cup sugar, 1 tsp. baking powder,1/8 tsp cinnamon, 1/8 tsp. nutmeg, 2 beaten eggs, 1/2 tsp of vanilla, 1/2 tsp of butter melted, 1 pint blueberries, several peaches sliced.

Mix the dry ingredients together. Put the fruit in a bowel and lightly coat it with some of the dry mixture then put the fruit into the cooking containers leaving some room for the topping. In this case I used 4 small soufflé and 4 small Pyrex dishes.

Next comes the tricky part—getting the right mixture of eggs to dry ingredient to make the crumb for the topping. The secret is that the more egg in the topping the crunchier it becomes but if you put in too much egg it turns into a mass rather than a crunchy crumb. So I start with the two eggs called for in the recipe and using my fingers mix it into the flour mixture until crumb starts to form. Then I carefully add the extra egg I set aside a little at a time until the crumb gets larger and start to stick together into large pieces (Picture on lower right). I never use the entire third egg. Once I get the crumb to the right consistency I sprinkle it over the fruit in the containers. Then I add the vanilla to the melted butter and drizzle the butter evenly over the crumb topping.

I put the containers on a cookie sheet (because they frequently bubble over) and cook in a 375 F oven for about 30 minutes for individual containers and 45 to 50 minutes for a single large container or until the fruit is bubbling and the topping is a rich dark brown.

This dish is the essence of summer. The fruit forms a kind of jelly on the bottom and the topping is pleasingly crunchy and slightly sweet with a vanilla butter flavor. Can’t go wrong with this combination. 

Thursday, September 6, 2012

Shio-koji marinated chicken tender 鶏のささ身の塩麴焼き

After I made shio-koji 塩麴 and shio-koji pickled vegetables, I tried chicken tenderloin. Since everybody seems to be raving about the shio-koji marinated food, our expectations were high.

I put just enough shio-koji (10% weight is recommended) to thinly cover the surface of the tenderloins in a Ziploc bag, I massaged it, removed the air as much as I could and let it marinade over night in the refrigerator.

CIMG5258
Next day, I took the chicken tenderloin out of the bag and cooked it using a small amount of light olive oil on a medium-low flame (see below). I did not remove the shio-koji from the surface. Because shio-koji contains starch and sugar, the surface browned much more quickly than without shio-koji. I cooked both sides for several minutes each until it was done.

CIMG5256
I served this with the previously made shio-koji pickled vegetable and Campari tomato (The first picture). How was the chicken? To be honest, we were disappointed. It was OK and the meat was moist but attained a strange “doughy” consistency. It felt like the meat was cooked before it was cooked (it must have been cured in shio-koji). Perhaps, marinating overnight was too much or, perhaps, the benefits of shio-koji are overhyped. Before we give up, we will try several more iterations.

Monday, September 3, 2012

Goat cheese drop biscuit 山羊乳チーズビスケット

This was a classic Southern breakfast which my wife made based on Chef Art Smith of Ophra Winphrey fame. But, this is also a good starch dish to end your evening.

Biscuit ビスケット can mean two totally different things whether the term is used in England (Commonwealth) or in North America. In the former, it is  a type of cookie or short bread  (which is also what Japanese think of “ビスケット”) and the latter, a type of quick bread somewhat similar to scones.Digression alert!: The category of “bread” called “quick” bread, in which biscuit certainly belongs, usually use chemical leavening agents (instead of organic and living  agents such as yeast). These are baking powder and baking soda. Baking soda is rather straight forward. It is “sodium bicarbonate” which requires an external acid to do its job which is to release carbon dioxide gas that causes the bread to rise.

On the other hand, baking powder is more complex. It contains its own source of activating acid in addition to the basic baking soda and is differently formulated depending on the brand.  I am not going into details but “double action” baking powders can contain “aluminum” compounds (heat activated or slow-action part). My wife is very sensitive to the taste of baking powder which contains aluminum compounds (I cannot taste it). She can tell immediately if something has been baked using baking powder with aluminum compounds. For any recipe which calls for baking powder, she uses the brand which does not contain aluminum salts (the brand she uses contains bisodium pyrophosphate).

In addition to the fact that some people are sensitive to the metallic taste of aluminum compounds, aluminum is not a metal I would like to consume. Certain neurodegenerative diseases such as ALS (amyotrophic lateral sclerosis or better know as Lou Gehrig disease in North America) or even Alzheimer may be linked to aluminum (disclaimer; no scientific proof has been established). Japanese often use another “aluminum” salt called “myouban” 明礬 in cooking especially to preserve the bright purple color of eggplant when it is picked (salted). I do believe that we should avoid eating aluminum, although its ill effects are not proven. I’d prefer to eat brown discolored eggplant “tuskemono” 漬物 to avoid the risk of aluminum; proven or not.
I have to ask my wife for the recipe.

This is the recipe doubled—no sense in making small quantities because they go so fast!

4 cups AP flour, 1 Tsp baking soda, 4 tsp baking powder, 2 tsp salt, 8Tbs (4 oz) butter, 8 Tbs. goat cheese, 2 cups buttermilk, chives chopped.
Heat oven to 425, and put cast iron skillet in the oven while it is preheating. (I used one 8 inch, and one 5 inch pan. Place flour, baking soda, powder and salt in a bowl and whisk to evenly distribute ingredients. Cut in the cold butter and goat cheese until they are about the size of small peas. Add the chives and coat with the flour to distribute evenly. Pour in the buttermilk and stir until just moistened.

The next part is a bit intimidating. Take the hot pan out of the oven (be careful because it will be really hot). Drop in a Tbs. of butter or whatever amount is necessary to coat the bottom of the pan. Scoop the batter into the pan in spoonful, (hence the name drop biscuits). I use a large ice cream scoop. Leave room around the biscuits so that they can form a nice crunchy crust. Pop back into the oven and cook for 14-16 minutes until brown. 
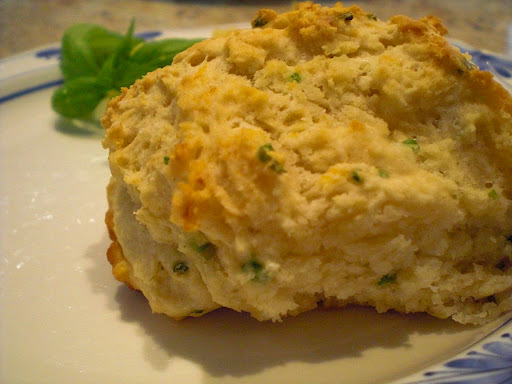
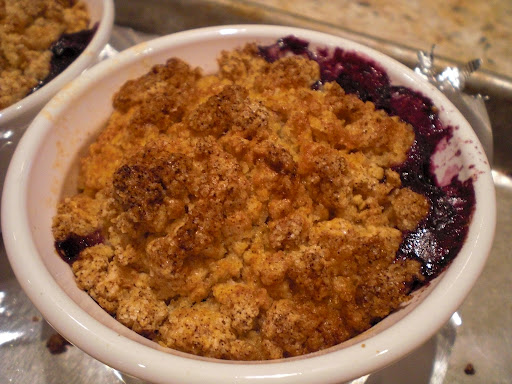
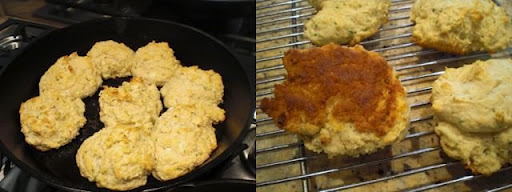
Since the dough is “dropped” into a hot iron skillet (see above left), the bottom of the biscuit became brown and extra  crispy (see above right)—this is without a doubt the best part! The goat cheese flavor with chives in this crunchy fluffy and hot biscuit is good eatin’ any time.

Saturday, September 1, 2012

Ground Okra and Tuna sashimi cubes 鮪のオクラトロロ山かけ

This is by far the most slimy (in a peculiarly good way) dish I ever made and ever encountered. I decide to make this after I saw this recipe on line. This is like tuna "Yamakake" やまかけ but instead of grated "nagaimo" 長いもor "yamaimo", this green slime was made of okra.

Okra: This is one pack of okra (about 12 okra). I first rubbed the surface with kosher salt to remove the "fuzz" and washed away the salt. I blanched for 30 seconds to 1 minute in salted rapidly boiling water (or until the okra’s green color becomes bright). I then drained and dunked the okra into ice water to keep the green color (picture below). I removee the ends and roughly chopped them up. I used an emersion blender and the plastic container that came with the blender. I added an equal mixture of concentrated dipping sauce (menstuyu 麺つゆ) and water and I blended to get a nice consistency.

Tuna: I used the "akami" 赤身 portion of Bluefin tuna I got from Catalina. I just cut it into a bite size cubes and marinated in a mixture of soy sauce and sake (1:1) overnight in a refrigerator.

I assembled it exactly like "Yamakake". I poured the grated okra into the bottom of a small bowl, placed the marinated tuna cubes on top and garnished it with strips of nori and perilla.

The taste?? This is very interesting. This is slime on steroids. It is even more viscous than nagaimo (I could have put more liquid to make it looser) but it has the refreshing green taste of fresh okra. Certainly, this is very unique way of using okra. I may try a different variation in the future but we prefer nagaimo for yamakake dish. Amazingly, I was more resistant to the idea of this green slime than my wife was—she is definitely not a fan of okra but she seemed to like this.

Wednesday, August 29, 2012

Indian-style spinach with fresh cheese curd (Saag Paneer) ほうれん草とチーズカードのカレー

This was entirely made by my wife. It is good but the amount of work involved, especially making the cheese curds, require a bit more energy than we would like to expend. I will let my wife blog this.


This recipe comes from American Test kitchen. I was intrigued by the prospect of making my own cheese—it looked so easy in the recipe. 


For the cheese I used: 2 quarts of 2 percent milk, 2 cups buttermilk and 1/3 Tsp salt. I heated the milk to boiling, took it off the heat and stirred in the buttermilk and salt. I like it stand for about 1 minute (picture above #1). I then poured the contents of the pot into a colander lined with cheese cloth (picture above # 2, 3 & 4). When it cooled down to the point where I could handle it I squeezed the curd as hard as I could to remove more liquid. I then put the still wrapped curd between two plates weighted down with some cans (I used cans of beans). I found that I had to continue draining the curd overnight until it became firm enough to handle and cut into 1 inch size pieces (see picture below).

 
cheese curd

For the spinach sauce I used:One large bag of spinach (12 oz.), The leaves from one bunch of rapini (or broccoli rabe, actual recipe calls for mustard green), 3 tbs butter, 1 tsp. cumin seeds, 1tsp. ground coriander, 1tsp. paprika, 1/2 tsp. ground cardamom, 1/4 tsp ground cinnamon, 1 onion finely chopped, 2 garlic cloves, 1 tbs grated fresh ginger, 1 jalapeno pepper (seeded, deveined and chopped), 1 can of whole tomato (14.5oz), drained and chopped coarsely, 1/2 cup roasted chopped cashews (toasted in the toaster oven) and enough buttermilk to thin the sauce if it gets too thick. I wilted the spinach and rapini in a wok and squeezed out the liquid. I then chopped the leaves and set aside about 1/3 cup of the chopped leaves.


Then I put the butter in a skillet over medium heat and added the cumin, coriander, paprika, cardamom and cinnamon and cooked the spices until they were fragrant. Then I added the onion and salt and cooked until wilted. Next came the garlic, ginger and chili which I cooked until lightly browned and most of the moisture had evaporated from the pan (picture above left). Then I added the tomatoes and continued cooking until the moisture was gone (picture above right). I removed about half the onion mixture and set aside. The rest of the onion mixture as well as the 2/3 of the spinach mixture and 1/2 of the toasted cashews went into a blended and were pureed. I then added the pureed mixture back into the skillet and added the onion mixture and spinach mixture I had set aside. We added some additional hot sauce (Sriracha) to bring up the heat a bit. 

To serve: I cut the cheese curd into inch size pieces and gently folded into the sauce added a little buttermilk and gently heated it. I served it with rice and the remaining cashews sprinkled on top.

The sauce for this dish is fabulous. All of the flavors meld together and the addition of the hot sauce made the flavors sing with a pleasant heat. We ate the sauce and curd with rice. Then, we had the sauce for breakfast on toasted bread with a poached egg on top. We served it as an appetizer on crackers with smoked cheese. It is extremely versatile. I would make the sauce again but I would probably use a commercial product for the curd in the future. I would also try other types of cheese such as feta. It would probably work with tofu as well…my husband will probably say I am getting “too creative” again at the last suggestion.