Tuesday, December 11, 2012

Baby clam "Minnesotan hotdish" 子ハマグリのミネソタ風キャセロール

Recently we cleaned out the basement and my wife found an old box of “Betty Crocker” recipe cards. This was the first cookbook she ever owned. She subscribed to the cookbook and every month she would get a packet of recipe cards which she could store in the  large plastic box they provided for the purpose. In about a year she had the whole cookbook of cards. Over time she stuffed other recipes cut out of newspapers or received from friends into the box. Eventually she moved to more sophisticated recipe books and the box sat gathering dust for at least 25 years. The eclectic collection of newspaper or hand written recipes from friends were by far the most interesting.

This recipe was written in a very careful hand on a used computer punch card (which gives you an idea of how old it is). My wife didn’t remember the dish but the fact she asked for it from a friend indicates that at one time she really liked it. So we decided to make it. As the dish started to take shape we realized that it had to be a “Minnesota hotdish”.  The additional fact that, my wife had a friend from the midwest who was a computer specialist working on a mainframe computer that used punch cards cinched the identification.


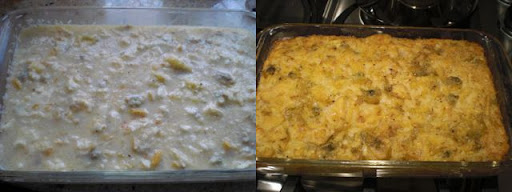
The recipe starts with the unlikely combination of 20 coarsely crushed soda crackers soaked in 1 1/2 cup milk for 20 minutes. In another bowl, mix 3 well-beaten eggs, 1tbs grated onion, the entire contents of a can of baby (or chopped) clams (10 oz can, liquid and all), 1/4 cup melted butter and salt and pepper to taste. After the crackers have soaked add them to the egg mixture. Pour the mixture into a greased 13x9x2 inch pan. Bake in a 300 degree oven for 1 hour.


This comes out like a clam quiche without the crust. The soda crackers completely disappear. It has a very pleasant clam-y taste. It has to be a classic hotdish--easy to make, complete with canned ingredients. Maybe this, unbeknown to us, is a classic “long lost” hotdish favorite. Despite its oddity, I really kinda like this dish. I can see why I asked my friend for the recipe. My husband, however, remains a bit skeptical due to the unusual combination of ingredients. I can see potential here however—sorry hubbie you may be seeing this again in other mutations.

Saturday, December 8, 2012

Pennsylvania Dutch Gingerbread  ジンジャーブレッド

This is another one of wife's quick breads. I only helped by mixing together the dry and wet ingredients (since my wife tends to make a large batch of this bread then freezes it for future use). This PA Dutch gingerbread is very moist and flavorful. We mostly eat it as a breakfast bread. Since I am not wild about the taste of molasses my wife adjusts the flavoring to my preference by using “light molasses” (as it is called in the old Pa Dutch cookbooks). This is a half and half mixture of molasses and corn syrup which tones down the molasses flavor. The original recipe, of course, calls for all molasses (no corn syrup) referred to as just “molasses” in the recipes. If you like an intense molasses taste go with the original specification.

This recipe comes from a cookbook called “the Dutch Peoples Cookbook” Which was published in the early 1960’s. But I think many of the recipes are reprints of much older ones. When I make this I quadruple the recipe which are the amounts shown in the pictures—you can relax, a single amount does not require the 8 eggs shown here.


Single amount recipe: 3 cups flour, 1tsp. baking soda, 2tsp. ground cinnamon, 2 tsp. ground ginger, 1 tsp ground cloves, 1/4 tsp. ground nutmeg, 1/2 cup butter, 1 cup sugar, 2 eggs well beaten, 1 cup light molasses (1/2 cup molasses plus 1/2 cup corn syrup) (or regular molasses if you like the taste). 1/4 cup boiling water, 1 cup buttermilk or sour milk. (Diversion alert: When old PA Dutch recipes call for “sour milk” they do not mean milk that has been left to go bad but rather milk to which an acid has been added. For example, instructions for sour milk read: “put 1 tbs. vinegar or lemon juice into a cup measure and fill the remainder with milk”. This is a good substitute to keep in mind if you don’t have buttermilk.)


Sift together the first 6 ingredients and set aside (picture 1). Mix together the molasses, corn syrup (or just molasses if you are not using light molasses) and the boiling water until they are completely blended and set aside (the measuring cup with the spatula in it in picture 2).  Cream the butter until fluffy (picture 3) and then begin adding the sugar, eggs and molasses mixture shown in picture 2 starting with the sugar (bowl on the left). When it has been incorporated and is fluffy add the eggs one at a time and beat until the mixture is fluffy. Slowly add the molasses mixture. At this point it will look like the mixture has “broken” but don’t worry all is well. Alternatively add the flour mixture and the buttermilk to the butter-egg mixture. (This is where my husband helps because when you are making 4 times the recipe it requires some muscle to mix it together). Pour the batter, which will be very runny, into a well greased (bottom only) 13x9x2 in pan. Bake at 350 degrees about 35 minutes or until a toothpick inserted in the center comes out clean.

This is without a doubt the best gingerbread I have ever eaten. It is moist, full of cinnamon, ginger, molasses flavor with a pleasingly dense texture. I served it with port stewed dried figs as shown in the picture and that is a great combination. I usually make this in the fall and it has become one of our seasonal dishes. I make it in large batches because small batches don’t last long.

Wednesday, December 5, 2012

Persimmon salad 柿のサラダ

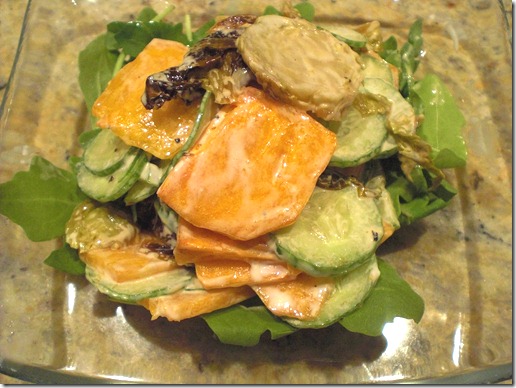
Persimmon or “kaki” 柿 is a quintessential autumn fruit of Japan. Persimmon are not particularly popular in the U.S. mostly because the varieties available may be inedible if not completely ripe—supremely unpleasantly puckering in the mouth. Well, you have to know the type of persimmon and how to avoid the astringent puckering taste (tannin). In contrast, persimmon in Japan are lusciously sweet. Fortunately, the sweeter varieties are appearing in the market in the United States. In any case using sweet persimmons, I made a quick salad one evening by also using leftover blackened Brussels sprouts from Thanksgiving.

CIMG5563

I just sliced American mini-cucumber, blackened (baked)  Brussels sprouts and dressed with mayonnaise and seasoned with salt and black pepper. I placed the salad on the bed of baby arugula. I think you could do “shira-ae” 白和え using tofu as a dressing (tofu, sesame paste, light colored soy sauce).

Because of the nice sweetness of persimmons and different textures of persimmon (firm but soft), cucumber (crispy and refreshing) and Brussels sprout (soft) but also sweet in its own way, this was a nice salad to start.

Digression alert: A few words about persimmon. Persimmon contain a large amount of tannin (the same substance that develops in red wine). Depending on the type of persimmon and its ripeness, it could be astringent or it could be wonderfully sweet. Many Americans do not know this and often end up biting into a totally inedible astringent persimmon and never to try it again. My wife fell into this category.

When I was growing up, there are many kinds of persimmon including some with big stones (seeds) inside and some which puckered your mouth called “shibugaki” 渋柿 but, in my more recent memory, all the persimmon were sweet or “amagaki” 甘柿 with no seeds or stones. This must have been because of the selection of cultivars with only the seedless sweet variety being sold. Other ways to remove the tannin from persimmon is by drying them called “Hoshigaki” 干し柿.  I used to eat this often as a kid. Another way is soaking them in alcohol or “tarugaki” 樽柿. I read also that placing them in carbon dioxide also removes tannin, which was reportedly done on a  large industrial scale.
In any case, at least in our area, at some gourmet grocery stores, you can get persimmon and I see two different kinds being sold.

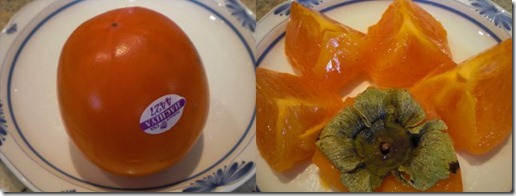
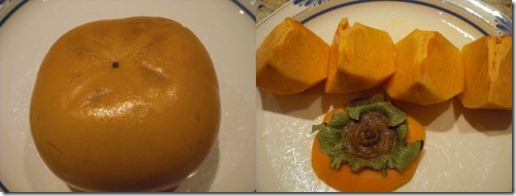
Here is one kind called “Hachiya” 蜂谷. This one has a pointed end and is classified as “Shibugaki” 渋柿 or astringent persimmons. This  means that if you eat this before the meat of fruit become soft and pudding-like, it will pucker your mouth in a big way—”like the mouth of a tightly pulled drawstring purse” according to my wife. I let it sit on the counter for almost 2 weeks before we ate it. As you can see on the right, the meat of the fruit became soft and semi-transparent. This type has a nice sweetness and the fruit melts in your mouth with nice soft pudding-like texture.

Persimmon Hachiya

Here is another type called “Jiro” 次郎. This is square in shape with a flat bottom. This is classified as “amagaki” 甘柿 or sweet persimmon. As long as it is ripe, you do not have to wait until the meat becomes soft. As you can see on the right, the appearance of the meat of this persimmon is quite different from the previous one and the fruit is still firm yet it is not astringent. This is the one I used in the salad.

Persimmon, Hacchin

Once you know these tips about enjoying persimmons, it is one of the most wonderful fruits you can have. Unfortunately, only a small percentage of people in the U.S. enjoy persimmon. On second thought maybe that is good thing; more for those of us who know what to do to enjoy them.

Finally, here is a famous Haiku of Shiki Masaoka 正岡子規 about autumn, the temple bell and persimmon.

柿食えば鐘が鳴るなり法隆寺

I am not going to translate this but Roger Pulvers did this for us in the article in Japan times (9/20/2010).
As lovely and evocative as that is (referring to his friend Natsume’s autumnal haiku), Masaoka went one better than his friend with what has become one of the most well-known haiku in Japan, set at Horyuji Temple in Nara:

"Eat a persimmon / And the bell will toll / At Horyuji."


The tolling of the temple bell is a potent symbol, going back 1,000 years and resonant of the transience of life.”

Sunday, December 2, 2012

Home made tofu from store-bought soy milk 市販豆乳から自家製豆腐

The quality of tofu we can buy in the U.S. is variable. Some of the soft tofu (Japanese brand) we can get at the  Japanese grocery store is not bad at all. Our surrogate Izakaya “Tako Grill” makes a excellent “sukui-dofu” or un-pressed tofu. But I am not satisfied with “momen-dofu” 木綿豆腐 or firm tofu, either from the regular grocery store or from the Japanese grocery store. For this reason, I wanted to make tofu at home but the amount of effort and time made me hesitate to undertake this project.

Recently, while I was browsing through the new cook book called “Japanese farm food” by Nancy Singleton Hachisu, I came across a recipe for home-made tofu and it rekindled my interest in making  tofu. Since this book had a list of Japanese food/cooking tool suppliers, I promptly ordered the tofu press box and nigari にがり coagulant (magnesium chloride). Then, I procrastinated for some time.
Finally I made my first attempt which was a qualified success

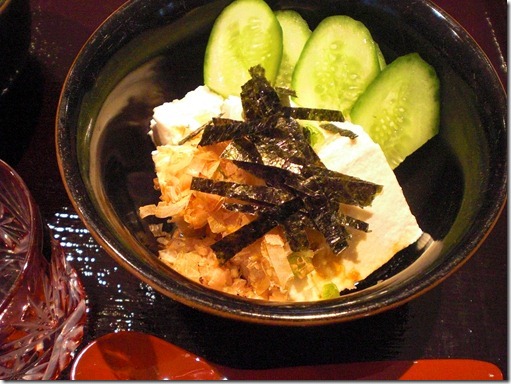
Here is my very first home made tofu served as “hiya-yakko” 冷や奴.

CIMG5551

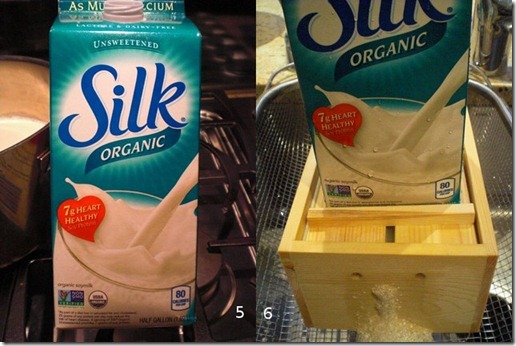
Soy milk: Almost all recipes I can find start from scratch, i.e., making soy milk from dried soy beans. As a matter of fact, the place I ordered my tofu box mainly sells an automated soy milk maker. Before embarking on making soy milk myself, I decided to use store-bought organic unflavored non-sweetened soy milk. I could not find any specific recipes if store-bought soy milk can be used in tofu making. So nothing to loose, I decided to try it on my own. I used half a gallon (2 quarts or nearly 1.9L) as you can see below (#5).

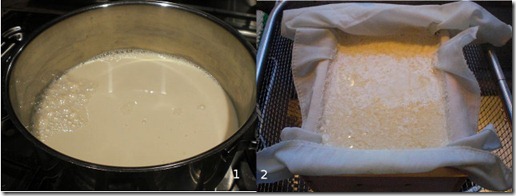
I heated up the soy milk to 180F stirring occasionally to prevent scorching (I measured the temperature using an instant read digital thermometer). As soon as the temp has reached, I cut off the flame #1).

Coagulant
: I dissolved 1 tsp of nigari (magnesium chloride) in 1 cup of warm water and stirred it into the soy milk. Since I stirred several times, it made a very fine curd. This is the area I have to experiment with and improve further.

Tofu box
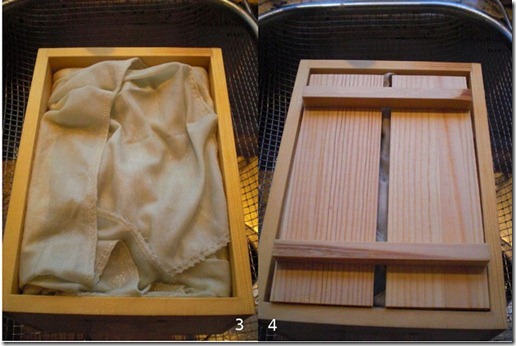
: The tofu box has a removable bottom with slots and the box has several side weeping holes. I set the bottom and side and lined the box with the cloth that came with it. The entire box was set up in a square metal basket which spanned the edges of the sink (so that there would be no chance of back wash). After 10 minutes or so when the curds were fully developed, I poured the curds and whey into the box (#2). I skimmed off any bubbles that formed on the surface.
Tofu1
As the excess whey dripped down and the level was 1/2 inch below the edge, I folded the excess cloth over the curd (#3). I then placed the top plate (#4).
tofu3

As a weight, I used the empty carton of soy milk (#5) filled with water and placed in the center of the top plate (#6).
tofu3

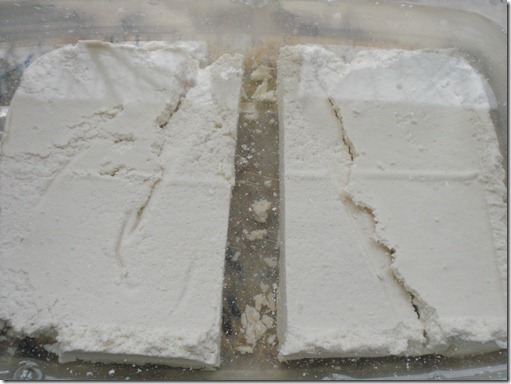
I left the weight for 30-40 minutes. I slipped the still-cloth-wrapped tofu into water (I used our reverse-osmosis filtered water) and unwrapped it under water(below, after I cut it into two). It is not as firm or as solid as I wished but it held its shape.
CIMG5540

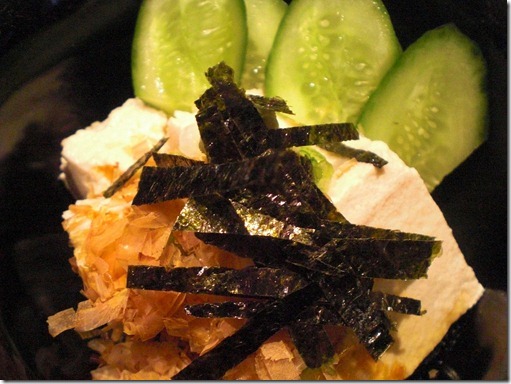
I cut the tofu into smaller blocks under water and served it as you see in the first picture with a garish of chopped scallion, bonito flakes, and thin strips of nori sea weed. I added a small dab of real wasabi and poured undiluted kelp dashi noodle sauce (2x concentrated from the bottle).
CIMG5552

The taste was pretty good—the slightly peanut taste of a legume. It was not as silky in texture as commercial silken tofu but not as grainy or firm as firm tofu. It did not have any off smell/taste which are common among US-made tofu. It could have stronger soybean flavor but this is quite good for my first attempt especially from store bought soy milk.

I read later that, to make a good tofu, soy milk needs to have higher protein than one in the store-bought one (I assume 3-4%  but I am not sure this is correct). It is certain, however, that tofu can be made from store bought soy milk. I may try some more times with store bought soy milk (I have some idea of increasing the protein content) before venturing into making my own soy milk.

Thursday, November 29, 2012

Baked curry flavored cauliflower カレー味焼きカリフラワー

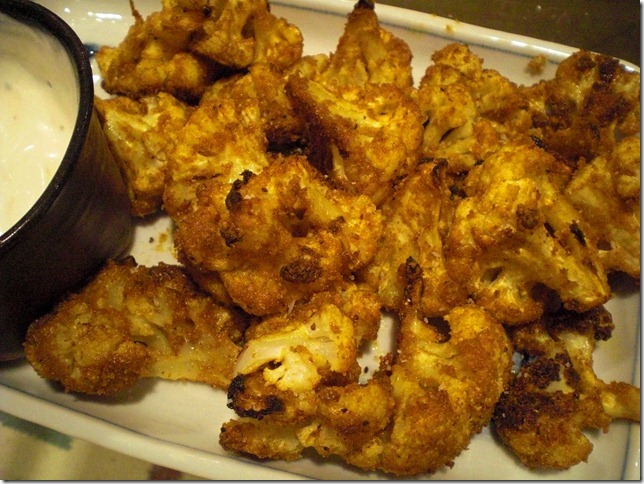
We saw a recipe called “Buffalo wing cauliflower” posted on an internet “recipe site”. Essentially, it was crispy hot (spicy) baked cauliflower. But that recipe did not work well. It called for a kind of batter to coat the cauliflower florets then the florets were to be baked so the crust would get crispy. After the florets were removed from the oven they were to be coated with a mixture of melted butter and hot sauce. Somehow the batter did not work (at all). It was soggy and it made the cauliflower soggy instead of crispy. (did anyone actually try making this dish before posting it)? The idea of spicy nuggets of cauliflower sounded good however, so my wife suggested I try making baked cauliflower like I make my curry flavored wings and I agreed to try it.

CIMG5513

I could have used an oven, either toaster oven or regular oven, but we were doing chicken thighs and wings on the Weber grill and decided to baked this in the grill before I cooked the chicken. (Later I tried with the 400F convection toaster oven for 10-13 minutes which worked well).

The recipe is very simple. I first separated the cauliflower into small florets. I then coated the surface of the florets with olive oil using my hands to toss and coat well.

For seasoning I used 4-6:1 ratio of flours and curry powder (I used “sweet” curry powder) mixture. I placed it in a gallon-size Ziploc bag and coated the florets (I forgot to add salt here and sprinkled it after it was cooked).

CIMG5510

I placed this in a Weber Grill (I set it up for in-direct heat with the hot coal placed only half of the bottom. I placed the cauliflower on the cool side (indirect heat), put the lid (both lower and upper vents open) for 10 minutes (or 400 F oven for 10-13 minutes). We tasted it and felt it was slightly underdone and might need 5 more minutes. But after baking 5 more minutes, we found it was a bit overdone.

In any case, this is a very nice way to eat cauliflower and is a perfect appetizer while waiting for the chicken to cook. The curry was not too hot. The florets had a slight crunch from the combination coating of oil and flour. Our only regret was that they were too soft (over cooked). We must stop cooking when the cauliflower is still a bit underdone since it keeps cooking after removing from the heat. We had this with a dipping sauce of Greek yogurt flavored with blue cheese dressing (our effort to cut excess fat). This works very well since the flavor of the blue cheese dressing permeated the yogurt, and the blue cheese flavor went very well with the curried cauliflower.

Monday, November 26, 2012

Autumnal kara-age with chestnuts and ginkonuts 秋の栗と銀杏のから揚げ

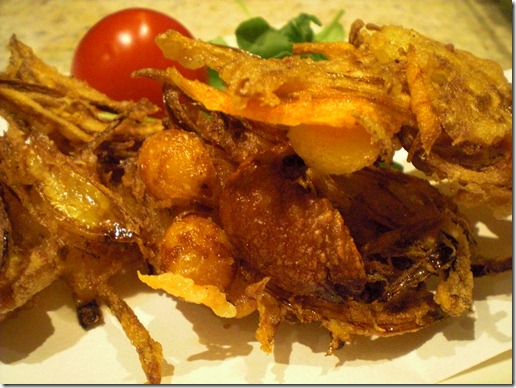
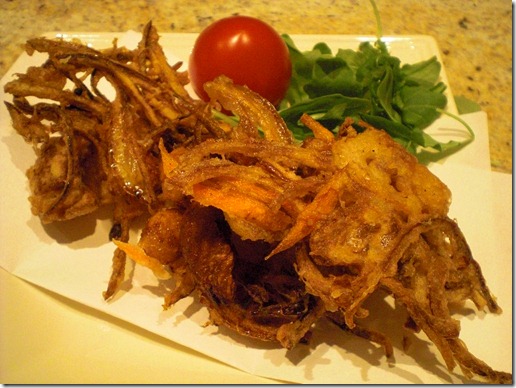
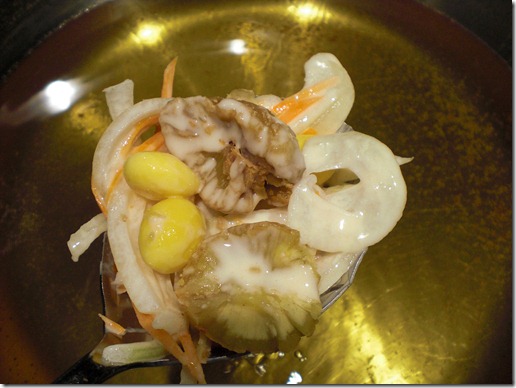
Since I am running out of dishes to make with North American chestnuts, this is my last attempt this fall. Here is "kakiage" かき揚げ with the essences of autumn; ginkonuts 銀杏 and chestnuts 栗.

CIMG5528

Although it is possible to harvest ginko fruits (which nobody here does except some dedicate Japanese expats), clean off the smelly skin, broil and crack open to produce ginkonuts, but it is too smelly and messy work for even for me. I tried it on a very small scale once in the past but that was more than enough for one lifetime. In the center of the kakiage shown in the above picture is a chestnut surrounded by three small yellow ginkonuts (out of a can).

CIMG5526

I used whatever vegetables were available. They included: onion (thinly sliced) and carrot (julienned). The amount is all arbitrary. I first put the vegetables in a bowl and added a pinch of salt and enough cake flour to coat the vegetables and let it sit for a few minutes. The moisture came out of the vegetables and moistened the flour which makes it easier to fry the veggies crispy. This “undercoat” of flour means the batter will coat the vegetables better. I added a bit more flour and cold seltzer water and mixed to make a rather thin runny batter.

On a large spoon or wooden (flat) spatula (or  Japanese "Hera" へら), I placed the mixture and chestnuts (previously boiled and both outer skin and inner skin removed) as shown below.

CIMG5522

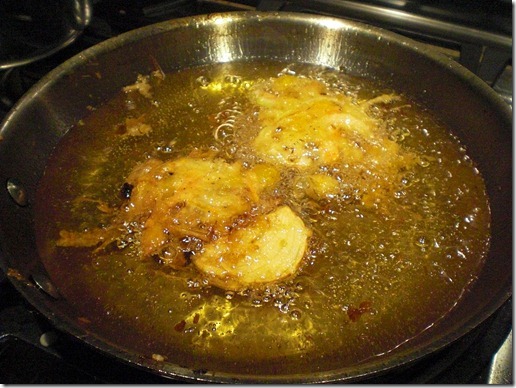
I slipped the mixture into hot oil (175-180C or 350F). I used peanut oil. I fried them for 4-5 minutes until brown and crispy (my oil was a bit too hot).

CIMG5524

The vegetables turned out to be a bit too brown but the crust was very light and crispy and deep frying makes the onions, ginko nuts and chestnuts very sweet. They have a nice texture as well. We had this with my usual green tea salt. Any left overs can be heated up nicely in a toaster oven. To reheat them in a toaster over, however, you need a metal grate over a cookie sheet since excess oil will drip down. This is another winning combination. You can’t go wrong with deep fried onions, a combination of sweet carrot and nuts.

Friday, November 23, 2012

RGPB (Really Good Pumpkin Bread) パンプキンブレッド

Again, this is something my wife made. This recipe came from America's test kitchen. I have to say this is one of the best quick breads I ever tasted. It is moist, flavorful with the crunch of nuts and sweet crumbs on the top. You can eat this any time of the day. It is sweet enough to be even a dessert (at least for us but probably not for most Americans). I asked my wife to take over this post.

This bread consists of two parts: the topping and the bread itself. The secret of this recipe is to cook the pumpkin puree to caramelize slightly and remove the “canned” taste. 


Topping: 5 Tbs. packed light brown sugar,1Tbs. all purpose flour, 1Tbs. unsalted butter softened, 1 Tsp. ground cinnamon, 1/8 Tsp. salt. I used my fingers to mix all the ingredients together until the mixture resembled coarse sand.

Bread: 
2 cups all purpose flour, 
1 1/2 Tsp baking powder, 
1/2 Tsp. baking soda, 
1, 15 oz. can of unsweetened pumpkin puree (According direct mathematical conversion 15 oz. should equal 425 grams.  But when I weighed the actual contents of the can it came out to 418 grams. I provide this information in case I don’t have a can of that exact size), 
1tsp. salt, 
1 1/2 tsp ground cinnamon, 
1/4 tsp. ground nutmeg, 
1/8 tsp. ground cloves, 
2 cups granulated sugar, 
1 Tbs. molasses, 
1/2 cup vegetable oil, 
4 oz. cream cheese cut into pieces, 
4 large eggs, 
1/4 cup buttermilk, 
1 cup walnuts toasted and chopped. 

I mixed the flour, baking powder and baking soda together in a bowl and set it aside. I combined the pumpkin puree, salt, cinnamon, nutmeg and cloves in a large sauce pan and cooked continuously until it turned brown and reduced by about half (picture 1 below). I removed the pan from the heat and stirred in the sugars, molasses, oil and cream cheese. I mixed it until everything was incorporated and homogeneous. I whisked together the eggs and buttermilk and added it to the pumpkin mixture (picture 2). (This step requires some care not to curdle the eggs so either let the mixture cool down or temper the eggs a bit before adding.)  I poured the cooled pumpkin mixture into the flour mixture to form a batter. I folded the walnuts into the batter. I poured the mixture into two greased loaf pans and sprinkled the topping mixture on top of the loaves. I cooked the loaves in a 350 degree oven for about 45 or 50 minutes or until a skewer came out clean. (I also made these into muffins, making a total of 15 muffins.) Just after cooking, this loaf is very tender so I let it rest in the pan for about 20 minutes before I attempted to remove it (picture 3). I waited until it was completely cool before slicing it (picture 4).

This bread is quite good. It is very tender and has lots of flavor. The nuts add a nice counterpoint to the rich soft texture of the bread. The topping adds an additional texture component and a nice sweet crunch. The bread would be really good even without the topping. We will be making this again.