Tuesday, January 1, 2013

Happy New Year 2013 明けましておめでとう

Happy New year 2013! Last year was not an easy year. The most vexing were "departures" in the family and among good friends. One of the bright spots was that we finally got back our house from construction and, for the first time in the past 3 years, we could sit in our "tea room" to have our new year's celebration and eat all those Japanese auspicious good luck foods. This year, like the last year, we got Sushi taro's osechi boxes.

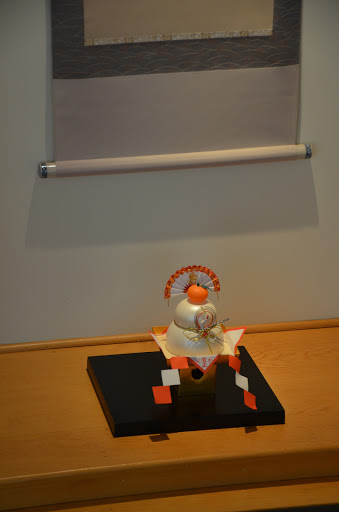
This picture shows our small alcove (or "Tokonoma" 床の間) with kagami-mochi 鏡餅. Of course we bought a fake plastic one with packaged round mochi inside. Digression alert: When I was a child, kagami-mochi  or traditional real round "mirror" mochi rice cakes were not packaged or preserved. They were just mounds of pounded rice that remained on display until they were supposed to be eaten (usually January 11, called "kagami-biraki" 鏡開き). Usually, by that time, green mold developed beween the two layers of mochi rounds.  I vividly remember my mother scraping the mold off before she could serve them as "zenzai" 善哉, mochi in sweet red bean sauce (which I did not care for-so my mother need not have gone to all that effort to remove the mold). At least, with the packaged mochi, we do not have to contend with scraping off the mold. Oh the wonders of modern technology!


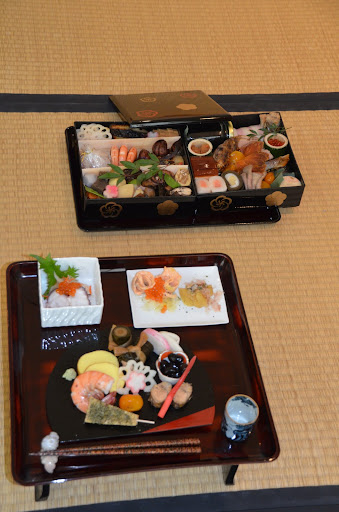
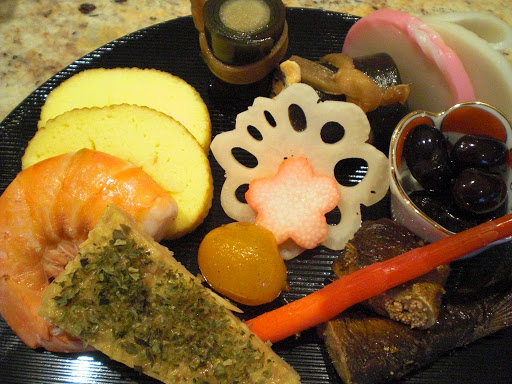
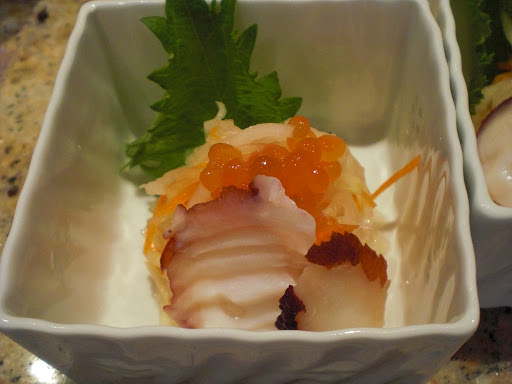
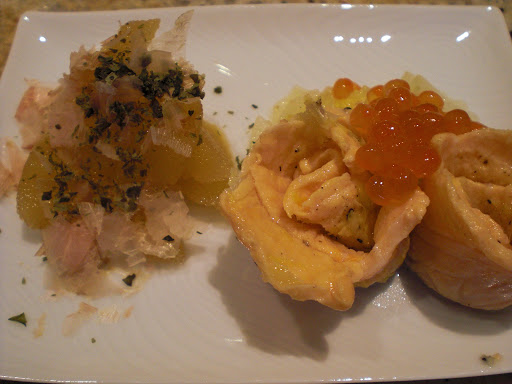
This picture shows new year's good luck food served on individual lacquered tables as well as the Osechi Box we got from Sushi Taro. I supplemented the Osechi box by preparing several of the items shown here.  From the upper left, daikon namasu 大根なます with boiled octopus and salmon roe, "Russian" marinated salmon, herring roe - this year, there was no terrorist package scare and my mothers "care package" arrived on time and included very nice large herring roe. Among the "kuchitori"  口取り appetizers, I made salmon and burdock kelp rolls 牛蒡と鮭の昆布巻き, date-maki roll 伊達巻 and chicken "matsugaze" cake 鶏肉の松風焼き. From the Sushi Taro's Osechi box, simmered black beans  黒豆, simmered roe bearing sweet fish 子持ち鮎の甘露煮, vinegar-dressed lotus root 花輪蓮根, kumquat simmered in syrup  金柑蜜煮, sake braised shrimp 海老酒煎. As you may notice, many items from the sumptuous Sushi taro osechi boxes have not been touched yet and remain for subsequent feasting.

My dikon namasu came out a bit on the sweet side this year. This may be due to the fact I was out of regular rice vinegar and had to use "sushi" vinegar which already contained sugar and salt (despite the fact that I reduced the seasoning especially the sugar).

The herring roe were very luxurious large ones from Hokkaido. I prepared them as per usual and they were excellent. The salmon on the right is my mother's recipe; "Russian" pickled salmon.

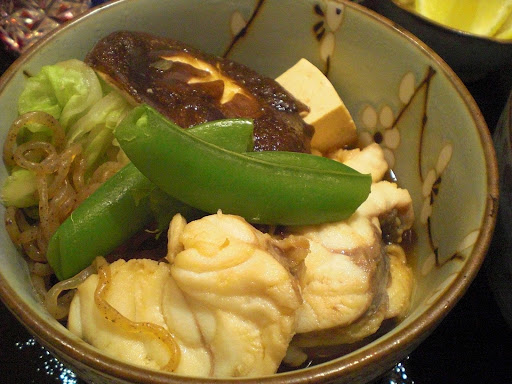
Finally we had a new years soup or "zouni"  雑煮. As usual, I added mochi 餅 or rice cake in a deep fried tofu pouch or "mochi kinchaku"  餅巾着. Instead of "yuzu", I also added a small wedge of lime. Since I forgot to get fresh chicken for the soup we used smoked barbecued chicken left over from Christmas. It added a nice smokey flavor dimension

Saturday, December 29, 2012

Salmon Miso 鮭味噌

This is a quick small dish I made to go with a drink one weekday evening. We had a small amount of grilled salmon left  over from the weekend and I wanted to make sure it was eaten before we forget. This is a perfect small dish which goes well with sake or rice depending on the amount of miso used.

Miso sauce: I mixed miso (1 tbs), mirin (1 tbs), and grated ginger (1/4 tsp) in a small bowl. I also made finely chopped scallion (from 3 stalks) and set it aside.

Salmon:This is leftover grilled salmon (without skin since we ate it all while it was crispy on the night we cooked the salmon). The amount is arbitrary but we had a rather small amount. My wife does not like very small pieces of salmon, so I just crumbled into large chunks.

In a small non-stick frying pan, I added dark roasted sesame oil (1/2 tsp) and sautéed the scallion for 30 seconds and then added the miso mixture. When it was bubbling and started thickening a bit, I added chunks of salmon and mixed to coat all the surfaces and also to warm up the salmon (for 1-2 minutes).
If you increased the amount of the miso sauce, this will be perfect for eating with white rice. My rendition here is good with a drink of sake. This is a very standard flavors of miso, some sweetness and ginger which cannot go wrong.

Wednesday, December 26, 2012

Monkfish hot pot アンコウ鍋

This is a rather standard Japanese hotpot dish with monkfish. It is perfect for a cold winter’s night. In Japan, you can buy a package of Monkfish for “nabe” . The package usually contains monkfish meat, some with skin attached, bone -for broth-, other innards and the most important item, the liver. In an authentic ankou nabe, at least, the liver must be included. The only Monkfish I can get here, however, is a fillet or the tail meat. In terms of seasoning, for the nabe you can season it with soy sauce or miso. Sometimes people use both soy sauce and miso. This time I decided to make a soy sauce flavored “ankou” nabe.

More about Monkfish: Japanese eat almost all parts of the monkfish with the liver being the most valued and cherished ("ankimo" あん肝). So-called "Seven tools of Monkfish"  or "Nanatsu dogu" 七つ道具 include: 1. liver, 2. tail and ventral fins, 3. gills (!!), 4. ovaries, 5. stomach, 6. skin, and 7. tail meat. By the way, we only eat female monkfish. The male is tiny-winy and not worth considering for food.


Broth: I used a combination of kelp and dashi pack with “iriko” いりこ or “niboshi” 煮,干small dried fish, to make a broth. A combination of kelp and bonito flakes is also good. I started with cold water (about 4 cups) and placed a 2x3 inch rectangle of kelp and one dashi pack and simmered it for 10 minutes before removing them.

I added mirin and soy sauce (1:2 ratio) as I tasted but I could have added either salt or more soy sauce. If you do not like a dark colored sauce you could use a combination of salt and light colored soy sauce or 薄口醤油.

In addition to the fish, you could use whatever vegetables or tofu you like. I used nappa cabbage or “hakusai” 白菜, threads of devil’s tongue* or “shirataki” 白滝 (see below for additional preparation), tofu, fresh shiitake mushrooms and snap peas.

(*"Shirataki" preparation: After removing from the package, I washed it in cold running water and then parboiled it. I drained it before putting into the nabe. This is important since it has a peculiar smell which is not particularly pleasant).

Monkfish: I used a bit less than 1 lb of monkfish fillet. I removed the slimy membrane and cut into large bite size pieces. If you use bone, skin or other parts of the monkfish (especially innards), you may have to pour hot water over the pieces to remove any fishiness but for the tail meat, it was not needed.


Instead of cooking the nabe at  the table, I cooked this nabe on the stove. I added vegetables and devil's tongue threads and put on the lid. After a few minutes, when the vegetables are almost done I added tofu and then the Monkfish. It only takes few minutes for the fish to cook.

I served the nabe in individual bowls with some broth. As condiments, I served small wedges of lemon (since I did not have “yuzu” ゆず), finely chopped scallion, Japanese red pepper flakes or ichimi tougarashi 一味唐辛子. Hot sake may be the usual choice for libation but we had cold sake.

Sunday, December 23, 2012

Breakfast Bread pudding パンのプディング

This is another post from my wife’s discovery of some “ancient” recipes written on used computer punch cards and stored forgotten in a Betty Crocker file card recipe box in the basement for at least 25 years. Like the previous one this must be another “Minnesota Hotdish”. Like many such recipes it is designed to feed multitudes at such events as church suppers or firehouse dinners or large family brunches. The amount my wife made represents 1/3 of the total recipe and it made two extremely generous servings. Should you be serving a lot of people just scale it up by a factor of 3.


Ingredients: 5 slices of white bread, 1/3 lb. cheddar cheese (I used smoked cheddar), 2 eggs, 1 cup milk, 1/3 tsp. salt, 1/3 tsp. dry mustard, 1/8 Tsp paprika, 1/8 tsp Worcestershire sauce, 1/8 lb. butter melted.

Butter 2 deep ramekins. Toast the bread and then cut into 1/2 inch cubes. Layer the ramekins with 1/3 bread, then 1/3 cheese until all the bread and cheese have been distributed. Beat together the eggs and milk and add the seasonings. Slowly pour the mixture over the bread. Pour the melted butter over top. Cover and refrigerate overnight. Remove the ramekins from the fridge and bring them to room temperature before baking. Place them in a pan of water (picture on left) and bake uncovered at 350 degrees for about an hour or until they puff up, turn brown and a knife inserted comes out clean (picture on right).


After tasting this dish I remember why I asked for the recipe. I liked it then and I like it now. My husband kept asking, “This is good but how much bacon did you use?” None. “But I am getting the taste and texture of bacon.” Turns out the texture came from the lovely crisp bread and the smoky “bacon” taste from the smoked cheddar I used. This is a brunch classic which I will be making again.

Thursday, December 20, 2012

Steamed marinated duck breast 合鴨の蒸し煮

This is a Japanese way of cooking duck breast and the recipe is based on one I saw on line. This takes some effort since it has to be browned in a frying pan, steamed in marinade and then allowed to rest in the marinade overnight before it can be served. The end result, however, is rather good and the multiple steps worthwhile. This dish will go with sake, beer or wine, maybe sagiovese or syrah but cab saub will be also good.


Duck breast: I had a rather large duck breast. As usual, I scored the skin in criss-cross fashion to expose the underlying fat for rendering. I rubbed salt and pepper sparingly on the skin and meat side.

Initial cooking: I placed the duck in a dry frying pan on medium-low heat with the skin side down. As the fat rendered, I mopped it up using paper towels. After 6-8 minutes, the skin was nicely browned and quite a good amount of fat was rendered. I flipped the breast over and browned other side for just 1-2 minutes.

Marinade: While waiting for the duck breast to brown, I prepared the marinade. In a small sauce pan, I added sake, mirin, and soy sauce in the ratio of 2:2:1 (I made about 1 cup of the mixture) but you may want to adjust the taste of the mixture to your liking in terms of sweet and saltiness by adjusting mirin and soy sauce). I then heated the marinade until came just to the boil. I poured the hot marinade into a deep soup bowl large enough to hold the duck breast comfortably. I  put the duck breast in the bowl with the marinade turning it once to coat all the surfaces.

Steaming: I used an electric wok for steaming. I placed the soup bowl with the duck breast and marinade in the wok with continuous steam for 8 minutes, flipped the duck and steamed another 8 minutes (total of 16 minutes). As you can see, after removing the duck, the surface of the marinade showed a good amount of rendered duck fat (which should to be removed, see below).


I am not sure this is necessary but I hung the duck breast over the sink with a metal skewer through one end and let the blood and fat drip down (picture below) as it cooled to the room temperature.

My wife was somewhat horrified with this step. She said I was losing one of the best ingredients to make a rich sauce. She was alluding to the “duck press” with which French extracted the very last drop of blood from duck carcasses by crushing the bones using the resulting extract for a sauce. I just said, I was following the recipe and that this may be to reduce the gaminess. To which, she retorted “Why would you want to do that. If you do not like a gamey flavor, what’s the point of eating duck?” (I suspect she has a penchant for gamey flavored meats).


Meanwhile, I put the marinade in a sealable plastic container in which the duck breast can snuggly fit. I placed the marinade (without duck in it)  in the refrigerator to cool. After 1-2 hours, the fat was congealed on the surface, I removed most of the fat and placed the now cooled down duck breast in the marinade. I let it marinade 24 hours in the refrigerator before serving.

When I sliced the duck breast the next evening, it was homogeneously rosy pink. Since it was nicely seasoned I did not add any sauce or the marinade but served it with just a dab of Japanese hot mustard.

This was remarkably good. Even the fatty layer developed flavor and unctuous texture reminiscent of well-cooked pork belly. Although it takes some time to prepare, this can be cooked ahead of time and is perfect for a small appetizer with a drink. Maybe next time I will try adding the drained liquid into a sauce.

Monday, December 17, 2012

Cheese ball チーズボール

This is a recipe from a very dear friend who passed away this fall after a short but intense battle with cancer. She had been a friend of the family for many years and every Christmas, she made these cheese balls which she served at holiday dinners and gave as gifts. Over time they came to symbolize the holidays and festive fun. As a tribute to her, In her absence, and to reignite the joy she contributed to the holidays we decided to try making a batch ourselves.


Ingredients: 1 lb cream cheese, 1 lb Wisconsin Pride Cheese Whiz (WisPride Aged Cheddar) , 1 lb blue cheese, 3 garlic cloves crushed, 3tbs Worcestershire sauce, toasted walnuts or pecans (This will make a bit over 6 cheese balls).

Bring cheeses to room temperature (this will make mixing a lot easier). All the cheeses eventually have to be creamed together in the mixer. I found the blue cheese was the hardest to cream and actually stayed in small pieces as shown in the bottom picture. For this reason I suggest starting with the blue cheese by putting it in a mixer and mixing until it is creamed. Then add the other ingredients and mix until fully incorporated. I then rolled small handfuls into a ball and put them on a parchment covered cookie sheet in the refrigerator until they firmed up a bit. Then I rolled them in the chopped toasted nuts. The nuts actually helped stabilize the cheese into a round shape.


These were a remarkable facsimile of the famous cheese balls our friend used to make. While making them it was fun remembering all the good times we had together while eating them. Since her son and daughter are also trying their hand at making these cheese balls we are planning a cheese ball tasting to see who did the best justice to “mom’s” recipe.

Friday, December 14, 2012

Scallop braised on touban grill 帆立の陶板焼き

Touban 陶板 means a ceramic plate, which I used previously to cook matsutake. It has a shallow ceramic plate base and you can use it to grill, or since it comes with a ceramic dome with steam hole in it you can grill/steam.


Compared to a cast iron or metal pan, ceramic plate somehow conveys heat more gently and evenly. Touban can be used on the table top for cook-as-you-eat dinners. I decided to cook shiitake mushroom and fresh diver scallops using touban.


While I could have cooked and served this at the table I cooked it on the stove and then served on plates as shown above.

Scallops: These were large diver scallops. For two appetizer-size servings, I used 4 scallops cut into two discs (total of 8 discs). Reducing the thickness allowed it to cook more quickly and evenly.

Shiitake mushrooms: I used two rather large meaty fresh shiitake mushrooms. I removed the stems and made decorative star-shaped cuts but this is optional.

I first heated up the touban on medium-low flame for 3-4 minutes until it got hot and melted a small pat of sweet butter (1 tsp). When it melted and was slightly browning I started cooking the shiitake. When I turned over the shiitake after 1 minute of cooking, I placed the scallops on the grill (left on the picture below).  I grilled one side for 30-40 seconds and then turned them over and grilled another 30-40 seconds. I then added sake (1 tsp) and let it steam for 10-15 seconds with the lid on. I removed the lid and added a dash of soy sauce (less than 1 tsp) and let it cook for another 30 seconds (left on the picture below). I turned the scallops so that the sauce coated both side. I just added cooked green beans in the last 10-15 seconds to warm them up.


The combination of brown butter, sake, and soy sauce is always an easy winner. The scallops exuded more juice than I expected. I served this on the small plate (2nd picture) and poured some of the sauce over it. I knew my wife likes this type of sauce, so I served the extra in a small dipping bowl.

The shiitake mushroom was great, almost meaty in taste. The scallops were perfectly cooked (We hate over cooked rubbery scallops; something we occasionally encounter at restaurants). My wife served small squares of toasted bread to soak up any sauce/juice from this dish. Cold sake was what we had with this.