Monday, March 4, 2013

Stuffed crepes 沢山具入りクレープ

After making a batch of crepes, we had quite a lot left over. I made this stuffed crepe one morning for breakfast.

Stuffing: Actually, I do not remember precisely what I did. I am sure this is thinly sliced onion, fresh shiitake mushroom, left over roasted pork, all sautéed together and seasoned with salt and pepper. I placed the crepe on a cookie sheet and then put the stuffing and cheese (My guess is either smoked gouda or gruyere  on top. I folded the crepe over the filling and put them into a 350 degree oven for 10-15 minutes or until they were heated through and the cheese melted.
Compared to omelet, the crepes added a more interesting texture and a faint vanilla flavor that actually works. Of course, my justification for posting this is “any good hearty breakfast will be a good alcohol-soaking ending dish after indulgence”.

Friday, March 1, 2013

Crepe クレープ

We may have to change our blog title from “Izakaya” to “Breakfast”. This is another suggestion for breakfast from my wife. We had our share of pancakes especially in the summer when blueberries are in season. For this crepe, instead of cheese fillings such as Mascarpone, she suggested Greek yogurt flavored with Clementine orange.

Here is the crepe we had one weekend.
CIMG5766
Next weekend, we had similar crepe but with a slight variation.
CIMG5789
As usual, my wife made the batter and I cooked the pancakes.

Ingredients for crepe batter:
3/4 cup All purpose flour
1/2 Tsp. salt
1 Tsp. double-acting baking powder
2 Tbs. sugar
2 Eggs
2/3 cup milk
1/3 cup water
1/2 Tsp. vanilla
grated lemon rind

Sift together the flour, salt and baking powder and set aside. Mix together the sugar, eggs, milk, water and vanilla (make sure the sugar dissolves completely). Mix the wet ingredients into the dry ingredients.
Although some recipes call for resting the batter for 5 to 6 hrs or overnight (I suppose to relax the gluten and make tender crepes), we did not do this since we were rather hungry. Add more milk or water to get proper runny consistency.
Since we do not have a special crepe pan, rake or a crepe machine, I just used our non-stick frying pan. I preheated the frying pan for few minutes and added light olive oil (the amount of oil has to be just enough to coat the bottom). When it started to shimmer (but not smoke), it is the opportune time to add the batter. The batter has to be runny enough to spread very thin and the pan has to be hot enough that the batter can be spread thinly but the portion in contact with the bottom of pan immediately starts cooking. I tilted and turned the pan to spread the batter. I took the pan on and off heat to get the right heat level (#1). When the surface looked dry, I flipped the crepe using a spatula (#2). This definitely requires some practice. Just 10-15 seconds on the last side and the crepe was done (#3). I stacked them up on the plate (#4).
Yogurt sauce:
Greek yogurt (or regular yogurt drained using cheese cloth in the refrigerator over night)
Clementine orange, peeled and cut up in small chunks
Juice of the orange, add sugar to taste

This is quite good for a relatively low fat recipe. The original recipe calls for a mixture of Mascarpone flavored with fresh orange/orange juice as the stuffing but Greek yogurt and Clementine are good substitutes. You just can’t beat the texture and lovely mouth feel of a crepe. The mild vanilla flavor of the crepe went very well with the orange flavored yogurt.

Tuesday, February 26, 2013

Fluffy Omelet ふわふわオムレツ

My wife is really into breakfast recently. Every weekend, she suggests something different. This weekend morning, she saw this fluffy omelet  recipe in the printed version of "Cook illustrated" and asked me to come up with the topping (or stuffing) for it. Although the recipe included two examples of stuffing, we did not have the ingredients for either of them. So I decided to "wing-it". This is something between Spanish "Tortilla" and French "soufflé".

Ingredients for one 8 inch omelet:

For Omelet:
Eggs (two large, yolk and white separated)
Butter, Melted unsalted (1/2 tbs)
Butter, unsalted (1/2 tbs)
Salt (1/8 tsp)
Cream of tartar (1/8 tsp)

For stuffing:
Shallot (1 medium, finely chopped)
Shiitake mushroom (fresh, two medium, stem removed and finely sliced).
Roasted pork filet (arbitrary amount, sliced and cut into wide strips or bacon)
Spinach (baby spinach, one handful)
Cheeses (smoked gouda, finely diced and parmisiano reggiano (grated), amount arbitrary).

Beat the egg yolks and mix in the melted butter and set aside. In a standing mixer, add the egg white and sprinkle cream of tartar and beat it to stiff peak stage (#1). Fold in the egg yolk mixture until no white steaks are visible (#2). Melt the reaming butter in a 8 inch non-stick frying pan on medium heat until foam forms and add in the egg mixture and add topping and cheeses (#3). Place the pan into the pre-heated 375F oven (#4) and bake for 5 minutes (We did not use pasteurized eggs and wanted it to be completely cooked). If it springs back when lightly pressed it is complete done (#5). Tip the omelet onto the cutting board and let it rest for 30 seconds before cutting (#6).

Note: The original recipe for 2 servings called for 4 eggs and folded the omelet into half and then cut it into two portions. We used 2 eggs and did not fold the omelet.
Stuffing: I added olive oil (1 tsp) and butter (1/2 tsp) into a non-stick frying pan and sautéed the shallot for few minutes. I added the shiitake mushroom and sautéed for another minute or two. I then seasoned it with salt and pepper. I added the pork and then the spinach and cooked until spinach wilted.

This is a very good omelet with a unique texture. It is rather fluffy and the topping I made was great. We may have put on too much cheese but there is no such a thing as too much cheese in general.

Saturday, February 23, 2013

Marinated tuna bowl 鮪漬け丼

When we get sashimi items from Catalina, it is not possible to finish everything in two days unless we have guests. To finish up everything in time, I need to plan ahead so that some portions of the sashimi may last into the 3rd day. One way is to make a marinated tuna  or "zuke" preparation. I used this technique often to make a low-quality frozen block of yellow fin tuna more palatable but, of course, this can be applied to good quality tuna.

When I prepared the block of top loin tuna, I separated the red meat "akami" 赤身 and marinated it. Although I posted a few variations of the marinades before, this time I used a very simple marinade of mirin, sake, and soy sauce (2:2:3) ratio. I used this marinade for the chiai with nattou dish as well. I did not do "yubiki" 湯引き or "tataki" たたき preparation for this (for no reason, just a bit lazy).

This was an ending dish for the 3rd evening after we received blocks of tuna sashimi from Catalina.

Making this dish is simple as long as you have sushi rice and marinated tuna sashimi.

Sushi rice: We got a new IH (induction heater) rice cooker a few weeks ago but did not have a chance to use it until now. So, we read the instructions and made the very first batch of sushi rice. This new cooker has a gauge for sushi rice--simply a bit less water. Using this setting, however, the rice came out a bit too dry or hard to our taste. In any case, I made sushi rice by mixing in seasoned rice vinegar (from the bottle). I placed the sushi rice on the bottom of the bowl, put the slices of the marinated tuna sashimi on top, smeared a small amount of wasabi on the tuna and garnished it with chopped chives and nori strips.

This is one of the cannot-go-wrong combinations of sushi rice, nori and tuna.

Wednesday, February 20, 2013

Marinated chiai nattou with egg yolk 卵黄入り血合い納豆

I made this dish from the two portions of chiai 血合い (one from the toro block and the other from top loin block) which was marinated over night. This dish may be rather challenging for most Westerners and even for some Japanese. Again,I have posted this before. You could add more soy sauce and put it over rice. We just had this as a drinking snack.

Once the chiai was prepared, the rest was rather easy. I used one small individual package of nattou 納豆 (frozen, made from organic soy beans from Hokkaido,-of course). After thawing the nattou, I mixed in fine chopped scallion, seasoning (tare) and the mustard that came with the nattou and mixed rather vigorously for a few minutes using my favorite nattou mixing contraption. I then separated one egg (As before I used a safe pasteurized egg for this). I added the cubes of marinated chiai and the egg yolk and mixed well. I just garnished it with the finely chopped green part of the scallion.

The gamey strong taste of chiai was a good match for nattou and the egg yolk binds all flavors. I admit this may be the acquired taste.

To clean the palate, I then served tuna sashimi as seen below. This time, I had very fatty tuna (ootro) from the previous night as well as medium fatty tuna (chutoro) and red meat (akami) from the top loin block I prepared this evening. As a garnish, especially since it is the year of the snake, I made snake belly cut mini cucumber or "jabara" 蛇腹 which was soaked in salted water and then seasoned with sushi vinegar (or I could used sweet vinegar). I served it with a tomato rose.

The quality of tuna was very good. Nothing really beats good blue fin tuna.

Sunday, February 17, 2013

Seared Ootoro fatty tuna 大トロの炙り

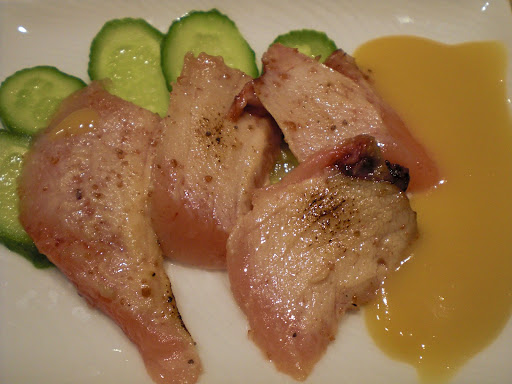
This is a continuation of the blue fin toro block we got from Catalina. After consuming the sashimi, I made the most fatty part of the tuna into "aburi" 炙り preparation. I have posted this before but, this time, I have more pictures and also made sumiso 酢味噌 sauce. The combination of "aburi" and "sumiso" further cut the fatty taste so that it was not too overwhelming.

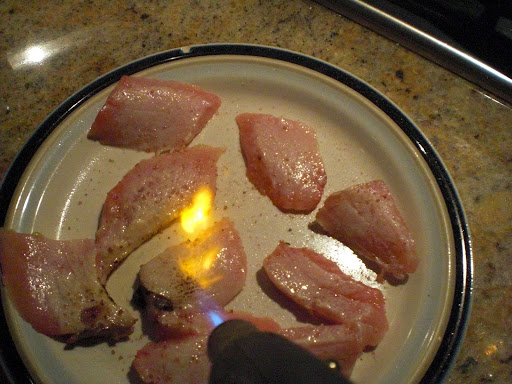
In very proper sushi bars, you should use a charcoal fire to sear the tuna but, for convenience, I used the ubiquitous kitchen blow torch (no self respecting kitchen should be without such a flame-thrower). I first sliced the ootoro pieces and spread  them on a utility plate. Since I happened to have a collection of fancy salts, I sprinkled freshly ground Hawaiian sea salt (pink colored) and let it sit for a few minutes. I, then, hit them with my blow torch as you see below. I seared it until the surface changed color and developed a few dark spots. I did this on only one side.

The sumiso sauce should have been called more precisely "karashi sumiso" 芥子酢味噌 sauce. Again I have posted the recipe before. To briefly reiterate; I added white sweet miso or "saikyo miso" 西京味噌 (1 tbs) in a small Japanese mortar "suribachi" すり鉢, prepared Japanese hot mustard (to taste from tube), sugar (optional,1/2 tsp) and rice vinegar (1 –2 tsp). To adjust the consistency, you can add “dashi” broth or just water. At this point, we had eaten more than enough fatty tuna for one evening (there is such a thing as too much of a good thing).
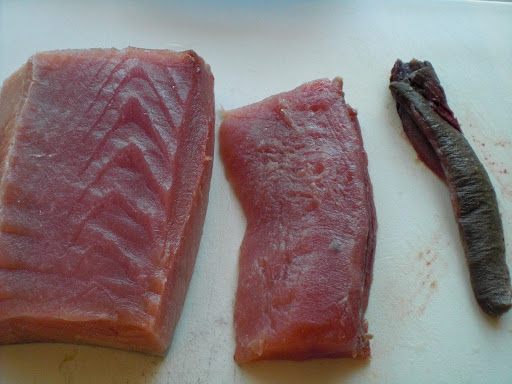
Next day, I prepared the top loin of blue fin tuna. This is also a small I lb block as you see below. This block almost looks like the tail portion of the same fish from which my “toro” block came.

As you can see from the side view below, this top loin has slightly fatty meat on the bottom and chiai 血合い or dark red meat (left upper corner).

So this one was very similar to the toro block in terms of the configuration of the different kinds of meat but depending on the size of the fish, one pound block could be quite different.  I separated the slightly fatty red meat or “kotoro” 小トロ (left) with skin on, red meat or “akami” 赤身 in the center and “chiai” 血合い on the right.

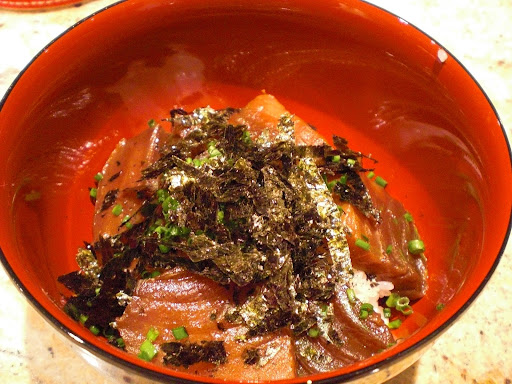
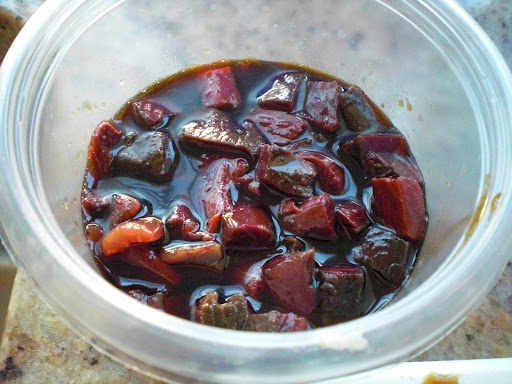
I used to discard “chiai” but, more recently I make dishes from it which I posted before. I made the marinade ahead of time. This is rather simple marinade of sake, mirin, and soy sauce (2:2:3 ratio). I heat the mixture until gently boiling without a lid for a few minutes to meld the flavors and let the alcohol evaporate. I let this cool down to room temperature. I cut the chiai (I used combined portions from both the toro and akami blocks). I placed them in a sealable plastic container and let it marinade overnight in the refrigerator.
The rest is for the next post (I am stretching out the content).

Thursday, February 14, 2013

How to prepare small "Toro" block 鮪のトロのさばき方

I have mentioned that it is getting more and more difficult to get fresh blue fin tuna from Catalina Offshore Products because it is offered only infrequently. For that matter, our Tako Grill appears to be having difficulty getting toro as well. The other day, when I checked the Catalina site, both top loin and toro block were available and, without hesitation, I ordered both blocks (small blocks 1lb each).

Here is the first sashimi I prepared on the Friday evening the tuna arrived.


The Toro was just excellent. I served mostly toro and a small portion of chutoro 中トロ (or more like kotoro 小トロ). Since I had half a (leftover) ripe avocado, I also served slices of avocado in sashimi-style. For garnish, I made the usual daikon garnish mixed with mini-cucumber (skin portion only) and carrot. Instead of the usual raw preparation, I salted the vegetables and then squeezed out the excess moisture. I then dressed them with sushi vinegar. The wasabi was freshly thawed "real" wasabi. We have not tasted this kind of good quality toro, actually more like Ootoro 大トロ, for quite some time. This is melt-in-your mouth good. My wife ooed and aahhed appropriately.


I realized that, although I have posted sashimi from Catalina several times and how to prepare the large belly loin block, I did not illustrated how I prepared the small block of tuna belly into sashimi. Since I am running out of dishes I can post, I thought this would be a good punt.


Here is a small one pound block of toro. This is from a rather small tuna and it has the skin on. The left side is toward the belly .


The toro block usually has a very dark red portion called "chiai"  血合い and small top loin portion, in this case, "chutoro"  中トロ. I first removed the chiai part and then the triangular shaped "chutoro" block .


Now I have three portions; on the left toro with the skin still on, chiai in the middle, and chutoro on the right. Usually I discard "chiai" but this time I made a dish from it.


Using a thin sharp blade (since I do not own a traditional "yanagi" knife 柳刃, I used a salmon fillet knife from Global which works fine for me. I removed the skin, by placing the toro skin down on the cutting board then moving the blade horizontally between the skin and toro while pressing on the toro with my palm. I removed a thin layer of mostly fat that was attached to the skin (right above and below picture). I did not discard this almost pure fat.

The left on the picture above is the toro bock. I cleaned up the white membrane ("peritoneal" lining which lines the abdominal cavity of the fish) which is shown on the right edge of the toro block in the picture above. Sometimes bone may be present, so I carefully look for it and remove it. This is a rather small block but I cut it into two making two small rectangular blocks or "saku" from which I sliced the sashimi seen in the first picture.

The portions we did not eat immediately, I wrapped in parchment paper and placed it in a ziploc bag and stored them in the meat drawer of the refrigerator. It should last at least 2 more days.