Friday, May 3, 2013

Beef "Yakitori" 牛肉ステーキの焼き鳥

Spring is the best season in the Washington DC area. In addition to all the beautiful flowers and cool sunny weather there are no mosquitoes. This enables us to have a barbecue outside without become a meal ourselves for these pesky insects. During this mosquito free interlude we really enjoy sitting outside and doing “Yakitori” style cooking. This is one such occasion. We did not plan to do Yakitori but it was such a nice sunny day and when we checked the fridge we saw we had some ingredients that could be grilled so we did it on a whim. Instead of the usual chicken or pork, we grilled New York strip steak and also cooked mushrooms two ways.
We have this yakitori grill from Japan which was purchased from a New York company “Korin 光琳.  Given the ingredients I had, I knew I would not be grilling for a long time so I put just enough lump charcoal in the chimney starter to cover the bottom 1/3 of the grill (below left). Since it is still early spring, it gets a bit chilly when the sun goes down, so we wheeled out the infra-red outside heater which was very effective in keeping us warm and providing a golden ambient light while we cooked (below right).
Rather than grilling steak in usual way i.e. as one big piece, I trimmed the fat cap and cut it into cubes and skewered them (below, left). I seasoned it with salt and pepper. This was one American size serving of New York strip steak but perfect for two of us.
I also had a box of assorted shimeji (both white and brown) as well as Royal trumpet mushrooms). I cooked the shimeji mushroom with miso and butter with the addition of sliced onion in an aluminum foil pouch as before (below right).
I just tore the trumpet mushroom in half lengthwise, coated with olive oil, seasoned with salt and pepper and put on a skewer. I grilled the pouch of mushrooms in miso, steak cubes, and royal trumpet mushrooms. As you can see all the trees were pushing new-growth leaves (below, right upper).
Once the beef, royal trumpet mushrooms (above, left) and shimeji with miso and butter in a packet (above, right) were done all I needed to do was to make grilled rice balls (below). I used the leftover miso sauce on the bottom of the mushroom packet which worked very well. As I mentioned before, this is the best way to make the perfect grilled rice ball. All the surfaces had a nice savory crust. This can only be accomplished by slow patient cooking on a hot charcoal fire.
Japanese often grill beef in small pieces such as in “Yakiniku” 焼肉 or “Dice” steak or “Saikoro steak” さいころステーキ in which cubes of steak are grilled. What I made is a sort of hybrid between them. The cubes increase the ratio of caramelized surface crust to tender meat inside. I think this gives the meat more flavor and dimension than when it is cooked as one large piece. The cubes were small enough that we (at least I)  could use only chop sticks to eat them. Although this was US prime not “Wagyu”, this was quite good.

Tuesday, April 30, 2013

Spinach rolled in thin omelet ほうれん草の卵巻き

This is a small dish I made from the steamed spinach my wife made. She cooked the entire bag of spinach (pre-washed) using a dry wok with a lid without any liquid. We kept this in a sealed container and used it for many dishes such as this one.

This is a variation of nori rolled spinach but instead, of using nori I used a thin omelet.

Spinach: I just seasoned the steamed spinach with Japanese prepared hot mustard (from a tube) and sugar mixed in some soy sauce (the amount is arbitrary, I use only small amount of sugar).  If you want it spicier you could increase the mustard. I also mixed in bonito flakes but this is optional especially if you want to keep it vegetarian.

Omelet: I made the  mistake of not watching it carefully and the flame was too high so it became a bit dry and browned. I just used one egg omelet seasoned with a bit of sugar and salt. I put a non-stick frying pan on low flame ( not low enough, apparently) poured in the egg mixture, put the lid and let it slowly cook until done (5-7 minutes). If the flame is low enough, the omelet is perfectly yellow without brown spots.

I placed the omelet on the cutting board and lined up the spinach mixture in the middle and rolled it up. I then rolled it in plastic rap and let it stand for a few minutes so that the omelet would not unravel. I then cut the roll into small disks as you see above, Both ends which are not perfect were eaten before serving by me and my wife.

This is nothing dish but quite good.

Saturday, April 27, 2013

Botargga pasta variation 唐墨パスタその2

This is just a variation of pasta with bottarga which I posted. Actually I used leftover grated botargga and angel hair pasta to make this dish. This is made in the same manner as "creamy tarako pasta".

I just sauteed the cooked angel hair past in olive oil to warm it up with small amount of red pepper flakes. After the pasta was coated with oil and warmed up, I added a few tablespoons of cream and let it cook for one minute or two so that it made nice sauce that could cling to the pasta. I cut the heat and mixed in grated botargga and garnished with thinly sliced botargga and nori strips.

The addition of cream add a different dimension to the pasta with bottarga. Both versions are good but I like the original a slight bit better.

Wednesday, April 24, 2013

Chicken "soboro" on rice ライスのそぼろのせ

This is the second dish I made from the chicken "soboro" I made a few days ago. This was a small ending dish one evening.

I just made three stripes over a dish of rice using the chicken soboro, spinach and scrambled egg. This is a variation of "bento" box.

Spinach: My wife prepared an entire package of baby spinach a few days ago. She just put the spinach in a dry wok (no water) with a lid on low heat. As the spinach steamed she used a tongs to move the cooked spinach on the bottom to the top. With this method the spinach steams by itself without adding any water. I chopped the cooked spinach coarsely, added dried bonito flakes (katsuo-bushi or kezuri-bushi, dried bonito shaving which come in a small plastic package) and concentrated noodle sauce (from the bottle). The amount is to taste but not too much.

Egg: I simply made scrambled eggs from one egg seasoned with sugar and salt.
Assembly: using, a ring mould as seen below, I first packed in a layer of white rice to make a disk and layered it with stripes of chicken soboro, spinach and scrambled egg.


This is very good flavor and color combination. You can make it any shape or amount you like. You can also change the seasoning such as sautéing the spinach in bacon grease and seasoning it with salt and pepper etc. Other greens such as asparagus, green beans will also work. If you want add another color, you could add cooked carrot seasoned whatever way you like.

This was a perfect "shime" ending dish for us.

Saturday, April 20, 2013

Octopus sashimi Wasabi flavor with apple and olive oil 蛸のわさび漬け、リンゴとオリーブオイルいり

This is a "proof of concept" testimonial. When we described the octopus dish we had at "Daikaya", I said, the dish must be based on a frozen packaged item. To confirm my point I decided to reproduce the dish using the packaged item I had in mind. Since I did not have a "kaiware" daikon (sprout of daikon radish), I used finely chopped jalapeño peper.


I defrosted a package of "Tako wasabi-zuke" たこわさび漬け (picture below left, the price is for two packages). The picture, below right, shows what it looks like once thawed.
I just diced an apple (Fuji apple) mixed it in, splashed on a good fruity olive oil and garnished with finely diced jalapeño pepper (seeded and de-veined).

My wife thought my concoction was better than what we had at "Daikaya". It has a nice yuzu-wasabi flavor and the pieces of raw octopus were much larger with a much nicer texture. (Maybe because of the difference in size and texture of the pieces of octopus in our dish, they did not stick between our teeth like the ones in the dish at Diakaya).  It was a good idea to add the crunch of apple and the nice fruity olive oil flavor to this type of dish but I'm not sure I would call this "cooking".

Thursday, April 18, 2013

Izakaya, Daikaya 居酒屋 大鍋屋

Recently, a few places have begun appearing in the Washington D.C. area with “Izakaya” as a part of their name; which is very encouraging. Once a restaurant with Izakaya in its name pops up on the “radar screen” we have to try it.

For example we tried Izakaya Azuma which is located in Rockville. It opened in June of last year and less than a year later it is closed. We can’t say we are surprised. We thought it missed the point of an izakaya both in terms of food and ambience in a big way. It was basically a Chinese restaurant with some “teiban” Izakaya dishes on the menu such as Yakitori and Kushiage.

Another such place is Kushi Izkakaya and Sushi. It is a big space lacking the real atmosphere of an Izakaya. I did not go but my wife went for lunch. She was not impressed.  To do it real justice, however, we should probably try it in the evening.

Another called Izakaya Seki sounds very promising but it’s location is very inconvenient for us so we haven’t tried it. 

Recently, another Izakaya cum ramen restaurant opened up in the “Penn Quarter” called “Daikaya”. It appears that its corresponding Japanese letters are “大鍋屋” meaning “Large caldron” probably referring to the large caldron in which ramen noodles are cooked. It is housed in a brand new building across from the Verizon Center (Google map street view still shows an empty lot). The 1st floor is a ramen place which we have not tried yet. It serves up a “Sapporo”style ramen. Since I am originally from Sapporo, we have to try this place. We did try the upstairs, however, which is  an “Izakaya”
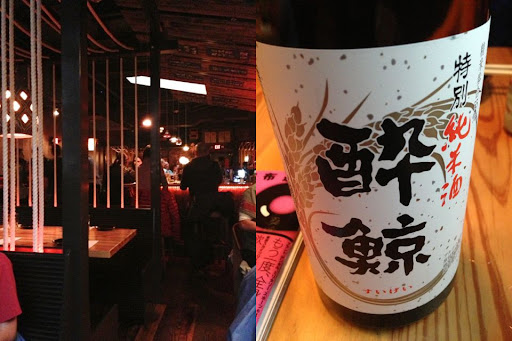
Inside the restaurant is very nice with a central bar counter with small tables and booths around the periphery (picture above left).They have very cozy (read: tight) seating for 90. The tables are quite close together so you have the added advantage of sharing the conversations of the tables on either side of you. The table at which we were seated was so close it its neighbor that the neighboring table had to be moved aside in order for us to be seated which is awkward when the other table is occupied.

The wait staff was very enthusiastic and tried their best to explain everything, as scripted, even after I told him that we were familiar with these types of food and drink. As part of the explanation it was suggested that in contrast to American style where you order the entire meal at once, for Izakaya style you order a few dishes at a time in several rounds over the course of the meal. Our waiter in true American style, however disappeared after the first round of orders.

For libation, we chose sake from Kochi 高知 prefecture called “Sui-gei, Tokubetsu junmaishu"  酔鯨 特別純米酒 (picture above right). This is not too bad, not too yeasty but a bit short on taste.

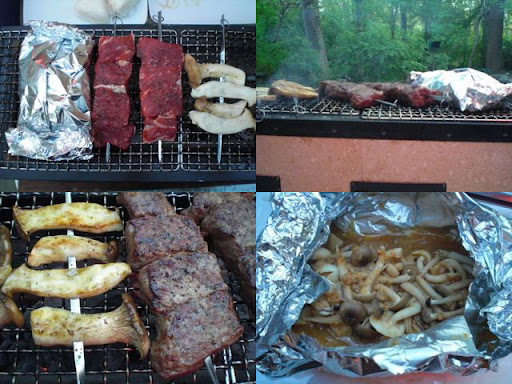
Here are the dishes we had. I stopped taking photos after the 4th dish. Since we are not big eaters we never thought we would say this, but the portions of these dishes were way too small for us or even for any Izakaya. Certainly the portion size is miniscule for your average American even as a drinking snack or bar food. In order to make a meal we ended up ordering quite a few dishes which became rather expensive and even so we left the place still hungry.

The first dish we had, was wasabi octopus sashimi (left upper). I may be wrong and hate to say it but this dish looked and tasted like it was made with packaged frozen wasabi favored raw octopus such as I occasionally buy at the local Japanese grocery store. They just added small cubes of apple or jicama, olive oil and daikon radish sprouts. This was not the type of dish I would have expected.

The second was cheese stuffed shishi-tougarashi which was very interesting and good. We may have mentioned that shishi-tougarash  grown in US soil can be atomically hot but all four peppers we ate were fine (Our waiter appropriately warned us).

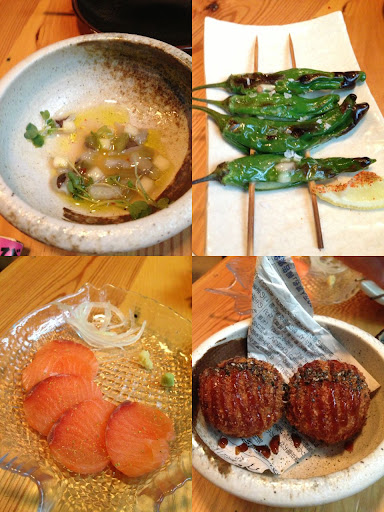
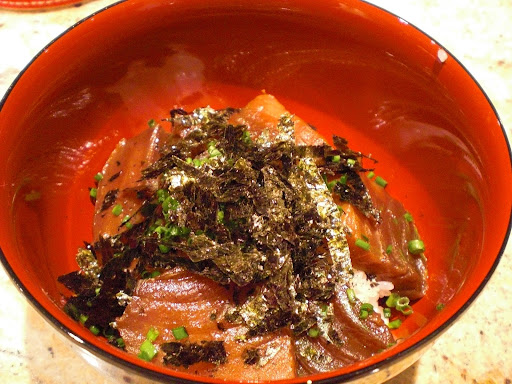
Then I found “Ruibe” るいべ of salmon. This is an Hokkaido specialty. It is thinly sliced semi frozen salmon. This was pretty good but again, the portion was Lilliputian (above lower left).

The 4th dish was "crab croquet". This is a very common Izakaya item and the base is Bechamel sauce with corn and crab meat. To be authentic, I was told that the crab meat must be "canned". In any case, this was served on old Japanese newspaper in apparent imitation of "Fish and Chips". We did not find the sight of our dish sitting on old newspaper appetizing and wondered how sanitary old Japanese newspapers could possibly be. Although this dish was not bad (deep fried Bechamel in general can’t be too bad) the crab missed its cue and didn’t make an appearance. This really looked like a factory made frozen item just deep fried at the restaurant.

Although I stopped taking pictures we had several other dishes: creamy tarako pasta, fried turkey wing  (this was good), tsukemono 漬物 (picked or salted vegetables) assortment of three kinds (again not bad but the portion was ridiculously small). At this point we were out of sake but still hungry (very unusual for us, since we usually get filled up with just a few appetizers). We thought of going to another restaurant but the Verizon Center was having a hockey game and the other restaurants we tried were stuffed to capacity. We gave up and went home.

While the dishes at this restaurant sounded innovative, they all had a premade packaged quality to them. Again, like many restaurants in the US that claim the izakaya title, it missed the ambiance that makes an Izakaya an Izakaya. Based on portion size alone, I just can’t imagine how this Izakaya will fair with the burly American clientele attending the hockey games and other events at the Verizon Center.

Monday, April 15, 2013

Pasta with grated bottarga からすみパスタ

After tasting bottarga thinly sliced like Japanese karasumi, we tried an Italian style dish and made  "spaghetti alla bottarga". This is based on Mario Batali's recipe. We really like this pasta dish.
CIMG5932
My wife does not like regular spaghetti for some reason (note from Wife: she doesn’t like regular style spaghetti because of all those endless bowels of over cooked spaghetti topped with tasteless canned sauce that she had to work her way through as a kid particularly for school lunches). As an alternative we used very thin Angel hair pasta instead.

The amount of bottarga is totally arbitrary but probably 1-2 tablespoon(s) full of grated bottarga per serving would be appropriate. I just used a Japanese porcelain grater and grated bottarge (about 1/2 cup, below). It is salty, so we did not need to salt the pasta.
CIMG5922
Other ingredients for 2 servings (see picture below):
Italian parsley, finely chopped 1/4 cup
Lemon zest from one lemon, grated using  a micro grater
Garlic, two cloves, thinly sliced
Bottarga, thinly sliced (2-3 per serving)
Olive oil, 2-3 tbs
Red pepper flakes, to taste
CIMG5923
I put the olive oil in a frying pan on low flame and cooked the garlic and red pepper flakes until the garlic was fragrant but not browned (2-3 minutes). I added the pasta, lemon zest, parsley and tossed to mix well for one more minute on medium flame. I cut the flamed and mixed in the grated bottarga and served.

I topped the pasta with the slices of botargga, added more grated bottarga and a little bit of fruity olive oil on top.

This is a good dish. It is a bit like "tarako" spaghetti but the flavor and texture are quite different. The lemon flavor from the zest is refreshing and went well with the taste of bottarga. Surprisingly, although the botargga seemed extremely salty it was just right once it was mixed into the pasta. This dish went Ok with wine (such as the red wine we were drinking) but still it was not perfect. I am not sure what will go well with this dish but sake (to which we switched) or Scotch with water, for sure, or, may be, Prosecco.

Friday, April 12, 2013

Tofu with chicken meat sauce 豆腐の鶏そぼろあんかけ

This is a dish I made using the chicken soboro I made the other day. You could make this using ground chicken as well but the meat has more flavor if you use chicken soboro. I made this as the second dish I served one evening and it was quite nice since it was still rather cold at night.

Ingredients (for two good sized servings):
Tofu,  1 block cut into bite-size cubes.
Chicken "soboro", 4 tbs
Dashi broth, About 2 cup (I made from a dashi pack)
Mirin, 1 tbs
Concentrated dipping sauce for noodles, 2 tbs or to taste
Ginger grated, 1/2 tsp
Scallion 2 stalks, finely chopped
Potato starch (Katakuriko) 2 tsp with sake or water to make slurry

In a sauce pan, I added the broth and heated it up. When the broth was warm, I added the mirin and concentrated dipping sauce. I tasted it and added a bit more, please be aware that the soboro is already seasoned. I could add more seasoning later if needed.

I added the tofu, put the lid on and simmered for 10 minutes until the tofu is thoroughly warmed (do not boil). I removed the tofu to the serving bowls using a slotted spoon. I then added the soboro, tasted it (adjust the saltiness as needed). I then streamed in the potato starch slurry in several increments until I reached the desired thickness of the broth (the broth needs to be near boiling to have the full thickening effect of the potato starch).

I ladled the hot broth over the tofu and garnished it with the chopped scallion and grated ginger.
This dish can be easily made using raw ground chicken but using soboro gives it a more complex flavor. The rather assertive ginger flavor was nice. We had this with cold sake but the tastes are rather neutral and should go well with any wine.

Tuesday, April 9, 2013

Bottarga 唐墨

Salted and dried fish roe may not to be the most popular food item in the U.S. but, for some (Sardinians, or Japanese for example), it is a delicacy. I was quite surprised to learn that Japanese “Karasumi 唐墨” was actually an import from Europe through Nagasaki 長崎 during the time Japan was mostly closed to foreign trade except for “Dejima 出島” in Nagasaki. The European counterparts are called “Bottarga”  or “Botargo” and are especially well known in Sardinia. Since we cannot get karasumi here in the US easily, we were interested in getting “Bottarga” from Sardinia instead. After several failed attempts trying to get bottarga from local Italian gourmet food stores, we resorted to the Internet. We finally got Sardinian bottarga made by L'Oro di Cabras from Gray Mullet roe sold by "Gustiamo" in New York (package pictured below).
CIMG5909
It is rather small and much darker colored than typical Japanese karasumi.
CIMG5910
First we tried it in Japanese style with thin slices of daikon (shown above).
CIMG5917
Next day, I served it with sliced cucumber and radish.

This one has a stronger flavor (or you could call it "fishy") than the Japanese variety. It is also saltier than the karasumi we got from Sushi Taro Osechi. We tried it with red wine and it did not go well  so we switched to cold sake which was much better. Albeit this is a good nibbling snack for sake, this is definitely an acquired taste and I have to admit, karasumi tastes better to me.

Saturday, April 6, 2013

Fried Amaebi heads and sashimi 甘エビの頭の唐揚と刺身

This is not a new dish but since we recently got amaebi 甘エビspotted prawns from Catalina among other things, I decided to post it again. This is the very first dish I served after we received toro, uni and amaebi from Catalina. I decide to serve deep fried shrimp heads and shrimp sashimi together. I changed how I served the sweet shrimp sashimi. For this preparation, I chose 4 of the smaller shrimp. The large shrimp heads are better suited for miso soup.
CIMG5899
I removed the heads, trimmed antennae and proboscis, dredged in potato starch (optional) and deep fried in peanut oil for 5 minutes turning once or twice. I removed the shells from the shrimp tails and deveined them. I cut them into small bite size chunks. (By the way, I made shrimp broth from the shells).
CIMG5901
I seasoned with sea salt and sprinkled them with sake and marinated for 10 minutes before serving. Since two of the larger shrimp had roe, I added some of the roe to the sashimi. I then added a small dab of freshly thawed “real wasabi”.

This is the best way to enjoy the pure taste of rather sweet raw shrimp meat. My wife removed the wasabi (she said she didn’t want to taste anything but the sweetness of the shrimp). I, however, mixed in a small amount of the wasabi which I think accentuated the flavor and made it taste even better. The deep fried heads were crunchy and nice, although you have to be very careful how you eat them so you don’t get stabbed by a sharp leg. My wife removed the hard outer shells and ate only the inside. I braved everything--the shell and all.

Wednesday, April 3, 2013

Chicken “Soboro” 鶏のそぼろ

“Soboro” そぼろ is a rather common Japanese dish which is often used as a topping for rice (especially for lunch boxes). It is also used for other dishes but (more importantly) it can be nibbled as a drinking snack. In this category of condiments, “Soboro そぼろ”, Oboro おぼろ” and “Denbu でんぶ” are similar products. All of them represent finely chopped or ground up fish or other meats, seasoned (soy sauce, sugar or mirin with the addition of garlic and/or ginger) and cooked until the liquid is almost gone. My first memory of “denbu” is “sakura denbu 桜でんぶ” which is artificially dyed pink and a very sweet fish meat product. My mother used to garnish scattered or roll sushi with it. The difference between “Soboro”, “Oboro” and “Denbu” may be the fineness of the chopped meat or fish. In any case, I made this “soboro” from mostly chicken tenderloin and other trimmings off of three large bone-in split chicken breasts.
CIMG5907
Here is one small serving which could be nibbled while sipping sake.
CIMG5906
Ingredients:
Chicken, ground ( I hand chopped tenderloins, 300 grams or about 10oz)
Ginger, grated (about 1/4 tsp, I was out of the tube kind and used fresh ginger).
Garlic, grated (about 1/3 tsp, I used garlic from a tube but you could grate fresh garlic).
Vegetable oil (1/3 tsp)
Soy sauce (2 tbs)
Mirin (2 tbs)

I added the ginger and garlic to the ground chicken. I cooked the meat mixture in a non-stick frying pan with a small amount of vegetable oil on low heat. I continuously mixed and crumbled the meat mixture into small individual pieces by occasionally cutting and squashing the pieces using a bamboo spatula with a straight edge (below, left). I kept stirring until the meat was completely cooked and individual pieces were separated into granules. I added the soy sauce and mirin (the amount should be adjusted depending on preference or the use of the soboro. For example, If it is going to be used as a rice condiment, you may season it more strongly). I kept stirring until almost all moisture was gone (below right).
chicken soboro
This is a very standard Japanese flavor of sweet and salty with ginger. The granular texture gives is a nice little crunch. Hopefully, I can come up with few more dishes from this chicken soboro.

Sunday, March 31, 2013

Chicken breast with yuzu flavor 柚子鶏

I saw this recipe in one of the blogs I follow (in Japanese). Interestingly, this is all done in the microwave oven in a fashion similar to my saka-mushi  or sake-steamed chicken. This is a quite good drinking snack and we enjoyed it.

CIMG5875
I followed the recipe with very minor modifications (I did not add sugar to the marinade).

Ingredients:

Chicken breast, boneless skinless (one, large)
Salt (1/4 tsp)
Potato starch (1 tsp)

For marinade:
Soy sauce 1 tbs
Mirin 1.5 tbs (original 1 tbs)
Sake (rice wine) 1/2 tbs (original 1 tbs)
Rice vinegar 1 tbs
Soy sauce 1 tbs
(Sugar 1 tbs, I omitted this)
Yuzu koshou 2tsp

For the side:
Onion, sliced, 1 medium
Scallion for garnish

I first removed the tenderloin from the chicken breast. Following the original recipe, I "stabbed" the chicken breast with the tip of my knife to make multiple cuts across the grain of the meat. Then, I flattened it using my  meat pounder (with a smooth flat bottom). I placed the marinade and the chicken in a Ziploc bag, massaged, removed as much air as possible and sealed it. I let it marinate at room temperature for 30 minutes.

I placed the chicken breast in a silicon microwave container. sprinkled in the potato starch, poured the marinade over and place on the lid. I microwaved it on high for 2 minutes and checked (it appeared that the sauce was getting thick and I added a small amount of hot water). I flipped the chicken over and microwaved for 1-2 more minutes. (Our microwave is 800KW, and this timing has to be adjusted depending on the wattage of your microwave oven). I let it cool down a bit with the lid on for 10-15 minutes.

Meanwhile I put the sliced onion in a separate silicon microwave container, put the lid on and microwaved it on high for 2 minutes. I then put the cooked onion in the sauce with the chicken.

When the chicken was warm but cooled down enough to handle, I sliced it (The first picture is one small serving which is half of the breast), put the onion on the side and garnished with chopped scallion (green part for color).
I thought this was quite good and had a nice yuzu-citrus favor from yuzu-koshou. It is not spicy at all despite the yuzu-kosho. My wife thought this was on par with my microwave sake steamed chicken. I thought this tasted more interesting. In any case, this is a perfect snack with sake or even wine. Actually we had a cold ginjou 吟醸 sake from Shizuoka 静岡 prefecture called "Wakatake Onigoroshi 若竹鬼ごろし" Devil slayer. This is a slightly sweet gentle sake but has a nice fruitiness and went well with this dish.

Thursday, March 28, 2013

Sesame "udon" noodle salad うどんの胡麻和えサラダ

I got this idea many years ago from “sesame noodle salad” which was available in the delicatessen section of a near-by grocery store. This is a sort of hybrid dish and could go well as a side for American style barbeque or could be served as a Japanese style drinking snack.I

I used the thin Udon noodles you see below on the left called “sanuki udon” 讃岐うどん. These are the dried kind and take about 13 minutes to cook. They have some texture and won’t dissolve or get too soft even if used in chicken noodle soup. Another needed ingredient is “nerigoma” ねりごま which nowadays comes in a plastic pouch (rather than in a can, below right) similar but slightly different from tahini. Nerigoma is from roasted white sesame seeds and appears much finer or creamier than tahini but tahini can be used in this recipe. Udon noodle: I used two bundles (2 servings) of dried sanuki udon. As per the package instructions, I boiled them for 13 minutes and rinsed under running cold water and then drained. I used the noodles without cutting them but you may want to cut them into short segments. I put just a dash of dark roasted sesame oil on the noodles and mixed well using my hands to add sesame flavor as well as preventing the noodle from clumping.

Other vegetables;
Carrot (2 medium, peeled and thinly julienned)
Haricot vert (or green beans): (1/2 cup, boiled and cooled, cut on bias)
Scallion: 4 stalks chopped finely (below, lower right).

Dressing:
Sesame past or nerigoma: 3 tbs
Soy sauce: 2 tbs
Rice vinegar 1 tbs
Sugar 1/2 tsp
Sesame seeds 2 tbs, dry roasted.

The secret to a good sesame dressing is to use both sesame paste and dry roasted sesame seeds which are coarsely ground. The combination will give a nice smooth texture to the dressing as well as bursts of strong sesame flavor.

I mixed the first 4 ingredients in a small Japanese mortar (or suribachi すり鉢) (above, left upper). Of course, you can use any small container or bowl to do this. I dressed the mixture of noodles and vegetables (above, right lower) using this dressing. Meanwhile I roasted sesame seeds on a dry frying pan until the surface of the seeds started developing dark brown color and became fragrant (above, right upper). I tipped the roasted sesame seeds, preserving a small amount for garnish, in a suribachi and ground it coarsely (above left lower). I mixed this into the salad. You could add more soy sauce and/or vinegar after tasting it.

I served this with a garnish of sesame seeds. In this presentation, this is a perfect sake snack. The nice slightly chewy texture of udon noodle and sesame dressing is a good combination.

Monday, March 25, 2013

Stir fried "kinpira" daikon 金平大根

When I recently made a simmered daikon dish, I removed the sharp edges (called mentori 面取り). This additional step makes the appearance of the daikon better and also prevents the edges from coming off after long simmering (called nikuzure 煮崩れ). Since I did not want to waste these scraps of daikon, I made this dish in a way very similar to “Kinpira” gobou or burdock root.

Digression alert: I first tasted this dish many years ago while bar hopping with friends in the Susukino 薄野 district of Sapporo 札幌, One of our favorite watering holes was a bar where the mama-san happened to be a high school classmate of one of my friends. One time, we stayed until closing and she suggested we move the party to another place that was still open. (Some places stayed open very late to serve people working in the industry and “night owls” the likes of us). As we walked (staggered?) to our destination we passed a fruit and vegetable stand. Such stands were not unusual in the Susukino area at that time (I always thought they were meant for drunk fathers and/or husbands to lessen the guilt of their imbibing by buying a souvenir/peace offering to take home to their families—or for bar hostesses, who were wife and/or mother, to get some vegetables for their family on the way home after a long night’s work ). The stand was open and brightly lit displaying baskets of fruits and vegetables…and they were expensive! The mama-san, urged us to stop and look around a bit. Of course, we did not buy anything especially since none of us was a father and/or husband or wife and/or mother at that time and especially since we were not going home yet.

When we finally arrived at our destination; a small bar with a lone master behind the counter, the mama-san whipped out a rather large good looking “daikon” and asked the master to make something with it. We did a double-take. Where had that come from? She apparently lifted the daikon from the fruit stand we had just visited.  Her explanation was that the fruit stand charged exorbitant prices for vegetables and this was her way of exacting justice. We were not in a state to argue. The master cooked up this dish and we enjoyed it very much. When I told this story to my wife, she just kept asking, “where did she hide the thing when she heisted it?” (Come to think of it, having divulged this story what is the statute of limitations on daikon theft?)

The amount of the vegetables are all arbitrary but this is the amount I used for two snack sized servings (below left). Since the daikon scraps were not enough, I also added 1 inch round of daikon which was peeled, sliced and julienned. I also did the same for one medium  carrot. I added julienned aburage 油揚げ which was thawed in hot water, water squeezed out and cut into thin strips.

I placed a small amount of vegetable oil (1/2 tbs) and a dash of sesame oil in a frying pan on medium heat and added flakes of red pepper (to taste). When the oil became hot, I added daikon and carrot and stir-fried  (above right). When the oil coated the vegetables, I added aburage and stirred for one more minute. I then braised with mirin (2 tbs) and soy sauce (1 tbs). I stirred until the liquid was almost completely evaporated. I garnished with white roasted sesame seeds.
I don’t remember if the dish I had at the Susukino bar included carrot and aburage. This dish could go with any drink but sake is the best match. Compared to Kinpira gobou, this has a different texture and taste, although the basic seasonings are the same.

Friday, March 22, 2013

Poached egg with curry sauce 温泉卵のカレーソース

This is another quick dish perfect for a late night after drinking or, for that  matter, as a breakfast the morning after. ( Of course we are not implying that was the case here). I just came up with this since we had leftover Japanese curry but most of the meat and vegetables were already consumed. As long as you happened to have leftover Japanese curry sauce, this is quick to make.
CIMG5869
We just toasted a piece of bread (This happened to be English muffin bread my wife baked). My wife toasted and buttered it. She put on three slices of smoked cheddar cheese (below left). Meanwhile I heated up the curry sauce, added slices of leftover roasted pork filet, and dropped two eggs (one per serving) into the sauce and put the lid back on. I took it off from the heat when the surface of the yolk was just barely opaque and the yolks were still runny (below right). Of course, we used safe, pasteurized eggs for this.  I poured the sauce over the cheese/toast and placed the poached egg on the top. Because of the heat from the sauce, the cheese melted/softened.
Curry porched egg
We broke the egg yolk and enjoyed. The smoky flavor of the smoke cheddar cheese really worked here. The eggs yolk mixed with the curry sauce and made it richer. Since the curry sauce was rather mild, heartburn after breakfast was not a worry. This was a very hearty satisfying breakfast.

Tuesday, March 19, 2013

Lamb stew with kidney beans 子羊肉とインゲン豆のシチュー

This is a lamb stew made from leftover roasted leg of lamb. Since my wife likes lamb, we occasionally make roasted or grilled lamb either in the oven or on the Weber grill. This time, we oven-roasted a butterflied leg of lamb which was simply seasoned with salt (smoked sea salt), pepper, and chopped fresh rosemary. We enjoyed this as a dinner with green beans and couscous one evening. We made a few sandwiches and this stew from the leftovers.CIMG5870
In saying this I am probably dating myself but this recipe is based on the one in Graham Kerr’s Mini-max cookbook. This is a very quick and simple dish using leftover and canned items but, it is quite good.

Ingredients for generous two servings:
Cooked lamb, about 1 lb (cut into bite sized chunks)
Garlic (2 fat cloves, finely chopped)
Olive oil (1 tbs) plus dash of dark roasted sesame oil
Parsley, stalk and leaves finely chopped (4 sprigs)
Kidney beans,(15 oz can, drained and washed)
Stewed whole plum tomato (12 oz can, drained and crushed by hand)
V8 juice (or tomato juice, two 5.5oz cans))
Ketchup (2 tbs)
Black pepper (to taste)
Broccoli florets (about 1 cup, separated)

I first put the olive and sesame oil in the pot and sautéed the garlic on medium low heat. When the garlic became fragrant but not browned, I added the chopped parsley and stirred for one more minute. I then moved the garlic and parsley to one side of the pan and added the ketchup to the empty part of the pan. I cooked the ketchup, occasionally stirring it until it became darkened. (Carmelizing the ketchup is one of the secrets of this recipe. It really givens it an added dimension). I then added the cooked lamb, kidney beans, tomato, and V8 juice. I mixed well, put the lid on and simmered for 30 minutes (below). Just 5 minutes before serving, I added florets of broccoli (submerged into the stew) and cooked until the broccoli was just done. Ketchup and  V8 juice have enough saltiness but taste and, if needed, adjust the seasonings including cracked black pepper to taste.
CIMG5863
The original recipe calls for adding arrowroot slurry at the end but I did not bother.  I served this with white rice (the original recipe calls for turmeric rice which looks nice with yellow color but I am not sure if it really contributes to the taste).

This is a very comforting dish to end your evening and goes perfectly well with red wine such as good Syrah or Cab.

Saturday, March 16, 2013

Hash brown potato and egg casserole ハッシュブラウン キャセロール

This was yet another breakfast dish made by my wife. She saw this recipe on line. The original recipe used packaged frozen "hash brown" potatoes and "chicken sausage". In general we don’t stock premade frozen foods but we always have potatoes so we replaced the frozen hash browns with finely julienned potato. We also replaced the sausage with leftover roasted pork filet. As you can see below, the exposed portion of potatoes got “high done”—the recipe requires some further refinement. This was served with sweet onion, cucumber salad dressed in rice vinegar and Greek yogurt and my wife's whole wheat dill rolls.

Using a Japanese mandolin (Benriner), I finely julienned white potatoes. I tossed them in about 1 tbs. of olive oil to coat and added salt and pepper. Then I put them in two small ramekins (#1). We baked this blank in a 400F toaster (convection) oven for 10 minutes (#2).(Next time we need to lower the temperature). Meanwhile, my wife mixed together two eggs,small cubes of roasted pork, and cheddar cheese. We poured this egg mixture into the nests of potato and baked for another 10 minutes or until the egg was cooked (#4).

This was a quite nice small breakfast. If we can prevent the edges of the potato from getting overcooked, this will be perfect.

Wednesday, March 13, 2013

Crostini with pesto and sundried tomato ペストとサンドライドトマトのクロスティニ

We have a potted basil plant growing at our house. I bought it to provide a continuous supply of fresh basil during the winter. Since it became rather lanky and started flowering, I decided it was time to harvest most of the leaves. My theory is that these annual plants die after flowering no matter how much sun and water are available to them. But I left two branches since my wife’s theory is that it may survive the winter (as of this posting it still hasn’t died…could my wife be right?) Faced with a large amount of  fresh basil leaves, the only thing I could do was make pesto. One evening, I used the pesto I made as a sort-of crostini with sundried tomato.
My pesto is nothing special but I do not add garlic since I keep this for one week or so in the refrigerator. Raw garlic in an olive oil mixture may not be safe (it may have a risk of botulism). Also when I use this in our sandwiches for lunch, I do not want garlic. If needed, I add crushed garlic to the pesto just before I use it. This time my wife made baked garlic and I am adding this (much milder) before using my pesto.
I did not measure anything but this is the amount of fresh basil leaves I harvested (#1). I dry roasted the pine nuts in a dry frying pan until slightly browned and oil started coming out on the surface (#2) and set them aside to cool. I added the basil leaves, the pine nuts, grated Parmigiano Reggiano cheese into the cuisineart. I added good fruity olive oil as I pulsed the machine (#3). I tasted it and seasoned it with salt and pepper. I placed it in sealable containers. This should last at least one week in the fridge and much longer in the freezer.
pesto
For crostini, I first toasted the slices of baguette. dripped small amount of olive oil on the bread, smeared on the pesto, add more grated Parmigiano Reggiano cheese.  I toasted it again briefly and added sundried tomato on the top (I should have used oil packed rather than dry). The crostini was good and went very well with our red wine.

Sunday, March 10, 2013

Crispy nagaimo "isobe" fry 長芋のカリカリ磯辺焼き

I had half a small nagaimo 長芋 left. I previously posted quite a few ways to prepare nagaimo . So I decided to do something a bit different. I remembered seeing recipes similar to this on the internet but the details are probably different since I just made this dish from memory without looking for the original recipe. Essentially, this is a pan-fried nagaimo. Instead of using the usual butter and soy sauce or salt, I made a breading with panko, dried powdered seaweed or "aonori" 青海苔 and also added grated Parmigiano Reggiano cheese. Just for kicks, I served it with mayonnaise-Sriracha (the yellow stuff shown in the picture below) and my home-made pesto.


I first peeled and cut the nagaimo into 1/4 inch thick medallions (#1). I mixed panko (3tsp), aonori (1 tsp), Parmigiano Reggiano cheese (grated, 3 tbs), salt (1/2 tsp), and black pepper (to taste). I put this mixture in a Ziploc bag added the nagaimo and shook the bag to coat the nagaimo medallions (#2). To a non-stick frying pan, I added light olive oil (1/2 tbs) on low flame. I fried one side for 5 minutes (or longer) without moving or touching the pieces (I leave them alone to prevent the forming crust from breaking). Once a nice brown crust formed I flipped them over and fried the other side for another 5 minutes (#4).


I decided to make some dipping sauces; one is a mixture of mayonnaise with Sriracha (or any hot sauce) and the other is a pesto sauce I made some days ago.
The cooked nagaimo is quite different from raw or grated nagaimo. The slimy surface almost disappears. The crust has lots of flavor and a crispy texture. The nagaimo itself has nice firm crunch. For sauce, we liked the mayonnaise/Sriracha the best.

Thursday, March 7, 2013

Baked crepes in Béchamel sauce クレープのホワイトソース オーブン焼き

Since I had leftovers from the large batch of crepes I made, I came up with two near near-identical dishes to have with wine in the evening. One was made with my leftover roasted pork filet (below). I served it with cucumber and onion salad with yogurt sauce. I also made a similar dish using my (leftover) sake-steamed chicken breast. I took only one picture of the chicken dish after it came out of the oven (the last picture) but I forgot to take pictures of the final plated product. So this time, I made a point of taking a few more pictures including some of the final dish. Both dishes are almost identical. The differences are types of cheeses and meat I used. 
Essentially, I made a Béchamel sauce starting with sautéing finely chopped shallots and shiitake mushroom adding flour, sautéed them together for few minutes. I added milk at once and stir until the sauce thickened. I seasoned it with salt , white pepper and freshly ground nutmeg as posted before. I then added cubes of sake steamed chicken or roasted pork filet and sautéed spinach into the  Béchamel sauce. I placed a small portion of this mixture on the crepes (#1) and rolled them into a tube. I placed these stuffed crepes in a small baking pan (#2) and covered them with the remaining Béchamel  sauce. I covered this with grated smoked cheddar and parmigeano reggiano cheeses. I baked it in a 350F oven for 10-15 minutes.
 
I used a mix of grated smoked Gruyere and cheddar cheese on the dish I made with the sake-steamed chicken (below).
For both dishes, I let it rest for 5 minutes before serving.This was a nice dish to have with wine. It was also extremely satisfying—bordering on comfort food (how could it be anything else with a nice Béchamel sauce and melted cheese). Although I do not remember exactly which wine we had with this, I am sure, one of our favorite reds.

Monday, March 4, 2013

Stuffed crepes 沢山具入りクレープ

After making a batch of crepes, we had quite a lot left over. I made this stuffed crepe one morning for breakfast.

Stuffing: Actually, I do not remember precisely what I did. I am sure this is thinly sliced onion, fresh shiitake mushroom, left over roasted pork, all sautéed together and seasoned with salt and pepper. I placed the crepe on a cookie sheet and then put the stuffing and cheese (My guess is either smoked gouda or gruyere  on top. I folded the crepe over the filling and put them into a 350 degree oven for 10-15 minutes or until they were heated through and the cheese melted.
Compared to omelet, the crepes added a more interesting texture and a faint vanilla flavor that actually works. Of course, my justification for posting this is “any good hearty breakfast will be a good alcohol-soaking ending dish after indulgence”.

Friday, March 1, 2013

Crepe クレープ

We may have to change our blog title from “Izakaya” to “Breakfast”. This is another suggestion for breakfast from my wife. We had our share of pancakes especially in the summer when blueberries are in season. For this crepe, instead of cheese fillings such as Mascarpone, she suggested Greek yogurt flavored with Clementine orange.

Here is the crepe we had one weekend.
CIMG5766
Next weekend, we had similar crepe but with a slight variation.
CIMG5789
As usual, my wife made the batter and I cooked the pancakes.

Ingredients for crepe batter:
3/4 cup All purpose flour
1/2 Tsp. salt
1 Tsp. double-acting baking powder
2 Tbs. sugar
2 Eggs
2/3 cup milk
1/3 cup water
1/2 Tsp. vanilla
grated lemon rind

Sift together the flour, salt and baking powder and set aside. Mix together the sugar, eggs, milk, water and vanilla (make sure the sugar dissolves completely). Mix the wet ingredients into the dry ingredients.
Although some recipes call for resting the batter for 5 to 6 hrs or overnight (I suppose to relax the gluten and make tender crepes), we did not do this since we were rather hungry. Add more milk or water to get proper runny consistency.
Since we do not have a special crepe pan, rake or a crepe machine, I just used our non-stick frying pan. I preheated the frying pan for few minutes and added light olive oil (the amount of oil has to be just enough to coat the bottom). When it started to shimmer (but not smoke), it is the opportune time to add the batter. The batter has to be runny enough to spread very thin and the pan has to be hot enough that the batter can be spread thinly but the portion in contact with the bottom of pan immediately starts cooking. I tilted and turned the pan to spread the batter. I took the pan on and off heat to get the right heat level (#1). When the surface looked dry, I flipped the crepe using a spatula (#2). This definitely requires some practice. Just 10-15 seconds on the last side and the crepe was done (#3). I stacked them up on the plate (#4).
Yogurt sauce:
Greek yogurt (or regular yogurt drained using cheese cloth in the refrigerator over night)
Clementine orange, peeled and cut up in small chunks
Juice of the orange, add sugar to taste

This is quite good for a relatively low fat recipe. The original recipe calls for a mixture of Mascarpone flavored with fresh orange/orange juice as the stuffing but Greek yogurt and Clementine are good substitutes. You just can’t beat the texture and lovely mouth feel of a crepe. The mild vanilla flavor of the crepe went very well with the orange flavored yogurt.

Tuesday, February 26, 2013

Fluffy Omelet ふわふわオムレツ

My wife is really into breakfast recently. Every weekend, she suggests something different. This weekend morning, she saw this fluffy omelet  recipe in the printed version of "Cook illustrated" and asked me to come up with the topping (or stuffing) for it. Although the recipe included two examples of stuffing, we did not have the ingredients for either of them. So I decided to "wing-it". This is something between Spanish "Tortilla" and French "soufflé".

Ingredients for one 8 inch omelet:

For Omelet:
Eggs (two large, yolk and white separated)
Butter, Melted unsalted (1/2 tbs)
Butter, unsalted (1/2 tbs)
Salt (1/8 tsp)
Cream of tartar (1/8 tsp)

For stuffing:
Shallot (1 medium, finely chopped)
Shiitake mushroom (fresh, two medium, stem removed and finely sliced).
Roasted pork filet (arbitrary amount, sliced and cut into wide strips or bacon)
Spinach (baby spinach, one handful)
Cheeses (smoked gouda, finely diced and parmisiano reggiano (grated), amount arbitrary).

Beat the egg yolks and mix in the melted butter and set aside. In a standing mixer, add the egg white and sprinkle cream of tartar and beat it to stiff peak stage (#1). Fold in the egg yolk mixture until no white steaks are visible (#2). Melt the reaming butter in a 8 inch non-stick frying pan on medium heat until foam forms and add in the egg mixture and add topping and cheeses (#3). Place the pan into the pre-heated 375F oven (#4) and bake for 5 minutes (We did not use pasteurized eggs and wanted it to be completely cooked). If it springs back when lightly pressed it is complete done (#5). Tip the omelet onto the cutting board and let it rest for 30 seconds before cutting (#6).

Note: The original recipe for 2 servings called for 4 eggs and folded the omelet into half and then cut it into two portions. We used 2 eggs and did not fold the omelet.
Stuffing: I added olive oil (1 tsp) and butter (1/2 tsp) into a non-stick frying pan and sautéed the shallot for few minutes. I added the shiitake mushroom and sautéed for another minute or two. I then seasoned it with salt and pepper. I added the pork and then the spinach and cooked until spinach wilted.

This is a very good omelet with a unique texture. It is rather fluffy and the topping I made was great. We may have put on too much cheese but there is no such a thing as too much cheese in general.

Saturday, February 23, 2013

Marinated tuna bowl 鮪漬け丼

When we get sashimi items from Catalina, it is not possible to finish everything in two days unless we have guests. To finish up everything in time, I need to plan ahead so that some portions of the sashimi may last into the 3rd day. One way is to make a marinated tuna  or "zuke" preparation. I used this technique often to make a low-quality frozen block of yellow fin tuna more palatable but, of course, this can be applied to good quality tuna.

When I prepared the block of top loin tuna, I separated the red meat "akami" 赤身 and marinated it. Although I posted a few variations of the marinades before, this time I used a very simple marinade of mirin, sake, and soy sauce (2:2:3) ratio. I used this marinade for the chiai with nattou dish as well. I did not do "yubiki" 湯引き or "tataki" たたき preparation for this (for no reason, just a bit lazy).

This was an ending dish for the 3rd evening after we received blocks of tuna sashimi from Catalina.

Making this dish is simple as long as you have sushi rice and marinated tuna sashimi.

Sushi rice: We got a new IH (induction heater) rice cooker a few weeks ago but did not have a chance to use it until now. So, we read the instructions and made the very first batch of sushi rice. This new cooker has a gauge for sushi rice--simply a bit less water. Using this setting, however, the rice came out a bit too dry or hard to our taste. In any case, I made sushi rice by mixing in seasoned rice vinegar (from the bottle). I placed the sushi rice on the bottom of the bowl, put the slices of the marinated tuna sashimi on top, smeared a small amount of wasabi on the tuna and garnished it with chopped chives and nori strips.

This is one of the cannot-go-wrong combinations of sushi rice, nori and tuna.