Tuesday, September 10, 2013

New Japanese-style plate 新しいお皿

One of our favorite places to visit in Tokyo is Kappabashi 合羽橋. We really enjoy wandering in the seemingly endless array of shops dedicated to cookware. While there is much we see and we would love to add to our collection there is only a limited amount of luggage space to accommodate our indulgences. As a result most of our Japanese-style plates and bowls come from the local pottery club’s annual sale or by mail (Internet) order; the company we use most often is Korin 光琳. So on our recent trip to New York, we were delighted to find a Kappabashi type neighborhood and a store that specialized in Chinese/Japanese style dishes. Our quest took us to the edge of Chinatown along Bowery street. While there were many stores specializing in restaurant-related items, there was nothing on the level of Kappabashi. We didn't let that stop us; we bought a few items and, luckily, we had them shipped home. One of our purchases is shown below.

I really like collecting interesting dishes because having that perfect vessel to display and present food adds so much to the overall enjoyment of the eating experience; first feasting through sight then smell and taste. I saw this type of plate somewhere before and wanted to have one for some time. One side is curved and has a square well and the other side is flat with a slightly raised rim. Although I did not make anything special, I decided to serve some small dishes using this newly acquired plate.

On the left is black vinegar/soy sauce simmered chicken thigh and daikon (half each) served with blanched broccoli and a dab of Japanese hot mustard. On the right is small piece of salmon briefly marinated (I used noodle sauce from the bottle) and grilled in the toaster oven. I sprinkled "sansho" powder.

I think this is a neat plate. I have to come up with the combination of small drinking snacks appropriate for this vessel.

Saturday, September 7, 2013

Japanese-style succotash 枝豆ととうもろこしのバター醤油ソテー

This was second dish I made from the leftover soy beans or edamame (hulled and frozen in a microwavable pouch). I saw the original recipe on line but this is very similar to the American summer favorite succotash except for the use of soy bean instead of Lima beans and soy sauce for seasoning. The combination of butter and soy sauce is almost fail-safe and add the flavor of sweet corn, it is extremely good.


Corn: I got four ears of fresh corn. As per my wife's method, after removing the husks and silk, I placed them on a plate covered loosely with paper towels and microwaved them for 4 minutes, turned them over and microwaved for additional 2 minutes. (Of course you could boil the corn or use frozen.) My wife removed the kernels of the cooked corns for me.

Edamame: I used frozen, hulled soy beans in a microwavable pouch but fresh or frozen soy beans in pods can be also used (even better, I am sure) after cooking and removing the soy beans from the pods. The amount is arbitrary but I could have used more for the amount of corn I had.

I can think of adding other items such as finely diced tomatoes, shallot, Jalapeño pepper, red pepper etc but I made this with just corn and soy beans. I just sautéed the soy bean and corn mixture in large frying pan with butter (1 tbs) until all the vegetables are coated and warm. I then added soy sauce from the edge of the pan (so that soy sauce will be heated up quickly and become fragrant before mixing into the vegetables.) I added soy sauce in several increments as I tasted.

As we were preparing this, both my wife and I were snacking on them and without further seasoning these were good. The corn was very sweet. The addition of butter and soy sauce made it even better. This could be a drinking snack or a side dish. I served this with corn-meal crusted chicken tender loins on the top (which I did not take pictures).

Wednesday, September 4, 2013

Cold tofu with upripe soybean puree 豆腐の枝豆ソース

The other day, when my wife made chow chow pickles, she used soy beans "edamame" 枝豆 instead of lima beans. Actually she prefers to use young soy beans instead of lima beans when the recipe calls for lima beans. She says that the texture and taste of the soybeans is not a starchy as lima beams. Since we had a leftover pouch of frozen shelled soybeans, I decided to use it up by making two dishes. This is the first one I made. This recipe came from "Otsumami Doujou" おつまみ道場 (in Japanese).


As usual, I did not precisely measure the ingredients but the original recipe (2 servings) calls for;

Edamame: 25grams (boiled, shelled and cooled or in my case, frozen shelled edamame in a microwavable pouch).

Seasonings: White miso (1/2 tbs, I used "saikyou" miso 西京味噌), Cream (1 tsp, I used more), Dashi broth (1 tbs, I used concentrated "white dashi" 白だし from a bottle, about 1 tsp)

I first put all the ingredients in a small food processor and whirred them until they attained a saucy consistency. I did this by adding a bit more cream as needed. The skin of the soybeans did not homogenize completely. So I moved the contents to a Japanese mortal or "suribachi" すり鉢 and tried to make it smoother but it didn’t seem to make a big difference. So the sauce was not as smooth as I had hoped. I tasted it, it had a nice salty nutty flavor from the miso. Since this sauce would be mixed into tofu, I thought the saltiness was just right. You can always "add" more miso or salt to make it saltier to your liking. The ratio of tofu to sauce needed to be taken into account as well. In my case, I was going to serve this with a rather small cube of silken tofu (i.e. more sauce than the original recipe) so I did not add any more miso.

I put this sauce over the cube of cold silken tofu. We mixed well with the tofu before eating but how you eat this is up to you. You could eat it with spoonful of tofu and sauce on the top as well. The cream adds a richness and the miso adds a nutty, slightly sweet and salty flavor. Perfect dish for summer days.

Sunday, September 1, 2013

Perilla pesto 青じそのペスト

Aojiso 青じそ or perilla is like mint, it re-seeds itself proliferating out of control. As you can see below, the perilla in our garden is no exception. Please note the way it terraced its growth this year so “everybody” got the maximum of the available sun. The basil (barely visible in the left back corner of the perilla patch) was being choked out. So my wife decided to harvest the tall "trees" of perilla surrounding the basil.


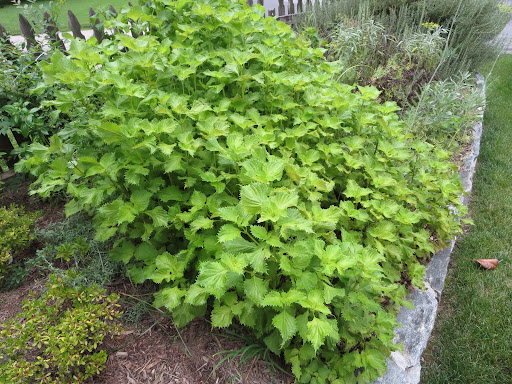
My task was to make something from the large amount of harvested perilla leaves and I decided to make "pesto". Yes I know, it is usually the basil that gets made into pesto but in an effort to rescue the basil the perilla became the prime ingredient….somewhat ironic isn’t it? By-the-way this picture was taken after my wife’s harvest which despite its large yield made hardly a dent in the total crop.

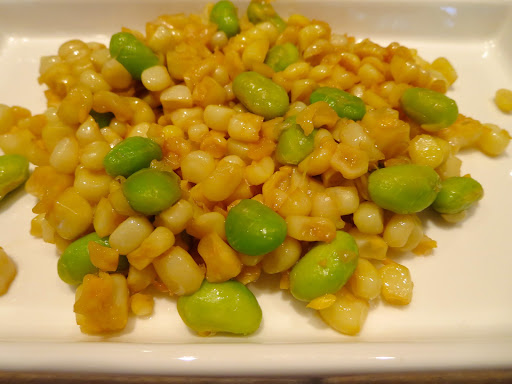
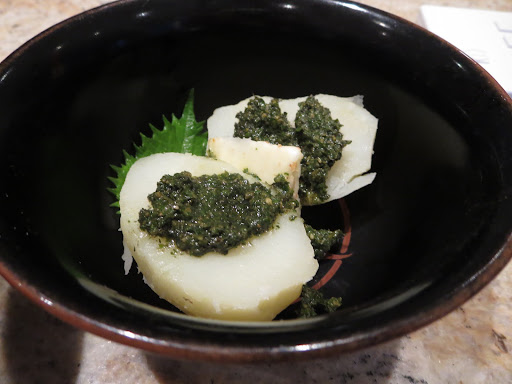
After making the pesto, we first used it on top of buttered potatoes . This was quite good.


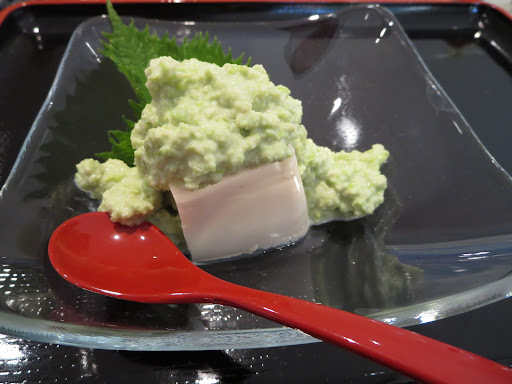
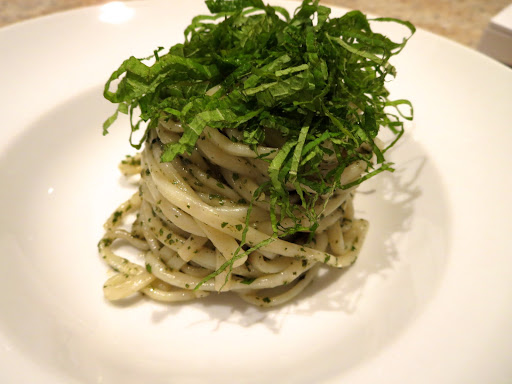
I also made pasta with the perilla pesto. Instead of spaghetti, I used thin Japanese Udon noodles. I cooked them as per the instructions on the package. I washed the noodles in cold running water. I warmed them up just before serving by soaking them in boiling water. I then drained them, and mixed in the "Aojiso" perilla pesto and garnished it with a mound of thinly julienned perilla.

Here is how I made the pesto. It is the same recipe I would use to make pesto from basil—I just replaced the basil leaves with perilla.

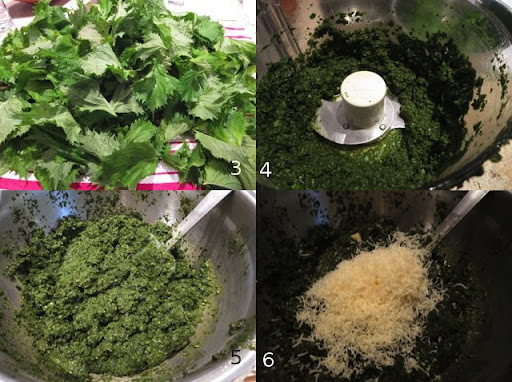
Perilla leaves and olive oil: My wife removed the leaves from the stems, washed, and dried (first using a salad spinner and then spreading on a dish towel, #3). The picture only shows a small part of the crop and, at the end, we had about 400 grams of perilla leaves (that is a lot!). I put the leaves in several small batches in the food processor. I streamed in enough extra virgin olive oil (EVOO) so that the leaves were all chopped up and a "pesto" consistency was reached (#4). I ended up using close to 750ml of EVOO (the entire bottle I opened).

Pine nuts and garlic: I used closed to 100grams of pine nuts and 6 cloves of garlic (about 30grams, skin removed and root end trimmed). I first dry roasted the pine nuts in a frying pan until the surface was very slightly browned. I placed the pine nuts and the garlic in the food processor and made a paste also adding a small amount of EVOO.

I then combined the ground-up perilla leaves EVOO mixture and the paste of pine nuts together in a large metal bowl (#5).

Parmigiano regianno cheese: I grated a wedge of P-R using a cheese grater (I used about 60grams) and mixed it in (#6). I seasoned it with Kosher salt in multiple increments as I tasted it (you can always add more later but you cannot take it back).

This pesto is very unique. The addition of olive oil, pine nuts and parmegiano cheese resulted in a taste quite different from what I would have expected from just ground up perilla. You could tell it is not basil but unless you are told you probably would not guess perilla. It has the nice fresh taste from the perilla and the other ingredients give it a complex taste dimension that is very nice and unexpected.

Using it as a topping for hot boiled potatoes (the second picture) was very good especially with the addition of butter and a bit more salt. The pasta of Japanese Udon (the third picture) was also excellent. We needed to add a bit more salt to the pesto for this dish, but addition of fresh perilla leaves as garnish made it clear that this was perilla pesto. The taste was as good as basil pesto.

We ended up with a large amount of the perilla pesto. I put a portion of the pesto in Ziploc sandwich bags, flattened them by removing as much air as possible. I then placed these in a larger Ziploc bag in layers and put it in the freezer. We had at lease 10-12 sandwich bags. Hopefully we will take it out during the winter to remember the summer bounty of our perilla…but we still have a lot of perilla left in the garden. We’ll be making pesto to last a decade.

Thursday, August 29, 2013

Potato with "Okizuke" squid ジャガイモのイカの沖漬けのせ

The most popular way to eat boiled or baked potato in Hokkaido 北海道 (and elsewhere for that matter) is with butter and salt (or soy sauce) ("Jagabata" ジャガバタ). Another popular way is to eat it with salted and fermented squid and guts or "shiokara" 塩辛. "Okizuke" 沖漬け is similar but it has no "innards" and is not fermented or too salty (marinated in soy sauce and mirin). I happened to have frozen squid "Okizuke" in a small plastic pouch in our freezer. So, one evening, I microwaved a small potato, removed the skin and served it with squid "okizuke".

Just to be sure the taste profile was elegant enough, I also added a thin pat of butter and a splash of soy sauce. This is a great combination. Salty, sweet and cold firm squid okizuke mixed with warm, soft, and buttery potato makes a wonderful symphony of textures and taste in the mouth. I could have used more potato. For this kind of small dish, the only thing you can choose to drink with it is sake.

Monday, August 26, 2013

Daikon and Pork filet with sweet miso sauce 大根と豚のヒレ肉の田楽風

This is mostly to show the small trapezoid-shaped bowels (one of the new bowls) we acquired in New York.  I did not have the time or energy to make anything special. I had some small daikon rounds which were leftover from making "katsuramuki" 桂剝き for the daikon Sashimi garnish  (center portion cannot be used for this). I prepared this dish rather than discarding the leftover rounds. I also found baked pork filet in the refrigerator. I decided to make sweet miso sauce and grill them in the style of "dengaku" 田楽.


Miso sauce: I used white miso (2tbs) with enough mirin to make saucy consistency. I tasted it and added 1 tsp of sugar.

I first warmed up the daikon rounds (this was previously simmered in dashi broth) and thickly cut slices of the baked pork filet in microwave oven. I then smeared the miso sauce on one side and placed just under the upper broiling unit of the toaster oven and broiled it until the miso sauce browned and became fragrant. I added blanched broccoli and sprinkled with micro grated lemon zest.

The bowls are a nice small size. I have many round ones (deep and shallow) and square ones but this one has an interesting shape. Grilled sweet miso is wonderful stuff. The dish was more than Ok for a sip of sake.

Friday, August 23, 2013

Nattou tempura  納豆の天ぷら

Mr. Segawa 瀬川 of our Izakaya substitute "Tako Grill" has had a special "Izakaya menu" for some time. We have been enjoying items from this special menu. Occasionally, he adds more items to this menu or offers one-time only special items. One evening, he offered us "nattou tempura". We really liked it and I reproduced it here. I have seen other recipes for "nattou tempura" but this one is a very good one indeed.

Close up showing delicate and crunchy crust.

Nattou: I used one package of "hikiwari nattou" 挽き割り納豆 which was previously frozen. As usual, I added chopped scallion with mustard, and seasoning liquid came with the package of nattou. I mixed it well with my nattou stirrer (Left upper on the image below)
Perilla: Now we have our own perilla ("aojizo" 青じそ or "ooba" 大葉) growing in our herb garden, it is easy to get six good sized leaves. I washed and patted dry with a paper towel. I placed one teaspoonful of nattou in the middle (Upper right in the image below). I folded it in half. Since nattou is sticky it will remain folded (lower left in the image below).
Tempura batter: I simply used cake flour and cold Seltzer water to make rather thin tempura batter.
I coated the folded perilla leaves containing the nattou in the tempura batter and deep fried it in 170F vegetable oil for 3-4 minutes turning once (lower right in the picture below).

This was very good. My wife (she who in general does not like nattou)  liked it as well. The smell of nattou and the slimy/sticky texture were much reduced. I served this with a wedge of lemon and green tea salt. For this, definitely cold sake is called for.